
10
Sound Effects
Sound effects! Sound is the only part of a video game that comes from the real world and makes it into the game. Using microphones, sound designers will record common video game sounds such as voiceovers, music, UI sounds, weapons, and ambient sounds to help bring a game to life! Sound tends to have a very subtle effect on how players perceive a video game’s quality. A good-looking animation in a game can only be as good as its sound.
In this chapter, we will be going over the five elements of selecting or designing sounds. These are Source, Envelope, Pitch, Frequency, and Layering. Understanding these five elements will give you a strong foundation to ensure your sounds fit the overall design of the narrative, character, environment, and mechanics we’ve worked through so far. Then we will go into how to scale these elements in the game engine with our code and mixing! Sounds tell a story on an individual sound effect basis as well as working together to tell a greater, more in-depth story. Finally, we will go through specific examples of our sound design in our project as well as their implementation in Unity. These examples include magical sounds, footstep sounds, and ambient sounds. Here’s a quick summary of this chapter:
- The five elements of sound design
- Designing for scale
- Our project’s sound design and implementation
- Triggering sound through player interaction
Sound… design?
Sound design! The forgotten stepchild of video games, but also the soul and emotion behind them.
A straightforward explanation of sound design is that a sound is recorded, processed, and then coded directly into a game. Therefore, this makes sound the only part of a video game that comes directly from the real world.
Any sound that we reference in this chapter can be found in /Assets/Sounds/[Name].
The five elements of sound design
The elements of sound design we’ll be discussing are source, envelope, pitch, frequency, and layering. These apply to the process of making an individual sound effect, as well as a broader scope of how sounds work together in a game.
Source
A source can be a person, place, or thing from which your inspiration comes or is obtained. Your source is what helps your listener understand the real-world characteristics of your sound. If you record the sound of a footstep hitting a grassy surface versus a concrete surface, the minute qualities and differences between these two sounds help us distinguish them. And thus, we can utilize the source as a creative limitation in creating our sounds authentically.
Limitations are what artists use to cut out all of the clutter in our brains to help create their visions. So, in our recording process, if we needed a magical water sound in a video game, we would record some water as a base layer. Or, if we wanted to record the sound for an animation of a dog rolling in dirt, the first and best thing to record would be the sound of a dog rolling in dirt. What we are creating sounds for helps us select what to record!
Recording sounds can be a difficult process and has an entire art form behind it; while it will help with your growth as a sound designer, I highly recommend using existing sound libraries. Almost any sound that you can think of has already been recorded, so it makes more sense to just buy or download sounds online! This will help speed up your workflow drastically. If you don’t want to use sound libraries, then you can use a microphone! Using a microphone is a very in-depth process that we won’t be covering in this book because you could literally write entire books on this art.
Here are some popular free websites and sound libraries:
- Blipsounds: https://blipsounds.com/community-library/
- Andrew V Scott: https://www.andrewvscott.com/Building-A-Large-SFX-Library-for-Free
- SKYES Audio: https://www.skyesaudio.com/blog/2019/4/1/the-ultimate-free-sound-effects-list-free-to-download
- Freesound: https://freesound.org/
There are many more that can be found with some internet searching. Don’t be afraid to look around to find what fits your needs.
In video games, the source of a sound effect is usually determined by what you see visually. For an ice mage that casts an icy wind spell, you’d limit yourself to using wind and ice sounds to get started. If you have a gun made of jello that shoots tiny horses with the power of radioactive farts, you’ll likely utilize jello, horses, farting, and gun sounds.
So, if we take a magic sword that has metal textures, and purple magic VFX that runs along the blade, what kind of sounds are we going to look for? You’ve probably put together that we’ll use sounds from a magic sound library and some metallic ringing sounds.
Another way to determine your source is via story context. The same magic sword may look like it’s magic, but maybe the writers of the game determined the blade uses futuristic magic so you need to use sci-fi sound elements.
It should be mentioned that there are many games that have limitations where the sound must fill in the gaps. A game that emulates graphics from an Atari 2600 with realistic sound design might require some imagination. A green area that your player walks on could be grass or a toxic waste dump depending on the context of the game’s world.
Envelopes
An envelope is a way for sound designers to explain the volume of a sound over time (volume as in decibels, not 3D models). The two parts of an envelope you’ll use are the “attack” and “release.”
The attack, shown below in Figure 10.1, is the start of the sound, and the release is the end of the sound. We describe the attack and release of a sound by speed (i.e., fast and slow).
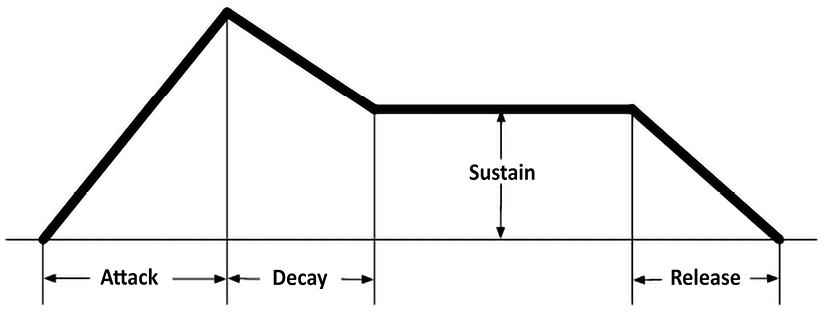
Figure 10.1: Envelope explanation
Attack
An example of a sound with a slow attack would be something like a “sword whoosh” sound effect when a sword is slashed through the air. The sound starts off being almost inaudible and raises in volume over the course of half of a second. We can make the attack even slower by making the volume raise over the course of a few seconds. You can see a direct visual in Figure 10.2 of how the envelope would look in its waveform. Sounds with a slower attack tend to appear more subtle and gentle to the player. Some other examples of sounds with a slow attack would be a car passing by or a kettle getting ready to whistle.

Figure 10.2: Fast attack sound
An example of a sound with a fast attack as in Figure 10.2 would be a punching sound effect. As soon as the sound starts, it will be almost at max volume, creating a transient sound. A transient sound is a sound with a faster attack, seeming more aggressive to the player, usually to create an impact of sorts to convey power or shock the player. Some other examples of a sound with a fast attack would be a gun firing, a cymbal crash as seen in Figure 10.3, or a hammer hitting an anvil.

Figure 10.3: Cymbal crash example of fast attack
Release
Then we have the release of a sound. As you can probably guess, we’ll be using speed to determine the nature of the release. An example of a sound with a slower release would be a car engine turning off or an explosion. Most sound effects will have a slower release as it sounds more appealing.
There aren’t many examples that you will hear in video games that will have a short release. A hard cutoff in a sound effect is unnatural and unpleasant to hear in most cases, barring some advanced stylized techniques. A sound with a slow release could be a big gong ringing out, or the sound of a car driving into the distance while you hear the sound’s volume dissipate. For the sake of example, here is what a slow release looks like:
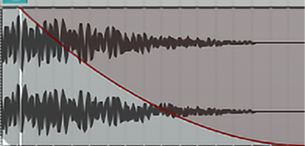
Figure 10.4: Slow release sound
And here is what a fast release looks like:
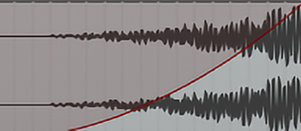
Figure 10.5: Fast release sound
Another element of sound is pitch.
Pitch
Pitch is an element of sound that determines its “highness” or “lowness.”
This is probably one of the easiest concepts to grasp as we hear it in movies, video games, and even day-to-day life. A big, buff character in an animated movie will commonly have a low-pitched voice, while a smaller, cuter character might have a high-pitched voice.
The example given above is one of the most common reasons to control the pitch of a sound effect – size. The other one is speed. Think of a car that is going slowly versus one that is going quickly. The one that is going faster has an engine revving at a higher pitch while an idle or slow-moving car will resonate low-frequency bellows.
To fully understand pitch, it will help to understand frequency, which is directly tied to it.
Frequency
Frequency is the most complicated element to explain, but it’s one of the most important to understand. You have probably listened to music in a car or on a stereo and have seen the option to control “bass” or “treble.” Treble refers to “higher frequencies” while bass refers to “lower frequencies.” The human hearing range is from 20 Hz to 20,000 Hz (Hertz), and many sounds, no matter if they sound high-pitched or low-pitched, hit every single frequency. When you play a sound in your car and turn down the “bass,” you’re turning down the lower frequencies.
The best example is white noise. White noise is simply a sound that plays every single frequency at the same volume. If you’ve never heard it, it sounds like TV static. You can listen to the sound in /Assets/Sounds/WhiteNoise.wav. You can find it in the project on GitHub, which you can find a link for in this book’s Preface.
The weird part about this sound is that, just by listening, it feels like the sound consists mostly of higher frequencies. But we can use a tool called an equalizer (or EQ for short) to visualize the frequencies that are playing, as well as controlling the volume of individual frequencies.
Generally, higher frequencies are perceived as louder, which is an important fact to consider when making sounds for your game. If you want to make a sound stand out, including higher frequencies will help quite a bit, while cutting them out might help blend sounds into the background. But if you want every sound to stand out, but also want them to have weight and power, we will have to utilize our lower frequencies. So, a balance must be struck.
The yellow lines on this graph indicate where the frequencies are hitting, and you can see that it’s practically at the same volume across the whole spectrum. This means that every single frequency has generally the same frequency volume.
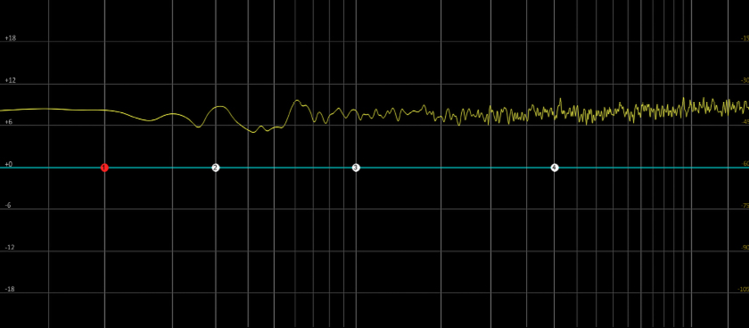
Figure 10.6: Example of similar-frequency volume
I’ve provided a few sounds below so you can all hear the differences when we remove the lower and higher frequencies, along with a graph showing which frequencies we removed. As you listen, you’ll hear and see that every sound seems to cover higher and lower frequencies to a certain degree, and we can control these frequencies to elicit unique feelings with each sound.
Listen to Assets/Sounds/Explosion.wav then Assets/Sounds/ExplosionLP.wav to hear what it’s like to have the higher frequencies cut. And then listen to ExplosionHP.wav to hear what it’s like to have the lower frequencies cut out.
Listen to Assets/Sounds/BeamSword.wav then Assets/Sounds/BeamSwordLP.wav to hear what it’s like to have the higher frequencies cut. And then listen to BeamSwordHP.wav to hear what it’s like to have the lower frequencies cut out.
Listen to Assets/Sounds/MagicIceSpell.wav then Assets/Sounds/MagicIceSpellLP.wav to hear what it’s like to have the higher frequencies cut. And then listen to MagicIceSpellHP.wav to hear what it’s like to have the lower frequencies cut out.
Listen to Assets/Sounds/Footstep.wav then Assets/Sounds/FootstepLP.wav to hear what it’s like to have the higher frequencies cut. And then listen to Assets/Sounds/FootstepHP.wav to hear what it’s like to have the lower frequencies cut out.
The reason frequency is one of the toughest concepts to grasp is because your ears aren’t trained to listen for it. We just hear a sound and know whether it sounds good or not.
Layering
Layering is the simplest concept to grasp of the five elements. While visual mediums are almost all multiplicative, sound mediums are additive. Layering is simply the process of playing multiple sounds at the same time in a unique sequence.Next, we have four unique sound effects that stand alone. We have the “impact,” the “bloom,” the “tail,” and the “bass.” If you listen to each on their own, they feel empty, but as soon as we add them all together, we have a beautiful explosion sound.
This is a useful process because we can take a source like “Sci-fi Energy” and “Metal Sword” and combine these together to make a “Sci-Fi Energy Sword.” Or, we can take our horse fart gun and choose our layers based on the description and functionality of the gun. Listen to Assets/Sounds/ScifiEnergySword01.wav, then Assets/Sounds/ScifiEnergySword02.wav, then Assets/Sounds/ScifiEnergySword03.wav.
Layering also allows us to break down our frequencies to more isolated parts. We can take a sound that is primarily lower frequencies and add it to a regular sound to give it more weight and power. Listen to Assets/Sounds/Splash01.wav, then listen to the lower frequencies added to Assets/Sounds/Splash02.wav to hear how it becomes more powerful.
We can also layer together two sounds with different envelopes, one with a long attack, and one with a fast attack to create a cool buildup effect to add impact. Listen to Assets/Sounds/EarthSpell01.wav to hear the sound before we add a buildup, and then listen to Assets/Sounds/EarthSpell02.wav to hear what happens when we add a buildup to hear how we can change the story of our sound!
Now that we’ve gone over what makes up a sound and how it applies to a single sound effect being created, we’ll go over the applications of these five elements on a broader scale of a game.
Designing for scale
Unlike art, which is multiplicative, making sound effects is a completely additive process. As an example, if we have 100 sounds without paying attention to the volume or frequency range of them, this can end up creating a lot of clutter. In the space of a video game, we must be prepared for any sounds, whether it’s a sword swipe, ambient sound, an orchestral score, or a voiceover reading, to be played at the same time. We have tools to control these sounds individually, but we must make sure that we have what’s called a balanced mix.
How to approach making sounds for a game
So where do sounds go in your game? Sounds can often go overlooked since they are technically not necessary to make what is defined as a “game.” And because of this, it’s tough to think immediately about what needs sound and what doesn’t.
Put quite simply, I like to look for anything that moves in a game. Even down to the smallest subtleties. Adding sounds for an NPC can include breathing, the sound of their feet hitting a surface, the sound of their clothes rustling... All of these are viable sounds to put into a game. We’ll talk about some reasons later in Chapter 11 as to why this much attention to detail might be difficult to achieve.
Sometimes the art in a game is minimal. What you see isn’t quite enough information, so use your imagination as to what sounds could be included! The more you add to the sound, the better. Sometimes a game can be nothing but pixel-art, and you might be incentivized to add fewer sounds, but you should always think about what attention to detail you can hear that isn’t being seen! If a player falls into a pit where you can’t see what’s happening, creating an audible experience can tell a more detailed story than visuals can allow! Maybe there are spikes, a bottomless pit, or lava! We would want the player to hear the bubbles of the lava, the impact of the spikes impaling the player, or the whistle of a player falling off a steep cliff!
Our project’s sound design and implementation
We find that the best way to learn is to jump in headfirst and start understanding how things work. This process is relatively simple now that we’ve gone over the Unity engine.
Getting our first sound to play
To start off, let’s get some audio files into our project. We’ll start by creating a folder called Audio in Unity, and then dragging our Assets/Sounds/TestTone.wav file into it.
Now that we have our audio in the folder, let’s create an empty GameObject in the scene right by our player. We’re going to begin by placing an object in the scene next to our character. For now, let’s call this GameObject Sound Emitter.
As it stands, this GameObject won’t do anything. So, let’s click and drag our audio from its Unity folder directly into our Sound Emitter GameObject’s inspector.
This will automatically create an Audio Source component on the GameObject. This is what allows our sound effects to play in Unity! Let’s go ahead and hit play to see what happens!
If you followed properly, you likely already heard your first sound! Congrats! This is of course just a placeholder sound, so we’ll focus more on adding other sounds that we’ll use in the game. In this process, we’ll go over the parameters we can change on the Audio Source component.
Organization
To better organize this project, let’s go ahead and add a new prefab called ====SFX====. We will put all our sound effects that exist in our scene into here.
In addition to this, we’ll create two new folders in /Assets/Sounds/ in our GitHub project. We’ll have a sources folder and a prefabs folder.
Music
Music is a massive part of video games. Sound effects help bring a game to life through detailed ambient sounds, player sounds, and expressive voiceovers, but music is what helps drive moment-to-moment emotions for the player.
You might have some questions about the difference between sounds and music. Technically they are the same, but to make it easier to communicate about them, most professional sound designers will consider music to be the score, or pitched instruments like piano, violins, guitars, and drums working together to make a cohesive song or musical track to listen to as background music. Meanwhile, sound effects are usually real-life instances like footsteps, swords, UI sounds, etc.
Let’s add music to our game! To add music to our game, all we must do is take our SFX GameObject that’s in our scene and rename it to Music.
Let’s give our Assets/Sounds/Music_01.wav a listen. First, select the audio file in your folder and click the looping button at the bottom of the inspector. It’s the button right above the waveform to the far right, seen in Figure 10.7 below.

Figure 10.7: Wave play UI in inspector
Now, hit the Play button, which is the sideways triangle to the right in the inspector, but to the left of the looping button.
If you listen to the music all the way through until the end, you’ll recognize that the music is a seamless loop! To hear this in action in the game, let’s take our Sound Emitter GameObject in the scene, and rename it to Music.
Next, let’s click and drag our music into our new Music GameObject. We’ll be putting it into the AudioClip space of our Audio Source component seen in Figure 10.8.
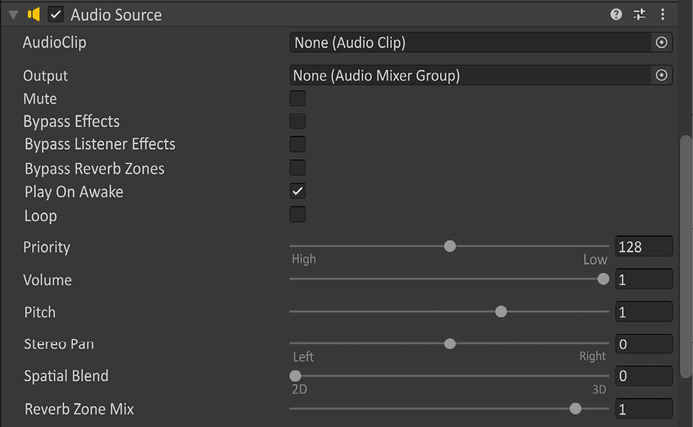
Figure 10.8: Audio Source component
If we were to test playing the game right now, we would be able to hear sound but it would stop eventually. But we pressed the looping button in the inspector for the .wav file, right? So why isn’t it working?
Well, that looping button was strictly for playback in that one instance. If we want to loop the sound on the Audio Source component, we must check Loop as on, seen under Play On Awake in Figure 10.8. Now if we play the game, our music will loop! How exciting!
Later on in this chapter, we will adjust the volumes of all of the sounds in the game, otherwise called “the mix,” or “mixing the game.” We aren’t going to mix the game immediately because the volume of every sound in a game is entirely dependent on how it sounds relative to other sound effects!
2D sounds
Up until now, we’ve only heard 2D sound effects. 2D sound effects are sounds that have no in-game location and will play anywhere for the player. No matter where you move on the map, a 2D sound will play as a consistent trigger.
The following is a list of 2D sounds that you’ve likely heard while playing video games:
- Music: Intro music that plays during the opening menu before you press play
- UI: Pressing a button, hearing the “click” of the button
- Voiceover: The narrator speaking over gameplay
- Ambient sound: General sound being played when in an area, such as wind
All the categories above can be triggered by player action, by a game event, by just starting the game, or by entering a new area of a game. But not all of them will exist in a 3D space in the game. This makes them 2D sound effects.
So now that we’ve gone over what 2D sounds are, let’s talk about 3D sounds.
3D sounds
Unlike 2D sounds, 3D sounds exist in the world of the game. When you play a game, you can usually tell what sounds are 3D by moving around in the world and hearing what sounds occur in which ear. This is called panning.
Panning is the stereo quality of a sound. Have you ever listened to a song with headphones on and taken them off one of your ears only to hear some of the instruments playing instead of the full song? This is what panning is! The music producers who made that song purposefully put those instruments in one ear to create better “stereo imaging” (we won’t be going much deeper than this, I promise).
So in the real world, if someone is speaking on your left, you will hear them in your left ear while you won’t hear them as much in your right ear. We want to recreate this feeling in video games. So, we define positional sound as 3D sounds.
Using 3D sounds
Let’s do a little experiment. Let’s take our Music GameObject and move the Spatial Blend option from 0 to 1.
We now have spatial audio! This means that our sounds will be in 3D!
As it stands, it might be difficult to pinpoint exactly where the music is playing from because there’s no visual indicator for it. So, to fix this, I like to create a sphere GameObject as a child of our audio source to visualize exactly where it lies!

Figure 10.9: Sphere GameObject being set to a child object
Now when we hit play, we can see exactly where the audio source is playing from! Next, we will talk about how to control the parameters of our 3D sound effects.
Audio listener part I
How are we able to hear sounds in a game? We hear them through our audio listener. It’s a component that we can place on any GameObject that acts as a virtual pair of ears. Placing this listener in most cases is very simple, but sometimes we require more complex integration.
In a game that uses a first-person camera, it’s simple: we just add the listener to the camera GameObject and we call it a day.
We use an audio listener on the camera because it acts as the ears of the player. But sometimes the camera can be in an isometric view, and the camera is too far from the player to properly pan and hear sounds as they move around in the world, so we offset the audio listener on a new GameObject to be offset from the camera.
We’ll get back to this in the Audio listener part II section. For now, let’s set up some 3D sound settings. We won’t be able to utilize the audio listener in a practical sense until we get our 3D sounds set up.
3D sound settings
When you hear a sound in real life, you can usually get close to it and it will become louder, while when you get further away from it, it gets quieter, and eventually becomes silent. We can control this effect using the 3D sound settings on our Audio Source component.
We’ll be focusing on Min Distance and Max Distance for our 3D sound settings.
Go ahead and change Max Distance to 10 in the Audio Source component and hit Play. Assuming you still have the sphere on your GameObject, get closer and further away from it in-game. To help visualize this further, let’s undock our scene tab in Unity and put it side by side with our Game tab.
Now that we’ve done this, we can visualize the min and max distance with a wireframe gizmo sphere in-game! And we can see that when we move our player outside of the range of the sphere, we will no longer hear the sound.
With our max distance slider, we can control the distance from where we can hear the sound. And with Min Distance, we can control at what point the sound will be the loudest. Let’s go ahead and change the min distance to 3. You’ll notice that the smaller sphere inside of the larger sphere changes, as shown later in the chapter in Figure 10.17.
When we move our player inside of this sphere, you will notice that there is no panning. This is because the sound has reached its maximum volume, and inside of the smaller sphere, the sound will turn into a 2D sound!
Lastly, we just want to take Volume Rolloff and set it to Linear Rolloff instead of Logarithmic. The reason we do this is when you change the max distance to a number less than 500 in Logarithmic mode, the sound doesn’t actually get cut off at that distance. So if we were to set the max distance to 10, then we would continue to hear it even if we’re 400 units across the map, even though we set the max distance to much less than this.
For reference’s sake, here is Logarithmic:
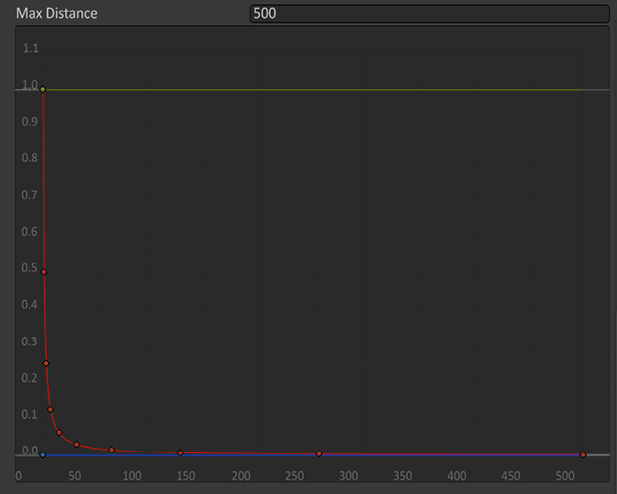
Figure 10.10: Logarithmic Rolloff

Figure 10.11: Linear Rolloff
Audio listener part II
You may have noticed that the audio feels a tiny bit off while your player is inside of the sphere. Usually, when our player passes the sphere, it isn’t at its loudest; it only reaches its loudest when the camera is next to the sphere. This is because the audio listener for Unity defaults to being set on the camera.
In a third-person game, like the one we’re making, we’ll want to add it to the player, but there’s a catch. We want it on the player without rotating with the player. We want to rotate it with the camera, showing the selection in Figure 10.12 below.
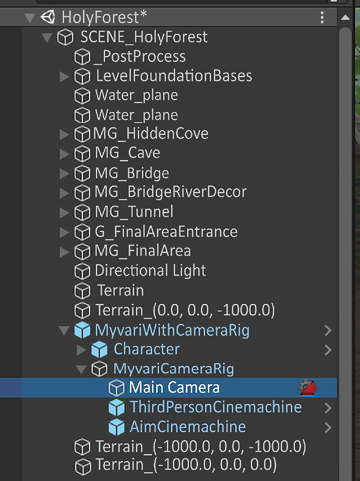
Figure 10.12: Selecting the camera in the Hierarchy
If we open our scene, we can see that MyvariWithCameraRig has Main Camera attached. And inside the inspector, we’ll find a component called Audio Listener, shown below in Figure 10.13.
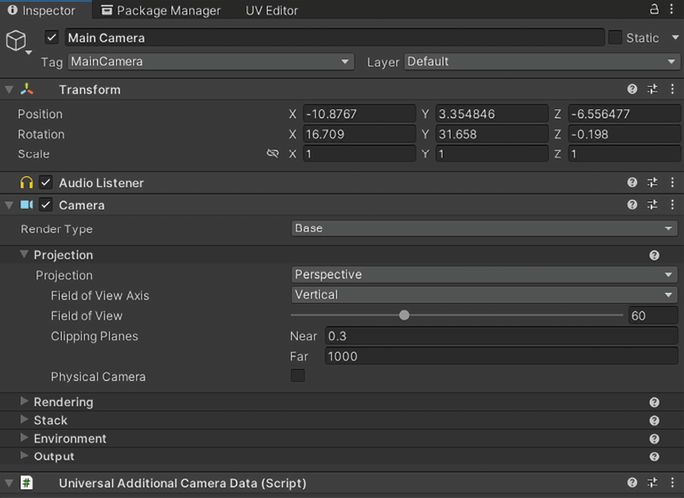
Figure 10.13: Audio Listener on Main Camera in Inspector
Now as an experiment, let’s remove the Audio Listener here, and move it directly onto our main character. Just placing it on the Character GameObject will work just fine.
Now play the game, and move about and away from our sphere object, and rotate around it. You’ll notice that the panning is all over the place! From our perspective watching the character, it’s hard to tell where information is coming from because we’re not in the shoes of our character; we have a third-person perspective.
In a game like this, we could probably get away with just placing our Audio Listener on the camera, but it would help quite a bit to have it on our character model. But we can’t do that because the player isn’t locked by its rotation.
But there’s a solution to this! In most games, we would have to add it as a child GameObject to Main Camera inside of the MyvariWithCameraRig GameObject. But here, we’ve already done most of the work, because the root MyvariWithCameraRig transform is already lined up with the character model!
All we must do is create a new GameObject inside of the root MyvariWithCameraRig, rename it Listener, as seen in Figure 10.14, and we can add our Audio Listener component to it.
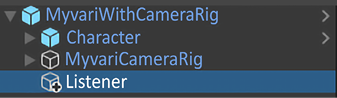
Figure 10.14: New GameObject to place our Audio Listener onto
Next, we can take this Listener GameObject and move it up on the y axis so it lines up right next to the ears of our character, seen by the transform gizmo below in Figure 10.15.
Figure 10.15: Audio Listener GameObject lined up to head height on Myvari
I moved it up by 1.5 units on the y axis. Now when we move around, the transform of the Listener GameObject will move alongside the camera. Our 3D sounds will now play relative to the character’s position instead of the camera!
Adding 3D ambient sounds to the game
How often in your life do you experience absolute silence? You might think that enjoying a quiet evening in your living room has absolute silence, but you still can hear your air conditioning, the refrigerator running, sounds outside your window, etc.
These sounds mentioned of course are very quiet, but the point is that we never truly experience absolute silence!
So even in our video games, if our player is idle, not moving, and staying completely still, it helps a lot to always have some sort of sound. This is where ambient sounds come in.
Ambient sounds can be generally defined as “sounds that exist in a 3D space but don’t move.” In our Holy Forest project, we can add sound for trees rustling, the interior of the cave, the portal humming, magical energies emitting from an object, rivers, and more!
To add an ambient sound is quite simple. We’ve technically already done this! The sound we listened to in the 3D sound settings section can technically be seen as ambient sound.
Let’s start with a very simple ambient sound of trees rustling in our scene.
Let’s take our Assets/Sounds/AMB_Trees3D.wav file and drop it into an audio source component on a GameObject. Let’s set Volume Rolloff to Linear Rolloff and set Spatial Blend to 1. Next, let’s keep our min distance to 1 and our max distance to 5.
Once we’ve done this, we can place our GameObject’s transform values as in the following image. The transform in the image reflects the ambient sound GameObject seen in Figure 10.16, and is physically available in the scene under Sound, in the hierarchy for the first AMB_Trees3D GameObject.
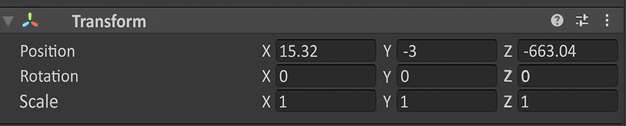
Figure 10.16: Ambient Tree 3D sound transform
We’re going to put it on the bigger tree to the left of where our player spawns. In the following image, you can see our sound gizmo placed in the scene.
You can see this in Figure 10.17 below as well as in the scene. Double-clicking on the AMB_Trees3D GameObject in the hierarchy will bring you physically to that location in the scene.

Figure 10.17: Gizmo for the ambient audio source
Lastly, we just want to make sure that Play On Awake is checked on so the sound plays immediately when the scene starts, as shown below in Figure 10.18.
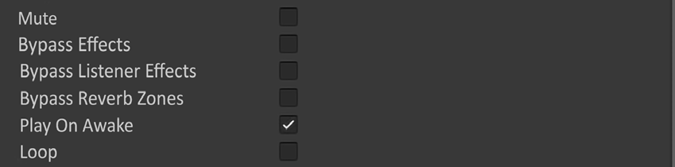
Figure 10.18: Ensuring Play On Awake is set to True
Now let’s press Play. And here we will see that the sound plays properly in the game! It will work exactly as our previous sound did, where we can hear it directionally, and the sound will eventually cut out when we leave the radius of the tree!
Filling out our ambient sounds
For the remainder of the ambient sounds, it will be a rinse and repeat of what we’ve just done. We’ll include the min/max ranges and the positions of our ambient sounds as well as the audio files that we feel work for each ambient item. In the scene we have the ambient sounds set up under ====AMB====, as seen in Figure 10.19 below. I strongly encourage you to listen to the ambient sounds and see how they sound to you!
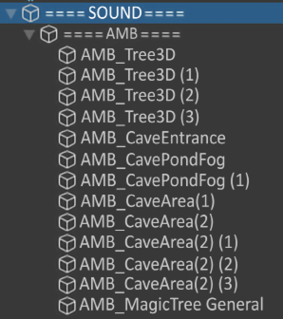
Figure 10.19: List of ambient sounds in the hierarchy
2D ambience
If you walk around our newly filled-out scene, you’ll notice that it feels much more alive now! However, you’ll notice that in certain spots, you’ll hear silence, and as we’ve learned, hearing absolute silence is not something we ever want our players to experience in the game!
Let’s add an audio source to our ====SOUND==== parent GameObject and throw in our General2D_Amb.wav.
Triggering sound through player interaction
All the sounds we’ve created so far are sounds that will play as soon as you enter a scene. This happens because we have Play On Awake checked in the Audio Source component.
If we don’t have this checked, sounds will never play. But what’s cool is we get to trigger sounds in other ways!
Triggering sound through Unity events
Let’s get a sound for our first stairs puzzle. This one will be quite easy. The easiest way for us to add our sound will be to add an Audio Source component directly to the trigger region GameObject. Let’s find LeftStairsTrigger and scroll down in the Inspector until we find the Interactio Trigger script, as shown in Figure 10.20.
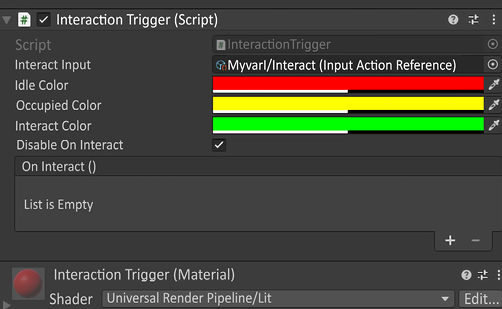
Figure 10.20: Interaction Trigger script on the LeftStairsTrigger GameObject
If you recall, we made a UnityEvent called OnInteract, which we can utilize with our Audio Source component! Go ahead and click Add Component at the bottom of the inspector and select Audio Source.
Next, drag and drop the StairsPuzzleSuccess.wav file into the Audio Source component. We will leave the Audio Source as 2D since the sound that we’re playing is a reward jingle.
Now, click the + in the OnInteract UnityEvent, and in the field that says None (Object), drag and drop your Audio Source component, as shown in Figure 10.21.

Figure 10.21: Sound added to Interaction Trigger
Next, you’ll see the dropdown that currently is labeled as No Function. Let’s click this and go down to AudioSource and then to Play (), as in Figure 10.22 below.
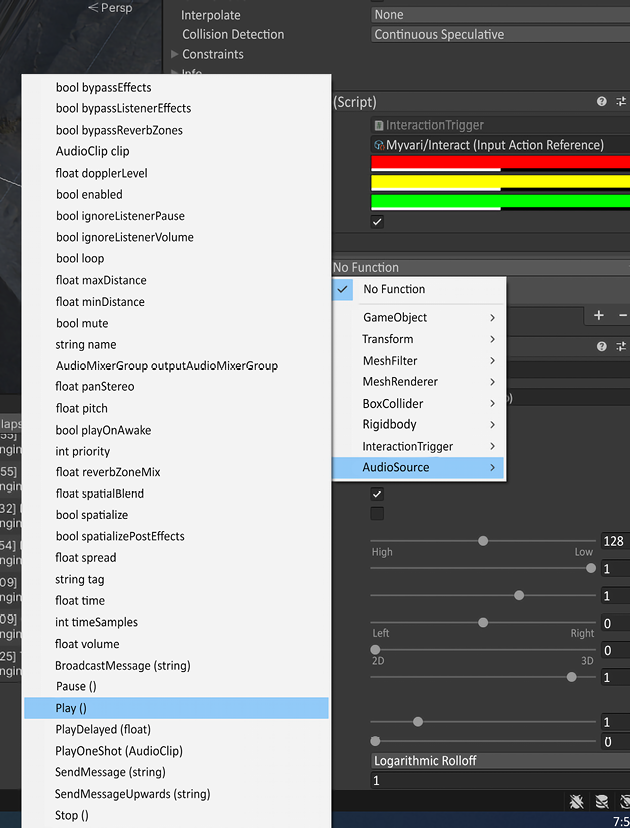
Figure 10.22: Adding the Play method to the sound object on interact
This will ensure that we play our audio file when we activate LeftStairsTrigger. Go ahead and hit play and navigate to LeftStairsTrigger. Once you do this, you’ll hear our sound! Let’s go ahead and repeat the same exact process for RightStairsTrigger.
Rotating puzzle sounds
For the first time, we’ll be triggering sound directly in code. This will be a fairly simple process of making our Audio Source variable publicly available through code. Then we just trigger it.
We’ll be adding the following sounds:
- A sound that plays when the puzzle is complete
- A sound for when the spire starts moving
Let’s start with the simplest one, our “puzzle complete” sound. This will play when all the spires are aligned, and the door opens. Go into our First Puzzle prefab in our scene and open up the FirstPuzzle.cs script. This script is where we will add our code, as in Figure 10.23. On line 173, go ahead and type in:
public AudioSource puzzleCompleteSFX;

Figure 10.23: Public Audio Source added to the first puzzle script
Now go back to the First Puzzle prefab in our scene, open up the inspector, and add an Audio Source component. On this Audio Source, we will uncheck Play on Awake and drag FirstPuzzleJingle.wav into it.
Next, in the same way we dragged and dropped our audio component into the UnityEvent, we will drag and drop the Audio Source into the new serialized field labeled Puzzle Complete SFX on our FirstPuzzle script component, seen in Figure 10.24.

Figure 10.24: Dragging and dropping an audio file into the Audio Source component
Now our last step is to go to the CheckForVictory() function inside the FirstPuzzle.cs script and go into the if statement on line 241. Right before return true on line 245, in Figure 10.25, we are going to add the following:
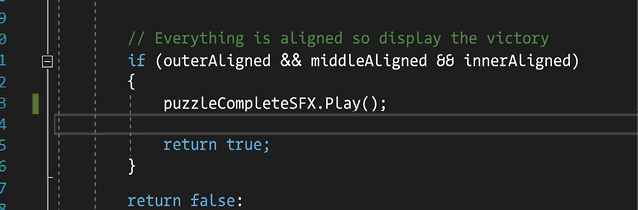
Figure 10.25: Adding Play to the Audio Source
Now let’s go into our game and see if it works. When we enter the game, we should be able to activate our puzzle and hear sound when we successfully rotate the spires!
Tree puzzle
Using the same method as before, let’s add a sound that plays when we put the ball on the bridge, when we solve part of the puzzle, and when we complete the final puzzle. We’ll open FinalPuzzle.cs and add:
IntroPuzzleSolved.wavon line 31FinalPuzzlePartial.wavon line 38FinalPuzzleSolved.wavon line 41
Summary
Congrats! We’ve just taken our first steps to understanding audio in video games. We’ve gone over what makes up a sound effect, broken down the five parts of sound design, learned about audio listeners and the differences between music and sound, learned how to use 3D sound, and learned how to trigger Audio Source components through code! This is a great start to breathing life into our game through sound. In Chapter 12, Final Touches, while polishing audio, we will go over some extra tips to make your audio go that one step further.
In the next chapter, we’ll move on to building our project so you can share it with others.