
We now have our assets. Let's add them to the assets folder in our project and start adding them into the game.
First up, let's add the background (bg.png). This is a relatively simple affair; like we did earlier, we create a Texture object that represents the background, then draw it. So, in the GameScreen class, add the following code:
private Texture background;

public void show() {
  /** Code omitted for brevity **/
  background = new Texture(Gdx.files.internal("bg.png"));
}

private void draw() {
  batch.setProjectionMatrix(camera.projection);
  batch.setTransformMatrix(camera.view);
  batch.begin();
  batch.draw(background, 0, 0);
  drawScore();
  batch.end();
}
Let's run it and see how it looks:
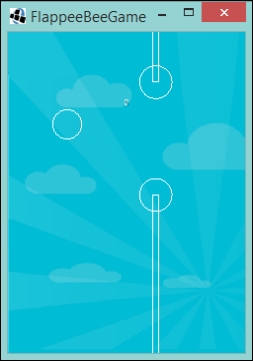
Excellent, we are almost there! OK, let's not kid ourselves, we still have more to do.
Next, let's bring those flowers to life.
First up, let's modify our Flower class to take two Texture objects, which will represent the top and bottom flowers. So, add the following code to your Flower class:
private final Texture floorTexture;
private final Texture ceilingTexture;

public Flower(Texture floorTexture,Texture ceilingTexture) {
  this.floorTexture = floorTexture;
  this.ceilingTexture = ceilingTexture;
  / ** Code omitted for brevity **/
}
Now, we need to render these, so let's create a draw() method:
public void draw(SpriteBatch batch) {
  batch.draw(floorTexture, floorCollisionRectangle.getX(), floorCollisionRectangle.getY());
  batch.draw(ceilingTexture, ceilingCollisionRectangle.getX(), ceilingCollisionRectangle.getY());
}
For the coordinates of the flower textures, we will use their corresponding collision rectangles' x and y values.
Next, let's update our GameScreen class. You might find that your IDE is now complaining about the Flower class, as we changed the constructor signature:
private Texture flowerBottom;
private Texture flowerTop;
public void show() {
  /** Code omitted for brevity **/
  flowerBottom = new Texture(Gdx.files.internal("flowerBottom.png"));
  flowerTop = new Texture(Gdx.files.internal("flowerTop.png"));
}
private void createNewFlower() {
  Flower newFlower = new Flower(flowerBottom, flowerTop);
  newFlower.setPosition(WORLD_WIDTH + Flower.WIDTH);
  flowers.add(newFlower);
}
So, here we define our textures and then pass them to our Flower class. Now we just need to add a call to our draw() method.
First, create a method called drawFlowers(). This will iterate over the Flower objects and call the draw() method for us:
private void drawFlowers() {
  for (Flower flower : flowers) {
    flower.draw(batch);
  }
}
Finally, add a call to this method in our main draw() method:
private void draw() {
  batch.setProjectionMatrix(camera.projection);
  batch.setTransformMatrix(camera.view);
  batch.begin();
  batch.draw(background, 0, 0);
  drawFlowers();
  drawScore();
  batch.end();
}
Good stuff! I think we should run our project and see what happens!
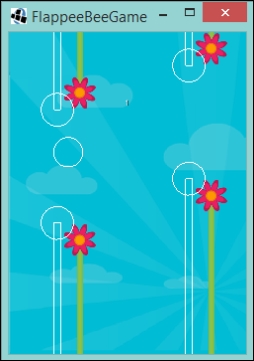
Oh! they are not where we were expecting them to be. This can be for a number of reasons, for instance, and in this case, our artist has added some padding around the texture for our flower. So, what we need to do is make the center of our flower texture relative to the center of the collision area.
Since we know that our collision circle's x value is the center of the collision area, we can use that as our reference point. Then, to get our texture's x value, we just subtract half the width of our texture from the collision circle's x value, as follows:
float textureX = floorCollisionCircle.x - floorTexture.getWidth() / 2;
Of course, it will still appear out of alignment on the y axis. To fix this we need adjust the position of the texture by our COLLISION_CIRCLE_RADIUS. So we can just add that value to our y as follows:
float textureY = floorCollisionRectangle.getY() + COLLISION_CIRCLE_RADIUS;
Let's put all the preceding explainations together in a little method:
private void drawFloorFlower(SpriteBatch batch) {
  float textureX = floorCollisionCircle.x - floorTexture.getWidth() / 2;
  float textureY = floorCollisionRectangle.getY() + COLLISION_CIRCLE_RADIUS;
  batch.draw(floorTexture, textureX, textureY);
}
Now, update the
draw() method:
public void draw(SpriteBatch batch) {
  drawFloorFlower(batch);
  batch.draw(ceilingTexture, ceilingCollisionRectangle.getX(), ceilingCollisionRectangle.getY());
}
Let's now run our project.
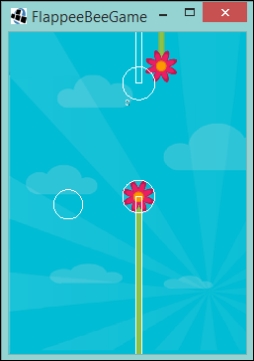
Perfect! Now, let's update the flower at the top by adding the following to your Flower class:
private void drawCeilingFlower(SpriteBatch batch) {
  float textureX = ceilingCollisionCircle.x - ceilingTexture.getWidth() / 2;
  float textureY = ceilingCollisionRectangle.getY() - COLLISION_CIRCLE_RADIUS;
  batch.draw(ceilingTexture, textureX, textureY);
}
At first glance, it might look like the same mathematics as the bottom flower, but the difference here is that we subtract the circle radius from the y position to move the image down.
Update the Flower draw() method again:
public void draw(SpriteBatch batch) {
  drawFloorFlower(batch);
  drawCeilingFlower(batch);
}
Spot on! Congratulate yourself. Just Flappee to bring to life now.
To bring Flappee to life, we go through a similar process to the one we did for the flowers. First, let's update our Flappee class:
private final Texture flappeeTexture;
public Flappee(Texture flappeeTexture) {
  this.flappeeTexture = flappeeTexture;
  /** Code omitted for brevity **/
}
public void draw(SpriteBatch batch) {
  batch.draw(flappeeTexture, collisionCircle.x, collisionCircle.y);
}
The astute among you might be asking why we are passing in our Texture object when we can get hold of a FileHandle instance statically and just create it in the constructor. Yes, you are correct, there is nothing to stop you from doing that. I have taken this approach, so that all our textures are created in the same place, that is, GameScreen, so it can be responsible for their life cycle, that is, dispose them when we no longer need them. You can handle the disposal in the Flappee class, but you might find that when stuff like this is hidden, it gets overlooked and before you know it, you are running out of memory because new textures keep getting created and are never disposed of.
Once again, we need to update our GameScreen class to reflect this change:
private Texture flappeeTexture;
public void show() {
/** Code omitted for brevity **/
flappeeTexture = new Texture(Gdx.files.internal("bee.png"));
flappee = new Flappee(flappeeTexture);
flappee.setPosition(WORLD_WIDTH / 4, WORLD_HEIGHT / 2);
}
private void draw() {
batch.setProjectionMatrix(camera.projection);
batch.setTransformMatrix(camera.view);
batch.begin();
batch.draw(background, 0, 0);
drawFlowers();
flappee.draw(batch);
drawScore();
batch.end();
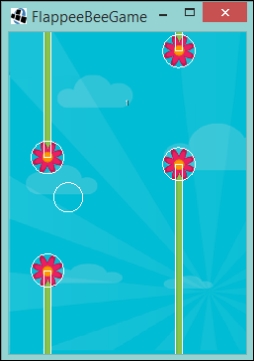
}In the preceding code listing, you will notice that we placed the construction of the Flappee object above the setPosition() method call. You might be aware that if we did this the other way around, we would get the dreaded NullPointer exception. Now, if we run our project, we will hopefully see a Flappee buzzing away on the screen!
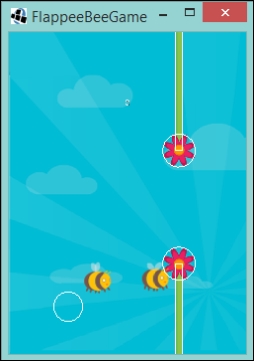
Oh no! First, he isn't where we expect him to be, and second, there are two! How did this happen?
Well, truthfully, I knew this was going to happen. Take a look at the bee.png image we used for our texture. It contains two bees, this will come in useful later on when we are looking at animating Flappee. But for now, we only want a single bee.
How do we do this? Well luckily, LibGDX's TextureRegion class comes with a split() method that will slice up our image into a two-dimensional array of TextureRegions. A TextureRegion class is exactly what it says it is, a region of a texture. If you look at the code (yey for open source software!) you will see it contains a reference to the parent texture and a set of coordinates of the region this object will cover.
So, we know what a TextureRegion is, but how do we implement it into our game? First, we need to know the size, in pixels, we want for each region. In the case of Flappee, it is 118x x 118px. Next, we need to take our Texture object and make it TextureRegion, so we can call split() and get our array of images.
Let's update our Flappee class:
private static final int TILE_WIDTH = 118;
private static final int TILE_HEIGHT = 118;

public Flappee(Texture flappeeTexture) {
  this.flappeeTexture = new TextureRegion(flappeeTexture).split(TILE_WIDTH, TILE_HEIGHT)[0][0];
  collisionCircle = new Circle(x, y, COLLISION_RADIUS);
}
We refer to the size of region we want with the TILE constants. It makes sense to refer to them as tiles, as that is essentially what we are doing, turning our texture into tiles. Then, we are specifying that we want the tile in the first column and first row.
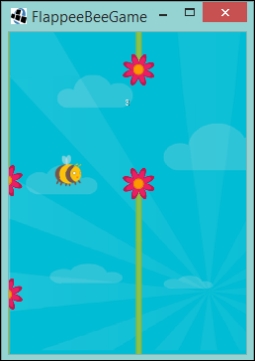
Let's have a run and check the output.

Almost there, let's now sort out that offset.
Similar to what we did in the
Flower class, we center our texture relative to the center of the collision circle:
public void draw(SpriteBatch batch) {
  float textureX = collisionCircle.x - flappeeTexture.getRegionWidth() / 2;
  float textureY = collisionCircle.y - flappeeTexture.getRegionHeight() / 2;
  batch.draw(flappeeTexture, textureX, textureY);
}
Run it up and check it out! It should be bang on. Now for added effect, turn off the call to drawDebug() in the GameScreen class.
Now it is looking pretty much like a game! However, we have the opportunity to animate Flappee as we have a second asset. Let's look at how to make Flappee come to life.
Once again, LibGDX saves the day with a very useful class called Animation. An Animation class essentially holds an array of TextureRegions and, when given a set frame duration and a state timer, it can tell you which TextureRegion parameter to draw. It has a variety of different play modes as well:
- Normal
- Reversed
- Loop
- Loop reversed
- Loop pingpong
- Loop random
Visit the JavaDoc at http://libgdx.badlogicgames.com/nightlies/docs/api/com/badlogic/gdx/graphics/g2d/Animation.PlayMode.html for more information.
These modes affect how the Animation class decides which TextureRegion parameter should be shown.
Great! Let's get it into Flappee. First, we remove the old reference to TextureRegion that we had in the class and replace it with an Animation reference:
private final Animation animation;
Next, we update the constructor to instantiate the Animation class with an array of TextureRegion parameters:
public Flappee(Texture flappeeTexture) {
  TextureRegion[][] flappeeTextures = new TextureRegion(flappeeTexture).split(TILE_WIDTH, TILE_HEIGHT);

  animation = new Animation(FRAME_DURATION,flappeeTextures[0][0], flappeeTextures[0][1]);
  animation.setPlayMode(Animation.PlayMode.LOOP);

  collisionCircle = new Circle(x, y, COLLISION_RADIUS);
}
So, similar to what we did earlier, we split the textures and then pass in the references to the tile. In this case, it is row zero and columns zero and one. We also specify a FRAME_DURATION constant:
private static final float FRAME_DURATION = 0.25F;
Set PlayMode to LOOP.
Next, we add an animation timer:
private float animationTimer = 0;
We increment this value on every update call, so this means we need to update our update() method to do this:
public void update(float delta) {
  animationTimer += delta;
  ySpeed -= DIVE_ACCEL;
  setPosition(x, y + ySpeed);
}
Finally, we update our draw() method to access the Animation class and return the TextureRegion parameter we want to render:
public void draw(SpriteBatch batch) {
  TextureRegion flappeeTexture = animation.getKeyFrame(animationTimer);
  float textureX = collisionCircle.x - flappeeTexture.getRegionWidth() / 2;
  float textureY = collisionCircle.y - flappeeTexture.getRegionHeight() / 2;
  batch.draw(flappeeTexture, textureX, textureY);
}
Excellent, Flappee has been updated! However, we need to update our GameScreen class to reflect the change in our Flappee class:
private void update(float delta) {
  updateFlappee(delta);
  updateFlowers(delta);
  updateScore();
  if (checkForCollision()) {
    restart();
  }
}
private void updateFlappee(float delta) {
  flappee.update(delta);
  if (Gdx.input.isKeyPressed(Input.Keys.SPACE)) flappee.flyUp();
  blockFlappeeLeavingTheWorld();
}
Superb! We are now ready to run our project and see Flappee buzz!