
The easiest way of creating a custom view is to use interface builder to drag and drop the contents. This is typically done with a UITableView and a prototype
table cell.
Drag in the table view controller from the object library onto the main storyboard, and drag and drop from the tab bar controller to the newly created table view controller to create a relation segue called view controllers. (Segues are covered in more detail in the Storyboards, Segues, and Scenes section in Chapter 4, Storyboard Applications with Swift and iOS)
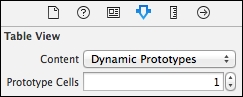
By default, the table view controller will have dynamic property content—that is, it will be able to display a variable number of rows. This is defined in the Table View section of the Attributes Inspector.
Note
There is an option for tables to have static content; a fixed number of rows in the table. This is sometimes useful when creating scrollable content that can be partitioned into slices, even if it doesn't look like a table. Most of the elements in the iOS settings are represented as a fixed-size table view.
At the top of the table view are one or more prototype cells. These are used to define the look and feel of the table items. By default, a UITableViewCell is used, which has a label and an image, but a prototype cell can be used to add more data to the entries.

The prototype cell can be used to provide additional information or views. For example, two labels can be dragged into the view; one label can be centered at the top and can be displayed in the headline font, while the second can be left aligned.
Drag two labels from the object library into the prototype cell. Arrange them using Auto Layout appropriately.
To change a label's font, select the label in the editor and go to the Attributes Inspector. In the Label section, click on the font chooser icon and select Headline or Subhead, as appropriate.

When finished, the prototype cell will look like:

When the application is run, an empty table will be seen. This is because the table doesn't have any items displayed at the moment. The next section shows how to add data to a table so that it binds and displays items to the prototype cell.
A UITableView acquires data from a UITableViewDataSource. The UITableViewController class already implements the UITableViewDataSource protocol, so only a small number of methods are required to provide data for the table.
Create a new
SampleTable class that extends UITableViewController. Implement the class as follows:
import UIKit
class SampleTable: UITableViewController {
  var items = [
    ("First", "A first item"),
    ("Second", "A second item"),
  ]
  required init(coder:NSCoder) {
    super.init(coder:coder)
  }
  override func tableView(tableView: UITableView,
    numberOfRowsInSection section:Int) -> Int {
    return items.count
  }
  override func tableView(tableView: UITableView,
    cellForRowAtIndexPath indexPath: NSIndexPath)
     -> UITableViewCell {
    let cell = tableView.
     dequeueReusableCellWithIdentifier("prototypeCell")
     as UITableViewCell
    // configure labels
    return cell
  }
}
Once the data source methods are implemented, the labels need to be configured to display the data from the array. There are three things that need to be done: the prototype cell must be acquired from the xib file; the labels need to be extracted; and finally the table view controller needs to be associated with the custom SampleTable class.
Firstly, the cellForRowAtIndex function needs an identifier for reusable cells. The identifier is set on the prototype cell in the main storyboard. To set it, select the prototype cell and go to the Attributes Inspector. Enter prototypeCell in the Identifier of the Table View Cell section:

The identifier is used in the dequeueReusableCellWithIdentifier method of the tableView. When a xib is used to load the cell, the return value will either reuse a cell that has gone off-screen earlier or a new cell will be instantiated from xib.
Each label can be given a non-zero integer tag so that the label can be extracted from the prototype cell using the viewWithTag method:
let titleLabel = cell.viewWithTag(1) as UILabel
let subtitleLabel = cell.viewWithTag(2) as UILabel
To assign tags to the views, select the heading label, navigate to the Attributes Inspector, and change the Tag to 1. Do the same thing for the subheading label with the tag 2.

Now the text values for the row can be set:
let (title,subtitle) = items[indexPath.row]
titleLabel.text = title
subtitleLabel.text = subtitle
Finally, the SampleTable needs to be associated with the table view controller. Click on the table, go to the Identity Inspector, and enter SampleTable in the Custom Class section.
When the application is run, the following view will be shown:

It is possible to create a view using interface builder, save it as a xib file, and then instantiate it on demand. This is what happens under the covers with the UITableView—there is a method registerNib:forCellReuseIdentifier: which takes an xib file and an identifier (which corresponds to prototypeCell in the previous example).
Create a new interface file CounterView.xib to represent the view, by navigating to File | New | File | iOS | User Interface | View. When opened, it will show as an empty view with no content and in a 600 x 600 square. To change the size to something that is a little more reasonable, go to the Attributes Inspector and change the size from Inferred to Freeform. At the same time, change the Status Bar, Top Bar, and Bottom Bar to None. Then, change to the Size Inspector and modify the view's Frame Rectangle to 300 x 50.

This should resize the view so that it is displayed as 300 x 50 instead of the previous 600 x 600, and the status bar and other bars should not be seen. Now, add a Stepper from the object library by dragging it to the left-hand side of the view and dragging a Label to the right. Adjust the size and add the missing constraints so that the view looks similar to the following screenshot:
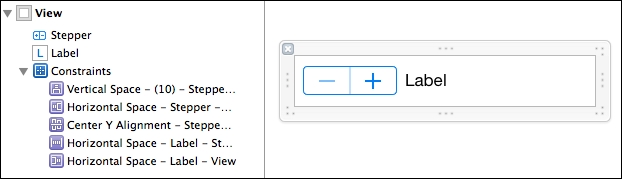
Create a new CounterView class that extends UIView, define an @IBOutlet for the label and an @IBAction change method that takes a sender. Wire the stepper's valueChanged event to the change method and connect the label outlet. Implement the change function such that the label text is changed when the stepper is picked:
import UIKit
class CounterView: UIView {
  @IBOutlet weak var label:UILabel!
  @IBAction func change(sender:AnyObject) {
    let count = (sender as UIStepper).value
    label.text = "Count is (count)"
  }
}
The CounterView will be added to the table header of the SampleTable. Each UITableViewController has a reference to its associated UITableView, and each UITableView has an optional headerView (and footerView) that is used for the table as a whole.
To create a CounterView, the xib file must be loaded. This is done by instantiating a UINib with a nibName and a bundle. The most appropriate place to do this is in the viewDidLoad method of the SampleTable class:
class SampleTable: UITableViewController {
  override func viewDidLoad() {
    let xib = UINib(nibName:"CounterView", bundle:nil)
    // continued
Once the xib is loaded, the view must be created. The instantiateWithOwner method allows the object(s) in the xib to be deserialized.
The owner is passed to the view so that any connections can be wired up to the File's Owner in the interface. This is typically either self or nil if there are no connections.
    // continued from before
    let objects = xib.instantiateWithOwner(self, options:nil)
    // continued
This returns an array of AnyObject instances, so casting the first element to a UIView is a common step.
Using the as? cast, it is possible to convert the optional value to a more specific type, and from that perform the assignment to the tableHeaderView:
    // continued from before
    let counter = objects.first as? UIView
    tableView.tableHeaderView = counter
  }
When the application is run in the simulator, the header is seen at the top of the table:

One of the advantages of having a xib for representing the user interface is that it can be reused in many places with a single definition. For example, it is possible to use the same xib to instantiate another view for the footer of the table:
tableView.tableFooterView =
  xib.instantiateWithOwner(self,options:nil).first as? UIView
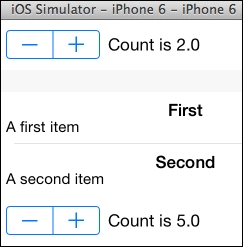
When the application is run now, counters are created at the top and bottom of the table:
When a view is added into a view that is being managed with Auto Layout, its intrinsic content size is used. Unfortunately, views defined in interface builder have no way of setting their intrinsic size programmatically or of specifying it in interface builder. The Size Inspector allows this value to be changed, but as Xcode notes, this has no effect at runtime:
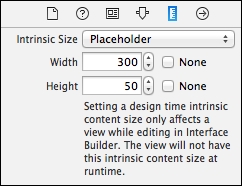
If a custom class is associated with the view, then an appropriate intrinsic size can be defined. Add a method to CounterView that overrides the intrinsicContentSize method and returns a CGSize, and to allow for some xib customization, return the maximum of the label's intrinsic size and a value such as (300,50):
override func intrinsicContentSize() -> CGSize {
  let height = max(50,label.intrinsicContentSize().height)
  let width = max(300,label.intrinsicContentSize().width)
  return CGSize(width: width, height: height)
}
Now when the CounterView is added into a view that is managed by Auto Layout, it will have an appropriate initial size, although it can grow larger.