
Auto Layout has been part of Xcode for the last few releases, and it was added to support an evolution from the previous springs and struts approach that predated Mac OS X. First released on iOS in 6.0, it has evolved to the point where size-independent displays can now be created as the default.
In Xcode 5, interface builder enabled Auto Layout by default for the first time. When a label was dragged to the top or bottom of the parent view, a dotted blue line would indicate that the label was correctly spaced, and a constraint would be generated.
However, in many cases, the constraints weren't created correctly or had undesired effects. For example, positioning a button in the center at the top might not maintain the location depending on whether the constraint being added was absolute (200 px from the right) or relative (in the center of the screen). In both cases, the button might look like it was positioned correctly, only to fail when the device's screen orientation rotates or it is run on a screen of different size.
In Xcode 6, although the guidelines are still shown as views are moved around, relative constraints are not created. Instead, each view is given an exact hardcoded position that does not change with screen rotation or with a change of display size.
Constraints must be added manually to the views in order to restore the right behavior, and as manual constraints are added, absolute constraints are removed.
In the example application, the Welcome to Swift label and the Press Me button are next to each other, a small distance from the top. However, when the screen is rotated in the simulator, by pressing Command and the left or right arrow keys, the spacing between the labels and the top doesn't change, so the labels look further away.
The desired outcome is that the label remain a standard distance away from the top-left and the button remain aligned to the label's baseline.
There are two separate constraints that need to be applied to the label:
- Be a standard vertical distance away from the top of the parent view
- Be a standard horizontal distance away from the left of the parent view
There are also two constraints that need to be applied to the button:
- Be aligned with the label's baseline
- Be a standard vertical distance away from the label
There are different ways of adding a constraint, which are covered in the following sections.
A quick way to add a constraint is to press Control and drag the mouse cursor from the view to the top of the container. Depending on the direction of the drag, different options will be shown. Dragging vertically upwards presents the vertical alignment options:

The Top Space to Top Layout Guide option will insert a recommended break between the navigation bar and the label. There is a Center Horizontally in Container option, which is also a vertical separation but not appropriate in this case.
The other types that are active—Equal Widths, Equal Heights, and Aspect Ratio—allow multiple views to be sized relative to each other.
Dragging horizontally will show a different set of options at the top, including Leading Space to Container Margin and Center Vertically in Container:
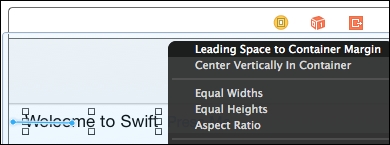
If the mouse is dragged at an angle, both sets of options will be shown:

To set the constraints for the welcome label, press Control and drag the mouse cursor from the label to the left and select Leading Space to Container Margin. An orange line will appear, and a dotted outline will be shown at the top of the screen.

Note
The orange line indicates an ambiguous constraint, which indicates some constraints have been added to the view but are not enough to uniquely position the label. In this case, the label is positioned from the left of the container, but it could be anywhere with respect to the top or bottom of the screen. The red dotted lines show where the Auto Layout algorithm will put the view with the constraints currently specified.
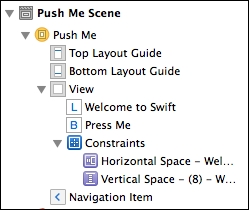
To resolve this problem, press Control and drag the mouse pointer from the label to the top and select Top Space to Top Layout Guide. Once this is done, two constraints will be shown in blue, which represent the constraints about the object:

The constraints can also be seen in the document outline on the left-hand side:
If the application is run now and rotated, the label is correctly repositioned but the button is not:

To find which views have no constraints, click through the views one by one in the document outline and check the size inspector (which can be seen by pressing Command + Option + 5 or by navigating to View | Utilities | Show Size Inspector). For views that have constraints set, there will be content shown under the Constraints section:
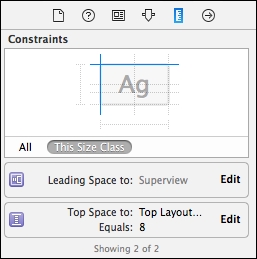
If a view has no constraints associated with it, then this section will be empty.
Interface builder has an option to create missing constraints for selected views, which can be accessed by navigating to Editor | Resolve Auto Layout Issues | Add Missing Constraints or from the Resolve Auto Layout Issues menu at the bottom-right, which looks like a triangle between two vertical lines.
When selected, the options in the top-half apply to selected views only, while the options in the bottom-half work on all the views in the selected view controller.

The options include:
- Update Frames: This is based on the current constraints; it automatically repositions and resizes the views to correspond to what will happen at runtime
- Update Constraints: This is based on the current positions of the objects and attempts to recalculate the existing constraints (but not create new ones)
- Add Missing Constraints: This is based on the approximate positioning of the components and adds constraints that create the same result
- Reset to Suggested Constraints: This is equivalent to clearing all the constraints associated with the views and then readding missing constraints
- Clear Constraints: This removes all the constraints associated with the views
To add constraints to the Press Me button, click on the view and then navigate to Editor | Resolve Auto Layout Issues | Selected Views | Add Missing Constraints. There should be two constraints added: a baseline alignment with the label and a horizontal space to the label.
To see the effect of the Update Frames operation, move the label and the button to different places in the view controller. Orange lines and dotted outlines will be shown, indicating that there is an ambiguous constraint. Navigate to Choose Editor | Resolve Auto Layout Issues | All Views in View Controller | Update Frames, and the views will automatically move to the right places and resize.
Note
The views are sized to their intrinsic size, which is the size that just fits the content. For example, a label's intrinsic size is the size in which the text can fit into the space in the current font. This can be used to fix the size of the label in the Message Scene; by adding constraints, the changing text will result in the intrinsic size being recalculated, and the background color will be correctly sized.
Now, run the application and rotate the device by pressing Command and the left and right arrow keys to see the view resize itself correctly.