
So far in this chapter, the storyboard content does not involve any Swift or other programming content—it used the drag and drop capabilities of the storyboard editor. Fortunately, it is easy to integrate Storyboard and Swift using a custom view controller.
Each standard view controller has a corresponding superclass (listed in the Scenes and view controllers section previously in this chapter). This can be replaced with a custom subclass, which then has the ability to influence and change what happens in the user interface. To replace the message in the Message Scene, create a new file named MessageViewCotroller.swift with the following content:
import UIKit
class MessageViewController: UIViewController {
}
Having created the class, it can be associated with the view controller by selecting it in the storyboard and then switching to the identity inspector by navigating to View | Utilities | Show Identity Inspector or pressing Command + Option + 3. In the Custom Class section, the Class will show UIViewController as a hint; entering MessageViewController here will associate the custom controller with the view controller:

This will have no visible impact to the message scene; running the application will be the same as before. To show a difference, create a viewDidLoad method with an override keyword and then create a random color for the background:
override func viewDidLoad() {
  super.viewDidLoad()
  let red = CGFloat(drand48())
  let green = CGFloat(drand48())
  let blue = CGFloat(drand48())
  view.backgroundColor = UIColor(
    red:red,
    green:green,
    blue:blue,
    alpha:1.0
  )
}
Running the application and pressing the Press Me button results in a differently colored view being created each time.
Each view controller has an implicit relationship with its view, and each view has its own backgroundColor property. This example will work regardless of what the view happens to be. What if the view controller needs to interact with the view's content in some way? The view controller could walk the view programmatically, looking for a certain type of view or for a view with a particular identifier, but there is a better way to do this.
Both interface builder and storyboard have the concept of outlets, which are a predefined point in a class that can be exposed and can have connections between the UI and the code. In Objective-C, this was done with an IBOutlet qualifier. In Swift, this is done with an @IBOutlet attribute. In effect, they are variables that can be bound to the UI.
Note
When defining a class with an @IBOutlet attribute, the @objc attribute is also implicitly added, marking this Swift class as using the Objective-C runtime. Since all the UIKit classes are already Objective-C types, this doesn't matter; but for types where the Objective-C runtime should not be used, care should be taken when adding attributes such as @IBOutlet. The @objc attribute can also be used for non-UI classes that need to use the Objective-C runtime.
The following steps are required to create an outlet in a Swift view controller:
- Define an outlet in the view controller code with
@IBOutletweakvarof an optional type of the connected view. - Connect the outlet in the view controller to the view by pressing Control and dragging the mouse cursor from the view to the outlet.
To do this, open the assistant editor by pressing Command + Option + Enter or by going to View | Assistant Editor | Show Assistant Editor. This will show a side-by-side view of the associated source file. This is useful for showing the associated custom view controller for a selected view in the storyboard (or the interface file).
Once the assistant editor is shown, open the Message Scene from the storyboard and press Control while dragging the mouse cursor from the message label to the assistant editor and dropping it just after the class declaration:
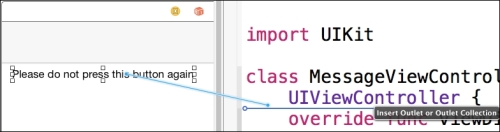
A pop-up dialog will ask what to call the field and present some other information; ensure Outlet is selected, name it message, and ensure that it has a Weak storage type:

This will result in the following line being added to the MessageViewController class, and will wire up the label to the property:
class MessageViewController: UIViewController {
  @IBOutlet weak var message: UILabel!
  …
}
The @IBOutlet attribute (defined in UIKit) allows interface builder to bind to the property. The weak storage type—which can be changed in the pop-up dialog—indicates that this class will not hold a strong reference to the object so that when the view is dismissed, the controller will not own it.
Tip
Generally, all @IBOutlet connections should be marked as weak, because the storyboard or xib file is the owner of the object, not the controller. Ownership does not pass when assigning properties from interface builder. Changing it to something other than weak might lead to circular references. Since Swift uses a reference counting approach to determine when an object is no longer referenced, a circular reference between strong references can cause memory leaks.
The exclamation mark on the end of the type UILabel! indicates that it is an
implicitly unwrapped optional. The property is stored as an optional type, but the accessor code will automatically unwrap it at the point of use. Since the view controller will not have a reference to the message at the point of initialization, it will be nil, so it must be stored as an optional. However, since accessing the value is known to not be nil after the view has been loaded, the implicitly unwrapped optional saves the ?. calls that will otherwise have to be used each time it is used.
Note
An implicitly unwrapped optional is still an optional value under the covers; it is syntactic sugar for unwrapping it at the point of use each time the value is accessed. When the view is loaded, but before the viewDidLoad method is called, the outlet's value will be wired to the instantiated view on screen.
The connections can be seen in the connections inspector, which can be shown by selecting the message label and pressing Command + Option + 6 or by navigating to View | Utilities | Show Connections Inspector. The inspector can also be used to remove existing connections or add new ones.

Now that the connection has been made between the message view and the custom controller, instead of changing the background color of the view, change the background color of the message instead:
message.backgroundColor = UIColor(...)
Run the application and the message will have the background color changed each time the scene is shown:

In the same way that outlets are variables for interface builder to assign to (or read from), actions are methods/functions that can be triggered from a view in interface builder. The @IBAction attribute is used to annotate a method or function that can be wired up.
To change the message when a button is invoked, a suitable changeMessage is required. Historically, the signature for an action method was one that returned void, marked with IBAction, and took a sender argument, which could be any object. In Swift, this signature translates to:
@IBAction func changeMessage(sender:AnyObject) { … }However, with Swift, the sender is no longer a required argument. It is therefore possible to bind an action with the following signature:
@IBAction func changeMessage() { … }If the signature is changed, any existing bindings must be deleted and recreated as an error will be reported otherwise.
The changeMessage function can randomly select a message and set the text on the label:
let messages = [
  "Ouch, that hurts",
  "Please don't do that again",
  "Why did you press that?",
]
@IBAction func changeMessage() {
  message.text = messages[
    Int(arc4random_uniform(
      UInt32(messages.count)))]
}
When the function is invoked, the message text will change to a value defined in the array. To call the function, it needs to be wired up in the storyboard editor. Add a new Button from the object library to the message scene, with a Change Message label. To connect it to the action, press Control and drag the mouse cursor from the Change Message button in the Message Scene and drop it in the Message view controller at the top:

A pop-up menu will then be shown of the outlets and actions that this can be connected to. Select the changeMessage from the list:

Now, when the application is run and the Change Message button is pressed, the label will change to one of the hard-coded values.
A segue can be triggered programmatically from code, if additional setup is required or there are data parameters that need to be passed from one view controller to another (such as the currently selected object).
Segues have named segue identifiers, which are used in code to trigger specific segues. To test this out, drag a new View Controller from the library (by pressing Command + Option + Control + 3 or by navigating to View | Utilities | Show Object Library) onto the main storyboard and name it About. Drag a Label and give it the text About this App.
Next, create a segue by pressing Control and dragging the mouse cursor between the Message scene to the new scene. The named identifier can be set as about through the attributes inspector (shown by pressing Command + Option + 4 or by navigating to View | Utilities | Show Attributes Inspector):

Finally, drag a new Button to the Change Message scene and call it About. Instead of directly calling the segue, create a new @IBAction called about. When this button is pressed, the following code will be run:
@IBAction func about(sender: AnyObject) {
  performSegueWithIdentifier("about", sender: sender)
}
When the About button is pressed, the about screen will be displayed.
Typically in a master-detail application, data needs to be passed from one scene to the next. This might be the currently selected object, or it might require additional information to be processed. When the segue is called, the view controller's prepareForSegue method is called, with the destination segue and the sending object. This allows any internal state of the view controller to be passed to the new segue.
The UIStoryboardSegue contains an identifier, which was set in the previous section. Since the prepareForSegue method might be called on the MessageViewController for any number of segues, it is common for a switch statement to be used on the identifier so that the right action can be taken. For a single segue, an if statement can be used:
override func prepareForSegue(segue: UIStoryboardSegue,
  sender: AnyObject?) {
  if segue.identifier == "about" {
      let dest = segue.destinationViewController as UIViewController
      dest.view.backgroundColor = message.backgroundColor
  }
}
Here, the prepareForSegue method is called with segue, which contains the destination (the scene) and the identifier. The if statement ensures that the correct identifier is matched. In this case, the background color of the message label (which is chosen randomly when the view is loaded) is passed to the destination view's background color; however, any property on either the view controller or the view can be set here.