
When there are multiple screens to be displayed, a parent controller is required to keep track of which screen is currently being shown and what the next step (or previous step) is. This is the purpose of a navigation controller; although it has no direct visual representation, it is represented as a scene in a storyboard and can affect the layout of the individual elements in the storyboard.
To embed the initial scene into a navigation controller, select the initial view and navigate to Editor | Embed In | Navigation Controller. This will create a new navigation controller view and place it to the left-hand side of the first scene. It will also change the initial view controller to be the navigation controller and set up a relationship segue with the name root view controller between the navigation controller and the first scene, represented by an icon similar to a percent symbol but with the line rotated the other way, as shown here:

It will be necessary to move the label and button below the newly added navigation bar so that they are still visible. This can either be done before the navigation controller is introduced or by selecting through overlapping objects.
To temporarily hide the navigation bar, delete the relationship segue between the navigation controller and the welcome scene, and the navigation bar will disappear. This will allow the objects to be selected and moved elsewhere temporarily in order to be repositioned. To add it back again, press the Control key and drag the mouse cursor from the navigation controller to the welcome scene and choose root view controller under Relationship Segue.
Alternatively, to select through overlapping objects, first select the object in the document outline so that the location is shown with the drag boxes. Then, press down the Shift key and right-click on it for a pop-up menu of the objects under the mouse position at any depth. From here, the object can be selected and then moved with the arrow keys to reposition it elsewhere.

Now, when the application is run and the Press Me button is tapped, the message will be shown again but with a < Back navigation menu item as well, as shown here:

When working with many scenes, calling all of them View Controller Scene is not helpful. To distinguish between them, the controllers can be renamed in the storyboard editor.
To change the name of a scene, select its view controller in the document outline and go to View | Utilities | Show Attributes Inspector, or press Command + Option + 3 and then drill down to the Document section, where the label hint will read Xcode Specific Label. Typing in another value, such as Press Me, Message, or Initial will rename both the view controller and the scene in the document outline:
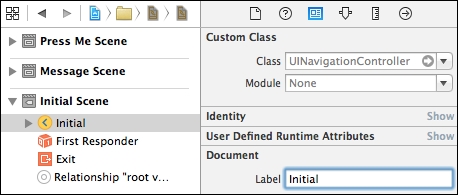
Tip
By default, the name of the element in the document outline is taken from the text value of the element or the type if no text value is present. This means that updates to the label or button text will be automatically reflected in the outline. However, it is possible to add document labels to any view in the document outline.