Playgrounds can contain a mix of code and documentation. This allows a set of code samples and explanations to be mixed in with the playground itself. Although there is no way of using Xcode to add sections in the UI at present, the playground itself is an XML file that can be edited using an external text editor such as TextEdit.app.
As playgrounds can contain a mixture of code and documentation, it makes them an ideal format for viewing annotated code snippets. In fact, Apple's Swift Tour book can be opened as a playground file.
Xcode documentation can be searched by navigating to the Help | Documentation and API Reference menu, or by pressing Command + Shift + 0. In the search field that is presented, type Swift Tour and then select the first result. The Swift Tour book should be presented in Xcode's help system:

A link to download and open the documentation as a playground is given in the first section; if this is downloaded, it can be opened in Xcode as a standalone playground. This provides the same information, but allows the code examples to be dynamic and show the results in the window:

A key advantage of learning through playground-based documentation is that the code can be experimented with. In the Simple Values section of the documentation, where myVariable is assigned, the right-hand side of the playground shows the values. If the literal numbers are changed, the new values will be recalculated and shown on the right-hand side.
Some examples are presented solely in playground form; for example, the Balloons demo, which was used in the introduction of Swift in the WWDC 2014 keynote, is downloadable as a playground from https://developer.apple.com/swift/resources/.
A playground is an OS X bundle, which means that it is a directory that looks like a single file. If a playground is selected either in TextEdit.app or in Finder, then it looks like a regular file:

Under the covers, it is actually a directory:
$ ls -F
MyPlayground.playground/
Inside the directory, there are a number of files:
$ ls -1 MyPlayground.playground/*
MyPlayground.playground/Resources
MyPlayground.playground/contents.xcplayground
MyPlayground.playground/section-1.swift
MyPlayground.playground/timeline.xctimeline
- The
Resourcesdirectory, which was created earlier to hold the logo image - The
contents.xcplaygroundfile, which is an XML table of contents of the files that make up the playground - The
section-1.swiftfile, which is the Swift file created by default when a new playground is created, and contains the code that is typed in for any new playground content - The
timeline.xctimelinefile, which is an automatically generated file containing timestamps of execution, which the runtime generates when executing a Swift file and the timeline is open
The table of contents file defines which runtime environment is being targeted (for example, iOS or OS X), a list of sections, and a reference to the timeline file:
<playground version='3.0' sdk='iphonesimulator'>
  <sections>
    <code source-file-name='section-1.swift'/>
  </sections>
  <timeline fileName='timeline.xctimeline'/>
</playground>
This file can be edited to add new sections, provided that it is not open in Xcode at the same time.
Tip
An Xcode playground directory is deleted and recreated whenever changes are made in Xcode. Any Terminal.app windows open in that directory will no longer show any files. As a result, using external tools and editing the files in place might result in changes being lost. In addition, if you are using ancient versions of control systems, such as SVN and CVS, you might find your version control metadata being wiped out between saves. Xcode ships with the industry standard Git version control system, which should be preferred instead.
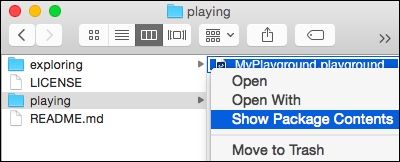
To add a new documentation section, ensure that the playground is not open in Xcode and then edit the contents.xcplayground file. The file itself can be opened by right-clicking on the playground in Finder and choosing Show Package Contents:
This will open up a new Finder window, with the contents displayed as a top-level set of elements. The individual files can then be opened for editing by right-clicking on the contents.xcplayground file, choosing Open With | Other..., and selecting an application, such as TextEdit.app.

Alternatively, the file can be edited from the command line using an editor such as pico, vi, or emacs.
Note
Although there are few technology debates more contentious than whether vi or emacs is better, the recommended advice is to learn how to be productive in at least one of them. Like learning to touch-type, being productive in a command-line editor is something that will pay dividends in the future if the initial learning challenge can be overcome. For those who don't have time, pico (also known as nano) can be a useful tool in command-line situations, and the on-screen help makes it easier to learn to use. Note that the carat symbol (^) means control, so ^X means Control + X.
To add a new documentation section, create a directory called Documentation, and inside it, create a file called hello.html. The HTML file is an HTML5 document, with a declaration and a body. A minimal file looks like:
<!DOCTYPE html>
<html>
  <body>
    <h1>Welcome to Swift Playground</h1>
  </body>
</html>
The content needs to be added to the table of contents (contents.xcplayground) in order to display it in the playground itself, by adding a documentation element under the sections element:
<playground version='3.0' sdk='iphonesimulator'>
  <sections>
    <code source-file-name='section-1.swift'/>
    <documentation relative-path='hello.html'/>
  </sections>
  <timeline fileName='timeline.xctimeline'/>
</playground>
The relative-path attribute is relative to the Documentation directory.
When viewed as a playground, the content will be shown in the same window as the documentation:

As the documentation is written in HTML, it is possible to style it using CSS. For example, the background of the documentation is transparent, which results in the text overlapping both the margins as well as the output.
To add a style sheet to the documentation, create a file called stylesheet.css in the Documentation directory and add the following content:
body {
  background-color: white
}
To add the style sheet to the HTML file, add a style sheet link reference to the head element in hello.html:
<head>
  <link rel="stylesheet" type="text/css" href="stylesheet.css"/>
</head>
Now when the playground is opened, the text will have a solid white background and will not be obscured by the margins:

Images and other resources can also be added to a playground. Resources need to be added to a directory called Resources, which is copied as is between different versions of the playground.
To add an image to the document, create a Resources folder and then insert an image. For example, earlier in this chapter, an image was downloaded by using the following commands:
$ mkdir MyPlayground.playground/Resources
$ curl http://alblue.bandlem.com/images/AlexHeadshotLeft.png > MyPlayground.playground/Resources/logo.png
The image can then be referred to in the documentation using an img tag and a relative path from the Documentation directory:
<img src="../Resources/logo.png" alt="Logo"/>
Other supported resources (such as JPEG and GIF) can be added to the Resources folder as well. It is also possible to add other content (such as a ZIP file of examples) to the Resources folder and provide hyperlinks from the documentation to the resource files.
<a href="../Resources/AlexBlewitt.vcf">Download contact card</a>
The previous example showed the minimum amount of content required for playground documentation. However, there are other meta elements that can be added to the document that have specific purposes and which might be found in other playground examples on the internet. Here is a more comprehensive example of using meta elements:
<!DOCTYPE html>
<html lang="en">
  <head>
    <meta charset="utf-8"/>
    <link rel="stylesheet" type="text/css" href="stylesheet.css"/>
    <title>Welcome to Swift Playground</title>
    <meta name="xcode-display" content="render"/>
    <meta name="apple-mobile-web-app-capable" content="yes"/>
    <meta name="viewport" content="width=device-width,maximum-scale=1.0"/>
  </head>
  <body>...</body>
</html>
In this example, the document is declared as being written in English (lang="en" on the html element) and in the UTF-8 character set.
Tip
The <meta charset="utf-8"/> should always be the first element in the HTML head section, and the UTF-8 encoding should always be preferred for writing documents. If this is missed, it will default to a different encoding, such as ISO-8859-1, which can lead to strange characters appearing. Always use UTF-8 for writing HTML documents.
The link and title are standard HTML elements that associate the style sheet (from before) and the title of the document. The title is not displayed in Xcode, but it can be shown if the HTML document is opened in a browser instead. As the documentation is reusable between playgrounds and the web, it makes sense to give it a sensible title.
Tip
The link should be the second element after the charset definition. In fact, all externally linked resources—such as style sheets and scripts—should occur near the top of the document. This allows the HTML parser to initiate the download of external resources as soon as possible. This also includes the HTML5 prefetch link type, which is not supported in Safari or playground at the time of writing.
The meta tags are instructions to Safari to render it in different ways (Safari is the web engine that is used to present the documentation content in playground). Safari-specific meta tags are described at https://developer.apple.com/library/safari/documentation/AppleApplications/Reference/SafariHTMLRef/Articles/MetaTags.html and include the following:
- The
xcode-display=rendermeta tag, which indicates that Xcode should show the content of the document instead of the HTML source code when opening in Xcode - The
apple-mobile-web-app-capable=yesmeta tag, which indicates that Safari should show this fullscreen if necessary when running on a mobile device - The
viewport=width=device-width,maximum-scale=1.0meta tag, which allows the document body to be resized to fit the user's viewable area without scaling
The format of the playground files are well known, and several utilities have been created to generate playgrounds from documentation formats, such as Markdown or AsciiDoc. These are text-based documentation formats that provide a standard means to generate output documents, particularly HTML-based ones.
Markdown (a word play on markup) was created to provide a standard syntax to generate web page documentation with links and references in a plain text format. More information about Markdown can be found at the home page (http://daringfireball.net/projects/markdown/), and more about the standardization of Markdown into CommonMark (used by StackOverflow, GitHub, Reddit, and others) can be found at http://commonmark.org.
Embedding code in documentation is fairly common in Markdown. The file is treated as a top-level document, with sections to separate out the documentation and the code blocks. In CommonMark, these are separated with back ticks (```), often with the name of the language to add different script rendering types:
## Markdown Example ##
This is an example CommonMark document.

Blank lines separate paragraphs. Code blocks are introduced with three back-ticks and closed with back-ticks:

```swift
println("Welcome to Swift")
```

Other text and other blocks can follow below.
The most popular tool for converting Markdown/CommonMark documents into playgrounds (at the time of writing) is Jason Sandmeyer's swift-playground-builder at https://github.com/jas/swift-playground-builder/. The tool uses Node to execute JavaScript and can be installed using the npm install -g swift-playground-builder command. Both Node and npm can be installed from http://nodejs.org.
Once installed, documents can be translated using playground --platform ios --destination outdir --stylesheet stylesheet.css. If code samples should not be editable, then the --no-refresh argument should be added.
AsciiDoc is similar in intent to Markdown, except that it can render to more backends than just HTML5. AsciiDoc is growing in popularity for documenting code, primarily because the standard is much more well defined than Markdown is. The de facto standard translation tool for AsciiDoc is written in Ruby and can be installed using the sudo gem install asciidoctor command.
Code blocks in AsciiDoc are represented by a [source] block. For Swift, this will be [source, swift]. The block starts and ends with two hyphens (--):
.AsciiDoc Example
This is an example AsciiDoc document.

Blank lines separate paragraphs. Code blocks are introduced with a source block and two hyphens:

[source, swift]
--
println("Welcome to Swift")
--
Other text and other code blocks can follow below --.
AsciiDoc files typically use the ad extension, and the ad2play tool can be installed from James Carlson's repository at https://github.com/jxxcarlson/ad2play. Saving the preceding example as example.ad and running ad2play example.ad will result in the generation of the example.playground file.
More information about AsciiDoc, including the syntax and backend, can be found at the AsciiDoc home page at http://www.methods.co.nz/asciidoc/ or on the Asciidoctor home page at http://asciidoctor.org.