
9
Building Your Projects
Now that you’ve completed the projects in this book, what’s next? This chapter will be a brief overview of tips for project management, a few project ideas, and a quick look at some of the other Arduino boards available and what they can do.
Project Management
In this book, we gave you step-by-step instructions on how to work with the Arduino. How do you start your own projects? The first step should be research. Look around online; many of the vendors we’ve mentioned have websites that are chock-full of tutorials and project ideas. Also, browsing through sites to get an idea of inputs and outputs that are available to you should give you plenty of ideas. Here are a few sites:
makezine.com/category/technology/arduino/
learn.adafruit.com/category/learn-arduino
learn.sparkfun.com/tutorials/tags/arduino?page=all
playground.arduino.cc/Projects/Ideas
Outline Your Project
Once you have an idea for a project, try sketching or writing out the system that you are thinking of building. This can be as simple as making a list containing the components you are planning to use and the type of behavior you will need in the code. It usually helps to be able to break your project down into inputs, outputs, and code. Remember, your project will always be a system, with inputs, outputs, and code that controls behavior running on the Arduino (Figure 9-1).
Break It Down
Breaking your project down into component parts, starting with the simplest section that you already know how to do, will help you get the work underway. Tackling each part separately, rather than facing the entire scope, makes it easier to get the job done. Also, when working initially, simplifying your idea will help you realize it; it’s always possible to enhance and refine it in later versions.

Figure 9-1: Planning notes can help direct your project.
As you start building your project, what do you do if something isn’t working? Throughout this book we have emphasized the importance of debugging, both your code and your circuits (Figure 9-2). Be patient and apply a methodical approach to examining each element of your project. If you get an error in the code editor of the IDE, note the exact language and type it into a search engine. You will probably find that you are not the first person to have this problem. The forums on the Arduino website (forum.arduino.cc) are a great place to search for answers to problems and post questions. Arduino Stack Exchange (arduino.stackexchange.com) is another place to look.

Figure 9-2: Avoid the frustrations of broken projects—use debugging.
User Testing
Once you have a working version or prototype of your project, share it with someone. Explain the project to them and have them test out your device. When building a project, it is easy to make a lot of assumptions about how someone will see it or use your project, and it can help to have an outside perspective in order to break some of your assumptions. If possible, having a wide variety of people test your project will help to make it the best possible version and to develop your idea. If you are unsure who to approach, start with friends and family (Figure 9-3).

Figure 9-3: Get others to try out your projects.
Reflect and Repeat
Now that you have gone through the first pass with your project, you should feel comfortable writing notes for yourself. What went well with your project? What improvements could be made? These notes can help you iterate on your project and make better versions in the future by improving on past mistakes or false assumptions.
Now that you have a basic understanding and support from some project management techniques, let’s talk about common genres for Arduino projects.
A Few Helpful Components
We don’t have enough room to get into all the varieties of sensors and outputs that exist in the world, but we do want to mention popular choices that can help your projects spring to life.
Sensors
Here are a few commonly used sensors that can be easily incorporated into your projects.
Sensing Distance and Motion
Passive infrared sensors (PIRs; Figure 9-4) and ultrasonic rangefinders (Figure 9-5) are both used to tell how far away people or objects are from your project. They can also be used to check if someone has walked in front of your project. Since both often give you analog values, you can use these sensors similarly to how you employed the photocell in Chapter 7, “Analog Values.”

Figure 9-4: Passive infrared sensor (PIR)

Figure 9-5: Ultrasonic sensor
Force-Sensing Resistors
Force-sensing resistors (FSRs) allow you to sense different values of pushing or pressing down on a sensor (Figure 9-6). Since they give analog readings, you can scale the response to move servo motors, light up different sections, or play sounds from a speaker. FSRs are used in gaming controllers and other hands-on interactions. FSRs come in a variety of sensitivities, shapes (including both square and round), and sizes.
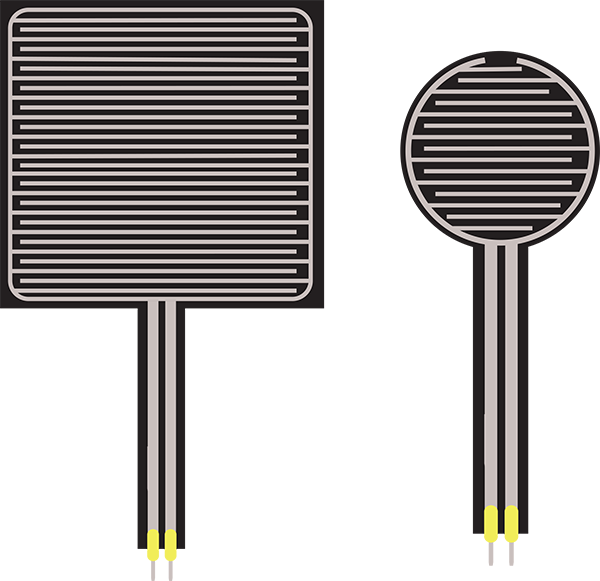
Figure 9-6: Force-sensing resistors (FSRs) come in different shapes and sizes.
Other Sensors
As mentioned earlier, there are many more sensors out there that can help extend your Arduino projects. From temperature sensors, to microphones for measuring volume levels, to heart rate and pulse monitors, finding the right sensor can make your project shine.
Actuators and Motors
We have shown you projects that incorporate motion by using servo motors, but there are several other types of actuators (components that can move something) that can make your project move in a variety of ways. We have highlighted a few popular options next.
DC Motors
DC motors come in a variety of sizes and strengths to power even the most stubborn projects (Figure 9-7). They often rotate only in one direction continuously and will move faster or slower, depending on how much power is applied to them (within a safe range). DC motors are used quite successfully to drive wheels, lift heavy objects, and more.

Figure 9-7: DC motor
Stepper Motors
Stepper motors (Figure 9-8) are a more controllable type of motor than the basic DC, which means they also require more computing power from the Arduino to function. Rather than turning continuously, stepper motors take single “steps,” some percentage of the total rotation. This means that they can be used for accurate positioning and will both start and stop on command. Stepper motors work quite well with the Arduino, though they often require an H-bridge integrated circuit chip or a stepper motor driver to perform more complex behaviors.

Figure 9-8: Stepper motor
Solenoid
Solenoids (Figure 9-9) look quite different from the other actuators we have talked about. Rather than creating a rotation, solenoids are “fired” in a straight line. They have a spring attached to a metal shaft that is either pushed or pulled from the central motor body depending on their type. They are often used in musical instruments to strike percussive or bell-like elements in order to create new sounds.

Figure 9-9: Solenoid
Types of Projects
We’ve talked about a wide variety of projects you can build with your Arduino, but we wanted to suggest a couple more genres of projects with a few ideas to help you get started.
Home Automation
Although there are a number of products on the market, you can build your own home automation projects using the Arduino. Popular choices for home automation projects include triggering lights, activating fans, or turning off appliances.
Robots
Robots are always a popular choice for Arduino projects. With a few motors and sensors, you can have a pet robot in no time. Single-task robots are also a great choice, from robots that slice butter to those that track objects on the floor. They can even be built out of cardboard (Figure 9-10)!

Figure 9-10: Cardboard robot pet
Wearable Projects
Wearable projects include any sort of clothing, jewelry, or accessories that combine the power of physical computing with portability and accessibility. You can use sensors to get data about your users’ pulse or build buttons right into the clothes they wear. Popular projects use gloves, hats, T-shirts, or jewelry and sensors to trigger musical instruments or display screens (Figure 9-11). What type of projects can you think of that use common accessories?

Figure 9-11: Bracelets, hats, and clothing items are all popular choices.
Art Projects
Beyond the categories we have already mentioned, you can make any sort of art project you have in mind. From auto-generated painting devices to moving sculpture and interactive books, the only limitation to an art project is your imagination.
Other Versions of the Arduino Board
We’ve mentioned that there are many other versions of the Arduino, which have different functionality. Here is a quick look at a few of the other boards and what they do. There are many more.
The Arduino 101
The Arduino 101 (Figure 9-12) is an excellent choice for moving on from the Uno, since it is the same size and has the same general layout as the Uno. It also has Bluetooth Low Energy (BLE) connectivity and a six-axis accelerometer/gyro. If you want your project to recognize gestures, this might be a good choice. Read more about it here: store.arduino.cc/usa/arduino-101.

Figure 9-12: The Arduino 101
The Arduino YÚN
Half Arduino and half Linux computer, the Arduino YÚN (Figure 9-13) will let you use WiFi and the power of an operating system in order to accomplish complicated computing tasks. The YÚN can be used to run Python scripts to analyze data on the Linux side of the board, with the Arduino handling inputs and outputs that respond to that information. It has a slot for an SD card, and both WiFi and Ethernet connectivity built in. More information can be found here: store.arduino.cc/usa/arduino-yun.

Figure 9-13: The Arduino YÚN
The Lilypad Arduino
As mentioned in the “Wearable Projects” section, sometimes you want the ability to attach an Arduino to a garment meant to be worn, and the Arduino Uno can be a bit clunky. The Lilypad Arduino is great because not only is it flat and less conspicuous, but it can also use conductive thread in place of wires. This will let you sew your sensors and Arduino directly into the fabric of the project. There are several versions of the Lilypad; Figure 9-14 shows a Lilypad Arduino Main Board.

Figure 9-14: Lilypad Arduino Main Board
Other Arduino Boards
Although it’s beyond the scope of this book to go into every model in detail, we would like to mention a few more boards. The Mega 2560 has 54 digital input/output pins and 16 analog input pins; it is suitable for larger projects. The Leonardo has built-in USB communication, so you can plug in a keyboard and mouse directly. The Micro is the smallest board in the Arduino family, making it appropriate for embedding inside projects. Like the Leonardo, it supports USB communication. The MKR ZERO is a smaller board designed to work with audio applications. The MKR1000 has WiFi connectivity and a built-in rechargeable lithium-polymer battery. The Gemma, developed by Adafruit, is another board designed to be used in wearables.
Arduino Shields
In addition to the various Arduino boards, there are a wide variety of branded and third-party “shields” that attach to the top of the Arduino and expand its functionality. These include adding
- SD card support in order to save data
- Sound file support for playing back recorded audio
- Support for controlling motors
and much more.
At arduino.cc/en/Main/Products, you’ll find a chart that links to details and technical specifications on each model and on some of the shields that are available.
Document Your Project and Share It!
One of the best things about open source projects is seeing what others have come up with, and now it’s your turn to share your projects with the world. Here are a few tips that can separate your project from other projects online.
Take Good Photos
One frustration that often pops up for DIY physical computing projects is that it can be hard to see what is happening in a project photograph. We recommend that you have bright, consistent lighting and a plain background underneath your project.
If you are planning on taking photographs of the wiring, it is extra important that you color-code your wires and avoid crossing them too often. Otherwise, you run the risk of having your project look like spaghetti (Figure 9-15)!

Figure 9-15: Spaghetti wiring; this is not an actual circuit!
Write Up Your Project
If you had problems with some section of code or a certain concept, chances are that the next person who tries to make the same idea (or something similar) will stumble onto the same issues that you did. Writing a summary of your experience building a project or the steps you took to make your project will help you remember the tricks you have learned for future projects—and may save someone else from a huge headache.
Share Your Project
Though not required, it can be a great help to share what you come up with for others to see. Many websites, such as makershare.com and instructables.com, have the option to post your own projects and include step-by-step instructions to make them. This is one of the strongest parts about Arduino being open sourced—the knowledge is free to be shared by everyone.
Summary
We’ve reached the end of this book. In the earlier chapters, you were introduced to basic electronic theory and practice as well as programming concepts. We gave you a few tips on moving forward with your own projects in this chapter. You are now well on your way to building your own fabulous Arduino projects.