
Learn Apple TV Basics
Now that you’ve completed the basic setup for your Apple TV, it’s time to learn how to handle your Home screen, get introduced to the Built-in Apps (including the App Store app, which you’ll use to download more apps), and find content by Searching with Siri.
Home Screen
Although it’s easy to get around the Apple TV Home screen by swiping on the touchpad, I want to bring to your attention a few subtle aspects of how it works:
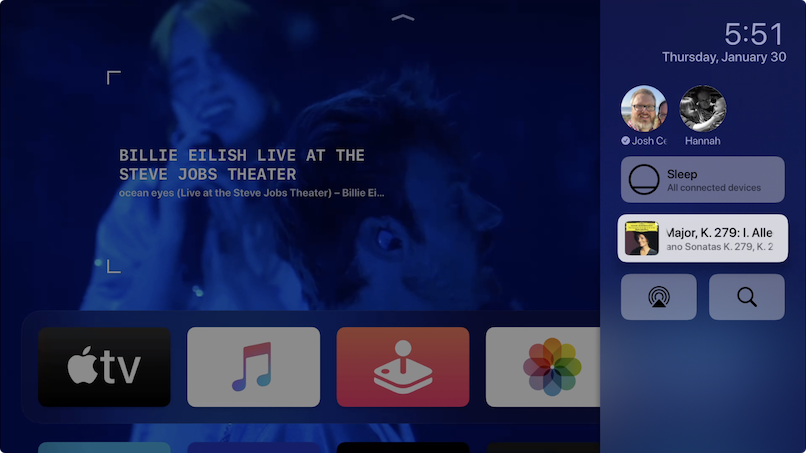
App shortcuts: At the top of the Home screen, you see the App Shortcuts area. This area changes depending on which app you’ve selected in the next row down on the Home screen (such as TV in Figure 19).

Figure 19: The top of the Home screen displays app shortcuts for the selected app below, such as the TV app in this image. The app shortcuts for TV provide one-click access to items in your Up Next queue. With apps such as TV or iTunes Movies, you can navigate up to the app shortcuts icons and click one, or swipe left or right to access additional shortcuts. But, for some apps, such as the Settings app, the App Shortcuts area displays just a single image.
Moving an icon: To move an icon, select it and then press and hold the touchpad until the icon shakes. Swipe the touchpad to move the icon, and press the touchpad to set it in place.
Deleting an app: Select the app’s icon and press and hold the touchpad until the icon shakes. Press Play/Pause and choose Delete. You can’t delete the built-in apps.
Keeping it quiet: If the sound bothers you as you scroll through the menus and apps, turn it off in Settings > Audio and Video > Navigation Clicks.
Making a folder: Highlight an app icon, and press and hold the touchpad until the icon shakes. Either use the touchpad to move the icon over another icon to form a folder or press Play/Pause and choose New Folder. Press Menu to set the app in place.
Populating a folder: Highlight an app icon, and press and hold the touchpad until the icon shakes. Use the touchpad to drag the app into the folder (Figure 20), or press Play/Pause and choose Move to Folder Name (Figure 21).
Figure 20: To move an app into a folder, highlight it, press and hold the touchpad until the icon shakes, and then drag it into the folder. 
Figure 21: Once an app’s icon is shaking, you can press Play/Pause to open a menu with choices for creating a new folder or moving the app into an existing folder. Moving an app out of a folder: Highlight the app’s icon, press and hold the touchpad until the icon shakes, press Play/Pause, and select Move to Home Screen. Press Menu to make the icon stop wiggling on the Home screen.
Renaming a folder: Open the folder, and swipe up to reveal a text input box (Figure 22). Either press the Siri button and dictate a new name or use the onscreen keyboard to delete the old name and type a new one (the Delete button is at the far right of the keyboard). Swipe down to return to the folder.

Figure 22: To rename a folder, enter the folder and swipe up to reveal a text-entry box. Delete a folder: Remove all apps from the folder, either by moving them to the Home screen or deleting them. Once the last app is removed, the folder deletes itself.
Built-in Apps
The fourth-generation Apple TV comes with several preinstalled apps. You can use them to watch TV generally, watch iTunes Movies and iTunes TV Shows, obtain new apps from the App Store, enjoy your Photos and Music, listen to and watch Podcasts, Search your Apple TV, play content from local Computers, and configure the Settings.
TV
tvOS 10.1 added the TV app, a content-based front end for the Apple TV that aggregates shows and movies from many different apps (with the notable exception of Netflix).
The first time you open TV, you are prompted to integrate available apps with TV. To connect or disconnect apps from TV later, open Settings and go to Apps > TV.
TV is split into four screens:
Watch Now: Look here to see recommended content and your Up Next queue (Figure 25). Up Next is a list of shows and movies you want to watch. The TV app syncs your Up Next queue via iCloud to any other Apple TVs that you may have signed in to the same iCloud account, as well as to the TV app in iOS (in iOS 10.2, the new TV app replaced the Videos app).

Figure 25: The Watch Now screen contains your Up Next list and recommended content. To add a program to Up Next, open its listing and select Up Next (Figure 26). Your Up Next list appears at the top of the Watch Now screen, as well as in the App Shortcuts area for the TV app at the top of the Home screen. To remove a program from Up Next, open its listing again and select Remove.

Figure 26: While viewing a program listing, you can add it or remove it from Up Next or watch it in the app of your choice. When you open a TV show’s listing from Up Next, it shows an option to play the next episode from one of the available apps. If the show is on a service you subscribe to, like Hulu, it presents that as the first option. To see alternative services, select Open In.
The Watch Now screen now also features a news section that links to news apps from CBS News, CNN, Fox News, and others. If you click on a link without having the app installed, it prompts you to install the app. Note that many of these apps require activate through a TV provider.
Sports: This screen lists upcoming sporting events that you can watch on your Apple TV, though they usually require a pay TV subscription—see Cable-Activated Video Apps. Click the Your Favorite Teams banner at the bottom to choose teams whose events will show up in your Up Next list.
Library: This screen lists the movies and TV shows you own in iTunes, so you can come here instead of accessing that content in the iTunes Movies and iTunes TV Shows apps.
Store: This screen features apps that are compatible with the TV app, so that you can easily identify them and set them up. Scroll down on the screen to purchase movies and TV shows from iTunes.
Search: Here you can search for available content and see trending movies and TV shows.
iTunes Movies
Here, you can rent and buy movies from Apple’s iTunes Store, as well as access your library of purchased movies. Many movies are available in iTunes before they’re in brick-and-mortar stores.
Rentals are available for 30 days, but expire 24 hours after you start watching. Not every title is available to rent. Newly released movies are usually available to rent 30 days after release. Be sure to check for discounted rentals on the weekend!
Movie purchases typically cost between $10 and $20, and can be streamed or downloaded to your iOS device or to iTunes on a Mac or Windows computer. Apple frequently has themed movie sales. Be on the lookout for these, as they can be a great way to expand your collection. You can often rent or purchase independent films that are still in theaters, but you’ll pay a premium.
iTunes TV Shows
You can buy episodes of many TV shows, which typically cost $1.99 for standard-definition and $2.99 for high-definition (most episodes are available only in one format or the other). However, the best deals come from purchasing an entire season. The cost for a season varies, but is always cheaper than buying individual episodes.
Additionally, you can buy a Season Pass for a currently airing season. The cost varies, but it is cheaper than buying each episode separately. Be aware that some shows split seasons into two parts, so you may be buying a pass for only half the season. This occurred during the final season of AMC’s Breaking Bad, leading to outraged fans suing Apple. Fortunately, Apple gave refunds for the second half of the season.
App Store
The App Store is your portal to new apps, including video services, games, screensavers, and more. Some apps are entirely free, while others require either an up-front purchase or offer in-app purchases. Some apps are sold as universal-purchase apps, so if you own either the iOS version or the tvOS version, you get the other one for free.
Finding Apps in the App Store
The App Store has five screens, accessible from the bar at the very top of the screen:
Featured: This section is for apps showcased by Apple.
Top Charts: Look here to discover the most popular apps.
Categories: Locate apps by browsing categories such as Games, Education, Health & Fitness, Kids, Lifestyle, News, and Sports.
Purchased: Find apps you already own here. This screen is worth checking first to see if any of your iOS app purchases have transferred to the Apple TV. If you’re part of a Family Sharing group, you can access family members’ purchases under Family Sharing.
Search: If you know an app’s name, enter it here to see its entry. You can also search by keyword: try
exerciseortravel, for instance.
Installing Apps from the App Store
Once you’ve opened an app listing, the button to obtain the app is highlighted. The button is one of the following:
Install: This button indicates an app that you already own or have downloaded before.
Get: This button is for a free app that you haven’t yet downloaded. If you select Get, you may be prompted for your iTunes password.
Buy: This button shows the price you’ll pay for the app. If you select Buy, you may be prompted to enter your iTunes password.
If you’re not sold on the app yet, scroll up to highlight its description. If it’s long, only a few lines appear—click the touchpad to reveal the entire description. You can scroll down to see screenshots and ratings.
Photos
The Apple TV can display photos and home movies from your local computer as well as online photo galleries from iCloud Photo Library, My Photo Stream, and iCloud Photo Sharing. Even better, you can use your photos to customize the Apple TV screensaver or view them in a slideshow.
Music
The Music app lets you listen to your Apple Music and iTunes Match libraries, as well as your iTunes Store purchases.
Apple Music syncs your iTunes library in the cloud and provides access to millions of songs. It costs $9.99 per month for an individual or $14.99 for a family. iTunes Match costs $24.99 per year, and it stores your music on Apple’s servers—either by matching your tracks to what’s in the iTunes Store, or uploading unrecognized tracks.
I talk more about the Music app in The Music App. You can also listen to your digital music through the Apple TV using Home Sharing in the Computers app or AirPlay. See Computers, AirPlay from iOS, and AirPlay Audio from a Mac.
Podcasts
With the Podcasts app, you can subscribe to, watch, and listen to the enormous collection of audio and video podcasts in the iTunes Store.
Podcasts, playback positions, and stations (which are like playlists for podcasts), sync over iCloud between the Apple TV, iTunes on your computer, and the Podcasts app in iOS.
I cover the Podcasts app in detail in The Podcasts App.
Search
Search lets you find movies, TV shows, and apps. When you launch Search, it displays trending (popular) movies and TV shows. You can search by title, cast and crew names, or developer name at the top of the screen (Figure 27).

Naturally, Search is focused on finding content in Apple’s own iTunes and App stores, but search results for a movie or TV show often let you know if certain streaming services have that content (Figure 28).

Search is great, but using Siri for search is faster and easier. See Searching with Siri.
Computers
The Computers app gives the Apple TV access to music, movies, home videos, podcasts, and photos shared from a computer via iTunes Home Sharing. To accomplish all this, a few conditions must be met:
The computer hosting the iTunes library must be on the same local network as the Apple TV. (If this can’t be set up easily, try AirPlay instead; see Master AirPlay.)
The computer hosting the iTunes library is powered on.
On the host computer, iTunes is open.
On the host computer, Home Sharing is enabled in iTunes.
Both the Apple TV and iTunes Home Sharing are signed in to the same iTunes Store account.
To connect from an Apple TV to an iTunes library on a computer, first set up Home Sharing in iTunes:
On your computer, open iTunes and choose File > Home Sharing > Turn On Home Sharing.
Enter the credentials for the Apple ID that you want to use.
Click Turn On Home Sharing, and click Done to finish.
You’ve now set up Home Sharing for your iTunes library.
To connect to the shared library with the Apple TV:
On the Apple TV, open the Computers app.
If you haven’t already signed in to iTunes, you are prompted to enter your username and password. Go ahead and enter the same credentials that you used when turning on Home Sharing on the computer.
Or, if you’re already logged in, you’re asked if you’d like to use the current Apple ID or another Apple ID to enable Home Sharing. Assuming you want to use the current Apple ID, select Yes to continue. You must enter your Apple ID and password again (though your Apple ID is pre-filled for you).
You can play video and audio from your iTunes library through the Computers app on the Apple TV. I talk more about playing content in the Computers app in View Photos and Home Movies with Home Sharing, Listen to Music with Home Sharing, and View Photos and Home Movies with Home Sharing.
Settings
The Settings app contains all the settings for the Apple TV. I cover some of them in Finishing Touches and elsewhere, but I recommend that you explore all the settings to see what you find useful.
Searching with Siri
You can find content using a text-based search in the built-in Search app or in many individual apps, but using voice commands with Siri usually provides the best search experience.
To search with Siri, hold down the Siri button on the Siri Remote until you see the prompt, start talking, and keep the button down until you finish. Search results usually appear along the bottom of the screen. Select a result with the touchpad or swipe down to dismiss the search results.
Here are some things you can do with Siri search:
Find (and open) an installed app: Say something like “Open Movies,” or “Open the App Store.”
Get the weather forecast: Say “What’s the weather today?” to display the weather conditions in your area. Swipe up on the touchpad for a detailed forecast (Figure 29).

Figure 29: The Apple TV’s detailed forecasts offer info like humidity, precipitation amount, and UV index. Find sports info: Try “When do the Mavericks play?” “How did the Grizzlies do last week?” or “How tall is LeBron James?” If you see an arrow pointing up, that means you can swipe up to see a detail pane with more information about your query. The detail pane shows an arrow pointing down at the top, indicating that you can swipe down to shrink it back down (Figure 30).

Figure 30: The result from some Siri sports queries has a detail pane, such as this one for LeBron James. The arrow on top (circled in red) indicates that you can swipe down to dismiss the extra detail. Search the iTunes Store: You can search by title, cast and crew, reviews, rating, date, age level, season, episode, and studio. Some examples: “Movies with Chris Pratt, “The best movies from 1995,” “Season two of Parks and Recreation,” “Episode three of Arrow,” and “Movies I can watch with my kids.”
Perform follow-up searches on content: For example, try saying “Show me the best horror movies,” followed by “Only the ones by Wes Craven” (Figure 31).
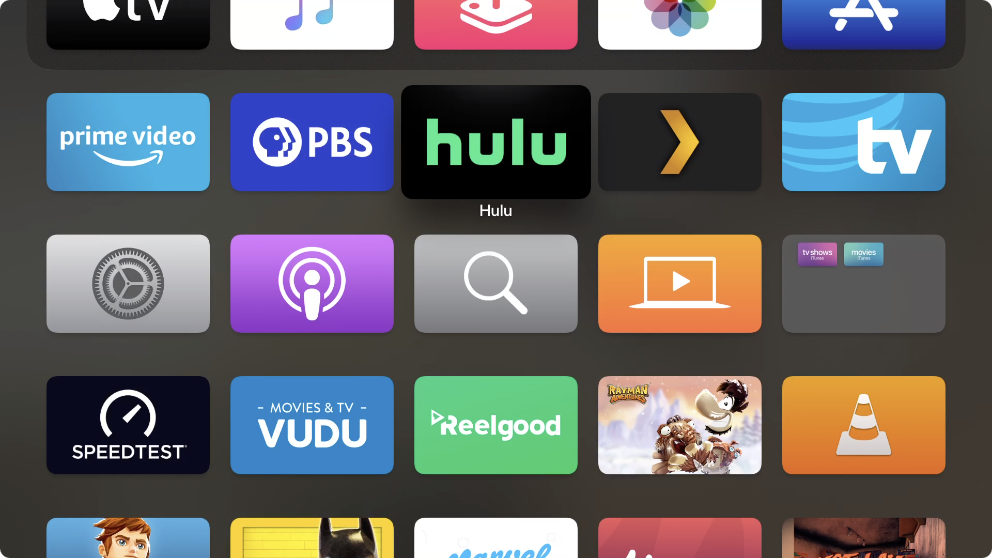
Figure 31: You can conduct a follow-up search to refine the results. Search for music: You can search for radio stations in the Music app, or music and playlists stored in iTunes Match or iCloud Music Library: Say “Play Beats One,” “Play songs by The Beatles,” or “Shuffle my backwoods playlist.”
Search for apps: In the App Store, say “Show me news apps,” “Show me racing apps,” or “Show me music apps.”
You can also tap the Siri button and say nothing to see suggestions of commands Siri can recognize (Figure 32).
Capturing Screenshots and Video
Sometimes, it can be useful to take a screenshot or record a video of your Apple TV’s screen—for instance, if you’re trying to describe a bug to an app developer.
If you have a USB-C cable (see About USB-C Cables) and a Mac, you can easily capture your Apple TV screen. Here’s how to set up your system:
Connect your Apple TV to power, to an external display via HDMI, and to your Mac with the USB cable.
Open QuickTime Player (located in the Applications folder).
Choose File > New Movie Recording to open the Movie Recording window.
In the Movie Recording window, to the right of the Record
 button, open the Options
  menu. Under both Camera and Microphone, choose your Apple TV. Under Quality, choose Maximum (Figure 33).
 menu, select your Apple TV (mine is named Living Room) for both the camera and the microphone input. Select Maximum quality for the best-looking result.
The Movie Recording window should now display the Apple TV screen.
Now, to take a screenshot of the Apple TV’s screen:
Move your pointer outside the Movie Recording window and press ⌘-Shift-4. The pointer turns into a crosshair.
Press the Space bar. The pointer’s icon turns into a camera icon.
Click the Movie Recording window.
The screenshot is saved to your default screenshot location (usually the desktop).
To record a movie of your Apple TV’s screen:
In the Movie Recording window, click the Record
button. Your movie begins recording.When you are finished, click the Stop
 button.
To save your movie, choose File > Save, enter a filename, select a location, and click Save.