
CHAPTER 8
StringBot—Program It
The StringBot is a unique little bot. When you ask someone to describe a robot, my guess is that he or she will probably have a mental picture of a wheeled robot or a bot with legs. Our StringBot has neither—it's going to move along a string. But whether your bot has wheels, legs, or some other method for moving, it has to be programmed properly to accomplish its desired tasks. The StringBot needs to move along a string, successfully drop a small object into a jar, then return to you. This chapter will show you how to make that happen.
Get Familiar with the Blocks
In Chapter 4, you used the MOVE, WAIT, and LOOP programming blocks to get the ExploroBot to complete its task. For the StringBot, you're going to use these same blocks. With the ExploroBot, you used the Ultrasonic Sensor, but with the StringBot, you're going to use the Sound Sensor.
Just like you started doing in Chapter 4, I'm going to ask you to refer back to your completed Design Journal page for the StringBot to help determine the proper blocks to use. Go ahead and get the StringBot Design Journal page out and open up the Lego Mindstorms NXT software (see Figure 8-1).
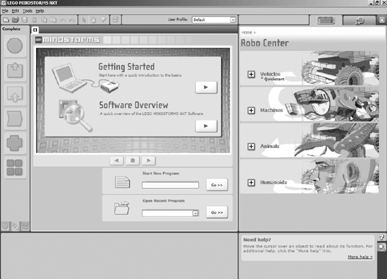
Figure 8-1. The Lego Mindstorms NXT software
Because you're creating a new program, go ahead and type StringBot into the blank text field labeled Start New Program and then click the Go button (see Figure 8-2).

Figure 8-2. Enter StringBot for the new program name and click Go.
Note To have more workspace visible on your screen, close down the RoboCenter area on the far right by clicking the small red X in the upper-right corner of the software. You can also maximize the window to cover the whole screen.
Take a look now at the Task List on your Design Journal page (Figure 8-3). Our Task List wasn't as long as the one for the ExploroBot, but we still need to go back through it to help us with the bot's program.
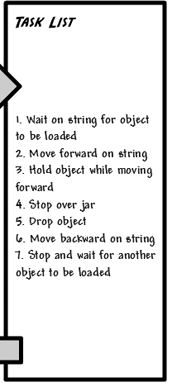
Figure 8-3. Use the Task List to help with programming the StringBot.
Let's go down the Task List and place potential programming blocks next to each step. This might help you to understand what the final program's structure will look like. At this point, you're just guessing about the blocks you might use, but at least this will get you thinking about what might be needed.
- Wait on string for object to be loaded:
WAIT,LOOP - Move forward on string:
MOVE,LOOP-UNTIL-SOUND-SENSOR - Hold object while moving forward:
MOVE - Stop over jar:
STOP,WAIT - Drop object:
MOVE - Move backward on string:
MOVE - Stop and wait for another object to be loaded:
MOVE,LOOP-UNTIL-SOUND-SENSOR
I also reviewed the Mindstorm section of the Design Journal page, and there are a couple items in there that I'd like to implement using programming:
- Need a way to slow down the bot as it gets near the jar
- If bot might swing, build in some wait time before beginning a new task
We'll keep these in mind as we begin to assemble our StringBot program. We're going to use the same blocks covered in Chapter 4: MOVE, LOOP, and WAIT, plus a new block—STOP.
There's not much to say about the STOP block (see Figure 8-4). In a nutshell, when you place the STOP block in your program, the bot will cease all function when it reaches that block—no further programming blocks will be executed by the Intelligent Brick.

Figure 8-4. The basic STOP block
However, you need to be aware of some things when it comes to the STOP block. First, the STOP block doesn't need to be configured. There are no special settings for it. Second, if any motors are running when the STOP block is reached in the program, they'll coast, not brake. The final item I want to mention about the STOP block requires a short diversion in our discussion. I want to introduce to you another programming block: the SWITCH block.
The SWITCH block will allow you to program your bot to perform actions based on input conditions. For example, the most basic SWITCH block will test for two conditions. If one condition is met (TRUE), then one path of the SWITCH block will be taken. If the second condition is met (meaning the first condition is FALSE), then the second path of the block will be taken. We'll use the SWITCH block for a later bot design, but for now I want you to look at Figure 8-5. In this example, the SWITCH has been programmed to execute a MOVE block and then a STOP block to stop the program. These program blocks will execute if the Touch Sensor is pressed (TRUE/condition met). If the Touch Sensor isn't pressed (FALSE/condition not met), then the programming block in the lower port of the SWITCH block will execute—a picture will be displayed on the LCD screen. The program will then continue by leaving the SWITCH block, and a SOUND block will play a sound file forever (or until you turn off the Brick or program).
If the Touch Sensor is pressed and the STOP block is executed, the SOUND block will never play its sound file because the program will, well, stop on the STOP block!
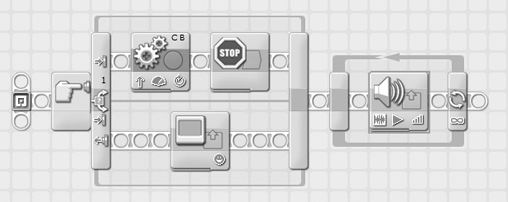
Figure 8-5. The basic SWITCH block
Note The SWITCH block is located on the COMMON palette and on the COMPLETE palette. In most instances, just look around on the COMMON and COMPLETE palettes and you'll find the necessary blocks. If it helps, you can hover the mouse over a block for a few seconds—a small "hint" block will appear telling you the name of the block.
Okay, let's get back to programming the StringBot.
Getting to the Vase
As you begin to put the program together, I want to suggest that you start adding comment text as you move forward. The comments you add will help you remember not only why you're using a certain block, but they can also be used to tell you how a block is configured. In the remaining programming figures, I'll include comments so you'll see what I mean.
Now, what was that first Task List item? Fairly simple: wait on the string while an object is loaded in the carrier. You're going to use a LOOP block, but this one is a little different from the one seen in Chapter 4. With this LOOP block, instead of testing for a sensor to be triggered (such as the Sound Sensor or Ultrasonic Sensor), you're going to have the block wait for a button on the Brick to be pressed. (You could use a simple WAIT block configured to wait for a button to be pressed, but you're using the LOOP block because you can later add more blocks inside the LOOP block if you wish, and add more options for your bot later on.) Take a look at Figure 8-6 to see how I did this.
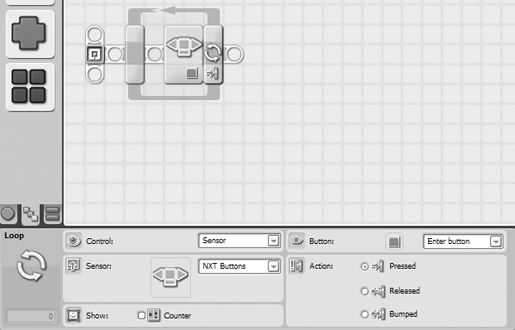
Figure 8-6. Using a LOOP block to hold the StringBot until an object is placed in the carrier
In Figure 8-6, I've configured the LOOP block to check and see if the Enter button (orange button) on the Brick has been pressed. Once the button has been pressed, the rest of the program will begin to execute. I could just as easily have included the Touch Sensor on my StringBot and had the LOOP block test to see if the Touch Sensor was pressed. But because I wanted to keep my StringBot light in weight, reducing the amount of sensors was important. The Brick has to be included, so I might as well use its buttons in place of the Touch Sensor, right?
So, while the StringBot is sitting on the string, waiting, we'll place an object in the carrier. Once the carrier is loaded, the next step is to start the StringBot moving along the string. If you remember, one of our conditions was that we wanted the StringBot to slow down as it neared the jar. We then want the motors to spin again, but slowly, so that we have more control over the accuracy of putting the bot over the jar. To do this, you're going to use LOOP blocks again. The first LOOP block will run the motors at high speed and the second LOOP block will run the motors at a reduced speed. You'll use your voice (with the Sound Sensor) to control when the bot switches from high speed to low speed. You'll place the first LOOP block as shown in Figure 8-7.
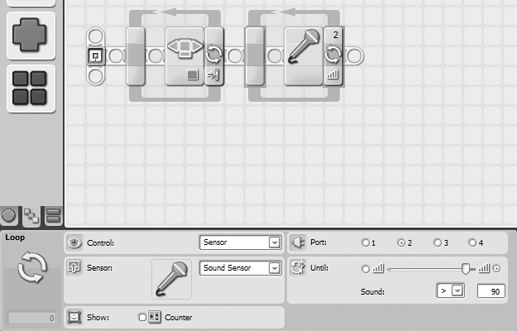
Figure 8-7. This LOOP block will allow you to stop the high-speed bot with your voice.
In Figure 8-7, I've configured the LOOP block to use the Sound Sensor. I set the threshold to 90 (I'll probably have to yell) so the LOOP will end when the Sound Sensor is triggered. Now you need to place the MOVE block so the motors will run at high speed (see Figure 8-8).
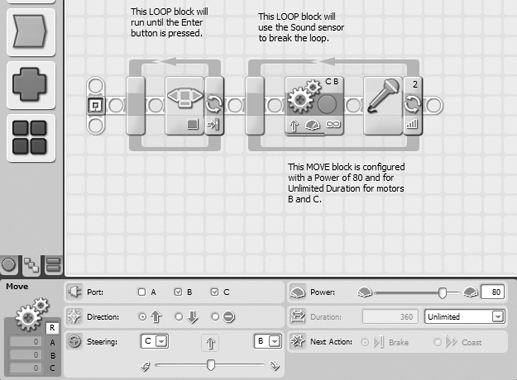
Figure 8-8. This MOVE block runs the motors at high speed.
After the Sound Sensor is triggered, you want the motors to stop. Figure 8-9 shows the program so far.
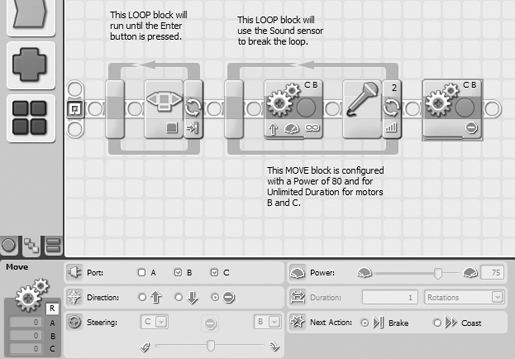
Figure 8-9. Now the motors need to stop.
Next, you want the bot to pause for a short period just in case it's swinging on the string. Drop in a WAIT block for this and configure it for three seconds (see Figure 8-10).
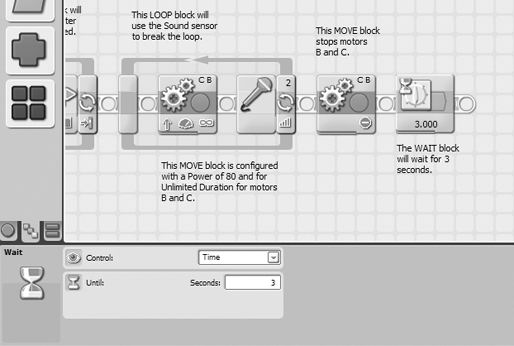
Figure 8-10. The WAIT block allows the bot to stop swinging.
Now that the bot is stopped, you need to configure the program to start the bot moving again, but this time at a slower speed. This is done just as before, with a LOOP block configured to break when the Sound Sensor is triggered with the Sound level set to greater than 90 (>90). Configure the MOVE block inside it at a slower power setting—40. Figure 8-11 shows the final LOOP block configured.
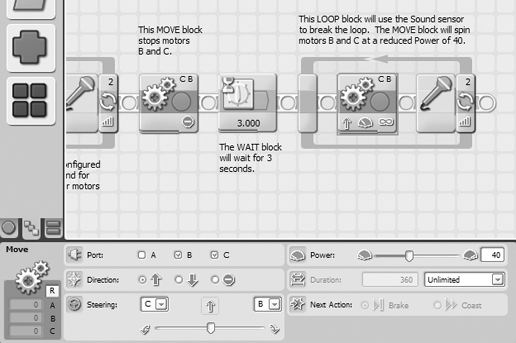
Figure 8-11. The motors run at a slower speed until the Sound Sensor is triggered.
When this LOOP block is broken, you need to stop the StringBot's movement and give it time to stop swinging. What you'll do is throw in a MOVE block that will stop the motors (see Figure 8-12).
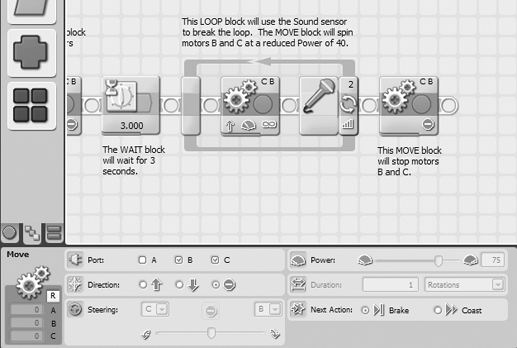
Figure 8-12. Now stop the motors—the StringBot should be directly over the vase.
Your StringBot should be directly over the vase at this point, but it might be swinging. Add in a WAIT block (see Figure 8-13) before releasing the object from the carrier—a five-second wait should do it.

Figure 8-13. Add in a WAIT block to allow the StringBot to stop swinging above the vase.
Above the Vase
Now you've got the StringBot directly over the vase. That wasn't too bad, was it? Well, the next part is even easier. All you need to do is have the carrier release the held object and return to its starting point, ready for another object to be loaded.
During my testing, I did find that if I had the carrier move too quickly, I didn't have very accurate control when the object dropped. I began to tweak the speed of the motor and found that a slower release resulted in a more accurate drop. By the way, I was dropping quarters and nickels. I experimented with dropping multiple coins at the same time; sometimes both coins dropped in the vase, sometimes neither did. You'll have to experiment with your own StringBot to determine what you want to drop and how many you wish to attempt to drop at the same time.
The other factor is how far back you wish the carrier to spin—experimentation with my StringBot revealed that a 90-degree rotation was sufficient for the object to fall out of the carrier and into the vase. You might also need to experiment to determine the proper rotational setting.
Take a look at Figure 8-14. I've added the MOVE block that will slowly lower the carrier. For now, I've set the speed of the motor to 25.
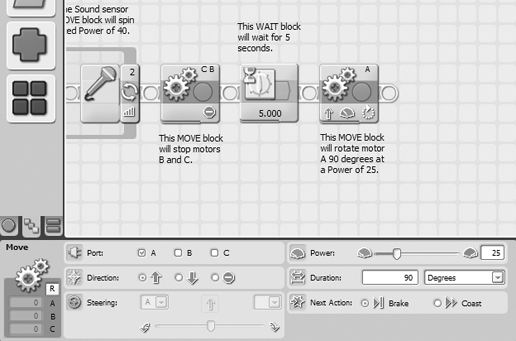
Figure 8-14. Use a MOVE block to control the carrier's release speed.
Okay, so now that the carrier has released its object, let's wait a few seconds and then close the carrier. Technically, we don't have to close the carrier, but I just don't like the look of the StringBot with the carrier hanging down.
First, add a WAIT block (see Figure 8-15).
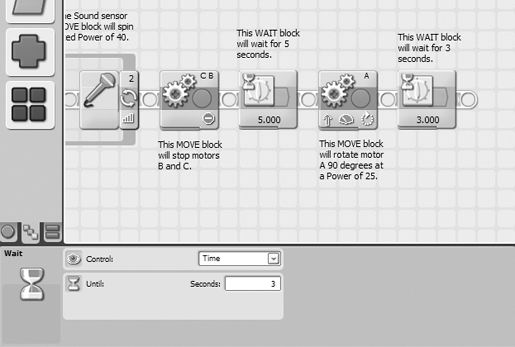
Figure 8-15. After the object is dropped, we'll wait for a few seconds before starting back.
Then, add the MOVE block to close the carrier (see Figure 8-16).
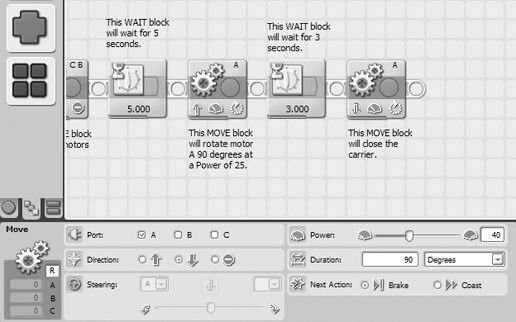
Figure 8-16. Another MOVE block closes the carrier.
Before you program the StringBot to return to its starting position, throw in one more WAIT block, just in case the StringBot is swinging on the string (see Figure 8-17).
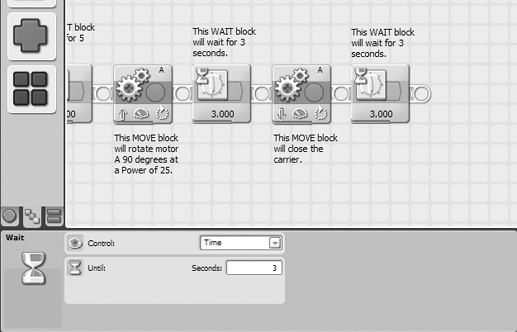
Figure 8-17. This WAIT block lets the StringBot stop swinging before returning.
Back for More
Our final task for the StringBot is to return to its starting position and get another object to drop. But before finishing up the programming, I do want to talk about the importance of testing your bot before putting it into actual use.
During my first test of the StringBot, I made a huge mistake. Take a look at Figure 8-18 and you'll notice that the final bit of programming I added was a LOOP block with a MOVE block inside. The MOVE block was configured with a Duration of Unlimited, and the LOOP block was again configured to respond to the Sound Sensor. And that was my mistake.
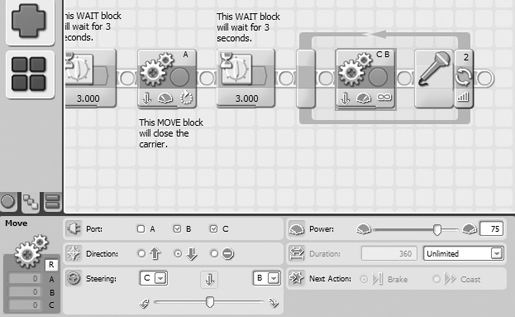
Figure 8-18. The StringBot program had a big mistake that could have spelled disaster.
On the fourth or fifth practice return trip, my phone rang. The Sound Sensor picked up the ringing of the phone and the StringBot stopped. That's what it's supposed to do, right? Well, my StringBot had only traveled about six inches. If this were the real situation, my StringBot would be stuck in the middle of the room without any way to retrieve it! I might have been able to rig up something to reach out and grab it, but maybe not.
Fortunately, I was testing the StringBot in my kitchen. I just walked over and grabbed the StringBot and brought it back to its starting position. If I had only performed the test once or twice, I would probably not have caught my mistake. So, let me repeat it again and again—test your bot, and test it often.
Once I caught this mistake, I deleted that final LOOP block. In its place, I used another LOOP block. This one I left set to loop Forever (see Figure 8-19).
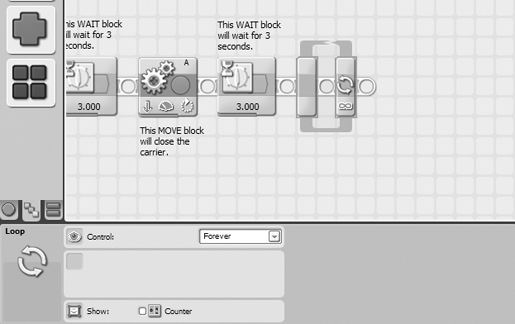
Figure 8-19. Set the last LOOP block to loop Forever.
Now place another MOVE block inside this LOOP block and configure it with a Duration set to Unlimited and a Power of 50 (see Figure 8-20).
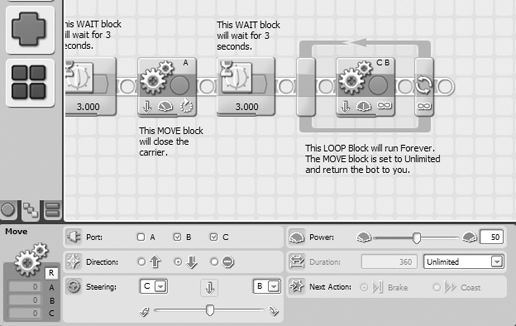
Figure 8-20. This MOVE block returns the StringBot to you.
There's no Sound Sensor this time to stop the StringBot, so when it returns to the starting position, you'll have to grab it and stop the program manually by pressing the Cancel button on the Brick.
One final programming item I'd like to mention is the addition of the STOP block (see Figure 8-21). Although the STOP block isn't really needed in this program, I find it's a good habit to use the STOP block anyway at the end of a program. It's an old habit, but many programmers will tell you that it's still a good habit. In some programs you'll create, the STOP block is good to have because it will tell the Brick to exit the program and you won't have to press the Cancel button on the Brick.
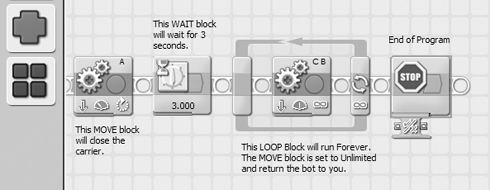
Figure 8-21. Put a STOP block at the end of your programs.
Guess what? You're done with programming the StringBot! All that's left is to upload your program to the Brick and test it.
Filling the Vase
Okay, you've got your StringBot built and you've uploaded your program to the Brick. It's now time to set up the challenge so you can put your bot to the test.
When I tested my StringBot, I didn't need to spend a lot of time creating a test environment. To start, I simply tied one end of a piece of string to the doorknob of a closed door. I then cut the string to a length of around 20 feet. Take a look at Figure 8-22 and you'll see that I fed the string through the "rear" string guide (the string guide on the back side of the Brick). The string then goes under the wheel rim, under the rubber tire, under the second wheel rim, then finally through the "front" string guide. I tied the other end of the string to a heavy chair and then moved the chair away from the door to tighten the string. The final setup element was placing a small jar a few feet from the door and directly beneath the string.
One thing I did have some fun with during my testing was changing the angle of the string. In one test the string was parallel to the floor, with the StringBot hanging about four feet above the ground. In another test, I tied the string to the bottom of the chair. The StringBot was forced to climb at a fairly steep angle, but it did work. You'll have to experiment with your own StringBot to determine the maximum angle it can climb.
The key with testing your bot is to try and have some fun. Play around with your StringBot in different ways—try tying the string higher than the doorknob so the StringBot has to drive at a downward angle. Experiment with a larger carrier. Maybe even try to attach a heavier object to your StringBot that can be released and dropped into the vase. How heavy of an object can your StringBot carry?
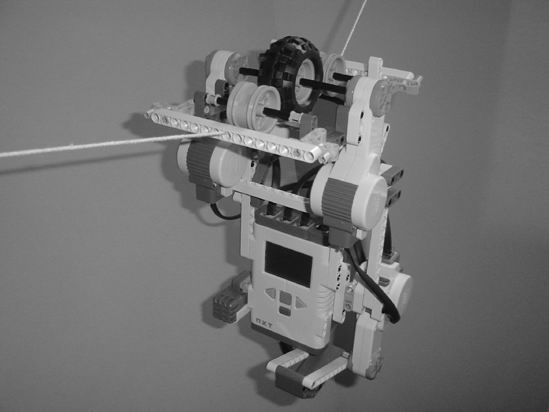
Figure 8-22. The string is fed through the front and rear string guides.
I ran a series of tests using my StringBot and I want to share them with you. Some were surprising, some were disappointing, and a few of the tests were perfect:
- First test—string parallel to floor: My StringBot carried a single quarter. I was able to get the bot to drop the quarter directly in the jar on the first attempt. Because of this, I got a little cocky on the next few tests.
- Second test—string parallel to floor: This time, I put a few quarters and nickels in the carrier. About halfway across the string, one of the coins dropped out of the carrier. And when the bot reached the vase and dropped the coins, only one nickel fell accurately into the jar.
- Third test—string tied to bottom of chair: I wanted my StringBot to climb the string at a large angle. About halfway up, the StringBot didn't have enough power to finish the climb and it stopped moving.
- Fourth test—string tied to middle of chair: I changed the angle of the string this time, reducing the angle. This time, the StringBot successfully carried two quarters and dropped them into the jar.
- Fifth test—string tied higher than doorknob: I changed the angle again, this time with the StringBot moving "down" the string. This was a bad idea. The StringBot slid at one point and the swinging motion caused most of the coins to fall out of the carrier.
- Sixth test—string tied higher than doorknob: I reduced the angle, making it less steep. The StringBot successfully made it to the vase, but when it dropped the coins, a slight swing in the bot caused the coins to miss the jar.
As you can see, the StringBot had some successes as well as failures. In the most basic test (first test), the bot did what it was supposed to do. However, I ran the first test 12 times in a row (16 minutes), and only one run failed. With these results, I imagine that I could fill that jar with about 50 to 60 trips in a little more than an hour.
When the vase was about half full, a loud cracking sound was heard underneath the floor. I think it might be safe to cross the reception room floor . . .