Chapter 6. Plan and configure cloud services
SharePoint Server 2016 is unique among all the other versions of SharePoint, simply because it is firmly rooted in the cloud. Development for what would become the on-premises version of SharePoint Server 2016 has been taking place over the last few years in Office 365, which itself is constantly progressing.
As Office 365 moves ahead, functionality found in the cloud can be expected to start appearing in on-premises environments in the form of software updates. As you work through this chapter, you will note that only a small amount of back-ported (providing older functionality not found in the cloud) content exists in SharePoint 2016.
Skills in this chapter:
![]() Skill: Plan and configure a BI infrastructure
Skill: Plan and configure a BI infrastructure
![]() Skill: Create and configure work management
Skill: Create and configure work management
![]() Skill: Plan and configure cloud and hybrid federated search
Skill: Plan and configure cloud and hybrid federated search
Skill: Plan and configure a BI infrastructure
SharePoint Server 2016 improves on the business intelligence (BI) components found in SharePoint 2013, while taking advantage of new external BI functionality surfaced by SQL Server 2016 Database Services and Analysis Services. Functionality that was once limited to on-premises use in previous versions can now be made available to both internal and external users, and (with few exceptions) the supporting BI components are moving quickly toward the use of HTML5 standards of presentation.
This section covers how to:
![]() Plan and configure PerformancePoint
Plan and configure PerformancePoint
![]() Plan and configure Reporting Services
Plan and configure Reporting Services
![]() Plan and configure Power Pivot
Plan and configure Power Pivot
![]() Plan and configure Excel Services (Office Online only)
Plan and configure Excel Services (Office Online only)
![]() Plan and configure BI security
Plan and configure BI security
Plan and configure PerformancePoint
PerformancePoint Services was folded into the SharePoint Server product line starting with the 2010 version of the product, and is used to create dashboards, scorecards, and key performance indicators (KPIs). This information can then be used by an organization to make informed business decisions around the reported metrics and trends.
Important
PerformancePoint Services is a back-ported product, meaning that this older feature was added into the newer SharePoint Server 2016 product.
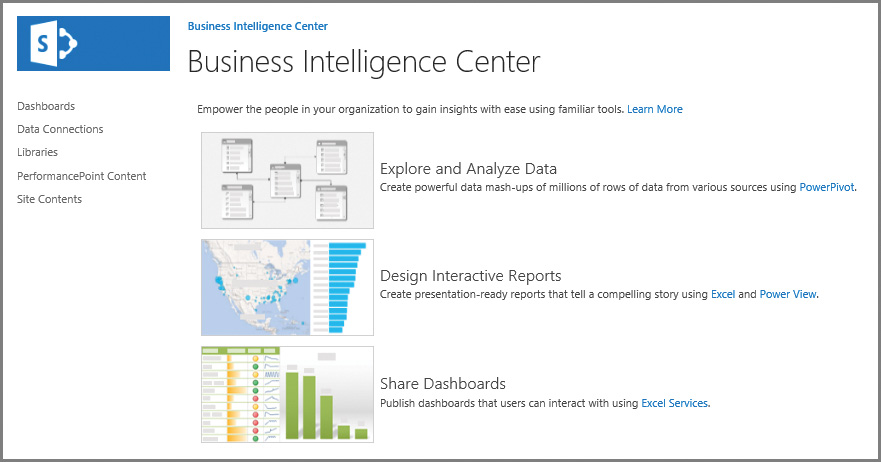
Introducing the Business Intelligence Center
As you work through this chapter, most of the technologies shown refer to some use of the Business Intelligence Center. This SharePoint site template provides a convenient way to unify the BI components of SharePoint into a single location for review and interaction (Figure 6-1).
Reports and scorecards
Generating a report or scorecard for use with PerformancePoint Services is done via the use of the Dashboard Designer tool set. Probably the easiest way to start this tool is to open the PerformancePoint Content section of your Business Intelligence Center and then click New Item. Creating a new item requires the use of the Dashboard Designer tool, shown in Figure 6-2.

PerformancePoint Services report templates
Although it’s quite possible to generate custom reports within PerformancePoint by using Dashboard Designer, seven different templates are shipped out-of-the-box (OOB), as seen in Table 6-1.
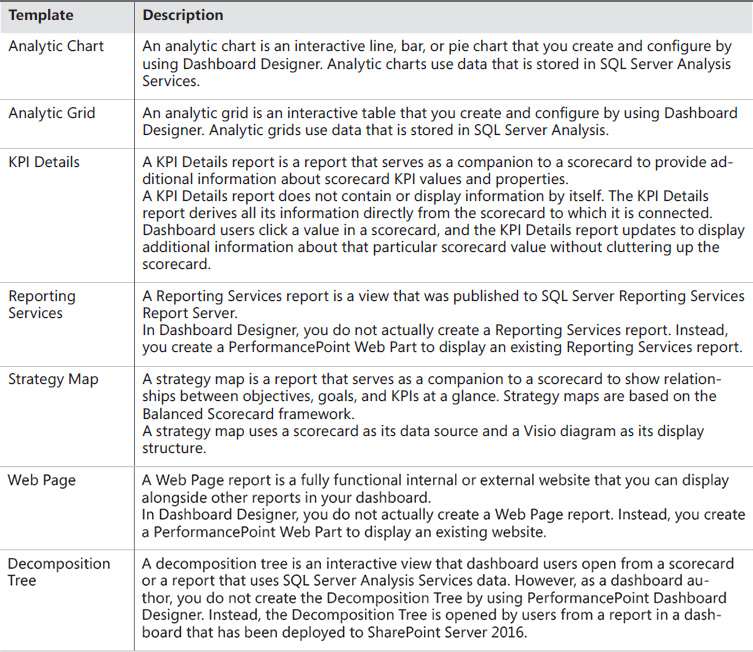
For a clearer understanding of how to use the Decomposition Tree in PerformancePoint Dashboard Designer, review the TechNet article entitled “Overview of the PerformancePoint Decomposition Tree” at https://technet.microsoft.com/library/gg576962(v=office.16).aspx.
PerformancePoint Services scorecard templates
Scorecards are a specialized type of report intended to provide high-level progress summary information. Using the Scorecard Wizard within Dashboard Designer allows the author a choice of four possible template types, shown in Table 6-2.

Need More Review?
Although this depth of information is not likely to be on the SharePoint 2016 certification test, detailed information concerning the types of reports and scorecards for PerformancePoint Services is available in the TechNet article entitled “Overview of PerformancePoint reports and scorecards” at https://technet.microsoft.com/library/gg410942(v=office.16).aspx.
Configuring PerformancePoint Services
Installing and configuring PerformancePoint Services requires only a few steps:
1. Install ADOMD.NET from the SQL Server 2012 Feature Pack.
2. Configure the PerformancePoint Services application pool account and service application.
3. Configure service application associations.
The installation of ADOMD.NET from the SQL Server 2012 Feature Pack provides access to some of the built-in reports present in the Power Pivot management dashboard, particularly those that use ADOMD.NET to access internal data for query processing and farm server health.
Important
The SQL Server 2012 Feature Pack can be downloaded from https://www.microsoft.com/download/details.aspx?id=29065. Remember that PerformancePoint is a back-ported application, and thus makes use of this older component.
Creating the service application pool account and service application for PerformancePoint Services is no different than those we configured earlier in this book, and can be accomplished from either Service Applications in Central Administration or via PowerShell.
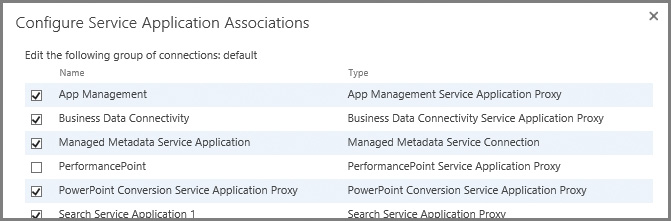
Before PerformancePoint Services can be used in SharePoint 2016, its service application must be associated with one or more proxy groups. This service application is intentionally not associated with any proxy groups for web applications, specifically because security considerations might need to be required prior to deployment.
Configuring the service application associations is quite straightforward; from Service Application Associations in Central Administration, a proxy group must be selected and then the PerformancePoint Services check box can be enabled (shown in Figure 6-3).
Important
The PerformancePoint Service Application can also be provisioned by using the New-SPPerformancePointServiceApplication cmdlet.
Be familiar with the configuration of the infrastructure items just covered because they are required to activate PerformancePoint Services within a SharePoint 2016 farm.
The final step in the core activation process is to activate the PerformancePoint Services feature for use within a site collection, as shown in Figure 6-4.

Need More Review?
A detailed view of the configuration process for PerformancePoint Services on SharePoint Server 2016 is shown in the TechNet article “Configure PerformancePoint Services (SharePoint Server 2016)” at https://technet.microsoft.com/library/ee748644(v=office.16).aspx.
Plan and configure Reporting Services
An SQL Server Reporting Services (SSRS) environment, integrated with the SharePoint Server 2016 farm, enables report creation and viewing within the context of a document library, also providing the subscription delivery of reports via email, Power View, data alerting, and report management.
Need More Review?
SQL Services allows users to create any number of report types, from basic tabular reports to data-driven and drill-through reports. A series of tutorials for using Report Builder can be found in the MSDN article entitled “Reporting Services Tutorials (SSRS),” which can be found at https://msdn.microsoft.com/library/bb522859.aspx.
Preparing your environment
If you are currently using SharePoint Server 2013 with SQL Server 2014 Reporting Services, the guidance for upgrading is to first upgrade the SSRS 2014 environment to SSRS 2016, as the SQL Server 2016 Reporting Services add-in is compatible with both SharePoint Server 2013 and SharePoint Server 2016. Doing so will ease the transition from a data and reporting standpoint when moving forward with a SharePoint Server 2016 migration.
Need More Review?
For a complete breakdown of which SharePoint and Reporting Services components versions are compatible, review the MSDN article entitled “Supported Combinations of SharePoint and Reporting Services Server and Add-in (SQL Server 2016)” at https://msdn.microsoft.com/library/gg492257.aspx.
Configuring SharePoint Server 2016 integration with SSRS 2016
The process for integrating these two systems together is functionally identical to the previous configuration used with SharePoint 2013. In this configuration, the SQL Reporting environment is set up and configured in SharePoint Integrated mode, and then an add-in is installed in the SharePoint 2016 farm.
![]() Report server The report server handles the data and report processing and rendering as well as subscription and data alert processing. The SharePoint mode report server is designed and installed as a SharePoint Shared Service.
Report server The report server handles the data and report processing and rendering as well as subscription and data alert processing. The SharePoint mode report server is designed and installed as a SharePoint Shared Service.
![]() SSRS SharePoint add-in The Reporting Services add-in (rssharepoint.msi) installs the user interface (UI) pages and features on a SharePoint 2016 server. The UI features include Power View, administration pages in SharePoint Central Administration, feature pages used within SharePoint document libraries, and Reporting Services Data Alerting pages.
SSRS SharePoint add-in The Reporting Services add-in (rssharepoint.msi) installs the user interface (UI) pages and features on a SharePoint 2016 server. The UI features include Power View, administration pages in SharePoint Central Administration, feature pages used within SharePoint document libraries, and Reporting Services Data Alerting pages.
Important
SharePoint Server 2016 is only compatible with SQL Server 2016 Reporting Services servers; components from either SQL 2012 or SQL 2014 will not work. SharePoint 2016 support, including Power View integration, requires the Reporting Services report server and the Reporting Services add-in version of SQL Server 2016 or later.
The actual deployment of SSRS 2016 in a SharePoint farm is largely unchanged from configuring SSRS 2014 in a SharePoint 2013 farm, with a few notable differences.
![]() SQL Server 2016 and SharePoint 2016 Regardless of the BI component chosen, SQL Server 2016 is required to enable BI support in SharePoint 2016.
SQL Server 2016 and SharePoint 2016 Regardless of the BI component chosen, SQL Server 2016 is required to enable BI support in SharePoint 2016.
![]() SSRS and MinRole compliance A server configured for SSRS use must be assigned the Custom role from a MinRole compliance standpoint. The installation of SSRS on any other MinRole server will indeed be successful, but will abruptly be stopped by MinRole during the next SharePoint maintenance window.
SSRS and MinRole compliance A server configured for SSRS use must be assigned the Custom role from a MinRole compliance standpoint. The installation of SSRS on any other MinRole server will indeed be successful, but will abruptly be stopped by MinRole during the next SharePoint maintenance window.
 Exam Tip
The SSRS service application only supports the Custom role.
Important
The installation and configuration of SSRS integration in a SharePoint 2016 farm is thoroughly examined in the MSDN article and document entitled “Deploying SQL Server 2016 Power Pivot and Power View in SharePoint 2016” at https://msdn.microsoft.com/library/mt614795.aspx.
Plan and configure Power Pivot
Power Pivot is a built-in component within the Excel 2016 client. This tool allows the user to import data from several data sources into a workbook, then create relationships between heterogeneous data, create calculated columns and measures using formulas, build Pivot Tables and Pivot Charts, then analyze data to make business decisions without requiring assistance from an IT standpoint.
Important
If you open Excel 2016 on your desktop, you will not immediately see the Power Pivot add-in. However, this add-in is included in the client and can be activated from within the Options menu.
Power Pivot in SharePoint extends this client functionality, working with the Excel Online functionality present in the Office Online Server. This arrangement allows the Power Pivot workbook to exist within a web browser, and only requires an SQL 2016 Analysis Services server, configured in Power Pivot mode. This server must be registered with the Office Online Server connected to the SharePoint 2016 farm. The functional arrangement of these servers is shown in Figure 6-5.

Installing Analysis Services in Power Pivot mode (SQL Server and Office Online Server)
SharePoint administrators are often required to understand (at a high level) configuration steps essential to activating certain functionality in a SharePoint 2016 farm. In the case of Analysis Services, we have to understand the steps required in SQL Analysis Services to make this integration a success.
Assuming SQL Server has been installed and an Analysis Services instance is available, there are four required steps for configuring Power Pivot mode.
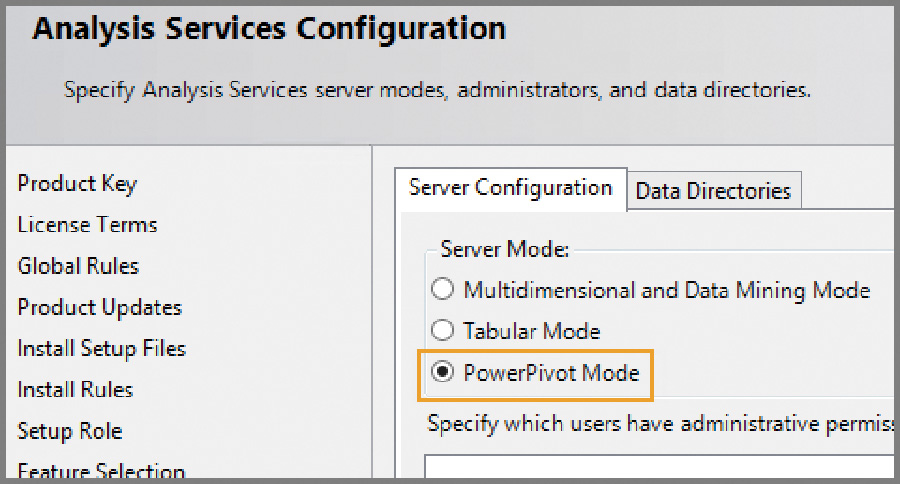
![]() Install Power Pivot for SharePoint This series of steps is usually carried out by an SQL database administrator (DBA), and involves the installation of SQL Server Analysis Services on a server. During the installation, the DBA will select Power Pivot Mode, as shown in Figure 6-6.
Install Power Pivot for SharePoint This series of steps is usually carried out by an SQL database administrator (DBA), and involves the installation of SQL Server Analysis Services on a server. During the installation, the DBA will select Power Pivot Mode, as shown in Figure 6-6.
Important
As Analysis Services is being set up, the option is given to also designate accounts requiring administrative access to the Analysis Services server instance. The following accounts should be granted this level of access: the Office Online Server machine account, the SharePoint farm account, and the service accounts for Power View and PerformancePoint Services.
![]() Configure Windows Firewall to allow Analysis Services access If there are no firewalls present between the Analysis Server and the Office Online Server, this step can be skipped. This series of steps to be performed depends greatly on how the Analysis Services implementation is intended to be configured.
Configure Windows Firewall to allow Analysis Services access If there are no firewalls present between the Analysis Server and the Office Online Server, this step can be skipped. This series of steps to be performed depends greatly on how the Analysis Services implementation is intended to be configured.
Need More Review?
The process for configuring this access is thoroughly detailed in the MSDN article “Configure the Windows Firewall to Allow Analysis Services Access” at https://msdn.microsoft.com/library/ms174937.aspx.
![]() Configure Basic Analysis Services SharePoint integration This series of steps requires participation from both the SQL DBA and the Office Online Server administrator.
Configure Basic Analysis Services SharePoint integration This series of steps requires participation from both the SQL DBA and the Office Online Server administrator.
![]() The SQL DBA must grant the Office Online Server machine account administrative access to the Analysis Server instance (you can skip this step if previously completed).
The SQL DBA must grant the Office Online Server machine account administrative access to the Analysis Server instance (you can skip this step if previously completed).
![]() The Office Online Server administrator must register the Analysis Server with Office Online Server. This process is accomplished via PowerShell cmdlets, and involves importing the OfficeWebApps module, then accomplishing the registration itself:
The Office Online Server administrator must register the Analysis Server with Office Online Server. This process is accomplished via PowerShell cmdlets, and involves importing the OfficeWebApps module, then accomplishing the registration itself:
Import-Module OfficeWebApps
New-OfficeWebAppsExcelBIServer -ServerId <servernameinstancename>
![]() Verify the integration This series of steps is accomplished as a user, and involves the creation and upload of a workbook to verify the Analysis Services integration with Office Online Server.
Verify the integration This series of steps is accomplished as a user, and involves the creation and upload of a workbook to verify the Analysis Services integration with Office Online Server.
Power Pivot is an essential part of most larger SharePoint 2016 BI installations. For a step-by-step walkthrough of this configuration process, review the MSDN article entitled “Configure Power Pivot and Deploy Solutions (SharePoint 2016)” at https://msdn.microsoft.com/library/mt595855.aspx. Read this document carefully for SharePoint 2016 specific steps, as instructions for SharePoint 2013 and Excel Services are also shown in the same document.
Install the Power Pivot for SharePoint add-in (SharePoint 2016)
Power Pivot for SharePoint 2016 is a collection of application server components and back-end services that provide Power Pivot data access in a SharePoint Server 2016 farm. These components allow for the use of workbooks as a data source, scheduled data refresh, and the Power Pivot Management Dashboard.
The Power Pivot for SharePoint add-in is an installer package used to install the application server components, and is downloaded separately.
Important
The Microsoft SQL Server 2016 Power Pivot for Microsoft SharePoint 2016 add-in can be downloaded from the Microsoft Download Center at https://www.microsoft.com/download/details.aspx?id=52675.
Installing Power Pivot for SharePoint causes four components to be deployed to the SharePoint server.
![]() Power Pivot for SharePoint Includes PowerShell scripts, SharePoint solution packages, and the Power Pivot for SharePoint 2016 configuration tool to deploy Power Pivot in a SharePoint 2016 farm. It is recommended that at least two servers in the farm should have the configuration tool installed.
Power Pivot for SharePoint Includes PowerShell scripts, SharePoint solution packages, and the Power Pivot for SharePoint 2016 configuration tool to deploy Power Pivot in a SharePoint 2016 farm. It is recommended that at least two servers in the farm should have the configuration tool installed.
![]() Microsoft OLE DB Provider for Analysis Services (MSOLAP) Used by Microsoft Excel to connect to Microsoft SQL Server.
Microsoft OLE DB Provider for Analysis Services (MSOLAP) Used by Microsoft Excel to connect to Microsoft SQL Server.
![]() ADOMD.NET data provider A Microsoft .NET Framework provider designed to communicate with Microsoft SQL Server Analysis Services.
ADOMD.NET data provider A Microsoft .NET Framework provider designed to communicate with Microsoft SQL Server Analysis Services.
![]() SQL Server Analysis Management Objects A library of objects that enables an application to manage a running instance of Microsoft SQL Server Analysis Services.
SQL Server Analysis Management Objects A library of objects that enables an application to manage a running instance of Microsoft SQL Server Analysis Services.
Exam Tip
Power Pivot for SharePoint 2016 is a Microsoft Windows Installer package (spPowerpivot16.msi) that deploys Analysis Services client libraries and copies Power Pivot for SharePoint 2016 installation files to the computer. This add-in should be installed on all servers in the SharePoint 2016 farm for consistency. This is useful because PerformancePoint Services and Power View can also use this functionality in their respective configurations. As an example, PerformancePoint can connect to Analysis Services data sources (including Power Pivot workbooks), but this functionality requires that Power Pivot for SharePoint be installed on every farm server running the PerformancePoint service.
For a better understanding of this installation process, review the MSDN article entitled “Install or Uninstall the Power Pivot for SharePoint Add-in (SharePoint 2016)” at https://msdn.microsoft.com/library/mt595853.aspx.
Configure Power Pivot and deploy solutions (SharePoint Server 2016)
This process is a SharePoint-specific effort, and should be carried out by logging on as the SharePoint farm account. During this process, two major tasks are completed.
![]() The SharePoint solution files for Power Pivot are installed.
The SharePoint solution files for Power Pivot are installed.
![]() The Power Pivot service application is created and configured.
The Power Pivot service application is created and configured.
Important
Prior to running the Power Pivot for SharePoint 2016 Configuration utility, you should either log on as the account that installed SharePoint, or configure the setup account as the primary administrator of the SharePoint Central Administration site.
These two tasks are completed by running the Power Pivot for SharePoint Configuration utility. Although this utility is run on a SharePoint 2016 server, it uses the Configuration Tools section of the Microsoft SQL Server 2016 installation media, and requires the use of the SharePoint farm passphrase.
Important
The installation process for this tool calls for the prior installation of the Power Pivot for SharePoint add-in. If you attempt to install the Power Pivot for SharePoint Configuration utility and cannot seem to find this link in the interface, you’ve neglected to install the add-in first.
To verify that this installation has successfully completed, you will look in four distinct locations.
![]() Services In Central Administration, Manage Services On Server, verify that the SQL Server Power Pivot System Service is started.
Services In Central Administration, Manage Services On Server, verify that the SQL Server Power Pivot System Service is started.
![]() Farm Feature In Central Administration, Manage Farm Features, verify that the Power Pivot Integration Feature is Active.
Farm Feature In Central Administration, Manage Farm Features, verify that the Power Pivot Integration Feature is Active.
![]() Site Collection The Power Pivot configuration tool creates a new site collection. In the settings of that site collection, click Site Collection Features, and then verify that the Power Pivot Feature Integration for Site Collections is Active.
Site Collection The Power Pivot configuration tool creates a new site collection. In the settings of that site collection, click Site Collection Features, and then verify that the Power Pivot Feature Integration for Site Collections is Active.
![]() Power Pivot Service Application In Central Administration, Application Management, click Manage Service Application, and verify that the Power Pivot service application status is Started.
Power Pivot Service Application In Central Administration, Application Management, click Manage Service Application, and verify that the Power Pivot service application status is Started.
Important
The SQL 2014 Power Pivot and Power View add-ins for SharePoint cannot be used in SharePoint 2016. To deploy these add-ins, you will need to upgrade to SQL Server 2016.
The configuration of Power Pivot can be quite detailed in scope. For a more complete understanding of this process, review the MSDN article entitled “Configure Power Pivot and Deploy Solutions (SharePoint 2016)” at https://msdn.microsoft.com/library/mt595855.aspx.
Plan and configure Excel Services (Office Online only)
Excel Online loads Excel workbooks and renders them for display and interaction via a user’s web browser. If the workbook contains a data model, Excel Online streams the model to SQL Server 2016 Analysis Services and then queries the data to update the workbook data, although this is an on-demand update.
Although you will continue to find references to Excel Services in some SharePoint 2016 documentation, it is important to note the differences between Excel Services functionality in SharePoint 2013 and Excel Online functionality in SharePoint 2016.
Excel Services proper has been deprecated, as Excel Online (a component of the Office Online Server) replaces its function within a SharePoint 2016 farm. This change results in the removal of some familiar Excel Services functionality:
![]() Trusted data providers
Trusted data providers
![]() Trusted file locations
Trusted file locations
![]() Trusted data connection libraries
Trusted data connection libraries
![]() Unattended service account
Unattended service account
![]() Excel Services PowerShell cmdlets
Excel Services PowerShell cmdlets
![]() Opening of Excel workbooks from SharePoint Central Administration
Opening of Excel workbooks from SharePoint Central Administration
Important
The switch to Excel Online requires a couple of functional behavior changes. SharePoint managed accounts are no longer able to open Excel workbooks in Excel Online, requiring that any test be carried out with a standard user account. Also, Excel workbooks can no longer be accessed from directly within Central Administration.
Excel Online in Office Online Server provides the following Excel functionality:
![]() Viewing and editing Excel workbooks in a browser (with or without the Data Model)
Viewing and editing Excel workbooks in a browser (with or without the Data Model)
![]() Excel Web Access Web Part for SharePoint
Excel Web Access Web Part for SharePoint
![]() Office data connection (ODC) file support (no longer requires Data Connection Libraries)
Office data connection (ODC) file support (no longer requires Data Connection Libraries)
![]() Programmability features such as JavaScript OM, User Defined Function Assemblies, SOAP and REST protocol support
Programmability features such as JavaScript OM, User Defined Function Assemblies, SOAP and REST protocol support
Configuring Excel Online for BI
Three steps are included in the configuration of Excel Online for BI:
![]() Analysis Services availability The SQL Server 2016 Analysis Services server instance in Power Pivot mode must be accessible over the network, from the perspective of Office Online Server.
Analysis Services availability The SQL Server 2016 Analysis Services server instance in Power Pivot mode must be accessible over the network, from the perspective of Office Online Server.
![]() Service instance registration The SQL Server 2016 Analysis Services server instance needs to be registered in the Excel Online configuration.
Service instance registration The SQL Server 2016 Analysis Services server instance needs to be registered in the Excel Online configuration.
![]() Permissions assignment for Excel Online The Excel Online service account must be added to the list of Analysis Services server administrators. You might have previously accomplished this when setting up Analysis Services for use with Power Pivot.
Permissions assignment for Excel Online The Excel Online service account must be added to the list of Analysis Services server administrators. You might have previously accomplished this when setting up Analysis Services for use with Power Pivot.
Aside from these three steps, there is one more registration that’s implied. Usually this has already been configured, but Excel Online has to be registered so that users can open workbooks in the browser, and Claims to Windows Token Service (c2WTS) has to be enabled such that Excel Online can resolve SharePoint identities into Windows identities.
Need More Review?
The configuration of Excel Online is a part of a larger BI configuration process, and is covered in great detail (including the necessary scripts) within the MSDN article and document called “Deploying SQL Server 2016 Power Pivot and Power View in SharePoint 2016” at https://msdn.microsoft.com/library/mt614795.aspx.
Plan and configure Power View
Although we’ve mentioned Power View several times in this chapter, we have not yet defined it. Power View is a browser-based Silverlight application supporting interactive data exploration, visualization, and presentation. This functionality is heavily dependent on SSRS, which is used to render the Power View reports.
Important
Power View reports embedded in Excel Online workbooks cannot be displayed unless the workbooks reside in a SharePoint farm with SharePoint-integrated Reporting Services installed. Excel Online relies on Reporting Services to render the Power View reports.
Exam Tip
Power View still relies on Silverlight for the display of some items.
Power View is installed and configured alongside SQL Server 2016 Reporting Services. The SQL 2014 Power Pivot and Power View add-ins for SharePoint cannot be used in SharePoint 2016. To deploy these add-ins, you will need to upgrade to SQL Server 2016.
The configuration of Power View is a part of a larger BI configuration process, and is covered in great detail (including the necessary scripts) within the MSDN article and document called “Deploying SQL Server 2016 Power Pivot and Power View in SharePoint 2016” at https://msdn.microsoft.com/library/mt614795.aspx.
Plan and configure BI security
As you’ve already seen in this section, implementing BI in SharePoint 2016 can be a challenge because there are multiple technologies to configure (for example, PerformancePoint, Power Pivot, Excel Services, and others) across a series of servers, including SQL Server 2016 Analysis Services, SQL Server Reporting Services, Office Online Server, and SharePoint Server 2016.
While implementing an environment this complex, we are also charged with finding effective ways to secure it. As is the case with any infrastructure effort, the resulting design must not only be secure, but also able to perform at a desired level, so as to be useful to the business.
Authentication mechanisms for BI
Each of the services in the BI stack behaves similarly from an authentication point of view, although how the authentication is implemented varies from service to service, as listed in Table 6-3.
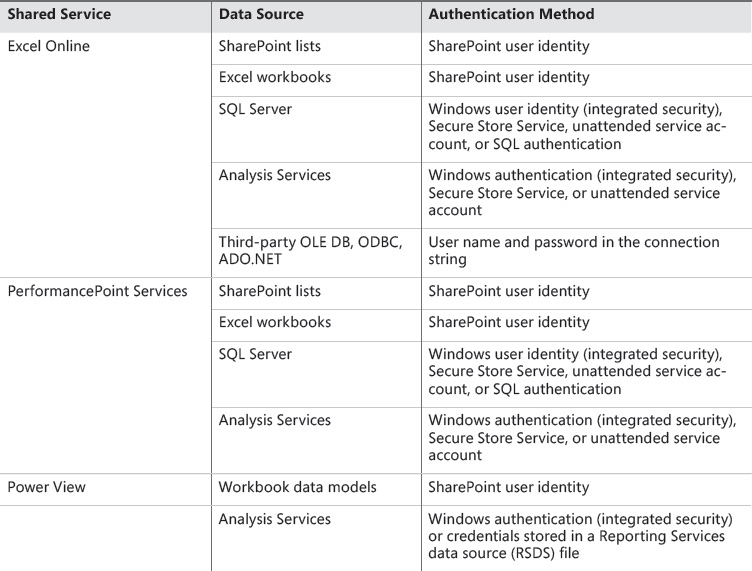

These authentication mechanisms are discussed in detail within the “Microsoft BI Authentication and Identity Delegation” Word document located at https://msdn.microsoft.com/library/dn186184.aspx.
Kerberos constrained delegation and BI
Kerberos is a network authentication protocol that has been available for use within a Microsoft environment since the Windows 2000 Server product was introduced. In a standard SharePoint Server 2016 configuration, Kerberos can be used to improve performance and further secure connectivity between a client and their SharePoint 2016 server farm.
When BI components are introduced to a SharePoint 2016 farm, Kerberos becomes a vital component in the overall BI stack. The reason for this is simple: BI components most often connect to external data sources such as external databases, Analysis Services data cubes, and SSRS reports; NTLM authentication cannot delegate client credentials, thus it cannot authenticate the user to the back-end system.
Need More Review?
An understanding of what double-hop authentication is (and more important, why NTLM can’t do it) can be found in the MSDN blog article “Double-hop authentication: Why NTLM fails and Kerberos works” at https://blogs.msdn.microsoft.com/besidethepoint/2010/05/08/double-hop-authentication-why-ntlm-fails-and-kerberos-works/.
For example, in SharePoint Server 2016, Excel Services is no longer part of the SharePoint farm (Excel Online is part of Office Online Server); as a result, authentication mechanisms for connecting to this external system must be capable of delegating client credentials in this two-hop scenario.
Need More Review?
Analysis Services and its use of Kerberos constrained delegation is detailed in the MSDN article entitled “Configure Analysis Services and Kerberos Constrained Delegation (KCD)” at https://msdn.microsoft.com/library/mt126226.aspx.
Is Kerberos the only mechanism for providing this access? Absolutely not. In fact, there are drawbacks to using Kerberos:
![]() Active Directory integration Kerberos is closely tied to Active Directory.
Active Directory integration Kerberos is closely tied to Active Directory.
![]() Internet readiness Kerberos is not something that can be used over the Internet.
Internet readiness Kerberos is not something that can be used over the Internet.
Secure Application Markup Language claims authentication and BI
As it happens, SharePoint 2016 requires that users authenticate via claims. Because the SQL 2016 BI stack has been updated, it is also claims aware, meaning that you can use it together with c2WTS in your SharePoint farm.
Important
If you are still using a Kerberos infrastructure, do not worry; Kerberos is also fully supported in SharePoint 2016.
The service account for c2WTS requires three different rights on each application server running this service:
![]() Act as part of the operating system
Act as part of the operating system
![]() Impersonate a client after authentication
Impersonate a client after authentication
![]() Log on as a service
Log on as a service
Once these permissions have been granted, the c2WTS service account needs constrained delegation with protocol transitioning and permissions to delegate to the BI services it will work with (for example, Analysis Services).
Need More Review?
A very good example of this configuration is the MSDN article entitled “Claims to Windows Token Services (c2WTS) and Reporting Services” at https://msdn.microsoft.com/library/hh231678.aspx.
Skill: Create and configure work management
SharePoint Server 2013 was a good start toward uniting systems in the enterprise, with the ability to connect disparate systems such as Exchange and Skype. This solidarity meant that users were able to move fairly seamlessly between environments, especially for the purposes of eDiscovery.
SharePoint Server 2016 improves on this trust functionality, bringing systems such as Exchange and Skype to the forefront of the data loss prevention and eDiscovery curve. Sensitive information policies that exist in Exchange are identical in SharePoint ensuring that, no matter which system hosts sensitive content, privacy and other governance policies are carried out in a uniform fashion.
SharePoint Server 2016 also brings Project Server 2016 users into the fold, literally combining the two distinct systems into a single server vertical capable of providing both functionality sets.
This section covers how to:
![]() Configure a connection to Exchange
Configure a connection to Exchange
![]() Activate and configure a connection to Microsoft Project Server 2016
Activate and configure a connection to Microsoft Project Server 2016
![]() Plan Exchange configuration for eDiscovery
Plan Exchange configuration for eDiscovery
Configure a connection to Exchange
Chapter 2, “Authentication and security,” discusses how to go about establishing server-to-server trusts between SharePoint 2016 and other on-premises servers; one of the servers discussed was Exchange Server 2016.
Establishing a trust between these environments allows eDiscovery to take place in a SharePoint 2016 environment, allowing the user to query, hold, and export content from Exchange as required. Setting up the trust is fairly straightforward, and requires three distinct steps:
![]() Configure the SharePoint 2016 farm to trust the Exchange 2016 farm by using a JavaScript Object Notation (JSON) endpoint located on the Exchange 2016 farm.
Configure the SharePoint 2016 farm to trust the Exchange 2016 farm by using a JavaScript Object Notation (JSON) endpoint located on the Exchange 2016 farm.
![]() Configure permissions on the SharePoint 2016 farm for the server-to-server trust.
Configure permissions on the SharePoint 2016 farm for the server-to-server trust.
![]() Configure the Exchange 2016 farm to trust the SharePoint 2016 farm by using the ConfigureEnterprisePartnerApplication.ps1 PowerShell script.
Configure the Exchange 2016 farm to trust the SharePoint 2016 farm by using the ConfigureEnterprisePartnerApplication.ps1 PowerShell script.
Need More Review?
For a walk-through of this configuration, visit the TechNet site “Configure server-to-server authentication between SharePoint 2013 and Exchange Server 2013” at https://technet.microsoft.com/library/jj655399.aspx.
Activate and configure a connection to Microsoft Project Server 2016
Project Server 2016 is now included in the SharePoint Server 2016 Microsoft Installer (MSI) file; thus, no additional media downloads are required for installation. The activation of the Microsoft Project Server components will require a specific Product ID (PID) key and supporting licensing from Microsoft.
For Project Server to be used in a SharePoint Server 2016 farm, it must be enabled by using PowerShell:
Enable-ProjectServerLicense -Key <LicenseKey>
Once Project Server is active, you will then need to configure the Project Server service application and create a Project Web App site.
Deployment option details
There are two ways to deploy a Project Web Application:
![]() Create a Project Web App site within a given site collection, giving you the ability to add Project Server functionality to sites in that site collection.
Create a Project Web App site within a given site collection, giving you the ability to add Project Server functionality to sites in that site collection.
![]() Create the Project Web App site as the top level of a site collection to centralize the deployment of project sites.
Create the Project Web App site as the top level of a site collection to centralize the deployment of project sites.
Need More Review?
Detailed information about the installation and configuration of Project Server 2016 is available on TechNet. The configuration of the Project Server service application (Step 2 of the core requirements just shown) is discussed in the TechNet article entitled “Install and configure Project Server 2016” at https://technet.microsoft.com/library/ee662109(v=office.16).aspx. The creation of the Project Web App site is discussed in the TechNet article entitled “Deploy Project Web App” at https://technet.microsoft.com/library/jj200303(v=office.16).aspx.
![]() Quick check
Quick check
![]() Your corporate Project Management Office is looking to start using the Project Server functionality present in SharePoint Server 2016. What needs to happen to spin the technology, and what might be the optimal Project Web Application deployment?
Your corporate Project Management Office is looking to start using the Project Server functionality present in SharePoint Server 2016. What needs to happen to spin the technology, and what might be the optimal Project Web Application deployment?
Quick check answer
![]() The Project Management Office will need to secure Project Server licensing. Once this is done, you will need to activate the license by using PowerShell. The Project Web Application might be best deployed in its own web application, with project sites deployed beneath it.
The Project Management Office will need to secure Project Server licensing. Once this is done, you will need to activate the license by using PowerShell. The Project Web Application might be best deployed in its own web application, with project sites deployed beneath it.
Manage trusts
Server-to-server (S2S) trusts in SharePoint 2016 can be established with on-premises servers, Office 365, or Infrastructure as a Service (IaaS) farms in Azure. Regardless of the option chosen, these trusts are all administered via PowerShell cmdlets; there is no option in Central Administration for inspecting existence or health of trust relationships currently established with the SharePoint 2016 farm.
Two different types of trusts are required to be used with SharePoint Server 2016:
![]() Farms with web applications The configuration of S2S on a receiving farm (having web applications) requires that the JSON endpoint of the sending farm be specified by using the New-SPTrustedSecurityTokenIssuer cmdlet with the -MetadataEndpoint switch.
Farms with web applications The configuration of S2S on a receiving farm (having web applications) requires that the JSON endpoint of the sending farm be specified by using the New-SPTrustedSecurityTokenIssuer cmdlet with the -MetadataEndpoint switch.
![]() Farms without web applications The configuration of S2S on a receiving farm (having no web applications) requires that the SharePoint Security Token Service certificate be exported and then incorporated on the trusting farm by using the New-SPTrustedSecurityTokenIssuer cmdlet along with the -Name, -Certificate, and -RegisteredIssuerName switches.
Farms without web applications The configuration of S2S on a receiving farm (having no web applications) requires that the SharePoint Security Token Service certificate be exported and then incorporated on the trusting farm by using the New-SPTrustedSecurityTokenIssuer cmdlet along with the -Name, -Certificate, and -RegisteredIssuerName switches.
Exam Tip
When reviewing the index of Windows PowerShell cmdlets for SharePoint Server 2016 at https://technet.microsoft.com/library/ff678226(v=office.16).aspx, you might notice that there are four cmdlets that all look a great deal alike: Set-SPTrustedIdentityTokenIssuer, Set-SPTrustedRootAuthority, Set-SPTrustedSecurityTokenIssuer, and Set-SPTrustedServiceTokenIssuer.
Only the last two of these four cmdlets are used to set up and administer trusts from within PowerShell. Set-SPTrustedIdentityTokenIssuer is used to set the identity providers for a web application (not for S2S). Set-SPTrustedRootAuthority is used to create a new trusted root authority (also not for S2S). Set-SPTrustedSecurityTokenIssuer is used to set the trusted token issuer as part of setting up S2S. Set-SPTrustedServiceTokenIssuer is used to update the trust with the SharePoint farm (S2S).
Need More Review?
For more information about the process of maintaining trusts between farms, see the TechNet Article “Configure server-to-server authentication between SharePoint 2013 farms” at https://technet.microsoft.com/library/jj655400.aspx.
Plan Exchange configuration for eDiscovery
Configuring the trust with Exchange Server 2016 is not the only step required to enable eDiscovery from SharePoint Server 2016 to Exchange Server 2016. For users to be able to use Exchange Server 2016 In-Place eDiscovery, you need to add these users to the Discovery Management role group from within Exchange.
Members of the Discovery Management role group have Full Access mailbox permissions to the default discovery mailbox, also known as the Discovery Search Mailbox. Members of this role group have the ability to access sensitive message content, as they can use In-Place eDiscovery to:
![]() Search all mailboxes in the organization (no restrictions).
Search all mailboxes in the organization (no restrictions).
![]() Preview the search results (and other mailbox items).
Preview the search results (and other mailbox items).
![]() Copy these results to a discovery mailbox.
Copy these results to a discovery mailbox.
![]() Export the search results to a .pst file.
Export the search results to a .pst file.
Important
Given the unfettered access to mailboxes presented by the Discovery Management role group, it would be wise to heavily limit the membership of this group to legal, compliance, or human resources personnel.
The Discovery Management role group can only have security principals added, including user mailboxes, mail users, security groups, and other role groups.
Adding a user to the Discovery Management role group
Users can be added to the Discovery Management role group in one of two ways:
![]() Exchange Admin Center (EAC) Within the Permissions section of the EAC, select Admin Roles, Discovery Management, and then add new members.
Exchange Admin Center (EAC) Within the Permissions section of the EAC, select Admin Roles, Discovery Management, and then add new members.
![]() Exchange Management Shell Use the Add-RoleGroupMember cmdlet on the Discovery Management role group to add individual users or groups.
Exchange Management Shell Use the Add-RoleGroupMember cmdlet on the Discovery Management role group to add individual users or groups.
Need More Review?
Assigning eDiscovery permissions is a fairly straightforward process, requiring only a handful of steps. An understanding of this process and other eDiscovery processes can be gained by reviewing the TechNet article entitled “In-Place eDiscovery in Exchange 2016” at https://technet.microsoft.com/library/dd298021(v=exchg.160).aspx.
Skill: Plan and configure cloud and hybrid federated search
Although Chapter 5 covered Search in great detail, this section discusses some of the nuances present in the configuration of cloud hybrid search and its older relation, hybrid federated search (also known as classic hybrid search). Cloud hybrid search can work on its own, or if desired, in concert with hybrid federated search; this allows a best-of-breed configuration experience, capable of meeting any hybrid search need from the enterprise.
Plan and configure on-premises and Office 365 search and encrypted metadata when content is transferred to the search index in Office 365
Search is a pervasive topic throughout this book; it stands to reason that it will be the same on the certification test. With this in mind, this section drills a bit deeper into the Cloud Search service application as well as its ability to transfer metadata from an on-premises SharePoint 2016 farm to the cloud.
It is often the case that people believe that their content is transferred to the cloud, immediately prompting a discussion of encryption and safety concerns. Fortunately, this configuration is not what happens in a SharePoint cloud hybrid search configuration; in fact, the only content that is transferred to the cloud (and this transfer is, in fact, encrypted) is the metadata itself, retrieved by crawling on-premises content sources.
Cloud versus on-premises search components
When a Cloud Search service application is created, all six search components are required: crawl, admin, query processing, index, analytics, and content processing. Although they are required (and continue to be so after cloud hybrid search is configured), the index, analytics, and content processing components are inactive on an on-premises Search role server.
In an on-premises, MinRole-compliant SharePoint 2016 farm, Search is its own role within the farm. Servers in the other standard tiers (Front-end, Application, and Distributed cache) are unable to host any of the search components, as doing so would violate MinRole requirements within the farm. This leaves the administrator with two MinRole-compliant choices: Either scale the Search role out (two or more servers would achieve resiliency requirements), or perhaps (if the environment is big enough) designate a Search-specific farm to provide search functionality to one or more SharePoint 2016 farms.
For cloud hybrid search, the only scaling that is required comes in the form of the crawl component. For most search architectures, having two crawl components in the farm should produce a reliable crawl rate.
Avoid throttling issues
Office 365 is, by its nature, a multitenant environment. This shared arrangement means that multiple tenants often share the same networking, memory, processing, and storage I/O resources. To keep one environment from consuming all available resources at any given time, Microsoft implements application throttling; this good neighbor policy ensures that no individual user (or group of users) in an Office 365 tenant can affect others by using unreasonable amounts of networking bandwidth or resources.
Need More Review?
Cloud hybrid search planning is a central component for implementing a successful SharePoint 2016 and Office 365 hybrid environment. For more information about this planning effort, review the Office.com article entitled “Plan cloud hybrid search for SharePoint” at https://support.office.com/article/Plan-cloud-hybrid-search-for-SharePoint-33926857-302c-424f-ba78-03286cf5ac30?ui=en-US&rs=en-US&ad=US#BKMK_Unused_search_components.
Configure user-specific queries and inbound and outbound or bidirectional hybrid topologies
In SharePoint 2013, three distinct hybrid search topologies exist, and can be selected for federated search with Office 365:
![]() One-way outbound topology In this configuration, the on-premises SharePoint Server farm has a connection to SharePoint Online, and allows the on-premises users to view both local and remote search results. Users from SharePoint Online only see results from the SharePoint Online Search portal.
One-way outbound topology In this configuration, the on-premises SharePoint Server farm has a connection to SharePoint Online, and allows the on-premises users to view both local and remote search results. Users from SharePoint Online only see results from the SharePoint Online Search portal.
![]() One-way inbound topology In this configuration, SharePoint online connects to the SharePoint farm through a reverse proxy device, and allows Office 365 users to view results from both the online and on-premises environments. Users from the SharePoint on-premises environment only see the local results from that environment.
One-way inbound topology In this configuration, SharePoint online connects to the SharePoint farm through a reverse proxy device, and allows Office 365 users to view results from both the online and on-premises environments. Users from the SharePoint on-premises environment only see the local results from that environment.
![]() Two-way, bidirectional topology In this configuration, the search query results for both on-premises and SharePoint Online environments are presented in both environments.
Two-way, bidirectional topology In this configuration, the search query results for both on-premises and SharePoint Online environments are presented in both environments.
Exam Tip
Cloud hybrid search environments no longer require the use of a reverse proxy device, streamlining installation and maintenance of the hybrid search environment.
Federated search has been largely replaced by cloud hybrid search (which is the default in SharePoint 2016 and the August PU for SharePoint Server 2013 and uses a Cloud Search service application). In this arrangement, search crawls of both on-premises and online content wind up in an Office 365 search index. For every 1 TB of pooled storage in the tenant, you are allowed to index 1 million items of on-premises content to the Office 365 search index (with a default limit of 20 million items).
Cloud hybrid search topologies and user-specific queries
When using cloud hybrid search, the default topology is to allow two-way searches; after all, the index is stored online (rather than maintaining two distinct indexes), and users in both environments (on-premises and online) can easily review search results from the index.
In special cases, a combination of cloud hybrid search and federated search can be used to prevent metadata from sensitive, on-premises content from appearing in the Office 365 index, allowing for different query results, based on the user’s location. In such an arrangement, the content sources for the Cloud Search service application cover all on-premises content except the sensitive content, whose metadata is retained in an on-premises index.
Need More Review?
Detailed information about the configuration and administration of cloud hybrid search can be found in the Office.com article entitled “Plan cloud hybrid search for SharePoint” at https://support.office.com/article/Plan-cloud-hybrid-search-for-SharePoint-33926857-302c-424f-ba78-03286cf5ac30.
Summary
![]() The BI stack in SharePoint Server 2016 includes PerformancePoint, SQL Server Reporting Services, Power Pivot, Excel Online, and Power View.
The BI stack in SharePoint Server 2016 includes PerformancePoint, SQL Server Reporting Services, Power Pivot, Excel Online, and Power View.
![]() PerformancePoint Services is a back-ported product that has been folded into SharePoint Server 2016.
PerformancePoint Services is a back-ported product that has been folded into SharePoint Server 2016.
![]() PerformancePoint Services provides a series of reporting and scorecard templates, although other templates can be created by an administrator.
PerformancePoint Services provides a series of reporting and scorecard templates, although other templates can be created by an administrator.
![]() SQL Server 2016 Reporting Services is a BI component that runs in SharePoint-integrated mode.
SQL Server 2016 Reporting Services is a BI component that runs in SharePoint-integrated mode.
![]() An SSRS server must be assigned the Custom role in a SharePoint Server 2016 MinRole configuration.
An SSRS server must be assigned the Custom role in a SharePoint Server 2016 MinRole configuration.
![]() Power Pivot is a built-in component within the Excel 2016 client that is capable of working in concert with SQL Server Analysis Services (configured in Power Pivot mode) to import data from several sources into a workbook and then create relationships between this data.
Power Pivot is a built-in component within the Excel 2016 client that is capable of working in concert with SQL Server Analysis Services (configured in Power Pivot mode) to import data from several sources into a workbook and then create relationships between this data.
![]() Office Online Server is required for use with Power Pivot to provide Excel Online functionality.
Office Online Server is required for use with Power Pivot to provide Excel Online functionality.
![]() The Microsoft SQL Server 2016 Power Pivot for Microsoft SharePoint 2014 add-in is downloaded separately and provides the necessary Power Pivot application server components.
The Microsoft SQL Server 2016 Power Pivot for Microsoft SharePoint 2014 add-in is downloaded separately and provides the necessary Power Pivot application server components.
![]() Three steps are required for the configuration of Excel Online for BI: Analysis Services availability, service instance registration, and permission assignment for Excel Online.
Three steps are required for the configuration of Excel Online for BI: Analysis Services availability, service instance registration, and permission assignment for Excel Online.
![]() Power View is a browser-based Silverlight application that supports interactive data exploration, visualization, and presentation.
Power View is a browser-based Silverlight application that supports interactive data exploration, visualization, and presentation.
![]() Power View reports in Excel Online workbooks cannot be displayed unless the workbooks reside in a SharePoint farm with SharePoint-integrated SQL Reporting Services installed.
Power View reports in Excel Online workbooks cannot be displayed unless the workbooks reside in a SharePoint farm with SharePoint-integrated SQL Reporting Services installed.
![]() The SQL Server 2014 Power Pivot and Power View add-ins for SharePoint cannot be used in SharePoint 2016.
The SQL Server 2014 Power Pivot and Power View add-ins for SharePoint cannot be used in SharePoint 2016.
![]() SharePoint Server 2016 uses a series of trusts to integrate functionality provided by Exchange Server 2016 (and others).
SharePoint Server 2016 uses a series of trusts to integrate functionality provided by Exchange Server 2016 (and others).
![]() Two different types of trusts are required for use in SharePoint 2016: trusts for farms with web applications and trusts for farms with no web applications.
Two different types of trusts are required for use in SharePoint 2016: trusts for farms with web applications and trusts for farms with no web applications.
A Cloud Search service application still requires that all six search components be installed: crawl, admin, query processing, index, analytics, and content processing. These last three, index, analytics, and content processing, are all inactive in a Cloud Search service application.
Thought experiment
In this thought experiment, demonstrate your skills and knowledge of the topics covered in this chapter. You can find the answer to this thought experiment in the next section.
You are designing a BI infrastructure for your enterprise using SharePoint Server 2016 and SQL Server 2016. Management would like to ensure that the environment will be supported going forward:
1. Which components might you opt to omit in your BI solution to ensure forward compatibility?
2. What are the differences between using Kerberos and Secure Application Markup Language claims in your environment?
3. What supporting SharePoint components might you need to ensure that your environment is complete?
Thought experiment answer
This section contains the solution to the thought experiment.
1. PerformancePoint, although useful, is a back-ported solution; this could mean that further development efforts might not take place. Power View is a component that is heavily dependent on SSRS, but uses Silverlight for the display of some of its data. If possible, you might even choose to forgo the use of Kerberos, replacing it with Secure Application Markup Language claims.
2. In an on-premises environment, both are quite effective means of overcoming the double-hop issue between SharePoint 2016 and other back-end BI functions and data sources. Kerberos is not useful in a cloud environment, as a user must be able to contact an Active Directory domain controller for its use.
3. As the BI stack in SharePoint 2016 has become claims-aware, a key design component might be c2WTS, which can be used to provide constrained delegation with protocol transitioning and permissions to the BI stack in your farm.