Appendix
Managing Your Migration
You hold in your hands all the technical details you require for a successful BizTalk Migration. This appendix is designed to show you one way of managing the effort, capturing and assigning the tasks, and showing your progress. Team Foundation Server (TFS) and its Azure-based counterpart, Visual Studio Team Services (VSTS), are one of those rare gems almost never seen outside development teams. This is unfortunate as TFS (also known as VSTS) is one of the best tools we have encountered for managing technical projects – even those like a BizTalk Migration that may require little or no code development.
As a technical project management tool – or in Microsoft parlance, an Application Lifecycle Management (ALM) platform – TFS is flexible, adaptive, and widely supported. Whether you are a Waterfall, SCRUM/ Agile, LEAN, or all of the above shop, TFS was designed to fit your operational style as opposed to dictating a particular approach. In this case, we have a code-free, almost entirely infrastructure-based project that in today’s world might be called “DevOps.”
Creating a TFS Project
Unless your Dev team already has TFS, the first thing you will need to do is get an instance of TFS up and running. You can begin this with a Free Visual Studio Team Service account at https://www.visualstudio.com/team-services/. As this book goes to press the Visual Studio Team Services home page has a prominent “Get started for free” button that opens the following page as seen in Figure A.1.
Start by giving your account a name. You can click on the “Get started for free” button within the VSTS home page to get to the screen shown in Figure A.1.

Clicking Continue is all that is required to create the instance. You now have TFS available to your organization. Now that you have TFS up and running, or with this book in hand you convinced your dev manager to let you in on the TFS magic, you will want to capture your BizTalk Migration effort in a TFS project. What you choose to name your first project is dependent on how you plan to use TFS going forward.
If your BizTalk Migration is part of a larger project and largely managed by your Infrastructure team it might be best to name your project “Infrastructure” and add your BizTalk Migration as a Project work item under it. For illustration purposes we will accept the default “MyFirstProject,” which we will change later. In Figure A.2 you can see the start page for your new project.

TFS splits its navigation into TFS Administration and Project Administration. The Administrative navigation is available via the Settings gear as shown in Figure A.3.

The Project navigation is available via the header menu and the left-hand project menu. Bring up the project menu by hovering over the Visual Studio icon in the upper left corner as shown in Figure A.4.

Clicking on the Visual Studio icon in the upper left will take you to the Projects landing page shown in Figure A.5.

As your first task, open “MyFirstProject” and rename it. To accomplish this, open the project by clicking on the project link (“MyFirstProject”) as shown above in Figure A.5. Either the one listed under Recent or the one under all will work. Once the Project page is displayed, use the Settings gear as shown in Figure A.6 to select the Account Settings option. Clicking this will bring you to the Project Admin Overview page.

Select the ellipses (…) next to “MyFirstProject” and select Rename, as shown in Figure A.7. Rename your project something like “BizTalk Migration.” At this point we should take some time to discuss a few important points that you should be aware off. The first is the process template used for your project. TFS comes with three process templates, which mainly differ by work-item types.

Agile, CMMI, and Scrum
Chances are if you don’t have TFS in your environment already that your organization is not practicing Application Lifecyle Management as described by Microsoft. However, your development team may be an Agile or Scrum shop, have had extensive training and have implemented one of these methodologies, and the business side of your organization is at least familiar with it. If that is the case, you may want to pick the Agile or Scrum template. If you do, understand that you must forego risk and change management, as well as hours of tracking, which I have found are often very useful for projects involving infrastructure. But, if your organization does not strictly adhere to any one methodology or you have the flexibility, I think you will find the CMMI template to be most familiar to your audience and lends itself to both LEAN thinking and codeless projects like a BizTalk Migration. The grid in Figure A.8 outlines the work-item type support under each template.

While the selection of a template can involve an emotional debate in which adherents of a methodology or framework will engage in a red-faced debate, do yourself a favor and sidestep all this by picking the one you’re comfortable with. You can always migrate to another template later. For infrastructure-related projects I have found the CMMI template to be a good fit. In fact, I have found CMMI to be a great fit regardless of methodology, and I like that it allows hours to be assigned to tasks I have found to be the easiest and most widely accepted measure of effort across teams.
Let’s change the process template to CMMI. Click the Agile link you saw back in Figure A.7. This will open the Process description page, which is another source of information on each process. Hover over the Settings gear and select the Default Settings option. Once the page has refreshed, hover over the Settings gear again and select Project Settings. This will open the Project profile page. The current process is listed under Process, which is also the location that we will use to change the process template to CMMI (see Figure A.9).

If you find yourself unable to change the process of an existing project, you can always delete it and create a new one. To do so click on the Projects menu. Create new project is the default view, as shown in Figure A.10. Enter the project name, select the Version Control (Git or Team Foundation Version Control), and choose one of the three Work item process templates.

Features, Requirements, and Tasks
Now that you have TFS setup and your project configured, the goal is to represent the project work within TFS. The following list is a high-level outline of a sample BizTalk Migration effort. We’ll use these to model out our project work.
1.Plan the deployment activities
a.Architecture
b.Migrate BizTalk components
c.Migrate non-BizTalk components
2.BizTalk installation
a.Prepare core servers
b.Install SQL
c.Install and configure BizTalk
3.Visual Studio
a.Recompile BizTalk projects to upgrade to latest version
4.Manual deployment activities
a.Deploy BizTalk assemblies
5.Automatic deployment activities
a.Export MSI
b.Export Binding files
c.Import MSI
d.Import Binding files
6.Testing
a.Test maps
7.Test end to end solutions
Start by adding the numbered items as Features. Click the Dashboard menu item, as shown in Figure A.11. This will open the Overview dashboard (see Figure A.12). This overview dashboard is standard to all projects and, as you learn more about TFS, you may opt to add additional dashboards. At this point the overview dashboard is sufficient.


At the top of the Welcome box is a Manage Work link click that and you will be presented with the Backlog Kanban board. At this point, nothing is present, as you have not entered any items. Select the Features item as shown in the top left corner of Figure A.13.

Now select the Backlog option shown in Figure A.14.

You are presented with a Backlog for features and can enter the titles (see Figure A.15). Complete this process for each of the items listed in the outline of work given earlier in this section.

As you add each Feature you will see the backlog begin to populate with the Features you add (see Figure A.16). Follow the same process you did for each Feature by adding each requirement until your backlog is complete.

Once you have all the features entered, select the Requirements link in left-hand menu, as shown in Figure A.17.

Similar to the Feature entry, you will create all your Requirements (refer back to the work list from the beginning of this section). You will then want to map each Requirement to its respective Feature. To do this, click on the “Mapping Off” indicator to turn mapping on as shown in Figure A.18.

When you have turned mapping on, all the features in your backlog will appear on the left-hand sign of the page as shown in Figure A.19. You can map the requirements to the features simply by dragging and dropping each Requirement onto the appropriate Feature.

After the mapping of Requirements to Features has been completed, click on the Features link under backlogs and then the expand on level “+” icon to display the Feature Requirement hierarchy of your backlog, as shown in Figure A.20.

As a final step, you will want to add the Tasks to be taken to meet each requirement. To add Tasks, select the appropriate requirement, click the plus sign next to it and then click Add data (see Figure A.21).

The Add Task dialog window will display. Enter a title for the Task, provide a description, attach any associated documents and provide an estimate of hours. Figure A.22 shows a Task being entered.

Unless you have added members to your project team the Task is assigned to you by default, as you are currently the active team member. Unless you’re doing all the work yourself, you will want to add new members to your team. To add new members, return to the project root (you can refer to Figure A.4 earlier in the chapter), then open the administrative navigation (also shown earlier in Figure A.6) and select Security. This will open the Security landing page. Select your Team (BizTalk Migration Team) on the left, select Members, Add, and then enter the email or user name in the Search users and groups text area (see Figure A.23). Save your changes when complete.

Create your next Task and select the user who should complete the work and save your Task (see Figure A.24).

Eventually, you will have entered all the tasks related to the requirements, and you can now plan and execute on your work. Figure A.25 displays the completed Requirements backlog.

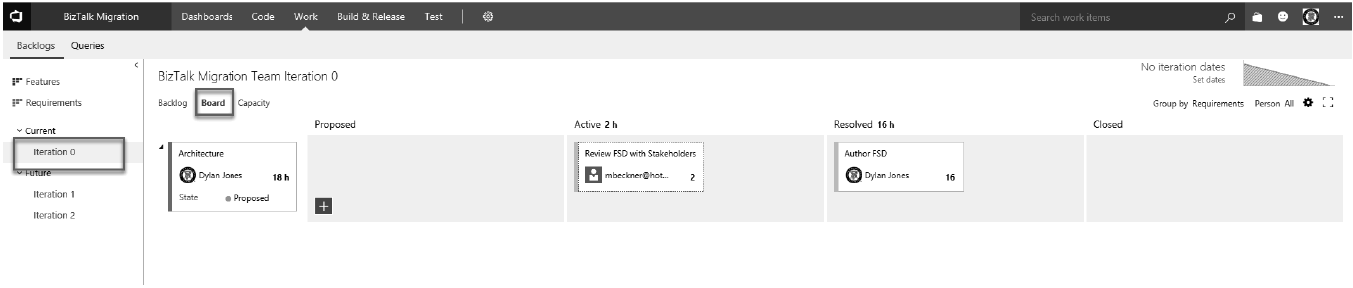
In the left column is the list of iterations for your team. Each iteration represents a two-week period. Your job is to drag and drop each requirement onto the two-week period that represents when the work will be started. Once this is complete you can view the Task Board and drag Tasks into the active column as you start them. When the Task is completed, drag it to Resolved. Once the item has passed its review or test, drag it to the closed column. Figure A.26 shows the board where items can be dragged and dropped to set status.
Summary
We have presented the bare bones necessary to manage your BizTalk Migration using TFS. We have touched only the surface of the capabilities and features present in the application. Regardless of the tool you use, it is very important that you manage the project. Having your work effort outlined and mapped out is critical not only for your own sanity, but also benefits your team and, as important, your customer.