Chapter 7. Knative on OpenShift
OpenShift is Red Hat’s distribution of Kubernetes for building and hosting enterprise-grade cloud native applications. OpenShift enables enterprises to embark upon their hybrid cloud journey by providing a unified developer experience as well as a comprehensive and rich operator experience irrespective of the underlying cloud platform. At its core, OpenShift itself is implemented as a series of Kubernetes Custom Resource Definitions (CRDs) and Operators.
Kubernetes Operators are software extensions that allow you to manage the deployment of Kubernetes applications and services. Operators not only provide automated installation, but can also manage the complete lifecycle of the software including upgrades and monitoring. Operators themselves are managed by the Operator Lifecycle Manager.
OperatorHub.io provides a place to share and discover Operators that have been contributed by the Kubernetes community, such as Apache Kafka, Redis, Jenkins, and many others.
This chapter is aimed at OpenShift developers who want to build and deploy serverless applications on OpenShift. The recipes in this chapter will help these developers get Knative installed and configured on OpenShift using the Operators. You will see that Knative service deployment is going to be similar to what you did with vanilla Kubernetes.
7.1 Installing Knative Serving
Solution
Knative support for OpenShift (aka OpenShift Serverless) is available only from OpenShift v4. To install Knative on OpenShift, you will need to have an OpenShift v4 cluster and a user with cluster administrative privileges.
The fastest way to have your own OpenShift cluster is to choose your infrastructure provider from try.openshift.com as shown in Figure 7-1 and follow the on-screen instructions to get your OpenShift cluster provisioned in less than thirty minutes.
You can install Knative Serving on OpenShift using the OpenShift Serverless Operator.
Note
The creation of the OpenShift cluster itself is beyond the scope of this book; however, if you are new to OpenShift, make sure to review the relevant documentation, especially the points related to how to configure your AWS, Azure, or GCP account. You can create a free Red Hat Developer account to access try.openshift.com, and once your AWS/Azure/GCP account is correctly configured, cluster creation is simply a matter of answering a few questions:
openshift-install --dir=myawscluster create cluster
? SSH Public Key /Users/developer/.ssh/ocp4aws.pub
? Platform aws
? Region eu-west-1
? Base Domain myroute53domain.com
? Cluster Name aws
? Pull Secret [? for help] *******

Figure 7-1. The OpenShift installation page (large format version)
Discussion
Once you have your cluster ready, you also need to download the latest OpenShift client (oc). oc is analogous to kubectl, and it allows you to interact and perform various operations on an OpenShift cluster. You can download oc from the OpenShift public mirror, unzip it, and add it to your $PATH. You can then verify the oc version using the command oc version as shown in the following snippet:
$ocversionClientVersion:v4.4.0ServerVersion:4.2.10KubernetesVersion:v1.14.6+17b1cc6
Note
At the time of writing, the versions listed here were the latest for the OpenShift client and server versions. You can use 4.2 or above for the recipes in this chapter.
The OpenShift Administrator Console has the OperatorHub integrated (Figure 7-2) directly into it out-of-the-box. This user interface (UI) enables you to install the software infrastructure that you require without leaving the browser and with just few button clicks.
You can install Knative Serving and Eventing on OpenShift using their respective Operators from the OperatorHub. There are two ways to get the Knative Operators installed:
-
Using the OperatorHub UI via the OpenShift Administrator Console
-
Using the
occommand-line tool, as Operators are nothing but sets of Kubernetes manifests that can be installed usingoc apply -f <your manifest file>
For the recipes in this chapter you will be using the UI-based approach. If you are interested in the CLI–based approach, check out the Knative Tutorial, which has the instructions to install the Operators using the oc tool.
The OpenShift Serverless Operator (aka Knative Serving component) installs an Istio ingress gateway and Istio pilot in a namespace called knative-serving-ingress, before installing the Knative Serving core components:
-
Select the OpenShift Serverless Operator from the OperatorHub (Figure 7-3).
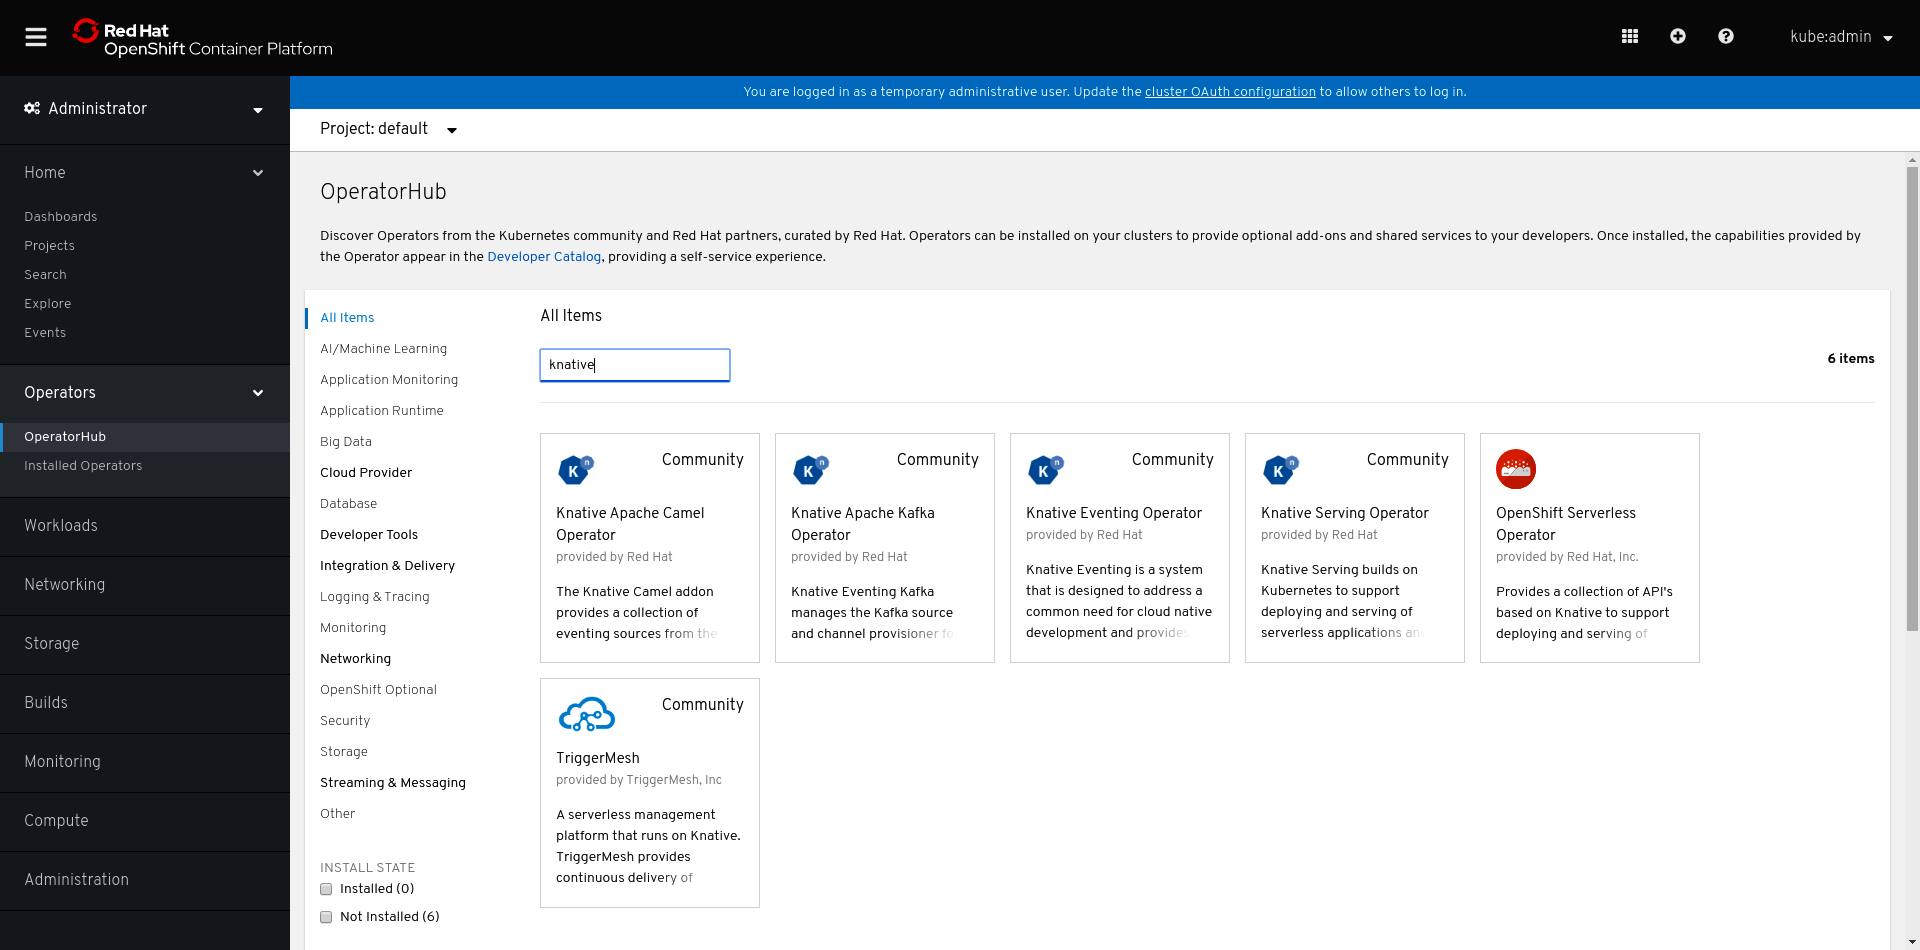
Figure 7-2. OperatorHub (large format version)
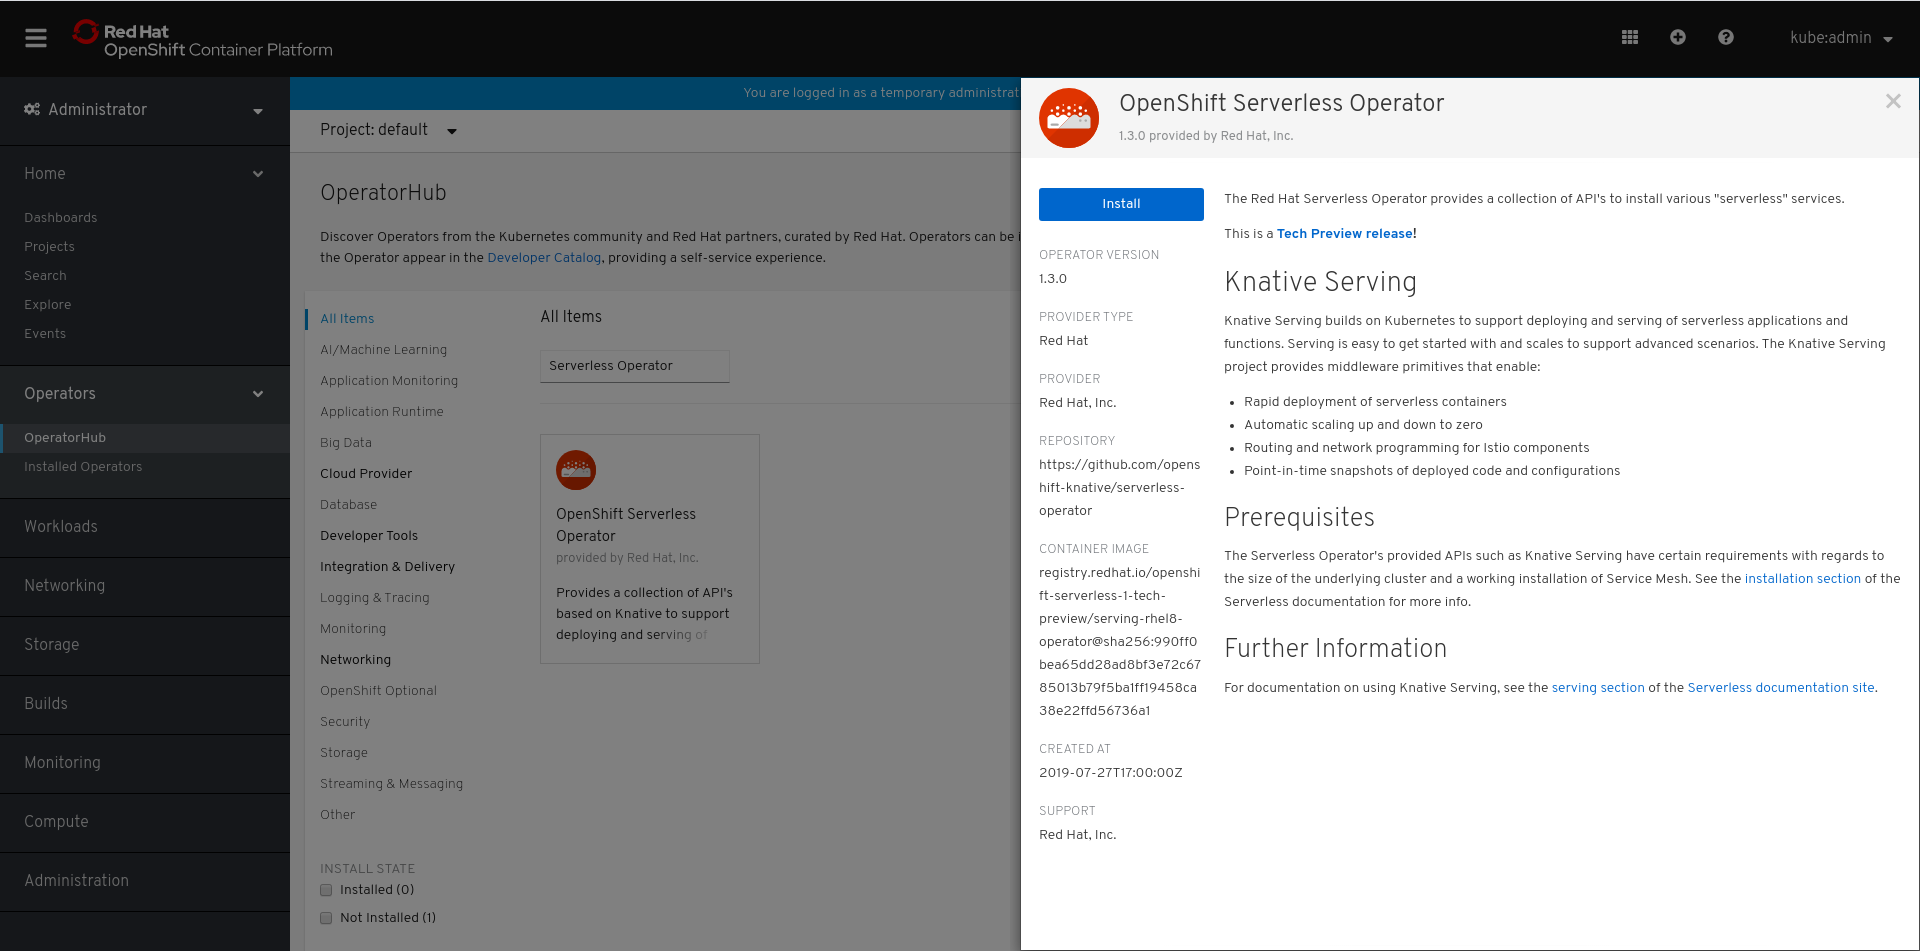
Figure 7-3. Selecting OpenShift Serverless Operator (large format version)
Click the Install button to start the Knative Serving installation onto the OpenShift cluster.
Leaving all the options with default values as shown in Figure 7-4, click the Subscribe button.
It will take a few minutes for the Operator to be available. A successful install is shown in Figure 7-5.
You can monitor the progress of the Operator installations using the watch command, looking for Succeeded with the following command (modified to fit within the printed page-width requirements):
$watchocgetcsvNAMEDISPLAYVERSIONPHASEelasticsearch-operator.4.2ElasticsearchOperator4.2Succeededjaeger-operator.v1.13.1JaegerOperator1.13.1Succeededkiali-operator.v1.0.9KialiOperator1.0.9Succeededserverless-operator.v1.3.0OpenShiftServerlessOperator1.3.0Succeededservicemeshoperator.v1.0.4RedHatOpenShiftServiceMesh1.0.4Succeeded
The Serverless Operator (serverless-operator) installs not only itself but also its dependencies. In this case, Knative has a dependency on Istio (servicemeshoperator) and Istio has a dependency on the Jaeger, Kiali, and Elasticsearch operators.
Now that you have the Serverless Operator installed, you still need to install Knative Serving itself. Create a new project called knative-serving as shown in Figure 7-6.
The installation of the OpenShift Serverless Operator in all namespaces (which is the default and recommended option) will cause the Operator to be copied into the knative-serving namespace (Figure 7-7) automatically. Wait a few minutes as this process may take some time.
Important
Wait for the Operators to be copied before proceeding to the next steps.

Figure 7-4. Install Serverless Operator (large format version)

Figure 7-5. Operators installing (large format version)

Figure 7-6. Knative Serving project (large format version)

Figure 7-7. Operators copying (large format version)
Click the Knative Serving hyperlink from the Provided APIs column as shown in Figure 7-7.
Click the Create Knative Serving button as shown in Figure 7-8, take the default settings, and click Create as shown in Figure 7-9 to start the installation of the Knative Serving components.
It will take a few minutes for the installation to complete. You can watch the status of the pods on the namespace knative-serving with the following command:
$watchocgetpods-nknative-servingNAMEREADYSTATUSAGEactivator-947bd7448-j6r6d1/1Running2m52sautoscaler-57668c89b7-hsnlm1/1Running2m51sautoscaler-hpa-9bf98ff7b-jhs6b1/1Running2m52scontroller-649c9f8d97-j99661/1Running2m47snetworking-istio-6fdb7457fd-mdwpw1/1Running2m44swebhook-85484bbfc4-bqpl81/1Running2m46s
Tip
You can also view the list of pods from the Workloads → Pods menu in the OpenShift Administrator Console.
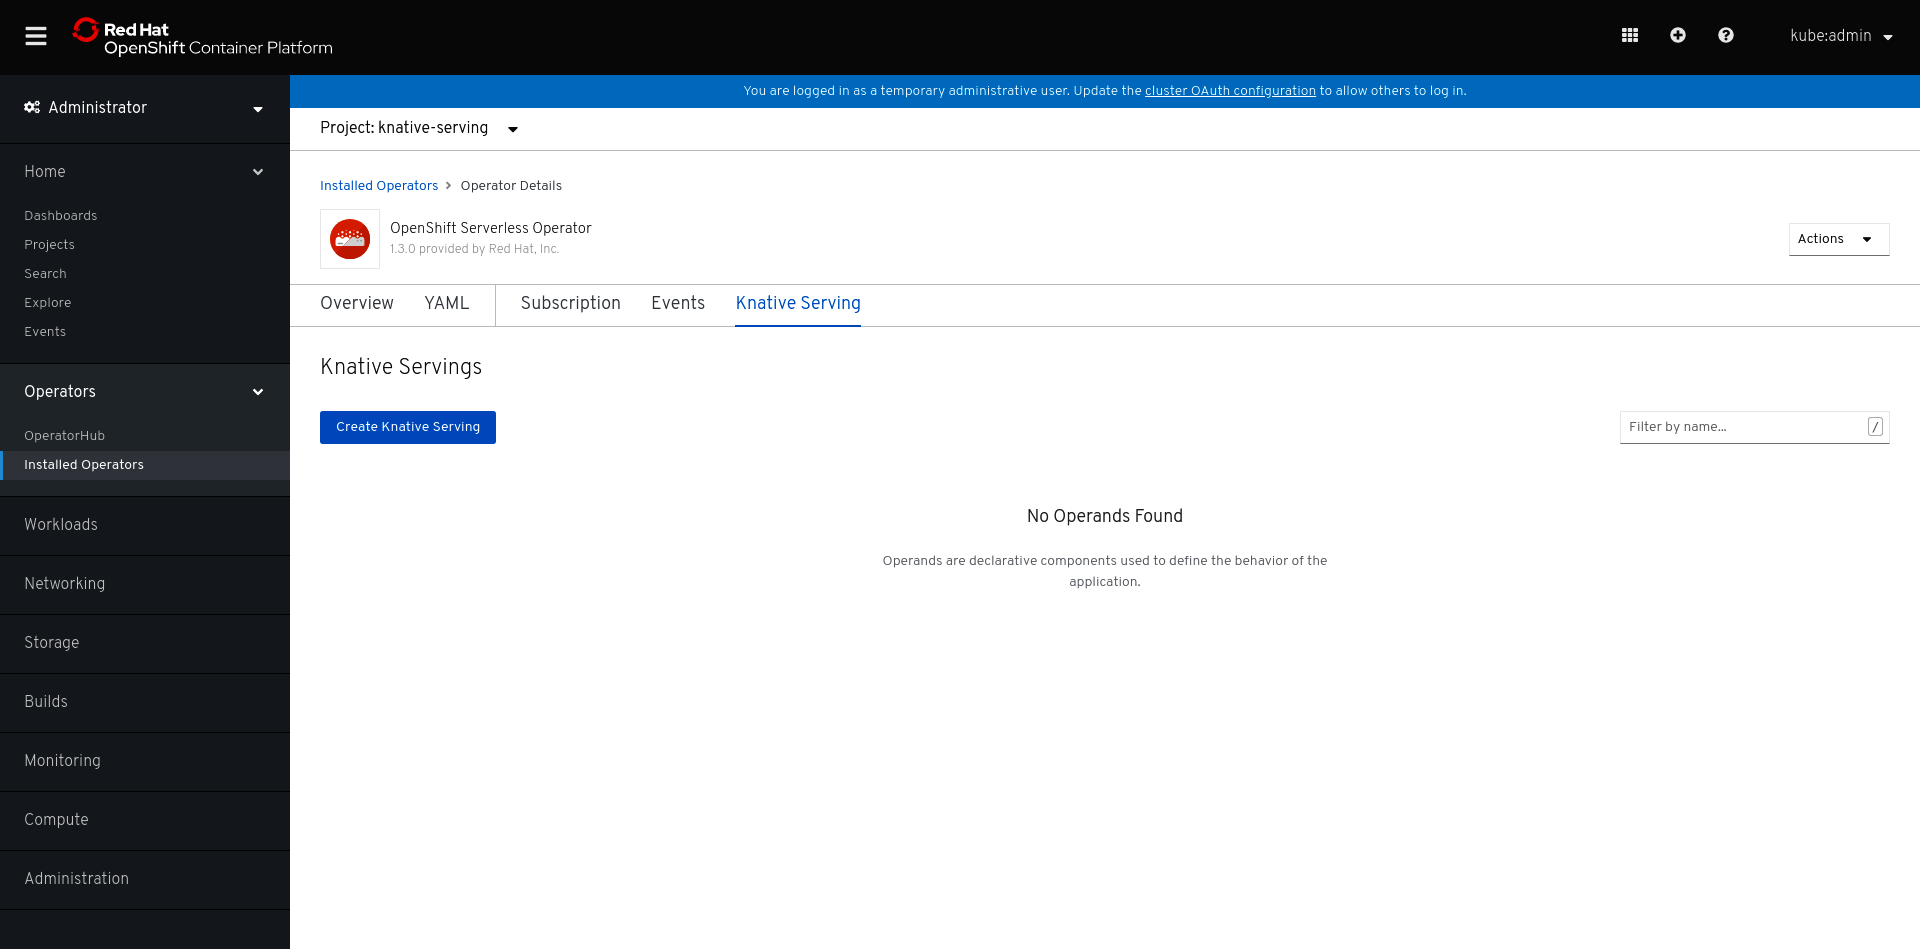
Figure 7-8. Create Knative Serving subscription (large format version)

Figure 7-9. Deploy Knative Serving (large format version)
7.2 Deploying a Knative Service
Solution
There are two ways to deploy a Knative Service on OpenShift:
-
The same method as a vanilla Kubernetes cluster using
oc apply -fservice.yaml -
The Developer Console method
Discussion
You can deploy Knative Service in OpenShift using one of the two methods:
-
CLI method
-
Developer Console method
CLI method
Deploy the same greeter service that has been used in the earlier chapters of this cookbook with the following steps:
-
Create a new OpenShift project called
chapter-7:$ocnew-projectchapter-7 -
Navigate to the
$BOOK_HOME/basics directory and run the following command:$ocapply-nchapter-7-fservice.yaml
The first deployment of the service will take some time as the container images need to be downloaded to your cluster. You can check the status of pods in the chapter-7 namespace:
$watchoc-nchapter-7getpodsNAMEREADYSTATUSgreeter-v1-deployment-5749cc98fc-gs6zr2/2Running
Important
This is a Knative Serving Service and it might have disappeared while you were busy elsewhere as it was automatically scaled-to-zero. You can also use watch oc get ksvc to monitor the deployment status of greeter.
Developer console method
The Developer Console method is behind +Add menu item as shown in Figure 7-10. Select the Container Image option.
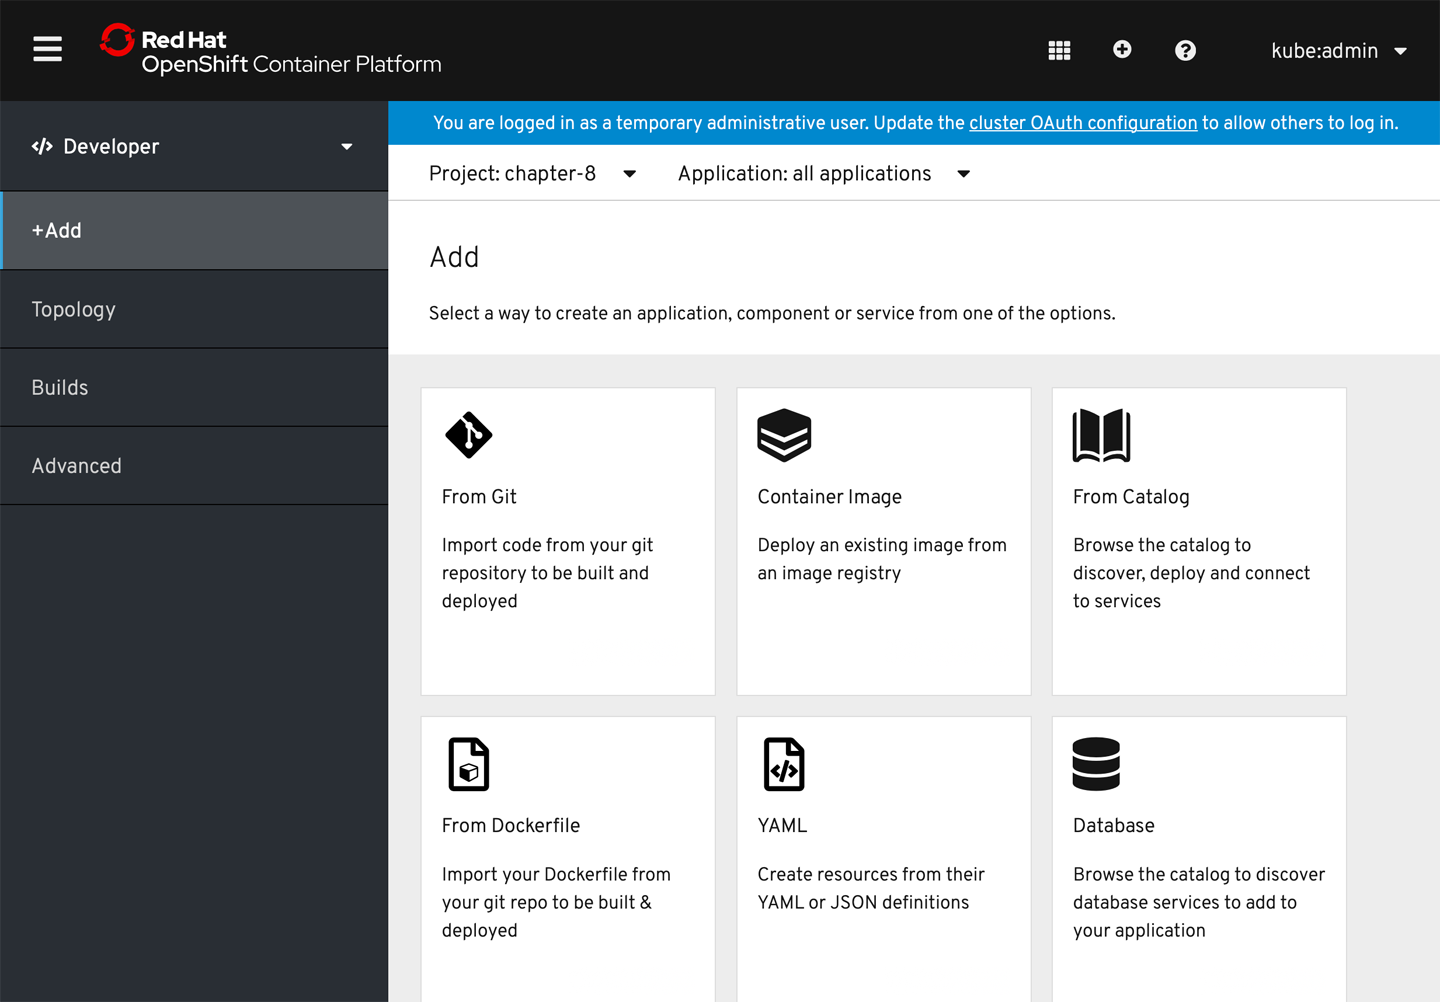
Figure 7-10. Click the +Add menu and select Container Image
Enter the name of a container image that is known to deploy well on OpenShift, such as openshift/hello-openshift, and click the magnifying glass icon as shown in Figure 7-11.

Figure 7-11. Enter the Image Name openshift/hello-openshift and click the magnifying glass
Scroll down the screen until you see “Enable scaling to zero when idle,” and check the box as shown in Figure 7-12.

Figure 7-12. Enable scaling to zero when idle
Also make sure to check the checkbox for “Create a route to the application” and then click the Create button. Wait a few moments for the container image to be downloaded into your cluster, and your Knative service will come to life and be visible inside the OpenShift Developer Console’s Topology view, as shown in Figure 7-13.

Figure 7-13. Topology view
7.3 Verifying and Invoking a Knative Service
Solution
You need to watch for the Knative route’s readiness state using the oc command.
Discussion
Each Knative route creates a Knative ingress, which might not be ready immediately after the service is deployed.
When the service is deployed, the command oc -n chapter-7 get rt greeter will return a response as shown in following listing. IngressNotConfigured under REASON means the Knative ingress for the route is still being created and configured.
$ watch oc -n chapter-7 get rt
NAME      URL                                                      READY
greeter   http://greeter.knativetutorial.apps.azr.workspace7.org   Unknown
REASON
IngressNotConfigured
Wait until the route READY status is True before using the route in your service calls:
$ oc -n chapter-7 rt
NAME      URL                                                      READY
greeter   http://greeter.knativetutorial.apps.azr.workspace7.org   True
REASON
You can now invoke the service using the route URL http://greeter.knativetutorial.apps.azr.workspace7.org either in your browser or from the CLI using curl. A successful invocation will have response like Hi greeter => '9861675f8845' : 1 as seen in the following:
$ curl http://greeter.knativetutorial.apps.azr.workspace7.org
Hi  greeter => 9861675f8845 : 1
If you receive the message Application is not available, that is an indicator that your Knative Serving Service did not deploy successfully. To learn more, use the following command:
$ oc get ksvc
NAME      URL                                                      READY
greeter   http://greeter.knativetutorial.apps.azr.workspace7.org   False
REASON
RevisionMissing
RevisionMissing could mean that the pod was unable to schedule within the cluster. Check the cluster events stream with the following command and look for the telltale sign of FailedScheduling:
$ *oc get events --sort-by=.metadata.creationTimestamp*
...
8m8s        Warning   FailedScheduling      pod/greeter-v1-deployment-5db4d86bc-
rxw8l    0/6 nodes are available: 3 Insufficient cpu, 3 node(s) had taints that
the pod didn't tolerate.
The default worker node size via try.openshift.com on AWS in particular is very small. The quick solution is to simply increase your worker node pool via the OpenShift Administrator Console.
Tip
The Administrator → Compute → Machine Sets option in the OpenShift Administrator Console will allow you to simply point and click to add a new worker node. This process can take a few minutes, but once the node joins the cluster you can then delete and re-add the Knative Service.
Other possible deployment issues might simply be a container image that is not downloadable to your cluster, and oc get events is very helpful in terms of debugging various situations.
You have successfully installed Knative Serving in OpenShift, deployed your first Knative Service, and called that service. You can continue your learning journey by attempting other recipes from this cookbook with your OpenShift cluster.