
You have your computer ready now, so let’s start programming! In this chapter, you will create your first program in the C# language and learn all the steps that you need to perform to do this.
Seeing It in Action
In this chapter, you’ll create a program that displays message “I am starting to program in C#.” to the user (see Figure 2-1).

Figure 2-1 Your first program
Creating the Project
You start every new program by creating a new project, so let’s do that now.
Launching Visual Studio
Launch Visual Studio and choose File ➤ New ➤ Project from its menu (see Figure 2-2).

Figure 2-2 Creating a new project
The New Project dialog appears (see Figure 2-3).
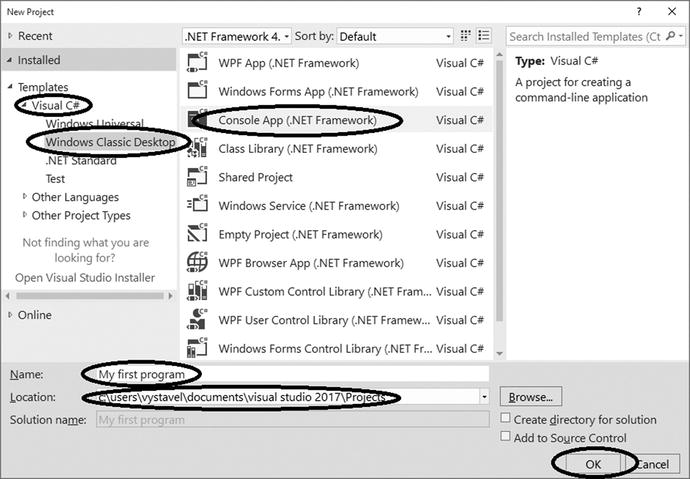
Figure 2-3 New Project dialog
Working with the New Project Dialog
In the dialog, follow the steps:
On the left, in the Templates section, choose the correct programing language, Visual C#.
Expand the Windows Classic Desktop template group.
In the middle, choose the Console App template.
In the field Name, name your project. For this example, enter My first program.
In the field Location, check where the project will be placed on your disk.
Confirm everything by click the OK button.
Writing the Program Code
The most important step is writing the program’s code, so read on.
The Look of the Development Environment
After project creation, Visual Studio looks like Figure 2-4.

Figure 2-4 The source code editor in Visual Studio
The main part of the development environment window is occupied by the source code editor. In it, the Program.cs file is opened, as is suggested by the tab’s title. Program.cs is the main file of your new project. As you can see, it already contains some source code.
You might wonder where this code came from. You haven’t written any line of code yet! The answer is that Visual Studio generated the code when you selected the Console Application template. As you saw when creating the project, Visual Studio contains many different templates; these templates are ready-made project skeletons for different types of programs.
You can see that the code contains some strange words like using, namespace, class, and so on. I am not going to explain these now because you do not need a detailed understanding of them at this time. But Visual Studio needs these lines, so just leave them alone. What you do need to know is where to write your own statements, which is what I will explain next.
Knowing Where to Write Statements
You write program statements between the curly brackets that you find after the line containing the word Main (see Figure 2-5).

Figure 2-5 Where you write your statements
Writing the Code
In this case, type the following statements between curly brackets after the Main line. Make sure to type them exactly as you see here. Differences between lowercase and uppercase matter, and semicolons matter, too!
// Output of text to the userConsole.WriteLine("I am starting to program in C#.");// Waiting for EnterConsole.ReadLine();
Visual Studio now looks like Figure 2-6.
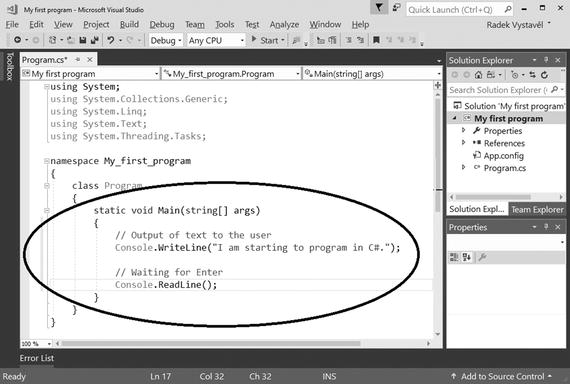
Figure 2-6 Entering your first code statements
Please double-check that you typed the statements in the same place as I did. Again, they have to be between the brackets. Also, be careful of the brackets. Do not accidentally delete any of them.
The source code of Program.cs now looks like this:
using System;using System.Collections.Generic;using System.Linq;using System.Text;using System.Threading.Tasks;namespace My_first_program{class Program{static void Main(string[] args){// Output of text to the userConsole.WriteLine("I am starting to program in C#.");// Waiting for EnterConsole.ReadLine();}}}
Understanding Your First Statements
What do these statements do?
Console.WriteLine outputs (writes) a single line to the user.
Console.ReadLine, in general, reads a line of text that the user enters with the keyboard. In this case, however, the purpose of the statement is to make your program wait for the user to press Enter when everything is done. In other words, you do not want the program window to disappear immediately.
Everything following the two slashes (//) until the end of a corresponding line is ignored. This text contains your remarks. Visual Studio colors them in green.
Using IntelliSense
You probably have noticed that when you type, Visual Studio offers you available possibilities (see Figure 2-7). You can choose an option either using the mouse or using the arrow keys followed by pressing the Tab key.

Figure 2-7 Using IntelliSense
The part of Visual Studio that provides you with these hints is called IntelliSense. Get used to relying on it as much as you can. It is the best way to avoid unnecessary typos .
Sav ing the Project
You have written several lines of code, so you probably want to save them. According to the default settings of Visual Studio, projects are automatically saved before every program launch. However, sometimes you want to save the changes manually. In that case, choose File ➤ Save All from the Visual Studio menu.
Launch ing Your Program
Having written your program, you usually want to launch it to see it “in action” and to check whether it does what you meant it to do.
Prepare yourself. The great moment of your first program launch is coming! Choose Debug ➤ Start Debugging from the Visual Studio menu, or just press the F5 key.
Visual Studio builds and launches your program (see Figure 2-8). The program outputs the specified text and waits for the Enter key to be pressed, which is exactly the way you have programmed it.

Figure 2-8 Launching your program
Now in the role of the user, press the Enter key. The program terminates, and the “black window” disappears.
Note
With the default settings of your computer, your programs will appear with white type on a black background, as you can see in Figure 2-8. However, for better readability, I will show all the later screenshots in black type on a light background. Actually, I have already done this at the beginning of this chapter.
Changing Text Size
Do you think the outputted text is too small? Do you need to enlarge the font your programs will use?
If so, click the title bar icon at the upper-left corner of the “black screen” of the launched program and choose Defaults (see Figure 2-9).

Figure 2-9 Choosing Defaults
Then click the Font tab, change the font according to your preferences, and confirm the change by clicking the OK button (see Figure 2-10).

Figure 2-10 Changing the font
When the next program launches, the new font will be used.
Dealing with Error s
If you did not write the statements exactly the way I showed you or you wrote them in the wrong place, program build will terminate unsuccessfully with errors.
Let’s try this! Delete the semicolon at the end of the line with the Console.WriteLine statement.
When you try to launch your program (by pressing the F5 key), the trial terminates with an error dialog (see Figure 2-11).

Figure 2-11 Getting an error
In this dialog, always click No; you do not want to run some older version of your program (if it exists).
After clicking No, the Error List pane appears (see Figure 2-12).

Figure 2-12 Error list
Return the deleted semicolon, and everything will be fine again. In the future, it may be more difficult to find what you did wrong, especially at the beginning of your programming career. That’s OK—my opinion is that you can’t become an expert in a field until you have made all the possible mistakes there are.
Finishing Your Work
You have just gone through all the essential steps of program development. You will proceed along the same lines in every future project you do.
You now need to learn how to terminate your work and how to get back to it later. The former is simple; you can finish your work on this project by choosing File ➤ Close Solution from the menu or by closing the whole Visual Studio program.
Restoring Your Work
When you want to get back to your project later, you can reopen it in Visual Studio using one of the following ways:
From the Start Page: This is the page that appears immediately after Visual Studio starts and contains links to your recent projects (see Figure 2-13). Simply click the right one.

Figure 2-13 Using the Start Page
From the Open Project dialog: Select File ➤ Open ➤ Project/Solution from the menu. The Open Project dialog appears in which you should locate your project (see Figure 2-14). Specifically, look for files with the .sln extension. If you cannot see the file extensions, turn their display on in Windows File Explorer (on the View tab, select the “File name extensions” check box), as shown in Figure 2-15.

Figure 2-14 Opening your program with the Open Project dialog

Figure 2-15 Showing extensions
From the File menu: Select File ➤ Recent Projects and Solutions. Visual Studio remembers what project you were working on recently. Just choose the appropriate project (see Figure 2-16).

Figure 2-16 Opening your program from the File menu
Transfer ring Your Work
You may also be interested in how to transfer your program to somewhere else from your computer. There are actually two questions in this matter. First, how do you transfer it so you can work on it later on a different computer, and second, how do you transfer it to other people to use it?
Transferring the Project
Do you want to transfer your project so you can work on it on another computer? If you’re using a flash drive, OneDrive, or something similar, just transfer its whole folder.
Transferring the Program to Others
Do you want other people to use your program? Simply hand them a copy of the file with the extension .exe that you can find in the bindebug subfolder of your project (e.g., My first program.exe). They can directly run the file; they do not need either the whole project or Visual Studio.
Using Solution Explorer
There is an important issue with transferring your projects onto another computer that you should be familiar with. Sometimes a project is opened without a source code editor (see Figure 2-17).

Figure 2-17 Opening a project without a source code editor
What do you do in such a situation? There is a pane (subwindow) called Solution Explorer usually located at the right side of the Visual Studio window. Simply double-click your source code file, Program.cs (see Figure 2-18).

Figure 2-18 Opening your source code via Solution Explorer
Did Solution Explorer disappear? No problem! At any time, you can display it using the menu selection View ➤ Solution Explorer (see Figure 2-19).

Figure 2-19 Opening Solution Explorer
Summary
In this chapter, you made your first program, and you also started learning about how to work with the Visual Studio development environment. You went through all the steps of program development, which essentially are these:
Creating the project
Editing the source code
Saving the source code
Launching the program
Detecting and removing possible errors
You also learned how to transfer your program to other computers. Specifically, you studied the following:
How to transfer your project onto another computer of yours to work on it elsewhere
How to deploy your program to your users