
![]()
The tvOS Weather App
This chapter will show you the capabilities of the tvOS by walking you through the steps on how to create a basic tvOS weather app. The app will demonstrate how UIKit controls look differently on tvOS than they do on iOS and how the development process is nearly identical. You will use this weather app for both this chapter and Chapter 3. In Chapter 3 you will use Stack Views to lay out part of this weather app.
Building this weather app will also enable you to explore how the focus engine works and how you can use it in your apps. The goal of the weather app will be to look up the current weather in different cities using www.OpenWeatherMap.org, a free web service (see Figure 2-1).

Figure 2-1. The weather app you will develop including UITabBarController, UITableView, and UIStackViews
The cool thing about tvOS development is how similar it’s to iOS development. Let’s start building this weather app by choosing a template for the app based on the Tabbed Application and include a Table View and labels.
- Create a new tvOS Xcode project and select Tabbed Application. Then click Next (see Figure 2-2).

Figure 2-2. Creating the first tvOS application
- Name the project (we are using WeatherStation), click next, and save this to a directory of your choosing, as shown in Figure 2-3.

Figure 2-3. Naming and saving the WeatherStation app
When the project is created, the project settings are displayed, as shown in Figure 2-4.

Figure 2-4. The WeatherStation app project settings
As shown in Figure 2-4, FirstViewController.swift and SecondViewController.swift files are created, one for each tab.
- Click the Main.Storyboard file and view the Storyboard in Interface Builder, as shown in Figure 2-5.
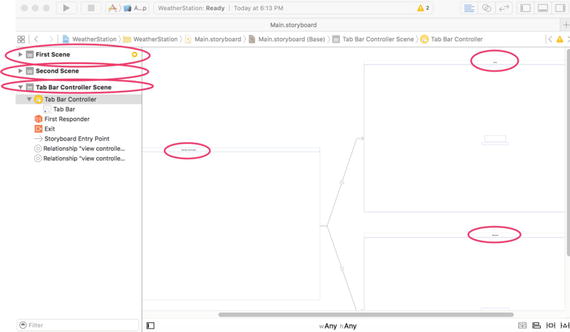
Figure 2-5. The WeatherStation app Storyboard
When the storyboard file is shown, you can see there are three scenes. The UITabBarController acts as the entry point to the application and also serves as the RootViewController that contains the First Scene and Second Scene View Controllers.
 Note You will frequently need to zoom in and out in the Storyboard to see all the scenes. Command + and Command – will quickly enable you to zoom in and out.
We created a Tabbed Application with two tabs to demonstrate how many of the UIKit controls look and behave differently in tvOS compared to iOS. You will be working in the Main.storyboard file and the FirstViewController.swift file. You will not be working with the SecondViewController.swift file directly; but you will be using the SecondViewController.swift file for our exercises at the end of this chapter.
Let’s run the WeatherStation app to see what it looks like in the tvOS simulator (see Figure 2-6). Click the Play button to run the WeatherStation app.

Figure 2-6. The WeatherStation app running in the tvOS Simulator with the remote in the lower right hand corner
You can see that the Tab Bar is at the top of the view in tvOS instead of the bottom of the view as in iOS apps. Use the remote to switch between tabs and dismiss the Tab Bar by swiping.
Note If you are not able to view the remote, you can access it by going to the tvOS Simulator menu and selecting Hardware  Show Apple TV Remote or entering Shift-Command-R.
Designing the View
Now let’s add the Table View and Label controls to the First Scene.
- Select the Main.storyboard file and select the First Scene.
- Remove the two labels in the middle of the First Scene (see Figure 2-7).

Figure 2-7. Removing the Labels in the First Scene
- Add a Table View to the First Scene and five Labels, as shown in Figure 2-8.

Figure 2-8. Adding UI Controls to the First Scene
Note You will need to expand your scene to 100% in Interface Builder to add your Table View and Labels. Make sure the controls appear under the Document Outline Section in Interface Builder. (see Figure 2-8). - Add and connect the outlets to the controls, as shown in Figure 2-9.

Figure 2-9. Connect the control outlets
- Connect the dataSource and delegate outlets for the Table View, as shown in Figure 2-10.

Figure 2-10. Connect the dataSource and delegate outlets
Now let’s add the additional code to populate the Table View by adding the code in Listing 2-1.
Line 18 contains the array of the cities for which you want to display the weather information.
Lines 30 to 40 contain the data source and delegate functions to populate the Table View.
Now run the app in the tvOS simulator to see the city names appear in the Table View. Practice using the remote in the simulator to change the focus in between cities (see Figure 2-11).

Figure 2-11. Running the app with the Table View being populated
Now let’s retrieve the weather information from www.OpenWeatherMap.org. Insert the code as shown in Listing 2-2.
Lines 41 to 44 contain the didSelectRowAtIndexPath delegate method. This method gets called when the user has selected a city. This method retrieves the row that was selected and then calls the function getWeatherData with the name of the city that was selected.
Lines 46 to 56 contain the getWeatherData function. Line 47 takes the city string that was passed in and replaces any spaces in the name (San Diego) with %20 (San%20Diego).
Line 49 then creates the URL used to request the weather data for the city. The URL String for the city is passed into the URL and the API key is used by OpenWeatherMap.org functions as a parameter at the end of the string.
Lines 50 to 55 make an asynchronous request to OpenWeatherMap.org to retrieve the weather information for the selected city. When the weather data are successfully downloaded, Line 52 calls setLables and passes the weather data that was downloaded for the selected city.
Lines 58 to 81 convert the data downloaded to JSON and parses them to retrieve the city name, temperature, and description of the weather.
Lines 61 and 62 convert the NSData to a JSON dictionary.
Lines 63 and 64 then look up the name of the city and set the cityNameOutlet text outlet.
Lines 66 and 67 look up the temperature data. OpenWeatherMap.org returns temperatures in Kelvin.
Lines 68 to 70 convert Kelvin to Celsius and then to Fahrenheit. The temperature is then sent to the weatherOutlet text outlet.
Now run the app to test that the weather data have updated with the city that was selected.
When you run the app, it will crash on line 52, self.setLables(data!). Starting with iOS 9, Apple has enforced using secure connections with websites. Because OpenWeatherMap.com is not a secure SSL connection (i.e., one that uses https://), Apple blocks the web service request. You can see what happened in the Output console, as shown in Figure 2-12.

Figure 2-12. iOS 9 blocking nonsecure (without https://) web service requests
White Listing Websites
As Apple indicates in the Console, you can configure your Info.plist file to enable only this website’s address to be accessed without it being an TLS URL. This is called white listing. To white list a website, you will need to modify the Info.plist.
- Right-click the Info.plist in the Project Navigator. Then Select Open As Source Code, as shown in Figure 2-13.

Figure 2-13. Opening the apps Info.Plist
- Add the code in Listing 2-3 to the Info.plist starting at line 31. The file should then appear as shown in Figure 2-14.

Figure 2-14. Updated Info.plist source code
- Close the Info.plist file and open it by clicking it. The Info.plist should appear as shown in Figure 2-15.

Figure 2-15. Updated Info.plist
Now that you have white listed the OpenWeatherMap.org website, you can run the app and retrieve the weather data for selected cities. Run the app and test the selecting of cities. The weather data should populate, as shown in Figure 2-16.

Figure 2-16. App running and retrieving weather data
Summary
In this chapter you learned how to develop a basic and functional tvOS app. You learned how to retrieve data from a web service and display it and learned how to white list a website.
In the next chapter we will use Stack Views layout our labels and explore the tvOS Focus Engine.
Exercises
- Read the OpenWeatherMap.org API JSON format and add the ability to display humidity, barometric pressure, and wind direction to the view.
- In the Second Scene, display an icon of the current weather that the selected city is experiencing. For example, if it is snowing, display a snowflake.