
![]()
Adding an Album Browser to the Photo Gallery App
In Chapter 4, you started the development of a Photo Gallery Apple TV app that used a Page View Controller to allow the user to browse through a single album of full-screen photos. In this chapter, we are going to expand on that project by adding the ability for the user to choose from a list of multiple albums and then browse the photos within them. We are also going add a custom static Top Shelf image to further showcase the contents of the app from the Home screen of the Apple TV.
Table View Controllers are a common user interface element used in a number of Apple’s platforms, and they provide a simple way of presenting a list of data to the user in table format. We are going to use the Table View Controller to allow the user to view and choose from a number of photo albums to browse through, as shown in Figure 5-1.

Figure 5-1. A Table View Controller containing a list of photo albums
A Table View Controller is in charge of populating and capturing user interface events from its embedded Table View. Each row within a Table View is referred to as a Table View Cell. The Table View Cells in Figure 5-1 each contain an image (the first image of the album), a main title (the name of the album), and a subtitle (the names of the images in the album). There are a number of default Table View Cell templates available, or you can even create your own custom templates in Interface Builder. For this project, we are going to use one of the default templates, as it will suit our needs appropriately. No point in doing extra work when you don’t need to!
Adding a Table View Controller to the Photo Gallery App
You are going to want the list of albums to be the first thing that the user sees when they launch the app, so let’s start by:
- Right-clicking (or Control-clicking) the Photo Gallery group in the Project navigator and selecting New File.
- Next, select Source underneath tvOS, and then Cocoa Touch Class, as shown in Figure 5-2.

Figure 5-2. Adding a new Cocoa Touch Class to the project
- Click the Next button, select UITableViewController from the Subclass drop-down list, and enter TableViewController as the Class name.
- Make sure Swift is selected as the Language (as shown in Figure 5-3), and click Next, followed by Create to add it to the project.

Figure 5-3. Adding the TableViewController class to the project
Now that you have created a TableViewController class, you are going to want to:
- Drag and drop a Table View Controller scene onto the Main.storyboard canvas to the left of the Page View Controller.
- With the new Table View Controller scene selected, check the Is Initial View Controller check box, as shown in Figure 5-4.

Figure 5-4. Adding a Table View Controller scene to the Main.storyboard canvas and making it the Initial View Controller
- Next, with the Table View Controller scene still selected, select the Identity inspector in the Utilities area and change the Class to be the newly created TableViewController, as shown in Figure 5-5.

Figure 5-5. Setting the Table View Controller scene class to TableViewController
Now that the Table View Controller has been added to the project, you need to configure the Table View Cell to display the appropriate information for each photo album.
- First, click the Document Outline button
in the bottom-left corner of the canvas to show the list of scenes in the Main.storyboard, as shown in Figure 5-6.
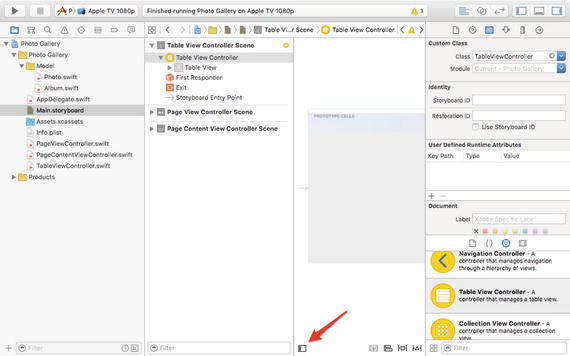
Figure 5-6. Viewing the list of Main.storyboard scenes within the Document Outline
- Next, expand the Table View item underneath the Table View Controller Scene by clicking the small gray rectangle next to it, revealing the Table View Cell, as shown in Figure 5-7.

Figure 5-7. Expanding the Table View to reveal the Table View Cell
- Select the Table View Cell from within the Document Outline and then select the Attributes inspector from the Utilities area.
- Next, select Subtitle from the Style drop-down list and enter Cell as the Identifier, as shown in Figure 5-8.

Figure 5-8. Configuring the Table View Cell
The Subtitle style is the default Table View Cell template that provides all of the user interface elements you need (image, main title, and subtitle) to display the list of photo albums. The Cell Identifier will be used in the TableViewController class code to identify which Table View Cell in the Table View Controller scene to use when populating the Table View. If you had more than one type of Table View Cell in the Table View, you would just need to give it a different Identifier.
The last thing you need to do in the storyboard is to add a Show segue between the Table View Cell and the Page View Controller so that when a user selects a particular photo album from the list they are able to browse through all of the photos within it.
- To add the Show segue, first expand the Page View Controller Scene to reveal the Page View Controller.
- Next, right-click (or Control-click) the Table View Cell and drag it to the Page View Controller, as shown in Figure 5-9.

Figure 5-9. Adding a segue between the Table View Cell and the Page View Controller
- Release the mouse button and choose Show under Selection Segue, as shown in Figure 5-10.

Figure 5-10. Selecting the Show segue
- Select the new Show segue that was added to the Table View Controller Scene in the Document Outline and change its Identifier to SelectAlbumSegue in the Attributes inspector, as shown in Figure 5-11.

Figure 5-11. Setting the Show segue identifier
That completes all of the changes you need to make to the Main.storyboard, so now we can turn our attention to writing some code!
Adding the Gallery Data Model Structure
In Chapter 4, you created the data model structures to represent both a single Photo, as well as a collection of Photos within an Album. Next, you are going to define a Gallery structure to represent a collection of Albums. That way you will be able to browse through the Gallery, choose an Album, and then browse through the Album’s photos.
- To start, right-click (or Control-click) the Model group in the Project navigator and choose New File.
- Select Source under tvOS and then select Swift File.
- Click Next, name the file Gallery.swift, and then click Create.
Add the following code into the newly created Gallery.swift file:
 1      import Foundation
 2
 3      struct Gallery {
 4          var albums: [Album] {
 5              return [
 6                  Album(name: "Animals", photoNames: ["Cows", "Dog", "Horses", "Seagull", "Sheep"]),
 7                  Album(name: "Cities", photoNames: ["Bridge", "Fireworks", "Traffic", "Village", "Windows"]),
 8                  Album(name: "Landscapes", photoNames: ["Coast", "Field", "Lake", "Lighthouse", "Road"])
 9              ]
10          }
11      }
The Swift Gallery structure contains a single computed property, an array of Albums called albums (Lines 4-10) that consists of three albums, each containing five photos.
Adding the Cities and Landscapes Image Files to the Asset Catalog
Now that you have defined the Gallery structure that consists of three different Albums, each containing five different Photos, you need to add those photo image files to the asset catalog, as you did in Chapter 4.
- After downloading and unzipping the associated project files for this chapter, drag and drop the Cities and Landscapes folders containing the image files into the asset catalog to add them to the project.
- Next, select each newly added image and change it from a Universal image to an Apple TV image, as you did in Chapter 4. Once completed, your asset catalog should look similar to that shown in Figure 5-12.

Figure 5-12. The asset catalog containing the Animals, Cities, and Landscapes photo albums
Completing the Photo Gallery App
Now that you have defined the Gallery structure and added the additional photo image files to the project, the last step you need to take is to finish implementing the Table View Controller that displays the list of photo albums for the user to choose from.
- Click the TableViewController.swift file in the Project navigator and add the following line at the top of the TableViewController class declaration:
1 let gallery = Gallery()Adding the gallery property to the Table View Controller will provide it with the data needed to display the list of photo albums to the user.
- Next, scroll down to the numberOfSectionsInTableView data source method in the TableViewController.swift file and change the return 0 to return 1, as there is only going to be one section in this table view that will contain the three rows of photo albums.
- Then, in the numberOfRowsInSection method, change the return value to the number of albums within the gallery, as shown below:
1 return self.gallery.albums.count - Next, uncomment and edit the cellForRowAtIndexPath method to match the following:
 1      override func tableView(tableView: UITableView, cellForRowAtIndexPath indexPath: NSIndexPath) -> UITableViewCell {
 2          let cell = tableView.dequeueReusableCellWithIdentifier("Cell", forIndexPath: indexPath)
 3
 4          cell.textLabel?.text = self.gallery.albums[indexPath.row].name
 5
 6          var names = ""
 7          for photo in self.gallery.albums[indexPath.row].photos {
 8              names += photo.name + ", "
 9          }
10          names = String(names.characters.dropLast(2))    // remove the last two characters of the string
11          cell.detailTextLabel?.text = names
12
13          cell.imageView?.image = UIImage(named: self.gallery.albums[indexPath.row].photos[0].name)
14
15          return cell
16      }
The cellForRowAtIndexPath method is a Table View Data Source method that is called for each Table View Cell that is displayed by a Table View. The indexPath parameter specifies which section and row within the Table View the cell is being requested for.
In this method, you first create a new Table View Cell (Line 2) using the Cell identifier that you specified in Interface Builder earlier in the chapter. Next, you set the textLabel main title to be the name of the album for the requested row (Line 4). Then, you create a comma-delimited names String from the names of each of the photos by looping through each photo within the album (Lines 6-9) and set that to the detailTextLabel subtitle (Line 11).
![]() Note If you are wondering why you would remove the last two characters of the names String (Line 10) before using it, it is because you are creating it by concatenating the name of each photo, followed by a comma and a space. Since you do not want to have a comma and a space after the final name, you simply remove those last two characters after exiting the loop.
Note If you are wondering why you would remove the last two characters of the names String (Line 10) before using it, it is because you are creating it by concatenating the name of each photo, followed by a comma and a space. Since you do not want to have a comma and a space after the final name, you simply remove those last two characters after exiting the loop.
After setting the main title and subtitle strings of the cell, the final thing you need to initialize before returning it is the image, which you do by loading the image associated with the first photo in the album that is being requested (Line 13).
If you build and run the application now, you should see something similar to Figure 5-13.

Figure 5-13. The Table View Controller showing the list of photo albums
That looks okay, but there is a lot of empty white space underneath the list of three photo albums. You can fix this issue by making each row taller by adding the following method to the TableViewController.swift file after the cellForRowAtIndexPath method:
1       override func tableView(tableView: UITableView, heightForRowAtIndexPath indexPath: NSIndexPath) -> CGFloat {
2           return 300
3       }
Now when you build and run the application, you should see something similar to Figure 5-14.

Figure 5-14. The Table View Controller showing the list of photo albums with a more acceptable amount of empty white space
If you select the Animals album using the Apple TV remote, everything works! The Animals album is displayed, and you can swipe back and forth between the photos within the album. Pressing the Menu button takes you back to the list of photo albums where you can swipe down and select either the Cities or Landscapes album and view their photos as well.
But wait! Selecting either the Cities or Landscapes album still takes us to the Animals album. Do you know why that is? What have we missed?
The reason that the Page View Controller will only show the Animals album is because it is still being initialized with that album when it is first created, and you have not yet implemented the code that passes the album selected from the Table View Controller on to the Page View Controller.
To do that, you need to uncomment and edit the prepareForSegue method located at the end of the TableViewController class declaration to contain the following:
1       override func prepareForSegue(segue: UIStoryboardSegue, sender: AnyObject?) {
2           if segue.identifier == "SelectAlbumSegue" {
3               if let pageViewController = segue.destinationViewController as? PageViewController, row = self.tableView.indexPathForSelectedRow?.row {
4                   pageViewController.album = self.gallery.albums[row]
5               }
6           }
7       }
Remember when you connected the Table View Cell to the Page View Controller with a Show segue with the SelectAlbumSegue identifier? When a user selects a Table View Cell, the Show segue is initiated, and the prepareForSegue method is called. In the method, you first check to see if the segue’s identifier is SelectedAlbumSegue (Line 2). If it is, you create local references to the Page View Controller and the row that was selected (Line 3) and initialize the album property of the Page View Controller with the album from the gallery that is indexed by the selected row (Line 4). That way, when the Page View Controller is loaded, the album property has already been initialized with the correct album data.
Great job! You have now completed the Photo Gallery app, giving users the ability to browse through a list of photo albums to view their associated full-screen photos on their widescreen HDTV.
One More Thing: Adding a Custom Static Top Shelf Image
The Photo Gallery app is now complete, but there is still something more you could do to improve it.
The Top Shelf is an area on the Apple TV Home screen that allows an app that is placed in the top row to showcase more information about itself when selected.
For example, when you select the Settings app, the Top Shelf shows a nice large image of the Settings gears icon, further indicating to the user which app is selected, as shown in Figure 5-15.

Figure 5-15. The Settings Top Shelf image
Selecting the Photo Gallery app next to it shows the default Apple TV Top Shelf image, as shown in Figure 5-16.

Figure 5-16. The default Top Shelf image
That is not very representative of the Photo Gallery app you have created. Thankfully, Apple has given developers the ability to add their own customized static Top Shelf images to their apps, giving them that additional recognition when placed in the top row of the Home screen.
Adding a custom static Top Shelf image is really quite easy.
- Simply click the Assets.xcassets asset catalog in the Project navigator and expand the App Icon & Top Shelf Image folder.
- Then, select Top Shelf Image and drag and drop the TopShelf.jpg image from the chapter’s downloadable content to the blank 1x Apple TV space, as shown in Figure 5-17.

Figure 5-17. Adding a custom static Top Shelf image
Now, simply build and run the app, and then press the Menu button on the Apple TV remote to return to the Home screen. The Top Shelf image should now be displayed whenever the Photo Gallery app is selected while it is located in the top row of the Home screen, as shown in Figure 5-18.

Figure 5-18. The Photo Gallery app with its custom static Top Shelf image
That looks really great! And it is much more representative of what the Photo Gallery app has to offer.
Summary
In this chapter you added a Table View Controller to the Photo Gallery app to allow the user to select from a list of photo albums before viewing the photos using the existing Page View Controller from Chapter 4. You also added a custom static Top Shelf image to the app to give the user a better indication as to the contents and functionality of the app when it is selected from the top row of the Home screen.
In the next chapter, you will customize the Top Shelf even further by adding a scrollable collection of dynamic thumbnail images for users to choose from when launching the app.
Exercises
- Try adding some additional albums and photos to the app from an existing album or add new albums to the gallery.
- Try adding an additional navigation layer to the app, perhaps starting with a Table View Controller containing a list of different galleries. The galleries could contain albums organized by category, allowing the user to first choose a gallery before choosing an album to browse its photos.