Code examples from this chapter are available from http://thinkpython.com/code/Point1.py; solutions to the exercises are available from http://thinkpython.com/code/Point1_soln.py.
We have used many of Python’s built-in types; now we are
going to define a new type. As an example, we will create a type called
Point that represents a point in
two-dimensional space.
In mathematical notation, points are often written in parentheses with a comma separating the coordinates. For example, (0,0) represents the origin, and (x,y) represents the point x units to the right and y units up from the origin.
There are several ways we might represent points in Python:
Creating a new type is (a little) more complicated than the other options, but it has advantages that will be apparent soon.
A user-defined type is also called a class. A class definition looks like this:
classPoint(object):"""Represents a point in 2-D space."""
This header indicates that the new class is a Point, which is a kind of object, which is a built-in type.
The body is a docstring that explains what the class is for. You can define variables and functions inside a class definition, but we will get back to that later.
Defining a class named Point
creates a class object.
>>> print Point
<class '__main__.Point'>
Because Point is defined at the
top level, its “full name” is __main__.Point.
The class object is like a factory for creating objects. To create
a Point, you call Point as if it were
a function.
>>> blank = Point()
>>> print blank
<__main__.Point instance at 0xb7e9d3ac>
The return value is a reference to a Point object, which we assign
to blank. Creating a new object is
called instantiation, and the object is
an instance of the class.
When you print an instance, Python tells you what class it belongs
to and where it is stored in memory (the prefix 0x means that the following number is in
hexadecimal).
You can assign values to an instance using dot notation:
>>> blank.x = 3.0
>>> blank.y = 4.0
This syntax is similar to the syntax for selecting a variable from
a module, such as math.pi or string.whitespace. In this case, though, we
are assigning values to named elements of an object. These elements are
called attributes.
As a noun, “AT-trib-ute” is pronounced with emphasis on the first syllable, as opposed to “a-TRIB-ute,” which is a verb.
The following diagram shows the result of these assignments. A state diagram that shows an object and its attributes is called an object diagram; see Figure 15-1.
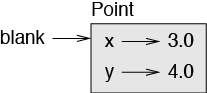
The variable blank refers to a
Point object, which contains two attributes. Each attribute refers to a
floating-point number.
You can read the value of an attribute using the same syntax:
>>> print blank.y
4.0
>>> x = blank.x
>>> print x
3.0
The expression blank.x means,
“Go to the object blank refers to and
get the value of x.” In this case, we
assign that value to a variable named x. There is no conflict between the variable
x and the attribute x.
You can use dot notation as part of any expression. For example:
>>> print '(%g, %g)' % (blank.x, blank.y)
(3.0, 4.0)
>>> distance = math.sqrt(blank.x**2 + blank.y**2)
>>> print distance
5.0
You can pass an instance as an argument in the usual way. For example:
defprint_point(p):'(%g,%g)'%(p.x,p.y)
print_point takes
a point as an argument and displays it in mathematical notation. To
invoke it, you can pass blank as an
argument:
>>> print_point(blank)
(3.0, 4.0)
Inside the function, p is an
alias for blank, so if the function
modifies p, blank changes.
Sometimes it is obvious what the attributes of an object should be, but other times you have to make decisions. For example, imagine you are designing a class to represent rectangles. What attributes would you use to specify the location and size of a rectangle? You can ignore angle; to keep things simple, assume that the rectangle is either vertical or horizontal.
There are at least two possibilities:
You could specify one corner of the rectangle (or the center), the width, and the height.
You could specify two opposing corners.
At this point it is hard to say whether either is better than the other, so we’ll implement the first one, just as an example.
Here is the class definition:
classRectangle(object):"""Represents a rectangle.attributes: width, height, corner."""
The docstring lists the attributes: width and height are numbers; corner is a Point object that specifies the
lower-left corner.
To represent a rectangle, you have to instantiate a Rectangle object and assign values to the attributes:
box=Rectangle()box.width=100.0box.height=200.0box.corner=Point()box.corner.x=0.0box.corner.y=0.0
The expression box.corner.x
means, “Go to the object box refers
to and select the attribute named corner; then go to that object and select the
attribute named x.”
Figure 15-2 shows the state of this object. An object that is an attribute of another object is embedded.

Functions can return instances. For example, find_center takes a Rectangle as an argument and returns a
Point that contains the coordinates
of the center of the Rectangle:
deffind_center(rect):p=Point()p.x=rect.corner.x+rect.width/2.0p.y=rect.corner.y+rect.height/2.0returnp
Here is an example that passes box as an argument and assigns the resulting
Point to center:
>>> center = find_center(box)
>>> print_point(center)
(50.0, 100.0)
You can change the state of an object by making an
assignment to one of its attributes. For example, to change the size of
a rectangle without changing its position, you can modify the values of
width and height:
box.width=box.width+50box.height=box.width+100
You can also write functions that modify objects. For example,
grow_rectangle takes a
Rectangle object and two numbers, dwidth and dheight, and adds the numbers to the width and
height of the rectangle:
defgrow_rectangle(rect,dwidth,dheight):rect.width+=dwidthrect.height+=dheight
Here is an example that demonstrates the effect:
>>> print box.width
100.0
>>> print box.height
200.0
>>> grow_rectangle(box, 50, 100)
>>> print box.width
150.0
>>> print box.height
300.0
Inside the function, rect is an
alias for box, so if the function
modifies rect, box changes.
Aliasing can make a program difficult to read because changes in one place might have unexpected effects in another place. It is hard to keep track of all the variables that might refer to a given object.
Copying an object is often an alternative to aliasing. The
copy module contains a function
called copy that can duplicate any
object:
>>> p1 = Point()
>>> p1.x = 3.0
>>> p1.y = 4.0

>>> import copy
>>> p2 = copy.copy(p1)
p1 and p2 contain the same data, but they are not the
same Point.
>>> print_point(p1)
(3.0, 4.0)
>>> print_point(p2)
(3.0, 4.0)
>>> p1 is p2
False
>>> p1 == p2
False
The is operator indicates that
p1 and p2 are not the same object, which is what we
expected. But you might have expected == to yield True because these points contain the same
data. In that case, you will be disappointed to learn that for
instances, the default behavior of the == operator is the same as the is operator; it checks object identity, not
object equivalence. This behavior can be changed—we’ll see how
later.
If you use copy.copy to
duplicate a Rectangle, you will find that it copies the Rectangle object
but not the embedded Point.
>>> box2 = copy.copy(box)
>>> box2 is box
False
>>> box2.corner is box.corner
True
Figure 15-3 shows what the object diagram looks like.This operation is called a shallow copy because it copies the object and any references it contains, but not the embedded objects.

For most applications, this is not what you want. In this example,
invoking grow_rectangle on one of the Rectangles
would not affect the other, but invoking move_rectangle on either would affect
both! This behavior is confusing and error-prone.
Fortunately, the copy module
contains a method named deepcopy that
copies not only the object but also the objects it refers to, and the
objects they refer to, and so on. You will not be
surprised to learn that this operation is called a deep copy.
>>> box3 = copy.deepcopy(box)
>>> box3 is box
False
>>> box3.corner is box.corner
False
box3 and box are completely separate objects.
When you start working with objects, you are likely to
encounter some new exceptions. If you try to access an attribute that
doesn’t exist, you get an AttributeError:
>>> p = Point()
>>> print p.z
AttributeError: Point instance has no attribute 'z'
If you are not sure what type an object is, you can ask:
>>> type(p)
<type '__main__.Point'>
If you are not sure whether an object has a particular attribute,
you can use the built-in function hasattr:
>>> hasattr(p, 'x')
True
>>> hasattr(p, 'z')
False
The first argument can be any object; the second argument is a string that contains the name of the attribute.
- Class:
A user-defined type. A class definition creates a new class object.
- Class object:
An object that contains information about a user-defined type. The class object can be used to create instances of the type.
- Instance:
- Attribute:
- Embedded (object):
- Shallow copy:
To copy the contents of an object, including any references to embedded objects; implemented by the
copyfunction in thecopymodule.- Deep copy:
To copy the contents of an object as well as any embedded objects, and any objects embedded in them, and so on; implemented by the
deepcopyfunction in thecopymodule.- Object diagram:
A diagram that shows objects, their attributes, and the values of the attributes.
Exercise 15-4.
Swampy (see Chapter 4) provides a
module named World, which defines a
user-defined type also called World. You can import it like this:
fromswampy.WorldimportWorld
The following code creates a World object and calls the mainloop method, which waits for the
user.
world=World()world.mainloop()
A window should appear with a title bar and an empty square. We
will use this window to draw Points, Rectangles and other shapes. Add
the following lines before calling mainloop and run the program again.
canvas=world.ca(width=500,height=500,background='white')bbox=[[-150,-100],[150,100]]canvas.rectangle(bbox,outline='black',width=2,fill='green4')
You should see a green rectangle with a black outline. The first
line creates a Canvas, which appears in the window as a white square.
The Canvas object provides methods like rectangle for drawing various
shapes.
bbox is a list of lists that
represents the “bounding box” of the rectangle. The first pair of
coordinates is the lower-left corner of the rectangle; the second pair
is the upper-right corner.
You can draw a circle like this:
canvas.circle([-25,0],70,outline=None,fill='red')
The first parameter is the coordinate pair for the center of the circle; the second parameter is the radius.
If you add this line to the program, the result should resemble the national flag of Bangladesh (see http://en.wikipedia.org/wiki/Gallery_of_sovereign-state_flags).
Write a function called
draw_rectanglethat takes a Canvas and a Rectangle as arguments and draws a representation of the Rectangle on the Canvas.Add an attribute named
colorto your Rectangle objects and modifydraw_rectangleso that it uses the color attribute as the fill color.Write a function called
draw_pointthat takes a Canvas and a Point as arguments and draws a representation of the Point on the Canvas.Define a new class called Circle with appropriate attributes and instantiate a few Circle objects. Write a function called
draw_circlethat draws circles on the canvas.Write a program that draws the national flag of the Czech Republic. Hint: you can draw a polygon like this:
points=[[-150,-100],[150,100],[150,-100]]canvas.polygon(points,fill='blue')
I have written a small program that lists the available colors; you can download it from http://thinkpython.com/code/color_list.py.