
Building Web Applications Using Servlets and JSP
Protocol is everything.
—François Giuliani
The core Internet protocols substantiate and sustain the Web, so understanding these protocols is fundamental to understanding how web applications are developed.
The Internet is a colossal network of networks, and in general, all of the machines on the Internet can be classified into two types: the server and the client. The client is the machine requesting some information, and the server is the machine that provides that information. The information data that flows from the information provider (that is, the server) to the information requester (that is, the client) is bound by a definite rule that governs the marshaling of the information to be transmitted by the server and the unmarshaling of the information to be translated or read by the client. This rule is called the protocol. The web browser (that is, the client), the web server (that is, the server), and the web application all converse with each other through the Hypertext Transfer Protocol (HTTP). The clients send HTTP requests to the web servers, and the web servers return the requested data in the form of HTTP responses. The HTTP clients and the HTTP servers are the bricks and mortar that lay the foundation of the World Wide Web, and HTTP is the lingua franca of the Web.
HTTP is a request-response stateless protocol, the corollary of which is that, from the web server’s view, any request is the first request from the web browser. When a client makes a request for the resource, the request also encloses the identification of the resource being requested, in the form of a Uniform Resource Locator (URL). URLs are described in RFC 39861 as a uniform way of uniquely identifying a resource. URLs are designed to implicitly provide a means of locating a resource by describing its “location” on a network.
Note A URL is a concrete form of Uniform Resource Identifier (URI), which is a mechanism to distinguish entities. But URIs in themselves are abstract. There are two concrete forms of URI: URL and Uniform Resource Name (URN). URN is still experimental and not widely adopted.
A generic URL is a hierarchical sequence of components, structured as scheme://hostName:portNumber/path/resource?query string.
To identify the parts of a URL, consider a URL that lists the details of a book on your bookstore web site, as shown here:
http://www.yourbookstore.com/bookstore/bookServlet?action=bookDetails
Figure 2-1 illustrates the parts of this URL.
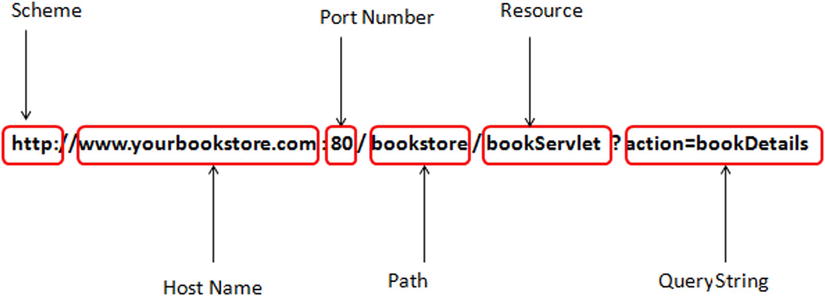
Figure 2-1. Anatomy of a URL
The host name and port number together are termed an authority. By default, a web server such as Tomcat, as explained later, listens for incoming requests on port 8080. Some parts of the URL shown in Figure 2-1 are optional, including the port number (which defaults to the well-known ports 80 and 443 for the HTTP and HTTPS schemes, respectively) and the query string.
When present, a query string is a series of name-value pairs preceded with a question mark (?) and with an ampersand (&) separating the pairs.
Note Query strings are supported only for the GET method. There are other HTTP protocol methods, such as POST, DELETE, and PUT.
A web application is a collection of web components that work together to provide a specific functionality on the Web. In the Java EE specification, a web component is defined to be either a Servlet or a Java Server Page (JSP) page.
Note Other than servlets and JSP pages, a web application may also comprise static resources such as HTML documents, images, and the metadata or configuration files that define properties of the web application; however, these are not considered to be web components.
The web application and its constituent components are managed and executed inside the web container, also called a servlet container, which provides additional features to the web application such as security. When the web server gets a request for specific functionality that a particular web component (such as a servlet or a JSP page) can provide, the web server forwards the request to the servlet container in which the web component resides. All requests for the dynamic content (that is, all requests to the web component that is responsible for generating the dynamic content) are mediated by the servlet container, as shown in Figure 2-2.

Figure 2-2. Request for dynamic content
The Java EE Servlet and JSP specifications describe the service contract that a servlet container must provide and specify how a servlet should use those services. In terms of implementation, a servlet is a Java class that acts as a dynamic web resource.
Servlets
Servlets are the central processing unit of a Java web application and are responsible for most of the processing required by a web application. Specifically, a servlet is a Java class that implements the javax.servlet.Servlet interface. The Servlet interface defines the methods that all servlets must implement. “One ring to rule them all!” This interface, along with other methods, defines key life-cycle methods such as init(), service(), and destroy() to initialize a servlet, to service requests, and to remove a servlet from the server, respectively. Table 2-1 describes all the methods of the javax.servlet.Servlet interface.
Table 2-1. The Life-Cycle and Non-Life-Cycle Methods of the Servlet Interface
Modifier and Type |
Method |
|---|---|
void |
init(ServletConfig config) |
void |
service(ServletRequest req, ServletResponse res) |
void |
destroy() |
ServletConfig |
getServletConfig() |
String |
getServletInfo() |
The life-cycle methods are invoked by the container at appropriate instants in a servlet’s life in the following sequence:
- The servlet is constructed and then initialized with the init method.
- Any calls from clients to the service method are handled.
- The servlet is then destroyed with the destroy method, garbage collected, and finalized.
The Servlet interface methods illustrated in Table 2-1 are explained here:
- init(ServletConfig): Called by the servlet container exactly once after instantiating the servlet. This method must complete successfully before the servlet is a candidate to receive any requests.
- service(): Called by the servlet container, after the servlet’s init() method has completed successfully, to allow the servlet to respond to a request.
- destroy(): Called by the container to destroy the servlet and serves as a method in which the servlet must release acquired resources before it is destroyed.
- getServletConfig(): Allows the servlet to get start-up information in the form of a ServletConfig object returned by this method. The ServletConfig object contains initialization and start-up parameters for the servlet.
- getServletInfo(): Allows the servlet to return its own information such as the servlet’s author and version.
Your First Web Application Using a Servlet
In Chapter 1, you installed the Eclipse Kepler IDE. You will develop your first web application in Eclipse in this section. Specifically, you will use Tomcat 7 both as the HTTP server and as the servlet container. You can install Tomcat 7 by downloading the source distribution of Tomcat as a ZIP file from http://tomcat.apache.org/download-70.cgi.
Start Eclipse and select the Window ![]() Preferences menu option to display the Preferences dialog, as illustrated in Figure 2-3.
Preferences menu option to display the Preferences dialog, as illustrated in Figure 2-3.
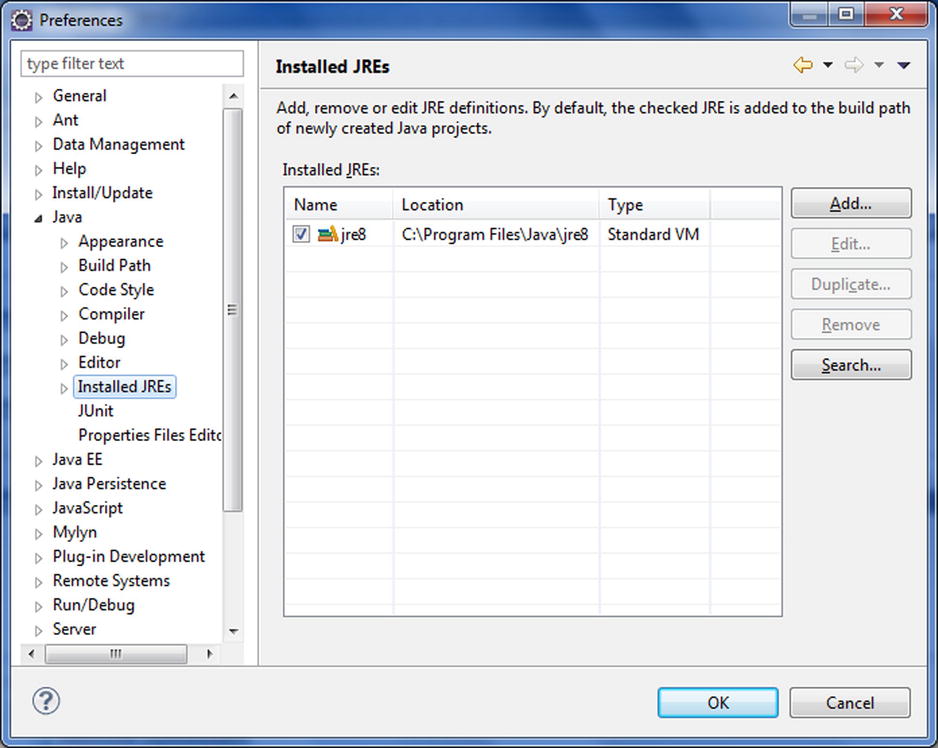
Figure 2-3. Preferencesdialog, verifying installed JRE
In the left pane of this dialog, drill down to Java ![]() Installed JREs and verify that your previously installed version of JRE8/JDK 8 shows up. If it doesn’t, click the Add button to add a reference to your JDK. Create a Dynamic Web Project by selecting File
Installed JREs and verify that your previously installed version of JRE8/JDK 8 shows up. If it doesn’t, click the Add button to add a reference to your JDK. Create a Dynamic Web Project by selecting File ![]() New
New ![]() Dynamic Web Project, as shown in Figure 2-4. Name the project helloworld, as shown in Figure 2-5.
Dynamic Web Project, as shown in Figure 2-4. Name the project helloworld, as shown in Figure 2-5.

Figure 2-4. Creating a new project
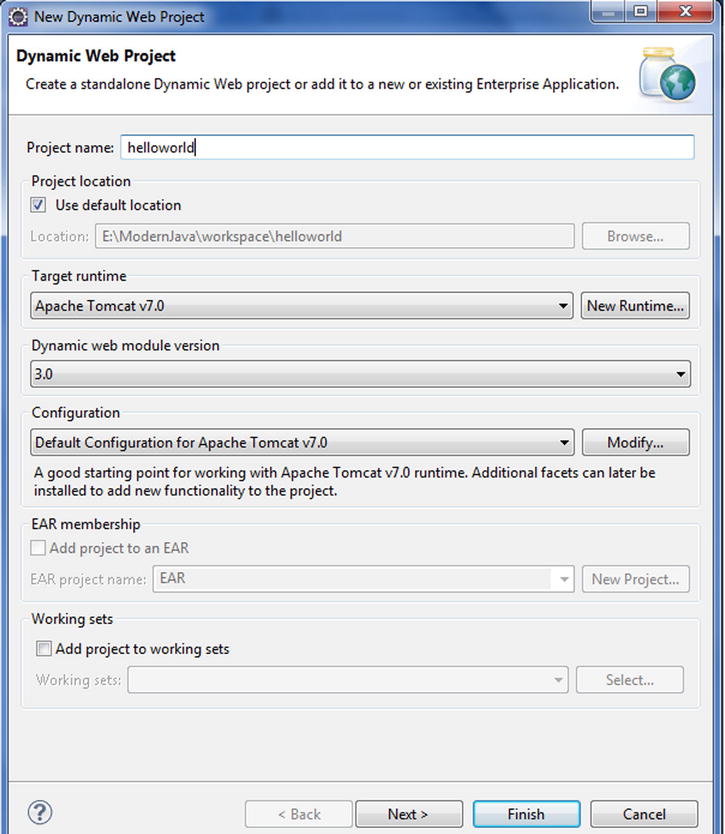
Figure 2-5. Creating the helloworld project
Click Next, and check “Generate web.xml deployment descriptor,” as shown in Figure 2-6. Later we will see how it is possible to configure the web module without web.xml.
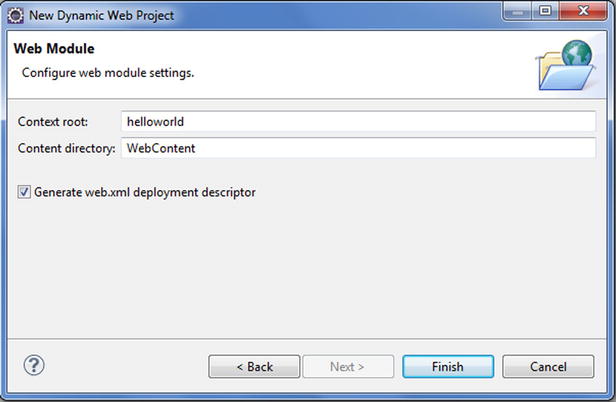
Figure 2-6. Configuring web module settings
Click Finish, and create a new Java class, as shown in Figure 2-7.
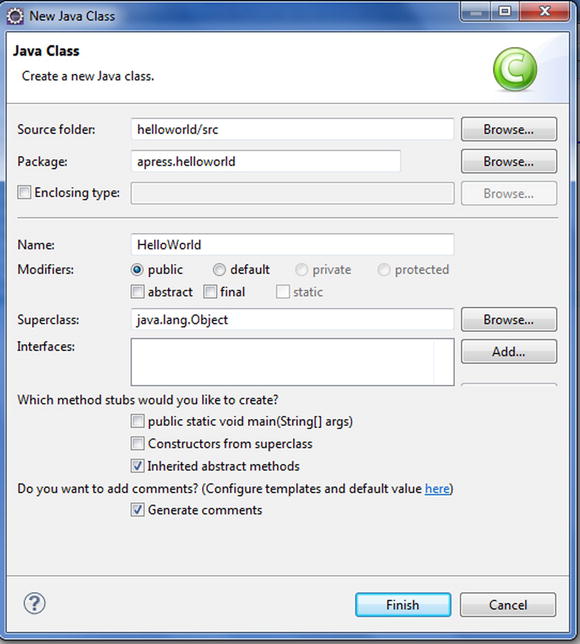
Figure 2-7. Creating a Java class: the servlet
Modify the generated HelloWorld class with the code in Listing 2-1.
Listing 2-1. HelloWorld Servlet
1.package apress.helloworld;
2.
3.import java.io.IOException;
4.import java.io.PrintWriter;
5.
6.import javax.servlet.http.HttpServlet;
7.import javax.servlet.http.HttpServletRequest;
8.import javax.servlet.http.HttpServletResponse;
9.
10.public class HelloWorld extends HttpServlet{
11.
12.protected void doGet(HttpServletRequest request,
13.HttpServletResponse response)
14.{
15.try
16.{
17.response.setContentType("text/html");
18.PrintWriter printWriter = response.getWriter();
19.printWriter.println("<h2>");
20.printWriter.println("Hello World");
21.printWriter.println("</h2>");
22.}
23.catch (IOException ioException)
24.{
25.ioException.printStackTrace();
26.}
27.}
28.
29.}
Modify the web.xml file with the code in Listing 2-2.
Listing 2-2. Web.xml: Deployment Descriptor
1.<?xml version="1.0" encoding="UTF-8"?>
2.<web-app xmlns:xsi="http://www.w3.org/2001/XMLSchema-instance"
3.xmlns="http://java.sun.com/xml/ns/javaee" xmlns:web="http://java.sun.com/xml/ns/javaee/web-app_2_5.xsd"
4.xsi:schemaLocation="http://java.sun.com/xml/ns/javaeehttp://java.sun.com/xml/ns/javaee/web-app_3_0.xsd"
5.id="WebApp_ID" version="3.0">
6.<display-name>helloworld</display-name>
7.<servlet>
8.<servlet-name>HelloWorld</servlet-name>
9.<servlet-class>apress.helloworld.HelloWorld</servlet-class>
10.</servlet>
11.<servlet-mapping>
12.<servlet-name>HelloWorld</servlet-name>
13.<url-pattern>/hello</url-pattern>
14.</servlet-mapping>
15.<welcome-file-list>
16.<welcome-file>index.html</welcome-file>
17.<welcome-file>index.htm</welcome-file>
18.<welcome-file>index.jsp</welcome-file>
19.<welcome-file>default.html</welcome-file>
20.<welcome-file>default.htm</welcome-file>
21.<welcome-file>default.jsp</welcome-file>
22.</welcome-file-list>
23.</web-app>
Now we need to configure HelloWorld servlet as a web module in Tomcat. SelectWindow ![]() Show View
Show View ![]() Servers in the menu bar of Eclipse, as illustrated in Figure 2-8.
Servers in the menu bar of Eclipse, as illustrated in Figure 2-8.
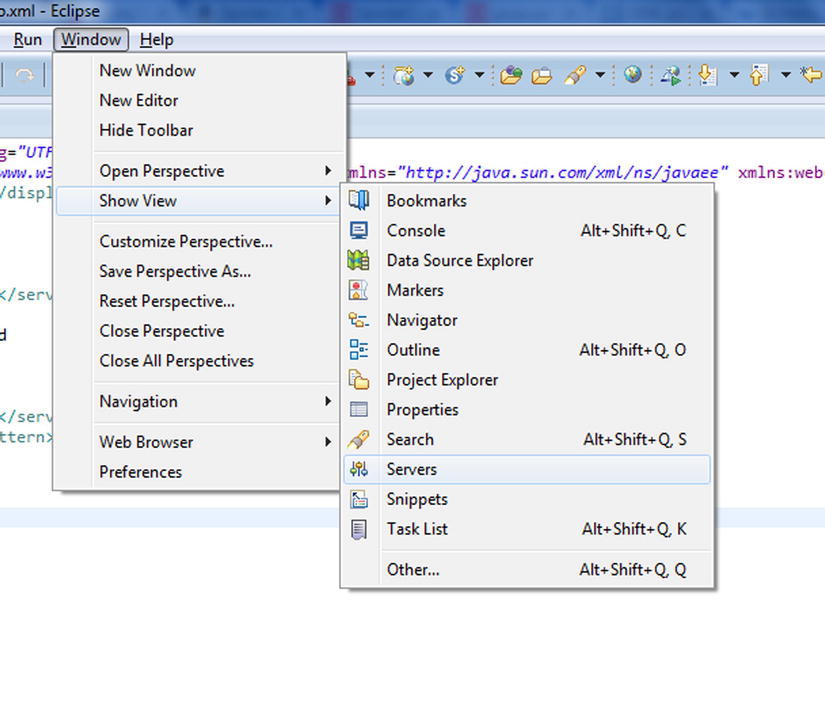
Figure 2-8. Adding the server
On the Servers tab, right-click and add Tomcat 7 as the new server, as shown in Figure 2-9.
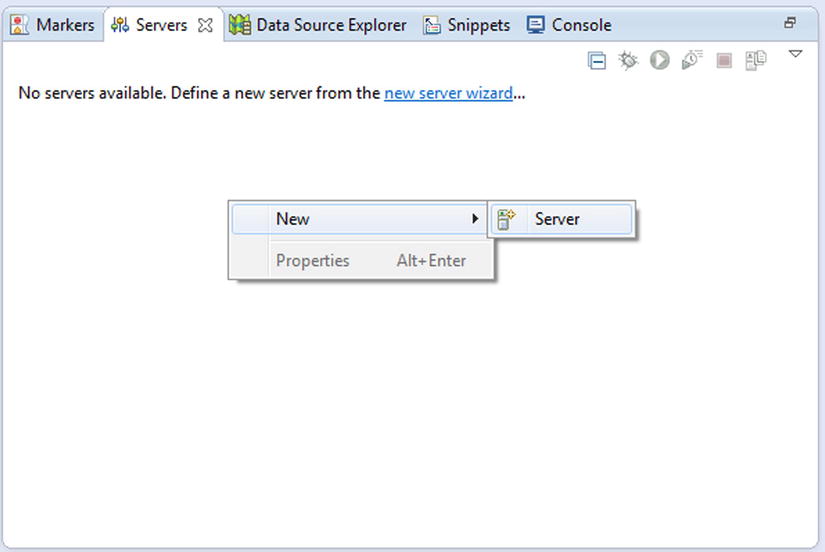
Figure 2-9. Defining the server
Next you will have to define a new server, as illustrated in Figure 2-10.

Figure 2-10. Defining the Tomcat server
Now configure the helloworld project by moving the resources to the right in the configured section, as shown in Figure 2-11.
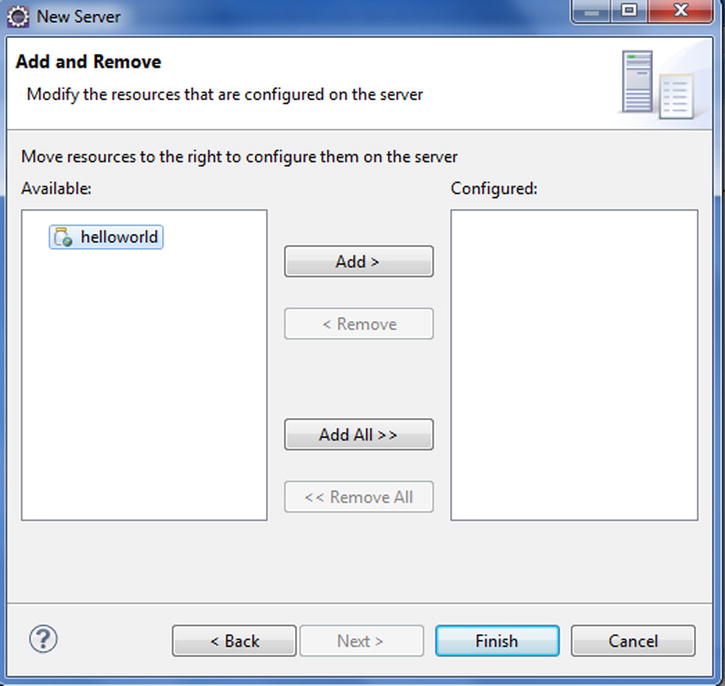
Figure 2-11. Configuring the resource on the server
Click Add, and the resource will be configured on the server. Then click Finish. Start the server and access the application using the URL shown in Figure 2-12.
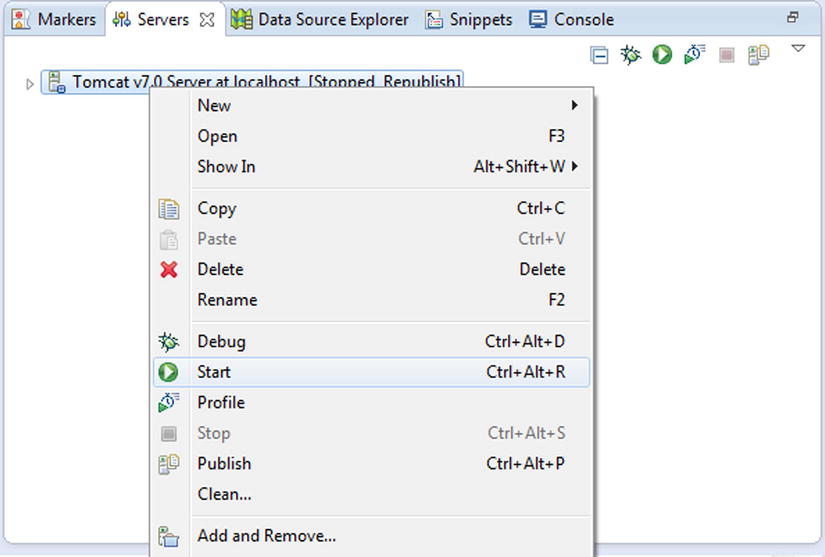
Figure 2-12. Starting the server
You can now access your first web application through the URL http://localhost:8080/helloworld/hello, as illustrated in Figure 2-13.
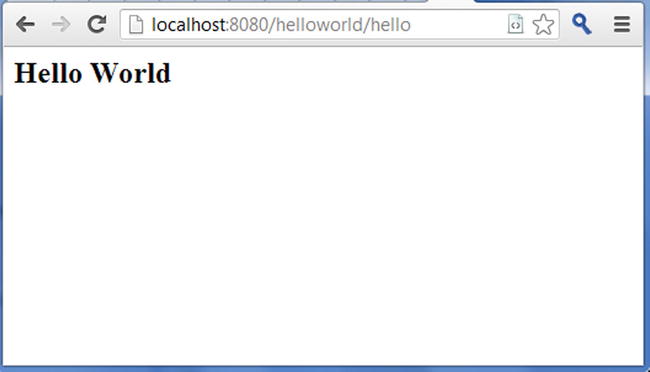
Figure 2-13. Running the helloworld web application
In the following section, you will learn how the request flows through the application and how the container finds the servlet in the helloworld application you developed. Then you will use the HelloWorld servlet to understand the life-cycle methods of the servlet.
Request Flow for the HelloWorld Servlet
The request originating from the web browser flows through the web server and the servlet container before the HelloWorld servlet can generate the response, as explained in following sections.
The URL used to access the helloworld web application is http://localhost:8080/helloworld/hello. When the user accesses the web application through this URL, the web browser creates the HTTP request, as illustrated in Listing 2-3.
Listing 2-3. HttpRequest Message
1.GET /helloworld/hello HTTP/1.1
2.Host: localhost:8080
3.User-Agent: Mozilla/5.0 (Windows NT 6.1) AppleWebKit/537.31 (KHTML, like Gecko)
Chrome/26.0.1410.43 Safari/537.31
- Line 3: This line describes the specific user agent (web browser) that initiated communication by making a request for a specific resource using HTTP, described in line 1.
- Line 1: The request made by the user agent is of the form shown in Figure 2-14.
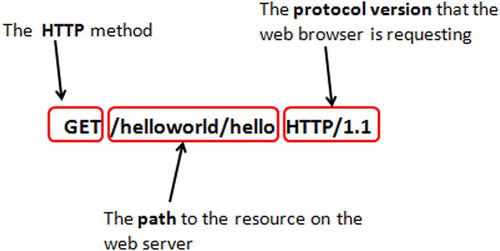
Figure 2-14. Anatomy of HTTP request message
- Line 2: This machine (your machine) that is running a web server is a server machine. Localhost is specified where you would otherwise use the host name of a computer. For example, directing a browser installed on a system running an HTTP server to http://localhost will display the home page of the web site installed on that system, as illustrated in Figure 2-15.
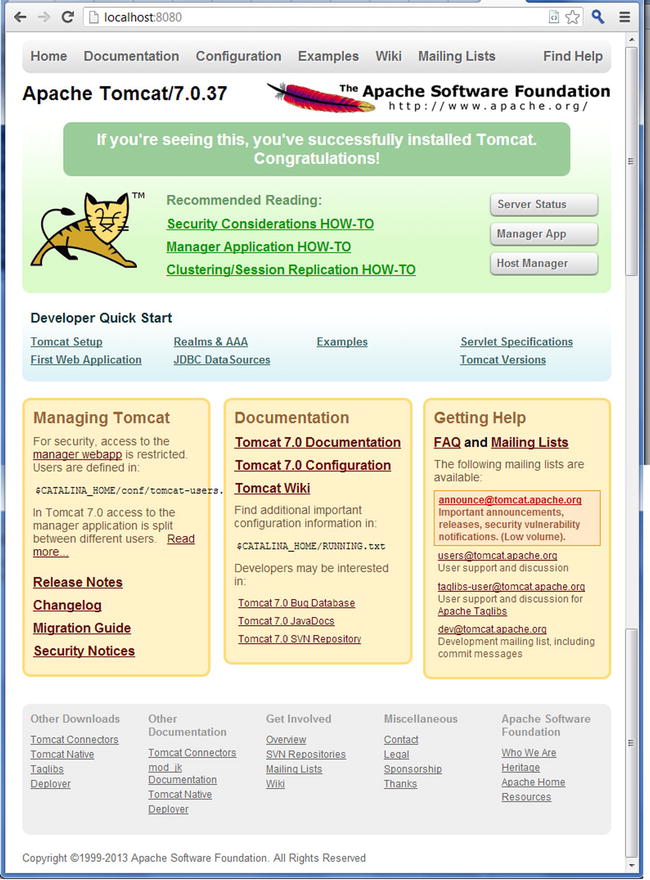
Figure 2-15. Home page of the web server
Figure 2-15 shows the homepage of Tomcat that you will see when you start Tomcat on your machine by running startup.bat in the bin directory of Tomcat. A server machine makes its services available to the Internet using numbered ports, one for each service that is available on the server. For example, if a server machine is running a web server, the web server would typically be available on port 80, or 8080 in the case of Tomcat.
When the client (web browser) makes a request (a GET request in this case), the web server (Tomcat) sees the resource path /helloworld/hello in the request in line 1 and determines that the resource requested by the user is not a static page (for example a .html file) and so forwards the request to the web container (Tomcat). Astute readers will notice that Tomcat serves the role of the web server and the web container.
The resource path in the request (line 1 in Listing 2-3) is mapped to the HelloWorld servlet through the web.xml file written in Listing 2-2. This web.xml file is called a deployment descriptor because it describes the deployed servlet to the web container. Through the deployment descriptor, the web container determines the servlet that needs to be called to serve the original HTTP request that the web browser initiated. For the sake of reader’s convenience, the web.xml is shown again here in Listing 2-4.
Listing 2-4. web.xml
1.<?xml version="1.0" encoding="UTF-8"?>
2.<web-app xmlns="http://java.sun.com/xml/ns/javaee" xmlns:xsi="http://www.w3.org/2001/XMLSchema-instance" xsi:schemaLocation="http://java.sun.com/xml/ns/javaeehttp://java.sun.com/xml/ns/javaee/web-app_3_0.xsd" version="3.0">
3.<servlet>
4.<servlet-name>HelloWorld </servlet-name>
5.<servlet-class>
6.apress.helloworld.HelloWorld
7.</servlet-class>
8.</servlet>
9.<servlet-mapping>
10.<servlet-name>HelloWorld</servlet-name>
11.<url-pattern>/hello </url-pattern>
12.</servlet-mapping>
13.</web-app>
- Lines 1 to 2: These lines contain boilerplate XML stating the version, encoding, and schema used for the XML file.
- Lines 3 to 8: The <servlet> tag is used to configure our servlet. It contains two nested tags: <servlet-name> defines a logical name for the servlet, and <servlet-class> indicates the Java class defining the servlet.
- Lines 9 to 12: The <servlet-mapping> XML tag is used to configure our servlet. It contains two nested tags: <servlet-name> matches the value set in the <servlet> tag, and <url-pattern> sets the URL pattern for which the servlet will execute.
Java EE web applications run from within a context root. The context root is the first string in the URL after the server name and port. For example, in the URL http://localhost:8080/helloworld/hello, the string helloworld is the context root. The value for <url-pattern> is relative to the application’s context root. A Java EE web.xml file can contain many additional XML tags. Besides mapping URLs to actual servlets, you can use the deployment descriptor to customize other aspects of your web application such as security roles, error pages, tag libraries, and initial configuration information. However, these additional tags are not needed for this helloworld application. The web container loads the HelloWorld servlet class and instantiates it. Only a single instance of the HelloWorld servlet is created, and concurrent requests to the HelloWorld servlet are executed on that same instance. Every client request generates a new pair of request and response objects. The container runs multiple threads to process multiple requests to a single instance of the HelloWorld servlet.
Note In a distributed web app, there is one instance of a particular servlet per JVM, but each JVM still has only a single instance of that servlet.
The life cycle of an object describes the sequence of steps an object must go through during its existence. The life of a servlet is different from a normal Java class because a servlet has to execute inside the web container. Figure 2-16 shows the hierarchy of the HelloWorld servlet.
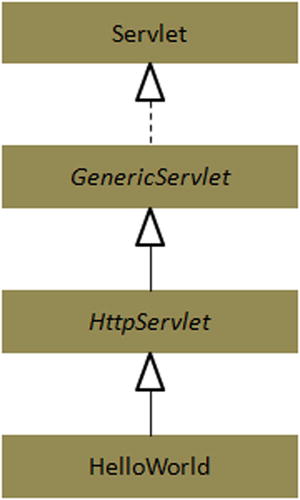
Figure 2-16. Hierarchy of HelloWorld servlet
Most servlets provide similar basic functionality through an abstract javax.servlet.GenericServlet class provided by the Servlet API. The GenericServlet class implementation is protocol-independent, so it does not matter if it has to respond to HTTP or FTP requests. The GenericServlet abstract class defines an init() method that is called by the default init(ServletConfig) method to execute any application-specific servlet initialization.
In a web application, lack of any protocol-dependent processing in a GenericServlet class signifies that the developer has to write the code for this processing in any subclass she creates. Since HTTP is the most well-known and widely used protocol on the Web, the Servlet API also includes one more abstract subclass of GenericServlet: javax.servlet.http.HttpServlet. The service() method is implemented by HttpServlet, which inspects the incoming HTTP method and invokes the appropriate method for that request type.
Note HTTP/1.1 defines seven request methods. The HttpServlet class provides default implementations for each of these methods that you can override in your servlets. However, most web application comprise servlets that override only the doGet() and doPost() methods.
An HTTP request to an HttpServlet subclass goes through a number of steps:
- A call to the public service (ServletRequest, ServletResponse) method by the container.
- Delegation of this call to HttpServlet’s protected service (HttpServletRequest, HttpServletResponse) method.
- The protected service (HttpServletRequest, HttpServletResponse) method then delegates to the appropriate doXxx method, depending on the HTTP method used for the request.
HelloWorld Servlet
As mentioned in the previous section, the superclass of your servlet includes two versions of init(), one that takes a ServletConfig and one that’s a no-arg. The init(ServletConfig) method calls the no-arg init(), so you need to override only the no-arg version.
The container calls init()on the servlet instance. You can override it in order to get database connections registered with other objects. Otherwise, the init() method from the Genericservlet runs.
- When a servlet instance is created, its init() method is invoked. The init() method allows a servlet to initialize itself before the first request is processed. You can specify init() parameters to the servlet in the web.xml file or via annotations.
- The web container calls the init() method of the servlet (only once in the servlet’s life), and the init() method must complete before the container can call service() method.
The container calls the service() method of the servlet. This method looks at the request, determines the type of HTTP method, and invokes the matching doGet() or doPost() on the servlet. You never override it. Your job is to override doGet() or doPost() and let the service implementation from HTTPServlet worry about calling the right one.
- When the service() method is called on your servlet, it will be handed references to HttpServletRequest and HttpServletResponse objects that implement the HttpServletRequest and HttpServletResponse interfaces. The container implements these interfaces.
- For every request received to the servlet, the servlet’s service() method is called. For HttpServlet subclasses, one of the doGet(), doPost(), and so on, methods is typically called. The container creates two objects: HTTPServletRequest and HttpServletResponse.
- The service() method can be called multiple times as long as the servlet is active in the servlet container.
- The service() methods call doGet()/doPost(). You always override at least one of them in your servlet.
ServletContext and ServletConfig
After the init() method is called, the servlet gets one ServletConfig object per servlet and one ServletContext per web application. In a distributed environment, you will have one ServletContext per JVM. A ServletContext is a means by which a servlet can connect with both the container and the other parts of the web application. In the servlet, the only time you have to go through the ServletConfig to get the ServletContext is if your servlet is not an HttpServlet or a GenericServlet.
The ServletConfig object can be used to do the following:
- Pass deploy-time information to the servlet (such as a database or enterprise bean lookup name) that you do not want to hard-code into the servlet. This deploy-time information is called the servlet init parameters. The servlet init parameters will be discussed in the next section.
- Access the ServletContext.
The ServletContext object can be used to do the following:
- Access the web application parameters
- Set attributes that all components of the application can access
- Get server information, including the name and version of the container and the version of the API that is supported
A servlet can have three types of parameters:
- Request parameters
- Initialization (init) parameters
- Context-initialization (context-init) parameters
The initialization parameters are defined in the web.xml file, as illustrated in Listing 2-5.
Listing 2-5. Defining Initialization Parameters
<servlet>
<init-param>
<param-name>email </param-name>
<param-value>[email protected]</param-value>
</init-param>
</servlet>
You cannot use init-parameters until the servlet is initialized. Your servlet inherits getServletConfig(), so you can call that from any method in your servlet to get a reference to a ServletConfig. Once you have a ServletConfig reference, you can call getInitParam().
When the container initializes a servlet, the following happens:
- The container makes a unique ServletConfig for the servlet.
- The container reads the init parameters from the deployment descriptor and sets them in the ServletConfig object.
- The container then passes the ServletConfig to the servlet’s init (servletConfig) method.
Note Once the container sets the init params in ServletConfig, the container never reads init param from the deployment descriptor again, unless the servlet is redeployed.
Context-init parameters are similar to init parameters. The main difference between the context-init parameters and init params is that context parameters are available to the entire web app while the init parameters are available to just the servlet. Listing 2-6 illustrates the context-init parameters in the web.xml file.
Listing 2-6. Defining Context-Initialization Parameters
<context-param>
<param-name>email </param-name>
<param-value>[email protected]</param-value>
</context-param>
The <context-param> element is not nested inside the <servlet> element.
Listing 2-7 illustrates how to get the context-init parameters from your servlet.
Listing 2-7. Getting Context-Initialization Parameters
out.println(getServletContext().getInitParameter("email");
Every servlet inherits a getServletContext() method. The getServletContext() method returns a ServletContext object.
In a web application, there are two ways to alter the request flow.
- Redirecting the request: The request is redirected to a completely different URL. The redirect can be done by calling sendRedirect() on the response object. The redirect is done by the browser.
- Dispatching the request: The request is dispatched to another component in the web app, typically a JSP page. A request dispatch is different from a redirect in that it does the work on the server side. A RequestDispatcher is called on the request, and a redirect is called on the response.
Figure 2-17 shows the methods in the RequestDispatcher interface.
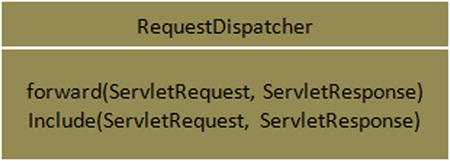
Figure 2-17. RequestDispatcher interface
You can get a RequestDispatcher in two ways.
- Getting a RequestDispatcher from a ServletRequest
- Getting a RequestDispatcher from a ServletContext
Getting a RequestDispatcher from a ServletRequest
RequestDispatcher view = request.getRequestDispatcher("bookDetails.jsp");
ThegetRequestDispatcher() method in ServletRequest takes a path for the resource to which the request is being forwarded. If the path begins with a forward slash (/), it is considered by the container to be starting from the root of the web application. If the path does not begin with the forward slash, the container considers it relative to the original request.
Getting a RequestDispatcher from a ServletContext
RequestDispatcher view = getServletContext().getRequestDispatcher("/bookDetails.jsp");
The getRequestDispatcher() method takes a String path for the resource to which you are forwarding the request. The RequestDispatcher, thus obtained from the context or request, can be used to forward to the resource because the RequestDispatcher knows the resource you are forwarding to, in other words, the resource that was passed as the argument to the getRequestDispatcher(). Listing 2-8 illustrates calling forward on a RequestDispatcher.
Listing 2-8. Calling forward on RequestDispatcher
RequestDispatcher view = request.getRequestDispatcher("bookDetails.jsp");
view.forward(request, response);
A filter is a reusable Java component that can transform the content of HTTP requests, responses, and header information. Filters are used for the following:
- Accessing static or dynamic content or modifying the request headers before invoking a request
- Intercepting the invocation of a web component after the call is invoked
- Providing actions on web components by using a chain of filters in a specific order
- Modifying the response headers and response data before they are rendered
A filter is created by implementing the javax.servlet.Filter interface and providing a no-arg constructor. A filter is configured in a web application either in the deployment descriptor using the <filter> element or in the @WebFilterannotation (introduced in the section that follows). In the <filter> element, you must declare the following:
- <filter-name>: Used to map the filter to a servlet or URL
- <filter-class>: Used by the container to identify the filter type
Note You can also declare the initialization parameters for a filter.
Listing 2-9 illustrates the filter declaration.
Listing 2-9. Declaring the Filter
<filter>
<filter-name>ResponseFilter</filter-name>
<filter-class>com.apress.ResponseServlet</filter-class>
</filter>
Filters can be associated with a servlet using the <servlet-name> element. Listing 2-10 maps the Response Filter filter to the ResponseServlet servlet.
Listing 2-10. Mapping the Filter to the Servlet
<filter-mapping>
<filter-name>Response Filter</filter-name>
<servlet-name>ResponseServlet</servlet-name>
</filter-mapping>
Filters can be associated with groups of servlets using <urlpattern>, as illustrated in Listing 2-11.
Listing 2-11. Associating a Filter with a Group of Servlets
<filter-mapping>
<filter-name>Response Filter</filter-name>
<url-pattern>/*</url-pattern>
</filter-mapping>
In Listing 2-11 the response filter is applied to all the servlets in the web application.
A web application typically comprises the following filtering components:
Configuring Servlet via Annotations
From Servlet 3.0 onward, servlets can be configured either via web.xml or using annotations or both. Table 2-2 describes the annotations supported by a Servlet 3.0–compliant web container.
Table 2-2. Annotations for Configuring the Servlet
Annotation |
Description |
|---|---|
@WebFilter |
Defines a filter in a web application |
@WebInitParam |
Specifies init parameters to be passed to the servlet or the filter |
@WebListener |
Annotates a listener to get events |
@WebServlet |
Defines a component in a web application |
@MultipartConfig |
Indicates that the request is of type mime/multipart |
In the section that follows, you will develop a helloworld project in which you will configure the servlet via annotations. Right-click the project helloworld, create a new servlet class, and give the class name as HelloWorld, as shown in Figure 2-18. Click Next.
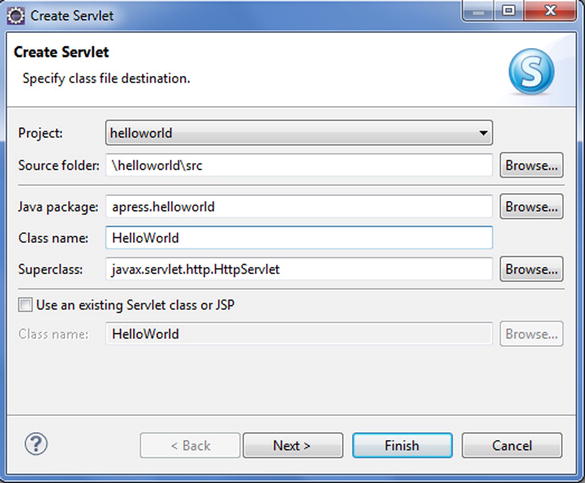
Figure 2-18. Creating a servlet
On the next screen, you can fill in the information pertaining to the deployment descriptor such as the initialization parameters and URL mappings, as illustrated in Figure 2-19. For the HelloWorld application, you do not have to fill in the values for initialization parameters. The default value of the URL mapping, in this case /HelloWorld, is just fine. This value in the “URL mappings” field is the servlet path of the URL, as explained in the previous section. Click Next.
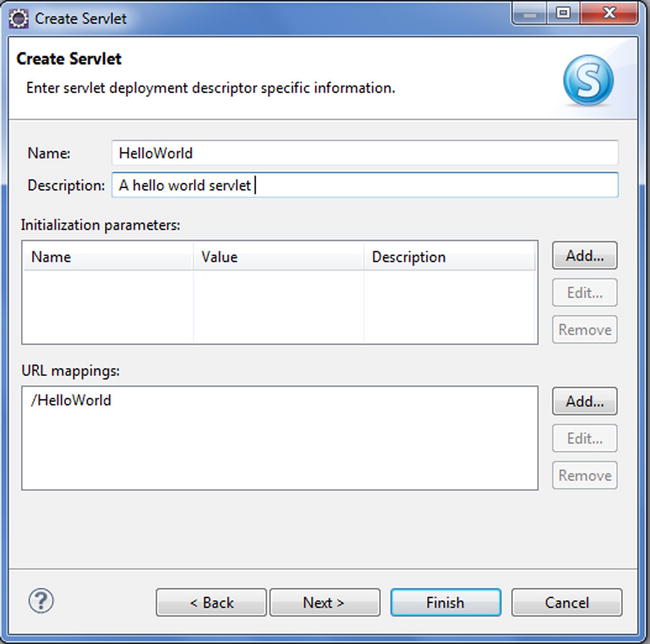
Figure 2-19. URL mapping
On the next screen, specify the modifiers, interfaces to implement, and method stubs to generate, as illustrated in Figure 2-20. Check doGet and doPost if they are not already checked. Then click Finish.
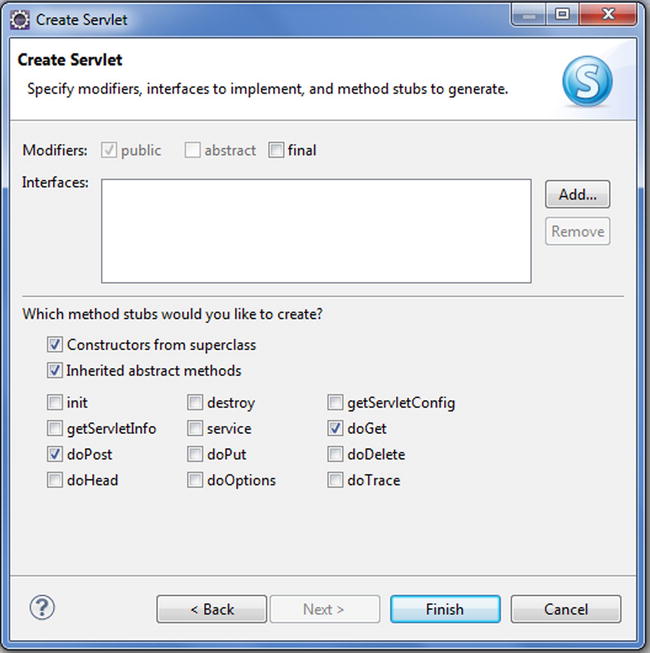
Figure 2-20. Specifying methods
The IDE generates the HelloWorld servlet illustrated in Listing 2-12.
Listing 2-12. HelloWorld Servlet Using Annotations
1.package apress.helloworld;
2.
3.import java.io.IOException;
4.import javax.servlet.ServletException;
5.import javax.servlet.annotation.WebServlet;
6.import javax.servlet.http.HttpServlet;
7.import javax.servlet.http.HttpServletRequest;
8.import javax.servlet.http.HttpServletResponse;
9.
10./**
11. * Servlet implementation class HelloWorld
12. */
13.@WebServlet(urlPatterns = { "/HelloWorld" }, description = "A hello world servlet")
14.public class HelloWorld extends HttpServlet {
15.private static final long serialVersionUID = 1L;
16.
17.    /**
18.     * @see HttpServlet#HttpServlet()
19.     */
20.    public HelloWorld() {
21.        super();
22.        // TODO Auto-generated constructor stub
23.    }
24.
25./**
26. * @see HttpServlet#doGet(HttpServletRequest request, HttpServletResponse response)
27. */
28.protected void doGet(HttpServletRequest request, HttpServletResponse response) throws ServletException, IOException {
29.// TODO Auto-generated method stub
30.}
31.
32./**
33. * @see HttpServlet#doPost(HttpServletRequest request, HttpServletResponse response)
34. */
35.protected void doPost(HttpServletRequest request, HttpServletResponse response) throws ServletException, IOException {
36.// TODO Auto-generated method stub
37.}
38.
39.}
- Line 13: This line shows the usage of the @WebServlet annotation. The HelloWorld servlet is decorated with the @WebServlet annotation to specify the name, URL pattern, initialization parameters, and other configuration items usually specified in the web.xml deployment descriptor.
- Line 14: This line shows that the HelloWorld servlet extends the HTTPServlet.
- Lines 28 to 37: These lines show the doGet and doPost methods generated by the IDE.
Add the code in Listing 2-13 to the doGet method of the HelloWorld servlet.
Listing 2-13. Printing “Hello World”
PrintWriter out = response.getWriter();
out.println("<h2>Hello World !</h2>");
You will have to import java.io.Printwriter. You can do this in Eclipse by selecting Source ![]() Add Import or by pressing Ctrl+Shift+M; now you can run the application on the server. Right-click HelloWorld.java in the helloworld project in Eclipse and then select Run As
Add Import or by pressing Ctrl+Shift+M; now you can run the application on the server. Right-click HelloWorld.java in the helloworld project in Eclipse and then select Run As ![]() Run on Server. The server you are using in this case is Tomcat 7.0. Then use the following URL to access the application:
Run on Server. The server you are using in this case is Tomcat 7.0. Then use the following URL to access the application:
http://localhost:8080/helloworld/HelloWorld
Figure 2-21 shows the output.
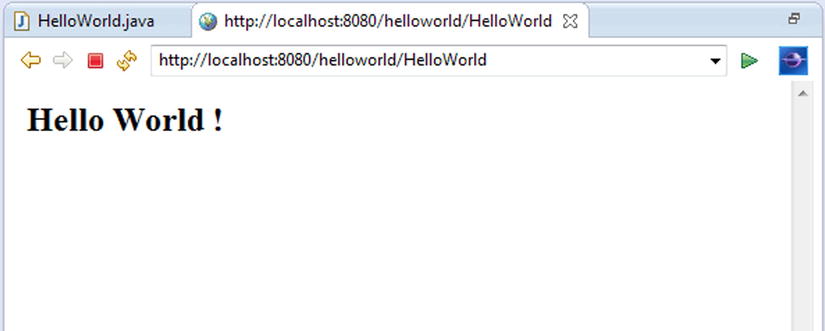
Figure 2-21. Accessing the application
For more information on the Java Servlet technology, refer to the Java Servlet 3.1 specification2 and the Java Servlet web site.3
Java Server Pages
Servlets enable the web server to generate dynamic content. However, servlets have one major disadvantage in that the HTML code is required to be hardwired in the Java code. To eliminate this cross-cutting of concerns, the Java Server Pages (JSP) technology was created. JSP uses a combination of static HTML content and dynamic content to generate web pages, thus separating the concern of embedding HTML content in Java code.
Your First Web Application Using JSP
Now you will create a “Hello World” application using JSP. Since you created a project with this name earlier, make sure to delete or rename the old project first. Then right-click in the project explorer and select Dynamic Web Project, as shown in Figure 2-22. Name the project helloworld.

Figure 2-22. Creating the helloworld project
Right-click the project helloworld, create a new JSP file, and give the name as helloworld.jsp. Click Next. Click Finish on the next screen.
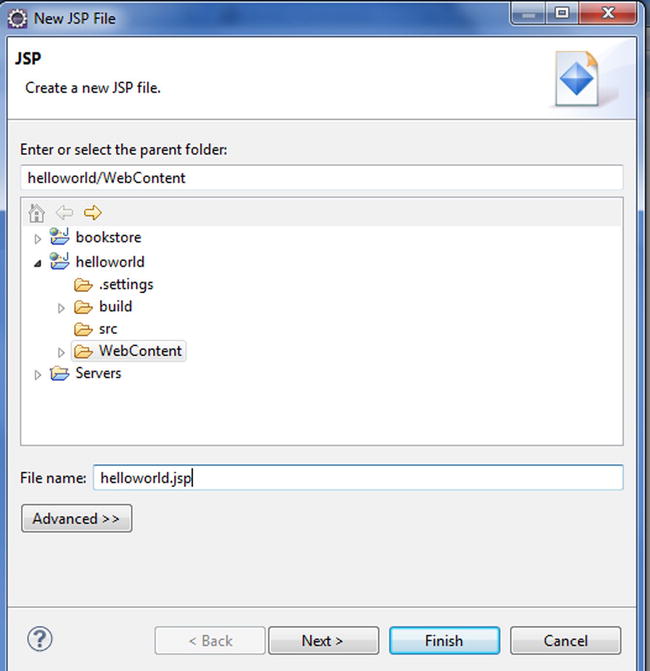
Figure 2-23. Creating the JSP file
Modify the code of helloworld.jsp as illustrated in Listing 2-14.
Listing 2-14. helloworld.jsp
<!DOCTYPE html >
<html>
<head>
<meta http-equiv="Content-Type" content="text/html; charset=ISO-8859-1">
<title>Hello World</title>
</head>
<body>
Hello World!
</body>
</html>
Deploy the application on the server, as shown in Figure 2-24.

Figure 2-24. Running the application on the server
Launch the application using http://localhost:8080/HelloWorld/hello.jsp.
Figure 2-25 shows the output.
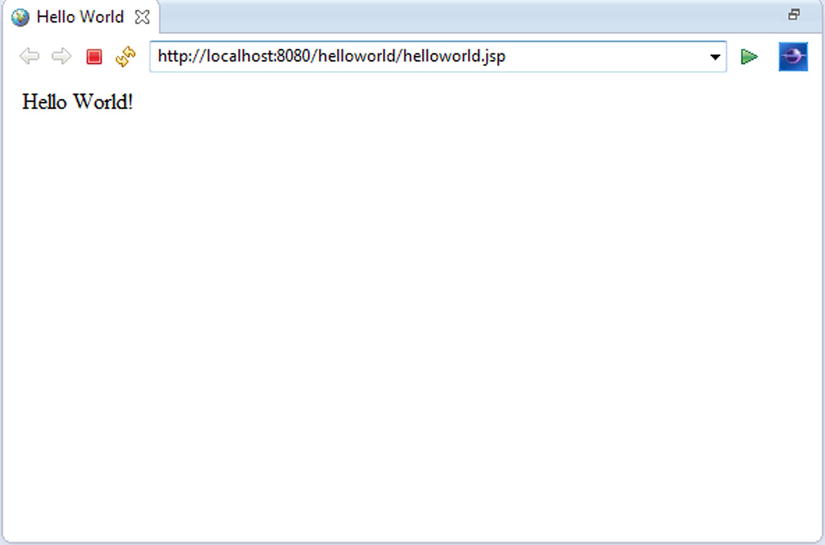
Figure 2-25. Accessing the JSP
JSP Basics
This section will cover the fundamental JSP constructs. A sound understanding of the classic approach is essential for understanding its limitations and to appreciate the power of more advanced techniques such as Expression Language, which is a subject of the next chapter. Before Expression Language was added to the JSP specification, a billion JSP pages were written using the classic approach, and you may still have to maintain them or refactor them. This need for backward compatibility is one reason why the JSP specification still covers the classic components. But when you have to write new JSPs in your application, you should not write backward-compatible code; instead, you should use the best-practice approach, which will be explained in the next chapter. When JSP 1.0 was added to the JSP specification in 1999, it was meant to produce dynamic, web-based content by embedding business-logic code in the template data. To that end, the following JSP elements were provided to be used within a JSP page to manipulate Java objects and perform operations upon them, thereby enabling the generation of dynamic content:
JSP directives are instructions to the JSP container that are processed during the page translation process. Directives provide a mechanism for making page-level information available to the JSP engine. The directives are declared between <%@ and %> directive delimiters and take the following form:
<%@ directive {attribute="value"}* %>
The page directive is used to provide instructions about a specific JSP page to be used by the container to generate the underlying servlet. The following is the basic syntax of the page directive:
<%@ page attribute="value" %>
Table 2-3 describes the attributes associated with the page directive.
Table 2-3. Attributes of the Page Directive
Attribute |
Purpose |
|---|---|
autoFlush |
Controls the behavior of the servlet output buffer. It indicates whether the buffer should be automatically written when it is full. |
buffer |
Specifies the buffering model for the servlet output stream. It indicates the size of the buffer. |
contentType |
Specifies the MIME type and character encoding scheme for the response. |
errorPage |
Specifies the URL of a JSP that handles the error conditions and reports the runtime exceptions. |
extends |
Indicates a superclass that the generated servlet must extend. |
import |
Specifies the classes for use in the JSP page similar to the import statement in Java. |
info |
Specifies a string for servlet’s getServletInfo() method. |
isELIgnored?isELEnabled |
Specifies whether the EL expression is allowed in the JSP page. |
isErrorPage |
Specifies whether this JSP page is meant to handle error conditions and report runtime exceptions. |
isScriptingEnabled |
Specifies whether scripting elements are allowed in the JSP page. |
isThreadSafe |
Indicates whether the JSP page can handle concurrent requests. |
language |
Indicates the scripting language that is used in the JSP page. |
session |
Specifies whether the JSP page participates in the HTTP session. |
The include directive is used to specify static resources that should be included within the current JSP page translation unit. The include directive has an attribute called file that specifies the URL for the resource that should be included. The general form of this directive is as follows:
<%@ include file="relative url" >
The following example demonstrates using the include directive to include a standard JSP header and footer in the current translation unit (Listing 2-15). You can create a project like your first web application, helloworld, and replace helloworld.jsp with main.jsp. Listing 2-15 illustrates main.jsp.
Listing 2-15. main.jsp
1.<%@ include file="header.jsp" %>
2.
3.<p>content</p>
4.
5.<%@ include file="footer.jsp" %>
- Line 1: This line includes header.jsp in the main.jsp file at translation time.
- Line 5: This line includes footer.jsp in the main.jsp file at translation time.
Listing 2-16 illustrates header.jsp.
Listing 2-16. header.jsp
1.<html>
2.<head></head>
3.<body>
4.<%out.print("header"); %>
- Line 4: This line uses an implicit object out. Implicit objects will be introduced later in this chapter. The implicit out object represents an instance of the JspWriter class and is used to write character data to the response stream.
Listing 2-17 illustrates footer.jsp.
Listing 2-17. footer.jsp
1.<%out.print("footer"); %>
2.</body>
3.</html>
Figure 2-26 illustrates the output.
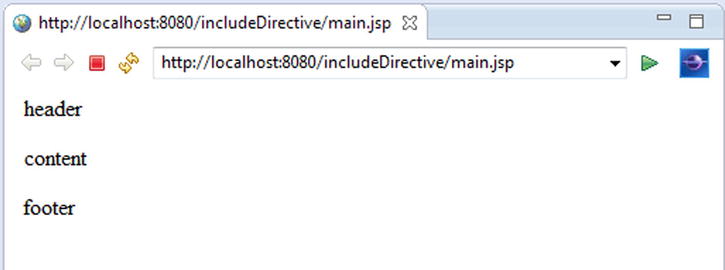
Figure 2-26. Using the include directive
The Java Server Pages API provides standard actions, covered in the next section, that encapsulate functionality. The JSP API also allows you to define custom actions that implement custom behavior. Several such custom actions, also called custom tags, are assembled in a library called a tag library. The taglib directive is used to define a prefix and location for a tag library in the current JSP page. The taglib directive uses the following syntax:
<%@ taglib uri="uri" prefix="tagPrefix" >
The uri attribute value is an absolute or relative path that specifies the location of the tag library, and the prefix attribute specifies the custom action to be used in the current JSP. Listing 2-18 illustrates the usage of the taglib directive for an example tag library called helloTagLib, which comprises a tag called hello that prints a “Hello World” message.
Listing 2-18. Usage of the Taglib Directive
1.<%@ taglib uri="/ helloTagLib" prefix="helloTag" %>
2.<html>
3.<body>
4.<helloTag:hello/>
5.</body>
6.</html>
- Line1: The URI to the library helloTagLib and prefix helloTag
- Line 4: Using the hello tag via the prefix
Using declarations, JSP allows you to declare methods and variables in JSP pages. Once they are in a JSP page, they are available to scriptlets and expressions throughout the page. JSP declarations are placed between <%! and %> declaration delimiters. Since declarations are used with expressions and scriptlets, I will introduce expressions and scriptlets in the following sections, and then I will show you how declarations, scriptlets, and expressions are used in a JSP page.
Expressions are similar to scriptlets, but they evaluate a regular Java expression and return a result, which is a String or something convertible to a String, to the client as part of the response. The general syntax is as follows:
<%= expression %>
Scriptlets are blocks of Java code surrounded within the <% and %> delimiters to create dynamic content. Listing 2-19 illustrates the usage of a declaration with a scriptlet and expression.
Listing 2-19. Usage of Declaration, Scriptlet, and Expression
1.<%!
2.public String hello() {
3.String msg = "Hello World";
4.return msg;
5.}
6.%>
7.Message from <b>Scriptlet</b>: <%hello();%><br/>
8.Message from <b>Expression</b>: <%=hello() %>
- Lines 1 to 6: These lines contain a JSP declaration that declares a hello() method. Line 1 is the start tag, and line 6 is the end tag of the declaration.
- Line 7: The hello() method declared in lines 1 to 6 is used in an expression on line 7.
Figure2-27 illustrates the usage of declaration, scriptlets and expression.
Figure 2-27. Using the declaration, scriptlet, and expression
Implicit Objects
In a web application, multiple web components collaborate with each other and share information by means of objects that are maintained as attributes of four scope objects. You access these attributes by using the getAttribute and setAttribute methods of the class representing the scope. Table 2-4 lists the scope objects.
Table 2-4. Scope Objects
Scope Objects |
Servlet API |
Accessible From . . . |
|---|---|---|
Application/web context |
javax.servlet.ServletContext |
Web components across the application |
Request |
Subtype of javax.servlet.ServletRequest |
Web components that handle the request |
Session |
javax.servlet.http.HttpSession |
Web components in a session |
Page |
javax.servlet.jsp.JspContext |
The JSP page that creates the object |
Note In addition to the standard servlet request, session, and application scopes, JSP adds a fourth scope called page scope.
A JSP page can access some specific objects through scripting variables. These objects are provided by the JSP container and are called implicit objects. These implicit objects can be accessed in scriptlets, in expressions, or as part of the EL expressions. (The EL expressions are introduced in Chapter 3.) Table 2-5 lists the nine implicit objects with the corresponding API.
Table 2-5. Implicit Objects
Implicit Object |
Usage |
API |
|---|---|---|
application |
Accesses application-level objects |
ServletContext |
config |
Provides configuration information |
ServletConfig |
exception |
Accesses error status |
JSPException |
out |
Accesses the JSP output stream |
JSPWriter |
page |
Provides a reference to the current JSP |
Object |
pageContext |
Accesses the JSP container |
PageContext |
request |
Provides access to the client request |
ServletRequest |
response |
Provides access to the JSP response |
ServletResponse |
session |
Shares information across client requests |
HttpSession |
These implicit objects are described in more detail in the following sections.
The implicit application object provides a reference to the javax.servlet.ServletContext interface. The ServletContext interface is used to provide access to any context-initialization parameters that have been configured for the JSP page via the deployment descriptor of the web application. The ServletContext object and parameters stored in them by the web container are available to the entire web application. The application object provides the developer of the JSP page with access to the ServletContext object.
Similar to the application object, the config object provides a reference to the ServletConfig interface of the web application. The ServletConfig interface is used to provide access to any initialization parameters that have been configured for the JSP page via the deployment descriptor of the web application. The config object provides the JSP developer with access to the ServletConfig object.
The implicit exception object is available to JSP to handle the error conditions and report the runtime exceptions using the errorPage page directive.
The implicit out object represents an instance of the JspWriter class that is used to write character data to the response stream.
The JSP implicit page object is an instance of the Object class and represents the current JSP page.
A pageContext provides context information by providing access to all the namespaces associated with a JSP page and to several page attributes. Also, it contains the reference to implicit objects.
The request object is an instance of the javax.servlet.http.HttpServletRequest interface. It represents the client request. The request implicit object is generally used to get request parameters, request attributes, header information, and query string values.
The implicit response object is an instance of the javax.servlet.http.HttpServletResponse interface and represents the response to be given to the client. The implicit response object is generally used to set the response content type, add cookies, and redirect the response.
The JSP implicit session object is an instance of a Java class that implements the javax.servlet.http.HttpSession interface. It is used to store session state for a client.
Listing 2-20 illustrates the usage of the often-used implicit objects. First it shows the common task of setting a book attribute in the request, session, and application scopes in a servlet. Then it shows their JSP equivalents.
Listing 2-20. Usage of Common Implicit Objects
1.getServletContext().setAttribute("book", book);
2.request.setAttribute("book", book);
3.request.getSession().setAttribute("book", book);
4.application.setAttribute("book" book);
5.request.setAttribute("book" book);
6.session.setAttribute("book" book);
7.pageContext.setAttribute("book" book);
- Line 1: This sets the book attribute in a ServletContext without using implicit objects.
- Line 2: This sets the book attribute in a request object. The request object is also an implicit object in JSP. Hence, setting the attribute in a servlet is similar to setting the attribute in a JSP page.
- Line 3: This sets the book attribute in the session without using implicit objects.
- Line 4: This sets the book attribute in the ServletContext using the application implicit object.
- Line 5: This sets the book attribute in a request object. request is also an implicit object in JSP. Hence, setting the attribute in JSP is similar to setting the attribute in a servlet.
- Line 6: This sets the book attribute in the session using a session implicit object.
- Line 7: This sets the book attribute in PageContext using a pageContext implicit object. There is no equivalent of pageContext in a servlet. A PageContext instance provides access to all the namespaces associated with a JSP page, provides access to several page attributes, and provides a layer above the implementation details. Implicit objects are added to the pageContext automatically.
The JSP standard actions provide a way to do the following:
- Manipulate JavaBeans
- Dynamically include files
- Perform URL forwarding
The <jsp:include> Action
The <jsp:include> action provides a way to include at runtime the directive for including the contents of a separate web component in the declaring JSP page. The syntax for using the standard include action is as follows:
<jsp:include page="relativeURL" flush="true"/>
We will create two JSPs, shown in Listing 2-21 and Listing 2-22, to illustrate the use of the <jsp:include> action.
Listing 2-21. main.jsp
1.<html>
2.<head>
3.</head>
4.<body>
5.<%out.print("Inside main.jsp"); %><br/>
6.<jsp:include page="sub.jsp"/>
7.</body>
8.</html>
- Line 6: Uses the <jsp:include> to include the target JSP page (sub.jsp)
Listing 2-22. sub.jsp
1.<html>
2.<head>
3.</head>
4.<body>
5.<%out.print("Inside sub.jsp"); %><br/>
6.</body>
7.</html>
Figure 2-28 shows the output when main.jsp is accessed.
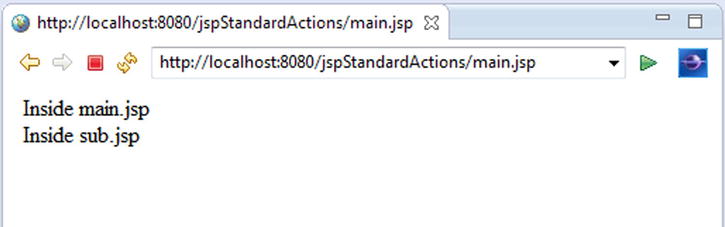
Figure 2-28. Using the <jsp:include> action
The <jsp:forward> action is used to forward the current request to another resource such as a static page, a JSP page, or a servlet. The syntax for the action is as follows:
<jsp:forward page="relativeURL" />
We will use the two JSPs created in the previous section to illustrate the use of the <jsp:forward> action as illustrated in the Listing 2-23 and 2-24.
Listing 2-23. Using the Forward Action in main.jsp
1.<html>
2.<head>
3.</head>
4.<body>
5.<%out.print("Inside main.jsp"); %><br/>
6.<jsp:forward page="sub.jsp"/>
7.</body>
8.</html>
- Line 6: Uses <jsp:forward> to forward to the target JSP page (sub.jsp).
Listing 2-24. sub.jsp
1.<html>
2.<head>
3.</head>
4.<body>
5.<%out.print("Inside sub.jsp"); %><br/>
6.</body>
7.</html>
Figure 2-29 shows the output when main.jsp is accessed.
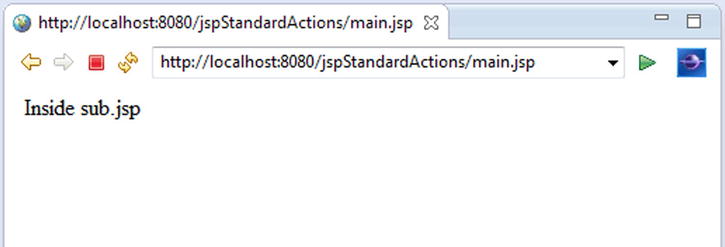
Figure 2-29. Usage of the forward action
To understand the difference between the include action and the forward action, compare Listing 2-21 with Listing 2-23 and compare Figure 2-28 with Figure 2-29. In Listing 2-23, we use the forward action in main.jsp, instead of the include action. The forward action transfers the control to sub.jsp, just like the include action. But when sub.jsp completes, unlike the include action, control does not go back to main.jsp.
The <jsp:useBean>, <jsp:getProperty>, and <jsp:setProperty> Actions
These three standard actions can eliminate a great deal of scripting code including declarations, scriptlets, and expressions.
The useBean action is used to declare and initialize the bean object. Once the bean is initialized, you can use the jsp:setProperty and jsp:getProperty actions to set and get bean properties
The <jsp:useBean> action has the following syntax:
<jsp:useBean id="someId" class="SomeClass" />
The <jsp:setProperty> action sets the properties of a bean.
The <jsp:setProperty> action has the following syntax where someId is the ID of the useBean:
<jsp:setProperty name="someId" property="someProperty" .../>
The <jsp: getProperty> action, as the name suggests, gets the value of a given property. If the property is not a string, it converts it to a string.
The <jsp: getProperty>action has the following syntax where someId is the ID of the useBean:
<jsp:getProperty name="someId" property="someProperty" .../>
Listing 2-25 shows how to create a user bean, and Listing 2-26 shows the usage of these three actions in a JSP page.
Listing 2-25. User Bean
1.package com.apress.jspactions;
2.
3.public class User {
4.
5.private String name;
6.
7.public String getName() {
8.return name;
9.}
10.
11.public void setName(String name) {
12.this.name = name;
13.}
14.
15.}
The user bean in Listing 2-25 will be used in user.jsp, which is shown in Listing 2-26.
Listing 2-26. user.jsp
1.<html>
2.<head>
3.</head>
4.<body>
5.<jsp:useBean id="user" class="com.apress.jspactions.User" />
6.<jsp:setProperty name="user" property="name" value="vishal" />
7.Hello <jsp:getProperty name="user" property="name" />
8.</body>
9.</html>
Figure 2-30 shows the output when user.jsp is accessed.
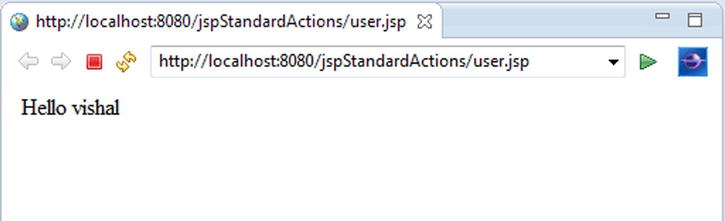
Figure 2-30. Usage of useBean, getProperty, and setProperty actions
The motivation for the Model-View-Controller (MVC) pattern has been around since the conception of object-oriented programming. Prior to MVC, the browser directly accessed JSP pages. In other words, JSP pages handled user requests directly. This was called a Model-1 architecture, as illustrated in Figure 2-31. A Model-1 architecture exhibited decentralized application control, which led to a tightly coupled and brittle presentation tier.

Figure 2-31. Model-1 architecture
A Model-2 architecture for designing JSP pages is in actuality the MVC pattern applied to web applications. MVC originated in Smalltalk and has since made its way to Java community. Figure 2-32 shows the Model-2 (in other words, MVC) architecture. In Model-2, a controller handles the user request instead of another JSP page. The controller is implemented as a servlet. The following steps are executed when the user submits the request:
- The controller servlet handles the user’s request.
- The controller servlet instantiates the appropriate JavaBeans based on the request.
- The controller servlet communicates with the middle tier or directly to the database to retrieve the required data.
- The controller sets the JavaBeans in one of the following contexts: request, session, or application.
- The controller dispatches the request to the next view based on the request URL.
- The view uses the JavaBeans from step 4 to display data.
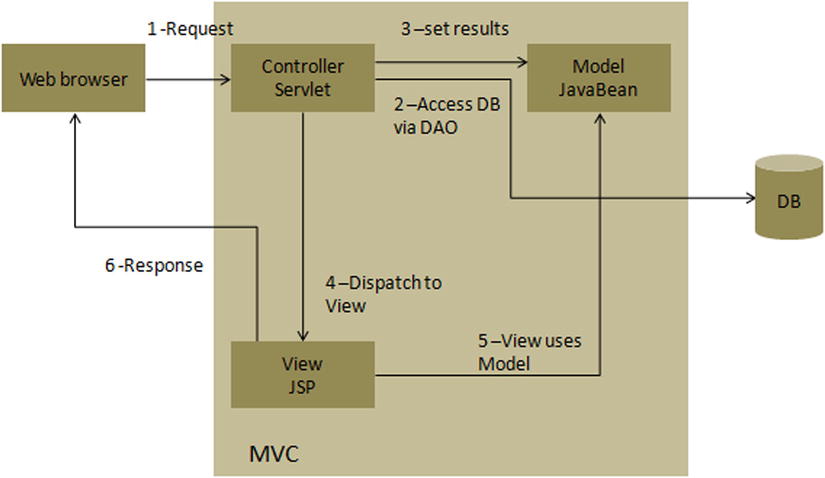
Figure 2-32. Model-2 architecture
Bookstore Application
In the previous chapter, we developed the data-access layer for the bookstore application and queried it with a stand-alone Java application. In this chapter, we will replace the stand-alone Java layer with a presentation layer. The data-access layer at the bottom will remain the same, as illustrated in Figure 2-33.
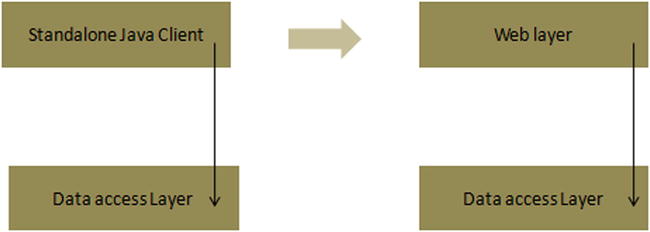
Figure 2-33. Replacing the stand-alone Java client with a presentation layer
In a production-ready application, you should also add a service layer to handle the database exception. As the application grows, a partitioned application keeps the separation of concerns clean. Figure 2-34 shows the directory structure of the bookstore application.
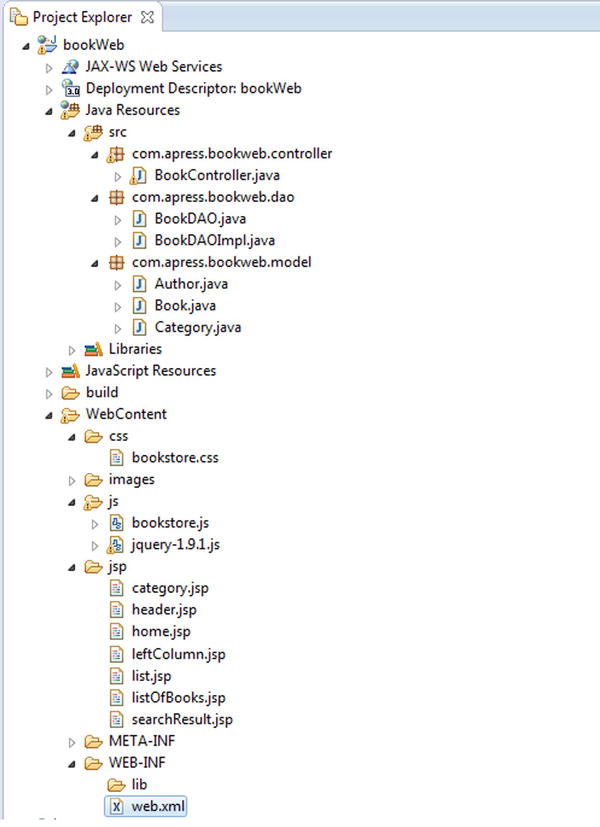
Figure 2-34. Directory structure of the bookstore application
Figure 2-35 shows the home page of the application. On entering the URL (http://localhost:8080/bookWeb/books), the home page displays the menu, which consists of the categories of the books available in the bookstore database.
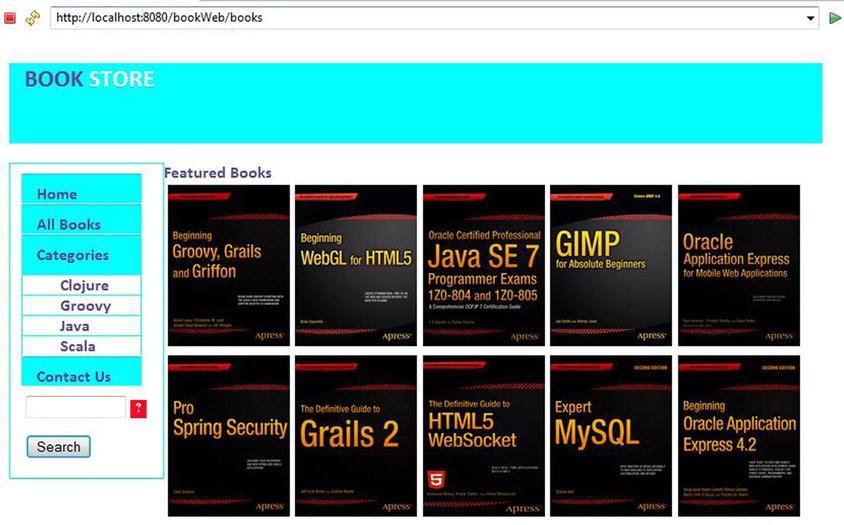
Figure 2-35. Home page of the bookstore application
Figure 2-36 shows the MVC architecture of the bookstore application. For the sake of brevity and understanding how the categories are displayed on the home page, only the components related to the home page and categories are shown in the figure.
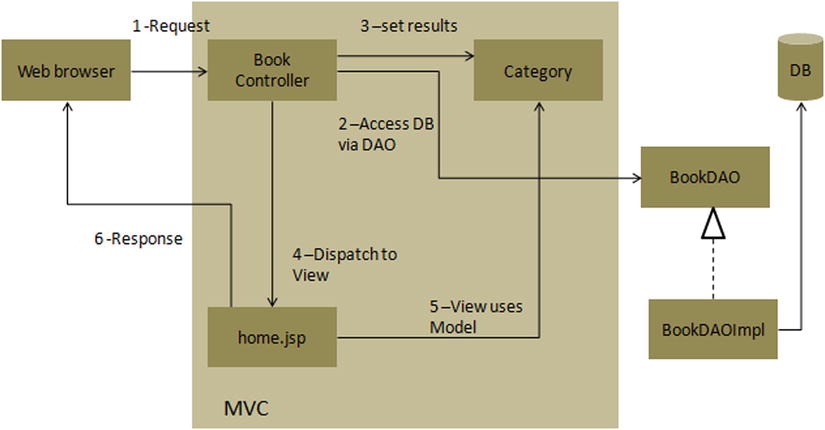
Figure 2-36. MVC in bookstore application
In the MVC architecture shown in Figure 2-36, M stands for Category, V stands for home.jsp, and C stands for BookController. The application flow comprises six steps, as discussed in the following sections.
Step 1: Locating the Servlet from the Request
The URL (http://localhost:8080/bookWeb/books) is for the dynamic content, so the web server forwards the request to the servlet container (Tomcat). Listing 2-27 illustrates the Deployment Descriptor.
Listing 2-27. Deployment Descriptor of the BookstoreWeb App
1.<?xml version="1.0" encoding="UTF-8"?>
2.<web-app xmlns:xsi="http://www.w3.org/2001/XMLSchema-instance"
3.xmlns="http://java.sun.com/xml/ns/javaee" xmlns:web="http://java.sun.com/xml/ns/javaee/web-app_2_5.xsd"
4.xsi:schemaLocation="http://java.sun.com/xml/ns/javaeehttp://java.sun.com/xml/ns/javaee/web-app_3_0.xsd"
5.id="WebApp_ID" version="3.0">
6.<display-name>bookWeb</display-name>
7.<servlet>
8.<servlet-name>BookServlet</servlet-name>
9.<servlet-class>com.apress.bookweb.controller.BookController</servlet-class>
10.<init-param>
11.<param-name>base</param-name>
12.<param-value>/bookWeb/books</param-value>
13.</init-param>
14.<init-param>
15.<param-name>imageURL</param-name>
16.<param-value>/bookWeb/images</param-value>
17.</init-param>
18.<load-on-startup>1</load-on-startup>
19.</servlet>
20.<context-param>
21.<param-name>param1</param-name>
22.<param-value>/bookWeb/books</param-value>
23.</context-param>
24.<context-param>
25.<param-name>imageURL</param-name>
26.<param-value>/bookWeb/images</param-value>
27.</context-param>
28.<servlet-mapping>
29.<servlet-name>BookServlet</servlet-name>
30.<url-pattern>/books </url-pattern>
31.</servlet-mapping>
32.<welcome-file-list>
33.<welcome-file>index.html</welcome-file>
34.<welcome-file>index.htm</welcome-file>
35.<welcome-file>index.jsp</welcome-file>
36.<welcome-file>default.html</welcome-file>
37.<welcome-file>default.htm</welcome-file>
38.<welcome-file>default.jsp</welcome-file>
39.</welcome-file-list>
40.</web-app>
- Line 30: url-pattern/books is mapped to the BookServlet in the <servlet-mapping> element, which is mapped to the servlet class BookController on line 9.
- Lines 20 to 27: We specify context parameters to the servlet in the web.xml file, since context parameters are available to the entire web app. When a servlet instance is created, its init() method is called by the servlet container. The init() method allows a servlet to initialize itself before the first request is processed. We override the init(ServletConfig config)method in the BookController for getting the categories from the bookstore database. These categories will be available to the entire application. The overridden init(ServletConfig config) in the BookController is illustrated in Listing 2-28.
Step 2 and Step 3: Accessing DB via DAO to Get the Categories from the Database and Setting the Categories in the Model
Listing 2-28 shows the BookController.
Listing 2-28. init( ) Method in BookController
1.public void init(ServletConfig config) throws ServletException {
2.super.init(config);
3.BookDAO bookDao = new BookDAOImpl();
4.// calling DAO method to retrieve bookList from Database
5.List<Category> categoryList = bookDao.findAllCategories();
6.ServletContext context = config.getServletContext();
7.context.setAttribute("categoryList", categoryList);
8.}
Step 4: Dispatching to the View
As the init() method is completed in the previous step, the container calls the service() method of the servlet (discussed in life-cycle methods of servlet). This method looks at the request, determines the HTTP method, and invokes the matching doget() or dopost() on the servlet. Listing 2-29 illustrates the doGet() and doPost() methods of the servlet.
Listing 2-29. doGet( ) and doPost( ) in BookController
1.protected void doGet(HttpServletRequest request,
2.HttpServletResponse response) throws ServletException, IOException {
3.doPost(request, response);
4.}
5.
6.protected void doPost(HttpServletRequest request,
7.HttpServletResponse response) throws ServletException, IOException {
8.String base = "/jsp/";
9.String url = base + "home.jsp";
10.String action = request.getParameter("action");
11.String category = request.getParameter("category");
12.String keyWord = request.getParameter("keyWord");
13.if (action != null) {
14.switch (action) {
15.case "allBooks":
16.findAllBooks(request, response);
17.url = base + "listOfBooks.jsp";
18.break;
19.case "category":
20.findAllBooks(request, response);
21.url = base + "category.jsp?category=" + category;
22.break;
23.case "search":
24.searchBooks(request, response, keyWord);
25.url = base + "searchResult.jsp";
26.break;
27.
28.}
29.}
30.RequestDispatcher requestDispatcher = getServletContext()
31..getRequestDispatcher(url);
32.requestDispatcher.forward(request, response);
33.}
- Line 3: The doPost() method is called from the doGet() method.
- Line 9: This line constructs the URL that points to the home page view (home.jsp).
- Line 10: This line gets the action parameter from the request. But since this is a home page, there is no associated action parameter, so the variable action is null.
- Lines 13 to29: The code block from lines 13 to 29 is skipped as the action is null. If the action was not null, the URL would have been reconstructed to point at a different view depending on whether the action value is allBooks or category or search.
- Line 32: The RequestDispatcher forwards to the view name in the URL on line 31.
Step 5: Accessing the Model from the View
In the previous step, the controller forwards to the view home.jsp using the RequestDispatcher.
Listing 2-30 illustrates a fragment of home.jsp, which includes leftColumn.jsp. The leftColumn.jsp file uses the model Category to display categories on the left menu of the home page.
Listing 2-30. Including leftColumn.jsp in home.jsp
1.<body>
2.<div id="centered">
3.
4.<jsp:include page="header.jsp" flush="true" />
5.<br />
6.<jsp:include page="leftColumn.jsp" flush="true" />
7.<span class="label">Featured Books</span>
8...........
9.</div>
10.</body>
- Line 6: The <jsp:include> tag is used to include leftColumn.jsp. This is done because the left-side bar of the application (the menu) is common to all screens in the application, but instead of writing the left-side bar in all screens, we write it in one JSP page and include it wherever required as a means to reusability. (In the next few chapters on web frameworks, we will see more advanced techniques for reusing JSPs.)
Listing 2-31 illustrates the code fragment related to categories in leftColumn.jsp where the Category is accessed.
Listing 2-31. Accessing the Category Model in leftColumn.jsp
1.<li><div><span class="label" style="margin-left: 15px;">Categories</span></div>
2.<ul>
3.<%
4.List<Category> categoryList1 = (List<Category>) application.getAttribute("categoryList");
5.Iterator<Category> iterator1 = categoryList1.iterator();
6.while (iterator1.hasNext()) {
7.Category category1 = (Category) iterator1.next();%>
8.<li><a class="label"href="<%=param1%>?action=category&categoryId=<%=category1.getId()%>&category=<%=category1.getCategoryDescription()%>"><spanclass="label" style="margin-left: 30px;"><%=category1.getCategoryDescription()%></span></a>
9.</li>
10.<%}%>
11.</ul></li>
- Line 4: In this line, the category list is obtained from the ServletContext. We had saved the category list in the ServletContext obtained from the database in step 2.
- Line 6 to 10: The category details are displayed in the markup, such as the category description that you see on the home page.
Note The JSP page in Listing 2-31 uses scriptlets and expressions to obtain the categories and display them. Using scriptlets and expressions are bad practices and should be avoided as much as possible. This is the subject of the next chapter, which will show you how to replace scriptlets and expressions with JSTL and EL.
Step 6: Sending the Response
The view constructed in the previous step is delivered to the browser.
When the user clicks All Books on the menu, the list of all books is displayed, as illustrated in Figure 2-37.
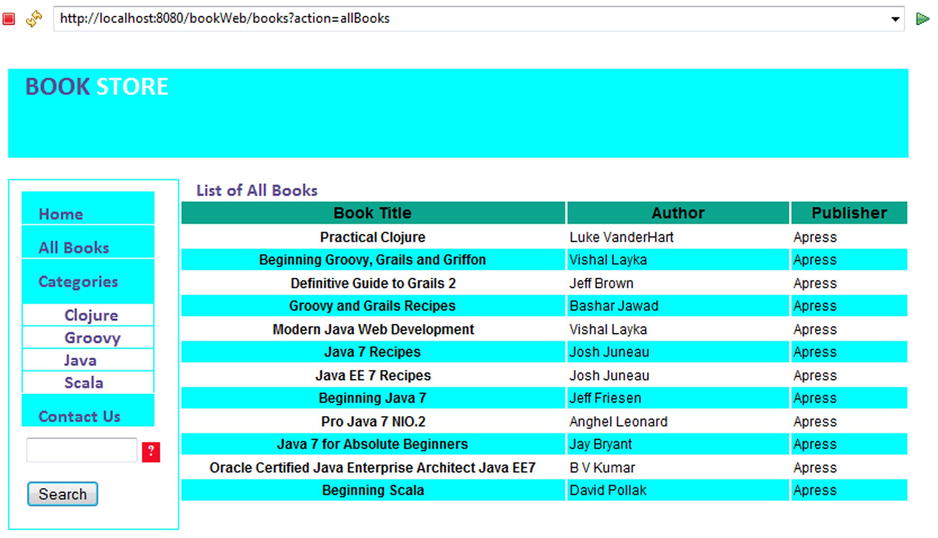
Figure 2-37. Listing all books
The All Books link is in the leftColumn.jsp file. Listing 2-32 illustrates the code fragment for the All Books link on the menu.
Listing 2-32. All Books Link in leftColumn.jsp
1.<li><div>
2.<a class="link1" href="<%=param1%>?action=allBooks"><span
3.style="margin-left: 15px;" class="label">All Books</span></a>
4.</div></li>
- Line 2: This line is the All Books link displayed in the menu. When this link is clicked, the value of action-allBooks is added to the URL as the parameter, as shown in the URL:
http:localhost:8080/bookWeb/books?action=allBooks
Step 2, which is locating the servlet from the request, is executed, but this time the action is not null and has a value allBooks. So, the code block in the doPost() method in the BookController, shown in Listing 2-33, is executed.
Listing 2-33. All Books in the doPost( ) in BookController
1.protected void doPost(HttpServletRequest request,
2.HttpServletResponse response) throws ServletException, IOException {
3.String base = "/jsp/";
4.String url = base + "home.jsp";
5.String action = request.getParameter("action");
6.String category = request.getParameter("category");
7.String keyWord = request.getParameter("keyWord");
8.if (action != null) {
9.switch (action) {
10.case "allBooks":
11.findAllBooks(request, response);
12.url = base + "listOfBooks.jsp";
13.break;
14.case "category":
15.findAllBooks(request, response);
16.url = base + "category.jsp?category=" + category;
17.break;
18.case "search":
19.searchBooks(request, response, keyWord);
20.url = base + "searchResult.jsp";
21.break;
22.
23.}
24.}
25.RequestDispatcher requestDispatcher = getServletContext()
26..getRequestDispatcher(url);
27.requestDispatcher.forward(request, response);
28.}
- Line 8: The action is not null, and the value of the action is allBooks.
- Lines 10 to 12: The helper method findAllBooks(request, response) is invoked, the URL is reconstructed to point to listOfBooks.jsp, and RequestDispatcher forwards to the view provided to the RequestDispatcher in the form of a URL.
Listing 2-34 shows the helper method findAllBooks(request, response) in the BookController.
Listing 2-34. findAllBooks( ) in BookController
1.private void findAllBooks(HttpServletRequest request,
2.HttpServletResponse response) throws ServletException, IOException {
3.try {
4.BookDAO bookDao = new BookDAOImpl();
5.List<Book> bookList = bookDao.findAllBooks();
6.request.setAttribute("bookList", bookList);
7.
8.} catch (Exception e) {
9.System.out.println(e);
10.}
11.}
- Lines 5 to 6: This list of all books is obtained from the database using the findAllBooks() method on the DAO and is set as an attribute in the request.
Searching the Books by Category
When the user clicks a specific category on the menu, the list of books in that category is displayed, as illustrated in Figure 2-38.
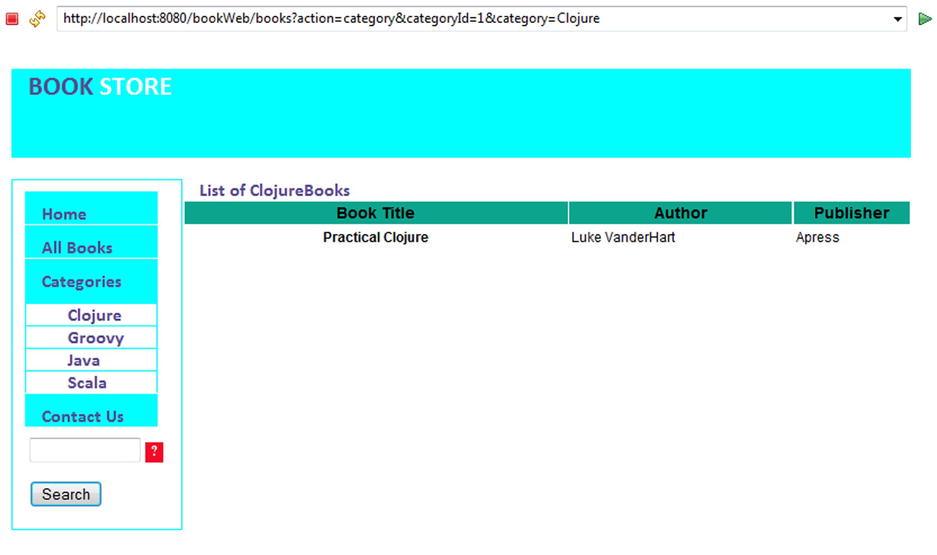
Figure 2-38. Searching the book by category
We saw in the previous section that the categories are in leftColumn.jsp. Listing 2-35 illustrates the code fragment for the category.
Listing 2-35. Categories Link on the Menu (leftColumn.jsp)
1.<li>
2.<a class="label" href="<%=param1%>?action=category&categoryId=<%=category1.getId()%>&category=<%=category1.getCategoryDescription()%>"><span class="label" style="margin-left: 30px;"><%=category1.getCategoryDescription()%></span></a>
3.</li>
- Line 2: This is the link of the category displayed in the menu. When this link is clicked, the ID of the category and description and the name of the action category is added to the URL as the parameter, as shown in the following URL:
http:localhost:8080/bookWeb/books?action=category&categoryId=1&category=clojure
Again, step 2, which is locating the servlet from the request, is executed, and this time the action is not null and has a value category. So, the code block in the doPost() method in the BookController, shown in Listing 2-36, is executed.
Listing 2-36. doPost( ) in BookController
1.protected void doPost(HttpServletRequest request,
2.HttpServletResponse response) throws ServletException, IOException {
3.String base = "/jsp/";
4.String url = base + "home.jsp";
5.String action = request.getParameter("action");
6.String category = request.getParameter("category");
7.String keyWord = request.getParameter("keyWord");
8.if (action != null) {
9.switch (action) {
10.case "allBooks":
11.findAllBooks(request, response);
12.url = base + "listOfBooks.jsp";
13.break;
14.case "category":
15.findAllBooks(request, response);
16.url = base + "category.jsp?category=" + category;
17.break;
18.case "search":
19.searchBooks(request, response, keyWord);
20.url = base + "searchResult.jsp";
21.break;
22.
23.}
24.}
25.RequestDispatcher requestDispatcher = getServletContext()
26..getRequestDispatcher(url);
27.requestDispatcher.forward(request, response);
28.}
- Line 8: The action is not null, and the value of the action is category.
- Lines 15 to16: The helper method findAllBooks(request, response) is invoked, the URL is reconstructed to point to listOfBooks.jsp, and RequestDispatcher forwards to the view provided to the RequestDispatcher in the form of a URL.
Listing 2-37 shows the helper method findAllBooks(request, response) in the BookController.
Listing 2-37. findAllBooks( ) in BookController
1.private void findAllBooks(HttpServletRequest request,
2.HttpServletResponse response) throws ServletException, IOException {
3.try {
4.BookDAO bookDao = new BookDAOImpl();
5.List<Book> bookList = bookDao.findAllBooks();
6.request.setAttribute("bookList", bookList);
7.
8.} catch (Exception e) {
9.System.out.println(e);
10.}
11.}
- Lines 5 to 6: A list of all books is obtained from the database using the findAllBooks() method on the DAO and is set as an attribute in the request.
Searching the Books by Keyword
You can search the books by the author’s name or a keyword in the book’s title, as illustrated in Figure 2-39.
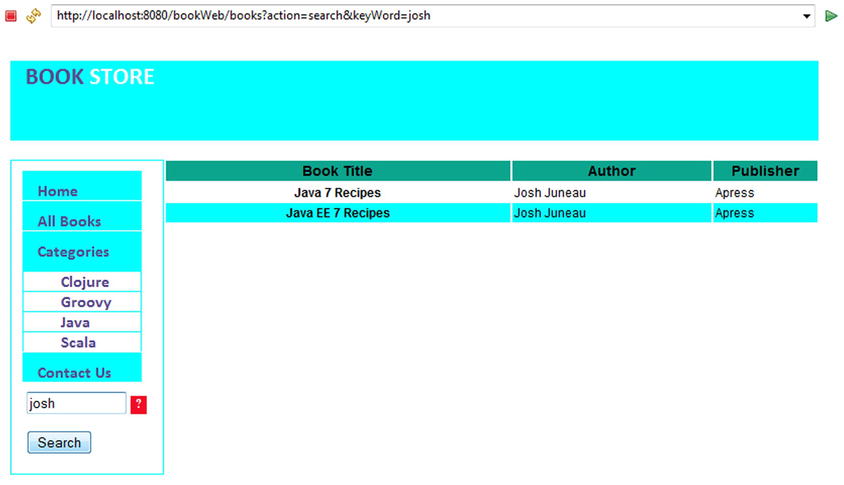
Figure 2-39. Searching books by keyword
Before we talk about how the search by keyword works, let’s first take a look at one usability aspect of search. There is a question mark next to the search field, which serves to help the user. In other words, on mouse-hover, a tooltip is shown that indicates search parameters to be used, as illustrated in Figure 2-40.
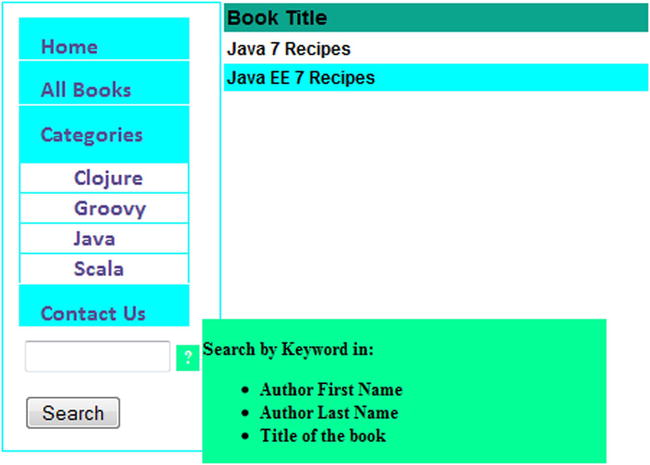
Figure 2-40. Tooltip for the search parameters
To understand how the tooltip works, take a look at the markup of the search field, which is in leftColumn.jsp, as illustrated in Listing 2-38.
Listing 2-38. Search Field Markup
1.<form class="search">
2.<input type="hidden" name="action" value="search" />
3.<input id="text"type="text" name="keyWord" size="12" />
4.<spanclass="tooltip_message">?</span>
5.<p />
6.<input id="submit" type="submit" value="Search" />
7.</form>
- Line 4: This has a class tooltip_message. The tooltip works using jQuery and CSS on this class.
Listing 2-39 illustrates the jQuery code.
Listing 2-39. jQuery for the Tooltip
1.$(document).ready(function () {
2.$("span.tooltip_message").hover(function () {
3.$(this).append('<div class="message"><p>Search by Keyword in:<ul><li>Author First Name </li><li>Author Last Name <li>Title of the book </li></ul></p></div>'),
4.},function () {
5.$("div.message").remove();
6.});
7.});
- Line 2: The class tooltip_message and the <span> tag are used as a selector on which the hover function is called.
- Line 3: The message to be displayed in the tooltip is appended to the object returned by the selector in line 2.
In the similar manner, a tooltip can be added to the images on the home screen, as illustrated in Figure 2-41. Listing 2-40 illustrates the jQuery function used.
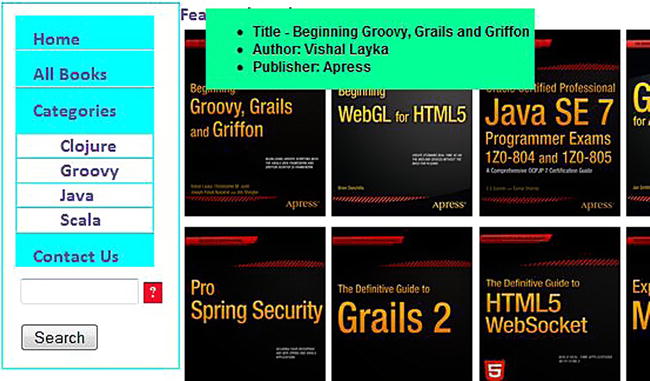
Figure 2-41. Tooltip for the images
Listing 2-40. jQuery Function for the Image Tooltip
$("span.tooltip_img1").hover(function(){$(this).append('<div class="message"><ul><li>Title - Beginning Groovy, Grails and Griffon</li><li>Author: Vishal Layka</li><li>Publisher: Apress</li></ul></div>'),
}, function(){$("div.message").remove();});
Listing 2-41 illustrates the CSS code for the tooltip.
Listing 2-41. CSS for Tooltip
1.span.tooltip_message,span.tooltip_img1 {
2.cursor: pointer;
3.display: inline-block;
4.background-color: #F20B26;
5.width: 16px;
6.height: 18px;
7.color: #ffffff;
8.font-size: 12px;
9.font-weight: bold;
10.text-align: center;
11.position: relative;
12.}
13.
14.span.tooltip_message:hover {
15.background-color: #04FF97;
16.}
17.
18.div.message {
19.background-color: #04FF97;
20.color: #000000;
21.position: absolute;
22.left: 18px;
23.top: -18px;
24.z-index: 1000000;
25.text-align: left;
26.width: 280px;
27.}

This CSS and jQuery code in Listing 2-40 and Listing 2-41 are included in leftColumn.jsp, as illustrated in Listing 2-42.
Listing 2-42. Accessing CSS and jQuery Files in leftColumn.jsp
1.<link rel="stylesheet" href="css/bookstore.css" type="text/css" />
2.<script src="js/bookstore.js" type="text/javascript"></script>
3.<script type="text/javascript" src="js/jquery-1.9.1.js"></script>
- Line 1: This is the externalized CSS file for the rules illustrated in Listing 2-41
- Line 2: This is the externalized JavaScript file for the jQuery function in Listing 2-40
- Line 3: Line 3 specifies the jQuery library we are using.
Now we will begin with the search-by-keyword functionality in our web application. Listing 2-43 illustrates the search field markup.
Listing 2-43. Search Field Markup
1.<form class="search">
2.<input type="hidden" name="action" value="search" /><input id="text"
3.type="text" name="keyWord" size="12" /><span
4.class="tooltip_message">?</span>
5.<p />
6.<input id="submit" type="submit" value="Search" />
7.</form>
- Line 2: This line specifies the action value search.
- Line 6: This line submits the request.
When the user submits the search request (again, locating the servlet from the request), step 2is executed, and this time the action has a value search. So, the search case in the doPost() method in the BookController, shown in Listing 2-44, is executed.
Listing 2-44. doPost( ) in the BookController
1.protected void doPost(HttpServletRequest request,
2.HttpServletResponse response) throws ServletException, IOException {
3.String base = "/jsp/";
4.String url = base + "home.jsp";
5.String action = request.getParameter("action");
6.String category = request.getParameter("category");
7.String keyWord = request.getParameter("keyWord");
8.if (action != null) {
9.switch (action) {
10.case "allBooks":
11.findAllBooks(request, response);
12.url = base + "listOfBooks.jsp";
13.break;
14.case "category":
15.findAllBooks(request, response);
16.url = base + "category.jsp?category=" + category;
17.break;
18.case "search":
19.searchBooks(request, response, keyWord);
20.url = base + "searchResult.jsp";
21.break;
22.
23.}
24.}
25.RequestDispatcher requestDispatcher = getServletContext()
26..getRequestDispatcher(url);
27.requestDispatcher.forward(request, response);
28.}
- Line 18: The case search is executed, and the value of the action is search
- Line 19: The searchBooks() method is called. The searchBooks( ) is illustrated in Listing 2-45.
- Line 20: Line 20 constructs the URL for the view.
- Line 26: The URL for the view is provided to the RequestDispatcher.
Listing 2-45 illustrates the searchBooks() helper method used by the controller to invoke the call on the DAO.
Listing 2-45. searchBooks( ) in the BookController
1.private void searchBooks(HttpServletRequest request,
2.HttpServletResponse response, String keyWord)
3.throws ServletException, IOException {
4.try {
5.BookDAO bookDao = new BookDAOImpl();
6.List<Book> bookList = bookDao.searchBooksByKeyword(keyWord);
7.
8.request.setAttribute("bookList", bookList);
9.
10.} catch (Exception e) {
11.System.out.println(e);
12.}
13.}
14.
- Line 6: This obtains the bookList based on the search keyword by invoking the searchBooksByKeyword() method defined in BookDAO. We used this method in Chapter 1 when we built the data-access layer for our web application.
Summary
This chapter introduced servlets and JSP and showed you how to make your first web application using these web components. Then the chapter implemented the real-world MVC-based Java web application, a bookstore using servlets and JSP. In the next chapter, we will augment this application to use the best practice of separating the business-logic concerns from the presentation using JSTL and Expression Language.