
![]()
Validating Data
There’s an old saying in IT: garbage in, garbage out. In essence, it means that if you enter nonsense data into a computer system, the results of any processing will also be rubbish. Fortunately, LightSwitch makes it easy for you to ensure that users can enter only clean data.
In this chapter, you’ll learn how to do the following:
- Define data rules by using the table designer
- Write validation code that runs on the server
- Create validation code that runs only on the client
This chapter extends the HelpDesk application and shows you examples of how to apply validation rules. When a manager attempts to save an engineer record with an empty email address, the application shows a warning, but it still allows the user to save the record. You’ll learn how to create these types of validation warnings.
You’ll also learn how to create validation rules that apply to the HelpDesk issues. These include conditional rules (for example, if the user enters a closing date, “closed-by engineer” becomes mandatory) and comparison rules (such as “closing date can’t be earlier than create date”). Users can upload issue documents, and you’ll learn how to restrict file sizes and file numbers. If a user tries to delete an issue, the system prevents the deletion if there are outstanding responses.
When a manager edits an engineer record, the system ensures that the engineer’s Social Security number (SSN) adheres to a valid format (using regular expressions). It also ensures that SSN and security reference numbers are unique for each engineer.
Understanding Validation in LightSwitch
LightSwitch allows you to apply validation and business rules in several places throughout your application. First, you can apply predefined validation by using the table designer. Any screens that you create in LightSwitch will then automatically validate the data type and data length that you’ve defined. If you change the data length of a property afterward, LightSwitch handles all changes to the validation without you having to do any extra work.
For more complex scenarios, you can write your own custom validation rules. You can define custom validation rules on tables and fields.
You can also define validation at a screen level. This allows you to perform validation that’s specific to a particular screen. Finally, LightSwitch enforces any validation that’s defined at the storage layer (for example, Microsoft SQL Server check constraints).
LightSwitch performs the validation on the client and server tiers. Figure 5-1 illustrates the workflow and shows the type of validation that’s carried out on each tier.
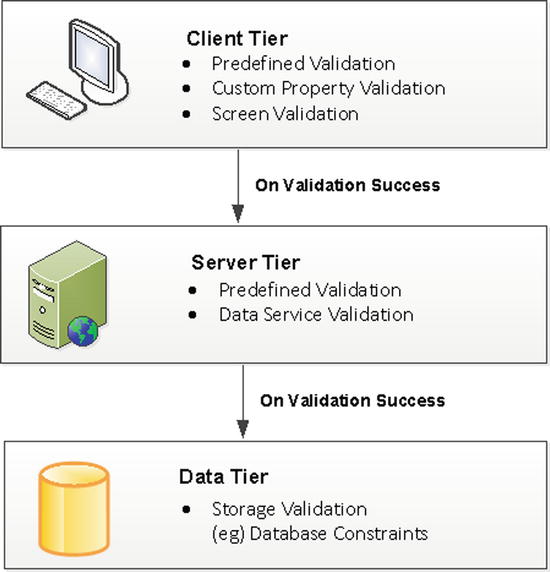
Figure 5-1. The type of validation that runs on each tier
On the client, LightSwitch performs screen and entity validation. It applies all predefined entity rules on the client as soon as any data change occurs. This allows your screen to show validation errors immediately to the user. For example, if the user enters text that exceeds the maximum length, LightSwitch alerts the user as soon as the focus leaves the text box.
Users must correct all validation errors before the client calls the server-side save operation. When the server receives the change set data, it repeats the validation that was carried out on the client. However, it won’t repeat any custom screen validation because the screen object doesn’t exist on the server. Therefore, LightSwitch won’t re-validate any rules that you’ve defined on local screen properties. During server-side execution, LightSwitch also applies any custom rules that you might have defined in the save pipeline.
When LightSwitch completes the server validation, it submits the change to the data-storage layer (such as SQL Server for Intrinsic data). If the data fails any validation that’s defined at the data store, the data store returns an exception to the server. The server then rolls back any data changes that have been applied, executes the code in the SaveChanges_ExecuteFailed method, and returns the data store error to the client. You can refer to the save pipeline diagram in Chapter 4, Figure 4-10 to remind yourself of this path through the save pipeline.
How Client Validation Works
LightSwitch uses an efficient client-side validation engine that caches the results after they are first derived. When the validation runs again, it saves the client from having to rerun all validation rules if just one single rule fails validation. Behind the scenes, LightSwitch uses a system of dependency tracking.
Let’s suppose that you create a validation rule on a field/property called EndDate. This rule specifies that EndDate must be greater than StartDate. When the validation engine first processes this rule, it registers StartDate as a validation dependency of the EndDate validation rule. If the StartDate property changes afterward, LightSwitch schedules the EndDate validation rule for re-evaluation.
The validation engine tracks entities, properties, and most of the properties that are exposed by the LightSwitch API. Specifically, this includes the members that it exposes via the Details class. As you’ll remember, this is the class that allows you to access the change set (as discussed in Chapter 4).
To further reduce overhead, the validation engine does not compute results for unmodified properties. For example, say you’ve created an engineer entity and set the surname property to Is Required. If you open a new data screen based on this entity, the screen won’t report the surname as missing, even though it is. This is because LightSwitch evaluates the rule only when the surname property has changed. You’ll need to type something into the surname text box and modify the value before LightSwitch checks the rule.
How MVVM Applies to Validation
If a user enters data that fails validation, LightSwitch summarizes the errors in a validation summary control. It also surrounds any offending controls with a red border to highlight the error (as shown in Figure 5-2).
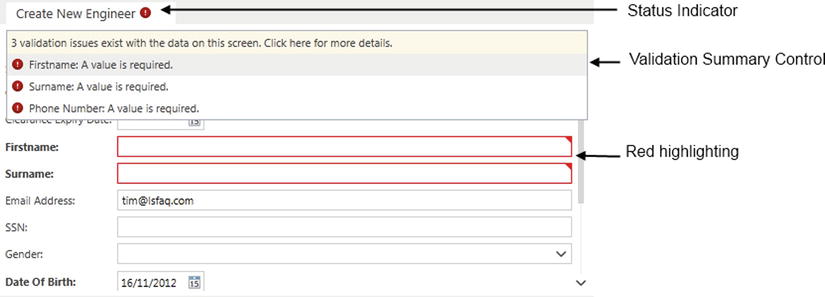
Figure 5-2. Validation summary control
These red borders are generated by the Silverlight control. Silverlight controls are bound to content items that are autogenerated by LightSwitch at runtime. These content items expose validation errors to the controls by implementing the INotifyDataErrorInfo interface.
So in keeping with the MVVM principles that were explained in Chapter 1, the View (Silverlight Control) performs only the red highlighting, and the actual validation logic is carried out by the View Model (the content item).
Defining Validation Rules
The simplest way to apply validation is to specify your rules declaratively through the table designer. Figure 5-3 highlights the validation rules that you can define for a table field, using the properties sheet.
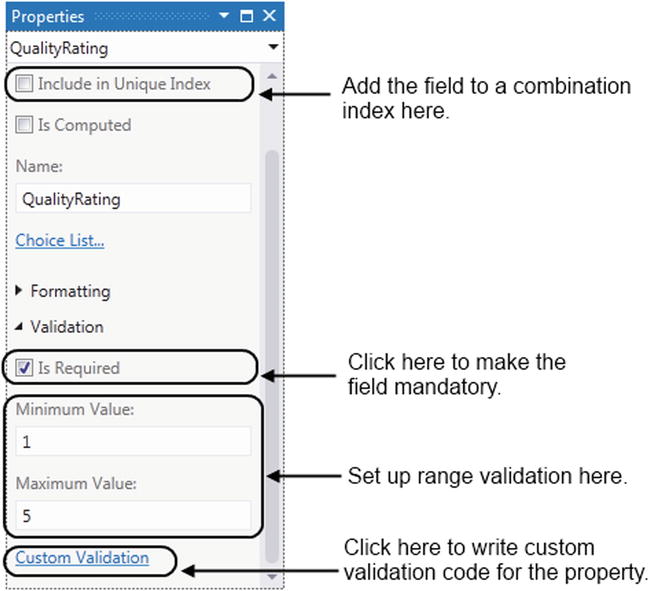
Figure 5-3. Setting validation properties at a field level
This illustration refers to a field of data type Double. LightSwitch automatically prevents users from entering non-numeric data. It enforces data type validation for all other data types without you having to do any extra work.
![]() Note LightSwitch creates storage constraints for many of these settings. This enables your database engine to enforce the same validation rules. For example, if you check the Include In Unique Index check box, LightSwitch creates a unique index in your SQL Server database.
Note LightSwitch creates storage constraints for many of these settings. This enables your database engine to enforce the same validation rules. For example, if you check the Include In Unique Index check box, LightSwitch creates a unique index in your SQL Server database.
Other property validation rules that you can specify through the property sheet for various data types include the following:
- Data Length Validation: The String data type allows you to specify the maximum amount of text that a user can enter.
- Range Validation: The Numeric and Date data types allow you to perform range validation by specifying the Minimum Value and Maximum Value properties. This type of range validation applies to the data types Date, DateTime, Decimal, Double, Money, and all Integer types.
- Required Field Validation: You can make a field mandatory by checking the Is Required check box. When you do this in the Intrinsic data source, LightSwitch also creates a NOT NULL constraint on the database column.
Note that many of the declarative validation settings apply only to your intrinsic database. If you attach an external SQL Server database table and view the properties of a numeric column, LightSwitch won’t give you the option to set minimum and maximum values. You’ll need to apply this rule in your SQL Server database by adding a check constraint to your database.
EXERCISE 5.1 – USING PREDEFINED VALIDATION
Open your Engineer table in the designer, and examine the validation options that you can set for each property. Select the firstname property, and set the Maximum Length property to 15. Run your application, open any of your engineer screens, and try entering a first name that exceeds 15 characters. How exactly does LightSwitch apply the maximum-length validation and prevent users from entering text that exceeds 15 characters? Now return to the table designer and increase the Maximum Length property to 20. Notice how LightSwitch automatically applies the new Maximum Length setting on all of your screens.
Although predefined validation works well for simple scenarios, you might want to enforce more complex validation rules. You can achieve this by writing custom validation, which you can apply at a property or entity level (as part of the save pipeline).
![]() Note Several of the code samples in this chapter contain LINQ (Language Integrated Query) syntax that might be unfamiliar to you. Don’t worry if you struggle to understand this code—Chapter 6 will explain the syntax in further detail.
Note Several of the code samples in this chapter contain LINQ (Language Integrated Query) syntax that might be unfamiliar to you. Don’t worry if you struggle to understand this code—Chapter 6 will explain the syntax in further detail.
Identifying Where Validation Runs
LightSwitch can carry out validation on the client, on the server, or on both the client and server. It’s important to target the validation at the right tier. For example, if you want to write validation that relies heavily on data, it wouldn’t be efficient to download lots of data onto the client just to perform this task.
Custom validation requires you to click on the Write Code button and to write .NET code that applies your validation rules. To help you understand where validation takes place, Figure 5-4 illustrates the table and screen designers, highlights the three validation methods that you can choose, and shows you where LightSwitch carries out the validation.
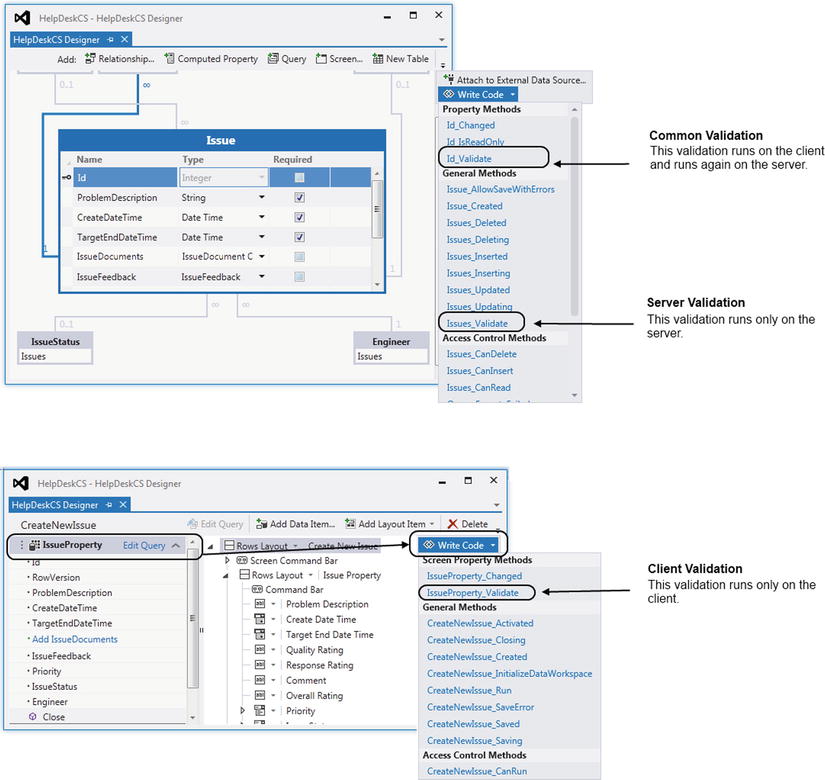
Figure 5-4. Where validation is performed in relation to the designer
Creating Validation Rules and Warnings
You can use custom validation to enforce mandatory rules or to simply provide optional warnings. The method for creating both types of validation is similar, so let’s begin by creating a validation warning.
The engineer table includes an optional email address field. To encourage users to enter email addresses for engineers, this example creates a validation rule that prompts the user to supply an email address if the user leaves it blank.
To begin, open the engineer table and select the EmailAddress property. Open the properties sheet, and click on the Custom Validation link that appears in the Validation Group. This opens the code window and reveals a method stub that contains the commented-out line results.AddPropertyError("<Error-Message>"). Uncommenting this line produces a validation error when LightSwitch validates the email address. So the key to building custom validation is to build conditional logic around this line of code.
To complete this sample, replace your code with the code that’s shown in Listing 5-1.
Listing 5-1. Creating a Validation Warning
VB:
File: HelpDeskVBCommonUserCodeEngineer.vb

Private Sub EmailAddress_Validate(results As EntityValidationResultsBuilder)
   ' results.AddPropertyError("<Error-Message>")
   If String.IsNullOrEmpty(EmailAddress) Then
      results.AddPropertyResult(
         "Providing an Email Address is recommended",
           ValidationSeverity.Informational)
   End If
End Sub

C#:

File: HelpDeskCSCommonUserCodeEngineer.cs

partial void EmailAddress_Validate(EntityValidationResultsBuilder results)
{
    // results.AddPropertyError("<Error-Message>");

    if (System.String.IsNullOrEmpty (EmailAddress))
    {
        results.AddPropertyResult(
           "Providing an Email Address is recommended",
           ValidationSeverity.Informational);
    }
}
Now run your application. Use the engineer screens that you created in Chapter 3 to create an engineer record without an email address. When you attempt to save the record, LightSwitch displays a validation warning that prevents you from saving. (See Figure 5-5.) Because this is just a warning, LightSwitch allows the user to save the record by clicking on the Save button again.
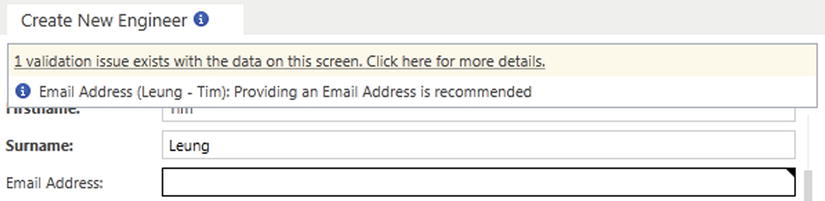
Figure 5-5. Validation warning
Let’s examine the code in Listing 5-1. The first part ![]() tests for an empty or null email address. If this condition is true, the code raises a validation warning by calling the result object’s AddPropertyResult method
tests for an empty or null email address. If this condition is true, the code raises a validation warning by calling the result object’s AddPropertyResult method ![]() . The first parameter allows you to supply the error that’s shown to the user.
. The first parameter allows you to supply the error that’s shown to the user.
The results object is of type EntityValidationResultsBuilder, and the methods that you can call are shown in Table 5-1.
Table 5-1. EntityValidationResultsBuilder Methods
| Method | Description |
|---|---|
| AddPropertyError | Generates a validation error that refers to a property |
| AddPropertyResult | Produces a validation warning that refers to a property |
| AddEntityError | Generates a validation error that refers to an entity |
| AddEntityResult | Produces a validation warning that refers to an entity |
The AddPropertyResult method that’s used in this example allows users to save their changes after viewing the validation warning. The AddEntityResult method also behaves in the same way.
Both methods allow you to supply a severity level that can be either ValidationSeverity.Informational or ValidationSeverity.Warning. If you choose the ValidationSeverity.Informational option, LightSwitch displays a blue information icon in the validation summary, whereas choosing the warning level produces a red exclamation point icon. (These icons may not be shown if you’ve chosen a nonstandard Shell.)
If you use the AddPropertyError or AddEntityError methods instead, users will not be able to save their changes until they enter data that conforms to the validation rules.
![]() Tip Screen validation occurs immediately, as soon as a user leaves a text box or control. If you want to perform a task that runs as soon as a user leaves a control, you could add the logic to the property’s validate method. For example, you could write code in the Surname_Validate method that changes the surname characters to uppercase, and this code will run as soon as the user leaves the surname text box. But before you apply this technique, you should read the section on using INotifyPropertyChanged in Chapter 7. This technique provides a better approach for running custom code when data changes.
Tip Screen validation occurs immediately, as soon as a user leaves a text box or control. If you want to perform a task that runs as soon as a user leaves a control, you could add the logic to the property’s validate method. For example, you could write code in the Surname_Validate method that changes the surname characters to uppercase, and this code will run as soon as the user leaves the surname text box. But before you apply this technique, you should read the section on using INotifyPropertyChanged in Chapter 7. This technique provides a better approach for running custom code when data changes.
Custom Validation Examples
Now that you understand how to write validation code and how to call the methods that belong to the EntityValidationResultsBuilder object, this section presents some more advanced validation scenarios.
You’ll learn how to apply validation based on the values of other fields in the same record, and how to prevent users from entering duplicate records. You’ll also find out how to use regular expressions, validate file sizes, and validate properties based on related data.
Comparing Against Other Properties
You can use custom validation to apply validation that depends on the values of other fields in the table.
The following example prevents users from entering an issue Close Date that’s earlier than the Create Date.
To create this rule, open the Issue table in the table designer and select the ClosedDateTime property. Open the properties sheet, click on the Custom Validation link, and enter the code that’s shown in Listing 5-2.
Listing 5-2. Compare Validation
VB:
File: HelpDeskVBCommonUserCodeIssue.vb

Private Sub ClosedDateTime_Validate(results As EntityValidationResultsBuilder)
   If CreateDateTime > ClosedDateTime Then
      results.AddPropertyError("Closed Date cannot be before Create Date")
   End If
End Sub

C#:
File: HelpDeskCSCommonUserCodeIssue.cs

partial void ClosedDateTime_Validate(EntityValidationResultsBuilder results)
{
    if (this.CreateDateTime > this.ClosedDateTime )
    {
        results.AddPropertyError("Closed Date cannot be before Create Date");
    }
}
If you now run any screen that uses the Issue table, you’ll be unable to set the Closed Date field to a value that’s earlier than the Create Date.
![]() Caution If you want to create a validation rule by using the Write Code button, rather than the Custom Validation link, you must select the property (for example, ClosedDateTime) before clicking the Write Code button. If you don’t, the property’s validate method (ClosedDateTime_Validate) will not appear in the drop-down menu of available options.
Caution If you want to create a validation rule by using the Write Code button, rather than the Custom Validation link, you must select the property (for example, ClosedDateTime) before clicking the Write Code button. If you don’t, the property’s validate method (ClosedDateTime_Validate) will not appear in the drop-down menu of available options.
Mandating Data Using Conditions
You can very easily make fields mandatory: just select the Is Required check box for your property in the table designer. However, you might want to make a field mandatory based on some other condition, and to do this, you need to write custom validation.
The Issue table contains a ClosedDateTime field and a ClosedByEngineer field. If the user enters a ClosedByEngineer value, the ClosedDateTime field becomes mandatory. Otherwise, the CloseDateTime field can be left blank.
In the previous example, the properties sheet for the ClosedDateTime property shows a Custom Validation link that opens the code window and creates a method stub. The properties sheet for the ClosedByEngineer field doesn’t include a Custom Validation link. This is because ClosedByEngineer refers to a related item. It belongs on the many side of a (zero-or-1)-to-many relationship between the engineer table.
So to access the code window, you’ll need to select the ClosedByEngineer navigation property in the table designer and click on the Write Code button. When the drop-down menu appears, you’ll be able to validate ClosedByEngineer by selecting the ClosedByEngineer_Validate method that appears. (See Figure 5-6.) Now enter the code that’s shown in Listing 5-3.
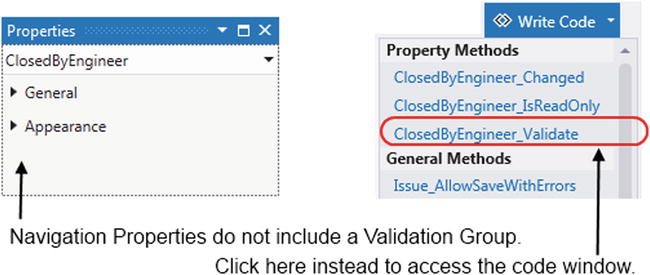
Figure 5-6. Creating validation on navigation properties
Listing 5-3. Making Fields Mandatory Based on Some Condition
VB:
File: HelpDeskVBCommonUserCodeIssue.vb

Private Sub ClosedByEngineer_Validate(
     results As EntityValidationResultsBuilder)
   If ClosedByEngineer IsNot Nothing And
      ClosedDateTime.HasValue = False Then
         results.AddPropertyError("Closed Date must be entered")
   End If
End Sub

C#:
File: HelpDeskCSCommonUserCodeIssue.cs

partial void ClosedByEngineer_Validate(
    EntityValidationResultsBuilder results)
{
    if (ClosedByEngineer != null &&
       ClosedDateTime.HasValue == false)
    {
        results.AddPropertyError("Closed Date must be entered");
    }
}
Validating Patterns with Regular Expressions
Regular expressions (regexes) allow you to carry out validation that involves matching string patterns. You might use regexes to validate the formats of Social Security numbers, bank sort codes, postal codes, or domain names.
This technique uses the Regex class in the System.Text.RegularExpressions namespace. Listing 5-4 shows the code that you would use to validate the format of the Social Security Number field in the Engineer table.
Listing 5-4. Regex Validation to Check Social Security Numbers
VB:
File: HelpDeskVBCommonUserCodeEngineer.vb

Imports System.Text.RegularExpressions

Private Sub SSN_Validate_Validate(
   results As EntityValidationResultsBuilder)

   Dim pattern As String =
       "^(?!000)([0-6]d{2}|7([0-6]d|7[012]))([ -]?)(?!00)dd3(?!0000)d{4}$"
   If (Not SSN Is Nothing) AndAlso
      (Regex.IsMatch(SSN, pattern) = False) Then
         results.AddPropertyError(
            "Enter SSN in format 078-05-1120")
   End If

End Sub

C#:
File: HelpDeskCSCommonUserCodeEngineer.cs

using System.Text.RegularExpressions;

partial void SSN_Validate(
    EntityValidationResultsBuilder results)
{
    string pattern =
       @"^(?!000)([0-6]d{2}|7([0-6]d|7[012]))([ -]?)(?!00)dd3(?!0000)d{4}$";
    if (SSN !=null && !Regex.IsMatch(SSN, pattern))
    {
        results.AddPropertyError(
            "Enter SSN in format 078-05-1120");
    }
}
This code highlights the use of the IsMatch method ![]() . This method allows you to pass in an expression, and the method returns a Boolean result that indicates whether a match is found.
. This method allows you to pass in an expression, and the method returns a Boolean result that indicates whether a match is found.
![]() Tip There’s a famous quote by Jamie Zawinski that illustrates how difficult using regular expressions can be:
Tip There’s a famous quote by Jamie Zawinski that illustrates how difficult using regular expressions can be:
Some people, when confronted with a problem, think, “I know, I’ll use regular expressions.” Now they have two problems.’
To make life easy for yourself, visit web sites such as http://regexlib.com or http://www.regular-expressions.info. There, you’ll find libraries of prebuilt expressions that you can easily reuse.
Validating File Sizes
If you have tables that store image or binary data, it’s useful to restrict the size of the files that users can upload into your application. You can do this by writing code that checks the size of the image or file that the user uploads.
The Engineer table contains a field called EngineerPhoto that stores a photo of the engineer. Listing 5-5 shows the code that ensures that users cannot upload images that are greater than 512 kilobytes (KBs).
Listing 5-5. Validating File Sizes
VB:
File: HelpDeskVBCommonUserCodeEngineer.vb

Private Sub EngineerPhoto_Validate(
    results As EntityValidationResultsBuilder)
   If Me.EngineerPhoto IsNot Nothing Then
      Dim sizeInKB = Me.EngineerPhoto.Length / 1024
      If sizeInKB > 512 Then
         results.AddPropertyError("Image Size cannot be > 512kb")
      End If
   End If
End Sub

C#:
File: HelpDeskCSCommonUserCodeEngineer.cs

partial void EngineerPhoto_Validate(
    EntityValidationResultsBuilder results)
{
    if (EngineerPhoto != null)
    {
        var sizeInKB = EngineerPhoto.Length / 1024;
        if (sizeInKB > 512)
        {
            results.AddPropertyError("Image Size cannot be > 512kb");
        }
    }
}
LightSwitch exposes Binary and Image properties in code as byte arrays. The code that’s shown here calculates the file size in KBs by dividing the byte array length by 1,024. If you want to calculate the size in megabytes (MBs), you would divide by 1,048,576. Table 5-2 shows the conversion values that you would use. If you need to carry out lots of conversions, you can make this code more reusable by adding it to a helper class and method.
Table 5-2. Converting a Byte Array Length
| Unit of Measurement | Divisor |
|---|---|
| Kilobyte (KB) | 1,024 |
| Megabyte (MB) | 1,048,576 (1,024 × 1,024) |
| Gigabyte (GB) | 1,073,741,824 (1,024 × 1,024 × 1,024) |
| Terabyte (TB) | 1,099,511,627,776 (1,024 × 1,024 × 1,024 × 1,024) |
Checking Against Child Collections
When you’re writing custom validation, you can use code to access child collections and records. In this example, the HelpDesk system stores documents that are related to each issue. Each issue can have many documents, and the documents are stored in a table called IssueDocument.
You can write custom validation that enforces a maximum of ten documents per issue. This allows you to preserve storage space on the server.
Just like the Closed Engineer example earlier in the chapter, the IssueDocument property is a navigation property. But unlike the earlier example, the Issue table belongs on the zero-or-1 end of a (zero-or-1)-to-many relationship.
For these types of navigation properties, LightSwitch doesn’t allow you to write property-level navigation that runs on both the client and server. Instead, you need to create entity (or data-service) validation that runs only on the server.
To create this validation, open the Issue table and click the Write Code button. Select the Issues_Validate method that belongs in the General Methods group (as shown in Figure 5-7). Now enter the code that’s shown in Listing 5-6.
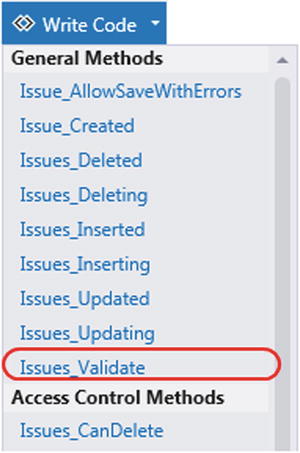
Figure 5-7. Creating entity validation that runs on the server
Listing 5-6. Validating the Counts of Child Items
VB:
File: HelpDeskVBServerUserCodeApplicationDataService.vb

Private Sub Issues_Validate(
    entity As Issue, results As EntitySetValidationResultsBuilder)

   If entity.IssueDocuments.Count() > 10 Then
      results.AddEntityError(
         "Issues can only contain a maximum of 10 documents")
   End If

End Sub

C#:
File: HelpDeskCSServerUserCodeApplicationDataService.cs

partial void Issues_Validate(Issue entity, EntitySetValidationResultsBuilder results)
{
    if (entity.IssueDocuments.Count() > 10)
    {
        results.AddEntityError(
            "Issues can only contain a maximum of 10 documents");
    }
}
The code in Listing 5-6 shows how you can apply an aggregate function to a child collection. When you call the Count function on a navigation property, LightSwitch produces the count by retrieving all related issue document records. Because each issue document record can be large, this type of validation is ideally suited to running on the server.
Enforcing Uniqueness and Preventing Duplicates
LightSwitch allows you to define a unique field by selecting the Is Unique check box for the field in the table designer. If you select the Is Unique check box for more than one field in a table, LightSwitch creates a combination index for the set of fields that you’ve selected.
You may want to enforce uniqueness on two or more fields independently within a table. In this example, the Engineer table contains Social Security Number and Security Clearance Reference Number fields. For every row in the Engineer table, both of these fields must be unique.
To apply this validation, open the Engineer table in the table designer and select the ClearanceReference property. From the properties sheet, click on the Custom Validation link and enter the code that’s shown in Listing 5-7.
Listing 5-7. Enforcing Unique Records
VB:
File: HelpDeskVBCommonUserCodeEngineer.vb

Private Sub ClearanceReference_Validate(results As EntityValidationResultsBuilder)

   If Len(Me.ClearanceReference) > 0 Then
      Dim duplicateOnServer = (
          From eng In
          Me.DataWorkspace.ApplicationData.Engineers.Cast(Of Engineer)()
          Where
          eng.Id <> Me.Id AndAlso
          eng.ClearanceReference.Equals(Me.ClearanceReference,
              StringComparison.CurrentCultureIgnoreCase)
          ).ToArray()

      Dim duplicateOnClients = (
          From eng In
          Me.DataWorkspace.ApplicationData.Details.GetChanges().
             OfType(Of Engineer)()
          Where
          eng IsNot Me AndAlso
          eng.ClearanceReference.Equals(Me.ClearanceReference,
             StringComparison.CurrentCultureIgnoreCase)
          ).ToArray()

      Dim deletedOnClient = Me.DataWorkspace.ApplicationData.Details.GetChanges().
         DeletedEntities.OfType(Of Engineer)().ToArray()
      Dim anyDuplicates = duplicateOnServer.Union(duplicateOnClients).Distinct().
         Except(deletedOnClient).Any()

      If anyDuplicates Then
         results.AddPropertyError("
            The clearance reference already exists")
      End If

   End If

End Sub

C#:
File: HelpDeskCSCommonUserCodeEnginner.cs

partial void ClearanceReference_Validate(EntityValidationResultsBuilder results)
{
    if (ClearanceReference!=null &&
        ClearanceReference.Length > 0)
    {
        var duplicatesOnServer = (
            from eng in
                this.DataWorkspace.ApplicationData.Engineers.Cast<Engineer>()
            where (eng.Id != this.Id ) &&
            eng.ClearanceReference.Equals(this.ClearanceReference,
                StringComparison.CurrentCultureIgnoreCase)
            select eng
                ).ToArray();

        var duplicatesOnClient = (
            from eng in
                this.DataWorkspace.ApplicationData.Details.GetChanges().
               OfType<Engineer>()
            where (eng != this) &&
            eng.ClearanceReference.Equals(this.ClearanceReference,
               StringComparison.CurrentCultureIgnoreCase)
            select eng
                ).ToArray();

        var deletedOnClient =
           this.DataWorkspace.ApplicationData.Details.GetChanges().
              DeletedEntities.OfType<Engineer>().ToArray();

        var anyDuplicates =
           duplicatesOnServer.Union(duplicatesOnClient).
              Distinct().Except(deletedOnClient).Any();

        if (anyDuplicates)
        {
            results.AddPropertyError(
                "The clearance reference already exists");
        }
    }
}
This code might seem trickier than you first expect. This is because you need to check for duplicates on the client (the user might enter several new engineers in a datagrid) in addition to checking for duplicates on the server.
First, the code checks that no server records match the clearance reference number that’s been entered by the user ![]() . It uses a where clause that excludes the ID of the current record—if not, the query would return a match for the identical record on the server.
. It uses a where clause that excludes the ID of the current record—if not, the query would return a match for the identical record on the server.
Next, it checks for duplicate clearance reference numbers that have been entered by the user on the client ![]() . It then performs a query that returns any deleted records
. It then performs a query that returns any deleted records ![]() .
.
If duplicate records were found on the server or client but are also marked as deleted, the clearance number passes validation. If not, the code raises a property error that prevents the user from saving the record ![]() .
.
EXERCISE 5.2 – CREATING CUSTOM VALIDATION
Use the code editor to add some custom validation rules on some of the HelpDesk tables. Here are some rules that you can add: Engineer date of birth—must not be in the future; Engineer Age—must be 17 or above; Login Name—cannot contain special characters; App Settings Mail Server—must be a valid IP address, or fully qualified server name.
Performing Screen Validation
A big advantage of the validation that you’ve seen so far is that LightSwitch applies the validation rules globally throughout your application. Once you define table or field validation, LightSwitch applies the rules to every screen in your application and every screen that you might create in the future.
However, you might want to perform validation that applies to only a single screen. To do this, you need to apply validation on the screen property.
In this example, we’ll make the priority field mandatory on the issue detail screen. By validating at a screen level, you can later extend the system to allow end users to raise their own issues, but not allow users to prioritize their own issues.
To begin, open the issue detail screen from Chapter 4 and select the issue property in the screen member list. Click on the Write Code button, and select the validate method from the Screen Property Methods group, as shown in Figure 5-8.

Figure 5-8. Creating screen validation
Now enter the code as shown in Listing 5-8.
Listing 5-8. Performing Screen-Level Validation
VB:
File: HelpDeskVBClientUserCodeIssueDetail.vb

Private Sub Issue_Validate(
    results As ScreenValidationResultsBuilder)

   If Issue.Priority Is Nothing Then
      results.AddScreenError("Priority must be entered")
   End If

End Sub

C#:
File: HelpDeskCSClientUserCodeIssueDetail.cs

partial void Issue_Validate(ScreenValidationResultsBuilder results)
{
    if (this.Issue.Priority == null)
    {
        results.AddScreenError("Priority must be entered");
    }
}
![]() Caution The main purpose of this example is to show you that it’s possible to carry out client-side screen validation, and to illustrate the code that produces the validation warnings. Screen validation isn’t secure because malicious users can circumvent your validation rules by directly accessing your data service through the OData endpoint. Where possible, you should always try to enforce your validation rules by writing code that LightSwitch executes on the server. Screen validation is more suitable for validating local properties to support some process that runs locally on your screen. You’ll find out more about local properties in Chapter 7.
Caution The main purpose of this example is to show you that it’s possible to carry out client-side screen validation, and to illustrate the code that produces the validation warnings. Screen validation isn’t secure because malicious users can circumvent your validation rules by directly accessing your data service through the OData endpoint. Where possible, you should always try to enforce your validation rules by writing code that LightSwitch executes on the server. Screen validation is more suitable for validating local properties to support some process that runs locally on your screen. You’ll find out more about local properties in Chapter 7.
This code looks similar to the earlier examples, but one difference is that the results object is of type ScreenValidationResultsBuilder ![]() . This object includes two methods that are called AddScreenError and AddScreenMessage. These methods allow you to assign a validation error or warning that targets the whole screen. Another method you can call is AddPropertyError. This method allows you to raise a validation error and, optionally, associate it with a specific screen property by supplying a screen property name.
. This object includes two methods that are called AddScreenError and AddScreenMessage. These methods allow you to assign a validation error or warning that targets the whole screen. Another method you can call is AddPropertyError. This method allows you to raise a validation error and, optionally, associate it with a specific screen property by supplying a screen property name.
The examples so far have shown you how to validate data when users insert or update records. In some circumstances, you might also want to control the rules that govern the deletion of data.
In this section, you’ll learn how to create a validation rule that prevents users from deleting issues where the issue status is still set to open. There are two places where you can perform this validation: on the client or on the server. The advantage of performing the validation on the client is that it involves much simpler code. But the disadvantage is that it’s less secure because users can circumvent your rule by accessing your data service directly.
To create this example, open the issue detail from the previous example. When the screen designer opens, carry out the following tasks:
- Select the Screen Command Bar, click the add drop-down, and select the New Button option. When the Add Button dialog appears, choose the Write My Own method and name it DeleteIssue.
- Select the Issue property in the screen member list, click the Add Code button, and select the Issue_Validate method.
- When the code editor opens, add the DeleteIssue_Execute and Issue_Validate code that’s shown in Listing 5-9.
- If you haven’t done so, create a search screen or an editable grid screen that allows you to open your issue details screen at runtime.
Listing 5-9. Validating Deletions
VB:
File: HelpDeskVBClientUserCodeIssueDetail.vb

Private Sub DeleteIssue_Execute()
   Issue.Delete()
End Sub

Private Sub Issue_Validate(
   results As ScreenValidationResultsBuilder)

   If Issue.Details.EntityState = EntityState.Deleted AndAlso
      (Not Issue.IssueStatus Is Nothing) AndAlso
          (Issue.IssueStatus.StatusDescription = "Open") Then

      results.AddScreenError("Unable to delete open issue")

   End If

End Sub

C#:
File: HelpDeskCSClientUserCodeIssueDetail.cs

partial void DeleteIssue_Execute()
{
    Issue.Delete();
}
partial void Issue_Validate(ScreenValidationResultsBuilder results)
{
    if (Issue.Details.EntityState == EntityState.Deleted &&
        Issue.IssueStatus != null
           && Issue.IssueStatus.StatusDescription == "Open")
    {
        Issue.Details.DiscardChanges();
        results.AddScreenError ("Unable to delete open issue");
    }
}
The first part of this code contains the logic that’s behind the DeleteIssue button. This code deletes the issue by calling its Delete method ![]() .
.
The code in the Validate method checks the issue entity’s EntityState ![]() . If the issue is marked as deleted, the code checks the issue status. If the status is set to open, the code undeletes the issue and adds a screen error
. If the issue is marked as deleted, the code checks the issue status. If the status is set to open, the code undeletes the issue and adds a screen error ![]() to inform the user that the record can’t be saved.
to inform the user that the record can’t be saved.
Validating Deletions on the Server
Validating deletions by using screen validation is relatively simple. I included the last example to highlight its simplicity, but it’s far from ideal. Relying on the client to perform validation isn’t good practice. If you want to apply the deletion rule throughout your application, you’ll need to write code in every single place where users can delete an issue. But if you want to validate deletions on the server, the process can be quite complex.
This complexity arises because LightSwitch doesn’t apply validation rules on deleted entities during the save pipeline process. If it did, your users would be forced to fill in all mandatory fields, even just to delete a record!
In this example, you’ll learn how to apply a slightly different deletion rule that includes a check on child records. The HelpDesk system allows engineers to respond to issues by adding records into a table called IssueResponse. If the response requires some input from the user, the engineer would set a field called AwaitingClient to true.
The following example shows you how to prevent issues from being deleted if there are responses that are awaiting client. This process consists of at least two parts (and optionally three):
- Carry out the validation check in the entity set’s Validate method.
- If errors are found, raise an exception in the entity set’s Deleting method.
- On the client, undelete the records that have failed validation (Optional).
To create the code in your entity set’s validate method, open the Issue table in the table designer, click on the Write Code button, and select the Validate method. Enter the code that’s shown in the first part of Listing 5-10.
Next, create a screen that’s based on the Issue table. Choose the Editable Grid Screen template, and name your screen EditableIssuesGrid. When the screen designer opens, click the Write Code button, and select the SaveError method. Enter the code that’s shown in the second part of Listing 5-10.
Listing 5-10. Validating Deletions on the Server
VB:
File: HelpDeskVBServerUserCodeApplicationDataService.vb

Private Sub Issues_Validate(entity As Issue,
     results As Microsoft.LightSwitch.EntitySetValidationResultsBuilder)

    ' Check for validation errors for deletions
   If entity.Details.EntityState = EntityState.Deleted Then
      If entity.IssueResponses.Where(
         Function(s) s.AwaitingClient).Any() Then
          results.AddEntityError(
             "Cannot delete issues with responses awaiting client.")
      End If
   End If

End Sub

Private Sub Issues_Deleting(entity As Issue)

    ' Check for validation errors for deletions
   If entity.Details.ValidationResults.Errors.Any Then
      Throw New ValidationException(Nothing,
         Nothing, entity.Details.ValidationResults)
   End If
   ' Cascade delete children because delete rule is Restricted
   For Each resp In entity.IssueResponses
      resp.Delete()
   Next

End Sub

File:HelpDeskVBClientUserCodeEditableIssuesGrid.vb

' This is the screen code
Private Sub EditableIssuesGrid_SaveError(
    exception As Exception, ByRef handled As Boolean)

   ' Un-delete deleted records that had server-side validation errors
   Dim validationExc = TryCast(exception, ValidationException)

   If validationExc IsNot Nothing Then
      Dim entities = From v In validationExc.ValidationResults
         Let e = TryCast(v.Target, IEntityObject)
           Where e IsNot Nothing AndAlso
              e.Details.EntityState = EntityState.Deleted
      Select e
      For Each e In entities
         e.Details.DiscardChanges()
      Next
   End If

End Sub

C#:
File: HelpDeskCSServerUserCodeApplicationDataService.cs

partial void Issues_Validate(Issue entity, EntitySetValidationResultsBuilder results)
{
    if (entity.Details.EntityState == EntityState.Deleted)
    {
        if (entity.IssueResponses.Where(s => s.AwaitingClient).Any())
        {
            results.AddEntityError(
                "Cannot delete issues with responses awaiting client.");
        }
    }
}

partial void Issues_Deleting(Issue entity)
{
    // Check for validation errors for deletions
    if (entity.Details.ValidationResults.Errors.Any())
    {
        throw new ValidationException(
           null, null, entity.Details.ValidationResults);
    }

    // Cascade delete children because delete rule is Restricted
    foreach (var childResp in entity.IssueResponses)
    {
        childResp.Delete();
    }
}

File:HelpDeskCSClientUserCodeEditableIssuesGrid.cs
// This is the screen code

partial void EditableIssuesGrid_SaveError(
   Exception exception, ref bool handled)
{
    ValidationException validationExc =
       (exception as ValidationException);
    if (validationExc != null)
    {

        var entities = from v in validationExc.ValidationResults
                       let e = (v.Target as IEntityObject)
                       where (e != null &&
                          e.Details.EntityState == EntityState.Deleted)
                       select e;

        foreach (IEntityObject e in entities)
        {
            e.Details.DiscardChanges();
        }
    }
}
The server-side Validate method checks the EntityState to see whether the issue is marked as deleted ![]() . If this condition is true, the code queries the IssueResponses navigation property to find any related issue-response records that have their AwaitingClient
. If this condition is true, the code queries the IssueResponses navigation property to find any related issue-response records that have their AwaitingClient ![]() property set to true. If one or more records exist, the code calls the AddEntityError method to record the fact that the entity has failed validation
property set to true. If one or more records exist, the code calls the AddEntityError method to record the fact that the entity has failed validation ![]() . Chapter 6 will explain the LINQ syntax and Any operator in more detail.
. Chapter 6 will explain the LINQ syntax and Any operator in more detail.
Because LightSwitch ignores validation errors on deleted entities, code execution continues into the pre-process entities phase of the save pipeline. (See Figure 4-10.) Here, the save pipeline executes the code in the Deleting method, and the code raises an exception if the AddEntityError method was called in the Validate method ![]() . By raising an exception here, the save pipeline aborts the transaction and executes the SaveChanges_ExecuteFailed method. This prevents the record from being deleted.
. By raising an exception here, the save pipeline aborts the transaction and executes the SaveChanges_ExecuteFailed method. This prevents the record from being deleted.
An important point is that if you want to perform validation against child records during a delete, you need to turn off the Cascade Delete option on the relationship (that is, set it to Restricted). If not, the save pipeline deletes any related child records prior to calling the validate method and you won’t be able to access any issue-response records in the validate method of your issue entity.
Because of this, the code manually carries out the cascade delete behavior by deleting the child records in the deleting method ![]() .
.
The second part of the code in Listing 5-10 refers to screen code that handles the save error event. This code finds the deleted entities and undeletes those entities. This allows the user to clearly see that the deletion has failed. Note that if you allow users to delete items other than issues, you should modify the screen code so that it checks that the deleted item is an issue before undeleting it.
![]() Note You can refer to the Save Pipeline diagram in Figure 4-10 to help you follow the workflow in this example.
Note You can refer to the Save Pipeline diagram in Figure 4-10 to help you follow the workflow in this example.
Accessing Validation Results in Code
If you need to access validation results in code, you can do so by using the details API. Listing 5-11 provides some example syntax.
Listing 5-11. Accessing Validation Results in Screen Code
VB:
' Examples of calling the IsValidated and HasErrors properties
Dim firstnameValid As Boolean = Me.Details.Properties.Firstname.IsValidated
Dim firstnameHasErrors As Boolean =
    Me.Details.Properties.Firstname.ValidationResults.HasErrors

' Get a count of all results with a severity of 'Error'
Dim errorCount As Integer = Me.Details.ValidationResults.Errors.Count

' Concatenate the error messages into a single string
Dim allErrors As String = ""
For Each result In Me.Details.ValidationResults
    allErrors += result.Message + " "
Next

C#:

// Examples of calling the IsValidated and HasErrors properties
bool firstnameValid = this.Details.Properties.Firstname.IsValidated;
bool firstnameHasErrors = this.Details.Properties.Firstname.ValidationResults.HasErrors;

// Get a count of all results with a severity of 'Error'.
int errorCount = this.Details.ValidationResults.Errors.Count();

// Concatenate the error messages into a single string.
string allErrors="";
foreach (ValidationResult result in  this.Details.ValidationResults ){
    allErrors += result.Message  + " ";
}
You can use the Details.Properties object to return only those errors for a specific field (for example, Details.Properties.Firstname).
LightSwitch validates properties only when they are modified, and the IsValidated property indicates whether a property is validated. The HasErrors property indicates whether or not any validation errors have been found.
The ValidationResults collection allows you to view the detail of each validation error. When you access ValidationResults, LightSwitch validates all objects that have not already been validated.
You can create your own validation rules at the database when working with an external SQL Server database. For example, you could create a SQL Server check constraint that validates your data against a T-SQL expression. If a user attempts to enter data that conflicts with the database rules you defined, LightSwitch will return the error to the user.
Earlier in this chapter, I showed you how to prevent users from entering duplicate records. If you were using an attached SQL Server database, you could apply this validation using a SQL Server unique constraint instead. To create a unique constraint, open your table in SQL Server Management Studio. Open the Indexes/Keys dialog box by clicking on the toolbar’s Index button.
In the General section of this dialog, choose the column that you want to apply the index on, set the Is Unique option to Yes, and select the type Unique Key.
Figure 5-9 illustrates a unique constraint on the SSN column in the engineer table. If you attempt to enter a duplicate SSN, LightSwitch displays the database constraint error in summary panel, as shown in Figure 5-10. Notice that the error message includes a heading that indicates that the error originates from the server. If the server returns any other errors, those errors are also grouped into the same block.
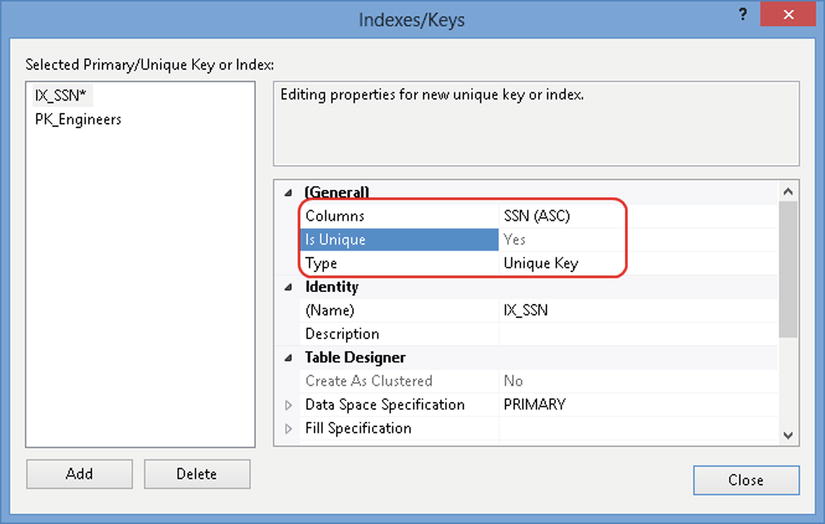
Figure 5-9. Creating a unique index
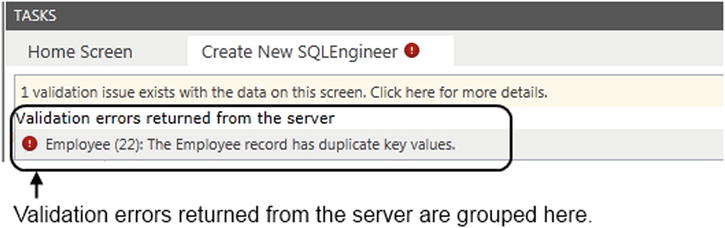
Figure 5-10. Unique constraint violation error
Summary
LightSwitch allows you to apply validation in two ways: predefined validation, and custom validation. Predefined validation allows you to define rules by using the table designer. They allow you to make fields mandatory, set maximum field lengths, and set minimum and maximum values for numeric data types.
LightSwitch applies predefined validation without you needing to carry out any extra work. If, for example, you increase the length of a text field, LightSwitch’s validation takes account of this change automatically.
For more-complex scenarios, you can apply custom validation by writing custom code. This allows you to define validation rules on entities, properties, and screens. LightSwitch executes the validation rules that you apply to entities (for example, tables) on the server as part of the save pipeline process. This type of validation provides a useful way to add rules that apply to navigation properties. This chapter showed you how to create conditional validation that makes an issue’s “close date” field mandatory if the user selects a “closed by engineer” rule. This is an example of where you would create validation rules that apply to entities. To create entity-level validation, open your table in the designer and click on the Write Code button. This opens the code editor and allows you to write .NET code that applies your validation rule. To create a validation rule, write a conditional statement that tests for the failure of your rule. When the failure condition occurs, call the AddPropertyError or AddEntityError methods and supply an error message to raise a validation error. If you raise an error using one of these methods, LightSwitch won’t allow the user to save their data until they correct all errors. If you call the AddPropertyResult or AddEntityResult methods instead, LightSwitch produces a warning but allows the user to save their changes once they acknowledge the warning.
Property-level (or field-level) validation allows you to create rules that apply to a specific property, and LightSwitch executes these rules on both the client and server. This chapter showed you how to use regular expressions to ensure that users enter Social Security numbers in the correct format. This is an example of where you would apply property-level validation.
If you want to apply validation that applies to a specific screen, you can do this by defining rules on the local screen property. LightSwitch applies screen-level validation on the client only, so you need to be aware that malicious users can bypass your screen validation by accessing your application’s OData endpoint directly. Therefore, it’s much better practice to apply business and validation logic through entity and property validation rules that run on the server.
Finally, you’ve seen some advanced validation examples that showed you how to prevent deletions, avoid duplicates, and validate files sizes. Although it might sound easy, defining a server rule that controls data deletion isn’t trivial because LightSwitch doesn’t apply validation rules to deleted entities.