
C H A P T E R 17
When Things Don’t Go Quite Right
We hope that your experience with LightSwitch turns out to be trouble free. However, if you do encounter problems, this chapter provides some tips and tricks to help you on your way. This chapter covers three areas:
- Problems that you can encounter during installations.
- Diagnosing SQL Server issues.
- Troubleshooting problems with deployed applications.
Troubleshooting Installations
LightSwitch 2011 is a complex product and has dependencies on many supporting components. The installer generally does a good job, but problems can sometimes occur during installation.
There are two ways you can install LightSwitch. The first method is to use the web installer. This method works by downloading a 3MB setup file called vs_vslsweb.exe. When you run the web installer, it checks to see what is already installed on your computer. It then downloads only the files that are needed on your computer.
The other method is to install LightSwitch from the installation CD. You can download an ISO image from the Microsoft web site. This can be burned onto a CD, or you can extract the files using a third party utility.
If you use the web installer and it fails, try using the setup files from the ISO instead. If the setup fails, the error message normally indicates where the failure has occurred. For example, an error may have been encountered during the installation of:
- SQL Server Compact Edition (needed for the LightSwitch data designer),
- SQL Server Express.
If such an error occurs, try manually installing the component that has failed. You can locate the individual installer files on the ISO image. Installing the components individually can sometimes reveal error messages that are hidden by the LightSwitch installer.
If that doesn’t help, check the Windows event log. Also check the contents of your temp directory for any files that are prefixed with .dd. These .dd files contain a plain text log of the installation. Any errors that are encountered by the installer will be logged here. You can determine the location of your temp directory by clicking Start ![]() Run and typing
Run and typing %temp% into the open textbox. If your username is Tim and you’ve attempted to install LightSwitch on a Windows 7 computer, some of the files that you should check are:
If you’re installing LightSwitch onto a machine with Visual Studio 2010 already installed, make sure to install Visual Studio 2010 Service Pack 1 before attempting to install LightSwitch 2011.
Troubleshooting the SQL Server
Most unexpected problems in LightSwitch 2011 are caused by the SQL Server. If your application reports an SQL Server Express problem at debug time, the first thing to check is that the SQL Server Express Service is showing the status “Started” (Figure 17-1).
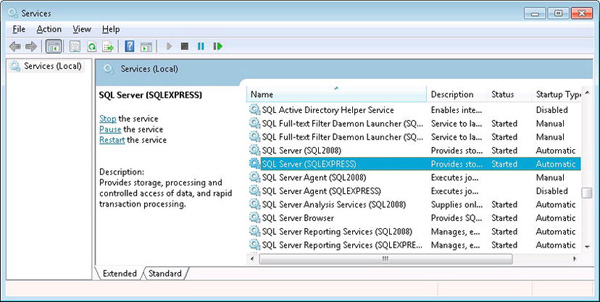
Figure 17-1. Make sure that SQL Express service is started
The Services Window can be found through Control Panel ![]() Administrative Tools
Administrative Tools ![]() Services. The following section describes some of the other SQL Server errors that you might encounter.
Services. The following section describes some of the other SQL Server errors that you might encounter.
Failed to Generate a User Instance of SQL Server
You might see the error message “Failed to generate a user instance of SQL Server due to a failure in starting the process for the user instance.” This problem can happen after applying an SQL Server update or by changing the language settings on your PC.
You can usually resolve this error by deleting the contents of the following folder: %AppData%LocalMicrosoftMicrosoft SQL Server DataSQLEXPRESS.
The SQL Server Express Service should be restarted for this fix to take effect. This can be done through the Services Window (shown in Figure 17-1).
SQL Express Instances That Are Not Named SQLEXPRESS
By default, LightSwitch expects to find a working instance of SQL Server Express called SQLEXPRESS. The SQLEXPRESS instance name is defined in Tools ![]() Options
Options ![]() Database Tools
Database Tools ![]() Data Connections (Figure 17-2).
Data Connections (Figure 17-2).
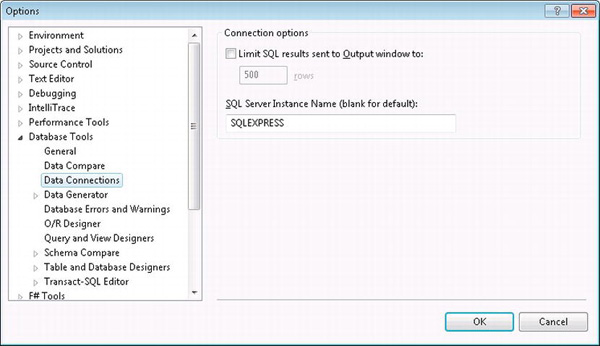
Figure 17-2. The SQLEXPRESS instance name is defined here
When a LightSwitch project is created, the SQLEXPRESS instance name is persisted in the MyApplication.lsproj file (substitute MyApplication with the name of your application).
If you share the project with someone who has changed their SQL Server Express instance name, your project will fail to run on his or her machine.
To resolve this problem, the LSPROJ file must be manually modified. Open the file in Notepad and search for the SqlExpressInstanceName element. The value of this setting can then be corrected as appropriate. Listing 17-1 shows the section in the file that you need to edit. If SQL Server Express is set to run as the default instance, this setting can be left blank.
Listing 17-1. Changing the SqlExpressInstanceName in the LSPROJ file
File: MyApplicationMyApplication.lsproj


<?xml version="1.0" encoding="utf-8"?>

<Project MSBuildVersion="4.0" ToolsVersion="4.0" DefaultTargets="Build"

 xmlns="http://schemas.microsoft.com/developer/msbuild/2003">

  <PropertyGroup>

    <-- Other elements here have been removed for brevity…-->

    <-- Modify the SqlExpressInstanceName  setting beneath…-->

    <SqlExpressInstanceName>SQLEXPRESS</SqlExpressInstanceName>
Errors Relating to Non-English Versions of SQL Express at Design Time
On your development machine, the default collation of the SQL Server Express Instance and collation of the intrinsic database should ideally match.
If a LightSwitch project is created on one machine and shared on a second machine with a different SQL Server collation, a mismatch will occur. This may result in search results being incorrect or data grids showing a red cross.
The easiest way to resolve this problem is to delete the intrinsic database file (found in bindataApplicationDatabase.mdf). LightSwitch will re-create this database the next time you run your application. Note that any data previously entered into your application will be lost.
![]() Caution The
Caution The ApplicationDatabase.mdf file allows data to be persisted between debug sessions and should be treated as temporary (hence, the suggestion to delete this file). If it’s important for you to retain the data that’s entered at debug time, create your tables in an attached SQL Server database rather than the intrinsic database.
Errors Relating to User Instances
At debug time, you might receive the error “An attempt to attach an auto-named database failed” or some other error message that mentions SQL Server User instances.
If you see such an error, you should check that User Instances are enabled in SQL Server Express. You can turn on User Instances by running a piece of T-SQL. Open SQL Server Management Studio, connect to your SQL Server Express instance, and run the following command: EXEC sp_configure 'user instances enabled', 1
SQL Server Log File
If your LightSwitch has once worked but you now get red crosses against all of your controls at debug time, deleting the SQL Server log file for your intrinsic database may help.
Make sure that your application isn’t running and search for the following file: bindataApplicationDatabase.ldf.
If found, deleting this file may fix your problem. If not, use Fiddler and the ASP.NET trace.axd page to diagnose the problem further. We’ll explain how to do this later in this chapter.
Tracing LightSwitch Applications
During design time, you can use the debugger to find and fix problems in your code. Once you deploy your application, what can you do to diagnose any problems you might encounter?
Fortunately, the tracing features built into LightSwitch can help you. You can use this to instrument and monitor the applications you have deployed. Microsoft.LightSwitch.Trace is the class that you would use to perform trace-related activities. This class contains three methods you can use to write out trace messages:
- TraceError,
- TraceInformation,
- TraceWarning.
The messages you create using these methods are sent to objects called listeners. During debug, a DefaultTraceListener displays any trace messages you have written into the Visual Studio output window. Other listeners that you can use include the EventLogTraceListener and TextWriterTraceListener. These listeners are used to write trace messages into the Windows event log or a text file. The trace.axd handler allows you to view trace messages through a web page, and we’ll explain how to view this later on.
Creating Trace Messages
When writing your LightSwitch code, you can create trace messages using the three trace methods listed earlier. Listing 17-2 shows an example of a computed field. Prior to the calculation, the TraceInformation method is called to create a trace message containing the DateOfBirth value.
By using this technique, you can determine whether a method has been executed by searching for your message in your trace output. You can also append additional details into your trace message to help you further.
Listing 17-2. Calling Trace.TraceInformation in a computed field
VB:


File: ShipperCentralCommonUserCodeCustomer.vb


Private Sub Age_Compute(ByRef result As Integer)

    Trace.TraceInformation(

       "Calculating age - DateOfBirth=" & DateOfBirth.ToString)

    result = DateDiff(DateInterval.Year, Now, DateOfBirth)

End Sub
C#:


File: ShipperCentralCommonUserCodeCustomer.cs


partial void Age_Compute(ref string result)

{

    Trace.TraceInformation(

       "Calculating age - DateOfBirth=" + DateOfBirth.ToString());

    DateTime now = DateTime.Today;

    int age = now.Year - DateOfBirth.Year;

    if (DateOfBirth > now.AddYears(-age)) age--;

}
Viewing Trace Messages at Debug Time
To view the trace messages you’ve created at debug time, your application must be set up as a web application rather than a desktop application. Once your application starts, the address that’s shown in the browser will be in the following format (the port number used by LightSwitch is set dynamically and can vary between sessions):
http://localhost:2142/default.htm?IsLaunchedByVS=True&AuthenticationType=None
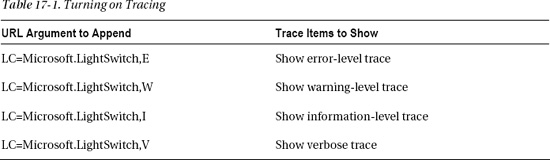
You can turn on tracing by appending an argument to the end of your URL. Table 17-1 shows the arguments you would append. If you append the LC=Microsoft.LightSwitch,E argument, only messages created using the Trace.TraceError method are shown.
The verbose option switches on tracing for all trace types. To illustrate how you would turn on verbose logging, type the following URL into your web browser:
http://localhost:2142/default.htm?IsLaunchedByVS=True&AuthenticationType=None&

LC=Microsoft.LightSwitch,V.
This restarts your application and trace messages will begin to appear in the output window. If the output window isn’t visible, you can enable it by clicking View ![]() Other Windows
Other Windows ![]() Output or by pressing Ctrl-Alt-O.
Output or by pressing Ctrl-Alt-O.
Figure 17-3 shows the trace message in the Output window when the age field is calculated.

Figure 17-3. Information trace messages in the Output window
Tracing a Deployed Application
Tracing really becomes useful if you need to diagnose a problem after you deploy your application. LightSwitch includes a diagnostic subsystem that integrates with the built in ASP.NET tracing. The messages that are shown are ideal for analyzing configuration issues or working out why a query has failed. The details displayed in the trace message show you the server request, response, and any errors that are generated.
Tracing is turned off by default. This is done for performance and security reasons. To turn on tracing, you have to make a modification to your web.config file. In this file, you’ll find five settings that relate to LightSwitch diagnostics system. These settings are shown in Table 17-2.
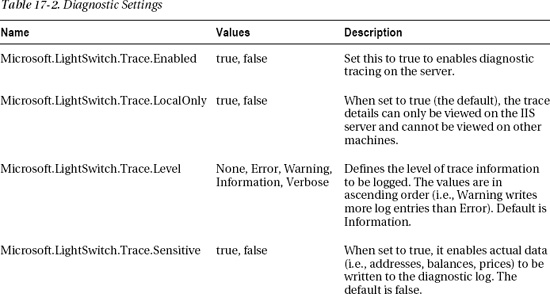

To configure these diagnostic settings, open your web.config file in Notepad. The relevant contents are shown in Listing 17-3. The configuration options in Table 17-2 can be found beneath the appSettings element. To turn on tracing, modify the two elements that are shown in bold in Listing 17-3.
Listing 17-3. Trace settings in web.config
<?xml version="1.0" encoding="utf-8"?>

<configuration>

  <appSettings>

    <add key="UserCodeAssemblies" value="Application.Common.dll;Application.Server

.dll;Application.ServerGenerated.dll" />

    <!-- A value of true will enable diagnostic logging on the server -->

    <add key="Microsoft.LightSwitch.Trace.Enabled" value="true" />

    <!-- A value of true only lets local access to Trace.axd -->

    <add key="Microsoft.LightSwitch.Trace.LocalOnly" value="true" />

    <!-- The valid values for the trace level are: None, Error, Warning, Information,

 Verbose -->

    <add key="Microsoft.LightSwitch.Trace.Level" value="Information" />

    <!-- A value of true will indicate that logging sensitive

        information is okay -->

    <add key="Microsoft.LightSwitch.Trace.Sensitive" value="false" />

    <!-- The semi-colon separated list of categories that will be

        enabled at the specifed trace level -->

    <add key="Microsoft.LightSwitch.Trace.Categories" value="Microsoft.LightSwitch" />

    <!-- A value of true will indicate http requests should be

        re-directed to https -->

    <add key="Microsoft.LightSwitch.RequireEncryption" value="false" />

    <add key="AllowAllWindowsUsers" value="false" />

  </appSettings>

  <connectionStrings>

    <add name="_IntrinsicData" connectionString="Data Source=localhost;

Database=ApplicationData;uid=tim;Pwd=strongpassword;" />

  </connectionStrings>

  <system.web>

    <!-- LightSwitch trace.axd handler -->

    <trace enabled="true" localOnly="false" requestLimit="40"

        writeToDiagnosticsTrace="false" traceMode="SortByTime"

        mostRecent="true" />

    <httpHandlers>

      <add verb="GET" path="trace.axd" type="Microsoft.LightSwitch.WebHost.Implementation
.TraceHandler,Microsoft.LightSwitch.Server.Internal,Version=10.0.0.0, Culture=neutral, PublicKeyToken=b03f5f7f11d50a3a" />

    </httpHandlers>
When you deploy an application to Azure, the tracing options are set in ServiceConfiguration.cscfg file rather than the web.config file.
After you make this change, you can view the trace messages by opening a browser and navigating to the trace.axd page. Using the previous example, our LightSwitch application ran on port 2142. The address you would use to view the trace details would therefore be http://localhost:2142/trace.axd.
When you navigate to this address, the trace messages are shown on the page (Figure 17-4). All HTTP requests are shown and you can view further details by clicking the View Details link.
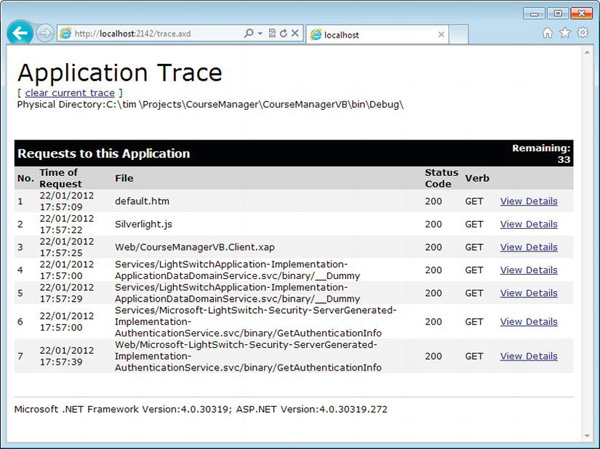
Figure 17-4. Details shown in the Trace.Axd page
The Application Trace page is the ideal place for diagnosing problems relating to database connectivity, or problems with queries.
Fiddler
Another tool that can help you is Fiddler. Fiddler is an HTTP debugging proxy that allows you to inspect the HTTP traffic that flows to and from the ASP.NET part of your LightSwitch application. It is ideal for diagnosing issues such as incorrectly configured IIS settings, problems with RIA services, or authentication issues.
To get started, download and install Fiddler from www.fiddler2.com. If you’re diagnosing a deployed LightSwitch application, disable ASP.NET custom errors in the web.config file. You’ll find this in an element called customErrors, which is found beneath system.web.
Now start up Fiddler and run your LightSwitch application. All HTTP traffic will be logged and displayed on the left-hand pane, as shown in Figure 17-5. Further details can be viewed on the right-hand pane.
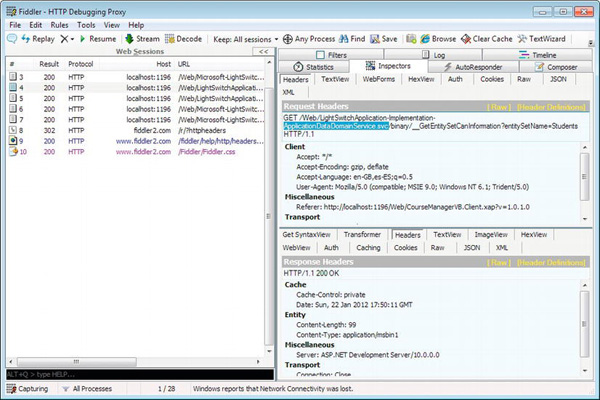
Figure 17-5. Fiddler results window
![]() Note After deploying an application you may receive the error “Load operation failed for query ‘GetAuthenticationInfo’. The remote server returned an error: Notfound.”
Note After deploying an application you may receive the error “Load operation failed for query ‘GetAuthenticationInfo’. The remote server returned an error: Notfound.”
GetAuthenticationInfo is the first call that the LightSwitch Silverlight client makes to the web server and can fail for many reasons, some of which may not be authentication related.
Fiddler is a great tool for diagnosing such issues. By viewing the data logged by Fiddler, you can hopefully find the details of HTTP or ASP.NET errors indicating what the error is. Such issues could include incorrect configurations of IIS, AppPool settings, or ASP.NET 4.
SQL Server Connection Problems
A failure to connect to your SQL Server database is the most common problem you’ll encounter after deploying a LightSwitch application.
When starting your application, it might attempt to load for about 30 seconds before timing out. At this point, all the controls on your screens will appear with a red cross. The most likely culprit for this condition is a database connection problem. The 30 seconds corresponds with the default connection timeout period of 30 seconds.
Another common error message that you’ll see when a database connection failure occurs is “Exception has been thrown by the target of an invocation” (Figure 17-6). We’ll now show you how to diagnose such SQL problems.
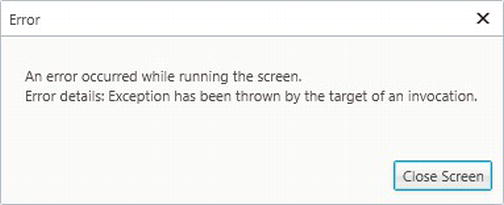
Figure 17-6. Exception has been thrown by the target of an invocation
Resolving SQL Server Connection Issues
The first thing to do is to check that your SQL Server is up and running. Make sure the SQL Server service is running in Control Panel ![]() Administrative Tools
Administrative Tools ![]() Services. Check that you can establish a connection to the SQL Server using SQL Server Management Studio.
Services. Check that you can establish a connection to the SQL Server using SQL Server Management Studio.
If you’ve just installed SQL Server, make sure you’ve enabled the TCP/IP (Transmission Control Protocol/Internet Protocol) protocol. By default, this is disabled as a security precaution. You can enable this in SQL 2008 by using the SQL Server Configuration Manager (Figure 17-7). In SQL 2005, use the Surface Area Configuration tool instead.
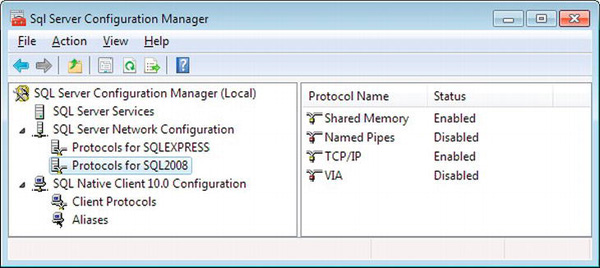
Figure 17-7. Enable TCP/IP
If SQL Server is installed on a server separate from your LightSwitch application server, you might receive the error “The specified SQL Server could not be found.” This error can indicate an underlying network connectivity problem.
To diagnose this further, use the ping command to ping your SQL Server. Open a command prompt from your LightSwitch server. If your SQL Server is called SQL2008Srv, type in the following command: Ping SQL2008Srv.
You should see some replies from your SQL Server. If you can establish a connection to your database server but still can’t connect to SQL Server, check that database traffic isn’t blocked by firewalls or antivirus software. For example, the McAfee Virus Scan product blocks ports using an Access Protection task.
If you’re using a named instance of SQL Server, make sure you’ve specified the instance name in your connection string. It’s sometimes easy to forget this.
A simple way to check that you can connect to your SQL Server is to use a UDL file. Create an empty text file on your web server and rename the file extension from TXT to UDL. When you double-click this file, the Data Link Properties window opens (Figure 17-8).
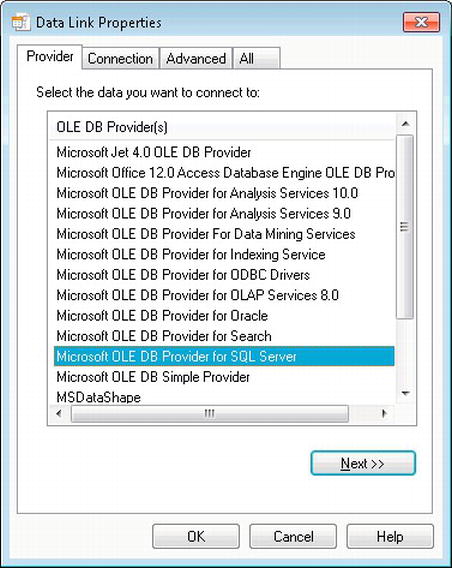
Figure 17-8. Data link properties window
Select “Microsoft OLE DB Provider for SQL Server,” and then click Next. Enter your SQL Server details and click the Test button. If the test succeeds, you can change the file extension of this file back from UDL to TXT. If you open the text file in Notepad, the database connection string is shown in plain text.
This test proves that the connection string is correct and you can reuse this in your web.config file.
ASP.NET Settings (Three-Tier Setup)
Incorrect IIS or ASP.NET configuration settings are typical reasons as to why your LightSwitch application could fail to work. The Application Trace page (shown earlier) is the best method for diagnosing such problems.
Other tips that can help you are:
- Check the Windows event log. Many IIS errors are reported here.
- Make sure that the .NET 4 Framework is installed. Also ensure that your application pool is configured to use .NET 4.
- Check that ISAPI (Internet Server Application Programming Interface) restrictions have not been applied for ASP.NET. In IIS Manager, select the Server node and choose ISAPI and CGI Restrictions. Make sure that the ASP.NET v4.0 entry is set to allowed.
- If you installed the .NET 4 Framework before installing IIS, make sure that ASP.NET is properly installed in IIS. You can run the command
aspnet_regiis –ito reinstall ASP.NET. Theaspnet_regiisis usually found in the locationC:WindowsMicrosoft.NETFrameworkv4.0.30319.- Ensure you have installed the LightSwitch prerequisites. If you’ve set up the IIS application pool to run under the context of a domain account, make sure that you’ve entered the correct username and password. Also, is the domain account valid? For example, has it been locked out or has the password expired?
- If you’ve set up an IIS application pool to run under the security context of a Windows user (to allow Windows authentication to take place between ASP.NET and SQL Server), make sure that a login has been created in the SQL Server.
Troubleshooting Publishing
Publishing an application from Visual Studio to IIS7 is an area that can cause much pain. After setting up your server, try packaging an application as a zip file (described in Chapter 16). Check that you can import the packaged application into IIS. If this works, the problem is more likely related to connectivity. The tips that you can follow to get publishing working are:
- Make sure that the Web Deployment Service is running correctly in Control Panel
Services.
- Make sure that firewall settings are not blocking any of the ports that are needed for the deployment service. By default, port 8172 is used.
- Check the authentication settings in IIS. You can set these to anonymous to rule out any problems.
- Follow the tips shown in the ASP.NET settings section to rule out IIS- or ASP.NET-related issues.
- Try using HTTPS to publish your application. When you do this, make sure that a valid SSL certificate is installed in IIS. If you’re using a self-certificate, make sure you’ve installed this into the trusted root authority on the computer from which you’re publishing.
Summary
This chapter has shown you how to:
- Diagnose installation failures.
- Troubleshoot SQL Server connectivity issues.
- Use the diagnostic tracing that is built into LightSwitch.
- Diagnose issues related to IIS/ASP.NET configuration.
You can install LightSwitch by downloading all of the LightSwitch installation files in the form of an ISO image or by running a small web installer. If you encounter problems when using the web installer, you should try using the installer from the ISO image instead. If a failure occurs while installing one of the component parts (i.e., SQL Server Express), you can try manually installing the part that has failed. This will often reveal error messages that can help you diagnose the exact cause of the failure.
SQL Server is an area where you might encounter difficulties. SQL Express files are stored in the folder %AppData%LocalMicrosoftMicrosoft SQL Server DataSQLEXPRESS. Deleting the contents of this folder can often resolve SQL Server problems.
LightSwitch includes built in tracing. After you deploy an application, you can turn on tracing by modifying some of the settings in the web.config file. This allows you to view trace messages in a web page called trace.axd. The information you’ll find on this page will help you diagnose the majority of problems you might encounter.
Always check the Windows event log whenever things don’t go to plan. The contents of the event log can often reveal much detail.