
C H A P T E R 16
Deploying Your Application
Now that you've built the perfect LightSwitch application, the only thing left to do is to make it available to your users. Following all the tips and tricks you've learned in this book, your users will surely be impressed.
As you already know, you can use LightSwitch to create desktop or browser applications. These can be deployed in either two-tier or three-tier mode. You can even deploy to Windows Azure. This results in several distinct deployment scenarios, each requiring a unique set of tasks to be carried out.
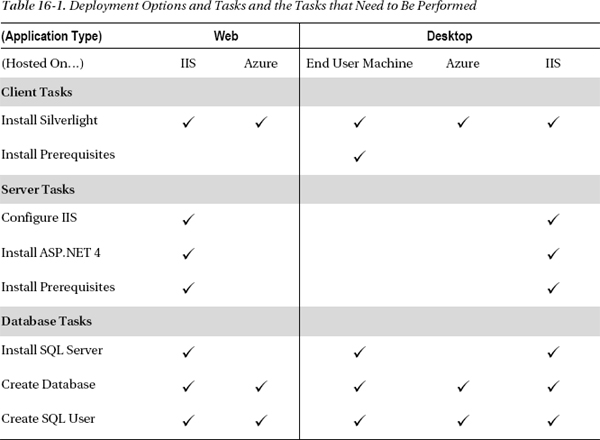
Table 16-1 gives you an overview of the various deployment options. It highlights the tasks that would have to be performed in each scenario.
This chapter covers quite a bit of content, so we'll start by giving you a summary of what's to come.
The first decision you'll need to make is whether to choose a two-tier or a three-tier deployment. In simplistic terms, your application type will determine this choice.
Browser applications must be deployed as a three-tier application. Desktop applications can be deployed as either two-tier or three-tier applications.
If you choose to deploy a three-tier application, you'll need to configure a web server. Your web server needs to have IIS, ASP.NET 4, and the LightSwitch prerequisites installed. Later in this chapter we'll show you how to carry out the following IIS tasks:
- Set up IIS6 on Windows 2003 and IIS7 on Windows 2008.
- Install and configure ASP.NET 4
- Install the LightSwitch prerequisites using either the CD or Web Platform Installer tool.
- Add support for publishing and packaging using the Web Deploy tool.
- Set up Secure Sockets Layer (SSL) and application pools.
If you choose to deploy a two-tier desktop application, IIS isn't required and you can skip the entire section on “Setting Up Your Web Server.”
Whatever route you choose, you'll need to perform some SQL Server tasks. At the very least, this involves creating a SQL Server database and a SQL Server login.
After you've carried out the server-related tasks, you can begin to focus on deploying the application you've written. LightSwitch includes a Deployment Wizard that guides you step by step through this process. In this chapter, we'll describe the pages that are shown by the wizard including the steps to:
- Configure database and authentication settings.
- Add application prerequisites (such as the .NET Framework) to a two-tier deployment package.
- Digitally sign your application with a certificate.
When the Deployment Wizard finishes, we'll show you the final steps that are needed to move the output onto your server. This includes:
- How to publish the output directly onto your IIS server.
- How to package your application into a zip file and install it manually.
- How to perform a manual XCOPY deployment.
Another way to avoid the complications of setting up IIS is to deploy your application onto Windows Azure. This makes your application available over the Internet and is particularly suitable if you don't want to limit the use of your application to your local intranet.
However, you'll be charged for bandwidth and compute time, so you'll need to weigh how much this might cost you-it could turn out to be quite expensive! You also might not want your data to be stored in the Cloud, perhaps for legal or security reasons. This is something you should take into consideration.
To end this chapter, we'll show you how to deploy your application into Windows Azure. We'll show you how to use the Azure web portal and also explain:
- What a hosted service is and how to create one.
- How to create a storage account and how to create an SQL Azure database.
- The steps you'll need to follow to publish your application onto Azure.
![]() Note Deploying applications can sometimes be tricky. Chapter 17 on troubleshooting contains additional information that can help you if you encounter any deployment issues.
Note Deploying applications can sometimes be tricky. Chapter 17 on troubleshooting contains additional information that can help you if you encounter any deployment issues.
Deployment Fundamentals
The key feature that LightSwitch offers is the Deployment Wizard. This guides you step by step though the deployment process. At the end of the process, your application will either be published or a set of setup files will be produced.
Figure 16-1 illustrates a flow chart that shows the pages that are shown in the wizard. You'll need to carry out some prerequisite work if you want to follow certain routes through the wizard. We've indicated these on the chart by keying the stages with a *PR (prerequisite) code.
We'll describe the wizard steps in more detail, but before we do so, we'll start by explaining some of the underlying concepts. This will help you to make informed choices when you reach the Deployment Wizard. In this initial section, we'll cover:
- Application and client topologies,
- The difference between publishing and packaging,
- Client installation requirements.
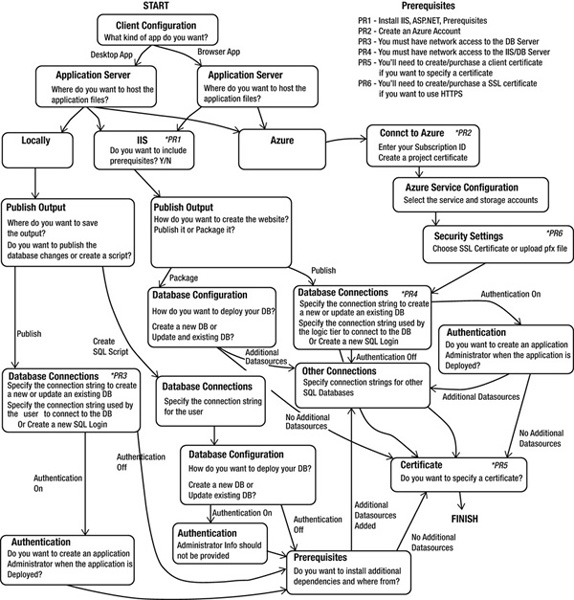
Figure 16-1. Deployment Wizard workflow
Application Topologies
By now, you have learned that the LightSwitch application can run either inside a browser or outside a browser as a desktop application. The technical term for this is the client topology. Figure 16-2 shows how you would set this up in the properties pane of your application.
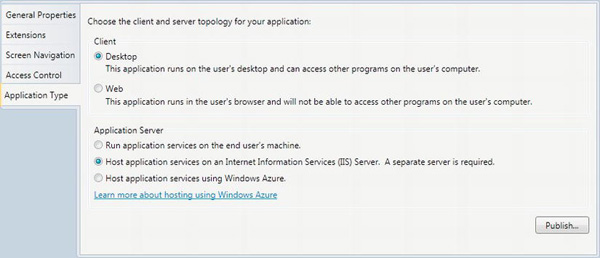
Figure 16-2. The application type settings window
Beneath the client settings (shown in Figure 16-2), you can find three more radio options that allow you to choose the application topology. These settings specify where the LightSwitch application services are installed and run.
Desktop Applications
When you deploy a desktop application, you can choose to install the LightSwitch application services on the end user's machine. Typically, the database is installed on a separate database server, and this type of deployment is known as a two-tier deployment. Running the application services on the end user machine simplifies deployment because it avoids having to set up IIS, and this is the place where some of the worst problems are often encountered.
The disadvantage of a two-tier deployment is that you'll need to install your application on every machine where you want to use it. This option is therefore more suitable for applications with a small number of users.
When you're performing a two-tier deployment, you can also choose to install the database on the end user machine using a local instance of SQL Server or SQL Server Express. This means that everything is installed and run from a single machine. This type of setup is ideal for a single-user application. If you need to install your application on multiple machines or have multiple users, it's best to install your database on a separate server rather than hosting it on an end user's machine.
At this point, you might wonder what application services are. As you've learned, LightSwitch applications rely on web-based technologies such as ASP.NET and RIA services. Since these services are traditionally hosted inside IIS, something needs to take their place if those services are not available.
Two-tier LightSwitch applications are therefore hosted using a process called VslsHost.exe. This executable is installed in your profile directory when you install your application using the setup.exe that you'll create. On a Windows XP machine, for example, VslsHost.exe would be installed into a subfolder of the folder C:Documents and SettingsTimLocal SettingsApps2.0.
VslsHost.exe is essentially a web server that runs on the workstation. Just like IIS, VslsHost creates working files in the following temporary location: C:WINDOWSMicrosoft.NETFrameworkv4.0.30319Temporary ASP.NET Files
oot.
VslsHost is responsible for the server portion of your application. The client part is hosted using the Silverlight out of browser runtime. This process is called SLLauncher.exe and it is typically installed in the folder C:Program FilesMicrosoft Silverlight.
If you choose not to host the application services locally, you can host them on an IIS server or Windows Azure. This type of setup would be called a three-tier desktop deployment. The advantage of a three-tier application is that users can run your application by simply pointing a web browser to the URL where it's been installed. Apart from installing Silverlight, there isn't anything else that needs to be carried out on the client's machine.
Desktop applications are installed locally on the end user machine using Microsoft ClickOnce. Unlike browser applications, they can be uninstalled using the Programs and Features or Add and Remove Programs option in the Control Panel (shown in Figure 16-3).
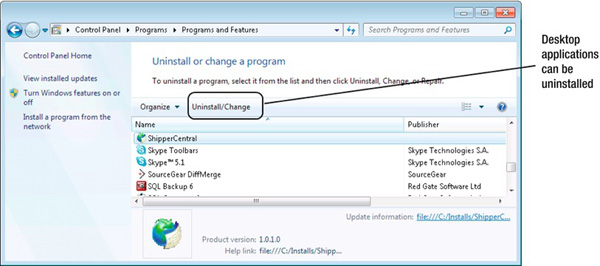
Figure 16-3. Uninstalling a desktop application
Browser Applications
Web applications must be deployed as three-tier applications and therefore must be hosted using IIS or Windows Azure. When you select the web client option from the Application Type settings window, the Run Application Services on the End User's Machine option is automatically grayed out.
Publishing vs. Packaging
In a three-tier setup, you can choose to either publish or to package your application (as shown in Figure 16-4).

Figure 16-4. Publishing vs. packaging
If you choose to publish, your application is deployed directly from Visual Studio onto your IIS server. It's very easy to publish an application but more work is involved in preparing your IIS server beforehand. The supported platforms for publishing include Windows Server 2008, Windows Server 2008 R2, Windows Server 2003, or Windows 7.
The second option is to package your application. Packaging produces a set of install files that can be manually copied and installed on your server.
Packaging an application is a simpler option compared to the publishing. You don't have to carry out as much work in IIS or struggle to make Visual Studio talk to IIS. For example, publishing will fail if a firewall blocks the ports that are required for it to work (port 8172 by default). If you're developing your application on a machine that doesn't belong to the same domain as the server you want to deploy to, packaging is a better choice.
Client Requirements
The client deployment story is relatively straightforward. Since LightSwitch clients are Silverlight based, you'll only need to install the Silverlight 4.0 runtime on your client.
If a user attempts to run a LightSwitch browser application without the runtime installed, a page is displayed that prompts the user to download the Silverlight runtime from the official Microsoft web site.
For those in corporate environments, the Silverlight runtime can be installed using group policy, SMS (Microsoft Systems Management Server), or some other software distribution mechanism.
Some companies have policies in place that block Silverlight or Adobe Flash. If Silverlight has been blocked, your LightSwitch application simply will not work. Silverlight 4.0 must be installed on the client for your application to function.
Setting Up Your Web Server
In this section, we'll show you how to set up IIS and how to configure your web server. If you want to deploy a three-tier application and not use Windows Azure, this is a necessary requirement. If you're setting up a two-tier desktop application, you can skip this section and move straight to the “Deployment Wizard” section.
The version of IIS that you'll set up will depend on the server operating system you've installed. When you set up a web server, we recommend carrying out the following tasks in the sequence shown:
- Install IIS
- Install ASP.NET 4
- Install LightSwitch prerequisites and the Web Deploy Tool
- Configure Application Pools
- Optionally set up SSL
We'll now describe each of these steps in more detail.
Setting Up IIS7
IIS7 is the web server you'll find in Windows 2008, Windows 7, or Windows Vista. The steps that you'll need to carry out are slightly different, depending on the operating system you've chosen. This section explains how to install and configure IIS7 on the above operating systems.
Setting Up IIS in Windows 2008
In Windows Server 2008, IIS7 is installed by adding the Web Server (IIS) role. To do this, open Server Manager by going to Administrative Tools Server Manager. In the Roles Summary group, open the Add Roles Wizard by clicking the Add Roles link (shown in Figure 16-5). The Add Roles Wizard includes a page that allows you to select the Web Server (IIS) role.
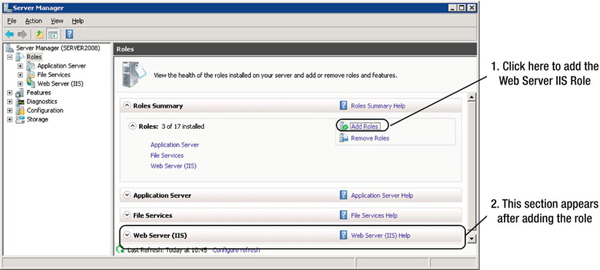
Figure 16-5. Adding the IIS server role
When you complete the Add Roles Wizard, the Web Server (IIS) link appears inside the Roles group that you'll find beneath the Roles Summary group. Clicking this link opens the IIS Summary page (shown in Figure 16-6).

Figure 16-6. Adding role services in Windows 2008
In the Role Services pane, enable the following role services:
- Management Service
- Application Development
 ASP.NET
 - Security Windows Authentication
Setting Up IIS7 in Windows 7
When setting up IIS7 on Windows 7 (or Windows Vista), a slightly different process is used, compared to Windows Server 2008.
Instead of adding the Web Server role, IIS is installed using the Windows Control Panel. After opening the Control Panel, select Programs and Features and choose the option to Turn Windows features on or off. When the Windows Features dialog appears (shown in Figure 16-7), select the Management Service, Application Development ![]() ASP.NET, and Security
ASP.NET, and Security ![]() Windows Authentication options.
Windows Authentication options.

Figure 16-7. Turning Windows features on or off in Windows 7
Setting Up IIS6
IIS6 is the web server that's included in Windows 2003. It's added by going into Control Panel Add/Remove Programs. In the Add/Remove Programs dialog that appears, click the Add/Remove Windows Components button that appears on the left-hand side. This opens the Windows Component Wizard. In the Windows Components section, select Application Server and click the Details button to open up the dialog shown in Figure 16-8.

Figure 16-8. Enabling IIS6 on Windows 2003
After installing IIS6, make sure you've installed ASP.NET and the LightSwitch prerequisites (we'll explain how to do this shortly). Now open Internet Information Services (IIS) Manager and switch to the Web Service Extensions view. Make sure you've allowed the ASP.NET 4 Web Service Extension, as shown in Figure 16-9.
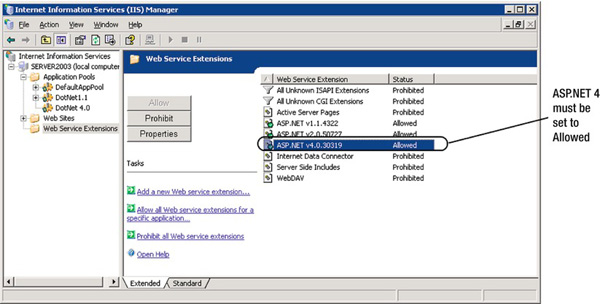
Figure 16-9. Enable the ASP.NET 4 Web Service Extension
Setting Up IIS Application Pools
When you create a web site in IIS, it gets added to the default application pool. Application pools improve reliability by isolating the applications that run within IIS. If a web site that belongs in an application pool crashes, it won't affect the other web sites that belong to other application pools. It therefore makes good sense to deploy each LightSwitch application into a separate application pool.
Each application pool also runs under a specific security context and this enables you to configure the logic tier of your application to connect to your SQL Server database using Windows authentication. This concept is illustrated in Figure 16-10.
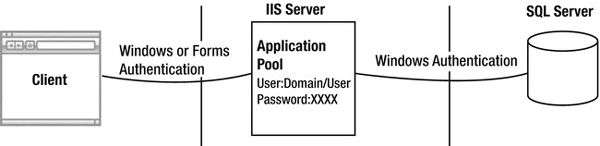
Figure 16-10. Set up an application pool to Windows authenticate to SQL Server
To create a new application pool, open Internet Information Services (IIS) Manager and right-click the Application Pools node on the left-hand navigation menu. A right-click context menu option allows you to create a new application pool, as shown in Figure 16-11. You must set up the Application Pool to use version 4 of the .NET Framework.
In IIS7, it is also preferable to choose the Integrated Managed Pipeline mode, as opposed to the Classic mode. Classic mode is primarily designed for legacy code, which may not run properly in integrated mode. Your LightSwitch server will run more efficiently and yield better performance if you set the IIS7 pipeline mode to integrated.
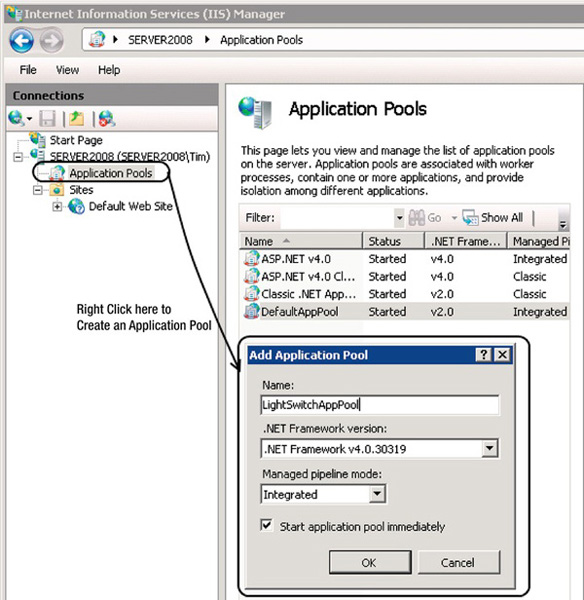
Figure 16-11. Creating an application pool in IIS7
After you've deployed your web site, you can configure it to use the new Application Pool that you've created by modifying the web site properties in IIS Manager.
Configuring SQL Server Windows Authentication
SQL Server can be set up to use two types of authentication: SQL Server authentication and Windows authentication. If you choose to use SQL Server authentication, you can create your own login and password in SQL Server and hard code these credentials into the database connection string. Some information technology departments regard Windows authentication as being more secure because credentials do not need to be persisted along with the application. If you want to learn more about the pros and cons of SQL Server authentication vs. Windows authentication, you can refer to the following TechNet article: http://technet.microsoft.com/en-us/library/ms144284.aspx.
To use Windows authentication, you'll first need to create a Windows domain user. If your IIS Server and SQL Server are on the same computer, you might find it easier to use a local Windows user, rather than a domain user (particularly if you don't have permission to create new domain users).
Now select the application pool you're using for your application. Bring up the Advanced Settings and choose the Custom Account radio button (Figure 16-12). Use the Set button to specify the Windows user you want to use.
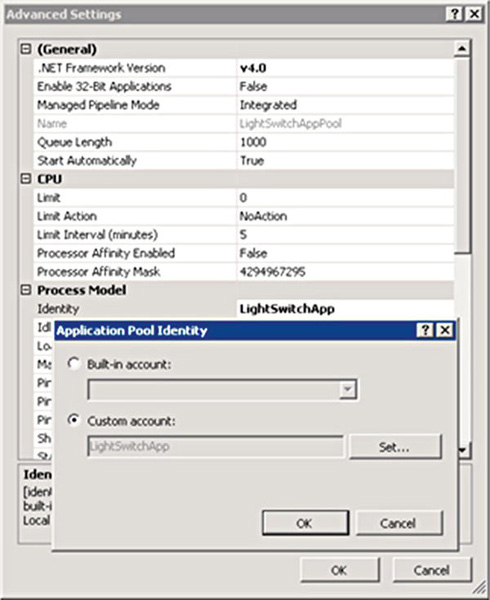
Figure 16-12. Changing the application pool identities
The Windows user you've specified must have read permissions on the folders where your LightSwitch application will be saved. You'll need to set the appropriate NTFS (New Technology File System) permissions. It's also a good idea to add the user to the local IIS_IUSRS group to avoid any problems with permissions. This grants access to web and ASP.NET resources that might be needed.
In the authentication section of your web site, you might also need to set up the NTLM provider or carry out a few additional steps to enable support for Kerberos authentication if you run into permission problems. The following TechNet article describes this in more detail: http://technet.microsoft.com/en-us/library/dd759186.aspx.
Finally, you'll need to create a SQL Server login for your Windows user using SQL Server Management Studio. You'll also need to configure object permissions to the tables in your application and any other tables that are used by the ASP.NET membership provider. The easiest way to get started is to add your user into the following roles:
aspnet_Membership*aspnet_Roles*db_datareaderdb_datawriterpublic
Configuring Secure Sockets Layer
When application services are hosted in IIS, the LightSwitch client communicates with the web server (the logic tier) using the HTTP protocol. The data transfer between the client and logic tier takes place in clear text. Someone monitoring the local network traffic could eavesdrop on this communication and watch the data that are exchanged between the client and server. If forms authentication is used in your LightSwitch application, the username and password credentials of someone logging in could be exposed using this technique (we discussed why you want to use forms authentication in Chapter 13).
As with all web traffic, this vulnerability can be mitigated by encrypting your data using the HTTPS protocol, which uses an encrypted tunnel called Secure Sockets Layer.
To set up SSL, you need to install an SSL certificate for your web server. This certificate is used to verify the identity of the server, and it contains the keys that are used for encryption. You can either purchase a certificate from a third party company such as VeriSign or use an internal certificate server if your company has such an infrastructure in place. After receiving the server certificate, you can configure SSL using the Server Certificates and Site Binding options in IIS Manager.
The server certificate you install in IIS must be valid. The server name on the certificate must correctly match the server name, it must not be past its expiry date, and it must be signed by a trusted certificate authority.
If you use a LightSwitch browser application that is installed on a web server with an invalid certificate, the behavior depends on the browser you use, but it generally warns you of the error and then allows you to continue.
However, if you connect an out-of-browser desktop application to a web server with an invalid certificate, the security model in Silverlight prevents your application from working. The only solution in this instance is to resolve the certificate error.
If you want to be extra secure, you can force your application to use HTTPS and redirect any HTTP traffic to the HTTPS endpoint instead. You can configure this by modifying your web.config file as shown in Listing 16-1. When deployed, this file is found in the root folder of the ASP.NET web site, and during development, it can be found in the ServerGenerated folder.
Listing 16-1. Web.config setting to force SSL
<appSettings>

<add key="Microsoft.LightSwitch.RequireEncryption" value="true" />
![]() Note You can find out more about setting up SSL on the official IIS7 and Microsoft TechNet web sites.
Note You can find out more about setting up SSL on the official IIS7 and Microsoft TechNet web sites.
ASP.NET Configuration
ASP.NET needs to be installed on your IIS server for LightSwitch to work. This is done by installing the Microsoft .NET 4 Framework redistributable.
You can obtain the .NET 4 redistributable by using the Web Platform Installer (which we'll describe soon) or alternatively, you can download it separately from the Microsoft web site (www.microsoft.com/download/en/details.aspx?id=17718).
If .NET 4 is already installed on your server and you install IIS afterward, ASP.NET may not register itself correctly.
If you need to register ASP.NET in IIS, you can use the aspnet_regiis.exe command. To run this command, open a command prompt and change to the following directory:
- On a 32-bit server, change to:
<WindowsDir>Microsoft.NETFrameworkv4.0.30319 - On a 64-bit server, change to:
<WindowsDir>Microsoft.NETFramework64v4.0.30319
You can now run the command aspnet_regiis.exe -i to re-register ASP.NET. You can also follow the same process to reinstall or repair ASP.NET if necessary.
LightSwitch Prerequisites
LightSwitch includes a Prerequisites setup utility. You'll need to run this on your web server to install the necessary LightSwitch components. These components are needed by LightSwitch, and your application won't run correctly unless you install the prerequisites.
These prerequisites can be found on the LightSwitch installation CD. You can find them in the folder WCUVSLSServerPrereqs. The two files in this folder are:
vs_vslsserverprereqs_x86.exe(this is the 32-bit version)vs_vslsserverprereqs_x64.exe(this is the 64-bit version)

Figure 16-13. Running the prerequisites setup
After running the prerequisites (shown in Figure 16-13), the files are installed into the following folder: C:Program FilesMicrosoft Visual Studio 10.0LightSwitch1.0Tools.
Listing 16-2 shows the files that are created by the prerequisites utility. Several subfolders are created that contain the localized DLLs (for example de, es, and fr). Listing 16-2 only shows the DLLs that are created in the German de folder. The other folders contain localized versions of the same files.
Listing 16-2. Files installed by prerequisites
ToolsMicrosoft.LightSwitch.AppBridge.dll

ToolsMicrosoft.LightSwitch.Base.Server.dll

ToolsMicrosoft.LightSwitch.CodeMarker.dll

ToolsMicrosoft.LightSwitch.dll

ToolsMicrosoft.LightSwitch.ExportProvider.dll

ToolsMicrosoft.LightSwitch.ManifestService.dll

ToolsMicrosoft.LightSwitch.SecurityAdmin.exe

ToolsMicrosoft.LightSwitch.Server.dll

ToolsSystem.ServiceModel.DomainServices.EntityFramework.dll

ToolsSystem.ServiceModel.DomainServices.Hosting.dll

ToolsSystem.ServiceModel.DomainServices.Server.dll

Toolsde

Toolses

Toolsfr

Toolsit

Toolsja

Toolsko

Tools
u

Toolszh-Hans

Toolszh-Hant

ToolsdeMicrosoft.LightSwitch.ExportProvider.Resources.dll

ToolsdeMicrosoft.LightSwitch.ManifestService.Resources.dll

ToolsdeMicrosoft.LightSwitch.Resources.dll

ToolsdeMicrosoft.LightSwitch.SecurityAdmin.Resources.dll

ToolsdeMicrosoft.LightSwitch.Server.Resources.dll
Microsoft Web Platform Installer
If you don't have access to the LightSwitch installation CD, the prerequisites can be installed by downloading and running the free Web Platform Installer tool (or Web PI as it's known). You can find this through the official Microsoft web site (www.microsoft.com/web/downloads/platform.aspx). After running Web PI, select the Products group and choose Tools from the left-hand pane, as shown in Figure 16-14.
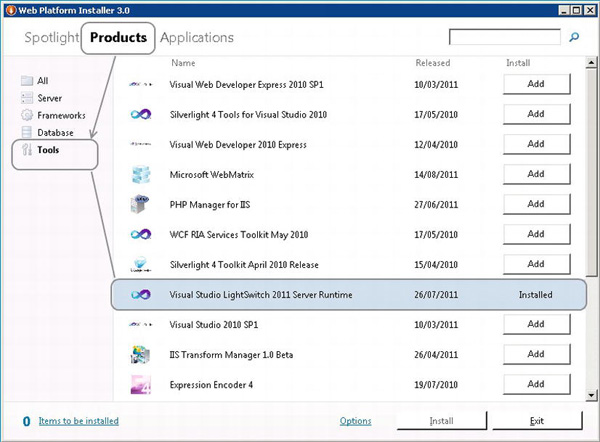
Figure 16-14. Installing the prerequisites using Web PI
Web PI provides a simple way for you to set up a server. If you want to install SQL Server Express on your server, Web PI can also do this for you.
Microsoft Web Deploy Tool
If you want to publish LightSwitch applications onto your server, you'll need to install the Microsoft Web Deploy tool. This also adds support for installing packages you've created using the Deployment Wizard from Visual Studio.
The Web Deploy tool is included as part of the LightSwitch prerequisites. It can also be obtained by downloading it from the IIS web site (www.iis.net/download/WebDeploy).

Figure 16-15. The Web Deployment Agent Service must be started
The Web Deploy tool installs a Web Deployment Agent Service. For publishing to work, it's important to ensure that this service is started (shown in Figure 16-15). The installer sets the startup type of this service to automatic. But if you experience problems publishing your application, you should manually check that the service is started.
Deployment Wizard
Now that you understand the principles and know how to set up a server, we'll show you how to use the LightSwitch Publish Application Wizard (or Deployment Wizard as we'll call it).
You can start the wizard by right-clicking your project in Solution Explorer and selecting the Publish menu option. At this point, the initial page prompts you to select the client topology (Figure 16-16).
This figure also shows the warning message that appears if the active configuration is set to Debug. When publishing an application for production, the active configuration should be set to Release using the dropdown that appears in the Visual Studio toolbox.
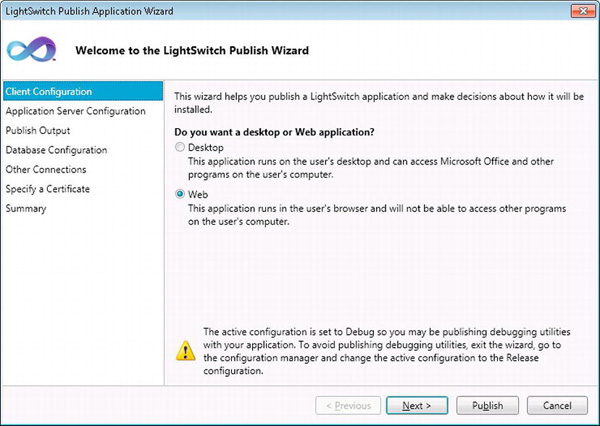
Figure 16-16. Page one of the Publish Application Wizard
After choosing whether or not you want to deploy a Desktop or Web application, you will need to specify where you want to host the server components. As mentioned earlier, there are two or three options you can choose from (shown in Figure 16-17).
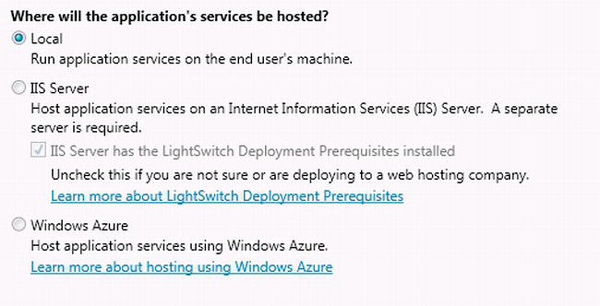
Figure 16-17. Page two of the Publish Application Wizard
The rest of the wizard allows you to enter the remaining settings. At this point, it might be worth referring to the flow chart that we showed you in Figure 16-1 to remind yourself of the steps that are shown in the wizard. At the end of process, your application will either be published or a set of setup files will be produced.
Most of the screens you'll encounter are intuitive. The Azure publishing process will be covered toward the end of this chapter. We'll now cover some of screens you'll encounter in the wizard and we'll begin with the database-related screens.
Database Connections Page
If you choose to publish your application, you'll reach a Database Connections page as shown in Figure 16-18.
This page allows you to specify two connection strings. The first connection string is used by the wizard at publish time to create and/or update your intrinsic database.
The user connection string is used by the application during runtime to connect to the intrinsic database. In a three-tier application, the user connection string is used by the IIS to connect to the database.
If you click the ‘...’ buttons that you'll find to the right of the connection string textboxes, a Connection Properties dialog opens up. This allows you to create a connection to your database, and the dialog also includes a test button to check that your connection works. When you OK this dialog, the connection string textbox is populated with the database connection you've specified.
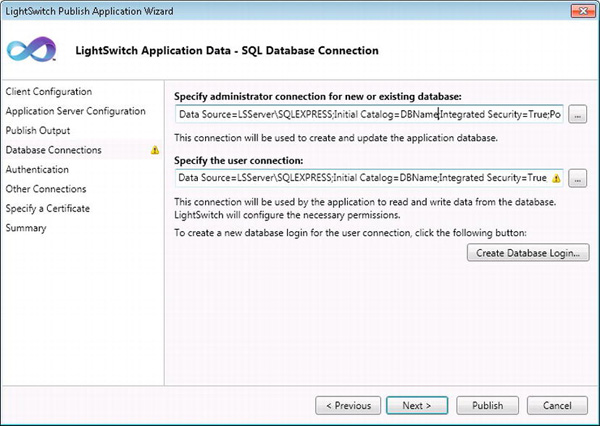
Figure 16-18. Database connection dialog
Figure 16-18 illustrates a warning against the user connection string. This is because you're not allowed to specify a user connection string that uses Windows authentication (i.e., Integrated Security). The connection string has to use SQL Server authentication, and the Create Database Login button can be used to create an SQL login. This button opens a dialog that allows you to specify a login name and password for your new login. When you OK this dialog, the login is created immediately using the administrator connection you've specified, rather than at the end of the publishing wizard.
If you choose a two-tier deployment and choose the option to create an SQL script, the administrator connection textbox will not be shown because the wizard does not need to connect to the database server.
Database Configuration Page
If you choose to package your application, the Database Configuration page is presented (Figure 16-19).
Using this dialog, you can choose the option to either create a new intrinsic database or update an existing database.
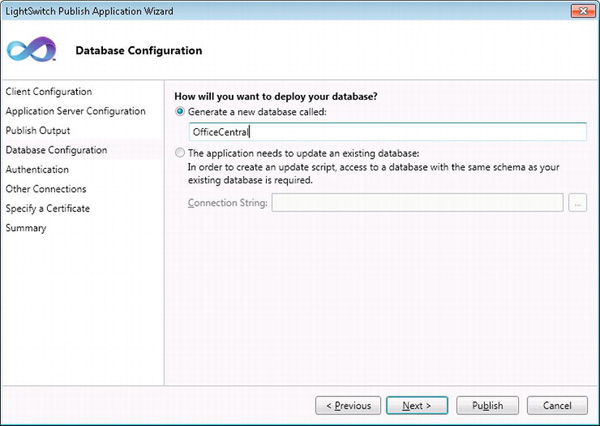
Figure 16-19. Database configuration dialog
You would typically choose the option to update an existing database when updating an application you have already deployed. When you choose this option, a connection string needs to be specified. The wizard uses this to compare your new schema to your existing schema and creates an update script.
You might wonder why the wizard doesn't prompt you for database security credentials at this point. The reason for this is because you are prompted for these credentials when you actually run the package.
Prerequisites Page
If you choose a two-tier deployment, you can add additional components into your setup package using the page shown in Figure 16-20. Adding prerequisites can improve the end user install experience because the installer won't fail if any required components are not found.
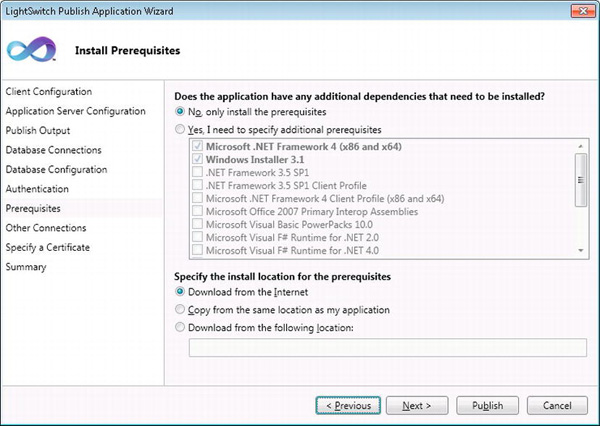
Figure 16-20. Install prerequisites dialog
You can specify additional prerequisites by choosing the “Yes” radio button. If you do this, the wizard automatically selects the .NET Framework 4 redistributable and Windows Installer 3.1 checkboxes. The .NET 4 Framework is required by LightSwitch, and Windows Installer is needed to install the .NET 4 Framework.
The final set of radio buttons allows you to specify the install location for your prerequisites. You can select the option to download from the Internet if you want to reduce the file size of your setup package.
The LightSwitch wizard doesn't allow you to include your own prerequisites. For example, Microsoft SQL Server Express 2008 is an option that is shown in the list. If you want to include the R2 version of SQL Server 2008 Express instead, there isn't an option for you to do this.
Authentication Page
If you've chosen to use authentication in your application, the Application Administrator page allows you to specify the LightSwitch administrator. As we showed you in Chapter 13, enabling authentication allows you to determine the identity of the logged in user and allows you to secure your application by specifying users, groups, and permissions.
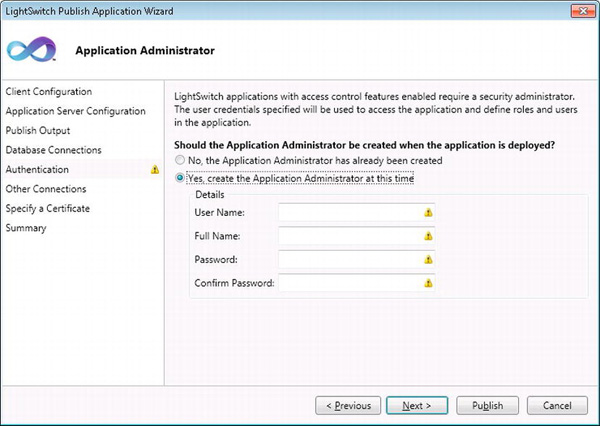
Figure 16-21. Application administrator dialog
Figure 16-21 shows the page that appears when forms authentication is chosen. If your application uses Windows authentication, the full name and password textboxes are not shown. You'll only be prompted to enter a domain username.
If you're updating an application you've already deployed, you would select the radio option that specifies an application administrator has already been created.
If you're deploying a two-tier application and choose the option to create an SQL script, the wizard prevents you from creating an administrator. You have to use the SecurityAdmin.exe utility instead during the actual installation.
Certificate Page
In all the deployment scenarios, you can optionally specify a certificate. But what's the purpose of a certificate and why would you want to add one?
The certificate page allows you to digitally sign the XAP file. The purpose of the XAP file was described in Chapter 2, but in essence, it's the Silverlight application that is downloaded to the end user.
When a user installs a two-tier desktop application you've created, signing the XAP file verifies that the setup package comes from you and that it hasn't been tampered with.
If you choose not to sign your application, a warning is shown to the user when your application is installed. This warning states that the publisher cannot be verified and that your application may be harmful (Figure 16-22). The only way to prevent this warning from appearing is to specify a certificate.
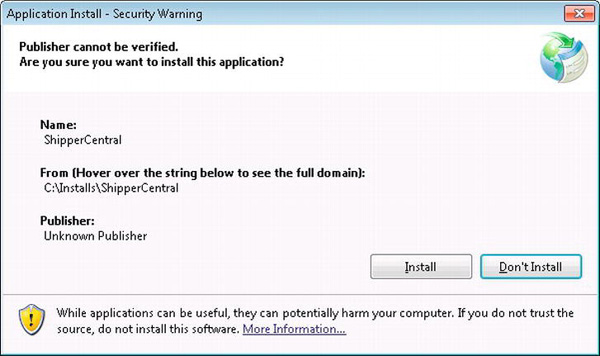
Figure 16-22. Dialog shown during installation
Figure 16-23 shows the page in the wizard that you would use to specify a certificate. Just like the SSL certificates, which were described earlier, you can purchase one from a third party company such as VeriSign or use an internal certificate server if your company has such an infrastructure in place.
When signing the XAP file, you can also choose to create your own self-signed test certificate. However, such a certificate should only really be used for testing purposes since the validity period will be short.
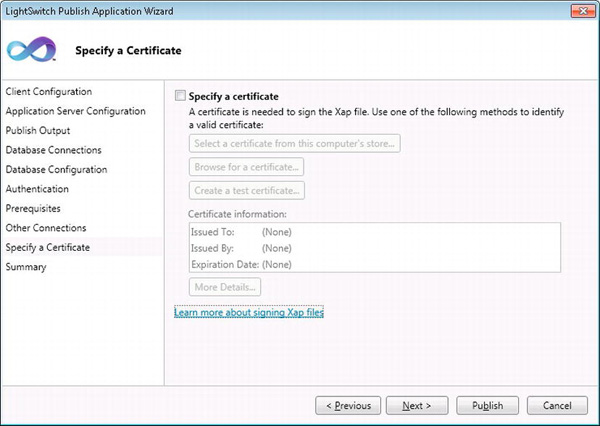
Figure 16-23. Dialog for specifying a certificate
You can use a command line tool called makecert to create a self-signed certificate. You can find out more about this command, and the command line switches you'll need to use, at the following Microsoft Developer Network page: http://msdn.microsoft.com/en-us/library/bfsktky3%28v=vs.80%29.aspx.
Installing the Packages
If you choose to produce a package or a two-tier application, a set of files are created. The following section describes how to install these files onto your server and/or client computers.
Two-Tier Desktop Installation
After completing the steps in the wizard, a set of files are generated (shown in Listing 16-3). A file called Install.htm contains a set of instructions you can read for additional information.
The steps that you need to follow are:
- Install the SQL database
- Change the database connection string
- Install your application
- Set up the initial user
Listing 16-3. Files created by the wizard
ShipperCentralCreateUser.sql

ShipperCentralfiles.txt

ShipperCentralInstall.htm

ShipperCentralsetup.exe

ShipperCentralShipperCentral.application

ShipperCentralShipperCentral.sql

ShipperCentralShipperCentral.zip

ShipperCentralApplication Files

ShipperCentralApplication Filesin

ShipperCentralApplication FilesClientAccessPolicy.xml

ShipperCentralApplication Filesdefault.htm

ShipperCentralApplication FilesShipperCentral.exe.manifest

ShipperCentralApplication FilesSilverlight.js

ShipperCentralApplication Filesvslshost.exe

ShipperCentralApplication Filesvslshost.exe.config

ShipperCentralApplication FilesWeb

ShipperCentralApplication Filesweb.config

ShipperCentralApplication FilesWebManifests

ShipperCentralApplication FilesWebShipperCentral.Client.xap

ShipperCentralApplication FilesWebManifestsMicrosoft.LightSwitch.Server.Manifest.dll

ShipperCentralApplication FilesinApplication.Common.dll

ShipperCentralApplication FilesinApplication.Server.dll

ShipperCentralApplication FilesinApplication.ServerGenerated.dll

ShipperCentralApplication FilesinApplicationDefinition.lsml
Database Tasks
The output produced by the wizard contains an SQL script called <YourApplication>.sql—in our example, this file is called ShipperCentral.sql. This script creates the database, tables, stored procedures, and all other objects that are needed to support your application. You'll need to run this script on your database server to install your database. The script can be executed using the sqlcmd command line tool or by using SQL Server Management Studio.
If you've installed a basic instance of SQL Server Express without the Management Tools, sqlcmd is the method you would choose. By default, this is installed in the folder Program FilesMicrosoft SQL Server100ToolsBinn. On a 64-bit computer, this will be Program Files(x86) rather than Program Files.
To use sqlcmd, open a command prompt and navigate to the directory where it's installed. Now run the command shown in Listing 16-4. ShipperCentral.sql should be replaced with the name of your SQL file, and .SQLExpress should be replaced with the name of your database server.
Listing 16-4. Installing the script file using sqlcmd
sqlcmd.exe -i ShipperCentral.sql -S .SQLExpress
By default, sqlcmd connects to an SQL Server using Windows authentication. If you need to connect using SQL authentication, you can use the -U and -P switches to pass in your username and password.
If you choose to install the SQL script using SQL Server Management Studio, make sure to place your query window into SQLCMD Mode by using the option you will find under the Query menu. The script won't run correctly if you fail to do this.
Set the Database Connection String
Having installed the database, the application connection string needs to be modified to point to the database you've installed.
Locate the web.config file in the Application Files subdirectory (shown in Listing 16-3).
Open the file in Notepad and edit the connection string value in the <connectionStrings> section. Listing 16-5 illustrates the section you should look for in the web.config file. If you've defined additional data sources in your application, the connection strings for those databases can also be found in the same section of the web.config file.
Listing 16-5. Modifying the web.config file
<add name="_IntrinsicData" connectionString="Data Source=SERVERNAMESQLEXPRESS;Initial
Catalog=MyApplication;Integrated Security=True;Pooling=True;Connect Timeout=30;User
Instance=False" />
Replace SERVERNAME with the name of your database server, and replace MyApplication with the name of your application.
Run Setup.exe
The wizard creates a file called setup.exe in the publish output location (shown in Listing 16-3). Run this program on the end user machine to install your application. If you've specified any prerequisites during the wizard, these will also be installed by setup.exe.
Setting Up Your Administrative User
If you choose to deploy a database script in the publish wizard (rather than publishing the database directly), you'll need to provide the default administrator login for your application using the Security Admin utility. Producing a database script in the wizard is handy when the computer you're publishing on doesn't have network access to the target SQL Server.
You can find this utility on your development machine in the following location: C:Program FilesMicrosoft Visual Studio 10.0LightSwitch1.0ToolsMicrosoft.LightSwitch.SecurityAdmin.exe.
The utility is also installed by the LightSwitch prerequisites, which was shown earlier.
To run the utility, open a command prompt and navigate to where the utility is installed. If your application is set to use Forms authentication, run the command as shown in Listing 16-6.
Listing 16-6. Running LightSwitch.SecurityAdmin-Forms authentication
Microsoft.LightSwitch.SecurityAdmin.exe /createadmin /user:username /password:password
/fullname:user'sfullname /config:pathtowebconfig
You'll need to point the utility to your web.config file using the config switch.
The username, password, and fullname arguments are also required.
If Windows authentication is used instead, run the listing as shown in Listing 16-7. The user switch needs to be specified in the format domainnameusername, and unlike forms authentication, a password does not need to be supplied.
Listing 16-7. Running LightSwitch.SecurityAdmin-Windows authentication
Microsoft.LightSwitch.SecurityAdmin.exe /createadmin /user:domainnameusername
/fullname:user'sfullname /config:pathtowebconfig
Three-Tier Desktop
If you select the option to create a three-tier desktop application, a single zip file is produced (shown in Listing 16-8).
Listing 16-8. Files created by the wizard
ShipperCentralShipperCentral.zip
After copying this file onto your server, you can install your application using IIS Manager. To do this, open IIS Manager, navigate to your web server using the left-hand pane, and select the Install option from the right-click context menu. The Install Application dialog appears, as shown in Figure 16-24. This initial page allows you to review the files that will be installed.
This includes an SQL script for deploying the intrinsic database, the option to create an IIS application, and the option to install the actual web files. You'll want to select all of these options.
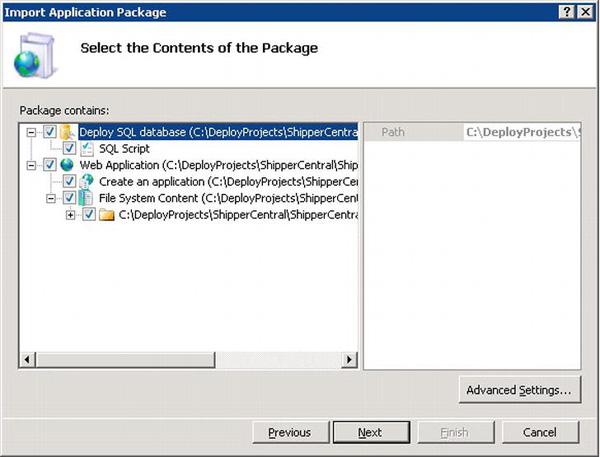
Figure 16-24. Import application package dialog—first page
The next page (shown in Figure 16-25) allows you to specify the database connection strings.
The initial Connection String textbox is used by the import tool to connect to a database server and to install or update the intrinsic database.
The next set of textboxes are used by IIS at runtime to connect to the intrinsic database. The import tool expects you to use SQL Server authentication and therefore, DatabaseUserName and DatabaseUserPassword textboxes are provided. If you want to use Windows authentication, you'll need to modify the web.config manually after the import tool finishes and set up an application pool in IIS, as described earlier.
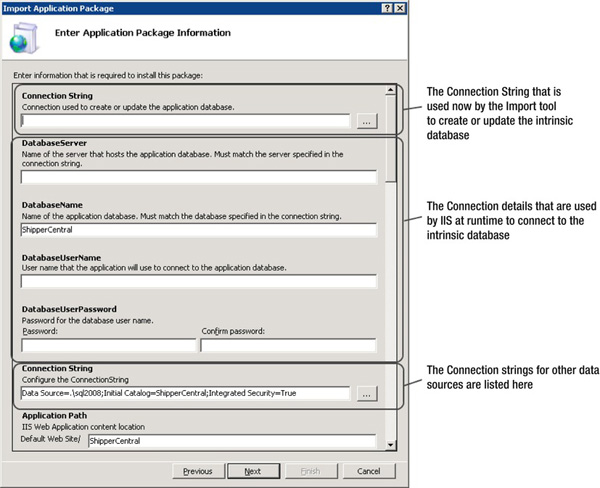
Figure 16-25. Import application package-database connection strings
After completing the steps in the import tool, your application will be installed into IIS. You may want to double check that the IIS settings have been set up correctly. For example, you might want to check that the application belongs in an application pool that is configured to use .NET 4.
If everything worked correctly, you can open a web browser and navigate to the web address where your application is installed. An installation page appears, similar to the one shown in Figure 16-26. Clicking the button installs the out-of-browser application and creates a desktop icon. Your three-tier desktop deployment is now complete.
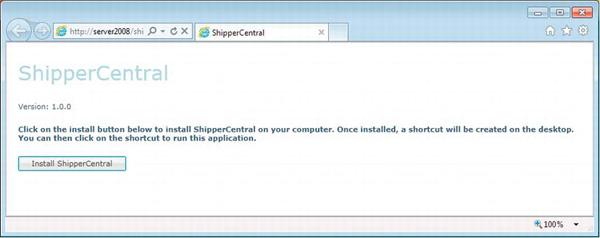
Figure 16-26. Out-of-browser application install page
Three-Tier Browser Application
A three-tier browser installation is very similar to a three-tier desktop install.
Just like a desktop install, the installation wizard creates a single zip file. This is installed in IIS using the same process as above, and the dialogs shown during the installation are identical.
When you navigate to the web address of your application after installation, your actual application will be shown. Unlike the two-tier setup, you won't see a placeholder page that prompts you to install the application.
Three-Tier Manual Deployment
Although the wizard provides a rich graphical way to deploy an application, you may prefer to deploy your three-tier application manually, rather than creating a zip file using the Web Deploy tool.
Some corporate information technology departments prefer not to install additional components such as Web PI or the Web Deploy tool on production servers. Performing a manual deployment will suit such scenarios well.
Deploying ASP.Net Web Site
Fortunately, performing a manual deployment isn't difficult. A LightSwitch application is simply an ASP.NET web site that uses a Silverlight client. Therefore, deploying a LightSwitch application is no more difficult than deploying any other ASP.NET web site.
In Chapter 2, you learned about the various files that make up a LightSwitch application. The ServerGenerated project contains the ASP.NET web site, and when you do a “build” in LightSwitch, the ASP.NET project is built into the ‘bindebug’ or ‘bin
elease’ folder depending on your build type. The files from the bin folder can then be copied onto your IIS server. You would then set up the web site manually using IIS manager. This would involve creating an application and configuring it to use an application pool that targets the .NET 4 framework.
SQL Server Connection String
The database connection string for your database is specified in the web.config file, which is found in root folder of your web site.
As shown earlier in the two-tier deployment example (Listing 16.5), this file can be modified using Notepad. Search for the ConnectionStrings section and modify the connectionString value for the _IntrinsicData entry. If you've specified additional data sources in your application, you'll need to modify the connection string for those too.
IIS7 ZIP File Deployment
Rather than deploying straight to a server, some developers prefer to publish onto to their own development computer.
This allows you to test the install, and once you're ready, the LightSwitch application can be exported from IIS (shown in Figure 16-27) and imported into your server.
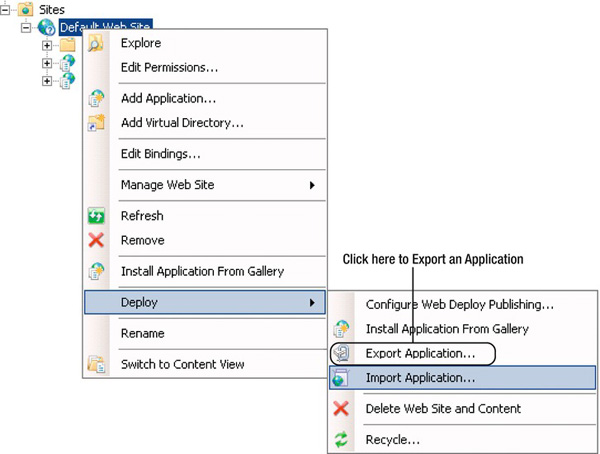
Figure 16-27. Exporting an application from IIS7
Before exporting, you can carry out additional tasks on your local copy such as setting permissions or adding extra files to your solution. The export includes the changes you make and generates a zip file.
You can then copy the zip file onto your production server and install the package using the import option, which you'll also find beneath the right-click Deploy menu item.
For this to work, you will need to install the Web Deploy tool onto both your development machine and your server.
Deploying Data
During development time, you might have entered data into tables that you've created in the intrinsic database. Although the publishing wizard deploys the schema of your database, it won't deploy any data you've added during debug time.
Earlier on, you saw how the publish wizard creates an SQL script that contains the schema of your database. The easiest way to deploy data during setup is to append SQL statements to the end of that file to insert your data.
If you want to recover the data that you've entered into your intrinsic database during design time, you can attach your MDF file using SQL Server Management Studio (as described in Chapter 2). Management Studio includes a feature that enables you to script out the data in your tables. To do this, right-click your database in object explorer. Start up the Script Wizard by selecting Tasks ![]() Generate Scripts. When you reach the options page, set the Script Data option to true. When the wizard completes its run, you can copy the SQL statements that have been generated when inserting the data and append them to the end of your deploy script.
Generate Scripts. When you reach the options page, set the Script Data option to true. When the wizard completes its run, you can copy the SQL statements that have been generated when inserting the data and append them to the end of your deploy script.
Updating an Application
Updating an application is very simple. You can update an application you have already deployed by running the Deployment Wizard again. Each time you run the Deployment Wizard, LightSwitch automatically increments the version number of your application.
In a three-tier setup, you can simply deploy your updated application over the original installation. The new version will be automatically used by browser clients. If you've deployed a desktop application, the client will detect that an updated version is available and will install it.
If you've made any changes to your database schema, the wizard can create SQL change scripts for you using the Database Configuration page.
Deploying to Azure
A great feature about LightSwitch is that it allows you to easily deploy applications onto Windows Azure. Azure is a Cloud-based service that offers many benefits. It's ideal if you want to make your application available over the Internet and don't want to worry about the difficulties of setting up and maintaining a public facing web server.
To get started with Azure, you'll need to sign up for an Azure account. You can do this from the Windows Azure web site (www.microsoft.com/windowsazure/). You'll also find the pricing details on this web site.
After creating an account, you can configure and manage the Azure services via the Windows Azure Web Portal.
The tasks you'll need to carry out in the Azure portal are:
- Create a hosted service
- Create a storage account
- Set up a SQL Azure database
After that, you can publish your application from LightSwitch by using the Deployment Wizard. We'll now describe these steps in further detail.
Setting Up Azure in the Web Portal
Before you can publish your LightSwitch application, you'll need to carry out a few steps on the Azure web portal. First, you'll need to make a note of your subscription ID. Your subscription ID is a globally unique identifier (GUID) that is used to uniquely identify your Azure account. We'll now show you how to set up a hosted service and storage account and configure a database server.
Creating a Hosted Service
Hosted services are used in Azure to host your files and applications. If you're new to Azure, think of a hosted service as a web site. You'll need to create one to host your LightSwitch application.
Using the Azure web portal, you can create, run, suspend, and delete hosted services. Management certificates are also added to hosted services. These are used to secure client access to your Azure resources.
To get started, you'll need to create a hosted service from within the Azure web portal. On the homepage, you'll find a button on the toolbar that allows you to create a new hosted service. Click this button to open the dialog shown in Figure 16-28. Within this dialog, specify a name and URL. In the deployment options group, you can select the do not deploy option.
After you've created your hosted service, you can find your subscription ID by viewing the properties of service you've created.
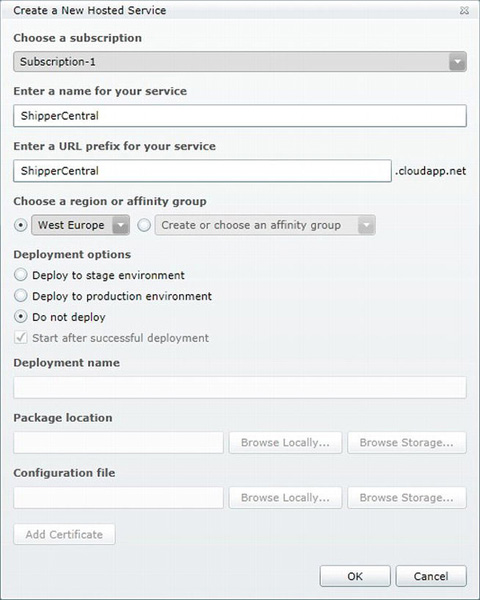
Figure 16-28. Creating a hosted service
An important point about Azure is that billing gets calculated by deployed hours (rather than the time your application is running). If you suspend a hosted service, your web site will be stopped. However, you'll still accrue compute hours and be charged accordingly. To stop being billed for compute hours, you have to delete your hosted service.
Note that if you deploy the same application to both the stage and production environments, you'll double your deploy hours and will be charged more.
Creating a Storage Account
In Azure, storage accounts provide access to services such as the blob, queue, and tables services. You'll need a storage account to store your LightSwitch binaries when you publish to Azure.
To create a new storage account, log into the Azure portal. Use the left-hand navigation panel to go to the Storage Accounts section. Now click the Toolbar button to create a New Storage Account. This opens the Create a New Storage Account dialog, shown in Figure 16-29.
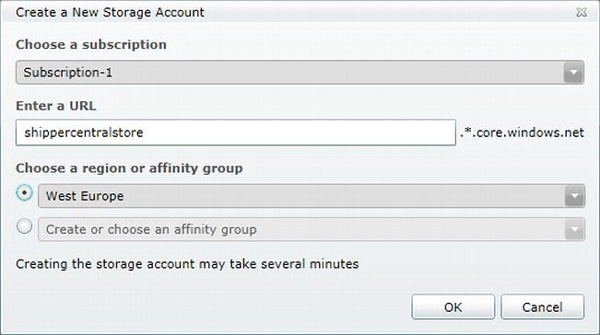
Figure 16-29. Creating a new storage account
After creating your storage account, you can view the properties of the account using the Properties window (shown in Figure 16-30). A couple of important attributes you'll find here are the access keys. These are the security credentials that allow you to access the storage account.
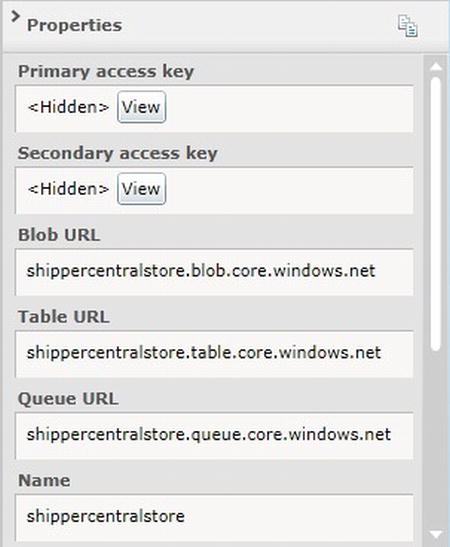
Figure 16-30. Viewing the properties of the storage account
Creating a Database
The final step you need to carry out in the web portal is to create a new database.
Each Azure subscription includes a single SQL Server Azure database. You can set this up in the databases section of the web portal. To create a new database, click the Toolbar button to create a new SQL Azure database. This opens a dialog and prompts you to choose the database size (1GB or 5GB). The next step prompts you to create an Administrator login. You'll therefore need to make up a username and password combination.
The final step prompts you to configure the firewall rules, as shown in Figure 16-31. SQL Azure includes a built in firewall to help secure your data. You'll need to check the Allow other Windows Azure services to access this server checkbox. You'll also need to click the Add button, and add a rule that enables your development machine to connect to the database. The screen for adding the rule shows you your current IP address. This saves you from having to find out what it is.
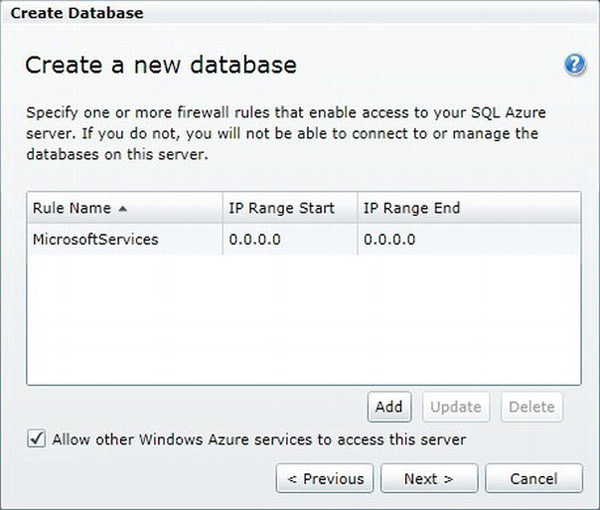
Figure 16-31. Setting firewall rules
Once you've created your server, the details are shown on the properties pane. You can use this to find out the Fully Qualified DNS Name of your server. This will look something like ood8rdffa.database.windows.net and you'll need to refer to this later on.
Publishing Steps
Now that you've set up your account in Azure, the difficult part is over and you can use the Publish Application Wizard to publish your application to Azure.
Connecting to Azure
After starting the wizard, select the client topology and select the Azure option in the Application Server Configuration page. When you reach the Connect to Windows Azure page (Figure 16-32), enter your subscription ID into the textbox.

Figure 16-32. Connecting to Windows Azure
At this point, you'll need to specify a management certificate. You can select the option to create a new self-signed certificate using the dropdown box (shown in Figure 16-33). Management certificates are used to secure access to your Azure service. Once you've created a new self-signed certificate, you'll need to associate this certificate with your Azure account. This is done through the Azure portal.
When you create a new self-signed certificate, a certificate file is saved on your computer. The Copy Path button copies the file location onto the clipboard.
You'll now need to log into the Azure portal and upload your certificate file. Once logged into the portal, navigate to the Management Certificates section and click the Add Certificates button (Figure 16-32). This opens a file browser dialog. From here, you can paste the file path that you copied earlier on and upload your certificate.
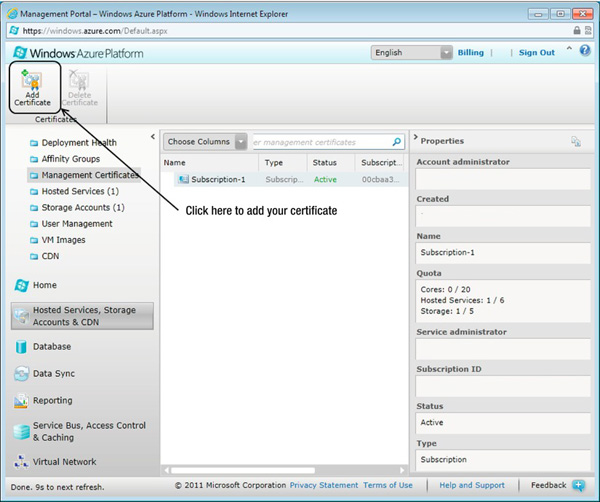
Figure 16-33. Adding your certificate using the Azure portal
Remaining Steps
During the next stage, you'll need to specify the hosting service and storage accounts you want to use. You can specify the ones you created earlier using drop-down boxes (shown in Figure 16-34). You'll also see an Environment drop-down box, which allows you to choose from the options of staging or production.
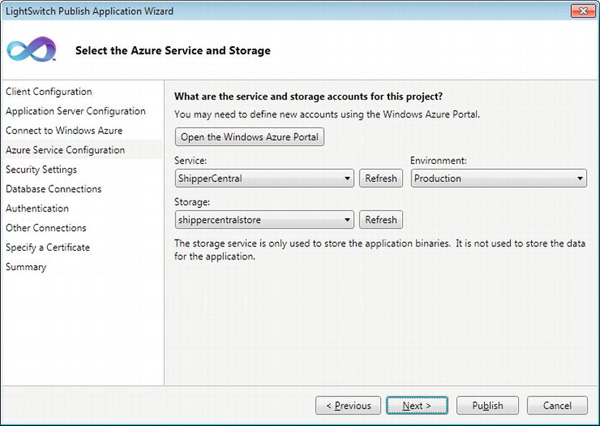
Figure 16-34. Azure service configuration page
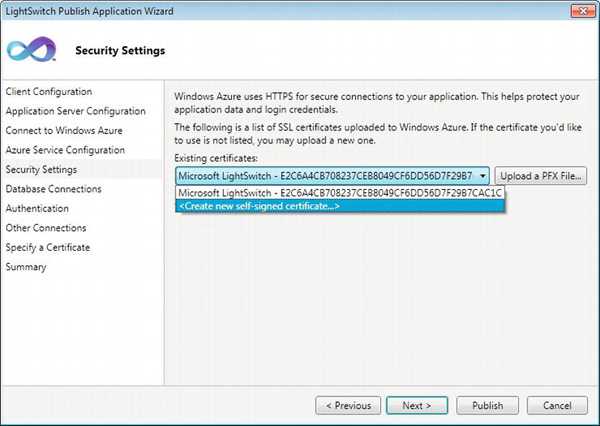
Figure 16-35. Selecting an SSL certificate
The next page (Figure 16-35) prompts you to select an SSL certificate. This is needed to support secure communications over the HTTPS protocol. Just like the management certificate you created earlier on, you can choose to generate your own self-signed certificate. As mentioned before, desktop LightSwitch applications deployed to Azure won't work if you haven't installed a valid SSL certificate. This is due to security restrictions that are imposed by Silverlight. You'll therefore need to purchase a certificate from a third party vendor if you want to use desktop applications that are hosted in Azure.
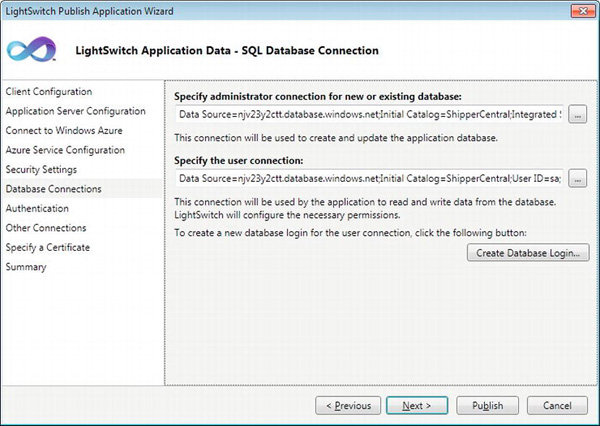
Figure 16-36. Entering database connection details
The next page (shown in Figure 16-36) prompts you to enter your database details. This screen is similar to the ones you've have seen previously. This time, however, you'll need to specify a connection string that points to your SQL Azure database. You'll need to know the fully qualified DNS name of your Azure database. This was displayed in the properties pane in the Azure portal when you created your database earlier on.
The final two pages allow you to specify an application administrator and to choose a certificate to sign your XAP files. These pages are identical to the ones you saw earlier.
Summary
In this chapter, you've learned how to deploy your LightSwitch application. The topics covered in this chapter include:
- Client and application topologies.
- The difference between publishing and packaging.
- Installing and configuring IIS and ASP.NET.
- The steps that are shown in the publishing wizard.
- Deploying an application into Windows Azure.
When you deploy an application, the application topology defines where the server components are run. These components could be hosted locally, in IIS, or in Azure.
The server components can be installed locally if you choose to deploy a desktop application. In a two-tier installation such as this, a local web server is installed called vslshost.
If you prefer to carry out a three-tier installation, this chapter has also shown you the steps you would need to carry out. In this scenario, the LightSwitch prerequisites must be installed for the server components to run properly. The Web Deploy tool is also needed to support publishing and packaging from within LightSwitch.
The difference between publishing and packaging is that publishing deploys an application immediately onto your IIS server, whereas packaging produces setup files that are manually installed afterward.
You can use the Microsoft Web Platform Installer to download and install the prerequisites, Web Deploy tool, and other necessary components onto your server.
Other tasks you might want to perform inside IIS include setting up SSL, or application pools. SSL enables secure communications to take place between the LightSwitch client and server. Application pools can make your application more reliable by isolating it from other web applications that are running on your server. They can also be configured to allow your web server to Windows authenticate to your SQL Server.
The LightSwitch publishing wizard allows you to publish or package your application. This wizard guides you step by step through the deployment process. It allows you to perform tasks such as add installation dependencies, set up the LightSwitch administrator, and digitally sign your XAP file.
If you don't sign your application, users receive a warning message if they attempt to install a desktop application. This message warns them that the application is potentially dangerous. A signed XAP file avoids this problem.
If you've created a deployment package, you've seen the steps that are needed to install the package. In a two-tier deployment, this includes setting up the intrinsic database using the sqlcmd command line tool. In this scenario, you would also need to create an application administrator using the SecurityAdmin.exe utility.
If you choose not to use the wizard, you can manually deploy your application. In a three-tier setup, you would deploy the output from the ServerGenerated project into IIS.
To update an application you have already deployed, you would simply update the application version number and rerun the wizard. The Database Configuration page can create SQL scripts to update the schema of your live database.
Finally, the wizard allows you to deploy your application into Windows Azure. Before using Azure, you'll need to set up an account using the Azure web portal. You'll need to create a hosted service, storage account, and database. You'll also need to create a management certificate. This enables you to authenticate to Azure. Once done, you can carry on through the steps in the wizard and complete the deployment of your application.