
In this chapter we are going to look at a few commonly-used transports and protocols that Mule supports. First, we're going to take a look at the overall architecture of a transport, what classes make up a transport, and how connectors are configured in general.
More than 26 transports are supported by Mule and available in the default installation. More are available through the developer community and there is a simple framework for you to develop your own.
Transport protocols are configured in Mule in a set of connector XML tags in the Mule configuration file. Every connector has a name attribute that lets you assign a unique name to each connector. All properties of a connector are defined here; while there are default values for most properties, some may need to be explicitly set before the connector can be used.
Endpoints also refer to the transport that is going to be used—generic endpoints refer to the transport in their address while transport-specific endpoints refer to the proper XML namespace. Most transport properties can be used and configured on an endpoint; in this case, properties on an endpoint will override the properties in the connector but only for the endpoint itself. Endpoints also have a connector attribute that will allow you to choose which connector to use for the endpoint. This is useful if you have multiple connectors as you would need to indicate which connector (and therefore group of settings) to use.
A connector will know to create and use a message dispatcher, or message receiver class, once an inbound or outbound endpoint is going to be used.
The dispatcher and receiver classes will also use any relevant configuration on the connectors to be able to read or write data.
In the example that follows we have two instances of the STDIO transport with different configurations. An endpoint will have to indicate which STDIO connector it wants to use, as otherwise Mule will not know which group of settings to apply. This is done through the connector attribute of the generic or transport-specific endpoints.
<stdio:connector name="NameFromConsole"
   promptMessage="Type out a name"/>

<stdio:connector name="NumberToConsole"
   promptMessage="Your number is: "/>

<stdio:inbound-endpoint system="IN"
   connector="NameFromConsole"/>

<stdio:inbound-endpoint system="IN"
   connector="NumberToConsole"/>
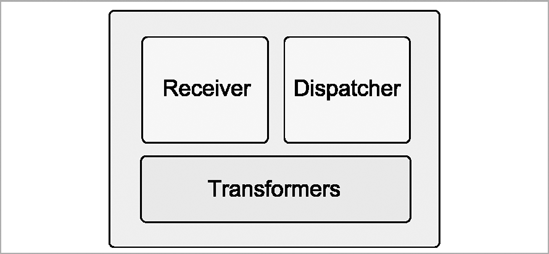
As Figure 5-1 shows, each transport in Mule is made up of the following items:
A message receiver that knows how to handle an endpoint and read data from that endpoint.
A message dispatcher that knows how to handle an endpoint and write data to that endpoint.
Zero or more transport transformers.
The MessageReceiver interface is implemented by objects that read data from an endpoint for a specific connector. The abstract implementation of this interface is org.mule.transport.AbstractMessageReceiver; polling receivers would inherit from org.mule.transport.AbstractPollingMessageReceiver. For transaction-aware receivers you should inherit from the org.mule.transport.TransactedPollingMessageReceiver.
The MessageDispatcher interface is implemented by dispatcher objects that are contained and managed by the connector. These objects know how to send data along the underlying technology so they are unique to each transport. The abstract class—AbstractMessageDispatcher—provides support for handling threads and their lifecycles and validations so you won't have to do this yourself; apart from this the abstract class will execute the dispatch in its own thread if it is asynchronous.
While you can create new transports, more often than not all you may need to do is customize an existing transport for your own use. In fact, you may just want to change one class within the entire transport rather than create a completely new one.
Tip
In most scenarios, just configuring the connection/endpoint will be sufficient to use a transport. However, in some scenarios it may be desirable to alter the existing behavior of the transport.
Each transport has a service descriptor file that is stored within the META-INF directory and is named according to the protocol that it represents. It is a standard Java properties file that contains a list of the internal classes used. You can change this file to indicate that you wish to use a different class, for example one of your own. Alternatively, service overrides can be more conveniently configured inside the XML file on the connector element.
The main classes that can be changed are as follows:
connectorrefers to the class that represents the entire connector. This class must implement theorg.mule.api.transport.Connectorinterface.message.receiverrefers to theMessageReceiverclass to use.transacted.message.receiverandxa.transacted.message. receiverindicate which class to use for single-resource or XA transactions.The
inbound.transformer, outbound.transformer, andresponse.transformerproperties show you which transformers are applied by default if no transformations have been explicitly set on the endpoint.
In the previous section, we spoke about how transports are configured and what classes are in use inside the transports, so now we can move on to the specifics of the commonly-used transports in a Mule application.
The console transport provides a Mule application with access to the standard input and output devices, which typically would be the keyboard and monitor. This transport is mainly used in debugging and testing and is rarely used in production environments. The required XML namespace and schema are listed here and are also available from the MuleSource site:
xmlns:stdio=
 "http://www.mulesource.org/schema/mule/stdio/2.0"
xsi:schemaLocation=
"http://www.mulesource.org/schema/mule/stdio/2.0
 http://www.mulesource.org/schema/mule/stdio/2.0/
    mule-stdio.xsd"
Attributes
No connector is needed and default values for this transport's properties are usually sufficient. The following properties are available as attributes:
promptMessageis an optional message that can prompt the user for input.messageDelayTimeis the length of time to wait before prompting the user for input, in milliseconds. Defaults to 3000 (3 seconds).outputMessageis an optional message that is displayed before any output is displayed.resourceBundlerefers to the name of the bundle to use if you are internationalizing your application.promptMessageCodeis a numeric property that is a code number referring to apromptMessageto use from theresourceBundle.promptMessageCodeis a numeric property that is a code number referring to apromptMessageto use from theresourceBundle.outputMessageCodeis a numeric property that is a code number referring to anoutputMessageto use from theresourceBundle.
Example
The following console connector is called SystemConnector and is configured to prompt users for input with a message of Please enter a flight code: after a delay of one second. Before displaying any output, the message The response is: is displayed.
<stdio:connector name="SystemConnector"
      promptMessage="Please enter a flight code: "
      messageDelayTime="1000"
      outputMessage="The response is: "/>

<stdio:inbound-endpoint system="IN"/>
<inbound-endpoint address="stdio://System.in"/>

<stdio:outbound-endpoint system="OUT"/>
<stdio:outbound-endpoint system="ERR"/>
The first two endpoints are inbound endpoints and are both the same; the first uses the transport-specific endpoint while the second is a generic endpoint. The second series of endpoints are both outbound endpoints and allow you to send output to the standard output device or to the standard error device. Normally, both of these refer to the monitor.
The VM transport is used for intra-VM communication between components managed by Mule. VM messaging can be both synchronous and asynchronous depending on how it is configured. It also supports transactions, which makes it the ideal transport to use for testing and simulating your Mule configuration. The required XML namespace and schema are listed here and are available from the MuleSource site:
xmlns:vm="http://www.mulesource.org/schema/mule/vm/2.0"
xsi:schemaLocation=
 "http://www.mulesource.org/schema/mule/vm/2.0
    http://www.mulesource.org/schema/mule/vm/2.0/
mule-vm.xsd"
Attributes
There is no host or configuration needed to set up a VM transport. The VM transport has only one attribute, queueEvents, which defaults to false.
<vm:connector name="myVM" queueEvents="true"/>

<vm:inbound-endpoint path="errorQueue"
   connector="myVM"/>
<inbound-endpoint address="vm://errorQueue"/>
This determines whether the messages will be transferred synchronously or asynchronously. If true, then queues will be created and the endpoint name will also be the name of the queue. If false, then the messages will be transmitted synchronously and delivered in a point-to-point fashion. The connector's queueEvents property cannot be configured on the endpoint; the VM transport needs to be constructed with the ability to either use queues internally or to deliver in a point-to-point fashion.
The preceding endpoint is therefore an asynchronous endpoint, since it is tied to the myVM connector.
Persistence
All VM queues can be configured to be persistent, which means that the items on the queues are persisted when the Mule server shuts down. All VM transports that are configured to be asynchronous can be configured to persist the items they contain. Check out this sample config:
<vm:connector name="myVM" queueEvents="true">
<queue-profile persistent="true"
      maxOutstandingMessages="1000"/>
</vm:connector>
The queue-profile child element for the VM transport allows you to specify whether you want to persist or not (the default is not to persist) and to indicate the maximum number of items that will be persisted. The default persistence strategy is to save the items on the VM queues to a file on disk.
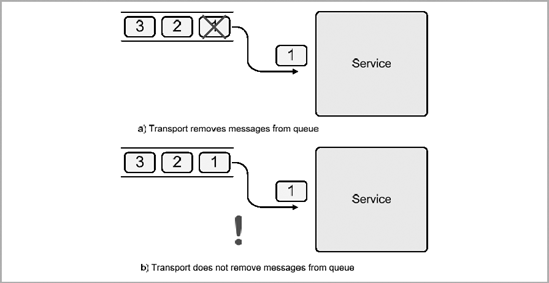
When a service is going to consume a message off a queue, the item at the front of the queue is removed and handled by the service. The queue will shrink and the second item in line will be in the front of the queue, as shown in Figure 5-2(a).
However, what happens when Mule is going to consume a message off a transport that does not use queues, such as the File transport for instance? In such a situation, the first file will be read and consumed but the file does not disappear from the underlying file system. If Mule tries to read from the same endpoint again, the same file will be re-read, as shown in Figure 5-2(b).
In such cases, the consumption of messages needs to be simulated. Let's take a look at how this is implemented in the File transport.
The File transport reads and writes files from and to the file system via network shares as well as mounted drives; as long as the directory is accessible to the operating system's file system, Mule will be able to consume or produce files.
This applies to both Windows and *nix file systems. The transport also has streaming support for large files. The required XML namespace and schema are listed here and are available from the MuleSource site:
xmlns:file=
 "http://www.mulesource.org/schema/mule/file/2.0"
xsi:schemaLocation=
"http://www.mulesource.org/schema/mule/file/2.0
 http://www.mulesource.org/schema/mule/file/2.0/
    mule-file.xsd"
Attributes
The following is a list of commonly-used attributes for this transport:
pollingFrequencyis the frequency, in milliseconds, that the read directory should be checked. Note that the read directory is specified by the endpoint of the listening component.fileAgeis a property that, if set, tells the connector to ignore files that have just been created unless they are a specified age old. This age is specified in milliseconds.moveToDirectoryNameis the directory to which the file should be written once it has been read. This property helps simulate the consuming of a file. If this property is not set the file is deleted once read.moveToPatternis the pattern to use to build file names when moving a file that was read to a new location determined by themoveToDirectoryproperty. This can use the patterns supported by the file name parser (see the next section) configured for this connector.binaryindicates whether binary files are going to be read and written. Defaults tofalse.streamingindicates whether the file should be read in its entirety or streamed.outputAppenddetermines whether the file being written should append to an existing file, if one exists. Defaults tofalse.outputPatternis the pattern to use to build a file name when writing a file to disk. This can use the patterns supported by thefilenameParserconfigured for this connector (see the next section).writeToDirectoryis the directory to which the file should be written on dispatch. This path is usually set as an outbound endpoint; however, this allows you to explicitly force a single directory for the connector.
Parser Options
The default file name parser used by Mule is this legacy-filename-parser:
<file:legacy-filename-parser pattern=""/>
This parser understands the following patterns:
${DATE}uses the full timestamp in the format ofdd-MM-yy_HH-mm-ss.SS. This can be restricted or changed, for example, by using this format:${DATE:yy-MM-dd}.${SYSTIME}is the current system time, in milliseconds.${UUID}is an automatically-generated, universally-unique ID.${ORIGINALNAME}is the original file name if the file being written was read from another location.${COUNT}is an incremental sequential counter that is maintained on a per connector basis.
You can also use the following expression-filename-parser if you would rather use an expression language to create your patterns:
<file:expression-filename-parser pattern=""/>
XPath can be used, for instance, to extract XML properties from a file and use them within the file names. The following custom-filename-parser would be used if you have created a parser of your own and want to use that instead:
<file:custom-filename-parser>
Example
In this example you can see a file connector called newOrders, which will poll the inbound endpoints once every 600,000 milliseconds, or once every 10 minutes. After reading files, these are placed into a subdirectory called "processed," but renamed to have the system time inside their file names. When writing files out, the original file name will be used.
<file:connector name="newOrders"
                pollingFrequency="600000"
                moveToDirectory="./processed"
                moveToPattern="${SYSTIME}.xml"
                outputPattern="${ORIGINALNAME}"/>

<file:inbound-endpoint path="/temp/file"/>
<file:inbound-endpoint path="C:/temp/file"/>
<file:inbound-endpoint path="./temp/file"/>
<file:inbound-endpoint path="temp"/>
<file:inbound-endpoint path="//192.168.0.1/temp/"/>
All file endpoint addresses need to be valid file URIs. The first inbound endpoint listed here uses Unix-style path names starting with a forward slash; however, Windows-style URIs, such as the next three inbound endpoints, are all valid too. Windows network file resources can also be accessed using the URI shown in the last inbound endpoint in the preceding code example.
File Transport Transformers
The following two file transformers are bundled with the File transport:
FileToByteArraywill convert a file into a byte array:<file:file-to-byte-array-transformer>
FileToStringwill convert a file into a byte array first and then convert it to a string using the current encoding:<file:file-to-string-transformer>
The HTTP transport allows Mule messages to be sent and received over HTTP or HTTPS. Because it inherits from the TCP transport, properties from that connector can be used for HTTP too. The required XML namespace and schema are listed here and are available from the MuleSource site:
xmlns:http=
 "http://www.mulesource.org/schema/mule/http/2.0"
xsi:schemaLocation=
"http://www.mulesource.org/schema/mule/http/2.0
 http://www.mulesource. org/schema/mule/http/2.0/
    mule-http.xsd"
The XML namespace and schema for the HTTPS transport are identical to those in the previous code listing; simply substitute https for http, as shown here:
xmlns:https=
 "http://www.mulesource.org/schema/mule/https/2.0"
xsi:schemaLocation=
 "http://www.mulesource.org/schema/mule/https/2.0
    http://www.mulesource. org/schema/mule/https/2.0/
mule-https.xsd"
Properties
These are some of the commonly-used attributes for this transport:
proxyHostname—if you need a proxy to access the Internet, then this attribute should contain the IP address or host name of the proxy server.proxyPort—if you need a proxy to access the Internet, then this attribute should contain the port number of the proxy server.proxyUsername—a username to use if the proxy requires authentication.proxyPassword—the password to use if the proxy requires authentication.receiveBufferSize—the buffer size used to read data; defaults to 64*1,024.sendBufferSize—the buffer size used to write data; defaults to 64*1,024.
HTTPS Transport Elements
The HTTPS transport does not add any further properties to those included in the HTTP transport, but it does have these additional child elements that are needed:
tls-clientrefers to client key stores that contain certificates necessary for identification. It has apathattribute that indicates a relative or fully-qualified path to the store; astorePasswordattribute is the password needed to unlock it.tls-key-storerefers to key stores needed for the server. It has apathattribute that indicates a relative or fully-qualified path to the store. ThestorePasswordattribute is the password needed to unlock it, and thekeyPasswordattribute is the password that unlocks the private key.tls-serverrefers to the key store that contains the public certificates of trusted servers. Itspathattribute indicates a relative or fully-qualified path to the store and itsstorePasswordattribute is the password needed to unlock it.
Example
Here's an example using an HTTPS connector called partnerCommunication:
<https:connector name="partnerCommunication">
   <https:tls-key-store path="bin/serverKeyStore"
         keyPassword="pr1vateKey"
         storePassword="passw0rd"/>

   <https:tls-client path="bin/clientStore"
         storePassword="cl1entPassword"/>
<https:tls-server path="bin/trustedServers"
storePassword="trustPassw0rd"/>
</https:connector>It uses three key stores:
Its main key store is stored in a file called
serverKeyStoreunder thebindirectory, which can be unlocked using a password ofpassw0rdand whose private key is accessible using a password ofpr1vateKey.Its client key store is in a file called
clientStorein the same directory and can be accessed using the passwordcl1entPassword.Its collection of trusted server certificates is in a file called
trustedServersin the same directory and can be accessed using a password oftrustPassw0rd.
HTTP and HTTPS Endpoints
Following are some examples of HTTP and HTTPS endpoints:
<https:inbound-endpoint address="localhost:1234"/>
This first endpoint is an inbound HTTPS endpoint that will read from the localhost on port 1234.
<http:outbound-endpoint
      address="user:[email protected]/x1"/>
This second endpoint, on the other hand, is an outbound HTTP endpoint that will send messages to http://mycompany.com/x1. This connection is meant to be secure; the credentials are encoded on the endpoint in the form of username:password and are set on the message using Basic-authentication encoding.
<inbound-endpoint address="http://localhost:8080/mine"
                  synchronous="true">
   <properties>
      <property name="Content-Type" value="text/html"/>
      <property name="Location"
                value="http://mule.codehaus.org/"/>
      <property name="http.status" value="307"/>
   </properties>
</endpoint>
The last endpoint is a generic inbound endpoint that will read from port 8080. The properties set here are all properties for the MuleMessage itself.
HTTP Transport Transformers
The following four transformers are included with the HTTP transport:
<http-client-method-response-to-object-transformer>transforms an HTTP client response to aDefaultMuleMessage.<http-response-to-string-transformer>transforms an HTTP client response to a string. All response headers are preserved.<object-to-http-client-method-request>transforms aMuleMessageinto anHTTPClient HTTPMethodthat represents anHTTPRequest.<message-to-http-response>transforms aMuleMessageinto an HTTP response.
The FTP transport allows the transfer of files to and from a remote FTP server. Either a remote file will become available as a MuleMessage, or a MuleMessage will be converted into a file on an FTP server. The connector, configuration, and use of this protocol are similar to that of the File transport. Streaming is supported for transmission of large files.
The XML namespaces and schema required are listed and available from the MuleSource site:
xmlns:ftp=
   "http://www.mulesource.org/schema/mule/ftp/2.0"
xsi:schemaLocation=
 "http://www.mulesource.org/schema/mule/ftp/2.0
  http://www.mulesource.org/schema/mule/ftp/2.0/
     mule-ftp.xsd"
Attributes
Here are the most commonly-used attributes for this transport:
pollingFrequencyis the frequency with which to poll the FTP server for new files, in milliseconds. The directory to read will be defined as the endpoint, naturally. This property is required and defaults to 1,000 (1 second). This property can also be set on the endpoint.binaryflags whether to use binary or ASCII file types for transfer; defaults totrue. This can also be set on the endpoint.passiveflags whether to use FTP passive mode to allow progress through firewalls; set totrueby default. This can also be set on the endpoint.filenameParseris what controls how file name patterns are interpreted to create new file names. It defaults to thelegacy-filename-parserthat the File transport uses. All the patterns that can be used for the File transport can also be used here.outputPatternis the pattern to use to build a file name when writing a file to an FTP site. This can use the patterns supported by thefilenameParserconfigured for this connector. This property is required and defaults to${DATE}. It can also be set as a property on an FTP endpoint.validateConnectionsvalidates FTP connections before use; while this will take care of a failed (or restarted) FTP server, there is the cost of an additional NOOP command packet being sent. It does increase overall availability, however.
Example
The following example shows an FTP connector called newItems that will poll any inbound FTP endpoint every 600 seconds (10 minutes) for binary files. It will use passive mode to pass through firewalls and will output files to FTP endpoints using the original file name, if available.
<ftp:connector name="newItems"
      pollingFrequency="600000"
      binary="true"
      passive="true"
      outputPattern="${ORIGINALNAME}"/>
The next example refers to an inbound FTP endpoint. The FTP server to connect to is ftp.mycompany.com, and this connection will be attempted using a username of joe and a password of 123456. Once connected, the home directory will be used.
<ftp:inbound-endpoint address=
      "ftp://joe:[email protected]/~"/>
The SMTP transport allows you to send mail through an SMTP server using the javax.mail API. A specific connector provides transport for SMTPS, which has several additional properties for security.
The required XML namespace and schema are listed here, and are available from the MuleSource site:
xmlns:smtp=
   "http://www.mulesource.org/schema/mule/smtp/2.0"
xsi:schemaLocation=
 "http://www.mulesource.org/schema/mule/smtp/2.0
  http://www.mulesource.org/schema/mule/smtp/2.0/
     mule-smtp.xsd"
Attributes
The following SMTP properties can be set on the URI of the endpoint or as properties of the endpoint, as well as within the connector. However, you can set up property values on the MuleMessage too; these will override any properties on the endpoint.
authenticatoris needed when sending authenticated SMTP requests. By default, Mule handles authentication by creating a default if there are user credentials set on the SMTP endpoint. Users can customize the authenticator by setting this property to point to their own authenticator. Authenticators must implement thejavax.mail.Authenticatorinterface.bccAddressesis a comma-separated list of e-mail addresses to blind carbon copy to.ccAddressesis a comma-separated list of e-mail addresses to carbon copy to.contentTypesets the default Mime content type for the outgoing messages.customHeadersis a map of custom properties that will be set on the outgoing message's header.fromAddressis thefromaddress to set on the outgoing message. This attribute is mandatory.replyToAddressesis a comma-separated list of e-mail addresses that will receive replies to the e-mail.subjectis (if set on the connector) a default subject for the outbound message if one is not set on the endpoint. By default this is an empty string.
SMTPS Transport—Attributes
Besides inheriting all the attributes from the SMTP connector, the SMTPS connector implements the following attributes too:
socketFactoryis the SSL socket factory to use; by default this isjavax.net.ssl.SSLSocketFactory.socketFactoryFallbackindicates whether to enable fallback; by default this is set tofalse.trustStoreis the file location of a trust store.trustStorePasswordis the password for the trust store specified.
While server credentials may be set on the endpoint, defaults can be set on the connector as usual.
Example
In this example, any e-mails sent using this connector will have a default subject of Mule Server and will automatically appear as having been sent from [email protected]:
<smtp:connector name="EmailConnector"
      fromAddress="[email protected]"
      hostname="smtp.company.com"
      subject="Mule Server"/>
In this next example, an e-mail to [email protected] will be sent through the smtp.company.com mail server. The username (anyName) and password (123456) to access the SMTP server are included as attributes.
<smtp:outbound-endpoint
      to="[email protected]"
      host="smtp.company.com" name="anyName"
      password="123456"/>
SMTP Transformers
Two common transformers allow you to convert plain e-mail messages into strings or vice versa. These transformers work with the body of the e-mail message.
<smtp:string-to-email-transformer>—this transformer converts a string to ajavax.mail.Message. It uses transformer attributes to determine thetofield and does not handle attachments.<smtp:email-to-string-transformer>—you can convert ajavax.mail.Messageto a string using this transformer.
The Java Message Service (JMS) specification is a Sun standard for messaging middleware (sometimes called enterprise messaging). It allows for data and events to be exchanged between different applications by utilizing queues in a centrally-located server. This leads to the creation of message-based applications rather than autonomous silos. Messages sent to or received from a JMS server are done so asynchronously, which means that the server itself is loosely coupled to your application. Messages can also be transacted to preserve integrity.
A number of vendors supply JMS servers—WebLogicMQ, WebSphereMQ (previously MQSeries), and TIBCO EMS are the most common ones. Each vendor may implement one or both of the main versions of the standard—JMS 1.1 or JMS 1.0.2b.
Queues and Topics
Messages can be placed on one of two different data structures within a JMS server—queues or topics. A JMS queue, illustrated in Figure 5-3, is a standard message queue implemented within a JMS server. An application that places items on a JMS queue makes its messages available to other applications that can read this queue.

Topics (see Figure 5-4) differ from queues since they work on a publish/subscribe mechanism, which means any application that wants to read from the topic must subscribe to it first. You can have multiple subscribers on a single topic, with the result that when a new message is placed on the topic, all subscribers receive a single copy of it.
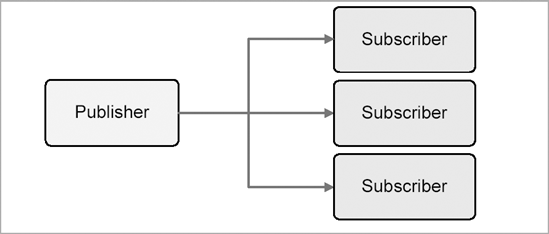
Depending on how the subscription is configured, a subscriber may or may not receive notification of items that were published when the subscriber was unavailable. The mechanism is very similar to RSS feeds, since multiple people can subscribe to the same feed and receive notification of new items on the feed even if they were unavailable at the time of publication.
The Transport
The Mule JMS transport can read and write to any JMS server that is 1.0.2b or 1.1 compliant. Although the JMS specification is a standard, different servers implement the specifications in different ways, so expect to find dedicated configurations in place. These settings may conflict, so a properly configured WebSphereMQ connector may not necessarily work with an ActiveMQ server. More information about server-specific settings is available on the MuleSource wiki.
Due to a restriction in the JMS API, you will need to configure separate Mule connectors to handle queues and topics if the server is JMS 1.0.2b–compliant; JMS 1.1 servers can use a single connector for either type of destination.
The required XML namespace and schema for the JMS transport are shown here, and are available from the MuleSource site:
xmlns:jms=
   "http://www.mulesource.org/schema/mule/jms/2.0"
xsi:schemaLocation=
 "http://www.mulesource.org/schema/mule/jms/2.0
  http://www.mulesource.org/schema/mule/jms/2.0/
     mule-jms.xsd"
Attributes
This list of attributes is not exhaustive; these are the most commonly-used ones. A complete list is available on the Mule wiki.
clientIduniquely identifies the client and must be set if using durable subscriptions for topics. The JMS transport will set it for you automatically tomule.<connector name>.<topic name>, but some JMS servers expect you to set it directly. If theclientIDis not unique, anInvalidClientIDExceptionis thrown. This property is required if you use durable subscriptions.durableis used when a client wants to receive all messages posted on a topic, even ones that were published when the subscriber was inactive (a durable subscription). This can be overridden on an endpoint.passwordis used when connecting to a JMS server; this can be set on the endpoint.specificationindicates whether this is a 1.0.2b or a 1.1 server; this property is required.usernameis the username to use when connecting to a JMS server; this can be set on the endpoint.
Tip
The connectors for specific JMS servers may have attributes of their own. For example, the ActiveMQ connector uses a brokerURL which is set to the URL that the JMS server is listening on.
Example
The following connector configuration defines a JMS connector to an ActiveMQ server; note the vendor-specific connector. This is a 1.1-compliant server, as you can see from the specification attribute, and its brokerURL is set to vm://localhost. In this case, connections to the JMS server will occur through Mule's JVM. The durable attribute is set to true, which tells us that this connector will be used for topics and that the subscriptions to all topics will be durable.
<jms:activemq-connector name="jmsConnector"
                        specification="1.1"
                        brokerURL="vm://localhost"
                        durable="true"/>
In this next set of examples, the first JMS inbound endpoint refers to a queue, while the second one refers to a topic. The queue and topic attributes are mutually exclusive as you can either refer to a queue or to a topic, but not both. The third endpoint is a generic inbound endpoint that shows how you can embed user credentials into the endpoint URI. Note that the topic in use is prefixed with the keyword topic:; queues do not need to be prefixed like this, but check the documentation for your JMS server.
<jms:inbound-endpoint queue="myQueue"/>
<jms:inbound-endpoint topic="myTopic"/>
<inbound-endpoint address=
                  "jms://name:password@topic:myTopic"/>
This last endpoint example shows how you can use a JMS selector on a JMS endpoint. JMS selectors are JMS-specific endpoint filters. They differ from Mule filters in that you cannot use multiple selectors together.
<jms:inbound-endpoint queue="myQueue">
<jms:selector expression="JMSPriority=9"/>
</jms:inbound-endpoint/>
JMS Transformers
The JMS message-to-object transformer <jms:jmsmessage-to-object-transformer> converts javax.jms.Message objects, or subtypes, to generic Java objects. You can change the returnType attribute for this transformer to typecast the result further according to this list:
javax.jms.TextMessageconverts to ajava.lang.String.javax.jms.ObjectMessageconverts to ajava.lang.Object.javax.jms.BytesMessageconverts to a byte array. If the payload is compressed it will automatically uncompress it.javax.jms.MapMessageconverts to ajava.util.Map.javax.jms.StreamMessageconverts to ajava.util.Vectorof objects from the Stream.
The object-to-JMS message transformer <jms:object-to-jmsmessage-transformer> does the opposite. Its returntype can be tweaked to typecast the JMS message too.
java.lang.Stringconverts to ajavax.jms.TextMessage.java.lang.Objectconverts to ajavax.jms.ObjectMessage.byte[]converts to ajavax.jms.BytesMessage.java.util.Mapconverts to ajavax.jms.MapMessage.java.io.InputStreamconverts to ajavax.jms.StreamMessage.
Note
Mule Enterprise Edition includes a premium WebSphereMQ transport that supports specific configuration and behavior optimized for WMQ.
The Java Database Connectivity (JDBC) transport connects to any relational database through the use of SQL statements. Inbound endpoints map to SQL SELECT statements to read data, and SQL INSERT statements are used to write data to a database, but UPDATE and DELETE statements can also be used. As with the File transport, queuing of messages needs to be simulated and so does consumption of messages. As we'll see this is achieved by using "acknowledge" queries.
The required XML namespace and schema for the JMS transport are shown here, and are available from the MuleSource site:
xmlns:jdbc=
   "http://www.mulesource.org/schema/mule/jdbc/2.0"
xsi:schemaLocation=
"http://www.mulesource.org/schema/mule/jdbc/2.0
 http://www.mulesource.org/schema/mule/jdbc/2.0/
    mule-jdbc.xsd"
Attributes
This list of attributes is not exhaustive; these are the most commonly-used ones.
dataSource-refis the name of the JDBC data source itself.pollingFrequencyis the frequency with which to poll the database for new records, in milliseconds.queryRunner-refis the name of the class used to execute queries. The default class used isorg.apache.commons.dbutils.QueryRunner.resultSetHandler-refis the name of the class used to pass query results back. The default class used isorg.apache.commons.dbutils. handlers.MapListHandler.
The transport also has a child element where you can define the queries with the following syntax:
<jdbc:query key=" ... " value=" ... ">
Each query needs a key (which is a descriptive name for the query) as well as the actual SQL query itself. You can have multiple queries for a single JDBC connector. Three types of queries can be used:
readqueries areSELECTSQL statements that are bound to an inbound endpoint.writequeries are usuallyINSERTSQL queries that are bound to an outbound endpoint.ackqueries are executed immediately after areadquery to mark the previously selected rows as having been processed. This type of query is identified with the same name as thereadquery, together with an .acksuffix. Typically these would beUPDATESQL queries.
Example
The connector shown here is called salesDB and refers to a data source called ordersDB that is defined in Spring. It will poll for new records one time every second and will use the salesOrderResultSetHandler class to handle any rows returned by the respective queries.
<jdbc:connector name="salesDB"
     dataSource-ref="ordersDB"
     pollingFrequency="1000"
     resultSetHandler-ref="salesOrderResultSetHandler">

<spring:bean id="ordersDB"
    class="org.springframework.jdbc.datasource.
    DriverManagerDataSource">
    <spring:property name="driverClassName"
        value="com.mysql.jdbc.Driver"/>
    <spring:property name="url"
        value="jdbc:mysql://localhost:3306/orderdb"/>
    <spring:property name="username" value="myName"/>
    <spring:property name="password" value="myPwd"/>
</spring:bean>

  <jdbc:query key="getTest"
     value="SELECT ID, TYPE, DATA, ACK, RESULT FROM TEST
            WHERE TYPE =${type} AND ACK IS NULL"/>
  <jdbc:query key="getTest.ack"
     value="UPDATE TEST SET ACK = ${NOW}
            WHERE ID = ${id} AND TYPE =${type}
            AND DATA = ${data}"/>
  <jdbc:query key="writeTest"
   <jdbc:query key="writeTest"
      value="INSERT INTO TEST (ID, TYPE, DATA, ACK,
             RESULT)
      VALUES (NULL, ${type}, ${payload}, NULL, NULL)"/>

</jdbc:connector>
There are three queries set up here:
The first query is an inbound query and will select the contents of five columns from the table called
test, where thetypefield matches a parameterized value and theackfield is Null.The second query is an acknowledge query. It is characterized by having the same key but with an
.acksuffix. Each row in the table that matches the criteria indicated will be updated so that theackfield will no longer be empty. This means that these rows will not be selected when the inbound query is re-run.The third query is an outbound query and will insert values into the correct columns in the table. The
${payload}parameter refers to the payload of the currentMuleMessage.
The following two endpoints are JDBC inbound and JDBC outbound endpoints, respectively, that refer to a specific query by name. In each case, we can configure any of the query parameters directly.
<jdbc:inbound-endpoint queryKey="getTest?type=1"/>
<jdbc:outbound-endpoint
   queryKey="jdbc://writeTest?type=1"/>
Note
Mule Enterprise Edition includes a premium JDBC transport that also supports stored procedures, cursors, and parameter parsing.
Transports are configured as connector elements in XML and are made up of a MessageReceiver class, a MessageDispatcher class, and zero or more transformers. The individual types of MessageReceiver classes differ depending on whether the transport is a polling- or listener-based transport. Having said that, the service descriptor file can always be inspected to see which classes are going to be used at runtime, and these settings can be overridden to change its behavior.
The first two transports we saw in this chapter—Console and VM—are invaluable for use in testing and debugging, and VM may also be used in production. While there is nothing to stop you using the Console transport in production, it has limited value. We also reviewed transports that implement standard Internet protocols such as HTTP, HTTPS, SMTP, SMTPS, and FTP transports.
We rounded out our tour of commonly-used Mule transports by taking a look at how Mule can tap into enterprise messaging mechanisms by using the JMS transport, and can read/write from/to a corporate database by using the JDBC transport.
This rounds out our discussion of the main transports in use in Mule. There are more transports available out of the box and on MuleForge. The manner in which they are configured is similar. It is worth visiting the information on the MuleSource wiki to figure out how to work with them.