
CHAPTER 1
CREATING THE SKETCH
CREATING THE SKETCH
PROPORTIONS OF THE FIGURE
One common way to understand the proportions of the body is to map out key points in the figure using the length of the head as a unit of measure. By comparing the length of the head to other distances on the body we begin to train our eye to see the proportions of the figure. The height of the head then becomes a “ruler” by which we can begin to understand and compare the rest of the vertical measures in a body.
Many figure drawing texts declare that the human figure is typically 8 heads tall. In my experience, this results in a long and idealized figure appropriate to fashion illustration. I prefer to utilize a more realistic sense of proportion and work with a figure that is 7½ heads of vertical space.
Here you can see the relative measures of both the male and female form. You can use the length of the head to find the placement of the nipples, the navel, the crotch, the mid-thigh, the base of the knee, and the ankle. Note that the feet will take roughly a ½ head of vertical space.


Let’s look at the proportions of the 7½-head figure as seen in real people. You will notice there is some variation among individuals, which is natural. You should view the 7½-head standard as a guide rather than as an ironclad rule. Regardless of how tall a person is, you can observe how parts of the body relate to each other similarly in different statures; for example in most people the wrists fall at the crotch level and the elbows generally land at the navel. Take time to observe people around you to get comfortable gauging these proportions.

Photo by author.

Photo by author.
GESTURE SKETCHES
Once you have an understanding of the proportions of the human form, begin working towards capturing the entire body in a few quick strokes. This is called a Gesture Sketch. By practicing these quick sketches you will become comfortable in capturing the energy of an active body, which in turn will make your renderings feel like real people on the page. This is incredibly beneficial when sharing your ideas with a director or design team.
I encourage my students first to figure out what the pose or posture of the character is. An active pose helps to contribute to the realness of the figure, and makes the difference between a flat drawing and truly capturing the character. Poses should relate to a key moment in the play or focus on the physical and emotional traits of the character, such as age, status, stress, or joy, and so forth. (For more examples of this, see ‘Finding the Pose’ at the end of this chapter.)
Example 1
In this example, I began by clearly marking out the head lengths. Then I made a quick gesture sketch to find the proportions relative to those head lengths. I then worked on top of that gesture sketch to find the rough dimensions of the torso and the finer details of the body, which we will look at further in this section.
Here I marked out the appropriate head lengths before I began working. You can also check your work as you go by measuring the head lengths after you capture the rough shape of the figure.

Example 2
Again, you can lightly mark out the appropriate head lengths before you begin working, or you can check your work as you go by measuring the head lengths after you capture the rough shape of the figure.
The goal of a gesture sketch is to feel out the action of the figure, to plan the layout of the figure on the page, and to find the general proportions of the figure. All of this is done while retaining looseness in your rendering.


Example 3
Capture the whole figure in a few quick strokes before moving on. Do not focus on details. Rather, your aim is to quickly mark out the space your figure will take up on the page.


Example 4
Just as the head measurement marks were a guide for finding the gesture sketch, the gesture sketch becomes a guide for placing the lines of the costume.

The gesture sketch can be used to find the placement and proportions of interacting figures. By drawing the male figure’s limbs, which would otherwise be obscured by the female figure, I am able to find a more accurate placement for all the major points of the rendering.


CORE MASSES OF THE FIGURE
All motion of the human body originates in the torso and has a direct relationship to the hips and head. Understanding and accurately depicting the relationship between these three large masses will give your renderings a sense of natural movement.
To begin, think of these three masses—the head, torso, and hips—as three simplified cylinders. Reducing these masses to their simplest shape allows you to see the relationship between them. Imagine that these three cylinders are joined together on a flexible spring or spine. Because these three forms are connected, one cannot move without affecting the others.


If you need help visualizing this relationship, stack a set of tumblers on top of each other. Where they connect is your waist. If you were to bend to the side, your waist would expand on one side—tipping the two tumblers towards each other on one side and away from each other on the opposite side. If any cylinder tips, the cylinder above it will react by tipping in the opposite direction.
These cylinders are building blocks for your final figure. Once you establish how they are arranged, you can work to find the more specific contours of the human figure.


The examples on this page show how the three core masses can be used to create bodies in motion.


Here we see how to think of the limbs as well as the core masses as simplified cylinders. In Figure 1.21 we begin to flesh out those cylinders. Note how the line of the shoulders and hips tilt towards each other on one side and away from each other on the opposite side.


In Figure 1.22 we see how to visualize the skeleton within the figure. This text is not intended as an anatomy reference, but artists will benefit from an ability to visualize the placement of the ribs, hip bones, and spine. Figure 1.23 shows this same figure mapped out with 7½ heads. Utilizing these various ways of thinking about the figure helps an artist establish, confirm, and correct the proportions of their rendering.


In this example we see again how visualizing the skeleton, thinking of the core masses and limbs as simplified cylinders, and utilizing a 7½-head measure leads to a three-dimensional and realistic figure. Rendering the costume is a joy when you have an accurate figure to work with.


THE HEAD AND FACE
The head is divided into two parts, as the green lines indicate in Figure 1.26; the eyes are halfway between the top of the head and the bottom of the chin. The face is divided into three parts: the eyebrows are ⅓ down from the hairline, then there is ⅓ to the base of the nose, and then again to the chin (as shown in red). Using the eyes as a guide, the width of the face should be divided into five sections (as shown by the blue lines) with each section an eye-width.

The profile has the same proportions as those from the full-face view. The ear is positioned between the eyebrow and the base of the nose, and is behind the center vertical line.

Step-by-Step Drawing the Head and Face
When drawing the head, always start with an egg shape, as the egg shape is used in all views. Sketch a simple set of feature-placement lines on the shell of the egg shape.
Sketch in the eyes, eyebrows, nose, mouth, and the ears on the placement line; fill out the hair over the skull. Keep sketching lightly at this point. You may need to correct some errors.


Features are explored gradually and you are ready to draw the finished result.
The following four examples show how I use these steps to draw heads and faces in my renderings.

Step-by-Step Example 1


Step-by-Step Example 2


Step-by-Step Example 3


Step-by-Step Example 4


ARMS AND LEGS
You can visualize the arm as two modified cylinders. These cylinders are narrower and longer than the ones used for the torso. When drawing the basic shapes that make up the body, it is important to “draw through,” which means drawing the back of the form as well as the front. Doing this allows you to see how the shapes connect and intersect—allowing you to capture the three-dimensional quality of the human form.
Just like with the arms, the legs can be thought of as two cylinders. Remember to “draw through” in order to see how the ellipses of the two cylinders connect. These modified cylinders will be longer than the ones you used for the arms. Refer to the vertical measures you marked out earlier, using the head as a unit of measurement.


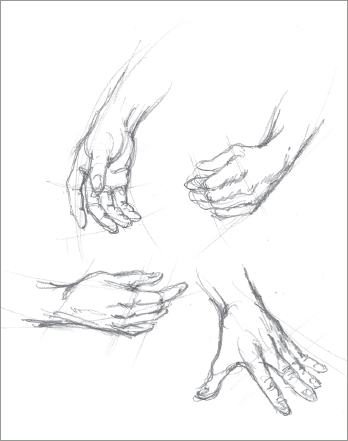
HAND
The hand is an incredibly complex machine. It helps to break it down into rectangular boxes. You can think of the palm of the hand as one box, and the fingers as a second box.
Another way to approach the complex shapes of the hand is to think of it as a mitten first. The individual fingers can be worked in once you find the overall shape of the hand.


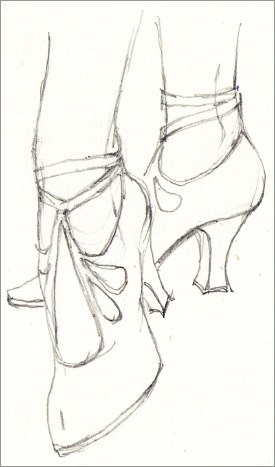
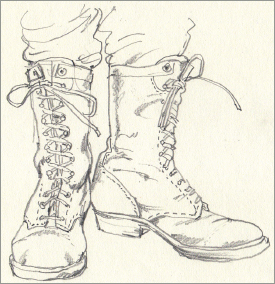
FEET AND SHOES
Similarly to the hand, the foot can be reduced to a series of boxes—one for the heel, one for the middle of the foot, and one for the toes.


Once you establish the shape of the foot, you can begin to understand how shoes fit on the foot.


THE COSTUME SKETCH: STEP-BY-STEP
The following two examples will help you see how a costume sketch develops. Each step builds the sketch as a whole rather than focusing on perfecting a single part.
Example 1 Lightning in The Last Firefly at the Children’s Theatre Company, Minneapolis
First, I establish the vertical proportions of the figure by marking out the head lengths and use a free-flowing line to find the movement of the character.

I create a quick gesture sketch using the proportions established, with my free-flowing line as a guide.
Now I begin finding the basic forms of the figure and experiment with the contours.


I further define the costume, darkening areas that I know exist in shadow and removing any lines I no longer need.
In this final stage I add in any final costume details and assess the final rendering for any necessary adjustments.


Example 2 Blake as Eileen in The Walworth Farce at Studio Theatre, Washington, DC
I begin by marking out the head lengths and finding the movement of the figure with a gesture sketch.
I further develop that gesture sketch, deepening the lines I find helpful as the rendering develops.


As the sketch reaches the final stages, I can erase lines that I no longer need and add in smaller details.

FINDING THE POSE FOR THE CHARACTER
For each sketch I always begin by searching for a pose that will best describe the character. To do this I must imagine the scene as I see it and take note of how the character holds themselves. Working this way allows my sketches to serve in the larger collaborative conversation. It is enormously valuable in helping both a director and a performer “see” the character as I do.
On the following pages you will see several examples rendered in poses that help capture and communicate character.
Example 1 Melville from Schiller’s Mary Stuart at Milwaukee Repertory Theater
In this example I’ve rendered him stooped over at the shoulders, a sense of resignation and remorse in his posture. In my rendering I am conscious of the gravity pulling on his neck and torso and the weight of his arms rounding his shoulders, and those thoughts are reflected in my line quality.

Once I had loosely captured his figure, I roughed in the dimensions of his costume. Working quickly and lightly, I began building the foundation of the rendering. The curve of the chest informs the curve of the doublet. The centerline of the body, which I found in my gesture sketch, informs the centerline of his doublet and the angle of the front edges of his open coat. The folds of this outermost layer fall in a straight line from his sloping shoulders. If these folds followed the contours of his body, it would be an awkward misrepresentation of reality. Finding the body under the clothes first helps you avoid these missteps. It gives you a form upon which to “hang” the costumes.
As my rendering develops, my strokes become darker and more confident—I am willing to commit to what I am building on the page. I can begin erasing the body underneath the clothes and removing some of my working marks. However, I try not to focus too much on “cleaning up” the rendering. I find the renderings are most effective when the artist’s journey remains present on the page.


Example 2 Sean from The Walworth Farce at Studio Theatre, Washington, DC
To create this character, I want to render him with his hands shoved deep into the pocket of a pair of oversized pants. To do this I begin with a gesture sketch to find the placement of the hands and how that affects the hunch of his shoulders.
Working from my gesture sketch, I fill out the masses of the body—finding the relationship between the shoulders, chest, and hips as I go. I begin roughly working in the features of the face.


With the figure and pose in place, I begin finding the contours of the costume. This is a very slim man who is enveloped by his clothing. Therefore, I have rendered the pants as hanging from his hips. His hands are shoved deep into his pockets and this affects the curve of the waistline on the pants. Deepening my lines at the base of the figure helps his clothing feel like it is hanging off of him.
As I complete this rendering, I add in details such as the plaid pattern on the pants. I can eliminate some of the guidelines that helped me find the figure at first. I’ve added more detail into the face and deepened the lines at the back of the skull to emphasize the thinness of his neck and the visible angularity of this character’s jaw.


Example 3 Vera from 4000 Miles at Studio Theatre
In this example, the character is a 91-year-old political activist.
I begin with a quick gesture sketch. The lines of the shoulders, chest, and hip are all running at roughly the same angle because the character will be resting her weight upon a laundry cart.
This is an older woman and this is reflected in the stooped quality of her shoulders and the caved-in abdomen—there is fragility to how she is standing. The facial features have begun to droop, showing the age of this character.


Working lightly, I begin finding the general shape of her costume in relation to her body. The cardigan will hang straight down from her shoulders and away from her body. The trousers are not baggy but the folds in them show us where the weight is resting in the body.
When I begin laying in the details of the costume, my focus is on communicating the overall texture rather than an exact pattern. Too much attention to rendering each and every precise detail can sometimes get in the way of seeing the character as a whole.


Example 4 Clara from The New Electric Ballroom at Studio Theatre
In this example, a quick sketch helps me find the scale and pose of this plus-sized woman.
As I begin finding the contours of her figure, there is no need to fill in every detail, rather I need to find the key points that the garment will rest upon.


Here I begin working with the costume for the character. Many of the lines of the figure have been removed. However, finding those lines was critical to finding the proper drape for this seemingly simple nightgown. I’ve begun working in the details of her face and slippers. I am always endeavoring to bring the rendering forth as a whole rather than in parts.
In the finished rendering I have been able to finalize my ideas and add in key details, such as the gathers at her bust line and the ruffles at her shoulders.


THE EXPRESSION OF PENCIL STROKES
Your pencil is a multi-purpose tool. By varying your strokes you can achieve a wide range of effects that give texture and dimension to your sketches. On the following pages you will find examples of renderings where I utilized hatching, scribbles, and smooth shading to give texture and dimension to the rendering.
In this drawing from The Caretaker at Studio Theatre, I have used multiple techniques to express the aged and shabby quality of the character’s costume.
Hatching involves using short directional strokes to build up layers of depth in a rendering. The direction of these strokes is important and should generally follow the grain of the costume or figure. These strokes can be soft or dark, depending on the effect you want to achieve.


Scribbles are swirling lines that often change direction. I use these to add moments of distortion or distress to a rendering. These chaotic lines can be enormously descriptive if used correctly. Smaller, more delicate marks can be made with the tip of your pencil, while more decisive scribbles can be worked in with the side of your pencil.
Smooth shading involves using the side of your pencil to add shadow and depth to your rendering. Make sure your pencil is well sharpened so that you get the maximum lead exposure to work with.


Soft and smooth shading, made with the side of the pencil, helps to create depth in the folds and shadows of fabric. In this sketch I used this technique to show the texture of a traditional British wool or tweed suit.


This rendering used charcoal, which gives a more textural quality to my lines. The shadows can be made much darker, and the shading helps to emphasize the weight and curve of the folds in the gown. Soft, swirling lines give the impression of pattern, without being too specific.

Charcoal allows for quick changes in line weight, creating both strong lines and shadows, as well as softer curves in fabric draping. These shifts in line weight are created by using varying amounts of pressure in quick, decisive strokes.


A combination of scribbles and smooth shading helps to give this drawing a feeling of soft, worn fabric. Lines are loose and rough, and the haphazard feeling of the line work contributes to the feeling of an old, worn garment. I used heavier smooth shading around the pockets and folds of the dress to show where it is stretched and drooping with age.

Quick, loose squiggling lines are used in this drawing to capture the feeling of many layers of lace and ruffles. I varied the pattern of each layer, but was not too specific in the detailing of the lace design. This gives it a much lighter and more energetic feeling than a more labored drawing with accurate details.
A quick, loose, and light pencil line is good for drawing dancers. The sweeping gestures are airy, and capture lightweight dance fabric and a feeling of movement.
