
Chapter 3

Relighting in the Composite
Lighting is an important component for film-making. Although real-life lighting is captured when film or video is shot, it’s by no means permanent. You can use standard tools and effects within compositing programs to creatively relight. You can alter the overall mood of shot, change the perceived time of day, or correct unaesthetic lighting. Relighting may be necessary to achieve continuity between surrounding shots in a scene or may be applied to fix sub-par lighting that was the result of a limited budget or rushed production schedule.
This chapter includes the following critical information:
• Color grading, relighting, and lighting terminology
• Common lighting and relighting problems and solutions
• Motion tracking masks
• Color grading different regions of a shot
• Working with color effects/tools to alter color balance and contrast
Color Grading and Relighting Overview
Color grading is a process through which the color balance of a shot is digitally altered. Color balance is the relationship of color values between color channels. In digital compositing, this involves the balance of red, green, and blue. In this context, colors refer to color channel pixel values. When affecting color ranges, many effects and tools operate on color regions that are broken into shadows (darkest values), midtones (mid-values), and highlights (high values). Color grading may be undertaken for several reasons:
• Colors are adjusted to make a shot better match surrounding shots in a scene or sequence. Along those lines, colors may be adjusted to match a particular time of day or the lighting of a particular location.
• Colors are altered in anticipation of applying particular tools or effects. For example, you can color grade a green screen shot so that the keyer is more successful.
• Colors are adjusted to meet a specific aesthetic goal. An aesthetic goal may be a certain mood, like cheerful or spooky.
Relighting is the process through which a shot is updated so that it appears as if it was lit with a different combination of lights, light intensities, and/or light colors. In digital compositing, relighing is intrinsically linked to color grading as color values must be changed. Relighting is generally dependent on some form of masking or rotoscoping to limit the color grading results to particular areas of the frame. However, various color grading tools/effects may be applied to the entire frame in certain circumstances, such as changing a daytime shot to a nighttime shot.
When discussing relighting techniques, it’s necessary to use lighting terminology borrowed from real-world stage, film, and video lighting. A key light is the strongest light (or lights) in a scene. A fill light is a weaker, secondary light that “fills” the shadows created by the key. In the real-world, fill light is often present as bounced key light. For example, sun light bouncing off a back wall is fill light. Other lights may be added for stylistic reasons. For example, a rim light is a strong light arriving from behind that illuminates the edge of an actor or objects. (A rim light is also referred to as a hair light or back light.) A kicker is a variation of fill light that is designed to light the dark side of an actor’s face to give it better form. Light intensity is the same as light brightness. All real-world lights have specific color temperatures, which produce a particular color cast. Color cast is the dominance of a recognizable color, such as blue or yellow. Color temperature is produced by the light’s wave-length with longer wavelengths appearing more blue and shorter wavelengths appearing more red. (Technically, color temperature is the temperature of an ideal black-body radiator that radiates light of comparable hue to that of the light source; color temperature is measured in Kelvin units.)
Exposure is the amount of light per unit area that is permitted to strike a film frame or digital video sensor for one frame. With non-floating-point digital formats, proper exposure is critical—improper exposure can lead to loss of information within overly-dark shadows or overly bright highlights. When relighting, you have more flexibility when working with HDR (High-Dynamic Range) images. HDR images utilize a floating-point structure that allows for a huge dynamic range of color values. HDR image formats, such as .hdr, floating-point TIFF, or OpenEXR, can store extremely small values, such as 0.000000000232, or extremely large values, such as 2.23x10s4. As such, HDR formats support decimal-place accuracy, something lacking with standard integer-based formats such as PNG or JPG. HDR formats are generally 16- or 32-bits. After Effects and Fusion support 8-bit integer and 32-bit floating point workflows. Bit-depth refers to the number of color steps a color channel can carry. 8-bit, for example, carries 28 colors per channel and thus produces 0-to-255 range for each channel. When working with 32-bit floating-point workflows in After Effects or Fusion, a 32-bit floating-point color range is expressed on a 0-to-1.0 scale, with values more than 1.0 being superwhite. Super-white values are those that are not displayable by standard 8-bit monitor, but are nonetheless processed by the composite.
When working with 3D animation, it’s possible to create lighting render passes in anticipation of re-lighting within the composite. One variation of a lighting pass renders the 3D scene multiple times with each pass containing a single light. The renders are then recombined in the composite through masking and various blending mode combinations. Other variations of lighting passes may involve surface normal information or surface UV information, which allows color grading to be applied to particular areas of surfaces based on their rendered color values or relationship to the rendering camera.
Lighting Problems and Solutions
Table 3.1 lists common problems encountered when gauging lighting and planning relighting. Potential solutions for creating successful relights are included.
Table 3.1
| Problem | Solution |
| Under-IR The shot is underexposed. |
Color grading effects/tools can lighten the shot, although caution is necessary to avoid the exaggeration of noise, grain, or compression artifacts. Noise reduction effects/tools can be |
| Over-lit The shot is overexposed. |
Overexposure leads to a loss of information if the maximum value of the i mage bit-depth is reached (for example, a value of 255 on an 8-bit 0-to-255 color scale). Color grading cannot restore lost information. As such, you can apply paint fix techniques to repair overexposure. (Paint fixes are discussed in Chapter 4.) |
| Poor contrast The lighting within the shot makes the subject ‘flat’ and evenly exposed in all areas. |
You can combine color grading, masking, and rotosoping to increase cc decrease contrast in particular areas of the frame. |
| Incorrect colors The color balance of a shot is undesirable or unaesthetic. |
Color grading techniques can alter color balances and color casts. If you break the grading process into regions through masking and rotoscoping, you can produce more complex combinations of colors within a frame. For example, you can grade a shot so there is a red color cast on one side of an actor’s face and a blue cast on the opposite side. |
| Lacking shadows Shadows, which may be desirable as a story point or as an aesthetic choice, are missing. |
Once again, you can limit color grading to a masked or rotoscoped area to emulate a new cast shadow. |
| Continuity mismatch Lighting does not match surrounding shots in an edited scene. |
You can use color grading, masking, and rotoscoping techniques to change the color balance or color cast to better match another shot. You can use the same techniques to alter the apparent time of day (dawn, dusk, afternoon, night, and so on). |
Relighting Challenge
Figure 3.1 shows a frame from the image sequence Actress.##.png. Although the shot features acceptable lighting, there is room to relight the shot to produce different aesthetic results. Table 3.2 lists the shot’s strengths and weaknesses.

Figure 3.1 An actress is featured in a close-up. Regardless of the shot, there is always an opportunity to relight in the composite. Image sequence adapted from “Insanity Trailer” by Sabine Mondestin and is licensed under Creative Commons A ttribution 2.0 Generic (CC BY2.0).
Table 3.2
| Strengths | Weaknesses |
| There is little motion in the shot, which is always an advantage when masking or rotoscoping. | The woman’s eyes are underexposed and difficult to see. |
| The lighting is low-contrast where the left and right side of the actress are lit identically—this lends itself to re-lighting the face. | The darkest areas of the woman’s hair are underexposed. No detail exists in those areas. |
| The background is left out-of-focus, which allows the woman to be more clearly seen. | The contrast between the background and foreground is not sufficient to produce a luma masking for separating the actress. |
Layer-Based Solution for Relighting Challenge
When relighting a shot, it’s important to establish a lighting goal. With this challenge, our goal is to light the actress more dramatically with a distinct difference between her left and right sides and the impression of a cast shadow from a key light. While we are at it, we’ll adjust the color balance and saturation to alter the light colors within the shot for a more stylized look. In addition, we’ll color grade her eyes to make them easier to perceive.
Complex relighting requires nested compositions, masking, and rotoscoping. To make the rotoscoping more efficient, we can use the After Effects mask tracking feature. You can follow these steps:
1. Create a new project. Import the Project-FilesPlatesActressActress.##. png image sequence. Interpret the image sequence frame rate as 24 fps. Create a composition that matches the resolution (1920x1080), duration (48 frames), and frame rate (24 fps) of the sequence. Name the composition Eyes.
2. Add the footage to the Eye composition three times. Rename the top layer LeftEye. Rename the middle layer RightEye. Select the lowest layer, numbered 3, and click its Solo switch so it can be seen by itself. Add a Brightness & Contrast effect (in the Effect > Color) menu). Increase Bright-ness to 35 and Contrast to -75 to reduce the contrast even further. Reducing the contrast will make relighting easier in a later step. Turn off the Solo switch.
3. Select the LeftEye layer. While on frame 0, use the Pen tool to draw a closed mask that separates the frame-left eye. Convert the mask vertices to smooth segments by selecting the vertices switching to the Convert Vertex tool, and clicking one of the vertices. (To make this process easier, you can use the Solo switch for this layer.) You can select more than one vertex by Shift-selecting or LMB-dragging a selection marquee. Increase the Mask Feather to 125 to soften the mask edge (Figure 3.2). The softness will disguise the edge transition when we color grade this layer. With the LeftEye layer selected, add a Curves and Hue/Saturation effect. Insert 3 points into the Curves effect’s RGB curve. Shape the curve to brighten the midtone values and increase the overall contrast, thus making the eye white and iris more distinct (Figure 3.3). Increasing the contrast with the Curves effect increases the saturation. To offset this, reduce the Master Saturation slider for the Hue/Saturation effect to -25.

Figure 3.2 The frame-left eye is separated with a mask and given additional contrast with a Curves effect. The mask’s Edge Feather is set to 125. The other layers are temporarily hidden.

Figure 3.3 A Curves effect brightens the mid-tones while increasing the contrast.
4. Because the actress moves during the shot, the mask must be animated to follow. One ap-proach to animating the mask is to keyframe the Mask Path property and manually alter the mask shape by moving mask vertices at different frames. Another, more efficient method is to use the program’s built-in mask tracking function. The function is similar to transform tracking with the Tracker tool (as discussed in Chapter 2) but is significantly easier to apply. Expand the Masks section of the LeftEye layer in the layer outline. RMB-click over the Mask 1 name and choose Track Mask. The Tracker panel opens at the bottom-right of the program window. However, the tracking options are designed for mask tracking. Set the Method menu, in the Tracker panel, to Position & Rotation (a scale transform is not needed with this footage). Click the Track Selected Masks Forward play button. The Tracker plays the timeline, updating the position of the mask vertices with each frame. The Mask path property is automatically keyframed. When the Tracker reaches the timeline end, play back using the time slider. The mask follows the eye. The tracking need not be perfect as the mask edge is very soft. The Tracker notes the pixel pattern within the mask and attempts to reshape the mask to maintain the pattern over time. if you manually alter the mask shape by moving vertices, you should re-track the mask using this process.
5. Select the RightEye layer and draw a mask to separate the frame-right eye. Add Curves and Hue/Saturation effects to the RightEye layer. Adjust the Curves effect’s RGB curve to look similar to Figure 3.3 but pull the midtone peak even higher to push the contrast further. Set the Hue/ Saturation effect’s Master Saturation to -50. Play back. The frame-right eye is brighter and possesses greater contrast. However, the color grading makes the noise within the original video more obvious, thus creating buzzing around the eyelids and eyelashes. You can reduce this by adding a Remove Grain effect (Effect > Noise & Grain > Remove Grain). Set the Remove Grain effect’s Viewing Mode menu to Final Output. Increase the Noise Reduction, in the Noise Reduction Settings section, to 1.5. Play back. The noise is reduced while the frame-right eye is softened slightly.
6. Follow the direction outlined in Step 4 to motion track the mask for the RightEye layer.
7. Create a new composition that is the same resolution, frame rate, and duration as the first one. Name the new composition Face. LMB-drag the Eyes composition into the face composition so that Eyes becomes a nested layer.
8. Duplicate the Eyes layer. Rename the new, top layer Shadow. Return to frame 0. With the Shadow layer selected, use the Pen tool to draw a closed mask that covers the frame-left side of the woman’s face and emulates the area of a cast shadow (Figure 3.4). We’ll assume that a key light is coming from the top-right side of the frame.

Figure 3.4 A mask is drawn on the top layer, emulating the shadow of a key light. Uneven softness is introduced by using the Mask Feather tool. The masked layer is darkened with a Curves effect.
9. Add Curves and Hue/Saturation effects to the Shadow layer. Bow the midtone portion of the Curves effect’s RGB curve downwards to darken the masked area. Set the Hue/Saturation effect’s Master Hue property to −20. This pushes the shadow area colors towards purple to give a stylistic look to the virtual fill light on the frame-left side of the woman’s face. Reduce the Master Saturation to -10 so the color cast isn’t too strong.
10. Switch to the Mask Feather tool (accessible via the menu that appears when you LMB-click and hold the Pen tool button). LMB-click on the mask and LMB-drag new feather points to create an uneven softness. Make the mask edge softer down the center of the face and sharper along the hairline and bottom of the neck. Use Figure 3.4 as a reference. You can soften the edge further by raising the Mask Feather property to 100. We’re not concerned about the background at this point.
11. Create a second mask on the Shadow layer that cuts a hole into the first mask (Figure 3.5). We’ll use this mask to create a patch of light on the woman’s frame-left cheek. (This light pattern is referred to as a Rembrandt patch and is a common lighting pattern in classical painting.) To make the new mask, Mask 2, cut a hole in the first mask, set Mask 2’s blending mode menu to Subtract. The menu is located to the right of the mask name in the layer outline and is set to Add by default. Use the Mask Feather tool to vary the edge softness of Mask 2. Make the top of Mask 2 softer and the bottom of Mask 2 harder. We’ll treat the bottom edge as a more distinct shadow cast by the nose. Adjust the Mask Feather, Mask Opacity, and Mask Expansion properties to make the patch of light believable. You can temporarily hide th mask lines by turning off the Toggle Mask And Shape Path Visibility button carried by the Composition view. For example, set Mask feather to 28, Mask Opacity to 50%, and Mask expansion to −5.

Figure 3.5 A second mask cuts a hole in the first mask, creating a patch of light on the cheek.
12. Once again, we must decide how to make the masks follow the actress as she moves. Fortunately, the mask tracking function works equally well in this situation. RMB-click over the Mask 1 name in the layer outline and choose Track Mask. In the Tracker panel, set the Method menu Position & Rotation, and analyze the timeline. When the analyzation is complete, play back. The mask changes shape to follow the facial features. The tracking may not be perfect; however, due to the softness of the mask edge, perfect tracking is not mandatory. Repeat this tracking process for Mask 2.
13. Create a new composition that is the same resolution, frame rate, and duration as the previous one. Name the new composition Background. LMB-drag the Face composition into the Background composition two times. LMB-drag the actress image sequence from the Project panel and drop it into the Background composition two times. Rearrange the layers so that the nested Face layers are at the top and bottom and the image sequence layers become the middle two layers.
14. Draw a mask on the top layer that separates the actress from the background set. Draw the mask along the inside of the hair edge so that the outer edge of the hair is cut off (Figure 3.6). Use the mask tracking process to make the mask follow the actress as she moves.
Figure 3.6 A mask separates the face on the top layer of the Background composition.
15. Use the Solo switch to show the image sequence layer that is second from the top of the layer outline (layer number 2). Draw a mask that saves the background and cuts out the actress. Leave the mask loose so that it doesn’t intersect the woman’s hair. Draw a second mask, Mask 2, that emulates a beam of light coming from the top-center of the frame. Set Mask 2 blending mode menu to Intersect (Figure 3.7). Set Mask 1’s mask Feather to 100. Set Mask 2’s Mask Feather to 400 and Mask expansion to −200. With the layer selected, add a Brightness & Contrast and a Hue/Saturation effect. Set Brightness to −30, Contrast to 30, Master Hue to 20, and Master saturation to 25. This tints the masked background area a yellowish color, while also darkening and increasing the contrast.

Figure 3.7 Two masks are drawn on a layer, creating the shape of a light beam in the center of the frame. The result is tinted yellow.
16.Select Mask 1 on layer 2. Press Ctrl/Cmd+C to copy. Select the lower image sequence layer (labeled 3). Press Ctrl/Cmd+V to paste the mask. Increase the Mask Feather of the copied mask on layer 3 to 200. Solo layer 3. This layer will serve as a tinted version of the background set beyond the light beam created with layer 2. Add a Brightness & Contrast and Hue/Saturation effect to layer 3. Set Brightness to −125, Contrast to 75, Master Hue to −55, and Saturation to 35. This darkens the background and gives it a purplish color cast (Figure 3.8). When altering hue and saturation to such a great extent, compression artifacts and noise may become more visible. Posterization, in the form of color banding, may also appear. To disguise this, you can add a blur. In this case, a blur will not harm the background as it is already out of focus. Add a Camera Lens Blur (Effect > Blur & Sharpen > Camera Lens Blur) to the layer. Camera Lens Blur creates a style of blur that emulates real-world cameras. It’s a more expensive form of blur but it produces more realistic results. Set the effect’s Blur Radius to 20. Posterization and similar artifacts are no longer obvious (Figure 3.9).

Figure 3.8 The remainder of the background on layer 3 is darkened and given a purplish color cast.

Figure 3.9 Left: Adjusting the hue and saturation leads to color banding and the similar artifacts, as seen in a close-up view of the bottom-left of the frame. Right: The addition of a Camera Lens Blur effect reduces and removes the artifacts by adding an additional blur.
16. Turn off the Solo switches and display all the layers of the Background composition. Note that the lowest layer, layer 4, does not carry masks or effects. Layer 4 is added so that the unadjusted hair edge shows through. We did not want to include the hair edge on other layers, else the edge would gain color casts or extra blur.
17. Create a new composition that is the same resolution, frame rate, and duration as the previous one. Name the new composition Final. LMB-drag the Background composition into the Final composition. We’ll use the Final composition for final color grading. One advantage of nesting compositions is the ability to apply effects to the “flattened” result of proper compositions. Add a Curves effect to the nested layer and adjust the RGB curve to affect the overall brightness and contrast. As an optional step, we can add noise of grain to the shot. This can help disguise limitations of relighting. For example, it can help disguise the inaccurate motion of a mask edge or help disguise any remaining posterization, buzzing, or other artifacts created through earlier color grading steps. Add a Add Grain effect to the layer (Effect > Noise & Grain > Add Grain). Set the effect’s Viewing Mode menu to Final Output. Reduce the Intensity property, in the Tweaking section, to 0.15. Play back. The composite is complete (Figure 3.11).
A chart detailing the layer workflow is illustrated by Figure 3.10. The project is included with the tutorial files as Project-FilesaeFilesChapter3ActressChallengeFinal.aep.

Figure 3.10 Compositions, layers, and effects used in After Effects. Compositions are shown as orange boxes. Layers are numbered and written in bold type. Effects are listed in order, with the left-most effect on top of the effect outline. The arrow indicates nesting.

Figure 3.11 Top: Frame 0 of the original footage. Middle: Frame 24 after the relighting. Bottom: Frame 47 after the relighting. Note how the shadow mask follows the woman’s face.
Node-Based Solution for Relighting Challenge
When relighting a shot, it’s important to establish a lighting goal. With the node-based solution for this challenge, we’ll create a time-of-day change, making the shot appear as if it is lit by an orange sunset.
Complex relighting requires multi-branch networks and masking. You can follow these steps:
1. Create a new project. Choose Edit > Preferences and set the resolution to 1920×1080 and the frame rate to 24 fps. Import Project-FilesPlatesActressActress.##.png. Set the Global End Time to 47. Connect a Loader to a Display view.
2. Create two Color Corrector tools. Connect the output of the Loader to the inputs of the two Color Corrector tools. Connect ColorCorrector1 to a Display view. LMB-drag the tool’s center color wheel handle towards the orange area so that the Tint property value is roughly 0.025 and the Strength property value is roughly 0.72. This tints the shot orange and will emulate the sunset color.
3. Create three Merge tools. Connect the output of ColorCorrector1 to the Foreground of Merge1. Use Figure 3.15 at the end of this section as reference for the final network. Connect the output of the Loader to the Background of Merge1. Connect Merge1 to a Display view. Reduce the Merge1 tool’s Blend slider to 0.6. The orange version of the shot is mixed with the original version (Figure 3.12).

Figure 3.12 An orange-tinted version of the shot emulates sunset light.
4. Create a Color Curves tool. Connect the output of the Loader to the input of the Color Curves tool. Connect the Color Curves tool to a Display view. Insert two points into the tool’s curve and shape it to increase the contrast. The goal is to leave the overhead lights bright and the rest of the shot as close to black as possible. This will allow us to cut out the lights and place them back on top so they are not affected by the orange tint. Connect the output of ColorCurves1 to the input of the ColorCorrector2 tool (created in step 2). Connect ColorCorrector2 to a Display view. Set the ColorCorrector2 tool’s Master Saturation parameter to 0. This changes the separated lights to white. Create a Blur tool (Tools > Blur > Blur). Connect the output of ColorCorrector2 to the input of the Blur tool. Set the Blur Size to 50. Connect the Blur tool to a Display view. The separated white lights are softened, preventing stairstepping on their edges (Figure 3.13).

Figure 3.13 The overhead florescent lights appearing in the background of the shot are separated using Color Curves, Color Corrector, and Blur tools.
5. Connect the output of Mergel to the Background of Merge2. Use Figure 3.15 at the end of this section as reference for the final network. Connect the output of the Blur tool to the Foreground of Merge2. Change the Merge2 tool’s Apply Mode menu to Screen. Connect Merge2 to a Display view. The white, softened lights are placed back on top of the orange-tinted shot. To prevent the highlight at the bottom-left of the frame from being included, draw a simple mask around the upper lights. For example, to create a mask, use the Polygon tool to draw a simple rectangular mask across the top of frame, and connect the output of the Polygon tool to the Effect Mask input of Merge2.
6. Create a Brightness / Contrast tool. Connect the output of ColorCorrectorl to the input of the Brightness / Contrast tool. Connect the Brightness / Contrast tool to a Display view. Lower the Brightness / Contrast tool’s Gain, Brightness, and Saturation sliders to create a dark, slightly orange version of the background. This will become a set of shadows.
7. Connect the output of Merge2 to the Background input of Merge3. Connect the output of the Brightness / Contrast tool to the Foreground input of Merge3. Connect Merge3 to a Display view. The entire shot becomes dark. To limit the new shadow to areas of the background, add masking. For example, create a BSpline tool (Tools > Mask > BSpline), use the new tool to draw a closed mask over the right side of frame, and connect the BSpline output to the Effect Mask Input of Merge3. The masked, virtual shadow emulates a shadow cast by the orange sunlight onto the room behind the actress (Figure 3.14). To soften the shadow, raise the BSpline tool’s Soft Edge to 0.15. You can reduce the shadow’s opacity by lowering the BSpline tool’s Level to 0.8. You can allow the mask to cross the frame-right side of the woman’s face. The mask does not require rotoscoping or tracking due to the soft edge. However, you are free to add a few keyframes to the mask shape to give it some subtle changes as the actress moves. For example, go to frame 0, RMB-click over the BSlpine tool’s Right-Click Here For Shape Animation parameter, choose Animate from the menu, proceed to frame 47, and subtly alter the mask shape. Play back to test any animation.

Figure 3.14 Two BSpline tool masks limit a dark version of the shot to create virtual shadows.
8. To add a second shadow on the frame-left side, create a new mask with a new mask tool. Connect the output of the new mask tool to the Effect Mask input of the first BSpline tool. In this way, you can combine multiple masks into a single alpha matte. The composite is complete (Figure 3.15).
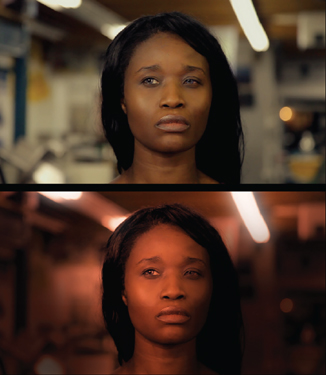
Figure 3.15 Top: Original shot. Bottom: Re-lit version emulating a sunset with orange color cast and soft shadows.
The final tool network is illustrated by Figure 3.16. A chart detailing the node workflow is illustrated by Figure 3.17. The project is included with the tutorial files as Project-FilescompFiles Chapter3ActressChallengeFinal.conip.

Figure 3.16 The final tool network. The Merge3 tool (selected) is the tool that is furthest downstream and is intended to create the final output.

Figure 3.17 Simplified representation of the Fusion node network. Colored boxes represent branches of the network. Specific tools are listed under each branch with low-numbered tools existing farther upstream. The purple arrow represents the connection of masking tools to an Effect Mask input.
Final Relighting Thoughts
Relighting in the composite can never match the quality of real-life lighting when a shot is captured. However, relighting is a useful technique as part of the post-production process. When relighting, consider the following:
Look at the Motion If a shot has heavy camera movement or features a moving actor or prop, it may be easier to apply the relight to the entire frame. If a shot is static or has minimal motion, it will be easier to relight the shot by masking or rotoscoping regions within the frame.
Make Subtle Adjustments Subtle color grading adjustments are less likely to produce color artifacts or are less likely to reveal limitations of the footage, such as noise, grain, or posterization.
Feather the Mask If you color grade with masks, use large mask feathers to disguise the transition from non-graded areas to graded areas or from one graded area to another.
Emulate the Real World If you relight a shot, follow the standard conventions of film and video lighting. Try to emulate lighting scenarios that would occur with real-world set-ups. Even if you prefer a stylistic look, ground the relight by using recognizable techniques (such as establishing a virtual key light, fill light, and so on).