
Chapter 8

Tackling a Complex VFX Shot
In this final chapter, we’ll tackle a single, long, visual effects composite. Frames from this project are featured on the cover of this book. Although we will use many of the techniques discussed in early chapters, it will give us an opportunity to try them with a more complex end result.
Creating the Cover Image
The image sequence of a giant lizard walking down a highway was created with After Effects through a single project. This project works through many of the visual effects compositing challenges discussed in the first seven chapters. These challenges include:
• Keying without green screen
• Stabilizing with motion tracking
• Working with mis-matched resolutions
• Changing the timing with time warping
• Color grading to match diverse pieces of footage
• Integrating 2D matte paintings
• Re-purposing footage as FX elements
We’ll work through this project one step at a time. We will stay with layer-based compositing. However, suggestions for taking a node-based approach are discussed at the end of the chapter.
Reviewing the Project Assets
The final project makes use of the plates described in Table 8.1. All of the plates use a frame rate of 24 fps. In addition, a static bitmap named News.psd and a matte painting named Destruction.png are imported.
Table 8.1
| Plate | Resolution | Challenging Aspect |
| Fire | 1280×720 | Camera is moving. |
| Fireworks | 640×480 | The resolution is very low and the video quality is poor. Camera is moving. Background contains many unwanted elements. |
| HelicopterA | 1920×1080 | Camera and helicopter are moving. Only the sky and clouds appear in the background. |
| HelicopterB | 1920×1080 | Camera and helicopter are moving. |
| Lizard | 1920×1080 | Camera and lizard are moving. The lizard has a complex silhouette, which makes rotoscoping difficult. The lizard and the ground are similar colors. The lizard is never fully in frame. |
| Overpass | 1280×720 | Camera is moving. |
The plates are illustrated by Figure 8.1 through Figure 8.5 on the next several pages. You can see the diverse quality of the footage. Note that the original pieces of footage associated with these plates were not intended for visual effects compositing. Nevertheless, they will offer a means to practice the various compositing techniques discussed in this book.
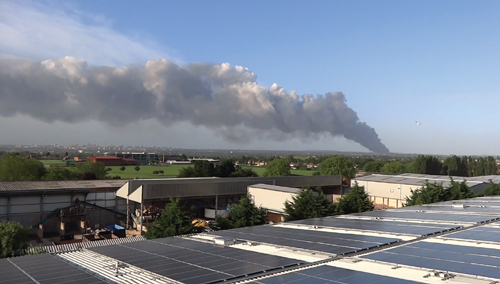
Figure 8.1 Frame from Fire plate. Image sequence adapted from “jayplas recycling plant fire in smethwick’ by h080 and is licensed under Creative Commons Attribution-ShareAlike 2.0 Generic (CC BY-SA 2.0).

Figure 8.2 Frame from Firework plate. Image sequence adapted from “EXCLUSIVE-SERIES OF EXPLOSIONS (VIDEO CLIP)” by KNOW MALTA by Peter Grima and is licensed under Creative Commons Attribution-ShareAlike 2.0 Generic (CC BY-SA 2.0).

Figure 8.3 Top: Frame from HelicopterA plate. Bottom: Frame from Helicopter B plate. Both image sequences adapted from “Wings Over Ga Airshow 10-19-2014 428” by Jeremy Simpson and is licensed under Creative Commons Attribution 2.0 Generic (CC BY 2.0).

Figure 8.4 Frame from Lizard plate. Image sequence adapted from “Paraguay Caiman Lizard (Dracaena paraguayensis) back on the road …” by Bernard DUPONT and is licensed under Creative Commons Attribution-ShareAlike 2.0 Generic (CC BY-SA 2.0).

Figure 8.5 Frame from Overpass plate. Image sequence adapted from “icy overpass” by Ed Schipul and is licensed under Creative Commons Attribution-ShareAlike 2.0 Generic (CC BY-SA 2.0).
Preparing the Background
The first step to this project is the preparation of the background, which will be a highway overpass. The goal of the project is to a create a science fiction themed shot where a giant lizard is creating havoc in a city and his passage is captured as a TV news broadcast.
Stabilizing the Plate
1. Create a new project in After Effects. Import the Overpass image sequence. Interpret the footage frame rate as 24 fps. Create a new composition that matches the resolution, frame rate, and duration of the footage. One trick is to LMB-drag the image sequence name from the Project panel to the Create A New Composition button at the bottom of the panel (this appears to the left of the Project Settings button, which is labeled 8 bpc by default). When using this button, the new composition is named after the footage, which helps keep the project organized.
2. Play back the footage. Note that the camera moves slightly and includes a left-right tilt. In order to integrate other visual effects elements into this shot, you can take one of two approaches: motion track the plate and pass the tracking data to other elements or motion track the plate to stabilize. It’s generally easier for the overall workflow if you stabilize the background first. (We’ll re-add a more aggressive camera move as one of the final steps.) With the sequence layer selected, choose Animation > Track Motion. Go to the Tracker panel. Change the Track Type menu to Stabilize. Select the Rotation checkbox. Selecting Rotation adds a second Track Point in the Layer view. In order to make the plate as stable and static as possible, we must try to remove the tilt through rotational tracking. When removing subtle rotation, it’s often best to place the track points at opposite sides of the frame. This helps to prevent jitter in the final tracking data. For example, interactively place Track Point 1 over the truck sign on the right and place Track Point 2 over the highway sign on the left (Figure 8.6). Place the track points over high-contrast features, such as the corners of a sign or sign letters. Analyze the footage. The resulting motion paths are tightly curled due to the subtle camera motion.

Figure 8.6 Track Point 1 and Track Point 2 are placed over two signs at opposite sides over the frame. Two track points are necessary to track rotational changes, such as left-right camera tilt. The resulting motion paths are the white blobs under the point windows.
3. After you are satisfied with the resulting motion paths, click the Apply button in the Tracker button. The layer’s Anchor Point is keyframed and the plate is stabilized. Play back. Black gaps appear at some of the edges. However, this will not be a problem due to re-framing in later steps. If the stabilization is successful, it will be difficult to detect that the original camera was moving or rotating. Feel free to revise the motion tracking using the tips and tricks discussed in Chapter 2.
Extending the Background
As mentioned, we’ll add a camera move as one of the final steps with this project. To give us greater flexibility, we can extend the resolution of the Overpass plate by borrowing the sky from a second plate. Follow these steps:
1. Create a new composition. Set the resolution to 1280×900. Set the frame rate to 24. Set the duration to 72. Change the composition name to Combine. We’ll use this composition to add the majority of the elements required for the shot. The vertical resolution of 900 allows for extra room when adding a new sky.
2. LMB-drag the Overpass composition into the Combine composition to form a nested layer. Position the layer so it appears at the bottom of the frame. Use a Position Y value of 550. LMB-drag the layer’s footage bar so that the last frame of the layer lines up with frame 71. The Overpass composition is significantly longer than the Combine composition, so you have flexibility determining what portion to use.
3. Import the Fire plate. Double-click the sequence name in the Project panel to view the footage in the Footage view. Play back using the view’s playback controls. The camera pans significantly, but the smoke from a distant fire barely changes. Hence, we can avoid stabilization by applying a freeze frame. Return to the Composition view. Add the Fire sequence as a new layer in the Combine composition. While on the first frame and with the new layer selected, choose Layer > Time > Freeze Frame. The first frame is repeated until the end of the timeline.
4. With the Fire layer selected, use the Pen tool to draw a closed mask that separates the sky from the city (Figure 8.7). Position the layer so that its horizon corresponds with the horizon of the Overpass layer. Increase the Mask Feather to 50. The result is an extended background.

Figure 8.7 The background is expanded by adding a masked copy of the Fire plate.
Adding the Helicopters
We’ll add two helicopters to the shot, with one in the foreground and one in the background. We will need to stabilize and key the plates.
Stabilizing the Plates
1. Import the HelicopterA and HelicopterB plates. Create two compositions that match each plate’s resolution, frame rate, and duration. Name the compositions after the plates. Add the respective plates to the new compositions.
2. Open the HelicopterA composition. Play back. Note that the camera and the helicopter are moving. In order to integrate the helicopter with the new background, we must remove the camera motion. Once again, we can motion track and apply stabilization. With the sequence layer selected, choose Animation > Track Motion. Go to the Tracker panel. Change the Track Type menu to Stabilize. Position and scale the Track Point 1 windows to surround a large feature within the clouds (you should not track anything on the helicopter itself). Analyze to create a motion path (Figure 8.8). A large pattern window is required in this situation because the clouds are soft and low-contrast.

Figure 8.8 Track Point 1 is scaled up and placed over a feature of the clouds.
3. After you’re satisfied with the resulting motion path, apply the tracking data. Play back. The helicopter moves but the background sky is fixed in place.
4. Open the HelicopterB composition. Play back. Both the helicopter and camera move. Apply motion tracking to stabilize the plate. This time, you can place the track point over the top of a tree. However, no single tree remains in frame for the entire timeline. To sidestep this problem, you can hop from one feature to the next using the Alt/Opt key while repositioning the track point. For example, go to the first frame, position Track Point 1 over a tree top on the left side of frame, and analyze forward. A few frames before the tree top disappears out of the frame on the right side, stop the analyzation. Alt/Opt+LMB-drag Track Point 1 to a new tree top on the left side of frame. Analyze forward to the end of the timeline. When you apply the motion tracking data, the Tracker takes into account the track point hop and creates a smooth stabilization.

Figure 8.9 Top: Track Point 1 placement on frame 1. Bottom: Track Point 1 placement on frame 55, after point is ‘hopped’ to a new feature
5. When the stabilization is applied, the helicopter leaves frame. This is due to the lengthy pan of the original camera. To avoid this, change the composition resolution to 5000×1000. The extra empty space in the frame will not be detrimental to the composition.
Keying the Helicopters
1. Return to the HelicopterA composition. With the layer selected, use the Rectangle mask tool to draw a closed mask that limits the amount of sky seen behind the helicopter. This will make the process of keying the sky easier. Animate the shape mask over time to follow the helicopter. Only a dozen keyframes are needed for the Mask Path property.
2. With the layer selected, choose Effect > Keying > Color Difference Key. Use the effect’s Key Color Eyedropper to select the sky color. Adjust the Matte In Black and Matte In White properties to improve the resulting alpha matte. The alpha matte is displayed in the top-right thumbnail in the Effect Controls tab. You can also switch the Show Channel menu in the Composition view to Alpha (Figure 8.10).

Figure 8.10 The alpha channel after the application of the Color Difference Key effect. The key area is limited by an animated, rectangular mask
3. Return to the HelicopterB composition. Apply steps 1 and 2 to remove the background (Figure 8.11). Feel free to fine tune the alpha matte by adjusting any of the remaining Color Difference Key properties.

Figure 8.11 HelicopterB after the application of masking and the Color Difference Key effect
Integrating the Plates
1. Return to the Combine composition. LMB-drag the HelicopterA and HelicopterB compositions into the Combine composition. Leave the new nested layers at the top of the layer outline. Change the name of the HelicopterA layer to HelicopterBG. Change the name of the HelicopterB layer to HelicopterFG. HelicopterB is longer than the Compose composition, so you can LMB-drag the footage bar left or right to choose what portion of the footage to use.
2. While on the first frame, adjust the position and size of HelicopterBG so it appears in the distance in the top-center of the frame (just above the horizon). Activate the Time icon for the Position and Scale properties. Go to the last frame. Update the position and size of the helicopter so it appears to be speeding towards the right side of frame (Figure 8.12). Although the helicopter already possesses motion, adding an overriding animation can increase the speed. Activate Motion Blur for the layer and the composition.

Figure 8.12 Left: HelicopterBG, as seen on frame 0. Right: Same helicopter, seen on frame 71. The motion path is visible as a straight line
3. At this stage, the helicopter color does not match the background. While the helicopter has high contrast with dark shadows, the background is hazy with low-contrast. Add a Hue/Saturation and a Curves effect to the HelicopterBG layer. Reduce the Master saturation to −75. Adjust the Curves effect curve so that the shadows are brighter and the highlights are darker. To do this, you can LMB-drag the left-bottom point upwards and the top-right point downwards. You can create the illusion of haze by reducing the layer’s Opacity to 90% (Figure 8.13).

Figure 8.13 Left: Helicopter before color grading. Right: Helicopter after color grading with Hue/Saturation and Curves effects
4. Repeat steps 2 and 3 with the HelicopterFG layer. You can leave the Opacity of the HelicopterFG layer set to 100%. Animate this layer so that the helicopter flies quickly through the foreground, close to the virtual camera (Figure 8.14). Activate motion blur for this layer.

Figure 8.14 HelicopterFG, as seen on frame 10. The Overpass layer is temporarily hidden
Adding the Lizard
We’ll add a giant lizard to the scene. The plate requires stabilization and keying.
Stabilizing the Plate
1. Import the Lizard plate. Create a composition that matches the plate’s resolution, frame rate, and duration. Name the composition after the plate. Add the plate to the new composition.
2. Open the Lizard composition. Play back. Both the lizard and the camera are moving. Once again, we will need to stabilize the plate with motion tracking. With this footage, you only need a single track point. You can place it over the small stone that appears at the bottom-left of the frame at frame 0 (Figure 8.15). Because the footage has a heavy red cast, the tracker may become confused whenever the camera suddenly moves, causing Track Point 1 to jump to the wrong feature. To improve the motion path, you may need to start and stop the analyzation, adjust the track point position or window sizes, and re-track. Experiment with tracking forward and backward to see how the results vary. Should the track point slip on a particular frame, you can manually move it to the correct position by LMB-dragging the track point in the Layer view. See Chapter 2 for more suggestions on how to improve motion tracking results.
3. After you’re satisfied with the resulting motion path, apply the tracking data. Play back. The lizard moves out of frame. To avoid this, change the composition’s resolution to 6000×3000.

Figure 8.15 Track Point 1 is placed on a small stone
Keying the Lizard
1. Due to the heavy red cast present in the footage, there is little color separation between the ground and the reptile. However, there is a fair amount of contrast. Thus, we can create a custom luma mask. Duplicate the stabilized lizard layer. Select the new, top layer. Add the following effects to the layer in the stated order: Curves, Hue/Saturation, Curves, Fast Blur, and Curves.
2. Adjust the Curves 1 effect to greatly increase the contrast. You can do this by LMB-dragging the top-right point towards the center and LMB-dragging the bottom-left point towards the center. The more narrow the left/right distance between the two points, the greater the contrast. Set the Master Saturation of the Hue/Saturation effect to −100. The result is illustrated by Figure 8.16.

Figure 8.16 Result of the Curves 1 and Hue/Saturation effects
3. Adjust the Curves 2 effect to maximize the contrast. Shape the curve in a fashion similar to Curves 1. Make the whites as white as possible and the blacks as black as possible. Set the Blurriness property of the Fast Blur effect to 10. This will cause the smaller, unwanted black spots to disappear. Adjust the Curves 3 effect to increase the contrast and re-sharpen the edges of the matte (Figure 8.17).

Figure 8.17 Result of additional Curves effects and a Fast Blur effect
4. Go to the lower layer and change its TrkMat menu to Luma Inverted Matte. This automatically hides the top layer. The lizard is cut out. However, unwanted parts of the ground, debris, stones, and foliage remain. We can convert the ground that touches the lizard’s body into a shadow at a later step. The debris that touches the body will blend into a matte painting we’ll also add at a later step. To remove other unwanted items, we can add a rough mask. With the lower layer selected, draw a closed mask that surrounds the body closely but does not touch it (Figure 8.18). Animate the mask changing shape over time. Increase the Mask Feather to 25. Adjust the Mask Expansion property if necessary to prevent the mask from eroding into the body.

Figure 8.18 Top: Mask on frame 0. Bottom: Mask on frame 71
Integrating the Lizard
1. Return to the Combine composition. LMB-drag the Lizard composition into the Combine composition and place the nested layer below the helicopter layers. Because the Lizard composition is longer than the Compose composition, you can select what portion of the Lizard footage to use by LMB-dragging the nested layer’s footage bat left or right. With the example project, the end of the footage bar is aligned with frame 71. Adjust the position and scale of the lizard so that it looks like the lizard is straddling the center of the raised highway (Figure 8.19). For example, set the Position to 715, 515. You can animate the Scale over time so that it appears as if the lizard is coming towards the camera. For example, set the Scale to 35% on frame 0 and 40% on frame 71.

Figure 8.19 Lizard positioned on frame 0
2. At this point, the lizard colors are significantly different from the background. Add a Color Balance, Hue/Saturation, and Curves effect to the Lizard layer. Adjust the Color Balance effect to reduce the red cast and make the lizard more blue-green. For example, set the Shadow Red Balance to −30 and Blue Highlight Balance to 30. Set the Master Saturation of the Hue/Saturation tool to −50 to reduce the remaining red. Adjust the Curves effect to reduce the highlights and brighten the shadows and midtones.
3. To remove some of the remaining debris that is close to the lizard body, you can erode the alpha matte. With the Lizard layer selected, choose Effect > Matte > Matte Choker. Set the effect’s Choke 1 property to 127. The edge is refined and small debris is removed.
4. Zoom in to the view. Note that the lizard is fairly sharp and in focus when compared to the background. Add a Fast Blur to the Lizard and set the Blurriness to 3 (Figure 8.20).
The lizard’s tail remains cut off as it never appeared in the original footage. We will disguise this limitation with the final framing.

Figure 8.20 Color-graded lizard
Restoring the Foreground
1. When you move to the end of the timeline, the lizard overlaps objects that should be in front. To correct this, you can mask an additional Overpass layer. Duplicate the current Overpass layer and change the name of the duplicate to Sign. Move Sign above the Lizard layer in the layer outline. With the new layer selected, draw one or more masks that separate foreground objects. For example, mask the highway sign and the sign pillar (Figure 8.21).

Figure 8.21 Two masks are drawn over an additional copy of the Overpass layer, restoring the highway sign
2. The highway sign support lattice presents a difficultly because it has so many small parts. As a workaround, we can treat it as a separate layer. Make one more duplicate of the Overpass layer. Change the name of the new layer to Lattice. Move the lattice layer so it is directly below the Sign layer. Add a mask to the Lattice layer that cuts out the lattice by itself (Figure 8.22). Add a Curves effect to the Lattice layer and bow up the center of the curve to brighten the midtones. Set the layer’s Blending Mode menu to Multiply. Play back. When the lizard moves behind the lattice, it’s still visible as only the dark areas of the lattice are placed back on top.

Figure 8.22 The lizard appears behind the sign lattice when the lattice is masked and set to use the Multiply blending mode
Adding Destruction
We can add destruction to the highway by integrating a matte painting and adjusting an explosion FX element.
Integrating a Matte Painting
1. As the lizard walks across the highway, there is no destruction. We can emulate breaking concrete by adding and rotoscoping a 2D matte painting. Import the Project-FilesArtDestruction.png bitmap. The bitmap is a frame from the Overpass image sequence that was taken into Photoshop and given a strip of damage along the highway. LMB-drag the bitmap and place it in the Combine composition. Rename the new layer Painting and move it directly below the Lizard layer. Change the Position of the new layer to 640, 550 so it lines up with the Overpass layer (Figure 8.23). Add a Fast Blur effect to the Painting layer and set the Blurriness to 1.0. Reduce the Painting layer’s Opacity to 90%.

Figure 8.23 A matte painting is placed below the lizard.
2. To make the destruction “grow” over time and follow the path of the lizard, we can rotoscope. Go to frame 71. With the Painting layer selected, draw a mask that represents the lizard’s path. Adjust the Mask Feather and Mask Expansion properties to fade the destruction into the highway. Go to frame 0. Draw a second, closed, subtractive mask that removes the destruction in front of the lizard. Animate this mask so that it stays in front of the lizard through the timeline (Figure 8.24).

Figure 8.24 Top to bottom: Frames 0, 25, and 71. The pink mask establishes the trail of destruction. The orange mask is subtractive and removes the destruction ahead of the lizard.
Adding an Explosion
1. Import the Fireworks plate. Create a composition that matches the plate’s resolution, frame rate, and duration. Name the composition after the plate. Place in the plate in the new composition.
2. Using motion tracking, stabilize the Fireworks composition. You can place the track point over a building window in the foreground.
3. After the Fireworks composition is stabilized, return to the Compose composition. Nest the Fireworks composition inside the Compose composition. Change the name of the nested layer to Explosion. Move the Explosion layer so that it sits directly below the Lattice layer. Note that the Explosion composition is longer than the Compose composition. In this situation, we can ignore the frames that come after frame 71. Set the Explosion layer’s Blending Mode menu to Screen. The bright parts of the fireworks appear over the background. To make the fireworks more visible, add a Curves effect to the layer. Adjust the effect to increase the contrast.
4. Scale and position to the Explosion layer to match the flames to the path of the lizard (Figure 8.25). For example, set the Scale to 300% and the Position to 207, 354.

Figure 8.25 An explosion is added by combining fireworks with the Screen blending mode.
5. The aggressive scale up reveals pixelation and stairstepping on the fireworks. Add a Fast Blur to the layer and set the Blurriness to 0.5. This reduces the artifacts. We can disguise the artifacts further by adding a custom glow. This will also brighten the area surrounding the explosion and thus replicate thrown light. Duplicate the Fireworks layer. Change the name of the duplicate layer to Fireglow. Increase the Blurriness value of the copied Fast Blur effect to 25. Increase the scale of the layer and adjust the position so that a glow appears around the explosion area (Figure 8.26).

Figure 8.26 A custom glow is added to the explosion.
6. The bright parts of th explosion spill into the lower-right frame. This also reveals bright parts of the foreground buildings in the original fireworks footage. This is undesirable. To cover this area, add a new mask to the Sign layer that encompasses everything from the right edge of the highway to the frame edge on the right and bottom.
Taking the Final Steps
We’re ready to make the final adjustments to the project. This includes freeze-framing some of the traffic, masking to control the lighting, creating an artificial camera move, and layering an on-screen graphic.
Stopping the Cars
1. The cars in the Overpass sequence slowly drive over the overpass bridge. This action does not match our intended goal, where a monster-like lizard is causing havoc to the city. As an alternative, we can freeze frame part of the frame to make it look like the cars are parked or abandoned. Duplicate the Overpass layer. Change the name of the copied layer to Static. Move the Static layer just below the Painting layer. Use Figure 8.32 as a reference for the final layer outline.
2. Go to frame 71. With the Static layer selected, choose Layer > Time > Freeze Frame. Frame 71 is repeated for the entire timeline. To prevent the entire frame from being frozen, draw a closed mask that surrounds the top-center section of the highway (Figure 8.27).

Figure 8.27 The traffic is brought to a stand-still with a freeze frame. The frozen area is limited by a mask.
Limiting the Reflection
1. Because the fireworks captured in the Fireworks footage explodes over water, there is a large reflection that appears at the bottom of the frame. When this is integrated in the Combine composition, this appears intensely over the highway surface. To reduce the intensity, we can add a paint fix patch over the top with partial opacity. Duplicate the Static layer. Change the name of the copied layer to ReduceRef. Move the ReduceRef layer above the Explosion layer but below the Lattice layer. Set the ReduceRef layer Opacity to 90%.
2. With the ReduceRef layer selected, draw a closed mask that isolates the two rightmost lanes on the highway. Set the Mask Feather to 25. The presence of the mask reduces the intensity of the reflection (Figure 8.28). (The reflection is heaviest at the end of the timeline.) Optionally, draw several additional masks that represent shadow areas where the reflection is completely blocked by nearby cars. (These areas appear more opaque due to overlapping masks.) Raise the Mask Feather of the additional masks.

Figure 8.28 A mask (red) reduces the intensity of the explosion reflection. Two additional masks (blue and green) create shadow areas near cars.
Adding a Camera Move and TV Graphic
1. Create a new composition. Set the resolution to 1280×720, frame rate to 24, and duration to 72. Set the composition name to Final. LMB-drag the Combine composition from the Project panel to the Final composition and nest it. Change the Scale of the nested layer to175%. In general, such a large Scale value will degrade the quality of the final product. However, the added camera movement, motion blur, and additional degradation will hide this shortcoming. Ultimately, our goal is to make the shot appear like a news broadcast.
2. Animate the layer’s Position property to create the illusion that the camera is panning and tilting to follow the action. You can make the camera erratic, as if the camera operator is in a panic. Animating the layer gives you an opportunity to avoid seeing the end of the lizard’s tail, which is cut off. Optionally, animate the Scale and Rotation properties. Activate motion blur for the layer. The entire nested layer receives the blur.
3. Feel free to fine tune the resulting animation curves in the Graph Editor (Figure 8.29). You can see the curves by clicking the Include This Property button beside the Position property name and clicking the large Graph Editor button at the top of the layer outline. By default, the X and Y curves are joined together. However, you can split them apart by RMB-clicking over the Position property name and choosing Separate Dimensions. You can LMB-drag keyframe boxes in the Graph Editor. You can delete selected keyframes by pressing the Delete key. You can select multiple keyframes by LMB-dragging a selection marquee around them. When multiple keyframes are selected, a transform box is shown. You can drag the box edges to scale the keyframe cluster. With the editor, the left/right direction is time and the up/down direction is property value. To frame the curves so they fit in the editor, click the Fit All Graphs To View button at the bottom of the editor. To insert a new keyframe, Ctrl/Cmd+LMB-click while the mouse hovers over a curve segment. To reveal tangent handles, RMB-click over a selected keyframe and choose Keyframe Interpolation from the menu. In the Keyframe Interpolation window, change the Temporal Interpolation menu to one of the Bezier styles. You can LMB-drag tangent handle ends in the editor.

8.29 Final X Position (red) and Y Position (green) animation curves, as seen in the Graph Editor. The X and Y curves are separated with the Separate Dimensions option.
4. Play back to test your animation. When you are satisfied, select the layer and choose Effect > Blur & Sharpen > Channel Blur. Change the effect’s Blue Blurriness to 15. This blurs the blue channel and adds a soft degradation. This emulates a low-quality video camera or a low-quality television set. This also helps to disguise some of the limitations of the low-resolution plates.
5. Import the Project-FilesArtNews.psd bitmap. This features TV news program graphic with transparency. When you import a Photoshop PSD file, a footage interpretation window opens. Select the Merged Layers option and click the OK button. (This option combines all Photoshop layers as a single After Effects layer.) Add the bitmap to the top of the layer outline. Add a Channel Blur to this layer. Set Red Blurriness to 5 and Blue Blurriness to15. Play back. The project is complete! Figures 8.30 and 8.31 illustrate five frames from the final composite.

8.30 Top: Frame 0 from the final composite. Bottom: Frame 13.

8.31 Top: Frame 0 from the final composite. Bottom: Frame 13.
Figure 8.32 illustrates the final layer outline for the Combine composite. Figure 8.32 illustrates the workflow. The project is included with the tutorial files as Project-FilesaeFilesChapter8FinalProject.aep.

8.32 Final layer outline for Combine composition.

Figure 8.33 Compositions, layers, and effects used in After Effects. Compositions are shown as colored boxes. Layers are numbered and written in bold type. Effects are listed beside each layer. The arrows indicate nesting.
Additional Improvements
There is always an opportunity to fine-tune and improve a composite. With this project, there are a few additional steps that can be taken:
• Add particle simulations to replicate dust kicked up by the lizard.
• Add particle simulations or additional FX elements that represent solid pieces of debris expelled by the explosion.
• Add particle simulations to replicate gun fire from the helicopters.
• Add additional FX elements that represent structure fires in the distance that show the path the giant lizard has traveled.
• Upgrade the Fireworks plate with a higher-quality piece of stock footage. Alternatively, layer additional FX elements to make the explosion more complex.
• Fine-tune the rotoscoping on the lizard to more carefully remove the ground around the body.
• Add additional matte paintings or stock footage to add stopped and wrecked cars and/or people fleeing the scene.
• Update the matte painting to change any signs that appear within the footage, alter surrounding buildings, or otherwise improve the aesthetic quality of the location to fit the storyline.
• Animate the TV graphic with scrolling font. Although the graphic was created in Photoshop, you can replicate it in After Effects with Solid layers and the Text tool. Text is animatable.
• Nest multiple iterations of the Combine composition into the Final composition. Convert each iteration into a 3D layer. With rotoscoping, break the 3D layers into different zones, such as foreground, middle ground, and background. Arrange the 3D layers in 3D space. Animate a 3D camera in 3D space to give the scene a sense of perspective shift and parallax change.
A Node-Based Workflow
The steps taken with the final project in After Effects can be taken in Fusion. The challenge with Fusion is the large number of tools required. The After Effects composite uses more than two dozen effects. Although a few effects are repeated and thus can be represented by a single tool, most would require a unique tool in the tool network. Nevertheless, for every After Effects effect, there is an equivalent tool.
The exact application of each necessary step may be slightly different in Fusion, but the basic approach is the same. When working in Fusion, start by prepping the individual plates. For example, prepare the Overpass plate, then prepare the Helicopter plates, then prepare the Lizard plate, and so on. This is equivalent to working with each plate in its own composition and applying stabilization, keying, and masking. Initially, there can be multiple, unconnected networks in Fusion. After the plates are prepared, you can combine these unconnected networks through a series of cascading Merge tools.
Book Wrap-Up
You made it to the end! Thank you for reading this book. Visual effects compositing is always a complex and fun challenge. No two compositors will find the same solutions for any given task. Hence, it pays to think creatively and try new approaches. I firmly believe that any visual effects shot, no matter what the source material may look like, can be made to work. You can key every green screen, motion track every moving shot, and integrate every FX element. It becomes difficult when there is a short deadline. With practice, however, you begin to build up your own workflows, shortcuts, and tricks. In fact, I fully expect every reader of this book to come up with superior solutions for a few of the tutorials. That’s the beauty of visual effects compositing—it’s rarely ever dull!
I’d also like to thank all those people who’ve purchased, read, and hauled around my books. If I’m counting correctly, this is my ninth book in as many years. I will never claim perfection, but I do strive to make the books as useful as possible. Thank you once again!