
| 9 | File Storage, Shared Preferences, and SQLite |
Chapter Objectives
In this chapter you will:
Learn about data storage methods.
Understand use of Shared Preferences.
Learn how to insert data using key-value pairs.
Understand File-based Storage.
Understand the differences between internal storage and external storage.
Learn how to build applications using SQLite databases.
■ 9.1 Storing Data
Working with stored data is essential to Android applications. At the most rudimentary level, an application often stores information about a user’s preferences in order to provide a more sophisicated level of personalization and responsiveness. For example, a user can log into and out of an application, and the application will remember the user when the application is relaunched. In addition, users expect to be able to choose settings according to their personal needs (such as specific background sounds and images) and have them automatically persist across user sessions.
Advanced Android applications are frequently data-driven and can require the management of a larger and more complex volume of data. An application can use databases and files to store structured data or information that will be made available to other applications.
Android supports multiple options for storing and accessing data. Choosing the manner in which data are stored depends upon the specific needs of the application, such as the amount of data to be stored and whether the data will be kept private within the application or made accessible to other applications.
The Android platform allows data files to be saved on the device’s internal memory and on an external storage media, such as a Secure Device (SD) card. Files that are saved within the device’s internal storage memory tend to be small, as opposed to external storage, which typically holds larger volume files, such as images.
Internal storage is used most often to store persistent data that can be retrieved when the user accesses the application again. The Android SDK provides SharedPreferences for the most primitive type of data storage, specifically user preferences, to enhance the user’s application experience. A SharedPreferences file is stored internally and managed by the framework. By default, all data stored in internal storage are private to applications, whereas files stored in external storage can be made accessible to other applications.
A network connection or server-side storage is another data storage option on which Android applications can rely. Rather than maintaining information directly on the device, such as SharedPreference, File-Based storage, and SQLite, some applications need to send and access information through the Web and persist it on a server.
This chapter explores storage and access options for Android. This includes SharedPreferences, File-based Storage, the SQLite database, and accessing content from a data provider.
■ 9.2 Shared Preferences
The term Shared Preferences refers to the storage of a limited set of primitive data used to make persistent changes in an Android application. More specifically, it is a simple way to read and write key-value pairs of data. SharedPreference files are primarily used to store a user’s personal settings and a small amount of application session data.
SharedPreference information is backed up in XML files in internal storage. These data are proprietary and inaccessible to outside applications. Data values can quickly be retrieved each time the application is launched or when an Activity is resumed after being paused.
SharedPreference data supports an intuitive and responsive experience for a user by allowing preference data values to persist automatically throughout sessions, regardless of how they end. This includes the exit of an application, a shutdown of the device, or—in a worst-case scenario—a system crash.
When a user decides to uninstall an application that relies on SharedPreference storage, this data will no longer persist. All SharedPreference information associated with the application will automatically be removed when the application is deleted.
A key-value pair is a data representation model that uses a set of key identifiers along with associated data values. This model is frequently used in hash tables and configuration files. This simple mechanism provides access to a data value or object by specifying its associated key. The SharedPreferences API provides a set of methods for reading and writing key-value pairs to files. This data can be made available at the Activity level or shared across all Activities within the application package. Shared Preferences supports the String data type and most of the Java primitive data types, such as int, float, long, and boolean.
The following code example illustrates how data values can be written to a SharedPreferences file:
Lines 1–3: |
To access a new or existing shared preferences file, the method |
The object named preferences is established as the SharedPreferences interface for accessing and modifying preference data for MyPreferences. |
|
Line 5: |
To write shared preference values to file, an |
Lines 6–10: |
The methods |
Line 12: |
The call to |

In the following code example, values are retrieved from the SharedPreferences object, preferences. If the preference value does not exist for the specified key, a default value is returned. The default value is identified by the second argument.

The editor object can mark a preference key-value pair for removal within the SharedPreferences file. Once the key is used to identify which key-value pair is marked for removal, commit() is called to perform the final changes.

All key-value data sets within the shared preferences file can be easily cleared using the clear() method. Once commit() is called, the only remaining preferences will be any key-value pairs that were not defined in the editor object.
![]()
■ 9.3 File Storage—Internal and External Storage
In Android, a File-based Storage option allows data to be written to an actual file structure. This storage method requires more control regarding read-and-write permissions. For example, do you want to allow read-and-write access solely within the context of your application? Or, do you want other applications to be able to read these files as well?
Internal storage allows data to be stored directly onto the device’s memory. This storage is always available, assuming there is space. External storage may not always be obtainable on a device. For example, some devices have removable external storage, such as an SD card, but others do not. This means that if an application attempts to use external storage, it must not assume it exists and should always take the precaution of checking for availability. Android devices are often designed to provide both internal storage and external storage built directly into the device. When external storage is supplied by nonremoveable means, it is technically regarded as internal to the device. It cannot be classified as internal storage, however, because it remains external to the operating system.
There are significant differences in how external and internal storage are utilized in an application. Internal storage files can be configured to be readable and writeable by the application. Typically, internal storage is utilized when processing an image, video and audio elements, and large data files. By default, files saved to internal storage are private to the application. When the user uninstalls the application, the associated internal storage data files are removed.
External storage is publicly shared storage, which means that it can be made available to external applications. For example, a photography application can access photos from the Android photo gallery, allow the user to edit them, and resave them to the gallery, which is outside the context of the application. Unlike internal storage, once an application is uninstalled, external storage files continue to exist.
In the following code example, a FileOutputStream object is used to write data to a file. FileOutputStream is an extension of the OutputStream class, which writes bytes to a file.
Lines 2–3: |
The |
Line 6: |
Once data content has been written to the file, the stream is closed by calling |

Reading from an existing file is performed using a FileInputStream, as shown in the code example below. FileInputStream is an input stream that reads bytes from a file. It is not buffered and therefore it is advisable that callers wrap the stream with a BufferedInputStream.


The external storage directory on a device is media/shared storage, intended to hold a relatively large amount of data that are shared across applications. Prior to using external storage, the permission WRITE_EXTERNAL_STORAGE must be set within the AndroidManifest.xml file. For Android versions KitKat and greater, read access requires the READ_EXTERNAL_STORAGE permission for applications that do not have preexisting write permission granted.
The mechanism for reading and writing to a file is the same for external storage and internal storage. However, external storage can be present on a device in various configurations. For example, external storage might be a permanent fixture on the device, or it can be available as a removeable disk. The method isExternalStorageRemovable () can be used to check if the storage device can be removed.
Before data are written to or read from external storage, it is important to check whether the storage is available. The method getExternalStorageDirectory() will return the primary external storage directory for the device; however, this directory may not currently be accessible if it has been physically removed from the device or damaged. The method getExternalStorageState() can be called to determine the current state of the external storage for the device, or more specifically to check if the storage is available to read and write. Both of these methods can be used to notify the user with more information when an application needs access.
The following code example illustrates how the availability of external storage on a device can be tested prior to reading and writing content:
Lines 5–6: |
|
Lines 8–13: |
|
Lines 14–20: |
|
Lines 21–25: |
There is no indication that external storage exists for either read or write access. |


■ 9.4 Android Database with SQLite
Many Android applications require the storage of complex data structured as a relational database. For example, a bird-watching application may allow users to keep track of details and the specific locations of birds they have viewed. To store intricately structured data, a database is essential.
SQLite provides the foundation for managing private and embedded databases in an Android application. The Android SDK includes the SQLite software library that implements the SQL (Structured Query Language) database engine. This library is used for defining the database structure and adding and managing the database content as required by the application. The Android SDK also includes an SQLite database tool for explicit database debugging purposes.
As a condensed version of SQL, SQLite supports the standard SQL syntax and database transactions. Although SQLite is not a full-featured database, it supports a large set of the SQL standard and is sufficient for Android developers needing a simple database engine to plug into their applications. The advantage of using SQLite for Android development is its compact code footprint and efficient use of memory, even for large projects with complex data structures. It is meant for serious applications; however, it is not suitable for large databases or applications that produce a large volume of transactions.
SQLite is a complete relational database engine, which means that an Android application can access content using high-level queries. In this environment, a database is implemented as a largely self-contained file. For example, a database file stores all the contents of the database and contains indices, triggers, and any metadata needed by SQLite. It requires minimal support from external libraries or from the Android operating system. The implementation of a database file will be accessible by name to any class in the application, but not outside the application.
SQLite differs from conventional database systems in that it does not require a server. This means that data can be easily read from and written to a file without requiring server interprocess communication. No additional programs or components are required for SQLite to run. SQLite is imported into an application as a library, android. database.sqlite.SQLiteDatabase. All database operations are handled by the application using methods provided by the SQLite library.
An SQLite database file is a collection of data organized in a table. The SQLite database table is structured by a set of rows and columns. A row represents a single record, the implicitly structured data entry in the table. A column represents a data field, an attribute of a data record. A field is a single item that exists at the intersection between one row and one column.
The possible data types for an individual field of data consist of NULL, INTEGER, REAL, TEXT, and BLOB. BLOB is a data type used to store a large array of binary data (bytes). SQLite does not provide specific data storage classes for values that need to be represented as Boolean, date, or time. Instead, these values can be stored as an INTEGER or TEXT. For example, a Boolean value can be stored as an INTEGER data type with 0 for false and 1 for true. Dates and times have a more complicated format and can therefore be stored as TEXT values. A string arrangement can be configured, such as “YYYY-MM-DD HH:MM:SS.SSS,” to represent a specific time/date format.
Consider the construction of a database table required to store information about individual students. Defining a database table structure means specifying field names, assigning data types, and applying various constraints on fields. The students’ table will be defined to hold the following fields: _id, name, gender, year_born, and gpa. The id field represents the primary key for the table. SQLite will produce an error when an attempt is made to insert a table row with an id value that already exists. The formal declaration of how the database is organized is called the schema.
Table 9-1 shows an outline for the students’ database table schema as follows. An AUTOINCREMENT key will be used to create a value for the id field automatically when a new row is inserted without a specific id value. The UNIQUE key attribute can be used to prohibit duplicate values from being inserted into a given table column. The ‘NOT NULL’ key will prohibit empty values from being inserted into a table column.
TABLE 9-1 Students’ Database Table Schema
Table: students |
||
Column Names |
Data Type |
Key |
|
|
PRIMARY KEY AUTOINCREMENT |
|
|
UNIQUE NOT NULL |
|
|
|
|
|
NOT NULL |
|
|
|
SQLite statements are divided into two categories: data definition language (DDL) and data manipulation language (DML). DDL statements are used to build and modify the structure of a database table. DML is used to query and update data. The following DDL statement is used to create the students’ database table. CREATE is used to create the table and define its structure, which includes field names, assigned data types, and key constraints.

The SQLite INSERT INTO statement is used to add new rows of data into a table in the database. The code example below illustrates two methods used for INSERT. The set of statements will create seven records in the students’ database table.
Lines 1–6: |
When values for all columns within a record will be added, it is not necessary to specify the column identifier names. The INSERT statements shown within these lines will supply column values in sequence. |
Lines 9–10: |
When inserting a row containing values for a select set of columns, the VALUES keyword is required in an INSERT statement. The INSERT statement shown in this example will omit the _id column. The _id column is defined as INTEGER PRIMARY KEY. Such columns are auto-incremented in SQLite. |

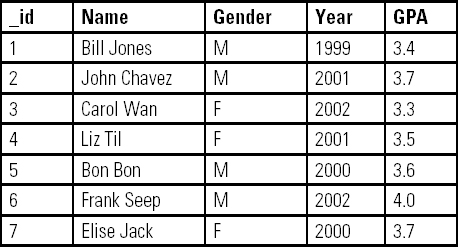
The SELECT statement is used to query data from a database table. In the following code example, the SELECT statement uses the asterisk symbol in its syntax to include all column table values in the table.
![]()
The results of the above statement will select all the records in the table, as shown by the following record listing.
A limited set of column values can be accessed in a SELECT statement. In the SELECT statement shown below, the column values stored in name and gender will be fetched.
![]()
The results of the above statement will be the following record listing:
Name |
Gender |
Bill Jones |
M |
John Chavez |
M |
Carol Wan |
F |
Liz Til |
F |
Bon Bon |
M |
Frank Seep |
M |
Elise Jack |
F |
A WHERE clause can be added to a SELECT statement to restrict records being fetched. In the SELECT statement shown below, only records that meet the criteria specified by gender = ‘F’will be selected.
![]()
The results of the above statement will be the following record listing:
Name |
Gender |
Carol Wan |
F |
Liz Til |
F |
Elise Jack |
F |
The DELETE statement is used to delete data from a table. The SQLite instruction shown below uses the WHERE clause with DELETE to eliminate the row containing the value 1 for _id.
![]()
The UPDATE statement is used to modify data within a table record. The SQLite instruction shown below uses the SET keyword to specify the column value to be altered and the WHERE keyword to identify the specific record to be changed.
![]()
■ 9.5 SQLiteOpenHelper
The Android SDK provides a set of classes for working with SQLite databases. One important class is SQLiteOpenHelper, which is essential for the creation and management of database content, as well as database versioning.
In an Android SQLite application, SQLiteOpenHelper must be subclassed. In addition, it must contain the implementation of onCreate() and onUpgrade(). The objective of onCreate() is to assume the responsibility for creating the database and opening it, or just opening it if it already exists. The purpose of onUpgrade() is to perform an upgrade of the database if necessary.
The onCreate() method is called when the database is created for the first time. The code segment below illustrates the construction of a database table named myTable. On Lines 2–9, the schema for myTable is built with seven attributes, including the unique identifier, KEY_ID. Each of the column names is stored as a string. For example, KEY_ID is used to hold the string “_id.” The underscore in _id is a common convention for a primary key and will be used in this text.
On Line 11, the execSQL() method is used to execute a direct SQL statement. This SQL statement is stored as a text string, instruction, which was assembled on Lines 2–9.
It is considered good practice to create each database table in a separate class within the onCreate() and onUpdate() methods.

SQLiteOpenHelper uses the methods getReadableDatabase() and getWriteableDatabase() to provide access to an SQLiteDatabase object. The database object will allow access in read or write mode.
There are several methods for inserting data into a table. A common method is to construct the content of a table record using a ContentValues object. The following code segment illustrates how a table record can be written to a database in writeable mode. A ContentValues object named values is first instantiated. Initially, it will consist of no content. Key-value pairs can be added to the ContentValues object using the put() method. Once all table column values have been added, the ContentValues object, which represents a record, can be inserted into the database. Line 16 shows the complete set of values added to the table using an insert() method. The close() method releases the reference to the table object in writeable mode and closes the object.


A second approach to inserting a record into a database table is to construct an SQLite INSERT statement and then execute it. In the code example below, the INSERT statement is stored in the string named insertStm. This statement is constructed on Lines 5–18. The execSQL() method will execute the string that stores the SQL statement.
When inserting a row into a database table, developers often prefer the use of ContentValues. The main reason is that it returns a −1 when an error has occurred. The execSQL() method is a void method and unable to provide feedback.

Database queries can be created using the rawQuery() or query() method. As shown in the following example, rawQuery() executes an SQL instruction and returns a result set produced by the query. This instruction is assembled as a string value.
The code shown on Lines 3–4 is used to illustrate how a Cursor object can provide read-write access to the result set of records returned by the query. The Cursor object is first positioned at the first record in the result set and then sequentially moves to subsequent records.

The query() method, shown in the code below, will query a given table and return a Cursor object over the result set. Filtering, ordering, and limits can be set directly from the arguments. Note that the second argument of the query() method is used to supply a list of the columns that will be returned in the result set.

The application built in this lab example is a database experiment that will evolve into a full application in Lab Example 9-2. The application, ToDo Today, is inspired by to-do lists and allows users to build and manage a list of tasks that need to be completed. In this version of ToDo Today, users can create a short-term task list: tasks that can be completed in a single day. For example, the user can build a task list in the morning and check off tasks as they are successfully completed by the end of the day. On the following day, the previous day’s tasks are cleared away and a new set of tasks is placed on the list. Figure 9-1 shows such a list.

This lab example is a first look at the use of SQLite for storing, managing, and accessing data in an application. ToDo Today requires structured data that will be embedded into the application. The objective of this lab example is to build a database and explore SQLite’s transactional statements.
Part 1: The Design
An SQLite database is stored as a single file. This file will contain a database table consisting of columns that form the schema of the table, as well as rows that store the data values. The name of the database file will be toDo_Today.
The toDo_Today database will contain a single table, toDo_Items, for storing each task item entered by the user.
The schema for the database table will use the INTEGER and TEXT data types. The primary key, the unique identifier for each task item in the database table, will be stored as an INTEGER and will be specified by the identifier _id.
A ToDo task description is stored in the column named description. Once a user has specified that a task has been completed, this action will be denoted by a value in the table column named is_done. The column labeled is_done is meant to store a Boolean value, true or false. SQLite does not have a separate Boolean storage class. Instead, Boolean values must be stored as integers 0 (false) and 1 (true).
The complete database schema for the ToDo Today application is shown as follows:
Database: toDo_Today Table: toDo_Items |
||
Column Names |
Data Type |
Key |
|
|
Primary Key |
|
|
|
|
|
|
Part 2: Application Structure and Setup
The settings for the application are as follows:
Application Name: |
ToDo Today |
Project Name: |
ToDoToday |
Package Name: |
|
Android Form: |
Phone and Tablet |
Minimum SDK: |
API 18: Android 4.3 (Jelly Bean) |
Target SDK: |
API 21: Android 5.0 (Lollipop) |
Compile with: |
API 21: Android 5.0 (Lollipop) |
Activity Name: |
|
Layout Name: |
|
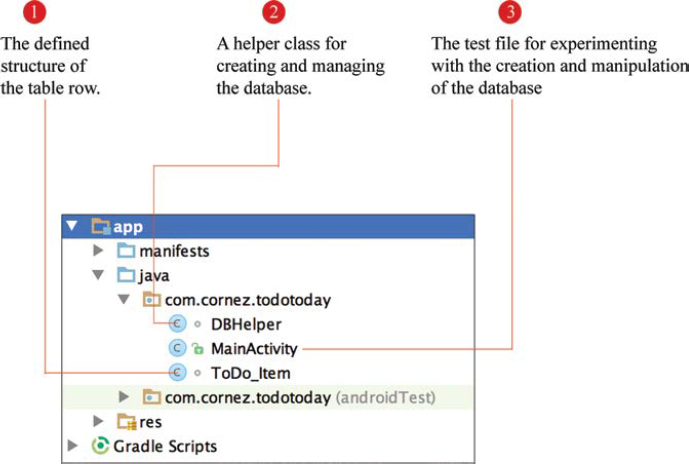
The project structure for the application is shown in Figure 9-2. This structure contains three Java source files. The activity for the class is MainActivity. The ToDo_Item class models a single ToDo item placed on the list. DBHelper will provide the database management support. As an experimental application, this project will not use an XML layout.
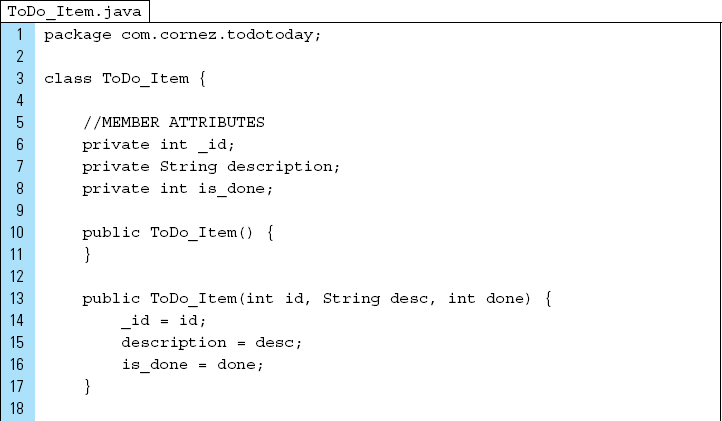
Part 3: The ToDo_Item class
The ToDo_Item class provides the data attributes for each task on the list. These include the description of the task and the completion status: is_done. The Java code for ToDo_Item is shown as follows:

Part 4: The DBHelper Class
By default, SQLite on Android does not have a management interface. DBHelper.java will be written to build and manage the toDo_Today database. This Java class will provide methods for handling all database operations: create, read, update, and delete.
Line 6: |
|
Line 7: |
|
Line 11: |
|
Line 14: |
The first version number of the database must begin at 1. The version number will be used to upgrade the database if the schema has been updated. |
Lines 31–38: |
|
Lines 41–46: |
Alterations to a database are performed by |


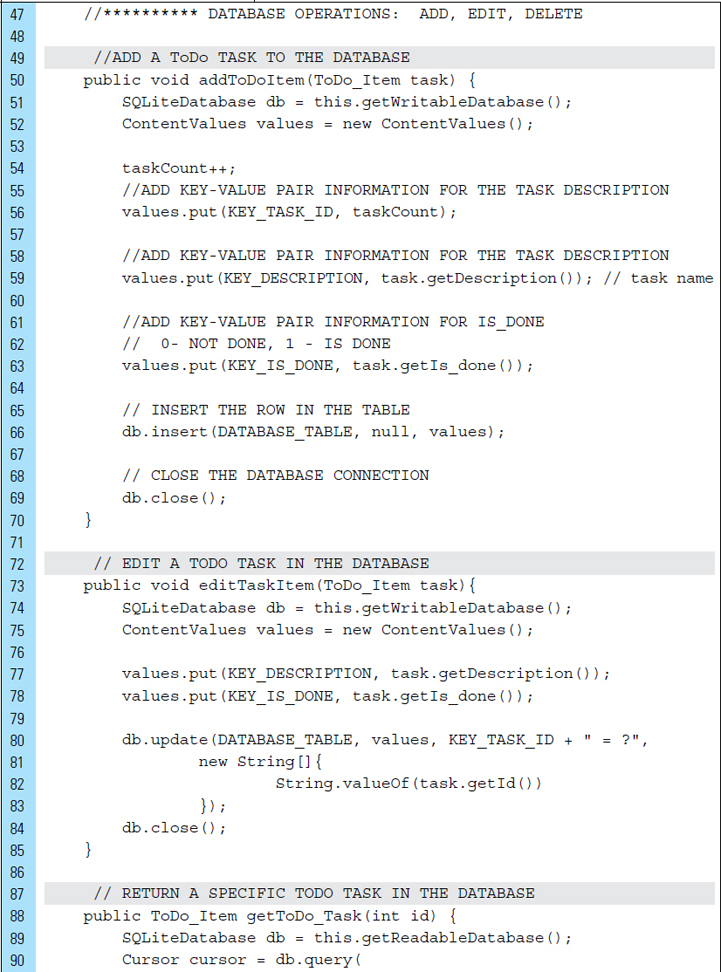
SQLiteDatabase provides methods for accessing database content. Database operations, such as adding new data elements and deleting data records, can be performed using these access methods.
Line 51: |
The database is opened for writing. Once opened, the database is cached. |
Line 52: |
An empty set of content values is created. Key-value pairs will be added to this |
Lines 54–63: |
The ToDo task information is added to the |
Line 66: |
A data row is inserted into the database table. The |
The |
|
Line 69: |
Once the writing activity has concluded, the method |
Lines 80–83: |
During an |
Lines 90–95: |
A |
Lines 101–105: |
The |
Lines 129–142: |
A |


Part 5: MainActivity Class
MyActivity is the controller for the application, as well as the test file that performs the database experiments. These experiments will consist of the following:
Experiment 1: |
Create the database structure. Add the following five ToDo task items to the database and display the records in the LogCat window. |

Experiment 2: |
Modify the first record of the database. Replace “Read Hamlet” with “Read newspaper.” |
Experiment 3: |
Display the second record of the database in the LogCat window. |
Experiment 4: |
Delete the “Buy a dog” record from the database. Display all the records in the LogCat window. |
The Java code for MyActivity is shown as follows:


The output produced by a test run of the application is shown in Figure 9-3.

■ 9.6 Adapters and AdapterViews
An Adapter object is a mechanism that binds a data source, such as a database, to an AdapterView. An AdapterView is a container widget that is populated by a data source, determined by an Adapter. Common AdapterViews are ListViews, GridViews, and Spinners.
Figure 9-4 illustrates the process of populating an AdapterView with items from a data source. The data source in this example is a database containing cities in California. The individual items from the data source are converted into a View and then added to and displayed inside the AdapterView. The AdapterView in this example is a ListView.
In this manner, the Adapter object behaves as an intermediary between the data source and the AdapterView layout. The Adapter retrieves the data from the data source and dynamically adds it to the AdapterView.
A ListView is often at the heart of data-driven applications. A ListView is an AdapterView that provides a simple approach for an application to display a scrolling list of records. These records can be displayed with a default format, using a built-in style, or customized extensively.

As an AdapterView, a ListView object requires an Adapter to provide it with data. A ListView consists of a collection of sequential items. As shown in Figure 9-5, each item is a visual representation of a data record in a list. Each record item is placed into an independent View. The View elements on the left are shown as default views defined by a resource file. The items on the right are designed with a simplified custom layout.
When a ListView is populated with many records, a fast-scrolling feature can be enabled and customized to help the user better navigate the list of data. For example, when scrolling through long lists, an index can be displayed indicating the location currently being viewed within the layout.
Consider the example shown in Figure 9-6. An AdapterView is populated with data collected from a data source. The AdapterView in this example is a ListView. The data source is a String array holding the names of dessert items. An ArrayAdapter is the object mechanism that performs the task of filling the ListView with a View object for each dessert item. In addition, the dessert View objects are made clickable to display general facts, such as name and index value, in a Toast popup.


The following Java code shows the creation of the Adapter and the setOnItemClickListener() assignment to each of the dessert items in the list.
Task 1: |
A |
Task 2: |
The data source is an array, |
Task 3: |
An |
It should be noted that there are two types of Adapters: |
|
A layout resource will be used to instantiate the |
|
Task 4: |
The adapter is assigned to the |
Task 5: |
Click listeners are applied to each of the items stored in the |


This lab example presents the complete ToDo Today application. As with the previous version of the application from Lab Example 9-1, the SQLite datatabase table toDo_Items will be used, along with the DBHelper class for creating and managing the data content. The main features added to this version of the application will be the user interface and the mechanism for listing the interactive items on the screen. The objective of this lab example is to explore the link between SQLite data files, Adapters, and AdapterViews.
Part 1: The Design
The user interface for the application, TODO Today II, will allow the user to add ToDo items to a scrollable list of items one at a time. An ADD ToDo ITEM button will display the entered item at the bottom of the list seen on the screen. In addition, this item will be added as a row to the database table.
Figure 9-7 shows the application after five ToDo items have been added to the database. Each ToDo item is displayed alongside a checkbox. Users will use the checkbox to indicate whether a task has been completed. A second button, CLEAR ALL ToDoS, will allow the user to clear all stored records in the database. Because the list on the screen is linked directly to the database table, its scrollable content will be deleted.

Part 2: Application Structure and Setup
The settings for the application are as follows:
Application Name: |
ToDo Today II |
Project Name: |
ToDoTodayII |
Package Name: |
|
Android Form: |
Phone and Tablet |
Minimum SDK: |
API 18: Android 4.3 (Jelly Bean) |
Target SDK: |
API 21: Android 5.0 (Lollipop) |
Compile with: |
API 21: Android 5.0 (Lollipop) |
Activity Name: |
|
Layout Name: |
|
The structure for the final application is shown in Figure 9-8. In addition to the ToDo_Item class, the DBHelper class, and the MainActivity, a layout file characterizing a single View of the ToDo item will be required. The layout file named todo_item.xml will be used to embody this View. As an interactive list item, it will provide the checkbox UI component.

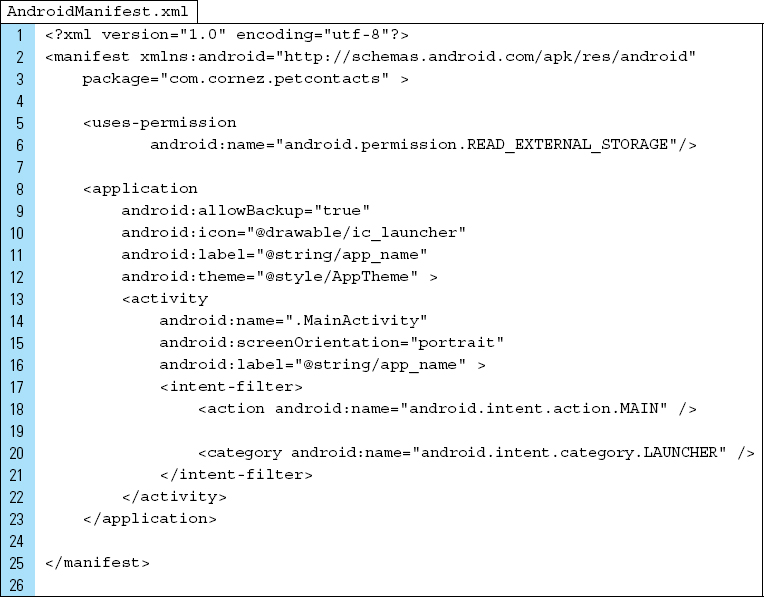
A portrait orientation of the screen is specified in AndroidManifest.xml. The single activity of the application is specified on Lines 10 through 20. The complete XML for AndroidManifest.xml is shown as follows:


Part 3: The User Interface
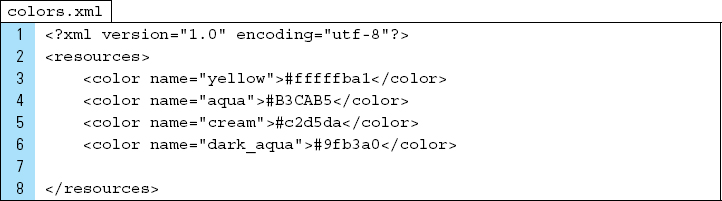
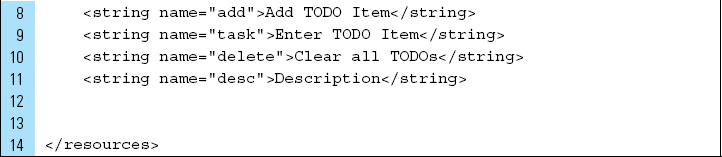
The ToDo Today II application uses values from the strings.xml file to store static button labels used by the layout associated with MainActivity. Color resources are defined to visually partition the screen and make the application easier to navigate. The XML code for these two files is shown as follows:

The user interface for the application is activity_main.xml. This layout file places UI objects relative to each other on the screen within a RelativeLayout root element. Within this root element are two main containers: RelativeLayout and ListView. The hierarchical layout structure is shown in Figure 9-9.
The controls for the application are placed in the RelativeLayout, named relativeLayout1. This consists of an EditText for ToDo item entries and buttons for adding and removing items.
The second container in the user interface is a ListView, named listView1. This component is the AdapterView that will be linked to the database table.

The two buttons, located in the relativeLayout1 container, are assigned onClick event handlers. The complete XML code for activity_main.xml is shown as follows:


Part 4: A Single Table Record Layout: todo_item.xml
ToDo items are added to the scrollable ListView by inflating a View. This View will be defined by the layout todo_item.xml. This View will be displayed as the item in the list.
To simplify the construction of this layout, a simple CheckBox widget will be used for both the text element of the ToDo item and the checkbox. The layout structure for todo_item.xml is shown in Figure 9-10.
The complete XML code for todo_item.xml is shown as follows. The CheckBox identifier, chkStatus, will be used to update the database automatically when an onClick() event occurs on the checkbox.


Part 5: Revised Version of DBHelper.java
The DBHelper class will perform similarly to the class designed for the first version of the application. The database table will be contructed using the following schema. In this schema, the _id column will be typeset as INTEGER PRIMARY KEY AUTOINCREMENT.
Database table: toDo_Items |
|
Column Names |
Data Type |
|
|
|
|
|
|
The database operation for adding an individual record to the database table will remain relatively the same as the previous version.
Lines 77–101: |
The method |
The two new methods added to the class are |
|
Lines 103–109: |
The method |
Line 107: |
The database is made available for writing. |
Line 108: |
The |
Lines 112–122: |
The |


Part 6: The Activity for the Application
MainActivity serves as the controller of the application. It will regulate the flow of data between the elements in the layout and the data content stored in the database, and it will respond to user actions.
A custom Adapter class, MyAdapter, will be used to populate the user interface screen layout with data from the database. MyAdapter is written as an extension of the ArrayAdapter.
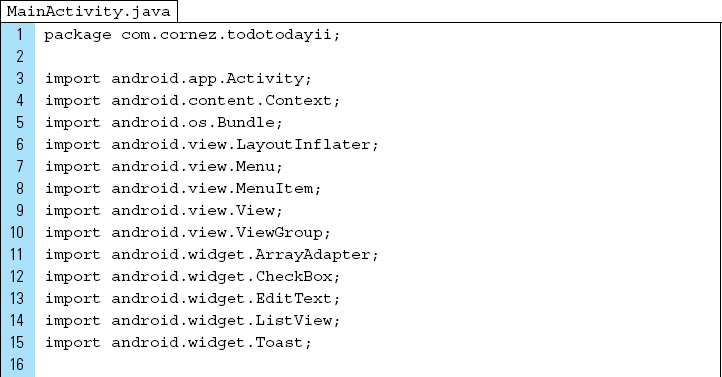
The Java code for MainActivity is shown below:
Lines 28–39: |
The |
The final task performed by |
|
Lines 41–48: |
The |
Lines 50–70: |
The |
The call to |
|
Lines 72–76: |
The CLEAR button, located on the layout, will trigger the |
Lines 78–87: |
The |
Lines 89–136: |
The |
When an |


■ Lab Example 9-3: Pet Contacts
Applications that store and manage contact information can help organizations, businesses, and the general user to work with customers, members, and other people. The Pet Contacts application, as shown in Figure 9-11, is a simplified look at how to incorporate database elements, along with data collected from externally stored files.
Part 1: The Design
Pet Contacts is designed as a veterinarian tool to record patient data. Along with information about the pet’s name, health condition, and owner’s phone number, an image can be added to the contact sheet. More specifically, a photo of the pet will be retrieved from the Camera/Gallery and added to the database.
The SQLite database will be designed as follows:
DATABASE NAME: DATABASE TABLE: |
petManager contact |
Table Column Names |
Data Type |
_id |
INTEGER PRIMARY KEY AUTOINCREMENT |
name |
TEXT |
details |
TEXT |
phone |
TEXT |
photo |
TEXT |

Part 2: Application Structure and Setup
The settings for the application are as follows:
Application Name: |
Pet Contacts |
Project Name: |
PetContacts |
Package Name: |
|
Android Form: |
Phone and Tablet |
Minimum SDK: |
API 18: Android 4.3 (Jelly Bean) |
Target SDK: |
API 21: Android 5.0 (Lollipop) |
Compile with: |
API 21: Android 5.0 (Lollipop) |
Activity Name: |
|
Layout Name: |
|
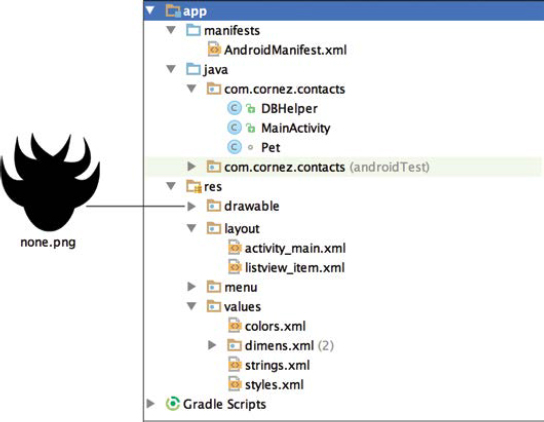
The launcher is set to the Android default ic_launcher.png file. The project structure, shown in Figure 9-12, contains three Java source files and two layout files. Pet objects are modeled by the Pet class. As pet contacts are displayed on the screen, they are visually constructed using the layout named listview_item.xml.
MainActivity is the controller of the application, and its associated user interface layout is activity_main.xml. As with previous lab examples, DBHelper is responsible for database management.
The none.png file is used as a default image when a photo is not found.
Applications that declare WRITE_EXTERNAL_STORAGE permission are implicitly granted READ_EXTERNAL_STORAGE permission. The Pet Contacts application will not require or request write permission. Because read permission is not implied using WRITE, the <uses-permission> for READ_EXTERNAL_STORAGE is specified.
The manifest file identifies MainActivity as the sole activity for the application. No other activities are started by this activity or will be used by the application. The orientation for the main activity is set to portrait. The complete XML code for AndroidManifest.xml is shown as follows:
Part 3: The User Interface
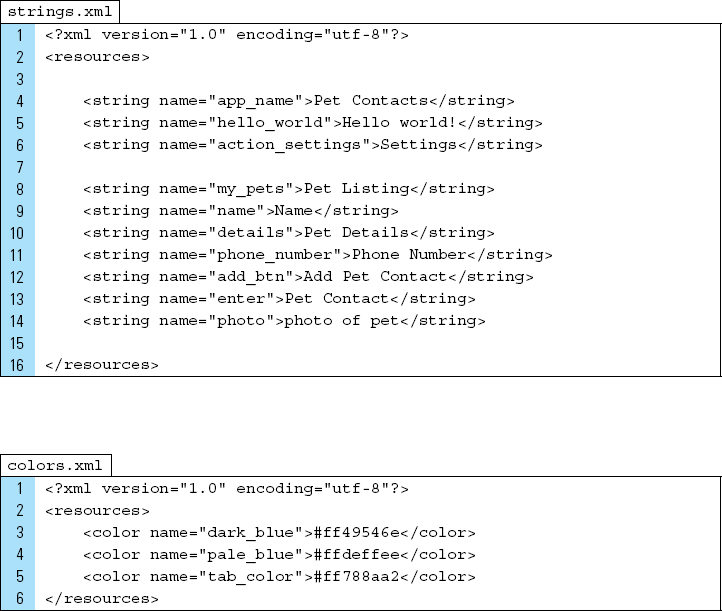
The Pet Contacts application uses values from the strings.xml file to store titles and button labels used by the layout associated with MainActivity. The XML code for strings.xml and colors.xml is shown as follows:
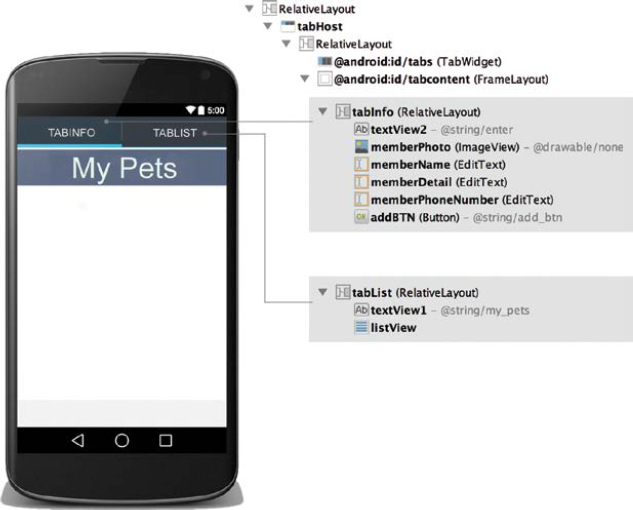
The user interface for the application is designed in the activity_main.xml layout. This layout file uses a RelativeLayout root element and relies on one of two possible displays identified by a TabHost. A TabHost is a container for a tabbed window View. This object holds two children: a set of tab labels that the user clicks to select a specific tab, and a FrameLayout object that displays the contents of that page.
As shown in Figure 9-13, the tab labels appear at the top of the screen. When the application is executing, the first label reads “ADD PET INFORMATION.” When this tab is activated, the FrameLayout object displays the content from the Relative-Layout container named tabInfo. The content consists of a set of widgets for the user to enter pet information, such as a pet name, phone number of the owner, and a photo.
When the tab for VIEW ALL PETS is activated, the FrameLayout object displays content from the RelativeLayout container named tabList. The content for this tab component is a ListView that displays a scrollable list of all available pet contact information.
![]() FIGURE 9-13 The User Interface structure for
FIGURE 9-13 The User Interface structure for Pet Contacts application. The complete XML code for activity_main.xml is shown as follows:
The complete XML code for activity_main.xml is shown as follows:


Part 4: The listview_item Layout
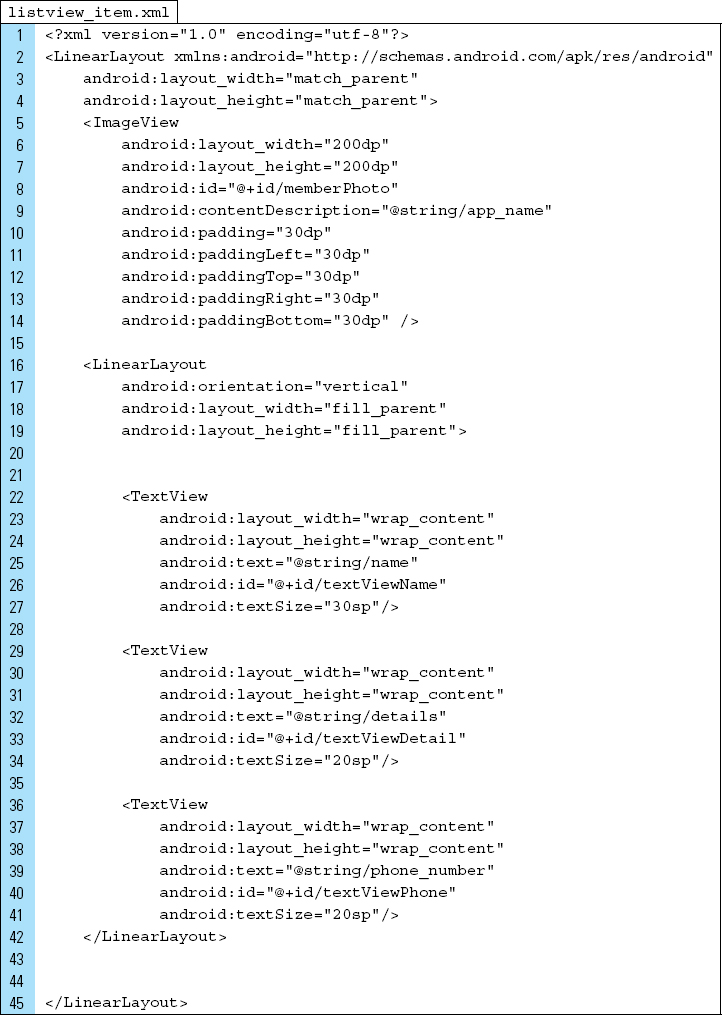
Each pet contact record is added to the scrollable ListView by inflating a listView_item.xml for each record added to the list of contacts.

The construction of this layout is shown in Figure 9-14. The LinearLayout root element simplifies the structure, which contains an ImageView and a nested LinearLayout. This design allows the photo of a pet to appear on the left side of the record and the name, details, and phone number for the pet’s owner to appear on the right.
The XML code for listview_item.xml is as follows:
Part 5: The Pet Data Model
The Pet class is used to model a pet object. This class corresponds with the columns in the SQLite database table. The photo for the pet is stored as a uniform resource identifier, URI.

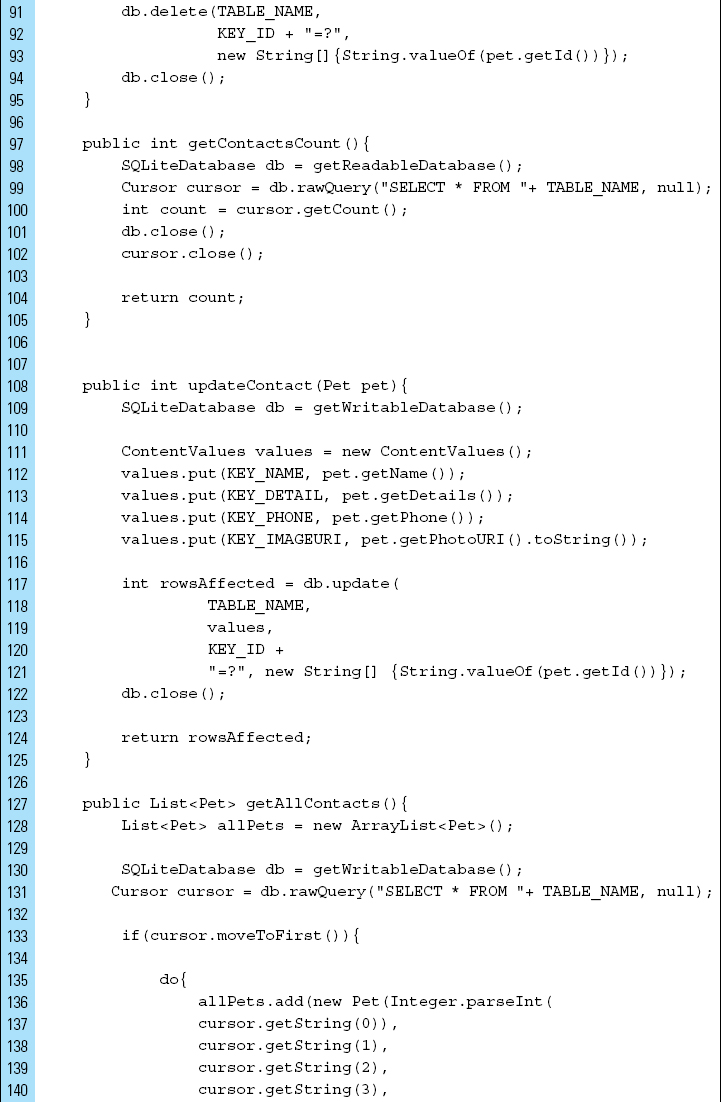
Part 6: The DBHelper for the Application
The database table will be contructed using the schema identified in Part 1 of this lab example. In this schema, the _id column will be typeset as INTEGER PRIMARY KEY AUTOINCREMENT. The Java code for DBHelper is shown as follows:


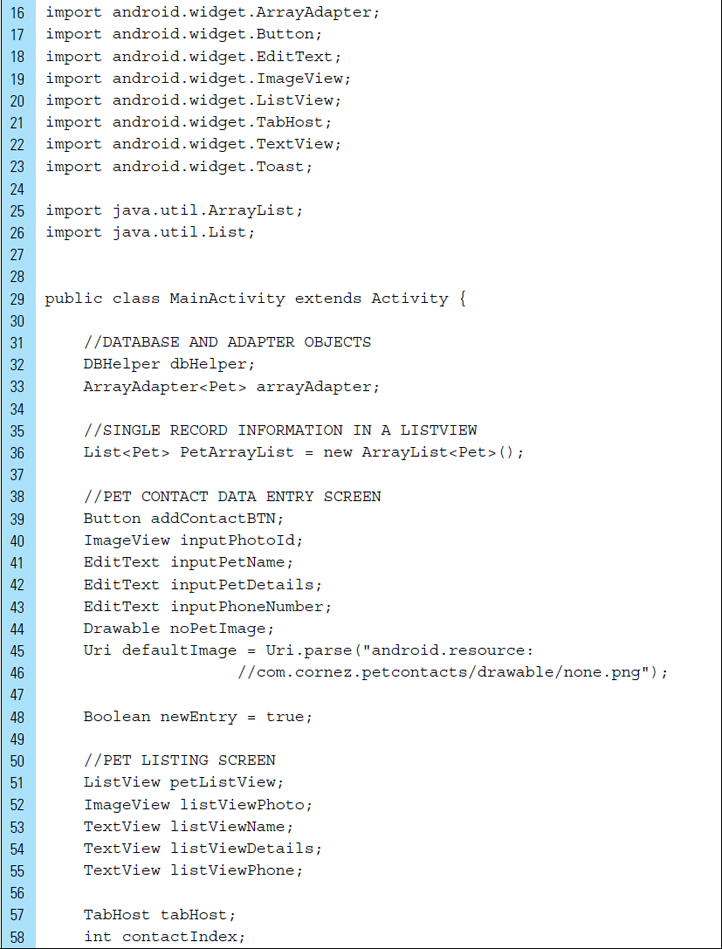
Part 7: The Application Controller–MainActivity
MainActivity serves as the controller of the application. It allows the user to choose one of two tab activities: (1) add a new pet contact to the database, or (2) list all the pet contacts in the database.
An ArrayAdapter will be used to populate the list of contacts displayed when the VIEW ALL PETS tab is active.
The Java code for MainActivity is shown as follows:
Lines 45–46: |
A default image will be assigned to pet contacts that do not have a photograph. The none.png drawable is located by its path: android.resource://com.cornez.petcontacts/drawable/none.png |
Line 57: |
A |

The onCreate() callback method will perform the initialization for the application. This includes instantiating a DBHelper object to establish the database schema, inflating the activity’s user interface layout, referencing widgets in the UI, and installing the action tabs.
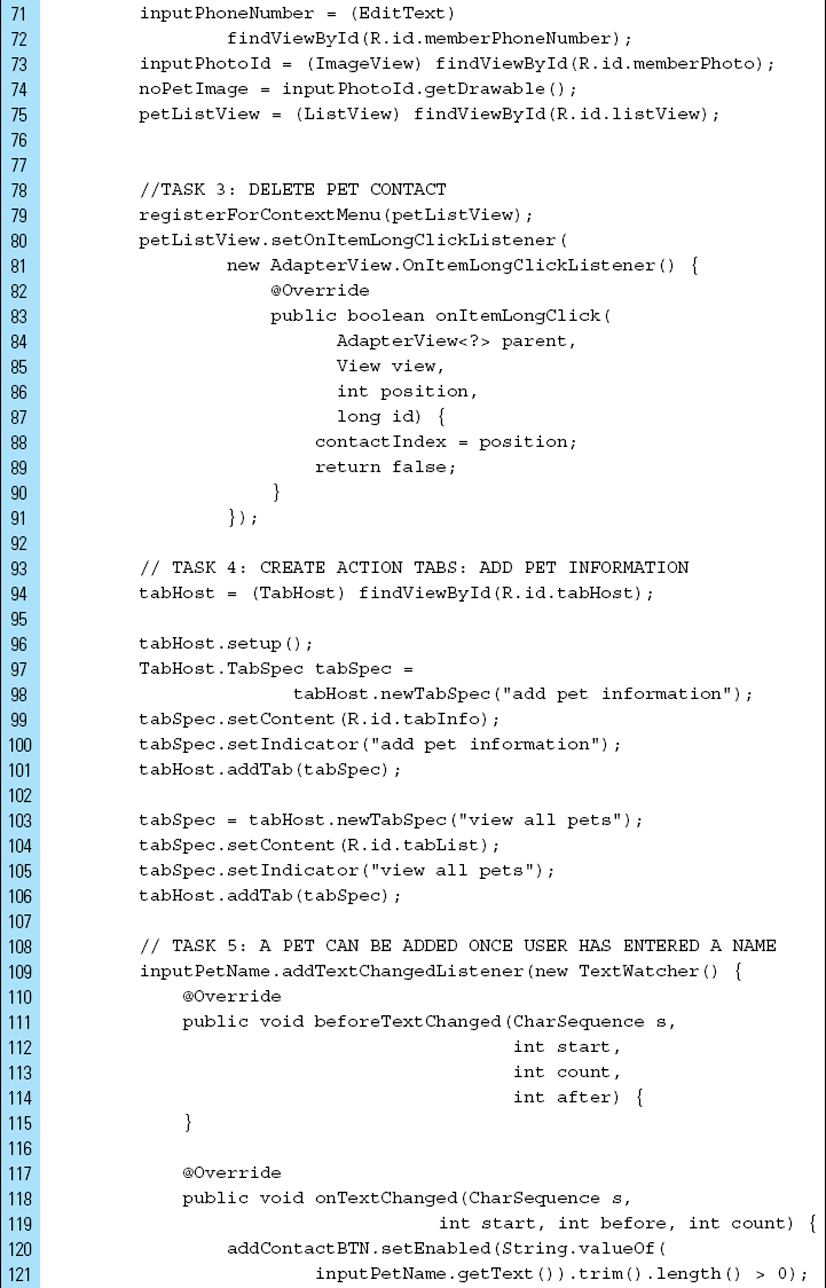
Lines 68–74: |
The widgets for the tab container to ADD PET INFORMATION are referenced. |
Lines 75: |
The widget for the tab container to VIEW ALL PETS is referenced. This widget is a ListView that will display the records stored in the database. |
Lines 79–91: |
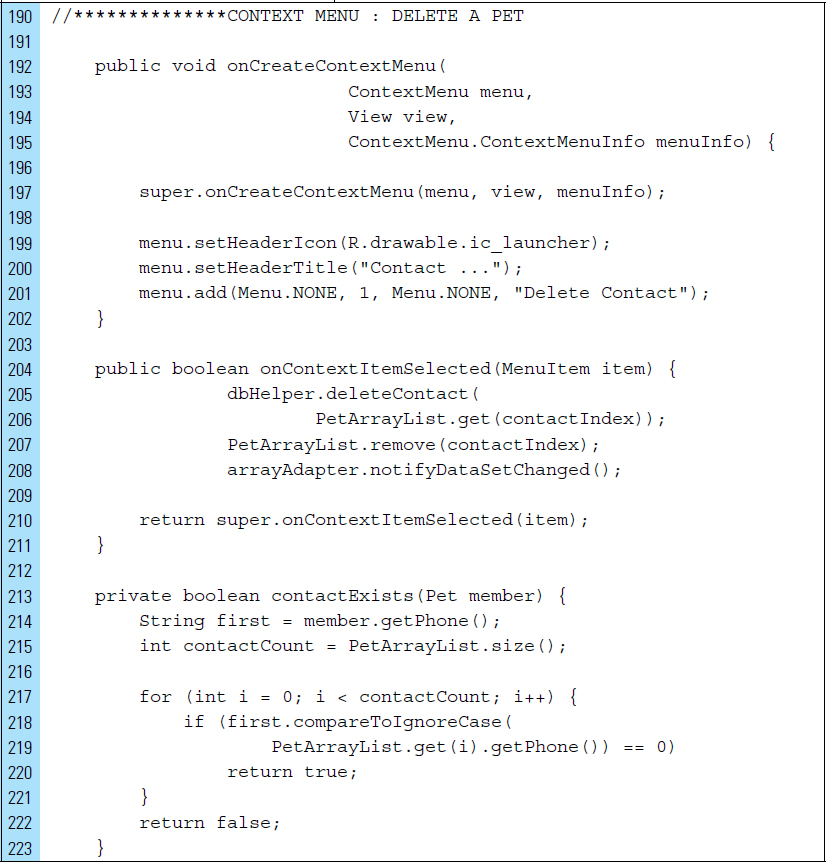
A simple approach to allowing the user to delete a contact is to register a context menu for the items in a |
The method call |
|
The specific pet contact is identified by an index position, shown on Line 88. |
|
Lines 94–96: |
The |
Lines 97–101: |
The action tab for ADD PET INFORMATION is initialized. Each tag is assigned the information as follows: |
1. Tab indicator: Specified by its initial label. 2. Tab content: Specified by the id of the View. 3. Tab tag spec: A tag name. For example, “information” is the tag name used for the ADD PET INFORMATION tag. |
|
Lines 103–106: |
The action tab for VIEW ALL PETS is initialized. |


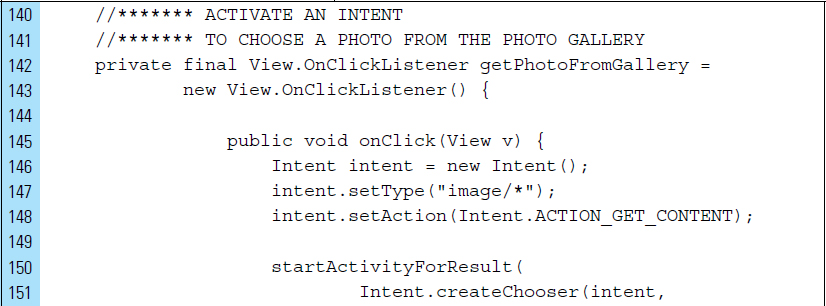
Lines 142–154: |
An |
Note: The |
|
Lines 157–189: |
An |

Lines 192–202: |
|
Lines 204–211: |
|
The index of the record to be deleted is identified and the row is removed from the database table. The |
Lines 238–241: |
|
Lines 243–275: |
The |
The constructor parameters consist of the current context, the layout resource ID for a pet contact item, and the ListView. The pet contact item layout will be used when instantiating layout views containing contact data. |


■ Exercises
Briefly describe three scenarios for data storage suitable for SharedPreferences.
Briefly describe what can happen when information entered by a user is not persisted.
Briefly describe the characteristics of the following storage options.
SharedPreferences
File-based Storage
SQLite
What type of data storage would you choose for saving your favorite recipes?
SharedPreferences
File-based Storage
SQLite
True or False. Files saved into external storage can be configured for deletion or long-term storage on a device when the application is removed.
True or False. An SD card is always available as external storage on an Android device.
True or False. Data saved to internal storage will be available after an application is uninstalled from a device.
True or False. Internal storage is always available, assuming there is space.
True or False. By default, files saved to internal storage cannot be viewed by other applications.
Which of the following primitive data types is not supported by SharedPreferences?
Int
Double
Float
Boolean
Which of the following data types is not supported by SQLite?
TEXT
REAL
BLOB
DATE
Which SQLite data type can be used to store a date or time value?
INTEGER
REAL
TEXT
All of the above
When an image data is stored in SQLite, what value type will typically be used?
REAL
BLOB
DATE
True or False. SharedPreferences support many collections of key-value pairs.
Which of the following is not an operation in SQLite?
LOCATE
SELECT
UPDATE