
| 7 | Touch Gestures |
Chapter Objectives
In this chapter you will:
Learn to code the detection of and response to touch gestures.
Find patterns of common touches to create touch gestures that can be interpreted by an Android device.
Learn about MotionEvents.
Understand the differences between touch events and motion events.
Learn how to build applications using multitouch gestures.
■ 7.1 Touchscreens
As users of Android devices, we often take touch input for granted. We double tap, fling our fingers across screens, pinch images, and perform other touch gestures that were not widely available as characteristics of screen interfaces prior to January 2007. The naturalness and variety of touch-based hand gestures play an integral role in application interfaces.
Touchscreens are an essential feature of Android devices. On a typical Android device, the high-resolution touchscreen is often the most expensive element on the device. Even though touchscreen technology has been around since the 1960s, it was not an assumed interface component until the mobile device market triggered its explosive growth. Today, Android application interfaces depend on interactions with touch-screens. Understanding touchscreen implementation is crucial to Android application development.
Not all touchscreens are created equal. Many different touch technologies are available to design engineers. Some touchscreens rely on infrared light, some use sound waves, and some use force sensors. All of these technologies have their advantages and disadvantages, ranging from size, accuracy, reliability, durability, number of touches sensed, and cost. Only two of these technologies, however, dominate the market in mobile devices: capacitive touchscreens and resistive touchscreens.
Most Android devices are equipped with a capacitive touchscreen, which relies on the electrical properties of the human body to detect when and where the user is touching the display. Capacitive technology provides numerous design opportunities for Android developers because interactivity can be detected with the slightest touch of a finger. An Android touchscreen is usually made of one insulating layer, such as glass, which is coated by a transparent conductive material on the inside. Since the human body is conductive, electricity can pass through it, and the Android touchscreen can use this conductivity as input. When a user touches a capacitive touchscreen, a change in the screen’s electrical field occurs on the screen surrounding the fingertip. This change is registered, and the location of the touch can be computed. Because capacitive touchscreens rely on the electrical change caused by a light touch of a finger, users cannot wear gloves or tap with their fingernails. Fingernails and gloves are not conductive, and the touch does not cause any change in the electrostatic field.
This chapter describes how to write applications that allow users to interact via touch gestures. Unlike traditional desktop applications, mobile devices tend to be small, which is an essential reason for their ubiquity. People use them anywhere and everywhere, which means that application developers must pay sufficient attention to the user experience to ensure that interactivity is easy and intuitive. In an exploration of basic interactivity in Chapter 2, we examined the use of buttons and other user interface components, such as radio buttons, checkboxes, and text input. Interaction with all of these components involved the use of a touchscreen and listener events.
■ 7.2 Touch Gestures
The Android API has large support for gestures, as they are the primary way in which users interact with most Android devices. Touch gestures represent a fundamental form of communication with an Android device. A touch gesture is an action, typically a movement of a user’s finger on a touchscreen, recognized by the device to perform a specified function. For example, to interact with items on the touchscreen, users use touch gestures, such as tapping a button. The functions associated with a touch gesture are customizable and can be tailored to meet the specific needs of an application.
As human interfaces become more intelligent and intuitive, more and more gestures are used to control device applications. A touch gesture in Android can involve one or more fingers on the touchscreen. A multitouch gesture refers to a touchscreen’s ability to recognize the presence of two-finger contact points. This plural-point awareness is often used to implement more advanced functionality, such as a pinch open for zooming in on a display object on the screen.
Gestures for touchscreen interactivity are inherently intuitive because they mirror known user actions. Using a touchscreen, the user can interact directly with an application through simple gestures that involve one or more fingers. A touch gesture involves input through the placement and motions of fingers on the touch-sensitive screen. By echoing a natural action, touch gestures provide for a richer user experience; ultimately, gestures or touch interactions translate into easier-to use-applications.
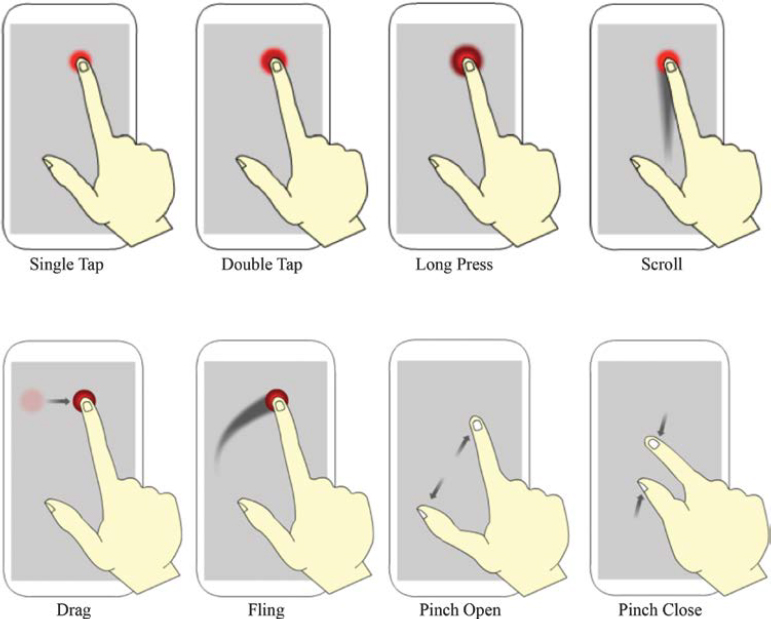
Gesture listeners, which cater to the most generic gesture inputs, have been part of the Android API since its creation. The common touch gestures for Android devices, shown in Figure 7-1, are single tap, double tap, long press, scroll, drag, fling, pinch open, and pinch close. The first six are single-touch gestures and the last two are multitouch.
A single tapping gesture is similar to the clicking of a mouse; we think of it as the activity that activates the given functionality of an icon or menu selection. This gesture is often referred to simply as “touch.” The double-tap gesture is commonly known as a secondary gesture for text selection. It is also used to provide a zooming action that is typically associated with magnifying content on the screen.
For applications that require editing and data entry, a long press is useful for indicating data selection. For example, when the user places a finger on a word and performs a long press, the word is highlighted. In this way, a long press gesture allows users to select one or more items on the screen.
A dragging touch gesture is typically associated with the act of dropping. A drag-and-drop is a combined gesture that allows users to rearrange data within a view. Users can drag data from one container and release, or drop, the item into another container.
A quick fling of a finger across the surface of a touchscreen is called flinging; on iPhone devices, this is referred to as swiping. Flinging is often used for scrolling overflowing content or navigating between views in the same hierarchy. This gesture is also used in games where direction and velocity can be applied to an object that is set in motion.
The difference between a scroll and a fling gesture is that the user lifts a finger at the end of the gesture in order to make it a fling. In addition, a fling movement tends to be more rapid. For Android developers, these two events are similar and difficult to tell apart. From the user’s perspective, using both gestures in a single user interface can be confusing because they are so similar. For example, it is very difficult to keep the ordinary scroll behavior and still detect the fling.
Pinch open is the gesture most commonly known for zooming into the content displayed on the screen. Hence, its counterpart, pinch close, is frequently associated with zooming out of the content.
■ 7.3 The Basics of Touch Events
Android provides a variety of classes and APIs to help create and recognize simple and complex patterns of single and multiple touches. These touch patterns can be turned into input for applications. Although application developers may not always depend on touch gestures for basic behaviors (because the gestures may not be available to users in all contexts), adding touch-based interaction to an application can unlock extra functionality and interaction possibilities.
All Android touch gestures begin when the user first places a finger on the touchscreen. Every touch gesture that occurs on a touchscreen triggers an onTouch-Event(). The specific details of each touch event, such as the location of the finger or fingers, the amount of pressure applied by the touch, and the size of the finger, are provided as identification of the gesture. The position of the finger, or multiple fingers if it is a multitouch gesture, is tracked until the finger is removed from the screen. Each individual finger in a gesture is referred to as a pointer.
The MotionEvent class, discussed more thoroughly in Section 7-5, provides a collection of methods to report on the properties of a given touch gesture. Motion events describe movements in terms of an action code and a set of axis values. Each action code specifies a state change produced by a touch occurrence, such as a pointer going up or down. The axis values describe the position and movement properties.
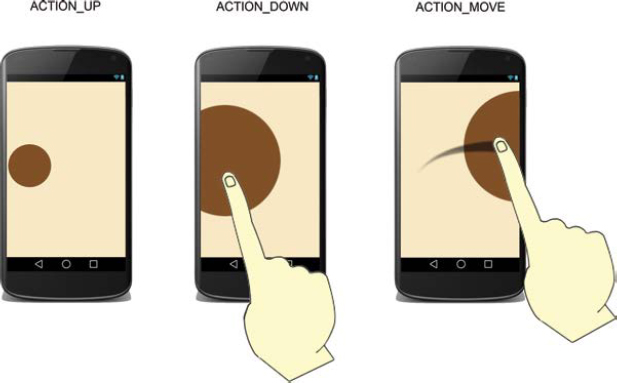
For example, when the user taps the screen, the system delivers a touch event to the appropriate view with the action code ACTION_DOWN and a set of axis values that include the x and y coordinates of the touch and information about the pressure, size, and orientation of the contact area.
To understand gestures and how they work, we must be familiar with three basic MotionEvents, which can be combined to create touch gestures. These basic motion events are identified by the following action codes:
ACTION_DOWN
ACTION_MOVE
ACTION_UP
A MotionEvent object can be used to provide the details of all events involving finger movement. For example, when the first touch on a View occurs, the MotionEvent object contains an action type of ACTION_DOWN and the x, y coordinates of the touch. When the finger is lifted from the screen, an ACTION_UP event is generated. ACTION_MOVE events represent any motion of the touch between the ACTION_DOWN and ACTION_UP events. A specific View object located on the screen can also intercept these actions. A touch gesture can be associated with a View object through the registration of an onTouchListener event and the implementation of a corresponding onTouch() callback method. The callback method receives both a reference to the View object on which the touch gesture was triggered and an object of type MotionEvent.
■ 7.4 Gesture Detector
Android provides several approaches to touchscreen event handling. The easiest approach is to use the GestureDetector class for detecting specific touch gestures. This approach uses the OnGestureListener to signal when a gesture occurs and then pass the triggered motion event to the GestureDetector’s onTouchEvent() method. The onTouchEvent() method then analyzes this new event, along with previous events, to determine exactly which action patterns are occurring on the screen. The ease with which a gesture pattern can be accurately classified makes this method very practical. For example, when detecting a fling gesture, a specific pattern of touch events is signaled: a down touch, followed by one or more scroll touches, before ending with a fling. The scroll events produced by a fling gesture can provide information about the velocity of a moving finger and the distance it has traveled on the screen. The execution of the on-Down(), onScroll(), and onFling() callback methods completes the fling gesture. The GestureDetector simplifies motion events by identifying the triggered event and delegating calls to a GestureListener object. In this manner, a Gesture object can receive callbacks for specific gestures that the GestureDetector recognizes.
GestureDetector has limited usage for Android application because it is not able to handle all types of gestures. For example, modifications are needed to recreate more complex gestures, such as fling left and fling right. At its simplest, GestureDetector is ideal for interfaces that involve simple and generic touch gestures. More specifically, the GestureDetector.OnGestureListener callback is used for signaling when a particular motion event has occurred. The callback methods contained in the GestureDetector class are onDown(), onLongPress(), onShowPress(), onSingleTapUp(), and onDoubleTap(). Table 7-1 shows a sequence of callback methods for several basic gestures.
The onDown() method is automatically called when a tap occurs with the down MotionEvent that triggered it. This callback is triggered every time a finger touches the screen. This is an important event because most other events will be preceeded with a finger touching the screen. For every ACTION_DOWN motion event, an onDown() is called.
The onLongPress() is called when a long press occurs with the initial onDownMotionEvent that triggered it. The event parameter for a long press is the initial onDown motion event that preceded the longPress motion. The onShowPress() callback occurs whenever the user has performed an onDown motion but has not yet completed any other movement. This event commonly provides visual feedback to let the user know that the action has been recognized (i.e., highlighting an element). The parameter for an onShowPress motion event is the initial onDown motion event that preceded the onShowPress. In some instances, this motion event might not get called at all. For example, when a user taps a finger on the screen very quickly, it is possible it will be considered an unintentional touch.
The onSingleTapUp() callback occurs when a tap gesture takes place with an up motion that triggered it. For example, a tap gesture happens when an ACTION_DOWN event is followed by an ACTION_UP event. A common pattern for this gesture is a single tap, where the user quickly touches the screen and then, just as quickly, removes the finger from the touchscreen. The required parameter for onSingleTapUp is an up motion that completes the first tap.
Similar to the onSingleTapUp() callback, onSingleTapConfirmed() occurs when a detected tap gesture is confirmed by the system as a single tap and not as part of a double-tap gesture. A double-tap event is recognized as two consecutive tap gestures. The onDoubleTap() callback occurs when a two-tap event is detected.
As shown in Table 7-1, when a fling gesture is detected, callbacks occur on four methods: onDown, onShowPress(), onScroll(), and onFling(). A fling gesture is recognized when there is an ACTION_DOWN followed by one or more ACTION_MOVE events and finally terminated by an ACTION_UP event. A fling is a constrained type of action. To be recognized as a fling, the ACTION_DOWN, ACTION_MOVE, and ACTION_UP events must take place with a specific velocity pattern. For example, when the user places a finger on the touchscreen and moves it slowly before removing it, this unrestrained sequence is not recognized as a fling gesture.
TABLE 7-1 Sequences of callback methods for basic gestures
Gesture |
Sequence of Callback Methods |
Single Tap |
onDown onShowPress() onSingleTapUp() onSingleTapConfirmed() |
Double Tap |
onDown onShowPress() onSingleTapUp() onDoubleTap() onDoubleTapEvent() onDown() onShowPress() onDoubleTapEvent() |
Fling |
onDown onShowPress() onScroll() onScroll() … onScroll() onFling() |
Scroll |
onDown onShowPress() onScroll() onScroll() … onScroll() |
The last gesture sequence in Table 7-1 represents a scrolling gesture, which is very similar to a fling gesture. Scrolling the content on display on a touchscreen is a common task and is detected and processed on an Android device with callbacks to onDown(), onShowPress(), and a series of onScroll(). The onScroll() callback is typically called when there is an ACTION_MOVE event. This involves the user placing a finger on the screen and moving it for a period of time before removing it from the screen. During this period, there will be a chain of repeated method calls to onScroll().
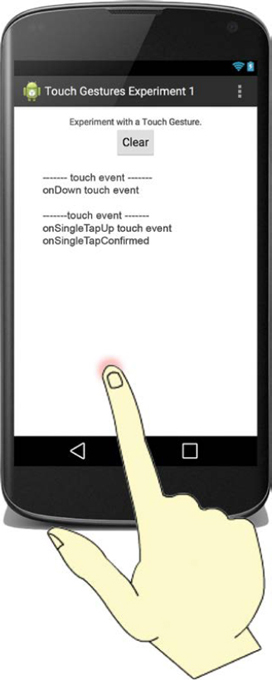
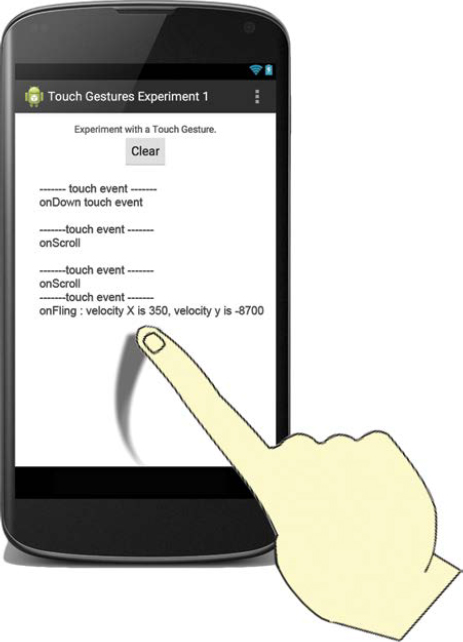
This lab example provides an opportunity to explore all simple touch gestures that involve the detection of a single-finger touch event. A collection of gestures can be tested, ranging from a single tap to a fling event. As each gesture is produced, a scrollable text field will provide a list of the touch events and triggered callbacks that occur. Figure 7-2 illustrates the touch events that are triggered when the user performs a single tap on the touchscreen.
Part 1: Application Structure and Setup
The goal of this lab is to recognize simple touch patterns and to develop an application that utilizes GestureDetector and MotionEvent. The application in this example is simple and involves the implementation of the onGestureListener, the creation of a GestureDetector object and the construction of the onTouch-Event() method.
The settings for the application are as follows:
Application Name: |
Touch Gestures Experiment 1 |
Project Name: |
TouchGesturesExperiment1 |
Package Name: |
|
Android Form: |
Phone and Tablet |
Minimum SDK: |
API 18: Android 4.3 (Jelly Bean) |
Target SDK: |
API 21: Android 5.0 (Lollipop) |
Compile with: |
API 21: Android 5.0 (Lollipop) |
Activity Name: |
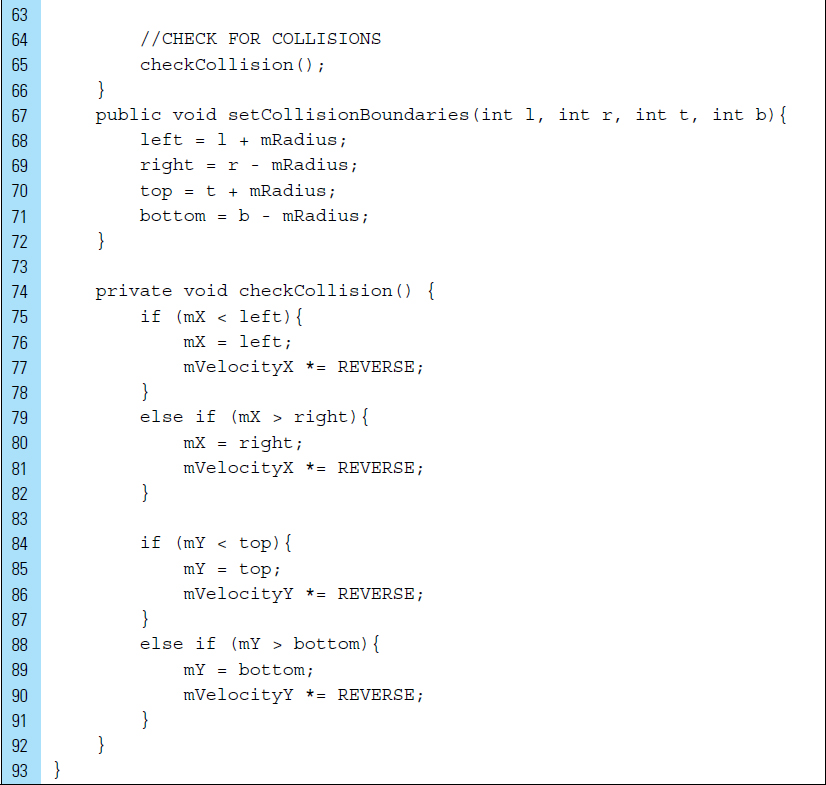
|
Layout Name: |
|
The project structure for the application is shown in Figure 7-3.
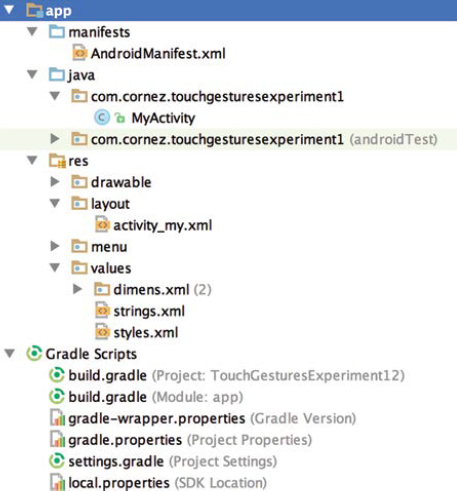
The application will use a single layout associated with one main activity.
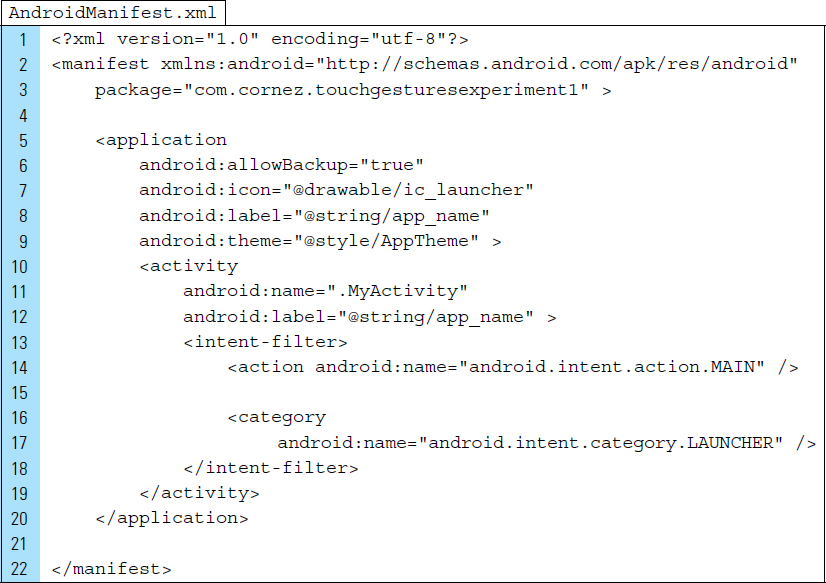
The activity is specified as MyActivity in the Android Manifest file. The XML code for the manifest file is shown as follows:
Part 2: The User Interface
After performing each touch gesture experiment, a button labeled “Clear” can be used to empty the scrolling text field. This will create a clean slate for reporting the results of the Touch Gestures experiment. The application string requirements for labeling the button, emptying the text field, and providing a title for the application are shown as follows in strings.xml:

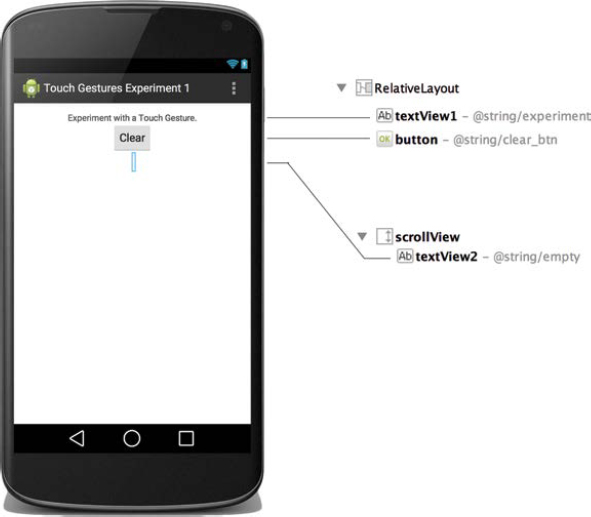
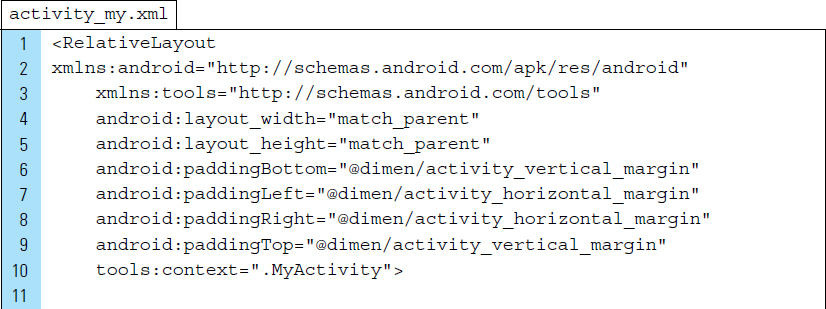
The layout file associated with the application’s activity is shown in Figure 7-4. This file, activity_my.xml, uses a RelativeLayout as its root element. Several touch experiments produce extensive method callbacks to touch events, such as fling gestures. Depending on the size of the touchscreen, this information may require a scrollable TextView to accommodate the full text. To provide a scrolling feature for the text field, a TextView is placed within a ScrollView.
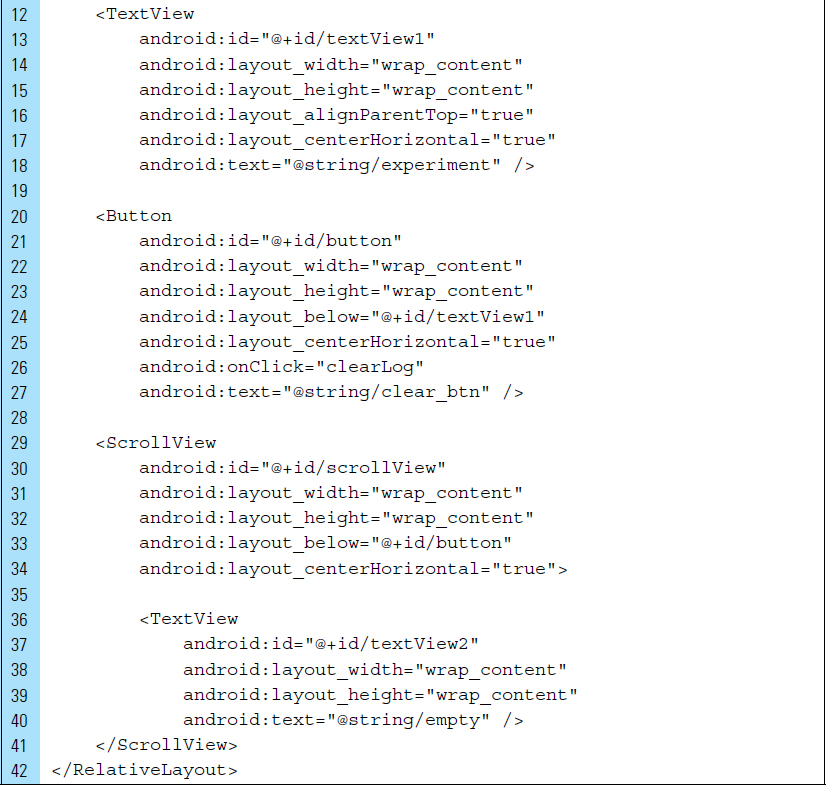
The XML for activity_my.xml is shown as follows. The onClick event handler for the button defined in Lines 20–27 is specified as clearLog.
Part 3: Source Code for Application
A single source file is used by the application, the main activity. The first lines of code in this file are used to import the required libraries. Lines 5 and 8 import the required libraries for listening for a gesture and receiving motion data. The GestureDetector class is always used in companion with MotionEvent to report touch gestures.


The output, or report log, produced by this application is the sequence of callback responses triggered by a given gesture. A GestureDetector object is used to receive the motion data the application is expected to recognize.
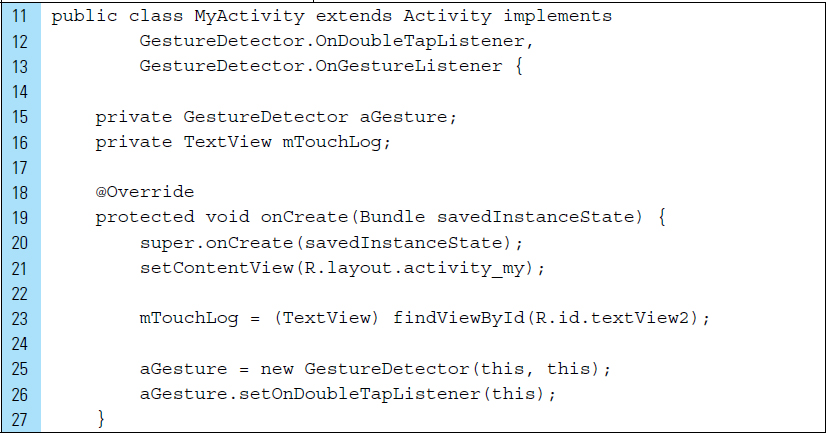
Lines 11–13: |
The interfaces for |
Lines 25–26: |
A |
Lines 32–36: |
The |
Line 35: |
The statement, |
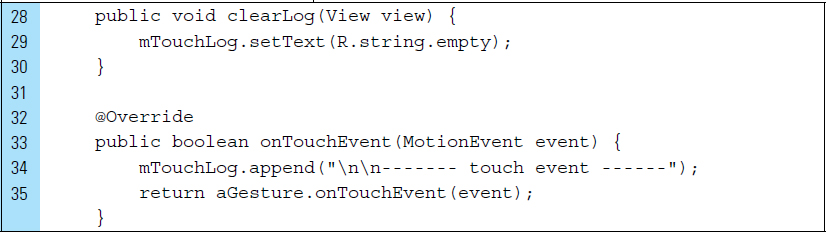
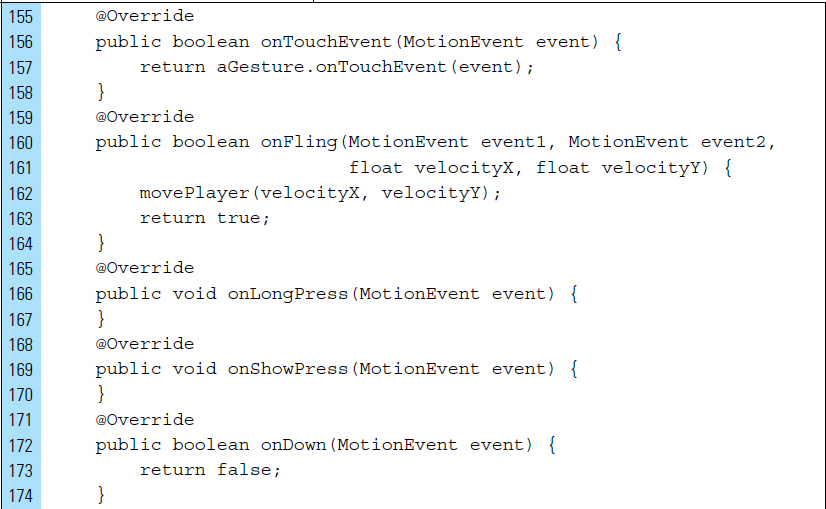
This application relies on the OnGestureListener to signal the occurrence of a gesture. By implementing the GestureDetector.OnGestureListener interface, we are required to provide a collection of methods to catch the gestures defined by this interface. For each triggered gesture, text is displayed that describes the specific touch event that has occurred.
The MotionEvent object that is passed as a parameter to each callback method sometimes represents the touch event that started the gesture recognition. It is also possible that the MotionEvent object will represent the last event that completed the gesture. For example, a single-tap event is recognized when a single-tap confirmed completes the gesture.
The GestureDectector class will handle all of the deciphering details for determining the kind of motion the MotionEvent object represents. For example:
1. The onDown() method will be called when a tap occurs with the down motion event that triggered it.
2. The onLongPress() method will be called when a long pressing motion occurs with the initial down motion event that triggered it.
3. The onSingleTapUp() method will be called when a tap occurs. The event will not be completed until an up motion event occurs.
4. The onShowPress() method will be called when the user has performed a down motion event but has not moved a finger or performed an up MotionEvent.

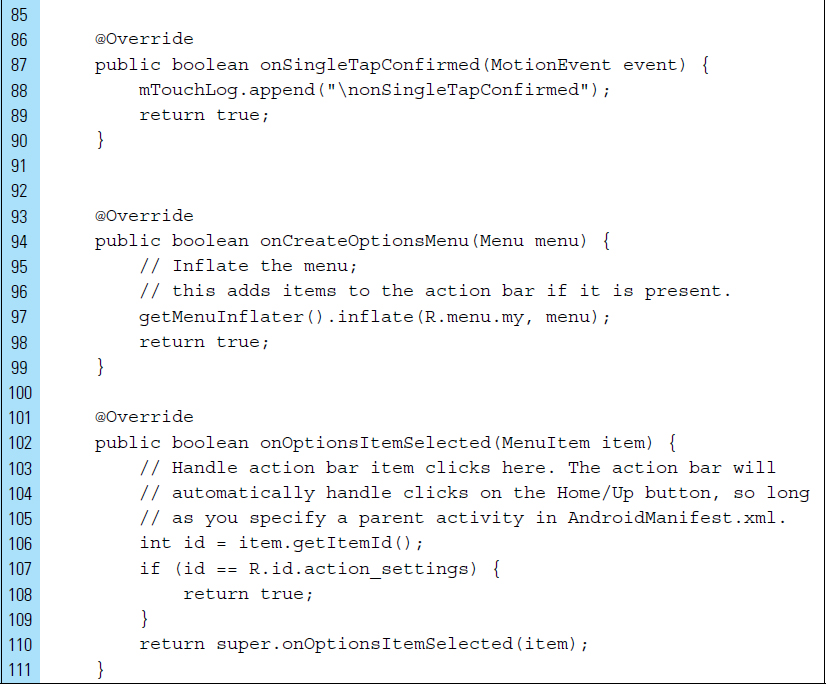
Figure 7-5 shows the application being tested with a fling gesture. A minimum of three touch events will occur with a fling. Each fling gesture is accompanied by a series of scroll events. A fling gesture will not be completed until the onFling() method has been called.
■ 7.5 The MotionEvent Class
For simple gesture handling, the GestureDetector class allows basic detections for common gestures.
For example, this basic form of gesture detection listens for all touch events and provides a generic response. This type of gesture detection is suitable for applications that require simple gestures; however, the GestureDetector class is not designed to handle complicated gestures.
A more sophisticated form of gesture detection is to register an OnTouchListener event handler to a specific View, such as a graphic object on stage that can be dragged. In this case, notification is required whenever there is a touch event on that View object.
To provide touch event notification, the onTouchEvent() method can be overridden for an Activity or touchable View. In this way, an instance of MotionEvent can detect specific user gestures on a given object. This type of gesture detection provides more control for game applications and applications that require a high degree of interactivity.
A MotionEvent object describes movement in terms of an action code and a set of axis values. The action code specifies the state change that occurred, such as a finger moving up or down on the touchscreen. The axis values of a MotionEvent object describe the x, y position of the contact point and movement properties, such as velocity.
For example, when the user first touches the screen, the system delivers a touch event to the appropriate View that has been touched. This event contains the action code ACTION_DOWN and a set of axis values that include the x, y coordinates of the location on the screen. In addition, information about the pressure, size, and orientation of the contact area is produced by the event.
Most Android devices are able to report multiple movement traces at the same time. For example, multitouch screens emit one movement trace for each finger. The individual fingers generate movement trace information as motion events.
The MotionEvent class provides a collection of methods to query the position and other properties of fingers used in a gesture. Several methods provided by this class are as follows.
|
Returns the x-axis coordinate value at the finger’s location on the screen. |
|
Returns the y-axis coordinate value at the finger’s location on the screen. |
|
Returns the time when the user initially pressed down to begin a series of events. The time is returned in milliseconds. |
|
Returns the precision of the X coordinate. This value can be multiplied by |
|
Returns the type of action being performed by the user, such as |
Each finger in a multitouch screen can be identified by a unique id, called a pointer id. The order in which an individual finger appears within a motion event is undefined. However, the pointer id of a finger is guaranteed to remain constant as long as the finger remains active on the touchscreen. The method getPointerId() can be used to obtain the pointer id of a finger that will be traced across all subsequent motion events in a gesture.
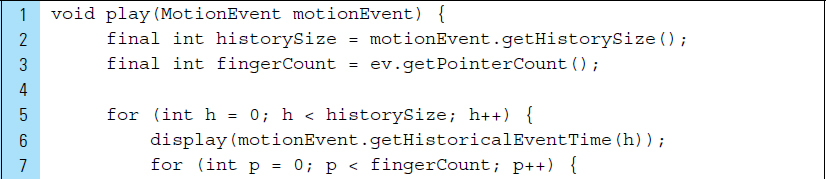
For interactive optimization, motion events with ACTION_MOVE may batch together multiple movement samples within a single object. Consider the code segment below. The play() method receives a MotionEvent object and displays current and past information.
The coordinate location of active fingers used in a gesture are accessed using getX() and getY(). Previous coordinate positions in a gesture are accessed using getHistoricalX() and getHistoricalY(). The coordinates are “historical” only insofar as they are older than the current coordinates in a given batch.

Touch events can also be handled in a ViewGroup that has multiple View elements that are targets for different touch events. The onInterceptTouch-Event() method can be used to ensure that either the child View or the parent ViewGroup will correctly receive an intended touch event. This method receives a MotionEvent and returns a true or false. Once implemented, it will be called automatically to intercept touchscreen motion events detected on the surface of a ViewGroup and then dispatched to the intended View. By returning a true, the MotionEvent will be intercepted and will not be passed on to the child View. In this way, the parent ViewGroup will receive a touch event before its child View. By returning a false, the MotionEvent will travel down the view hierarchy to a child target, which will handle the event on its own onTouchEvent() method.
■ Lab Example 7-2: Touch Experiment 2: Drawn Primitive Shapes with Touch Feedback
This lab exercise experiments with primitive shapes that will be made to respond to touch events. Although GestureDetector is useful for simple gestures, it is not an appropriate tool for detecting gestures associated with a specific object on stage. In this lab, we will explore the use of a Canvas element as a custom View, which supports touch interactions. As shown in Figure 7-6, when a touch event occurs on the View, the specified gesture will be unmasked and processed by drawing on the canvas.
Part 1: Application Structure and Setup
The settings for the application are as follows:
Application Name: |
Touch Gestures Experiment 2 |
Project Name: |
TouchGesturesExperiment2 |
Package Name: |
|
Android Form: |
Phone and Tablet |
Minimum SDK: |
API 18: Android 4.3 (Jelly Bean) |
Target SDK: |
API 21: Android 5.0 (Lollipop) |
Compile with: |
API 21: Android 5.0 (Lollipop) |
Activity Name: |
|
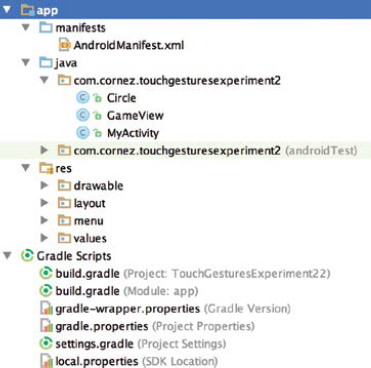
The project structure for the application is shown in Figure 7-7. This structure contains three Java source files. The activity for the class is MyActivity. The Circle class models the graphic circle that will be drawn in various sizes and locations on the screen. This application will not use an XML layout.
Part 2: The Application Activity
The default activity, MyActivity, is configured with a GameView object containing a drawing surface. The default layout is not utilized in this application. Instead, a View object, one containing a drawing surface, is constructed programmatically.
Lines 19–20: |
The activity content is set to an explicit view, |
Line 21: |
A background |
Lines 24–38: |
The |
Lines 39–43: |
|


Part 3: onTouchEvent() and the GameView Class
As illustrated in previous chapters, a simple way to employ a Canvas object for drawing is to override the onDraw() method of a View object. Conveniently, this method has a single parameter: the Canvas object.
When a touch event occurs on the GameView, the specified gesture is unmasked and processed by drawing on the canvas. When the touch action is identified in on-TouchEvent(), one of three responses are triggered, as shown in Figure 7-6. The onDraw() method is used to clear the canvas and paint a circle with a specified radius at an x, y location on the screen.
An important aspect of touch event handling involves being able to identify the type of action the user performed. We can obtain this information by making a call to the getActionMasked() method of the MotionEvent object, which was passed through to the onTouch() callback method. In this application, we detect the basic finger movements: press, lift, and move. The radius and the x, y location of the graphic circle will be altered to respond to these basic touch gestures.
The changing visual display of this application illustrates the appeal of touchscreen feedback. The user will have a sense of how the application operates based on the behavior of the drawn circle. Many Android UI elements support touch feedback that includes visual changes to components to indicate responsiveness to the user. For example, (1) a single tap on an application icon button causes the button to dim slightly, indicating that it is actionable; or (2) dragging an icon may diminish it in size, helping the user understand that dragging relocates the item.
The Java code for GameView is shown as follows:
Lines 52–65: |
A touch gesture is distilled into a motion event containing an action code that specifies the state change, such as a finger going down, up, or moving. Specifically,
Once the action code is triggered, the set of axis values are returned. The axis values describe the finger position and other movement properties. When using the emulator, the mouse cursor will substitute for a finger pointer. |


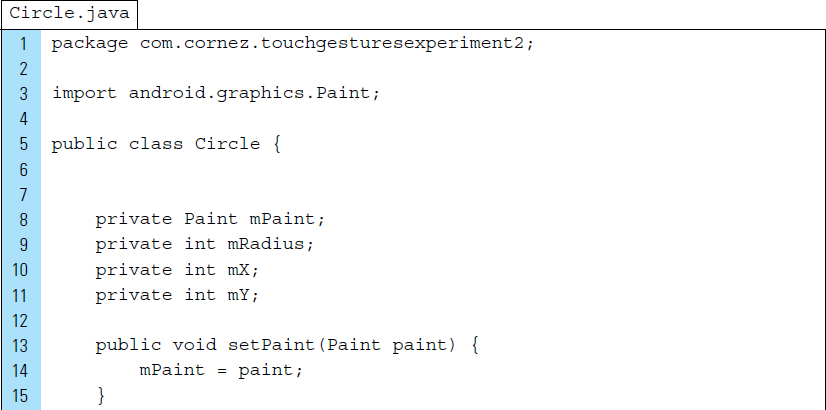
Part 4: The Circle Class
The Circle class provides the attributes for the graphic circle that appears on the canvas. These include the Paint to describe style and color, the radius, and the x, y location of the graphic on the screen. The Java code for Circle is shown as follows:

■ Lab Example 7-3: Bee Chases Finger Movement and the Motion Event
This lab example provides an animated game context for exploring the basic motion events for ACTION_UP, ACTION_DOWN, and ACTION_MOVE. Motion events describe movements in terms of an action code, as well as a set of axis values. The objective of this lab is to use action codes to specify the state change that occurs when the user’s finger goes down, up, or moves. We will use axis value feedback from these actions that describe the finger position.
Part 1: Conceptual Design
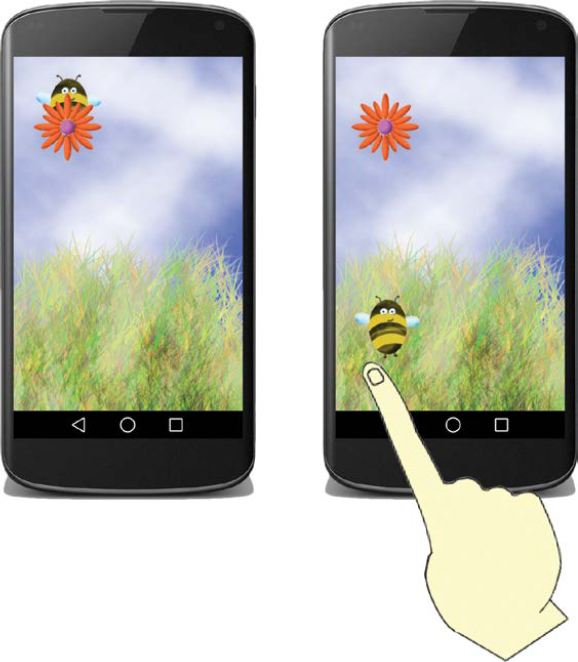
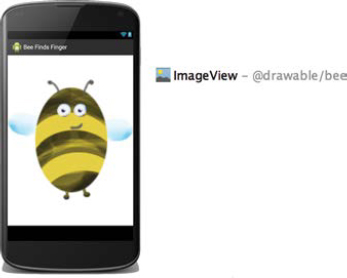
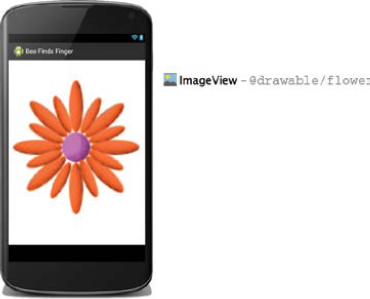
When the application is first launched, the user sees a bee hovering just above a flower, located in the upper left-hand corner of the screen, as shown in Figure 7-8. As the user places a finger directly on the screen, the bee moves toward the finger in a proportional easing motion. If the user moves the finger around the touchscreen while maintaining contact, the bee chases the finger. Once the user lifts the finger from the screen, the bee returns to the flower.
Part 2: Application Structure and Setup
The settings for the application are as follows:
Application Name: |
Bee Finds Finger |
Project Name: |
BeeFindsFinger |
Package Name: |
|
Android Form: |
Phone and Tablet |
Minimum SDK: |
API 18: Android 4.3 (Jelly Bean) |
Target SDK: |
API 21: Android 5.0 (Lollipop) |
Compile with: |
API 21: Android 5.0 (Lollipop) |
Activity Name: |
|
Layout Name: |
|
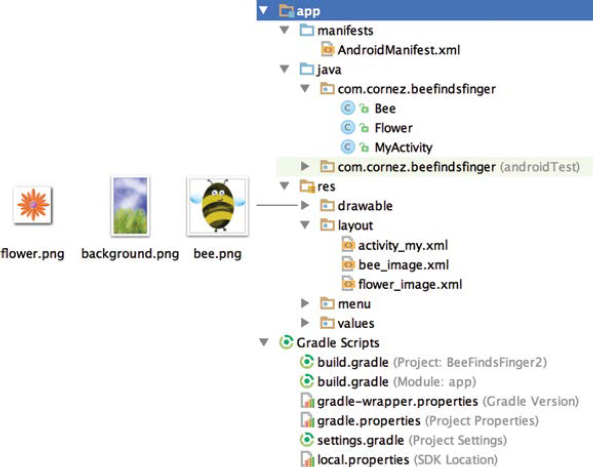
The application uses three Java files. The bee and the flower are modeled by separate classes: Bee and Flower. A single activity for the application serves as the controller. The application involves three drawable elements: the bee, the flower, and the background. As shown in the project structure in Figure 7-9, the bee and flower drawables are referenced as layout files in res/layout.
The AndroidManifest.xml file sets the orientation of the screen to a locked portrait mode. In addition, a fullscreen is utilized with the titlebar removed. The XML code for AndroidManifest is shown as follows:

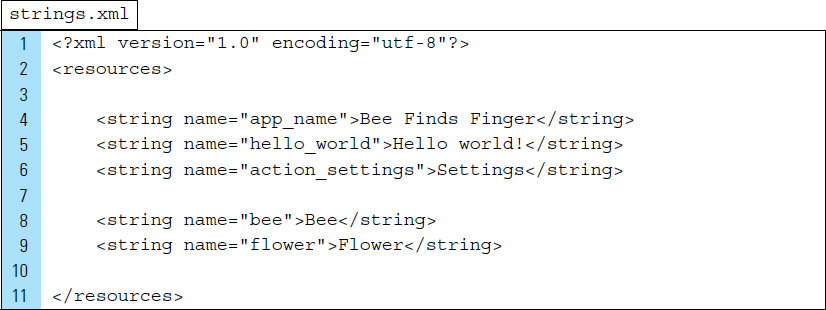
The string resources that the application uses provide the image descriptions, specifically “Bee” and “Flower.” These descriptions, defined on Lines 8–9, will be used in layout XML files for the application.
Part 3: The User Interface
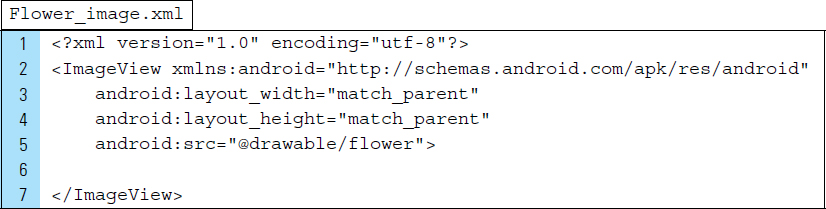
The visual elements, the bee and flower, are programmatically placed onto the screen. Each of these drawable components will be defined as ImageView Layout files in res/layout. The graphical layout design for bee_image.xml and flower_image.xml are shown in Figures 7-10 and 7-11, respectively.

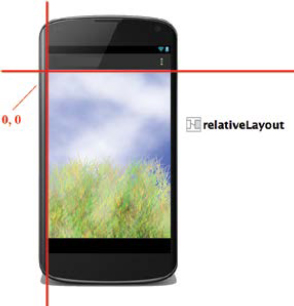
The main activity for the application, activity_my.xml, uses a Relative-Layout as the root view, as shown in Figure 7-12. The coordinate system specified by the RelativeLayout places the x = 0, y = 0 point at the top left-hand corner of the layout.
The background of the root view is set to the background drawable. This allows all other ImageViews to be layered on top of the root view. The XML code for activity_my.xml is shown as follows:

Part 4: Source Code for Application
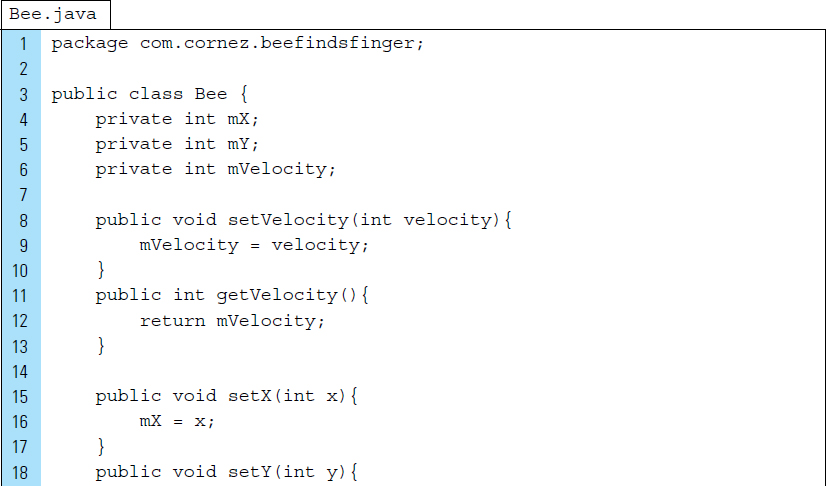
The Bee class stores the x, y location of the bee graphic that appears on the screen. In addition, an easing velocity, the proportional movement, is computed in the move() method. The Java code for the Bee class is shown as follows:
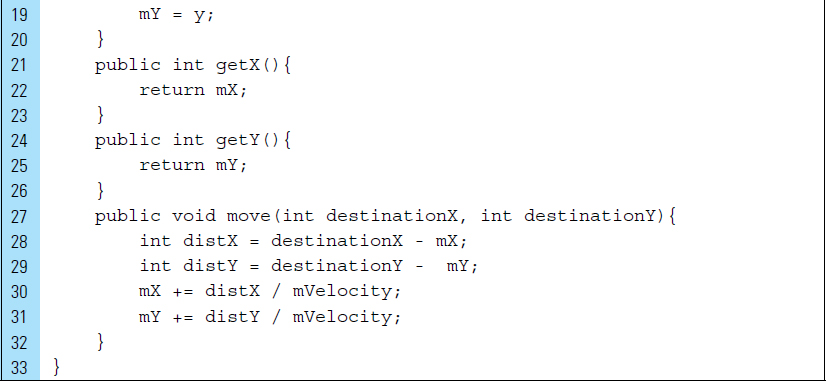
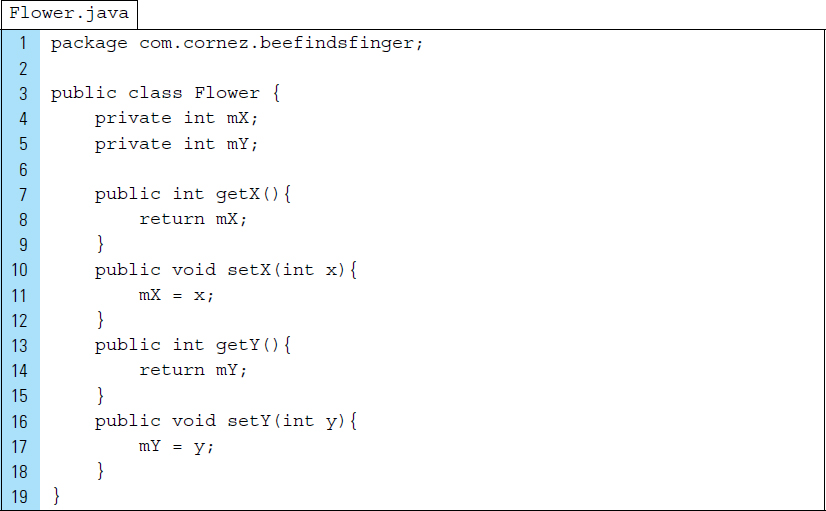
The flower graphic remains stationary in this application. The bee graphic is guided back to the flower when no touch activity takes place on the screen. The attributes for the Flower class provide a seek location for the bee and consist of an x, y point on the screen. The Java code for the Flower class appears as follows:
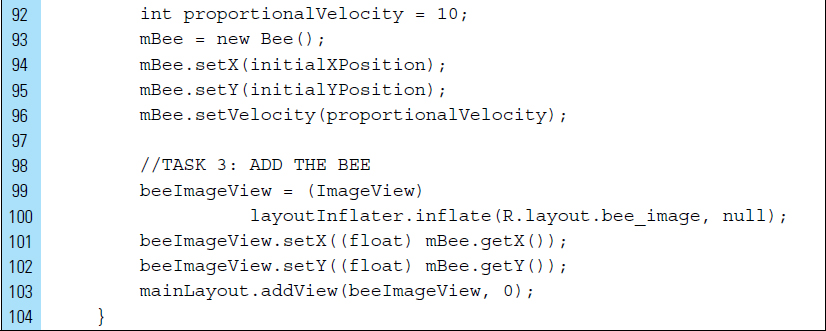
MyActivity is the single activity that the application uses. The onCreate() method performs the visual initialization by preparing the game window and inflating the bee and flower graphic elements. In addition, game objects are instantiated.
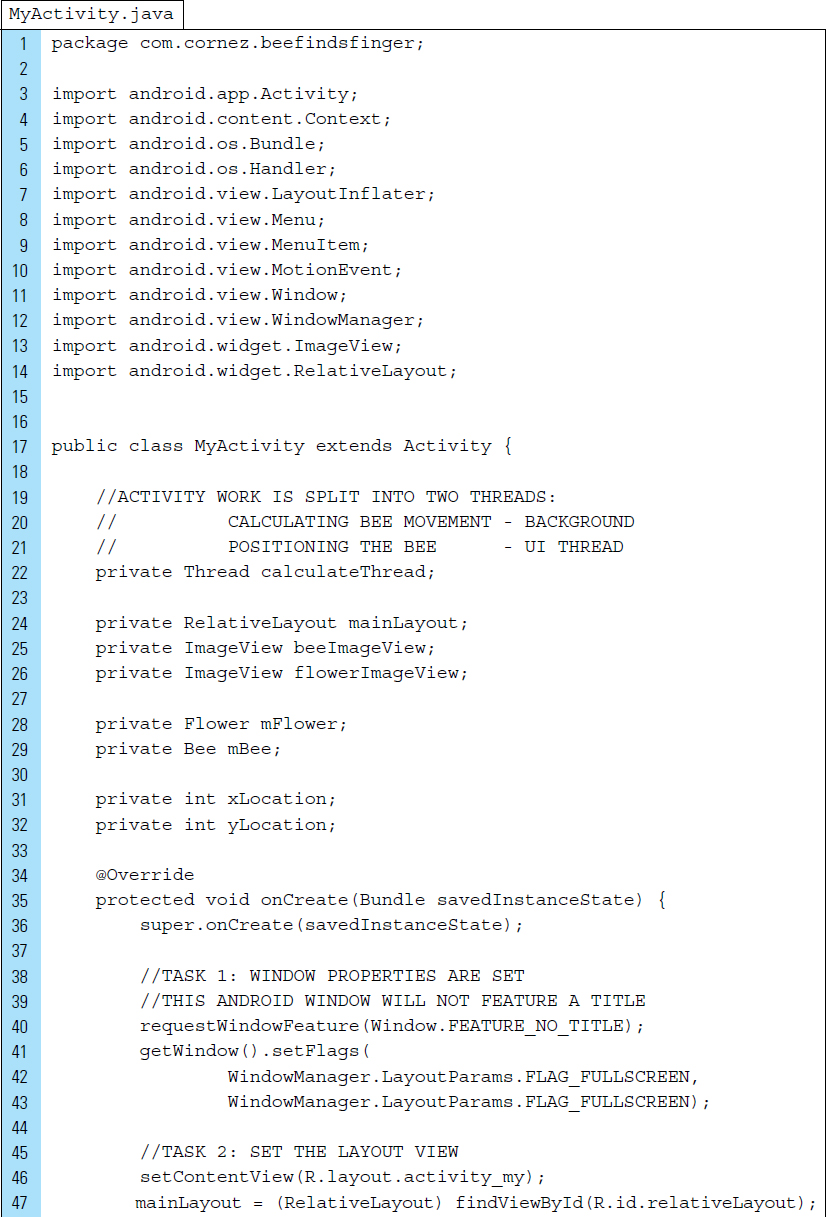

The bee and flower graphic elements are layered onto the screen so that the bee sits below the flower layer.

The animated movement of the bee is executed with the support of two threads. A background thread performs the computations associated with movment. The UI thread performs the updates to the ImageView holding the bee graphic.

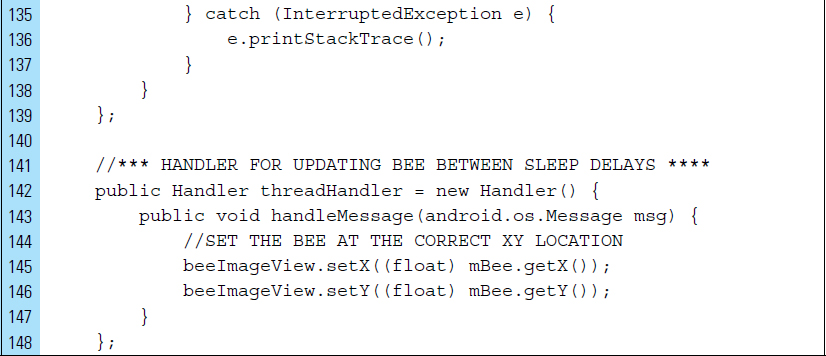
The touch events that control the bee movement are implemented in onTouch-Event(). In this application, the onTouchEvent() is automatically called when a screen touch event has occurred. The getActionMasked() method returns the specific action that was performed.
The first handled touch action is ACTION_DOWN. The user’s finger is stationary at the first touch. The location of the finger is used to reposition the bee. In a response to ACTION_MOVE, the bee graphic is moved over the extent of the screen as it traces the finger motion.

■ 7.6 The Drag-and-Drop Gesture
In human–computer interactions, drag-and-drop is the action of tapping on a virtual object and dragging it to a different location. This gesture is broadly used in graphical user interfaces; it is intuitive, efficient, and has a low learning curve. Drag-and-drop is a gesture that is most often associated with methods of data transfer. On an Android device, this gesture involves the use of a single finger to select an object, dragging this object over a desired drop target, and dropping it. This form of gesture interaction is an elegant, and frequently required, action sequence for many applications.
In a general sense, drag-and-drop is a gesture that can be used to invoke an action or create an association between two objects. This gesture assumes that a drag source and a drop target exist. In this manner, a user drags a drag source and drops it into a drop target.
The ability to reposition graphic images and text on a screen is a basic functionality of smart devices. Drag-and-drop is an important touch gesture because it increases the usability of an application by making it easy to position elements around the screen. As all Android device users know firsthand, the particular actions performed during a drag-and-drop are application-specific and are often determined by context. For example, dragging a selected graphic from one location to another might move the graphic by default. In another context, however, dragging and dropping a graphic may copy the element or perhaps an attribute of the element.
Using a drag-and-drop gesture provides an easier means to visualize or determine specific moves. Imagine dropping puzzle pieces on a puzzle board rather than visualizing the x and y coordinates as text. Although the Android framework for drag-and-drop is primarily designed for data movement, it is also possible to use it for other actions. The drag-and-drop features provided by the SDK are designed to be flexible and customizable to support a variety of drag-and-drop scenarios. For example, it is possible to create an application that mixes colors when the user drags a color icon over another icon. In this chapter, we focus on data movement, but it would be possible to use the discussed concepts for other types of actions.
The Android framework for drag-and-drop includes a drag event class, drag listeners, and helper methods and classes.
Source and target containers must be created to hold the View elements that will be dragged and eventually dropped. As Figure 7-13 shows, a basic drag-and-drop design relies on at least two Views, which serve as containers. The first View is a source container from which the dragged chess piece object originates. The second View is a target container, which receives the dropped chess piece. In this example, the drag source and drop target is a graphic image of a chess piece and is also a View itself. The most common objects manipulated through drag-and-drop operations are graphic images and text. In Android, any View object is eligible for drag-and-drop.

All elements that are the intended moveable objects in a drag-and-drop process must be registered with an appropriate listener event. A touch listener, setOn-TouchListener(), must be attached to each draggable View in a given application. This will register a callback to be invoked when an explicit touch event is sent to this draggable View object.
A view container that functions as a source or target container must be registered with an explicit “on drag” listener event. In the chess piece example shown in Figure 7-13, the target and source containers are registered with a setOnDragListener(). This listener event triggers a drag event callback when a drag is being dispatched to an explicit view.
For each draggable object, a touch listener can be implemented to respond to the triggered drag-and-drop registered event. This implementation allows the application to detect when a user touches a draggable object and then responds to that touch event.
A user first initiates a drag-and-drop process by pressing a finger down on the screen, usually a LongPress, over a View object. A startDrag() method is automatically called for the associated View, and the system sends a drag event with the action type ACTION_DRAG_STARTED to the drag event listeners for all View objects in the current layout.
During a drag-and-drop operation, the system provides a separate image that the user drags. For data movement, this image represents a copy of the object being dragged. This mechanism makes it clear to the user that an object is in the process of being dragged and has not yet been placed in its final target location. This dragged image is called a drag shadow because it is a shadow version of itself, as shown in Figure 7-14. A drag shadow, created using DragShadowBuilder, can be customized.
As a drag shadow intersects the bounding box of a target container, the system sends one or more drag events to the View object’s drag event listener. Registered listeners can alter the appearance of a given View object to indicate that the listener can accept a drop event. Once the user releases the drag shadow within the bounding box of a View container that is designed to accept the object, the system sends an ACTION_DROP event and an ACTION_DRAG_ENDED event to indicate the drag operation has ended. The listener is expected to return true if the drop is successful.
Drag-and-drop operations support an event-driven model. A number of different actions are used for monitoring the entire drag-and-drop process. In a typical drag-and-drop flow, it is necessary to consider the originating source location, the draggable data element, and a target drop location. Both the drag source and the drop target use a standard set of drag-event data to handle drag-and-drop operations. Table 7-2 summarizes the standard drag-and-drop event data by action type.
Consider the following segment of code that illustrates the drag component of a drag-and-drop operation. This segment of code assumes the existence of a custom class containing the implemention of an OnTouchListener to set the drag-and-drop process in motion. An ACTION_DOWN Motion Event triggers the onTouch() for the detection of a drag-drop operation. A touch will be treated as the beginning of a drag operation with the intention that a chess piece, residing in a source container, will be dragged from that container.

Once it is determined that an ACTION_DOWN event has occurred, a listener will perform a set of basic tasks before returning true, indicating that the listener has consumed the event, or false.
1. A DragShadowBuilder object is created using the chess piece being dragged.
2. From the clipboard framework, a clip data element is created to use in the start-Drag() method. To implement a drop of an object, the application must correctly interpret the data for its use. In this example, the data will be an empty string.
3. The startDrag() method is called for the chess piece being dragged.
TABLE 7-2 The drag-and-drop event data shown by action type
Action Type |
Description |
|
The event listener for a draggable |
|
The event listener for a |
|
A |
|
This action specifies that the user has moved the drag shadow outside the bounding box of a possible target container. The event listener for a |
|
The event listener for a |
|
This action specifies that a drag-and-drop operation has ended. The event listener for a |
The original chess piece can be hidden by calling setVisibility(). This leaves the DragShadowBuilder object visible, indicating that the drag has started.

When a drag ends, an ACTION_DRAG_ENDED event is sent to all drag listeners. The call to getResult() supplies information about the specific drag operation for a given drag event. Once the DragEvent.ACTION_DRAG_ENDED action has signaled a conclusion to a drag-drop operation, the appearance of a dropped View should return to its original state. The following segment of code illustrates the drop component of the drag-and-drop operation. The objective of this code is to process the actual drop of the chess piece. In this example, the chess piece was made visible again. Recall that it was hidden from view during the drag process so that the user would view only the drag shadow during the drag-drop operation.
All views that received an ACTION_DRAG_STARTED event will receive the ACTION_DRAG_ENDED event when the drag ends. If the user releases the drag shadow on a target container that can accept a drop, the system automatically sends an ACTION_DROP event to the View object’s drag event listener. A call to getResult() provides the results of the operation. The return value of getResult() depends on what happens after the user releases the drag shadow. This method returns valid data only if the action type is ACTION_DRAG_ENDED. For example, a false will be returned if no ACTION_DROP is sent. This can happen when the user releases the drag shadow over an area outside of the application. In this case, the system sends out an ACTION_DRAG_ENDED for the drag-and-drop operation, but it does not send an ACTION_DROP.
The call to getLocalState() returns the local state sent to the system as part of the call to startDrag(). This call is used to provide local information about a specific drag-and-drop operation. For example, it can be used to indicate whether the drag-and-drop operation is a copy or a move.

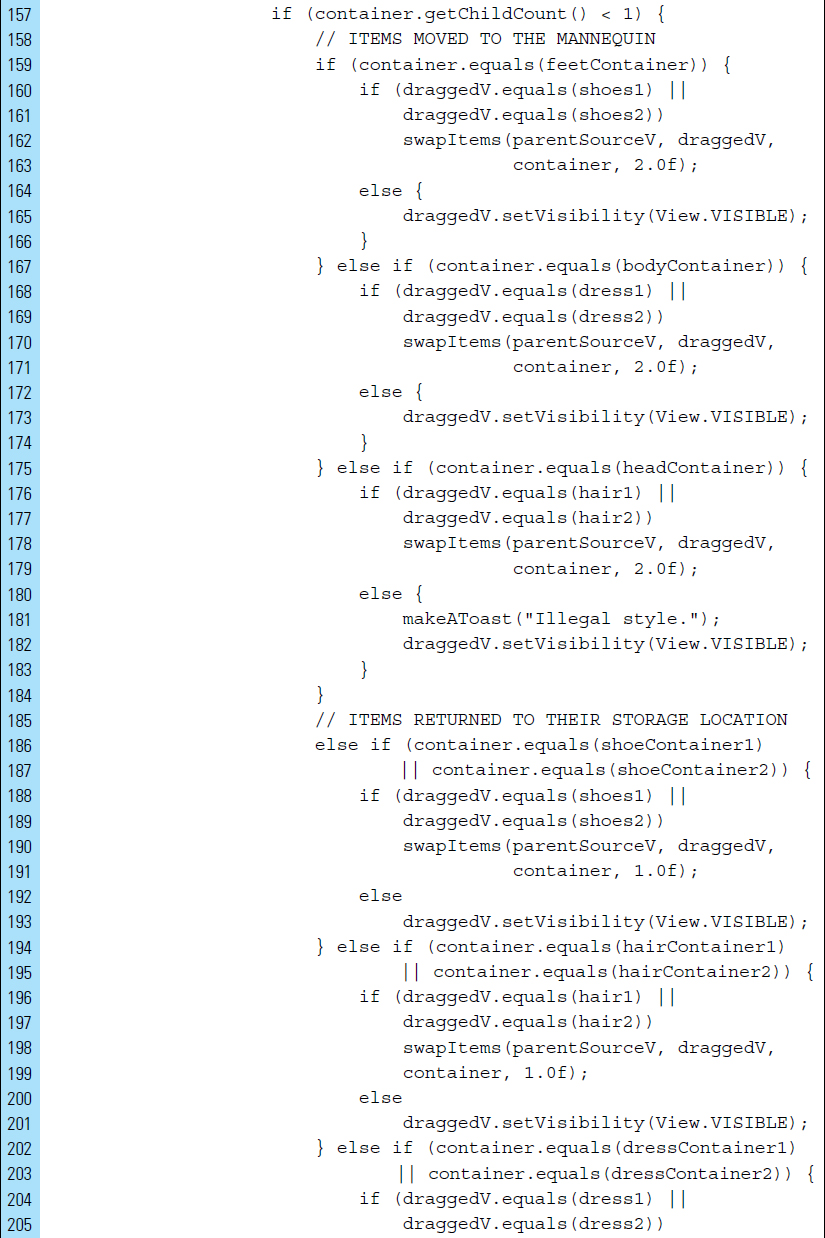
■ Lab Example 7-4: Drag-and-Drop Closet Stylist
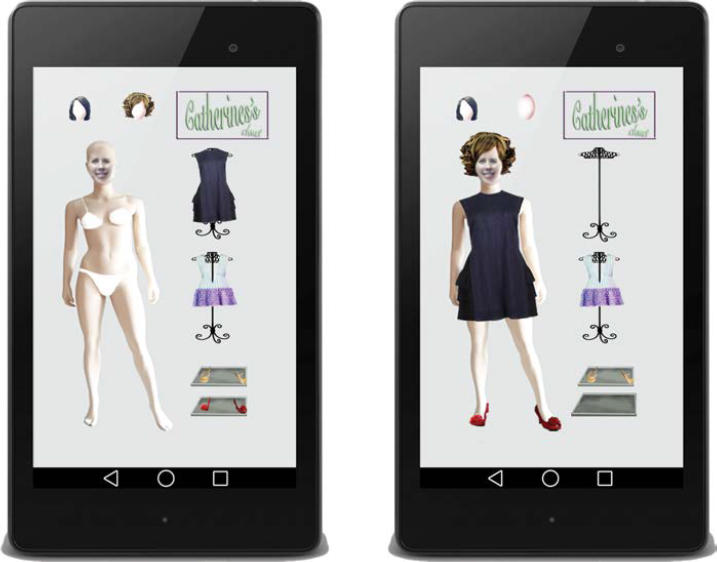
The objective of this lab is to demonstrate how to create a drag-and-drop scenario in a simple application that allows users to build a style by dragging and dropping hairstyles, dresses, and shoes onto a mannequin. When first launching this application, the user will see two wigs, two dresses, two pairs of shoes, and a mannequin named Catherine, as shown in Figure 7-15.
Part 1: The Application Structure
The settings for the application are as follows:
Application Name: |
Catherine Styist |
Project Name: |
CatherineStylist |
Package Name: |
|
Android Form: |
Phone and Tablet |
Minimum SDK: |
API 18: Android 4.3 (Jelly Bean) |
Target SDK: |
API 21: Android 5.0 (Lollipop) |
Compile with: |
API 21: Android 5.0 (Lollipop) |
Activity Name: |
|
Layout Name: |
|
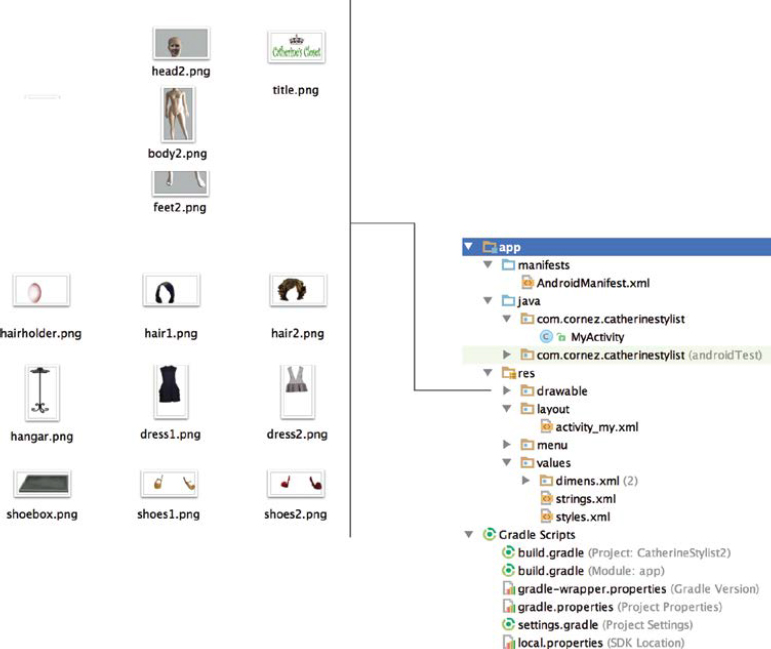
The structure of the application, as shown in Figure 7-16, is driven primarily by the graphic images representing the articles of clothing, wigs, and the mannequin. All of these elements are stored in the drawable resource folder. In addition, the application is simplified by the use of a single activity.
The manifest for the application is configured without a titlebar, utilizing a fullscreen, and set to portrait mode. The XML code for the manifest file is shown as follows:

Part 2: The User Interface as a Layout XML File
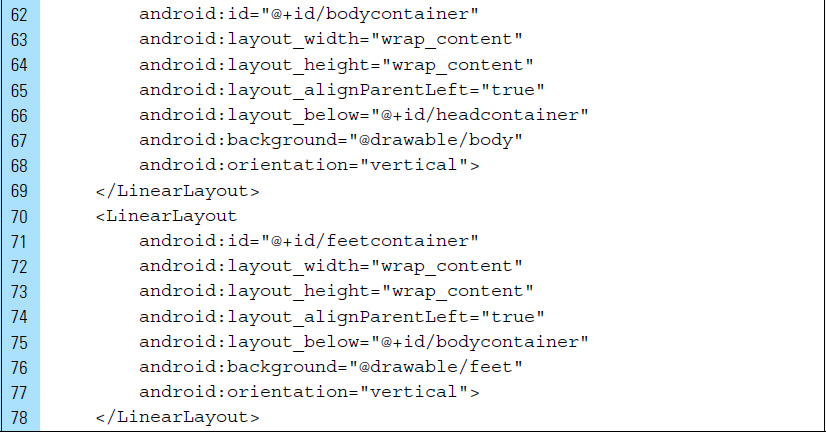
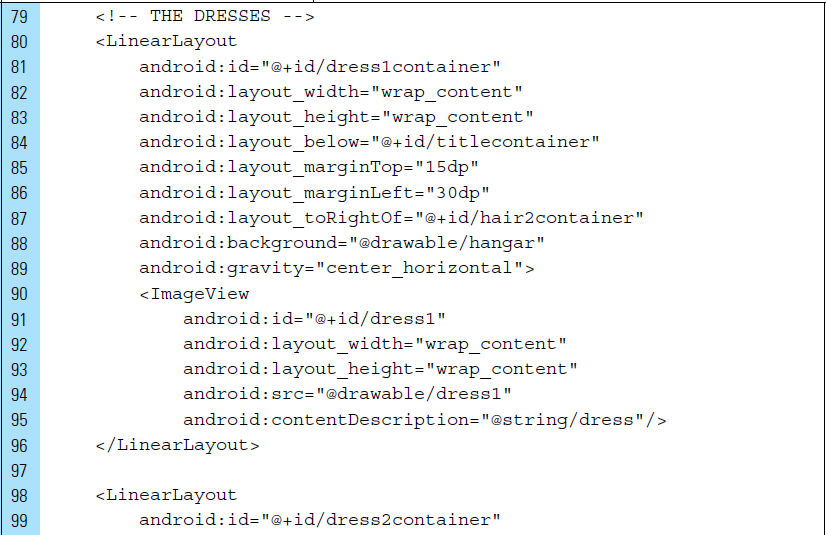
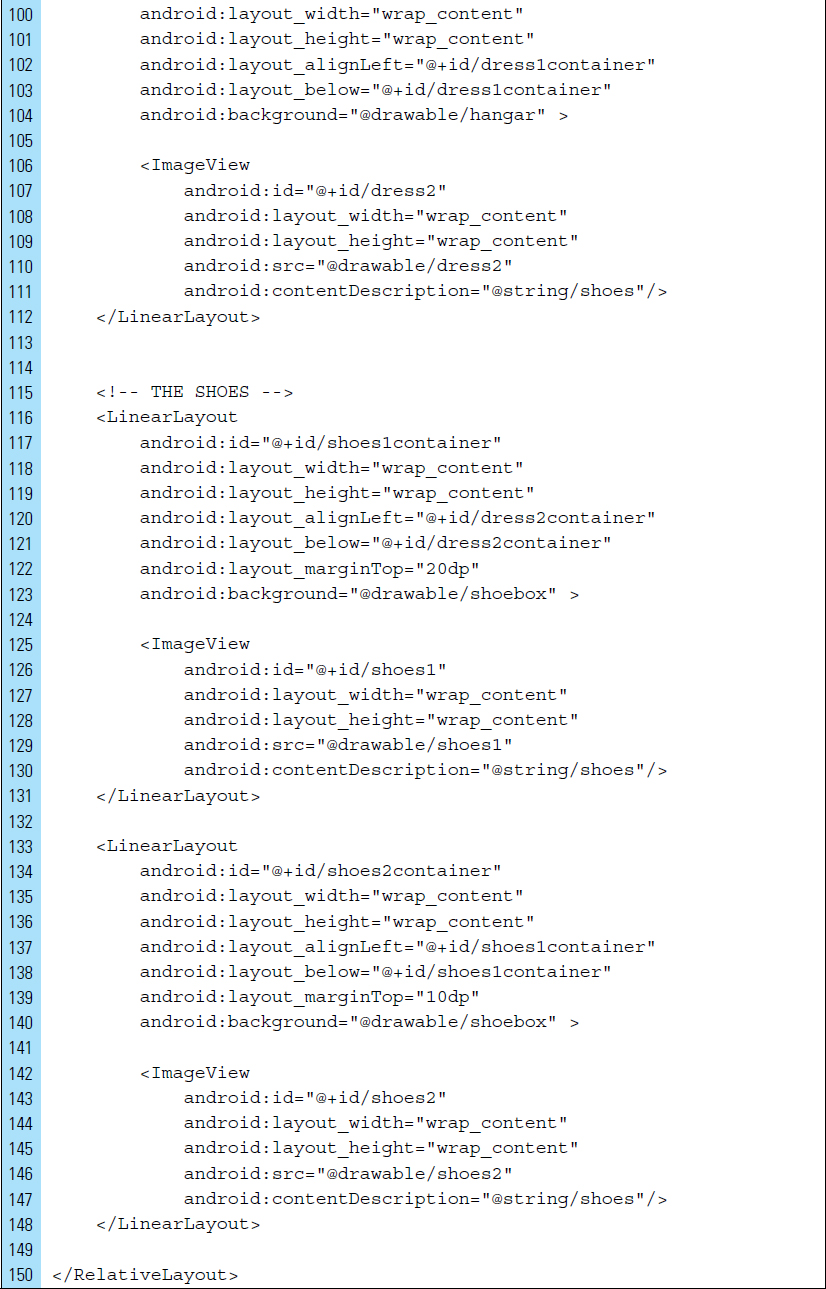
The design of the interface for the application’s activity relies on a RelativeLayout root tag that stores a collection of LinearLayout containers. The hierarchical structure for the layout file, activity_my.xml, is shown in Figure 7-17. The LinearLayout Views are ideal for storing single ImageView objects, such as hairstyles and clothing items. These LinearLayout elements will serve as source and target containers for View elements that will be dragged and dropped by the user.
The following activity, _my.xml code, performs the intricate arrangement of the draggable Views and the locaton of the source and target containers. It is necessary to control the Views that will be dropped into containers. For example, the user will not be permitted to place a pair of shoes on the mannequin’s head, which is designated as a container solely for the purpose of holding a wig.
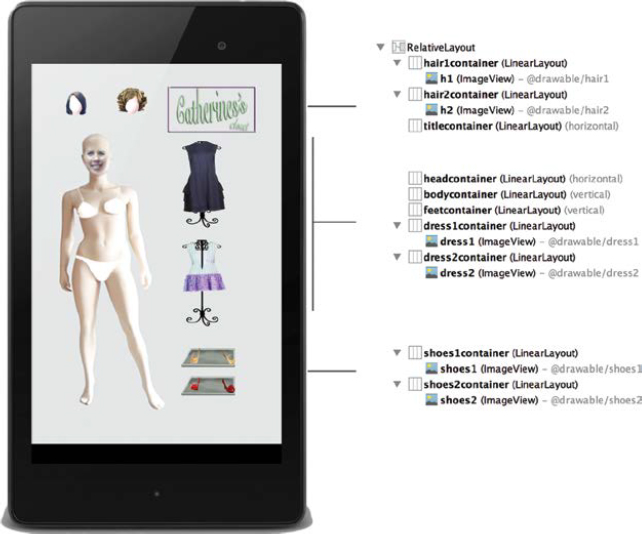
When the application first launches, the graphics representing the wigs are placed in the hair containers. These containers are the intial source containers and will be identified by hair1container and hair2container.


The mannequin is designed as a set of three target containers for dropping hair, a dress, and a pair of shoes. The background of these containers holds the mannequin’s head, body, and feet graphic elements. Each of the containers is represented by a LinearLayout and is identified by the names headcontainer, bodycontainer, and feetcontainer.

The clothing items for the application are two dresses. For visual interest, the dress graphics are placed into LinearLayout containers with an image of a hanger as a background. The ImageView elements stored in the containers are identified as dress1 and dress2. The containers with hanger backgrounds are dress1container and dress2container.
The shoe items are initially stored in the containers named shoes1container and shoes2container.
Part 3: Source Code for Application
MyActivity is the controller for the application, as well as the single source file used by the application. All drag-and-drop operations will be implemented in this document.
The main code objects for this application are the containers for the clothing and style items, as well as the containers for mannequin drop sites. The application requires the detection of illegal drops. In addition, limits need to be applied to control and restrict the area in which an item can be dropped. If the user attempts to drop a view that results in an illegal move, the View will appear to snap back to its original position.
Error detection will occur for all instances where the user attempts to place an inappropriate article of clothing on the mannequin. For example, shoes are inappropriate headwear, at least for this application. All errors will be handled with a snap-back method. In addition, the user will be informed as to why the attempted drag-and-drop operation failed to produce the intended.
The Java code for MyActivity is shown as follows:
Lines 19–30: |
All style elements are ImageViews, and all containers are |
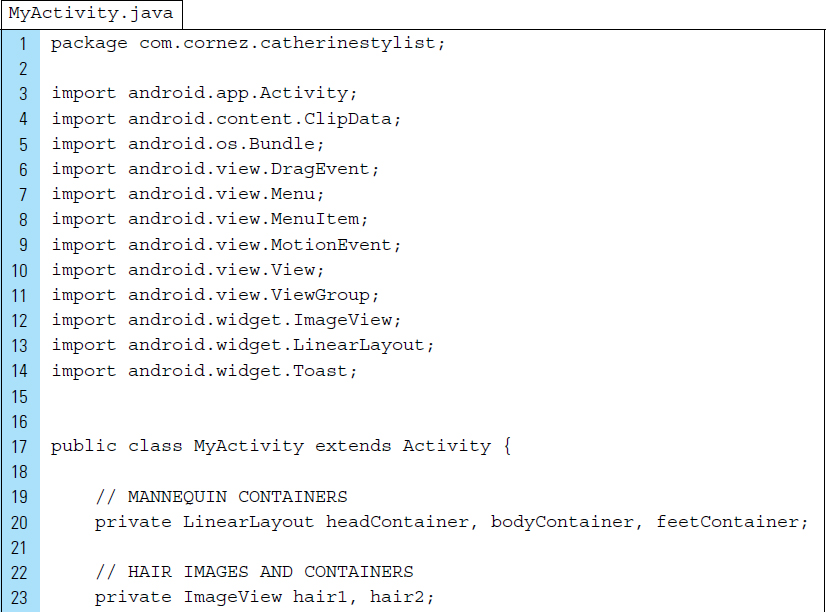
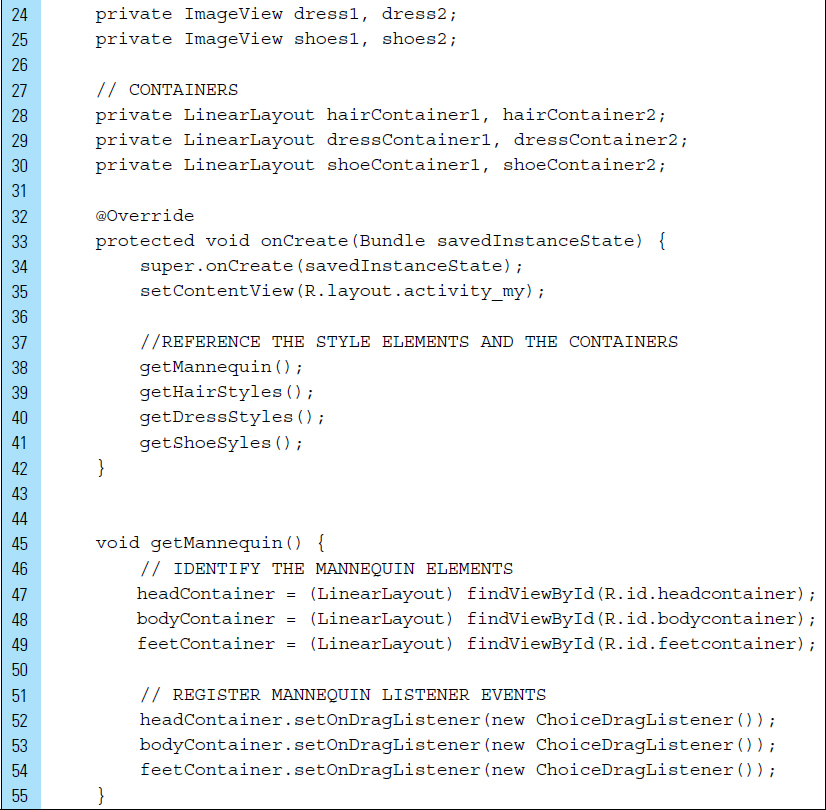
All style elements, including the source and target containers, are referenced. In addition, all listener events, one for each individual container, are registered.
setOnTouchListener() is used to register a listener event on a style image that is draggable. The setOnDragListener() registers a drag event listener callback for the containers. The ChoiceTouchListener class is implemented for performing the drag-and-drop operation.
The makeAToast() method, located on Lines 116–118, notifies the user of unsuitable drag-and-drops.


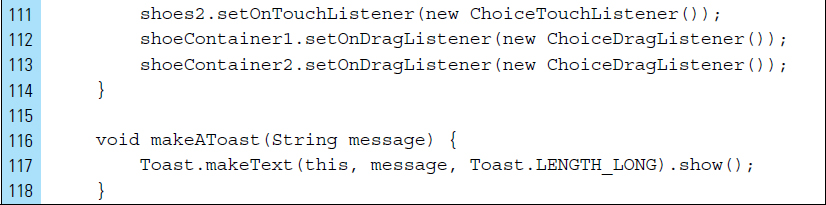
Lines 119–135: |
The The user begins the drag process with a simple touch gesture, in this case an |
Lines 137–231: |
During the drag operation, the system dispatches drag events to the drag event listeners of the View objects in the current layout. The listeners will react by calling
The two action responses required for this simplified application are In this application, the detection of an illegal drop results in the item snapping back to its original location. An illegal drop resets the A larger version of the articles of clothing and the wigs are placed on the mannequin. This means that once the items are successfully dragged to the mannequin or back to the closet, the item needs to be rescaled. The |
■ 7.7 Fling Gesture
A fling is a core touchscreen gesture that is also known as a swipe. Specifically, a fling is a quick swiping movement of a finger across a touchscreen. A fling can be performed in any direction and can cover a range of distances. For example, a fling can be a small flick of the finger that produces a simple and common behavior, such as flipping between the pages of an e-book. A fling can also be a great swiping motion that covers a large portion of the touchscreen. This more powerful gesture is often used in game applications, as well as in common desktop applications for basic behavior, such as a fast scrolling up and down a page. For this usage, the velocity of the fling can be computed to determine a data component, such as how far a page is able to scroll.
Fling gestures have been used since the early days of smartphones to make navigation easier and more efficient, making it a very natural way to browse content. As a core gesture, a fling is a common component for interactions in game applications, partly because it can easily remove user interface clutter on a content screen. For example, an application that features action bar tabs can utilize a fling gesture to navigate between different views. Many applications are implemented with a sideswiping menu, allowing users to fling the view to the right to reveal navigation elements. This technique can make a content-focused application easier to navigate by requiring a fewer number of touch gestures.
A fling begins when the finger first makes contact with the touchscreen, and it ends when the finger leaves the touchscreen. A motion can be interpreted that is either downward, upward, to the left, or to the right. As a touch event, a fling can be intercepted in an Activity or View by overriding the onTouchEvent() callback. Processing can be performed on these events to determine if a gesture has occurred.
As with other gestures, the MotionEvent object can be used to report a fling event. The motion events will describe the fling movement in terms of an action code and a set of axis values describing movement properties. Consider the following code segment. At the start of a fling gesture, the user touches the screen and the system delivers a touch event to the appropriate View with the action code ACTION_DOWN and a set of axis values that include the x, y coordinates of the touch. If the user then removes their finger after performing a fling, a second set of coordinates are delivered by the system.
In the code segment below, x1 and y1 represent the first set of coordinates, and x2 and y2 represent the second set. When y2 is less than y1, a fling from the bottom of the screen to the top has just occurred. If x2 is less than x1, then a fling from left to right has just occurred.
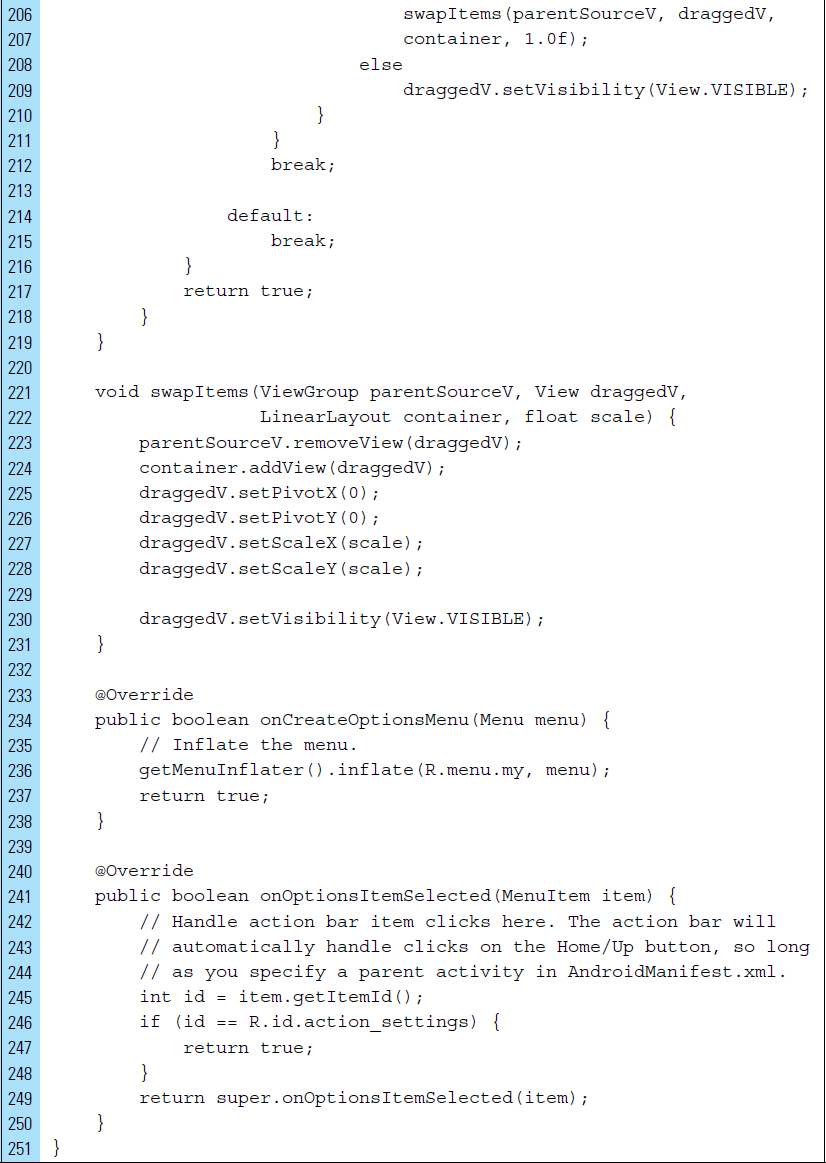
As an alternative to an onTouchEvent(), the View.OnTouchListener object can be attached to a View object for an explicit fling behavior. In the following code segment, an OnTouchListener object is used to interact with the carrot ImageView using a touch gesture.

For common gestures, such as onFling, Android provides the Gesture-Detector class that can be used in tandem with the onTouchEvent callback method. An application Activity can implement the GestureDetector.OnGestureListener interface to identify when a specific touch event has occurred. Once these events are received, they can be handed off to the overridden onTouchEvent callback.
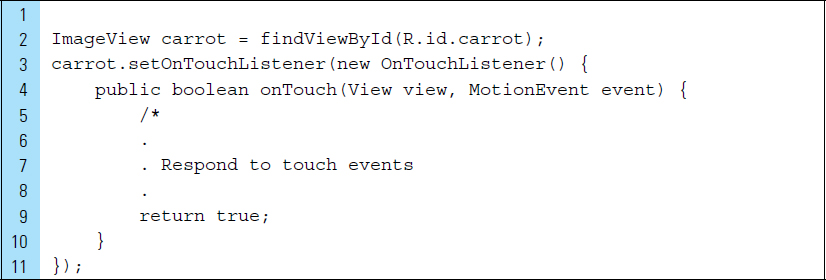
In the following code segment, MyActivity implements the GestureDetector. A gesture detector, mGesture, is instantiated with the application context and an implementation of GestureDetector.OnGestureListener. The first argument refers to the application context, and the second is the listener invoked for all of the callbacks, which must not be null.
This lab example explores a turn-based predator-and-prey game, “Escape the Catcher,” that requires fling interactions to move the butterfly on the board.
Part 1: Conceptual Design
“Escape the Catcher” is a board game based on a simplified concept of the predator vs. prey relationship. The game consists of a board organized by rows and columns. At the start of a game, the board contains a collection of obstacles, an exit, and two characters representing the predator and prey. Figure 7-18 shows the game in mid-play. The butterfly is the prey and the catcher is the enemy predator. The user of the application will play the role of the butterfly. The objective of the player is to escape the predator. The blocks represent wooden obstacles blocking a pathway.
The player (user) is first to take a turn. Using a fling gesture, the player can move the butterfly up, down, left, or right on the game board as long as there are no obstacles in the way. Once the player has taken a turn, the enemy predator will compute the next move.
To win the game, the user must navigate the butterfly around the board obstacles, avoid colliding with the enemy, and successfully exit through the single opening on the board. When it is the enemy’s turn, the catcher will actively hunt down the butterfly. If a collision occurs between the enemy and the butterfly, the game is over and the player is defeated.

Part 2: Application Structure and Setup
The settings for the application are as follows:
Application Name: |
Escape the Catcher |
Project Name: |
EscapetheCatcher |
Package Name: |
|
Android Form: |
Phone and Tablet |
Minimum SDK: |
API 18: Android 4.3 (Jelly Bean) |
Target SDK: |
API 21: Android 5.0 (Lollipop) |
Compile with: |
API 21: Android 5.0 (Lollipop) |
Activity Name: |
|
Layout Name: |
|
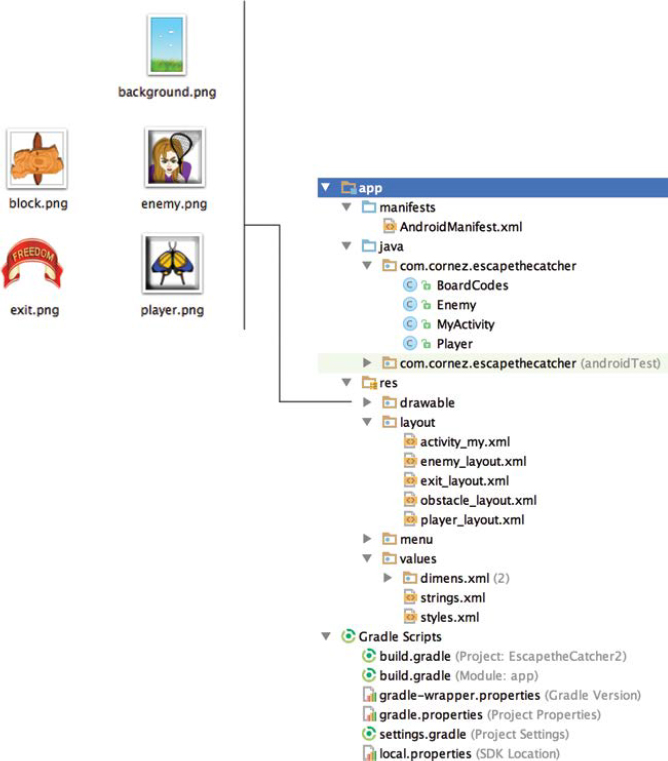
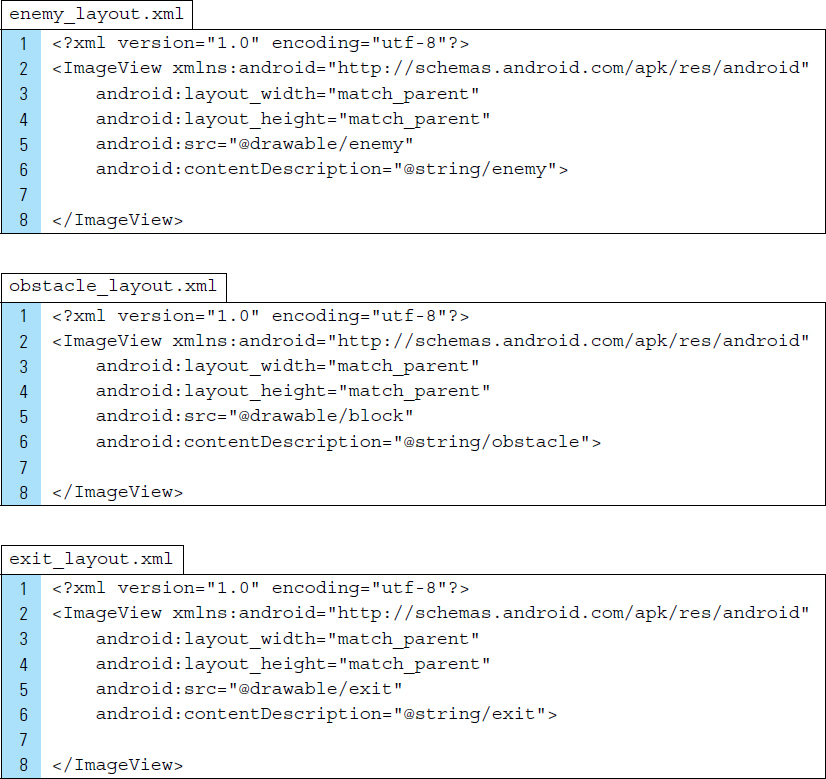
The application launcher is set to the Android default ic_launcher.png file. Five graphic elements representing the application backdrop, obstacles, prey, enemy, and exit are added as PNG files to the drawable directory.
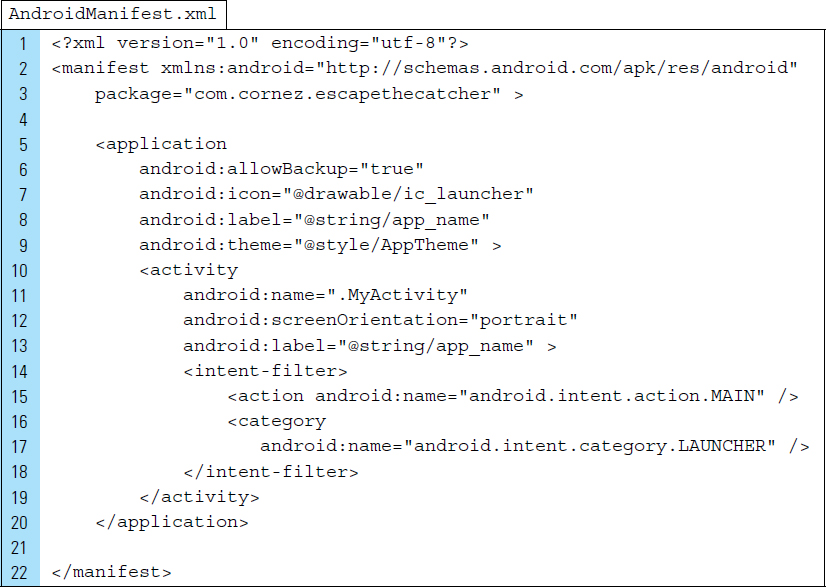
The structure of the complete application is shown in Figure 7-19. The Java source files consist of classes that model the butterfly and the enemy, the logic codes for the game board, and the application Activity, MyActivity.
Three XML layout files needed for this application are used to hold the graphic objects for the enemy, the player, and the obstacles blocking the path to the exit. In addition to these containers, a main activity layout is used to store all the elements in a relativeLayout root View.
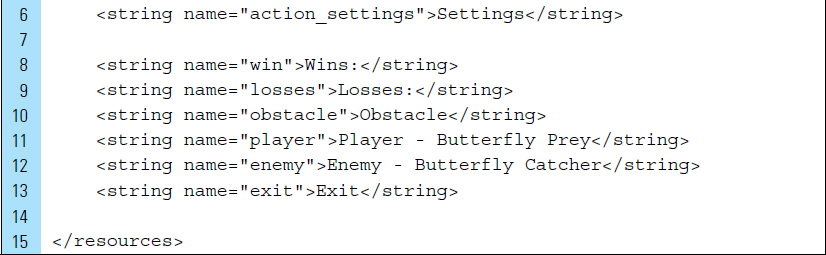
The screen settings are indicated in the AndroidManifest file. A fullscreen is utilized and the titlebar is removed. The screen orientation is locked in portrait mode. The XML code for AndroidManifest is shown as follows:
Part 3: The User Interface
As shown in the project structure for the application, four layout files are needed to support a dynamic user interface and to create a random game board for each new game. The layout associated with the application’s activity is activity_my.xml. This layout represents the application screen. The remaining four layouts are used to inflate views during runtime, such as the butterfly, the enemy, obstacles, and the exit door.
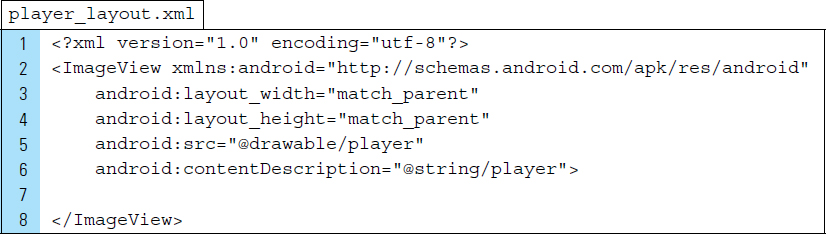
To build the layout, activity_my.xml, the strings.xml resource file is used to define the labels and titles. The XML code for strings.xml is shown as follows. The string values that appear on Lines 8–9 are used as labels for wins and losses. Lines 10–13 provide the descriptions for images used in the application.


The user interface for the activity’s content is activity_my.xml. As shown in Figure 7-20, this layout is designed with a RelativeLayout root tag, identified as relativeLayout. This identifier name is used to reference the layout from within MyActivity. As a RelativeLayout, the x, y coordinate system will reference 0, 0 at the upper-left corner of the screen. This coordinate system is used in the arrangement of visual elements that will be dynamically added to the board during runtime.
The XML code for activity_my.xml is shown as follows. For visual appeal, the drawable file named background.png is applied to the background of the root View. Two TextView elements are added to provide the win-and-loss game results.

The game board for the application is populated with obstacles, an exit banner, and game players once the application launches. To inflate these graphic elements, each display object type is modeled as a layout file with an ImageView specified as the root element. The XML code for the player, the enemy, the obstacle, and the exit layouts are shown as follows:
Part 4: The Logic Board
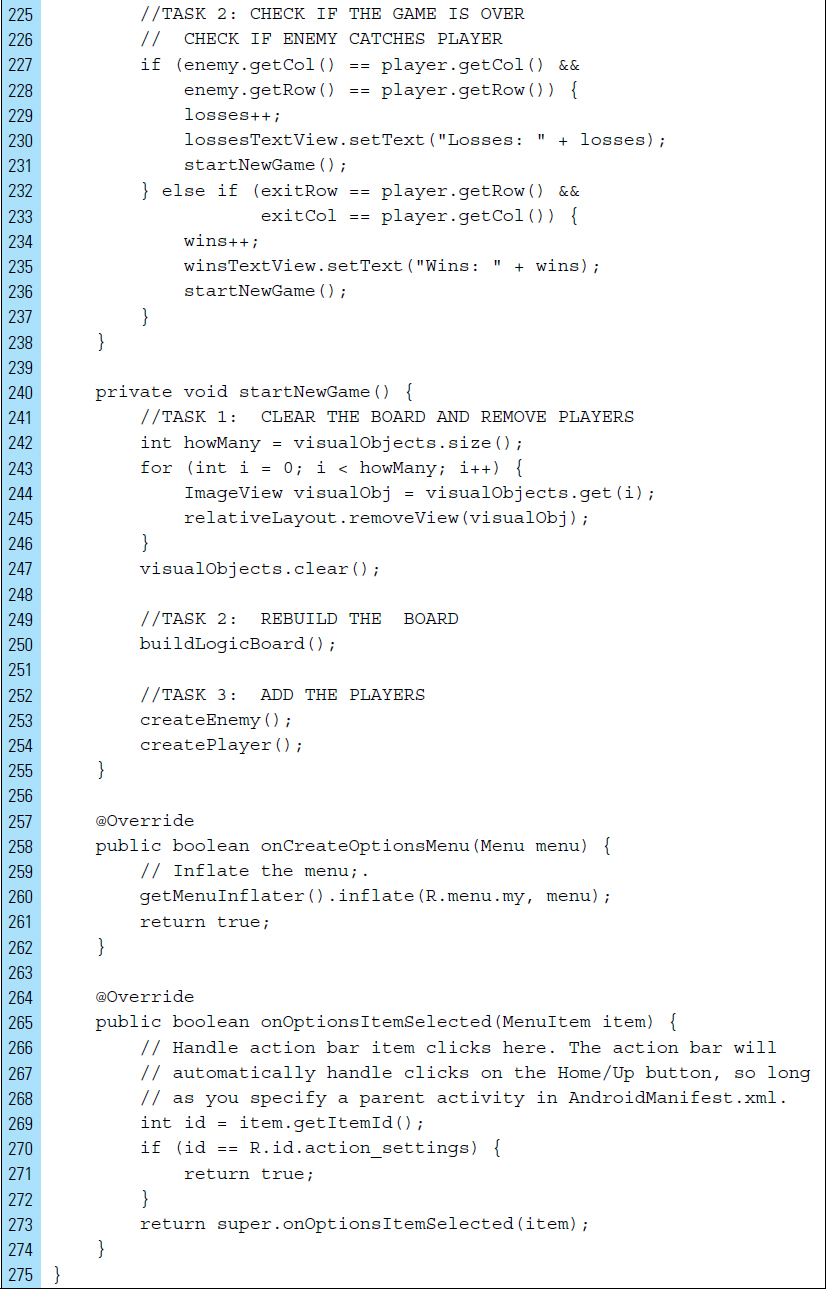
To control the placement and movement of the player and the enemy, the game algorithm depends on a logic board. As shown in Figure 7-21, this logic board is constructed as an array consisting of eight rows and five columns. Each cell of the array holds a code indicating the presence of an obstacle, an exit door, or a nonexisting element. Code 1 is used to indicate the presence of an obstacle. Code 2 indicates a cell is empty. An empty cell means the player and the enemy can freely move in this unblocked location. Code 3 indicates an exit door, represented by an exit banner graphic.
The algorithm for the application relies on board codes for logical positioning, manuevering, and computing the moves made by the player and the enemy.
The designated board codes are also used to arrange specific visual objects on the screen, such as the obstacles and the exit banner. At the start of every game, MyActivity implements a game board. The codes stored on the game board are defined in the Java class BoardCodes as follows:


Part 5: The Player and Enemy
The movements of the player and the enemy are governed by the codes assigned to the cells on the game board. If an obstacle exists on the board, the player and enemy are not allowed to move into that board’s cell location.
When it is the user’s turn to make a move on the board and a fling gesture is detected by the application, the player’s ability to move right, left, up, or down is verified prior to moving the butterfly into the new position on the board. If it is established there are no obstacles barring the indicated move, the ImageView will be updated within MyActivity; otherwise the turn is consumed.
The Java code for the Player class is shown as follows:

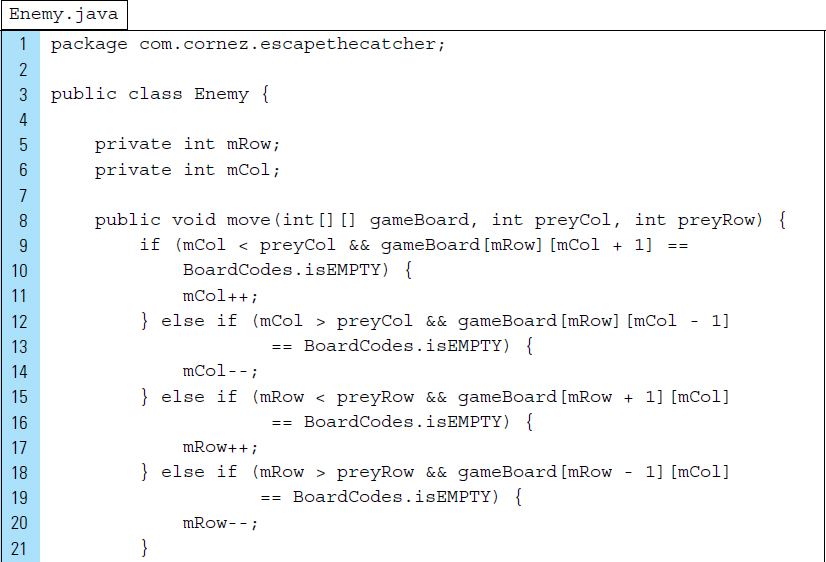
The enemy will behave as a predator. For example, its movements are based on typical predator/prey logic rules. The Java code for the Enemy class is shown as follows:
Lines 8–22: |
The |
Part 6: The Game Controller
MyActivity will serve as the game controller for the application. Its objective is to initialize the game elements, update the UI display objects on the screen, determine when a game has concluded, and detect fling gestures, which are required for the user to move the butterfly. For this simplified version of the game, the enemy will always be positioned in the second row, fourth column of the game board. The player (butterfly) will be positioned in the first row, first column.
The Java code for MyActivity is shown as follows:
Lines 20–22: |
MyActivity is implemented with the |
Lines 32–41: |
To simplify the game for demonstration in this lab example, a fixed logic gameboard is constructed. The final board will appear similar to the one shown in Figure 7-21. |
Lines 100–125: |
The visual elements on the logic board are added. Obstacle ImageViews will be inflated and arranged on the logic gameboard in the appropriately coded cells. The exit banner graphic is placed on the screen. |
Lines 126–139: |
The Enemy ImageView is inflated and placed on the screen, using the arrangement specified by the logic gameboard. |
Lines 140–154: |
The |


Lines 156–164: |
A motion event is analyzed. If it is applicable, it will trigger the appropriate callbacks supplied by the |
Lines 198–238: |
The velocity of the finger movement along the x- and y-axis determines the fling direction. Threshold values of 2500 and –2500 are used in this example. Based on the experiments performed in Lab Example 7-1, this value is enough to indicate both a feeble and strong direction of a given fling. |
Lines 240–254: |
Once the player has either successfully escaped the enemy or been captured, a new game will begin. The screen is cleared for a new arrangement of visual elements. |

■ 7.8 Fling Velocity
Well-designed user interfaces are often made interactive by allowing elements to respond to user input in a way that closely resembles a real-world action. For example, a user may fling an object in a game to produce movement. The resulting momentum will take into account the x, y coordinates of the object and the velocity of the gesture. In addition, the object in motion may slow down gradually, as dictated by the implementation of the application. In a typical game, the behavior of the moving object is subject to the physics of the game world being implemented.
In a given fling gesture, an onFling motion event notification occurs with an initial ACTION_DOWN MotionEvent, followed by an ACTION_MOVE MotionEvent, and ends with an ACTION_UP MotionEvent. As illustrated in “Escape the Catcher” game of Lab Example 7-5, a fling is based more on movement than on simple contact.
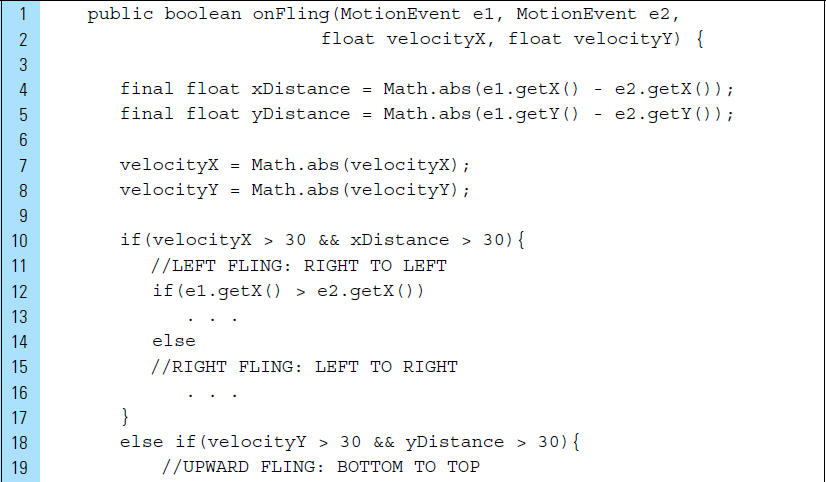
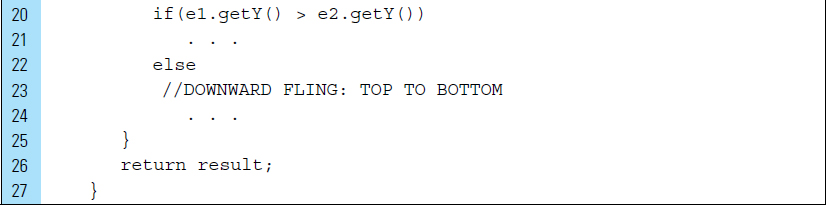
Tracking the movement in a fling gesture requires the start and end positions of the finger, as well as the velocity of the movement across the touchscreen. The direction of a fling can be determined by the x and y coordinates captured by the ACTION_DOWN and ACTION_UP MotionEvents and the resulting velocities.
Consider the following segment of code that implements onFling(). The MotionEvent e1 contains the x, y coordinates captured by the MotionEvent that started the fling gesture. The MotionEvent e2 contains the x, y coordinates captured by the MotionEvent that triggered the onFling gesture. The distance of the gesture is measured as the distance between these two points. The velocities are measured in pixels per second along the specified axis.
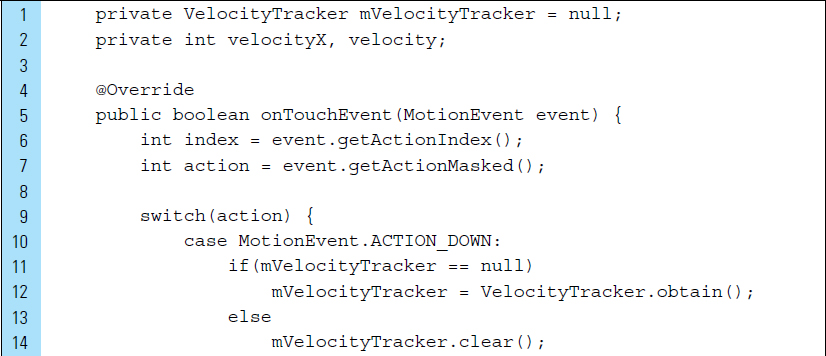
VelocityTracker is an Android helper class for tracking the velocity of touch events, including the implementation of a fling. In applications such as games, a fling is a movment-based gesture that produces behavior based on the distance and direction a finger travels with a gesture. The VelocityTracker class is designed to simplify velocity calculations in movement-based gestures.
Lines 10–11: |
The |
Line 12–13: |
The established |
Line 14: |
The |
Lines 18–22: |
While the movement-based gesture is being tracked, the |

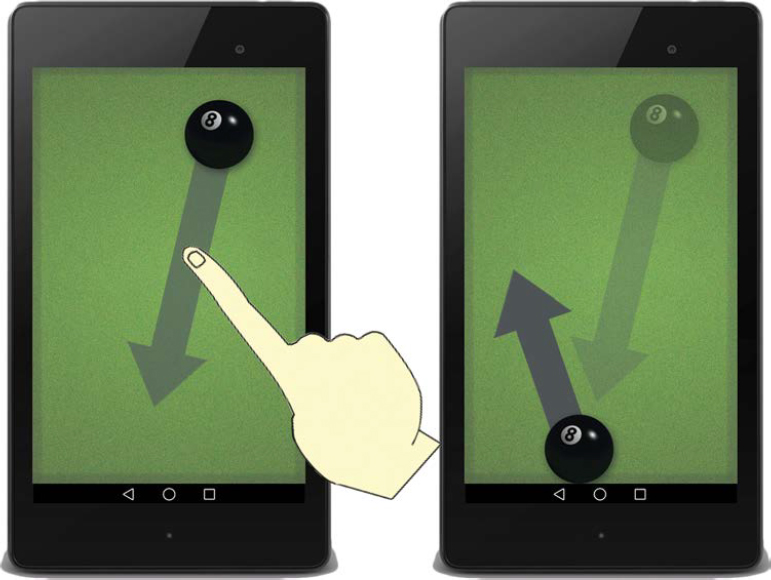
■ Lab Example 7-6: Fling Velocities Billiard Ball
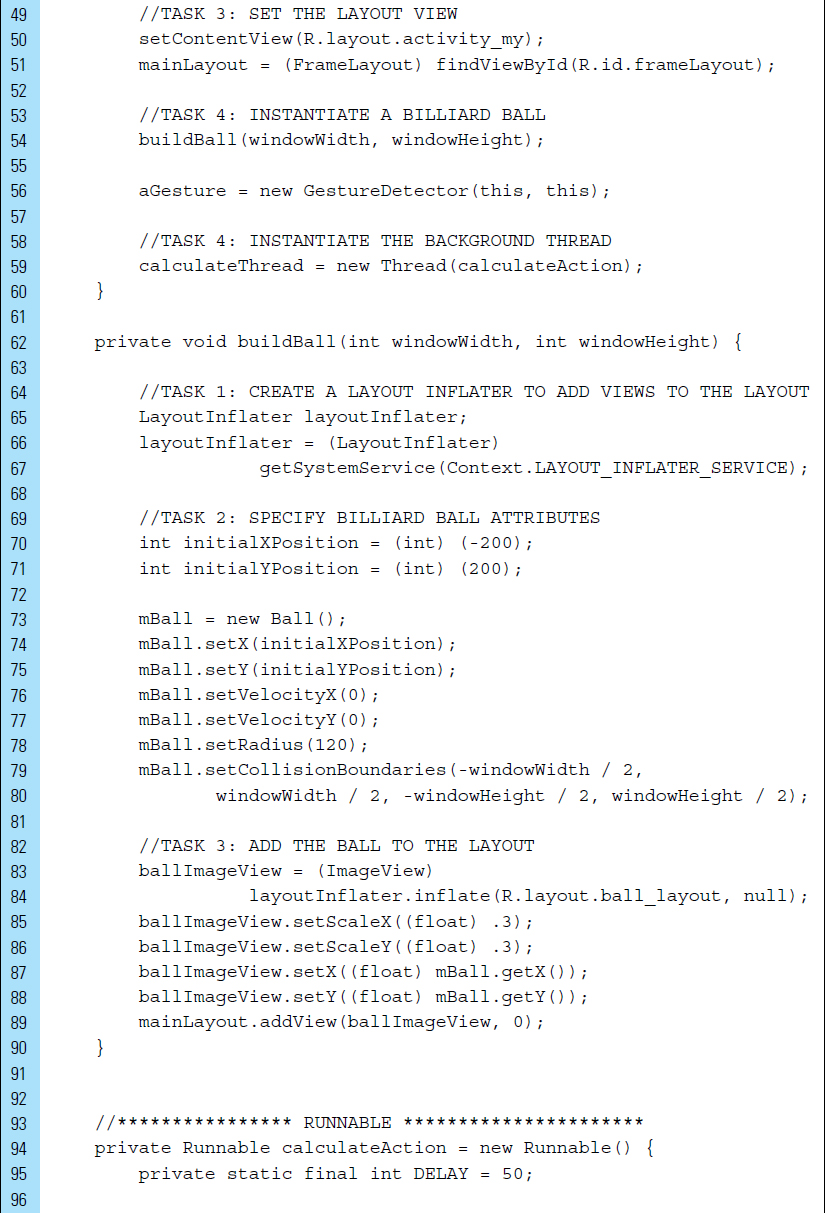
The Billiard Ball lab example explores momentum produced by a fling gesture. Using a quick fling movement, the user can set the billiard ball in motion, as shown in Figure 7-22. The magnitude of the resulting velocity is directly proportional to the force of the fling.
Given the force applied to the ball, there are several values that will be computed in this experimental application. The first is the initial velocity of the ball that results from the fling. Once the ball has been assigned a fling velocity that sets it in motion, the force of friction acts on the ball as it begins to move. The velocity will continually be updated, as friction is applied to the momentum of the ball until it eventually comes to a stop. How far the ball moves depends on its initial velocity. When the ball encounters the wall of the table at the edge of the touchscreen, a collision will be detected and the velocity of the ball will be updated.
Part 1: Application Structure and Setup
The settings for the application are as follows:
Application Name: |
Billiard Ball |
Project Name: |
BilliardBall |
Package Name: |
|
Android Form: |
Phone and Tablet |
Minimum SDK: |
API 18: Android 4.3 (Jelly Bean) |
Target SDK: |
API 21: Android 5.0 (Lollipop) |
Compile with: |
API 21: Android 5.0 (Lollipop) |
Activity Name: |
|
Layout Name: |
|
The project structure for the application is shown in Figure 7-23. Two drawable PNG files are added to the drawable directories: (1) the billiard ball, ball.png, and (2) the billiard table.
The Java source files for the Billiard Ball application are minimal: Ball and MyActivity. The Ball class is used to model the billiard ball with which the user interacts. The single activity of the application is MyActivity, the controller for UI operations and gesture detection.
The UI interface layout associated with MyActivity is activity_my.xml. activity_my.xml and ball_layout.xml are both required by the Activity.
The screen orientation for the Billiard Ball experiment is locked into portrait mode. The XML code for the AndroidManifest is shown as follows:


Part 2: The User Interface
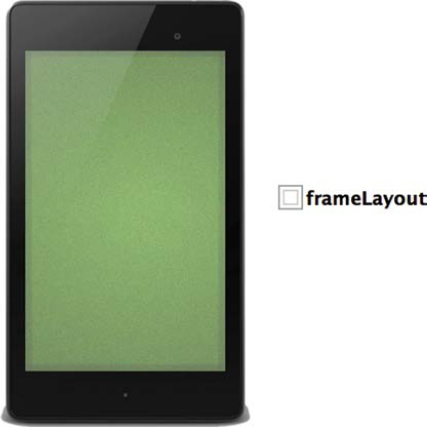
The Billiard Ball experiment is a movement-based application that is designed to display a single item. A FrameLayout root View is useful for blocking out an area on the screen to hold a single child view. The layout design for activity_my.xml is shown in Figure 7-24. The single element is a container, the FrameLayout root View. This container holds the billiard ball, which will be added programmatically in the application’s activity. For visual appeal, the background of the root View is set to the background.png drawable.
The XML code for activity_my.xml is shown as follows. Line 5 sets the identifier name for the container as frameLayout.

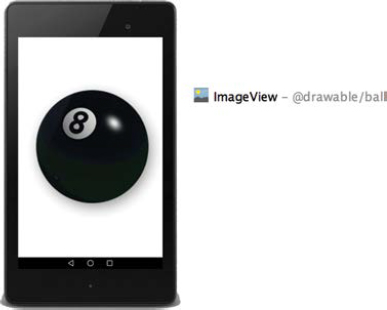
The ball drawable will be added to the screen content programmatically. For this purpose, the drawable is implemented as a layout file, ball_layout.xml, with an ImageView root element. The design of this file is illustrated in Figure 7-25. The XML code for ball_layout.xml is shown as follows:

Part 3: Ball Class
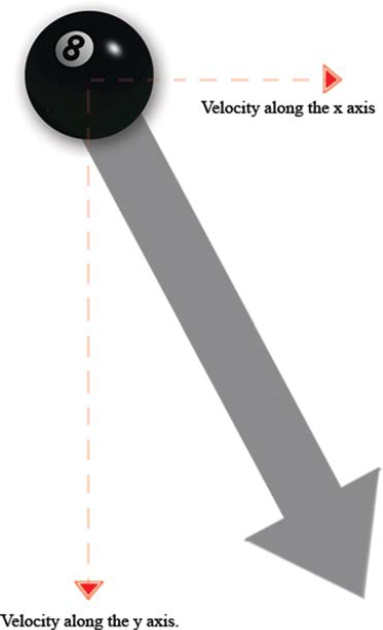
The billiard ball is modeled by Ball.java. Its behavior is based on velocity, radius, and the boundaries that define collisions. As shown in Figure 7-26, the velocity vector for a moving ball has an x and a y component.
The class attributes for collisions have been simplified for this experiment. For example, when the ball collides with a wall, it simply reverses direction while maintaining its momentum. The friction, or linear damping, to slow the ball down is stored as a constant value, 0.93.
The Java code for the Ball class is shown as follows:

Part 4: MyActivity
The activity for the application implements a GestureDetector to detect flings. A background thread is used to perform the animation calculations, and the main UI thread updates the position of the billiard ball at paused intervals.
The Java code for MyActivity is shown as follows. The onTouchEvent() is called when a touch event occurs. The onFling() callback is triggered when it is determined the user performs a fling gesture. The calculated velocity of the fling along the x- and y-axis is supplied to this callback method. The billiard ball is set in motion when its velocity is assigned the fling velocity in pixels per second. The constant, ADJUST, is used to finely tune the speed of the ball. This value is set to .025 of the supplied pixels per second.

■ 7.9 Multitouch Gestures
Most Android devices possess the ability to respond to multiple consecutive touches. The most common multitouch gestures are pinch and zoom, also referred to as pinch and spread. A pinch gesture involves two fingers placed on the screen. The finger positions, and the distance between them, are recorded. When the fingers are lifted from the screen, the distance separating them is recorded. If the second recorded distance is less than the first distance, the gesture is recognized as a pinch. A spread gesture is similar to a pinch gesture in that it also records the start and end distance between the fingers on the touchscreen. If the second recorded distance is greater than the first, it is a spread gesture.
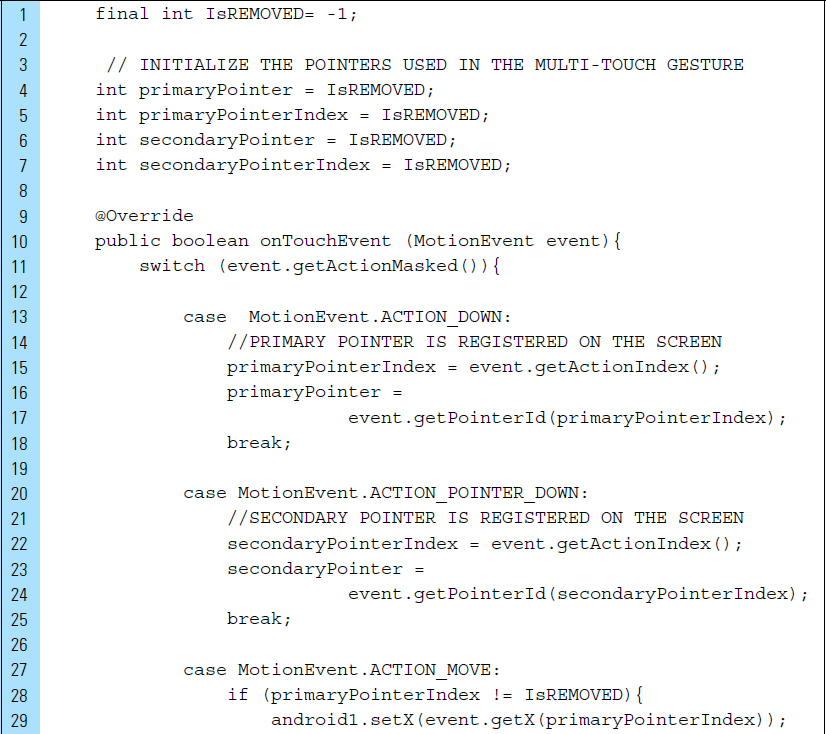
In a single-touch gesture, a MotionEvent object is passed to the onTouch() callback method. The MotionEvent object contains information about the specific touch gesture, such as the location of the touch within the view and the type of action performed. In a multitouch gesture, the MotionEvent object supplies information about the multiple pointers that constitute the multitouch gesture. Each finger placed on the screen in a multitouch gesture is referred to as a pointer by the Android framework. Each pointer is referenced by an index value and assigned an ID. The current number of pointers in a gesture can be obtained from the getPointerCount() method for a given MotionEvent object. In addition, the assigned ID for a pointer can be obtained from the MotionEvent getPointerID() method. In the following code segment, the number of pointers and the first pointer, at index zero, is obtained when a touch event occurs.

Multitouch gestures begin with an ACTION_DOWN MotionEvent. This occurs when the first pointer in the gesture touches the screen. This first pointer is the primary pointer of the gesture. The index for the primary pointer is always at index 0 in the list of active pointers. When additional pointers in the gesture are placed on the touchscreen, an ACTION_POINTER_DOWN occurs. getActionIndex() will return the index value for a pointer that triggered the MotionEvent.
A multitouch gesture ends when both pointers in the gesture are removed from the touchscreen. ACTION_POINTER_UP occurs when the secondary pointer goes up and ACTION_UP occurs when the last pointer leaves the touchscreen.
Consider the following sequence of pointer MotionEvents for a multitouch gesture that involves two pointers.
Pointer 1 (primary pointer) goes down: |
|
Pointer 2 (secondary pointer) goes down: |
|
Both pointers move: |
|
Pointer 2 (secondary pointer) goes up: |
|
Pointer 1 (primary pointer) goes up: |
|
A touch gesture will generate a stream of MotionEvents before the pointer or pointers are lifted up from the touchscreen. An application may need to track individual touches over multiple touch events.
Consider the following segment of code that handles multiple pointers directly in a multitouch gesture. The objective of the code is to track two-finger pointers as they travel around the screen. As shown in Figure 7-27, the primary pointer is tracked by a large black rectangle. The primary pointer represents the first pointer placed on the screen. The secondary pointer is tracked by a smaller black rectangle.
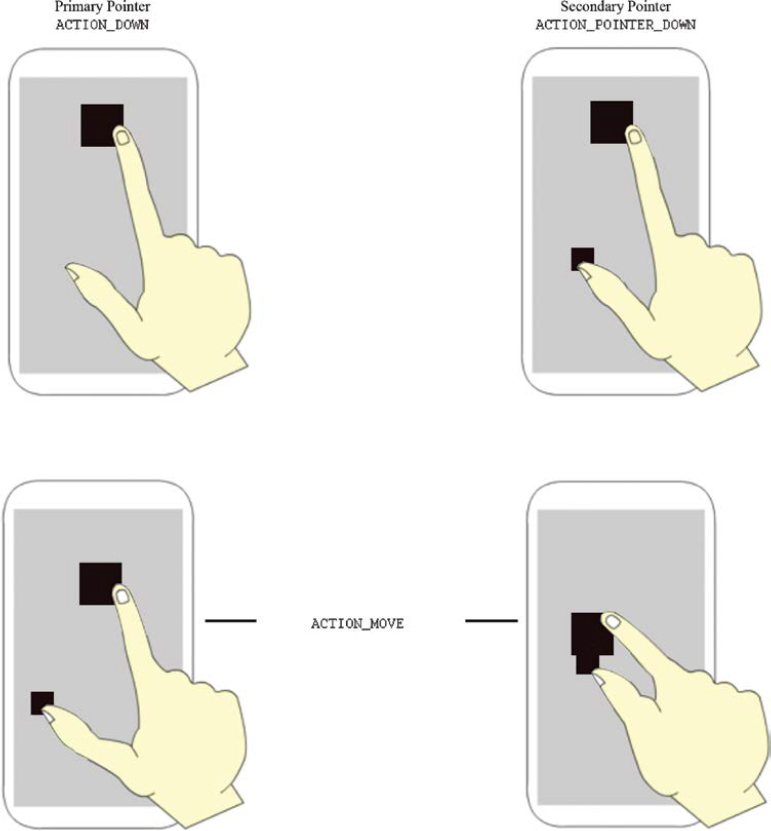
Lines 13–25: |
As the primary and secondary fingers are placed on the touchscreen, their pointer identifiers are accessed using their pointer data index. These identifiers provide the actual pointer number associated with the MotionEvent data, accounting for individual pointers going up and down from the start of the gesture. |
Lines 27–36: |
Once the |
Lines 38–47: |
If either of the pointers is removed from the touchscreen, the multitouch gesture is finished. |

■ Lab Example 7-7: Photo Zoom, Pinch, and Move Experiment
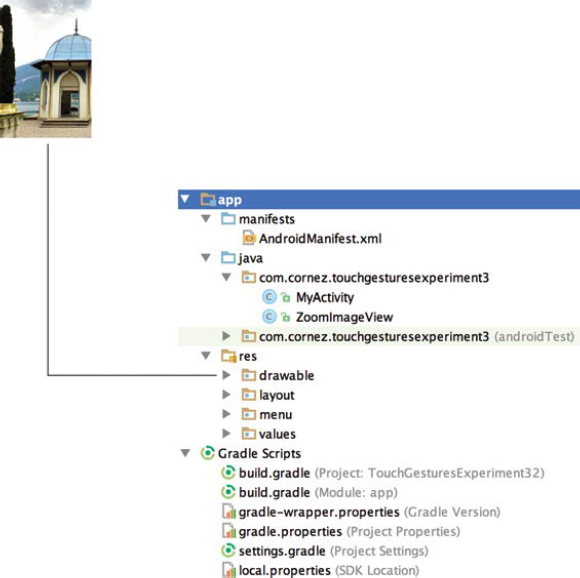
This lab is a touch experiment application that explores the implementation of the zoom and pinch multitouch gestures. Zoom and pinch are standard gestures that Android application users expect to use on photographs and other UI screens. As an experiment for gesture recognition, the application is limited to a single photograph. When the application is launched, the photograph shown in Figure 7-28 will appear on the screen. The user can zoom, pinch, or adjust the location of the image on the screen.
Part 1: Application Structure and Setup
The settings for the application are as follows:
Application Name: |
Touch Gestures Experiment 3 |
Project Name: |
TouchGesturesExperiment3 |
Package Name: |
|
Android Form: |
Phone and Tablet |
Minimum SDK: |
API 18: Android 4.3 (Jelly Bean) |
Target SDK: |
API 21: Android 5.0 (Lollipop) |
Compile with: |
API 21: Android 5.0 (Lollipop) |
Activity Name: |
|

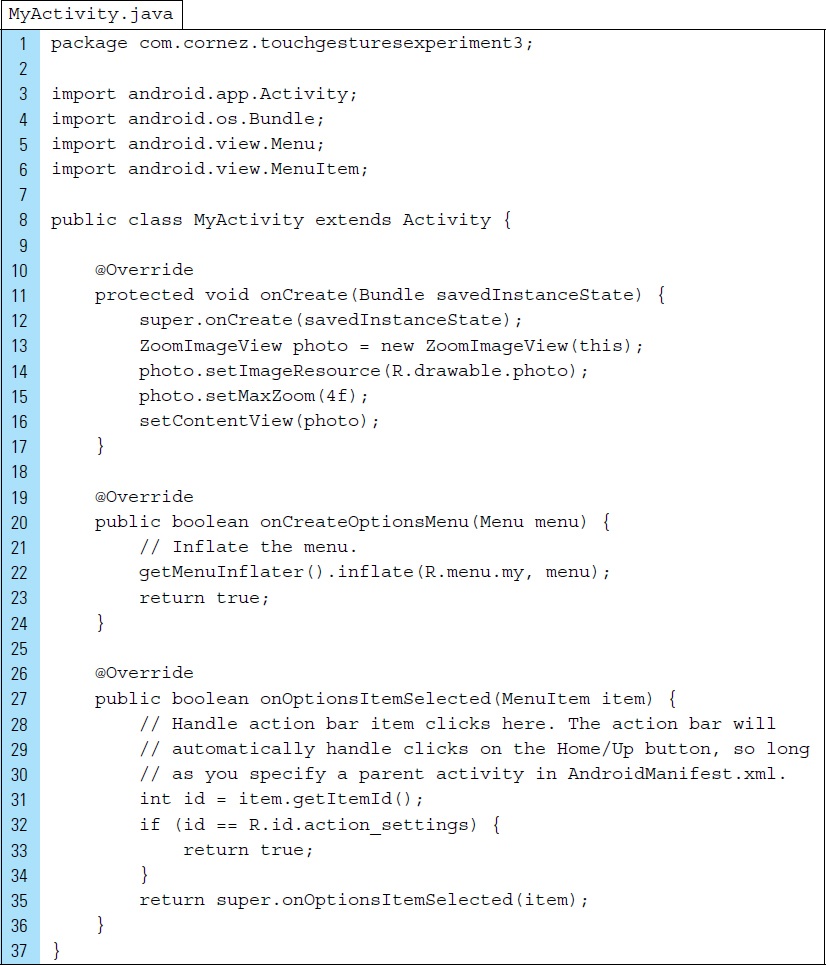
The project structure for the application is shown in Figure 7-29. The single photograph, a drawable PNG file, is stored in the drawable directories. The Java source files for the multitouch experiment are MyActivity and ZoomImageView. A UI interface layout will not be built as an XML file for this application.
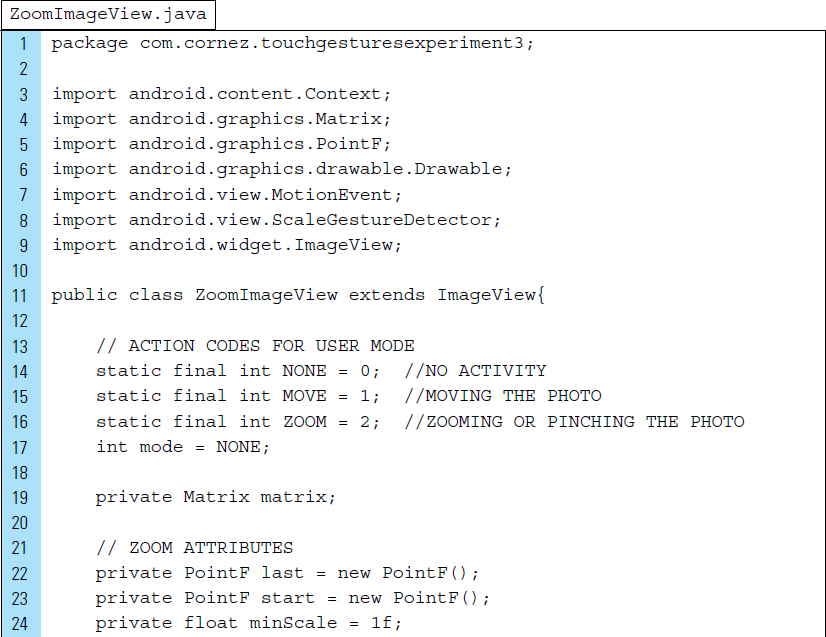
Part 2: MyActivity.java
The objective of MyActivity is to place the photo on the screen. This photo is set as the content View associated with the activity of the application. The Java code for MyActivity is shown as follows:
Lines 13–14: |
The |
Line 15: |
The maximum scale amount for the |
Line 16: |
The content for |
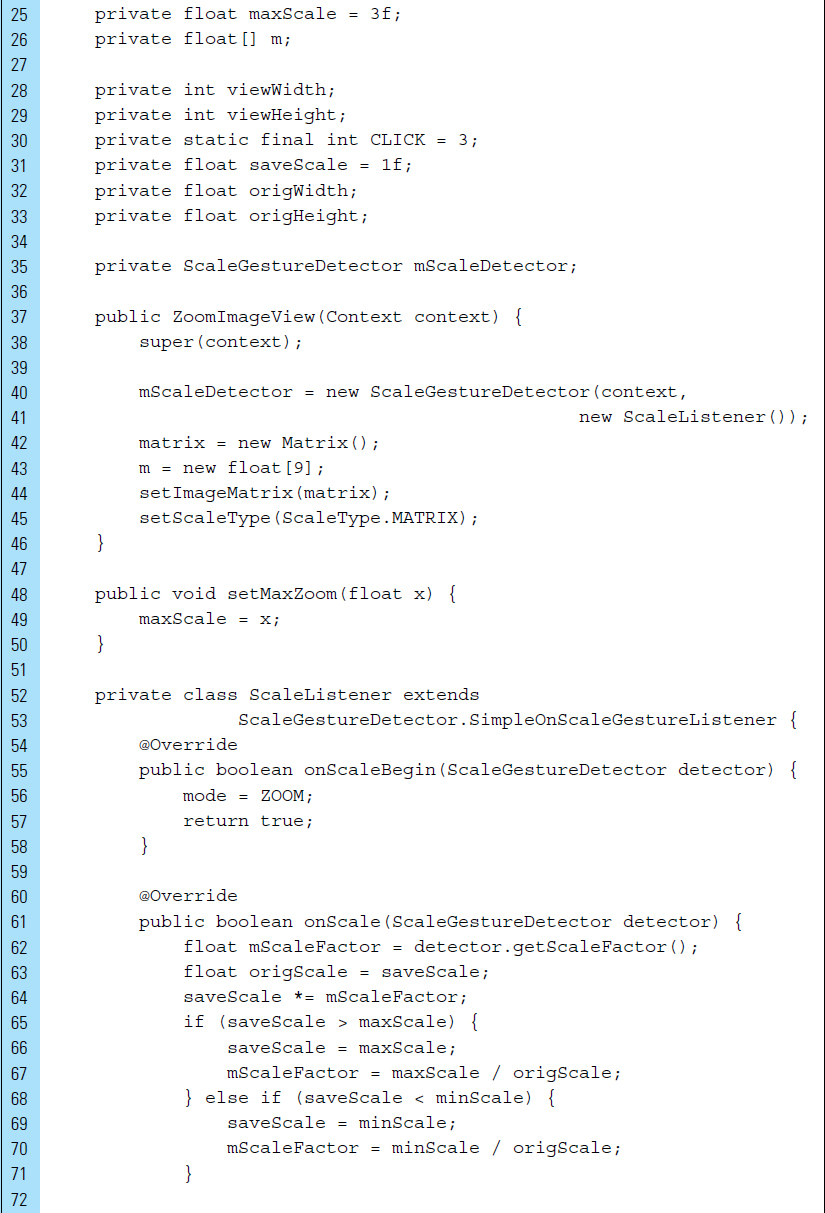
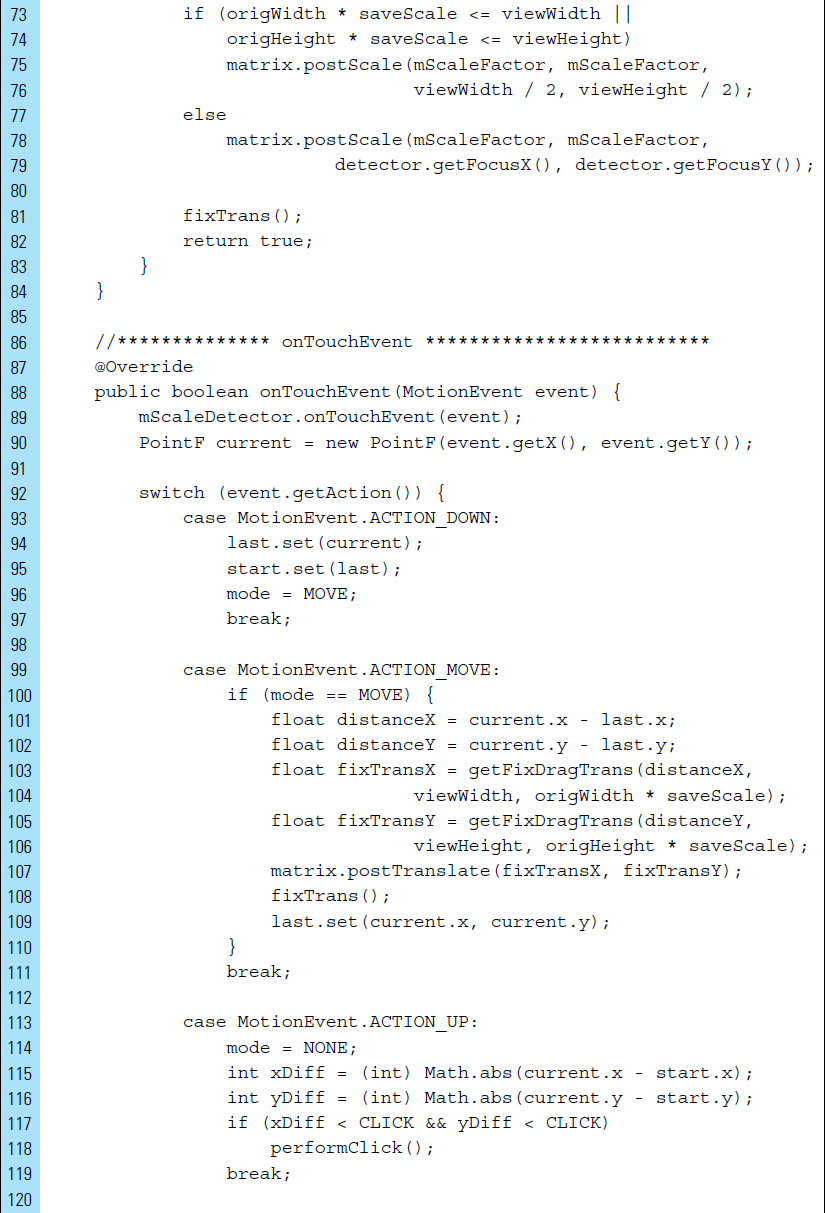
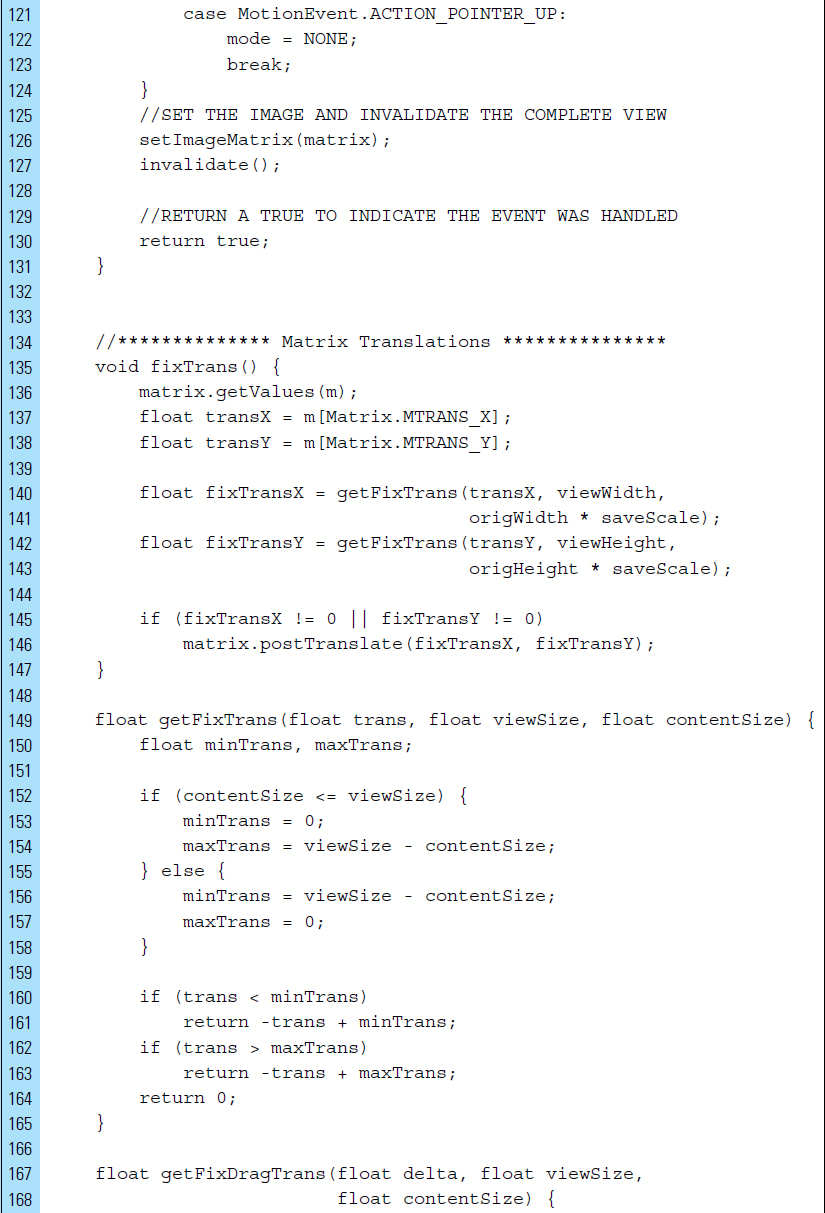
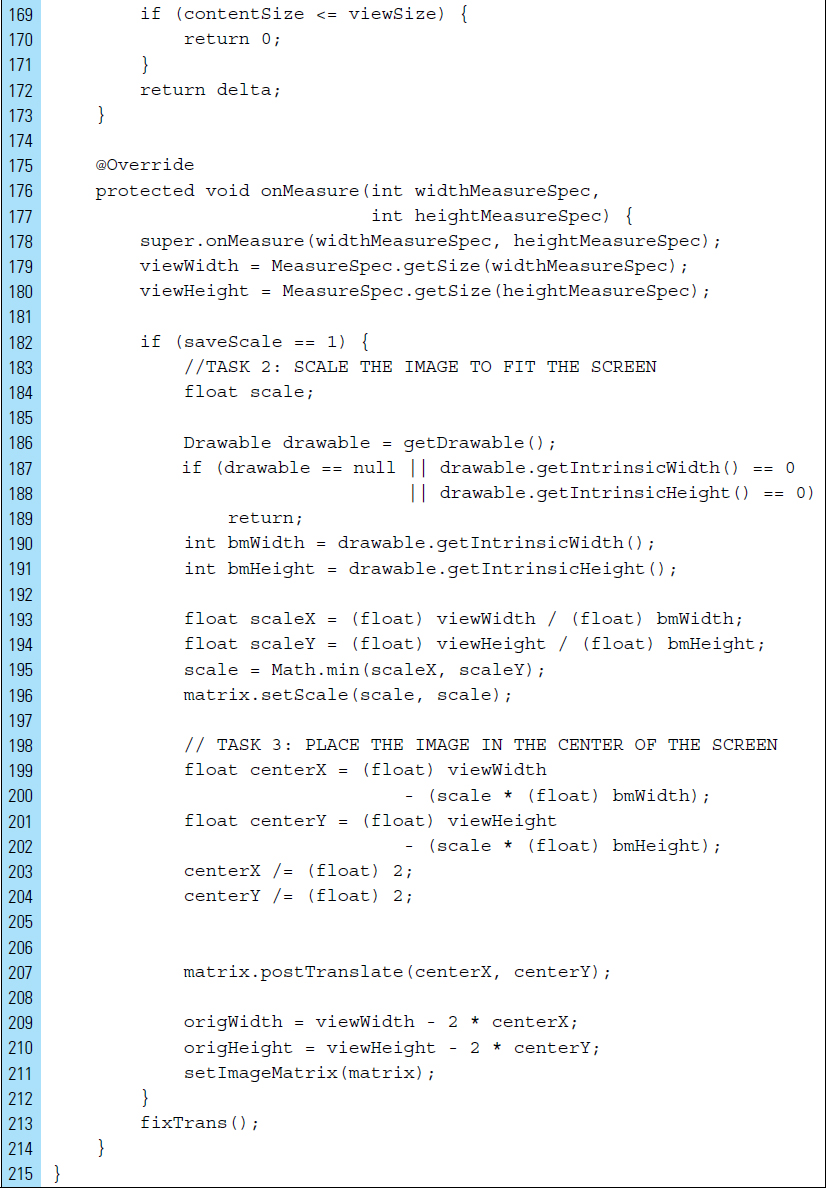
Part 3: ZoomImageView— Implementing the Multitouch Gesture
The ZoomImageView detects the multitouch gesture this application uses. User activities are categorized by three codes: 0, 1, and 2. When the user is not performing an activity, the activity mode is set to 0, or NONE. If the user is performing a single pointer gesture that is identified as moving the photo, the activity mode is set to 1, or MOVE. Finally, when the user is performing a multitouch gesture that is defined as a zoom—or its reverse, a pinch—the activity mode is set to 2, or ZOOM.
Lines 24–25: |
To specify the amount the user can zoom, the values of the |
Lines 52–84: |
To support the scaling of the photo, a |
Lines 86–131: |
The touch events are implemented. A zoom or pinch produces an increase or reduction in the image size based on the distance between the two pointers, current and last. Once the |
Lines 134–214: |
Matrix transformations scale and move the photo object intact to a new location. |
■ Exercises
List eight basic touch gestures.
When is an onTouchEvent() method triggered?
Briefly describe three action codes supported by the MotionEvent class.
Describe the usage of the GestureDetector class. What are its limits?
List and describe the callback methods contained in the GestureDetector class.
The MotionEvent class provides a collection of methods to query the position and other properties of fingers in a gesture. Name and describe five of these methods.
Outline the implementation of a drag-and-drop gesture.
Describe the purpose of DragShadowBuilder. How can a drag shadow be customized?
Write a segment of code that determines the direction of a fling gesture.
Write a segment of code that determines the velocity of a fling gesture.
Outline the sequence of MotionEvents for a multitouch gesture that involves two pointers.