
Chapter 3
Generating and Consuming Data
IN THIS CHAPTER
![]() Defining serialized data basics
Defining serialized data basics
![]() Developing a data generator and API
Developing a data generator and API
![]() Consuming the generated data and showing it onscreen
Consuming the generated data and showing it onscreen
![]() Seeing the applications in action
Seeing the applications in action
Cereal is what you eat for breakfast; serialization is what you do with local data in XML or flat-file format. If you eat the former, the latter might make more sense. This chapter delves into data serialization and deserialization, which are incredibly useful tools for all sorts of purposes because the combination of these two techniques lets you work with structured data in a manner that doesn’t require in-depth knowledge of database management. Throughout this chapter, you use the WeatherForecast project to generate weather data that is then serialized to create a usable data store (albeit not a very fancy one). The RetrieveWeatherForecast project queries the API created by the WeatherForecast project, deserializes it, and displays it onscreen. The first two parts of this chapter help you understand the current trends in data stores and the concept of serialization better.
 You don't have to type the source code for this chapter manually. In fact, using the downloadable source is a lot easier. You can find the source for this chapter in the
 CSAIO4D2EBK06CH03 folder of the downloadable source. See the Introduction for details on how to find these source files.
Understanding Why These Projects Are Important
At one point in history, companies relied on local data stores, with some users spending their entire day entering information into a database and other users spending their entire day trying to find ways to use the data. A developer had to be concerned about providing interfaces that implemented Create, Read, Update, and Delete (CRUD) principles. C# developers can still find tutorials demonstrating such applications online, such as the one at https://docs.microsoft.com/aspnet/core/tutorials/razor-pages/razor-pages-start.
 When you look at how data is used today, it doesn’t normally rely on local data stores with manually input data. According to Forbes (
https://www.forbes.com/sites/bernardmarr/2018/05/21/how-much-data-do-we-create-every-day-the-mind-blowing-stats-everyone-should-read/) and SeedScientific (https://seedscientific.com/how-much-data-is-created-every-day/), the probabilities are that no one sat at a terminal and manually input the data you’re using today. So, it becomes more important to know how to display information from these vast data stores than how to input the data manually, even though both are important.
Most data isn’t even handled by humans anymore. Consider the seemingly human-intensive act of predicting the weather. It turns out that most weather data today is generated based on information collected by sensors (see https://www.wunderground.com/about/data, https://agrimetsoft.com/knn-wg and https://www.ipcc-data.org/guidelines/pages/weather_generators.html). In other words, no human has touched the data.
Consuming data has also changed. The chances are that you’ll grab someone else’s data using an API. For example, you can grab data from many different weather sites, including the MeteoMatics site at https://www.meteomatics.com/en/weather-api/. There is no chance whatsoever that these sites will allow you to change their data, but they do want you to consume their data, which means that you need to concentrate on simple applications that let users view the data in a prescribed manner.
It isn’t possible to demonstrate complex weather forecast-generation techniques in a single chapter because most weather generators today rely on advanced machine learning and deep learning techniques. However, the WeatherForecast project gives you some idea of how such a program could work from a very basic perspective. The RetrieveWeatherForecast project demonstrates how to query an API and then present the information it provides onscreen in a basic manner. The point of these two projects is that you don't have to create extraordinarily complex coding scenarios to create truly useful applications that work with today’s data.
Serialized Data Isn’t for Breakfast
In some respects, serializing data is much like eating breakfast. You begin with a whole bowl of data and put it on disk one bite at a time, just as you eat cereal one bite at a time. The idea is to make the data manageable and more organized so that manipulating it is easier. When you work with a collection of objects in memory, a single object, the collection, contains other objects that you access. Each of these objects has a set of properties that contain data. Serialization breaks up each of the pieces so that you now have some means of storing the data on disk. The common storage methods are
- Comma-Separated Value (CSV): Breaks up the data into rows, with one row for each object in the collection, and columns, with one column for each property in the objects. You end up with a table consisting of rows and columns that look very much like what you might write down on paper to organize data yourself. This kind of storage normally requires that each object in the collection be of the same type and have the same properties defined. An advantage of this form of data storage is that it can be extremely space efficient for large quantities of data, which is why you see many datasets used for data science stored in this manner.
- Extensible Markup Language (XML): Starts at the root with the collection object, creating main nodes for each of the objects and subnodes for each of the properties. You end up with a tree-like structure that can adapt to any form that the data might take and can become quite descriptive of the relationship between data elements and the data itself. You normally use this form of storage when the data isn’t well structured and a collection could contain different objects with different properties in each object. It also works well for data that is naturally hierarchical. An advantage of this form of storage is that it allows storage of data attributes in a fully retrievable manner.
- JavaScript Object Notation (JSON): Creates dictionary-like entries for each object. In many respects, JSON and XML are similar because they’re both self-describing, use a hierarchical format, and can be fetched using a
XMLHttpRequestcall. However, JSON differs from XML in that JSON- Doesn’t use an end tag
- Is shorter most of the time
- Is quicker to read and write
- Can use arrays
Each of these storage methods has other advantages and disadvantages. For example, CSV files are easily damaged in ways that might be hard to detect, while XML is bulky and consumes a lot of space. Both types of storage are easily moved between platforms and you see both of them used extensively online. The point of using data-storage techniques like this is to ensure that your data remains accessible even if the application is discarded at some point. Both data formats are kinds of text, which is the universal format across systems and was the first format used to store information before people got fancy.
To serialize data, you must describe to the application how to interpret it — how to take bites. There are many ways to accomplish this task, and the approach you choose depends on your data format. In many cases, you begin by simply defining the object you create as serializable and then use special coding techniques to write these objects to disk. The compiler provides a great deal of help in this case, and the code is easy to understand (as long as you don’t delve too deeply into that behind-the-scenes code).
Developing a Data Generator and API
Data generators take information from some source or randomly define data elements and put it into a form that’s convenient for any of a number of purposes, such as analysis. A data generator can spawn textual data, but it can also produce graphical, aural, and other sorts of data. The form of data depends on the needs of the user consuming it. The following sections discuss how to use an existing Visual Studio 2022 project to create a data generator that also acts as an API that a browser or other application can query.
Creating the WeatherForecast project
The first thing you need is a project to use. This project will rely on an existing Visual Studio 2022 template with some modifications that you normally make when creating a data generator. To create the project, follow these steps:
Click Create a New Project in the Visual Studio 2022 start window.
You see a list of templates to use.
Choose C#, All Platforms, and Web in the drop-down list boxes. Locate the ASP.NET Core Web API template, shown in Figure 3-1.
 Notice that the list of environments that the template supports includes desktop operating systems and cloud-based setups. An API can normally run anywhere it has the required support and can service consumers from any browser, which makes APIs extremely versatile. However, you normally start an API locally before moving it to the cloud.
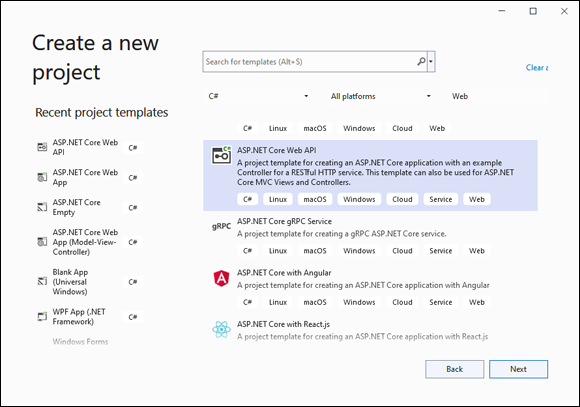
FIGURE 3-1: Locate the ASP.NET Core Web API template.
Highlight the ASP.NET Core Web API template and click Next.
You see the Configure Your New Project dialog box, shown in Figure 3-2.
Type WeatherForecast in the Project Name field and select a location for the project on your hard drive. Make sure that you select the Place Solution and Project in the Same Directory entry, and then click Next.
You see the Additional Information dialog box, shown in Figure 3-3.
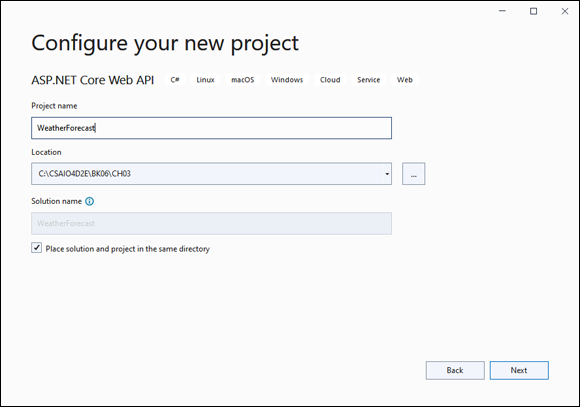
FIGURE 3-2: Provide a name and location for the API.

FIGURE 3-3: Select the additional requirements for the API.
Select .NET Core 3.1 (Long-term Support) in the Framework field and None in the Authentication Type field, and select Configure for HTTPS.
Public APIs, which number now in the hundreds of thousands (or perhaps even millions), usually don't require any authentication. Private and paid APIs usually do requirement authentication, but this authentication may not take the form of a logon dialog box. Instead, the client passes a special token to the API for verification. Consequently, you may not actually use the standard authentication features for your API very often. Think about how you want clients to authenticate before you create the project. It is standard practice to use Secure Sockets Layer (SSL) security for APIs of any sort because it’s incredibly hard to trust the data the client receives otherwise (see
 https://www.bluehost.com/resources/does-my-website-need-ssl-learn-the-benefits-of-ssl-for-website-security/andhttps://www.kaspersky.com/resource-center/definitions/what-is-a-ssl-certificatefor details). Deselecting the Configure for HTTPS check box is such a bad idea that it’s hard to understand why Microsoft would even include it in this case. The bottom line is, if you want your client to feel comfortable, always use SSL.Click Create.
Visual Studio 2022 creates a new web API project for you.
Making the data believable
The default API provided by the Visual Studio 2022 generates weather information randomly. In other words, this is fake data that you could use for testing purposes, but it isn’t based on any real data, nor does it rely on machine learning techniques to compute a forecast. Rather, it’s just values. However, the default setup is lacking in two ways:
- The dates don’t reflect any sort of progression normally associated with weather forecasts. Normally, you see one-, seven-, and ten-day forecasts. Some setups even offer hourly forecasts, but there is always some sort of progression, which the example lacks.
- It’s hard to believe weather data that claims that it’s scorching at 20 degrees below zero, yet the default setup will try its best to convince you that it is indeed scorching. Ignore that icicle hanging off your nose; you’re really overheated!
The code you need to change to make the output more realistic appears in the Controllers folder as WeatherForecastController.cs. Open this file and make the changes shown here:
[HttpGet]
public IEnumerable<WeatherForecast> Get()
{
    return Enumerable.Range(1, 10).Select(index => GetWeatherForecast())
      .ToArray();
}

private int DaysToAdd = 0;

public WeatherForecast GetWeatherForecast()
{
    var rng = new Random();

    WeatherForecast thisForecast = new WeatherForecast();
    thisForecast.Date = DateTime.Now.AddDays(DaysToAdd);
    DaysToAdd += 1;
    thisForecast.TemperatureC = rng.Next(-20, 40);
    switch (thisForecast.TemperatureC)
    {
        case int n when (n < -14):
            thisForecast.Summary = Summaries[0];
            break;
        case int n when (n >= -14 && n < -7):
            thisForecast.Summary = Summaries[1];
            break;
        case int n when (n >= -7 && n < 0):
            thisForecast.Summary = Summaries[2];
            break;
        case int n when (n >= 0 && n < 6):
            thisForecast.Summary = Summaries[3];
            break;
        case int n when (n >= 6 && n < 12):
            thisForecast.Summary = Summaries[4];
            break;
        case int n when (n >= 12 && n < 18):
            thisForecast.Summary = Summaries[5];
            break;
        case int n when (n >= 18 && n < 24):
            thisForecast.Summary = Summaries[6];
            break;
        case int n when (n >= 24 && n < 30):
            thisForecast.Summary = Summaries[7];
            break;
        case int n when (n >= 30 && n < 36):
            thisForecast.Summary = Summaries[8];
            break;
        case int n when (n >= 36):
            thisForecast.Summary = Summaries[9];
            break;
    }

    return thisForecast;
}
The public IEnumerable<WeatherForecast> Get() method is shorter than the original source. It doesn't actually define any data now, but it does create an array of weather predictions. The Enumerable.Range(1, 10) method creates a ten-day forecast, which is more believable than the five-day forecast created by default (although if you look hard enough, you can likely find some website that does provide a five-day forecast).
The WeatherForecast GetWeatherForecast() method defines the weather forecasts one day at a time. To create progressive days, the code calls DateTime.Now.AddDays(DaysToAdd) with a variable, DaysToAdd, that is incremented by 1 during each pass. The temperature in degrees Celsius is a randomly generated number. The temperature in degrees Fahrenheit is calculated in the WeatherForecast.cs file using public int TemperatureF => 32 + (int)(TemperatureC / 0.5556);. Calculated data often appears as part of the output of a data generator. Finally, the code uses a switch to define a Summary value based on the actual temperature (rather than randomly generating it as before). So, when the temperature nears 86 degrees Fahrenheit, the forecast will tell you that it's sweltering and not freezing.
Looking at the API configuration
It’s important to know how to contact your API. To discover this information, open the launchSettings.json file found in the Properties folder. There are two important settings in this file that you can't ignore even if you want to use the defaults in every other way. The first is "sslPort": 44327. The number that follows sslPort specifies the port number used to access your web service. You can ignore the applicationUrl setting because you won't use it to access the API; only the sslPort setting matters. This means that you’ll use https://localhost:4432/7/ as the base URL to access this web service. (The port number, 4432, varies by system.)
The second setting you need to know is "launchUrl": "weatherforecast". This setting defines where your client can find the actual API. Consequently, the full URL for accessing the API is https://localhost:44327/weatherforecast. This is an essential bit of information because you need it later when creating the client.
Checking the API for functionality
You can check your API before you develop the client. The output won't be very exciting, but you can see that the API works as expected. The following sections explain how to check your API for functionality.
Viewing the data in a browser
The first place you want to look for API functionality is your browser. Choose Debug⇒ Start Without Debugging. The first thing you’ll normally see is a dialog box asking whether you want to install an SSL certificate for your project, as shown in Figure 3-4.
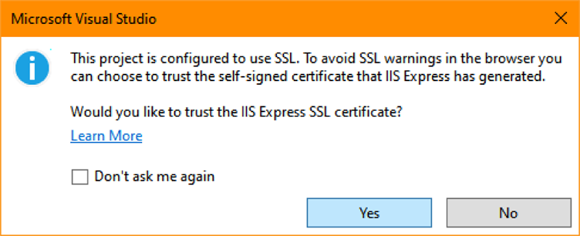
FIGURE 3-4: Determine whether you want to install the SSL certificate.
Unless you really enjoy having your browser ask you about the website you’re testing over and over until you finally go crazy, you’ll click Yes. Because the certificate is working only with your project, you don’t need to worry much about opening huge security holes in your system.
Immediately after you click Yes, Windows will usually display another dialog box asking whether you’re sure you want to install the certificate, as shown in Figure 3-5. Obviously, Visual Studio 2022 and Windows don’t talk, so you have to answer essentially the same question twice.
Just about the time you start to think that you may never see your API in action, a browser window comes up and you see the serialized JSON data shown in Figure 3-6. The background code for your API automatically takes care of the serialization for you based on the array created by the public IEnumerable<WeatherForecast> Get() call. There are a lot of fancy reasons for this happening, such as the addition of the [HttpGet] attribute to the method call, which you can read about at https://docs.microsoft.com/aspnet/core/mvc/controllers/routing and https://docs.microsoft.com/dotnet/api/microsoft.aspnetcore.mvc.httpgetattribute, but the main thing to know is that it simply works as it should without any additional coding on your part.
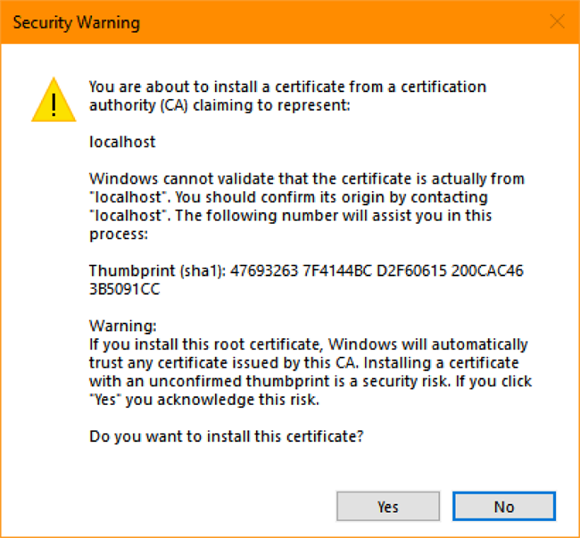
FIGURE 3-5: Make Windows feel better by answering the question a second time.
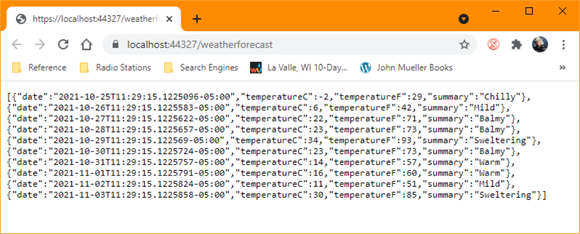
FIGURE 3-6: The browser output shows serialized weather forecast data.
Locating the IIS icon
If you've followed the process outlined in previous sections of this chapter, you now have a service. For a service to be useful, it must continue running until you don’t need it any longer. In the Windows Notification Area, you see an IIS Express icon like the one shown in Figure 3-7. Right-clicking this icon displays a list of the running websites. In addition, you see controls for interacting with the websites.
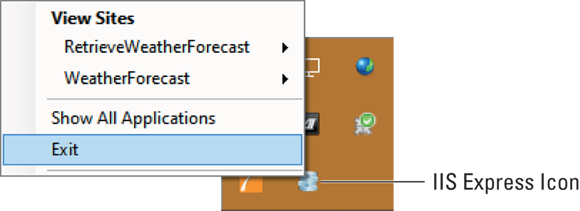
FIGURE 3-7: Look for the IIS Express icon in the Notification Area to see which applications are running.
Knowing about the IIS Express icon is very important because developers often spend a great deal of time looking for errors in their website code, only to find that the service isn’t running. You can save yourself time and embarrassment by looking for this icon.
Creating a Consumer Website
After you have an API to use, you need an application to consume it. Because of how APIs work, the application need not be a web application — you could also use a console application, a desktop application, or any other application that interacts with data. It’s amazing to think that your service could be used by anyone, anywhere. Given that this is a chapter on web development, however, the following sections focus on using the WeatherForecast API from a web application named RetrieveWeatherForecast.
The application in the following sections won't work if the WeatherForecast API isn’t accessible for use. Make sure you can see it in the IIS Express icon in the Notification Area by following the information in the preceding section, “Locating the IIS icon.”
Creating the RetrieveWeatherForecast project
To begin using the WeatherForecast API, you need a web application. Follow these steps to create the example web application:
Click Create a New Project in the Visual Studio 2022 start window.
You see a list of templates to use that are similar to the ones shown previously in Figure 3-1.
- Choose C#, All Platforms, and Web in the drop-down list boxes. Locate the ASP.NET Core Web App template.
Highlight the ASP.NET Core Web App template and click Next.
You see a Configure Your New Project dialog box similar to the one shown previously in Figure 3-2.
Type RetrieveWeatherForecast in the Project Name field and select a location for the project on your hard drive. Make sure to select the Place Solution and Project in the Same Directory entry, and then click Next.
You see an Additional Information dialog box similar to the one shown previously in Figure 3-3.
Select .NET Core 3.1 (Long-term Support) in the Framework field and None in the Authentication Type field, and then select Configure for HTTPS.
Because this is likely a critical business application, using SSL makes sense in this situation. Whether you use SSL for informational sites depends on the perceived risk from the client interacting with the data. When in doubt, use SSL.
Click Create.
Visual Studio 2022 creates a new web app project for you.
Developing a user interface
Because you have no designer to use for ASP.NET Core Web App applications, it's somewhat important to use a little trial and error in putting the interface together. Most people have a hard time visualizing what the website will eventually look like based solely on the code, so making a few changes and then viewing the website is the best option you have. The following sections tell you more about creating a user interface for this example.
If you make changes to the interface, they may not always show up, which is really frustrating. Unfortunately, if the web application site is kept running, you may see the old code, not the new code. To prevent major hair loss, stop the application website (not the WeatherForecast service website) after each change to your code. You can stop it by clicking Stop Site, as shown in Figure 3-8 in the IIS Express icon in the Notification Area (described in the “Locating the IIS icon” section of the chapter).
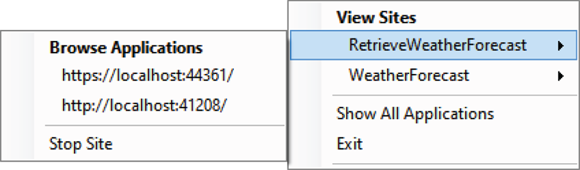
FIGURE 3-8: Stop the site so that you can see changes to your user-interface code.
Adding the basic user-interface elements
This section’s example uses a simple HTML table to display the data onscreen. However, the table comes in two sections: the container, which appears in the Index.cshtml file; and the data, which appears in the Index.cshtml.cs file. This section focuses on the container, as shown here:
@page
@model IndexModel
@{
    ViewData["Title"] = "The Weather Page";
}

<div class="text-center">
    <h1 class="display-4">Welcome to the Weather Page</h1>
    <table class="text-left" border="1" style="width:100%;" cellpadding="4">
        <tr>
            <th>Date</th>
            <th>Temperature (C)</th>
            <th>Temperature (F)</th>
            <th>Summary</th>
        </tr>
        @Html.Raw(Model.myData)
    </table>>
</div>
The changes include giving the page a new title and top-level heading. To make the data easier to see, you set some <table> tag attributes: border, style, and cellpadding. You may find that you want to make other changes to the appearance of the table as well.
Because the column headings don't change, you can also add them as part of the Index.cshtml file. In fact, you should always place non-changeable elements in the web page code rather than the code-behind.
The data for this example is provided by the @Html.Raw(Model.myData) entry. The code-behind replaces this code with the actual data obtained from the WeatherForecast API.
Understanding the need for raw HTML
The code-behind for your web page always assumes that a string is a string and not HTML. So, if you output something like <p>This is a string</p> from the code-behind, what you see on the web page is the string and both the opening and closing tags. Obviously, this isn't what you were expecting to happen on a web page, especially given that the web page is already full of tags. Consequently, the Model.myData output in the previous section would be flawed if you didn’t do something with it as part of the display process.
This is where the @Html.Raw() call comes into play (see https://docs.microsoft.com/dotnet/api/system.web.mvc.htmlhelper.raw for more details). It tells ASP.NET to display the data in Model.myData as HTML rather than as pure text. The call is part of an entire interface named IHtmlHelper, which you can read more about at https://docs.microsoft.com/dotnet/api/system.web.mvc.htmlhelper.
Getting and deserializing the data
It's finally time to show how the various elements of this example are put together to display information onscreen. The following sections help you get through the process of working through deserialization and then display as HTML output.
Adding the WeatherForecast class
To deserialize the data from the WeatherForecast API, you need a class that describes the data. Fortunately, you already have such a class. It appears in the WeatherForecast project. Use these steps to add the class to your RetrieveWeatherForecast project:
Right-click the RetrieveWeatherForecast entry in Solution Explorer and choose Add⇒ Existing Item from the context menu.
You see an Add Existing Item dialog box.
Navigate to the WeatherForecast project folder, as shown in Figure 3-9, and highlight
WeatherForecast.cs. Click Add.You see the
WeatherForecast.csfile added to your project.

FIGURE 3-9: Add the WeatherForecast class to your project.
There is only one problem with the file you've just imported. The variable names are all initial capitalized, such as Date. However, if you look at Figure 3-6, shown previously, you see that the variables are lowercase, such as date. Because C# is a case-sensitive language, you need to make the variables in the copy of WeatherForecast.cs that you just imported into your RetrieveWeatherForecast project lowercase as well, so it now appears like this:
using System;

namespace RetrieveWeatherForecast
{
    public class WeatherForecast
    {
        public DateTime date { get; set; }

        public int temperatureC { get; set; }

        public int temperatureF => 32 + (int)(temperatureC / 0.5556);

        public string summary { get; set; }
    }
}
Building the essential code
When the web page loads, it calls OnGet() in the code-behind to obtain any needed information, so this is where you place the code for querying the WeatherForecast API. You might initially be tempted to place this code in the RetrieveWeatherForecast constructor, but if you do, you'll see error messages talking about not being able to place asynchronous code there (as discussed in the “Getting past the multithreaded parts” section that follows). In addition to the code for retrieving the data and deserializing it, you also need to define the myData variable used to interact with the web page. The following code found in index.cshtml.cs shows what you need to provide to make the example work:
[BindProperty]
public String myData { get; set; }

public async Task OnGet()
{
    // Create a client object to retrieve the data.
    HttpClient client = new HttpClient();

    // Tell the client object where to obtain the data
    // and what format the data will appear in.
    client.BaseAddress =
        new Uri("https://localhost:44327/weatherforecast");
    client.DefaultRequestHeaders.Accept.Add(
        new MediaTypeWithQualityHeaderValue("application/json"));

    // Provide a default response and then obtain the data.
    myData = "No Weather Report Today";
    HttpResponseMessage getData =
        await client.GetAsync("https://localhost:44327/weatherforecast");

    // If the data access was a success, then read it from the response
    // and display it onscreen.
    if (getData.IsSuccessStatusCode)
    {
        String data = getData.Content.ReadAsStringAsync().Result;

        // Deserialize the JSON data as a WeatherForecast array.
        WeatherForecast[] JSONData =
            JsonSerializer.Deserialize<WeatherForecast[]>(data);

        // Output each weather forecast as a row in a table.
        myData = "";
        foreach (WeatherForecast Item in JSONData)
        {
            myData += "<tr>";
            myData += "<td>" + Item.date.ToLongDateString() + "</td>";
            myData += "<td>" + Item.temperatureC + "</td>";
            myData += "<td>" + Item.temperatureF + "</td>";
            myData += "<td>" + Item.summary + "</td>";
            myData += "</tr>";
        }
    }

    await Task.Delay(1000);
}
In addition to the added code, you must also supply these using declarations at the beginning of the file.
// Added Using Statements
using System.Net.Http;
using System.Net.Http.Headers;
using Microsoft.AspNetCore.Mvc;
using System.Threading.Tasks;
using System.Text.Json;
Notice that myData is defined as a standard property. You need to make it public so that the web page can access it. In addition, you need to add the [BindProperty] attribute to bind the property to the web page. as described at https://docs.microsoft.com/aspnet/core/mvc/models/model-binding.
The process of querying the API begins with creating an HttpClient object, client, and configuring it for use. As shown in the code, for client to work at all with JSON data, you must configure the BaseAddress and DefaultRequestHeaders.Accept properties. The BaseAddress points to the URL for the API. However, you must also tell the client to accept "application/json" data by adding a MediaTypeWithQualityHeaderValue object to DefaultRequestHeaders.Accept.
The actual request response appears in a HttpResponseMessage object, getData, after the client calls GetAsync() with the required URL. A successful query will set getData.IsSuccessStatusCode to true, not OK or 200 as you might expect if you work with HTML requests very often.
There still isn't any data to work with. You retrieve the data by calling getData.Content.ReadAsStringAsync().Result. However, you still need to deserialize the resulting string by calling JsonSerializer.Deserialize<WeatherForecast[]>(). This is where the need for lowercase variables comes into play because the deserialization won't succeed otherwise. At this point, JSONData contains an array of weather forecasts that you can then process into HTML tags and data using a foreach loop.
Getting past the multithreaded parts
You can't use the default OnGet() supplied with the template. The reason for this is that the calls to the web API are multithreaded and asynchronous. If you were to use the default OnGet(), you'd never see the data because OnGet() would return too soon. So, the problem is one of getting everyone to cooperate.
The first part of this process is to use the await operator (https://docs.microsoft.com/dotnet/csharp/language-reference/operators/await) each time you make an asynchronous call. Consequently, you see await client.GetAsync("https://localhost:44327/weatherforecast") in the code, not just the call to GetAsync(). Unfortunately, this modification makes the code compile, but it doesn't fix the problem of OnGet() returning too soon.
The second part of the process is to change the return type of OnGet() from void to Task. Except, you never see anything returned in the code, so how does this even work? The final piece is the call to await Task.Delay(1000), which provides an output that tells OnGet() that it's time to return. The example uses 1000 milliseconds, but you may have to increase this value for more complex API interactions.
Seeing the application in action
After completing the previous sections in the chapter, at this point you can finally run the application and see a result. Make sure that you have both the WeatherForecast and the RetrieveWeatherForecast projects open, and that the WeatherForecast service is running (as described in the “Locating the IIS icon” section of the chapter). Otherwise, the example won't work. Choose Debug⇒ Start Without Debugging. You see the weather forecast (simulated) for the next ten days, as shown in Figure 3-10 (your data likely won’t match).
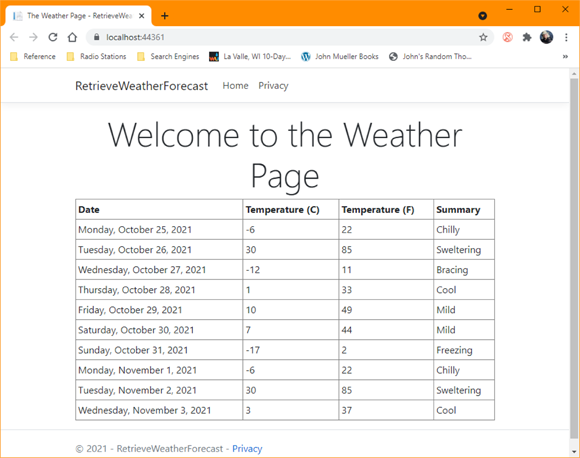
FIGURE 3-10: See the generated weather forecast from the WeatherForecast API.
Even though this is a simplistic view of web design, it’s what happens in a great many instances today. Organizations are only too happy to use data generated by someone else when it suits their needs, and the techniques shown in this chapter help you obtain the required access to the data.