
Chapter 8
Delegating Those Important Events
IN THIS CHAPTER
![]() Solving callback problems with delegates
Solving callback problems with delegates
![]() Using delegates to customize a method
Using delegates to customize a method
![]() Using anonymous methods
Using anonymous methods
![]() Creating events in C#
Creating events in C#
This chapter looks into a corner of C# that has been around since the birth of the language. The ability to create a callback, a method used to handle events, is essential for C# applications of all sorts. In fact, the callback appears in applications of every kind today. Even web-based applications must have some sort of callback mechanism to allow them to work properly.
The alternative is to hold up the application while you wait for something to happen, which means that the application won’t respond to anything but the anticipated input. That’s how the console applications used in examples to this point work. The Console.Read() call essentially stops the application until the user does something. A console application can work in this manner, but when a user could click any button on a form, you must have something better — a callback mechanism. In C#, you implement a callback by using a delegate, which is a description of what a callback method requires to handle an event. The delegate acts as a method reference type. In addition to callback methods, this chapter also helps you understand how to create and use delegates.
 You don't have to type the source code for this chapter manually. In fact, using the downloadable source is a lot easier. You can find the source for this chapter in the
 CSAIO4D2EBK02CH08 folder of the downloadable source. See the Introduction for details on how to find these source files.
E.T., Phone Home — The Callback Problem
If you’ve seen the Steven Spielberg movie E.T., the Extraterrestrial (1982), you watched the cute but ugly little alien stranded on Earth try to build an apparatus from old toy parts with which he could “phone home.” He needed his ship to pick him up.
It’s a big jump from E.T. to C#, but code sometimes needs to phone home, too. For example, you may have wondered how the Windows progress bar works. It’s the horizontal “bar” that gradually fills up with coloring to show progress during a lengthy operation, such as copying files. The progress bar is based on a lengthy operation’s periodic pause to “phone home.” In programmerese, it’s a callback. Usually, the lengthy operation estimates how long its task should take and then checks frequently to see how far it has progressed. Periodically, the progress bar sends a signal by calling a callback method back on the mother ship — the class that kicked off the long operation. The mother ship can then update its progress bar. The trick is that you have to supply this callback method for the long operation to use.
That callback method may be in the same class as the lengthy operation — such as phoning your sister on the other side of the house. Or, more often, it’s in another class that knows about the progress bar — such as phoning Aunt Maxie in Minnesota. Somehow, at its start, the lengthy operation has been handed a mechanism for phoning home — sort of like giving your kid a cellphone so that they can call you at 10 p.m.
This chapter talks about how your code can set up this callback mechanism and then invoke it to phone home when needed. Callbacks are used a lot in Windows programming, typically for a piece of code, down in your program’s guts, to notify a higher-level module that the task has finished, to ask for needed data, or to let that module take a useful action, such as write a log entry or update a progress bar. However, the place where you use callbacks the most is with the user interface. When the user does something with the user interface, such as click a button, it generates an event. The callback method handles the event.
Defining a Delegate
C# provides delegates for making callbacks — and a number of other tasks. Delegates are the C# way (the .NET way, really, because any .NET language can use them) for you to pass around methods as though they were data. You’re saying, “Here, execute this method when you need it” (and then handing over the method to execute). This chapter helps you get a handle on that concept, see its usefulness, and start using it yourself.
You may be an experienced coder who will recognize immediately that delegates are similar to C/C++ function pointers — only much, much better. Here are some things to consider when choosing delegates over function pointers:
- Delegates are managed so that you don’t have to worry about them hanging around to cause problems after you use them.
- A delegate will always point to a valid function, whereas function pointers can point to any memory location.
- When pointing to multiple callbacks, a function pointer’s built-in iterator makes it easy to ensure that each callback is called every time.
- It’s possible to use delegates in either synchronous or asynchronous mode.
- Delegates are type-safe and will always point to a method with the correct signature.
Think of a delegate as a vehicle for passing a callback method to a “workhorse” method that needs to call you back or needs help with that action, as in doing the same action to each element of a collection. Because the collection doesn’t know about your custom action, you need a way to provide the action for the collection to carry out. Figure 8-1 shows how the parts of this scheme fit together.
A delegate is a data type, similar to a class. As with a class, you create an instance of the delegate type in order to use the delegate. Figure 8-1 shows the sequence of events in the delegate’s life cycle as you complete these steps:
Define the delegate type (in much the same way as you would define a class).
Sometimes, C# has already defined a delegate you can use. Much of the time, though, you’ll want to define your own, custom delegates.
 Under the surface, a delegate is a class, derived from the class
 System.MulticastDelegate, which knows how to store one or more “pointers” to methods and invoke them for you. Relax: The compiler writes the class part of it for you.Create an instance of the delegate type — such as instantiating a class.
During creation, you hand the new delegate instance the name of a method that you want it to use as a callback or an action method.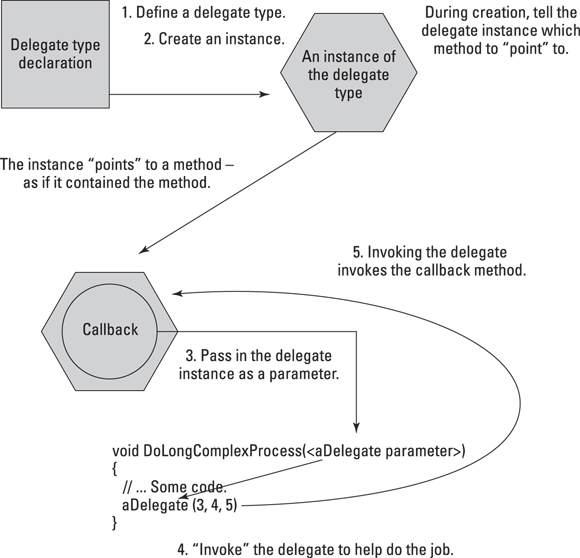
FIGURE 8-1: Sending your delegate to the bungee-jump on your behalf.
Pass the delegate instance to a workhorse method, which has a parameter of the delegate type.
That's the doorway through which you insert the delegate instance into the workhorse method. It’s like smuggling a candy bar into a movie theater — except that in this example, the movie theater expects, even invites, the contraband candy.
- When the workhorse method is ready — for example, when it’s time to update the progress bar — the workhorse invokes the delegate, passing it any expected arguments.
Invoking the delegate in turn invokes (calls) the callback method that the delegate “points” to.
Using the delegate, the workhorse phones home.
This fundamental mechanism solves the callback problem — and has other uses, too. Delegate types can also be generic, allowing you to use the same delegate for different data types, much as you can instantiate a List<T> collection for string or int. Book 1 Chapter 8 covers the use of generic types in detail.
Pass Me the Code, Please — Examples
In this section, you see a couple of examples — and solve the callback problem discussed at the beginning of this chapter.
Delegating the task
In this section, you walk through two examples of using a callback — a delegate instance phoning home, like E.T., to the object that created it. But first take a look at some common variations on what you can use a callback delegate for:
- To notify the delegate’s home base of an event: A lengthy operation has finished or made some progress or perhaps run into an error. “Mother, this is E.T. Can you come get me at Elliot’s house?”
- To call back to home base to ask for the necessary data to complete a task: “I’m at the store. Should I get white bread or wheat?”
- More generally, to customize a method: The method you’re customizing provides a framework, and its caller supplies a delegate to do the work. “Take this grocery list to the store and follow it exactly.” The delegate method carries out a task that the customized method needs done (but can’t handle by itself). The customized method is responsible for invoking the delegate at the appropriate moment.
First, a simple example
The SimpleDelegateExample program demonstrates a simple delegate. The delegate-related parts of this example are highlighted in boldface.
class Program
{
    // Inside class or inside namespace
    delegate int MyDelType(string name);

    static void Main(string[] args)
    {
        // Create a delegate instance pointing to the CallBackMethod below.
        // Note that the callback method is static, so you prefix the name
        // with the class name, Program.
        MyDelType del = new MyDelType(Program.CallBackMethod);

        // Call a method that will invoke the delegate.
        UseTheDel(del, "hello");
        Console.Read();
    }

    // CallBackMethod -- A method that conforms to the MyDelType
    //    delegate signature (takes a string, returns an int).
    //    The delegate will call this method.
    public static int CallBackMethod(string stringPassed)
    {
        // Leave tracks to show you were here.
        // What's written here? stringPassed.
        Console.WriteLine($"CallBackMethod writes: {stringPassed}");

        // Return an int.
        return stringPassed.Length;  // Delegate requires an int return.
    }

    // UseTheDel -- A "workhorse" method that takes a MyDelType delegate
    //    argument and invokes the delegate. arg is a string to pass
    //    to the delegate invocation.
    private static void UseTheDel(MyDelType del, string arg)
    {
        if (del == null) return; // Don't invoke a null delegate!

        // Here's where you invoke the delegate.
        // What's written here? A number representing the length of arg.
        Console.WriteLine($"UseTheDel writes {del(arg)}");
    }
}
First you see the delegate definition. MyDelType defines a signature, which specifies the inputs and outputs that the method must provide. You can pass any method with the delegate that takes a string argument and return an int. Second, notice that the CallBackMethod() matches the delegate signature. Third, Main() creates an instance of the delegate, called del, and then passes the delegate instance to a “workhorse” method, UseTheDel(), along with some string data, "hello", that the delegate requires. In that setup, here's the sequence of events:
UseTheDel()takes two arguments, aMyDelTypedelegate, and astringthat it callsarg. So, whenMain()callsUseTheDel(), it passes the delegate instance to be used inside the method. When you create the delegate instance,del, inMain(), you pass the name of theCallBackMethod()as the method to call. BecauseCallBackMethod()is static, you have to prefix the name with the class name,Program.- Inside
UseTheDel(), the method ensures that the delegate isn'tnulland then starts aWriteLine()call. Within that call, before it finishes, the method invokes the delegate by callingdel(arg).argis just something you can pass to the delegate, which causes theCallBackMethod()to be called. - Inside
CallBackMethod(), the method writes its own message, including the string that was passed whenUseTheDel()invoked the delegate. ThenCallBackMethod()returns the length of the string it was passed, and that length is written out as the last part of theWriteLine()inUseTheDel().
The output looks like this:
CallBackMethod writes: hello
UseTheDel writes 5
UseTheDel() phones home and CallBackMethod() answers the call.
Considering the Action, Func, and Predicate delegate types
All delegates represent a kind of function pointer, whether you use them to deal with events or not.You can divide delegates used specifically as function pointers into three types using three special keywords: Action, Func, and Predicate. All three are delegate types, but they have a special format, and you usually use them differently from standard delegates (as input to methods that require a function pointer, for example). Here's a quick overview of these delegate types:
Action: Has one or more input parameters and no output parameters (so you use it with methods that returnvoid). The Action delegates support up to 16 input arguments, as shown athttps://docs.microsoft.com/en-us/dotnet/api/system.action.Func: Has zero or more input parameters and one output parameter. As withAction,Funchas a limit of 16 input arguments, as shown at:https://docs.microsoft.com/en-us/dotnet/api/system.func-1.Predicate: Defines a specific set of criteria and determines whether the input object meets those criteria, returningTruewhen the conditions are met andFalseotherwise. You can see more specifics about thePredicatetype athttps://docs.microsoft.com/en-us/dotnet/api/system.predicate-1.
You can see how these three kinds of delegates work in the Program class of the ActionFuncPredicate example:
class Program
{
    static void Main(string[] args)
    {
        // Define and execute the action.
        Action<int, int> showIntMath = new Action<int, int>(DisplayAdd);
        showIntMath(1, 2);

        // Define and execute the function.
        Func<int, int, int> doIntMath = new Func<int, int, int>(DoAdd);
        Console.WriteLine($"1 + 2 = {doIntMath(1, 2)}.");

        // Define and execute the predicate.
        Values theseValues = new Values() { value1 = 1, value2 = 2 };
        Predicate<Values> isValue = x => x.value1 + x.value2 == 3;
        Console.WriteLine($"The output is 3? {isValue(theseValues)}");
        Console.ReadLine();
    }

    static void DisplayAdd(int value1, int value2)
    {
        Console.WriteLine($"{value1} + {value2} = {value1 + value2}.");
    }

    static int DoAdd(int value1, int value2)
    {
        return value1 + value2;
    }

    internal struct Values
    {
        internal int value1;
        internal int value2;
    }
}
In all three examples, the code evaluates two int values: 1 and 2. All three examples use the delegate pattern in some manner, with Action and Func being the most direct presentations. Here are differences to consider in the implementation for this example:
- To create an
Action, the code defines theDisplayAdd()method, which adds the two values and outputs their sum to the display. - To create a
Func, the code definesDoAdd(), which sums the two values and returns the result to the caller. - The
Predicateis a little more complex because the code must define astruct,Values, to hold the two values and then use a lambda expression,x => x.value1 + x.value2 == 3, to evaluate whether 1 + 2 really does add up to 3. The “Shh! Keep It Quiet — Anonymous Methods” section of the chapter talks more about lambda expressions, but essentially,xis an input object, and you work with it to determine what to provide as an output, which must always be a logical value when working with aPredicate.
When you execute this code, you see the following output:
1 + 2 = 3.
1 + 2 = 3.
The output is 3? True
A More Real-World Example
For a more realistic example than SimpleDelegateExample, the SimpleProgress example shows you how to write a little app that puts up a progress bar and updates it every time a lengthy method invokes a delegate. This example relies on a Windows Forms application, which means using a different template than you have in the past, so be sure to follow the procedure in the upcoming “Putting the app together,” section to start your project.
The example displays a small dialog-box-style window with two buttons and a progress bar. When you load the solution example into Visual Studio and then build it, run it, and click the upper button, marked Click to Start, the progress bar runs for a few seconds. You see it gradually fill up, one-tenth of its length at a time. When it's completely full, you can click the Close button to end the program or click Click to Start again.
Putting the app together
To create the sample app on your own and experience a bit of Windows graphical programming, follow these steps, working first in design mode, in which you’re just laying out the appearance of your app. First, create the project and position the necessary controls on your “window”:
Choose Create a New Project in the Start Window (choose File ⇒ Start Window if you don’t see it).
You see the Create a New Project window.
Choose C#, Windows, and Desktop in the drop-down lists that you see.
The wizard displays the list of project templates shown in Figure 8-2.

FIGURE 8-2: Choose the Windows Forms App (.NET Framework) template.
Choose the Windows Forms App (.NET Framework) template and click Next.
You see a Configure Your New Project window that looks similar to the window you’ve been using to create Console applications.
Type SimpleProgress in the Project Name field, ensure that the Place Solution and Project in the Same Directory check box is selected, and then click Create.
The first thing you see is the form: a window that you lay out yourself using several controls.
Choose View ⇒ Toolbox and open Common Controls group.
You see the list of controls shown in Figure 8-3.
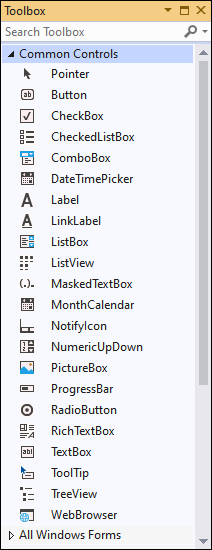
FIGURE 8-3: The Common Controls Group contains the controls you use most often.
- Drag a
ProgressBarcontrol to the form and drop it; then drag twoButtons onto the form. Position the buttons and the
ProgressBar, and resize the window using the sizing handles so that the form looks somewhat like the one shown in Figure 8-4.Note the handy guide lines that help with positioning.
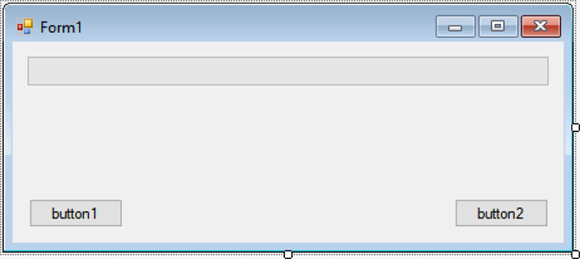
FIGURE 8-4: Create the form you use to demonstrate the use of a progress bar.
Setting the properties and adding event handlers
Next, set properties for these controls: Choose View⇒ Properties Window, select a control on the form, and set the control's properties:
- For the progress bar — named
progressBar1in the code — make sure that theMinimumproperty is0, theMaximumproperty is100, theStepproperty is10, and theValueproperty is0. - For button1, change the
Textproperty toClick to Startand drag the sizing handles on the button image until it looks right and shows all its text. - For button2, change the
Textproperty toCloseand adjust the button's size to your liking.
 In this simple example, you’re putting all code in the form class. (The form is your window; its class — here, named
 Form1 — is responsible for all things graphical.) Generally, you should put all “business” code — the code that does your calculations, data access, and other important work — in other classes. Reserve the form class for code that’s intimately involved with displaying elements on the form and responding to its controls. This example breaks the rule, but the delegate works no matter where its callback method is.
Now, still in design mode, add a handler method for each button:
On the form, double-click the new Close button.
This action generates a method in the “code behind the form” (or, simply, “the code-behind”) — the code that makes the form work. It looks like this (you add the boldfaced code):
private void button2_Click(object sender, EventArgs e)
{
  Close();
}
To toggle between the form’s code and its image, just change tabs in the main panel.- Double-click the new Click to Start button to generate its handler method, which looks like the following in the code-behind:
private void button1_Click(object sender, EventArgs e)
{
  UpdateProgressCallback callback =
    new UpdateProgressCallback(this.DoUpdate);

  // Do something that needs periodic progress reports. This
  // passes a delegate instance that knows how to update the bar.
  DoSomethingLengthy(callback);

  // Clear the bar so that it can be used again.
  progressBar1.Value = 0;
}
You see red underlines beneath
UpdateProgressCallbackandDoSomethingLengthy(), which indicate errors. Ignore these errors for now — later steps will fix them. - Add the following callback method to the form class:
private void DoUpdate()
{
  // Tells progress bar to update itself
  progressBar1.PerformStep();
}
The next section walks you through the remaining code, all of it on the form class. Later in the chapter, you see other variations on the delegate that's passed.
Looking at the workhorse code
The remaining bits of code tucked into the Form1 class consist of the parts of the delegate life cycle, covered earlier in this chapter. You see the class and then the various delegate components. Here’s the delegate declaration that you add immediately after the Form1() constructor:
// Declare the delegate. This one is void.
delegate void UpdateProgressCallback();
You also need a DoSomethingLengthy(), which is the workhorse for this application. It accepts an UpdateProgressCallback delegate as input.
// DoSomethingLengthy -- My workhorse method takes a delegate.
private void DoSomethingLengthy(UpdateProgressCallback updateProgress)
{
    // Set the total duration of the updates (4 seconds), number of updates
    // and the duration of each update interval.
    int duration = 4000;
    int intervals = 10;
    int updateInterval = duration / intervals;

    for (int i = 0; i <= intervals; i++)
    {
        // Do something time consuming.
        Thread.Sleep(updateInterval);

        // Update the progress bar.
        updateProgress();
    }
}
All this code does is sleep for the specified interval (simulating doing something time consuming) and then it updates the progress bar by calling updateProgress(). To make DoSomethingLengthy() work, you must also add another using statement to the top of your code:
using System.Threading;
It's helpful to look at the class declaration for this application because it’s different from those used for console applications:
public partial class Form1 : Form
The partial keyword indicates that this file is only part of the full class. The rest can be found in the Form1.Designer.cs file listed in Solution Explorer. (Take a look at it.) Later, in the “Stuff Happens — C# Events” section, you revisit that file to discover a couple of things about events. Partial classes let you split a class between two or more files. The compiler generates the Form1.Designer.cs file, so don't modify its code directly. You can modify it indirectly, however, by changing elements on the form. Form1.cs is your part.
Shh! Keep It Quiet — Anonymous Methods
The word anonymous essentially means “something that lacks a name.” America may have been in the desert on a horse with no name (https://www.youtube.com/watch?v=na47wMFfQCo), but programmers ride nameless methods instead. You can use anonymous methods in a variety of ways in C#, such as making delegate creation simpler. The following sections discuss anonymous methods, including some new uses presented with C# 9.0.
Microsoft is working on lambda additions for C# 10.0 that weren’t available at the time of writing. You can read about them at https://docs.microsoft.com/en-us/dotnet/csharp/language-reference/proposals/csharp-10.0/lambda-improvements. Most of these improvements don’t change the way lambdas work in any major way—they’re mostly subtle changes that have the potential to make lambda use a little easier.
Defining the basic anonymous method
After you have the gist of using delegates, take a quick look at Microsoft’s first cut at simplifying delegates in C# 2.0 a couple of years ago. To cut out some of the delegate rigamarole, you can use an anonymous method, as shown in the SimpleProgress2 example. Anonymous methods are just written in more traditional notation. Although the syntax and a few details are different, the effect is essentially the same whether you use a raw delegate, an anonymous method, or a lambda expression (a special kind of declaration for creating anonymous functions, as described at https://docs.microsoft.com/en-us/dotnet/csharp/language-reference/operators/lambda-expressions).
An anonymous method creates the delegate instance and the method it “points” to at the same time — right in place, on the fly, tout de suite. Here are the guts of the DoSomethingLengthy() method again, this time rewritten to use an anonymous method:
private void DoSomethingLengthy()
{
    // Set the total duration of the updates (4 seconds), number of updates
    // and the duration of each update interval.
    int duration = 4000;
    int intervals = 10;
    int updateInterval = duration / intervals;

    // Create delegate instance.
    UpdateProgressCallback anon = delegate ()
    {
        // Method 'pointed' to
        progressBar1.PerformStep();
    };

    for (int i = 0; i <= intervals; i++)
    {
        // Do something time consuming.
        Thread.Sleep(updateInterval);

        // Invoke the delegate.
        if (anon != null) anon();
    }
}
The code looks like standard delegate instantiations, except that after the = sign, you see the delegate keyword, any parameters to the anonymous method in parentheses (or empty parentheses if none), and the method body. The code that used to be in a separate DoUpdate() method — the method that the delegate “points” to — has moved inside the anonymous method — no more pointing. And this method is utterly nameless. You still need the UpdateProgressCallback() delegate type definition, and you're still invoking a delegate instance, named anon in this example. Consequently, even though there is no method name, the variable anon does have a name, and the method and variable are separate entities.
Using static anonymous methods
Code, including anonymous functions, are not without cost in terms of resources and speed. When you create an anonymous function, the hidden costs of doing so could include:
- Overhead for the delegate invocation
- Heap allocations for each of the arguments
- Heap allocations for the enclosing method created by a lambda expression
Each of these overhead needs and allocations wouldn't really seem like much for an individual data item, but the code repeats them for each data item, which means that the cost can become high. You can read more about these issues at https://devblogs.microsoft.com/premier-developer/dissecting-the-local-functions-in-c-7/. C# 9.0 allows the use of the static keyword with anonymous functions, which disallows the capture of locals or instance state from containing scopes. By adding static to an anonymous method, you can reduce or eliminate any unintended allocations. The WorkWithEats class of the StaticAnonymous example shows how this technique works (note that you must set up your project to use C# 9.0 by adding the proper language entry to StaticAnonymous.csproj):
internal class WorkWithEats
{
    const string outString = "{0} is a {1}.";

    internal struct EatItem
    {
        internal string Name;
        internal string Category;
    }

    internal void CreateEats(Func<string, string, string> func)
    {
        List<EatItem> Eats = new List<EatItem>
        {
            new EatItem() {Name="Apple", Category="Fruit"},
            new EatItem() {Name="Bread", Category="Grain"},
            new EatItem() {Name="Asparagus", Category="Vegetable"},
            new EatItem() {Name="Hamburger", Category="Meat"}
        };

        foreach (var item in Eats)
            Console.WriteLine(func(item.Name, item.Category));
    }

    internal void ShowEats()
    {
        CreateEats(static (name, category) => string.Format(
            outString, name, category));
    }
}
This example begins saving memory by defining outString as a const (which means that you don't need to provide the usual object baggage). You can find a longer discussion of how the memory savings happen at https://stackoverflow.com/questions/23529592/how-are-c-sharp-const-members-allocated-in-memory. The EatItem struct makes it possible to use a List<EatItem> to hold all the required data in the CreateEats() method. The CreateEats() method accepts a Func as input (see the “Considering the Action, Func, and Predicate delegate types” section, earlier in this chapter, for details). It then creates a list of EatItem entries and uses func to display them.
The second thing to notice about this example is the ShowEats() method, which begins by calling CreateEats() with a lambda expression as input. However, notice that this is a static lambda expression, which isn't available before C# 9.0. The lambda expression accepts a name and a category as input, and then displays them using outString for formatting.
The WorkWithEats class does most of the work for this example. All that Main() does is create the appropriate object and start it, as shown here:
static void Main(string[] args)
{
    WorkWithEats myEats = new WorkWithEats();
    myEats.ShowEats();
    Console.ReadLine();
}
The output from this example mixes the formatting string and the various values, as shown here:
Apple is a Fruit.
Bread is a Grain.
Asparagus is a Vegetable.
Hamburger is a Meat.
Working with lambda discard parameters
Currently, when you create a parameter for a lambda expression, C# will complain if you don't actually use the parameter as part of the expression code. For example, the compiler will complain if you have a lambda expression like this:
var handler = (object Obj, EventArgs Args) => ShowDialog();
You can replace Obj and Args with underscores to show that they're discard parameters (parameters that you won’t use) so that the compiler doesn’t complain that you haven’t used them during the compilation process. Using discard parameters makes your code clearer and easier to understand. In this case, you see that your call could use an object and EventArgs; it just doesn't. To use discard parameters, you modify your code like this:
var handler = (object _, EventArgs _) => ShowDialog();
Stuff Happens — C# Events
One more application of delegates deserves discussion in this section: the C# event, which is implemented with delegates. An event is a variation on a callback but provides a simpler mechanism for alerting the application whenever an important event occurs. An event is especially useful when more than one method is waiting for a callback. Events are widely used in C#, especially for connecting the objects in the user interface to the code that makes them work. The buttons in the SimpleProgress example, presented earlier in this chapter, illustrate this use.
The Observer design pattern
It’s extremely common in programming for various objects in the running program to have an interest in events that occur on other objects. For example, when the user clicks a button, the form that contains the button wants to know about it. Events provide the standard mechanism in C# and .NET for notifying any interested parties of important actions.
The event pattern is so common that it has a name: the Observer design pattern. It’s one of many common design patterns that people have published for anyone to use in their own code. To begin learning about other design patterns, you can consult Design Patterns: Elements of Reusable Object-Oriented Software, by Erich Gamma, Richard Helm, Ralph Johnson, and John Vlissides (Addison-Wesley Professional).
The Observer pattern consists of an Observable object — the object with interesting events (sometimes called the Subject) — and any number of Observer objects: those interested in a particular event. The observers register themselves with the Observable in some way and, when events of interest occur, the Observable notifies all registered observers. You can implement this pattern in numerous ways without events (such as callbacks and interfaces), but the C# way is to use events.
An alternative name for observers that you may encounter is listeners. Listeners listen for events. And that’s not the last of the alternatives.
What’s an event? Publish/Subscribe
One analogy for events is your local newspaper. You and many other people contact the paper to subscribe, and then the paper delivers current newspapers to you. The newspaper company is the Publisher, and its customers are Subscribers, so this variation of Observer is often called Publish/Subscribe pattern. That’s the analogy used in the chapter, but remember that the Observer pattern is the Publish/Subscribe pattern, with different terminology. Observers are subscribers, and the Observable object that they observe is a publisher.
In C#, when you have a class on which interesting events arise, you advertise the availability of notifications to any classes that may have an interest in knowing about such events by providing an event object (usually public).
The term event has two meanings in C#. You can think of the word event as meaning both “an interesting occurrence” and a specific kind of C# object. The former is the real-world concept, and the latter is the way it’s set up in C#, using the event keyword.
How a publisher advertises its events
To advertise for subscribers, a class declares a delegate and a corresponding event, something like this:
public class PublisherOfInterestingEvents
{
  // A delegate type on which to base the event. Should be
  // declared 'internal' if all subscribers are in the same assembly.
  public delegate void NewEditionEventHandler(object sender,
                                              NewEditionEventArgs e);
  // The event:
  public event NewEditionEventHandler NewEdition;
  // … other code.
}
The delegate and event definitions announce to the world: “Subscribers welcome!” You can think of the NewEdition event as similar to a variable of the NewEditionEventHandler delegate type. (So far, no events have been sent. This is just the infrastructure for them.)
It's considered good practice to append EventHandler to the name of a delegate type that is the basis for events. A common example, which you can see in the SimpleProgress code example, discussed earlier in this chapter, is a Button advertising its various events, including a Click event. In C#, class Button exposes this event as
event _dispCommandBarControlEvents_ClickEventHandler Click;
where the second, long item is a delegate defined somewhere in .NET.
Because events are used so commonly, .NET defines two event-related delegate types for you, named EventHandler and EventHandler<TEventArgs>. You can change NewEditionEventHandler in the previous code to EventHandler or to the generic EventHandler<TEventArgs>, and you don't need your own delegate type. The rest of this chapter uses the built-in EventHandler<TEventArgs> delegate type mentioned earlier, not EventHandler or a custom type, NewEditionEventHandler. You should prefer this form, too:
event EventHandler<NewEditonEventArgs> NewEdition;
How subscribers subscribe to an event
To receive a particular event, subscribers sign up something like this:
publisher.EventName +=
  new EventHandler<some EventArgs type here >(some method name here);
where publisher is an instance of the publisher class, EventName is the event name, and EventHandler<TEventArgs> is the delegate underneath the event. More specifically, the code in the previous example might be
myPublisher.NewEdition += new EventHandler<NewEditionEventArgs>(MyPubHandler);
Because an event object is a delegate under its little hood, the += syntax is adding a method to the list of methods that the delegate will call when you invoke it.
Any number of objects can subscribe this way (and the delegate will hold a list of all subscribed “handler” methods) — even the object on which the event was defined can subscribe, if you like. (And yes, this example shows that a delegate can “point” to more than one method.) In the SimpleProgress program, look in the Form1.Designer.cs file for how the form class registers itself as a subscriber to the buttons' Click events.
How to publish an event
When the publisher decides that something worthy of publishing to all subscribers has occurred, it raises (sends) the event. This situation is analogous to a real newspaper putting out the Sunday edition. To publish the event, the publisher would have code like this in one of its methods (but see the later section “A recommended way to raise your events”):
NewEditionEventArgs e =
  new NewEditionEventArgs(<args to constructor here>);

// Raise the event -- 'this' is the publisher object.
NewEdition(this, e);
Or for the Button example, though this is hidden in class Button:
EventArgs e = new EventArgs();  // See next section for more on this topic.
Click(this, e);                 // Raise the event.
In each of these examples, you set up the necessary arguments — which differ from event to event; some events need to pass along a lot of info. Then you raise the event by “calling” its name (like invoking a delegate!):
// Raising an event (distributing the newspaper)
eventName(<argumentlist>);
NewEdition(this, e);
Events can be based on different delegates with different signatures, that have different parameters, as in the earlier NewEditionEventHandler example, but providing the sender and e parameters is conventional for events. The built-in EventHandler and EventHandler<TEventArgs> delegate types define them for you.
Passing along a reference to the event's sender (the object that raises the event) is useful if the event-handling method needs to get more information from it. Thus a particular Button object, button1, can pass a reference to the Form class the button is a part of. The button's Click event handler resides in a Form class, but the sender is the button: You would pass this.
You can raise an event in any method on the publishing class. And you can raise it whenever appropriate. The “A recommended way to raise your events” section says more about raising events.
How to pass extra information to an event handler
The e parameter to an event handler method is a custom subclass of the System.EventArgs class. You can write your own NewEditionEventArgs class to carry whatever information you need to convey:
public class NewEditionEventArgs : EventArgs
{
  public NewEditionEventArgs(DateTime date, string majorHeadline)
    { PubDate = date; Head = majorHeadline; }
  public DateTime PubDate { get; private set; }
  public string Head { get; private set; }
}
You should implement this class's members as properties, as shown in the previous code example. The constructor uses the private setter clauses on the properties. Often, your event doesn’t require any extra arguments, and you can just fall back on the EventArgs base class, as shown in the next section. If you don’t need a special EventArgs-derived object for your event, just pass:
NewEdition(this, EventArgs.Empty); // Raise the event.
A recommended way to raise your events
The earlier section “How to publish an event” shows the bare bones of raising an event. However, you should always define a special event raiser method, like this:
protected virtual void OnNewEdition(NewEditionEventArgs e)
{
  EventHandler<NewEditionEventArgs> temp = NewEdition;

  if (temp != null)
  {
    temp(this, e);
  }
}
Providing this method ensures that you always remember to complete two steps:
Store the event in a temporary variable.
This step makes your event more usable in situations in which multiple “threads” try to use it at the same time. Threads divide your program into a foreground task and one or more background tasks, which run simultaneously (concurrently).
Check the event for
nullbefore you try to raise it.If it's
null, trying to raise it causes an error. Besides,nullalso means that no other objects have shown an interest in your event (none is subscribed), so why bother raising it? Always check the event fornull, regardless of whether or not you write this OnSomeEvent method.
Making the method protected and virtual allows subclasses to override it. That's optional. After you have that method, which always takes the same form (making it easy to write quickly), you call the method when you need to raise the event:
void SomeMethod()
{
  // Do stuff here and then:
  NewEditionEventArgs e =
    new NewEditionEventArgs(DateTime.Today, "Peace Breaks Out!");
  OnNewEdition(e);
}
How observers “handle” an event
The subscribing object specifies the name of a handler method when it subscribes — it’s the argument to the constructor (boldfaced):
button1.Click += new EventHandler<EventArgs>(button1_Click);
This line sort of says, “Send my paper to this address, please.” Here’s a handler for the NewEdition event:
myPublisher.NewEdition += new EventHandler<NewEditionEventArgs>(NewEdHandler);
…
void NewEdHandler(object sender, NewEditionEventArgs e)
{
  // Do something in response to the event.
}
When you create a button click event handler in Visual Studio (by double-clicking the button on your form), Visual Studio generates the subscription code in the Form1.Designer.cs file. You shouldn't edit the subscription, but you can delete it and replace it with the same code written in your half of the partial form class. Thereafter, the form designer knows nothing about it.
In your subscriber’s handler method, you do whatever is supposed to happen when your class learns of this kind of event. To help you write that code, you can cast the sender parameter to the type you know it to be:
Button theButton = (Button)sender;
and then call methods and properties of that object as needed. Because you have a reference to the sending object, you can ask the subscriber questions and carry out operations on it if you need to — like the person who delivers your newspaper knocking on your door to collect the monthly subscription fees. And, you can extract information from the e parameter by getting at its properties in this way:
Console.WriteLine(e.HatSize);
You don’t always need to use the parameters, but they can be handy.