
CHAPTER 4
Microsoft Azure Cloud Threat Prevention Framework
This chapter focuses on using Microsoft services for cloud threat protection in alignment with the MITRE ATT&CK framework and the NIST Cybersecurity framework.
Introduction to Microsoft Security
Threats can come from anywhere—whether from bad actors trying to compromise systems due to poor security hardening and patching, lack of security controls, or employees not following their organization's best practices or falling into social engineering traps.
Organizations should manage their threat landscape from end to end using the integrated and comprehensive security, compliance, and identity management solutions. Microsoft has an arsenal of tools and technologies to bring all these capabilities together, whereby it allows developers to natively integrate individual layers of protection to improve end-user experiences, decrease SecOps inefficiencies, and reduce the risk of costly data breaches and compliance violations. See Figure 4.1.
Understanding the Shared Responsibility Model
Understanding the shared responsibility model is essential for those who want to take advantage of Cloud Security. Cloud providers such as Microsoft and AWS offer considerable advantages for security and compliance efforts, but they do not absolve the customer from protecting their users, applications, and service offerings.
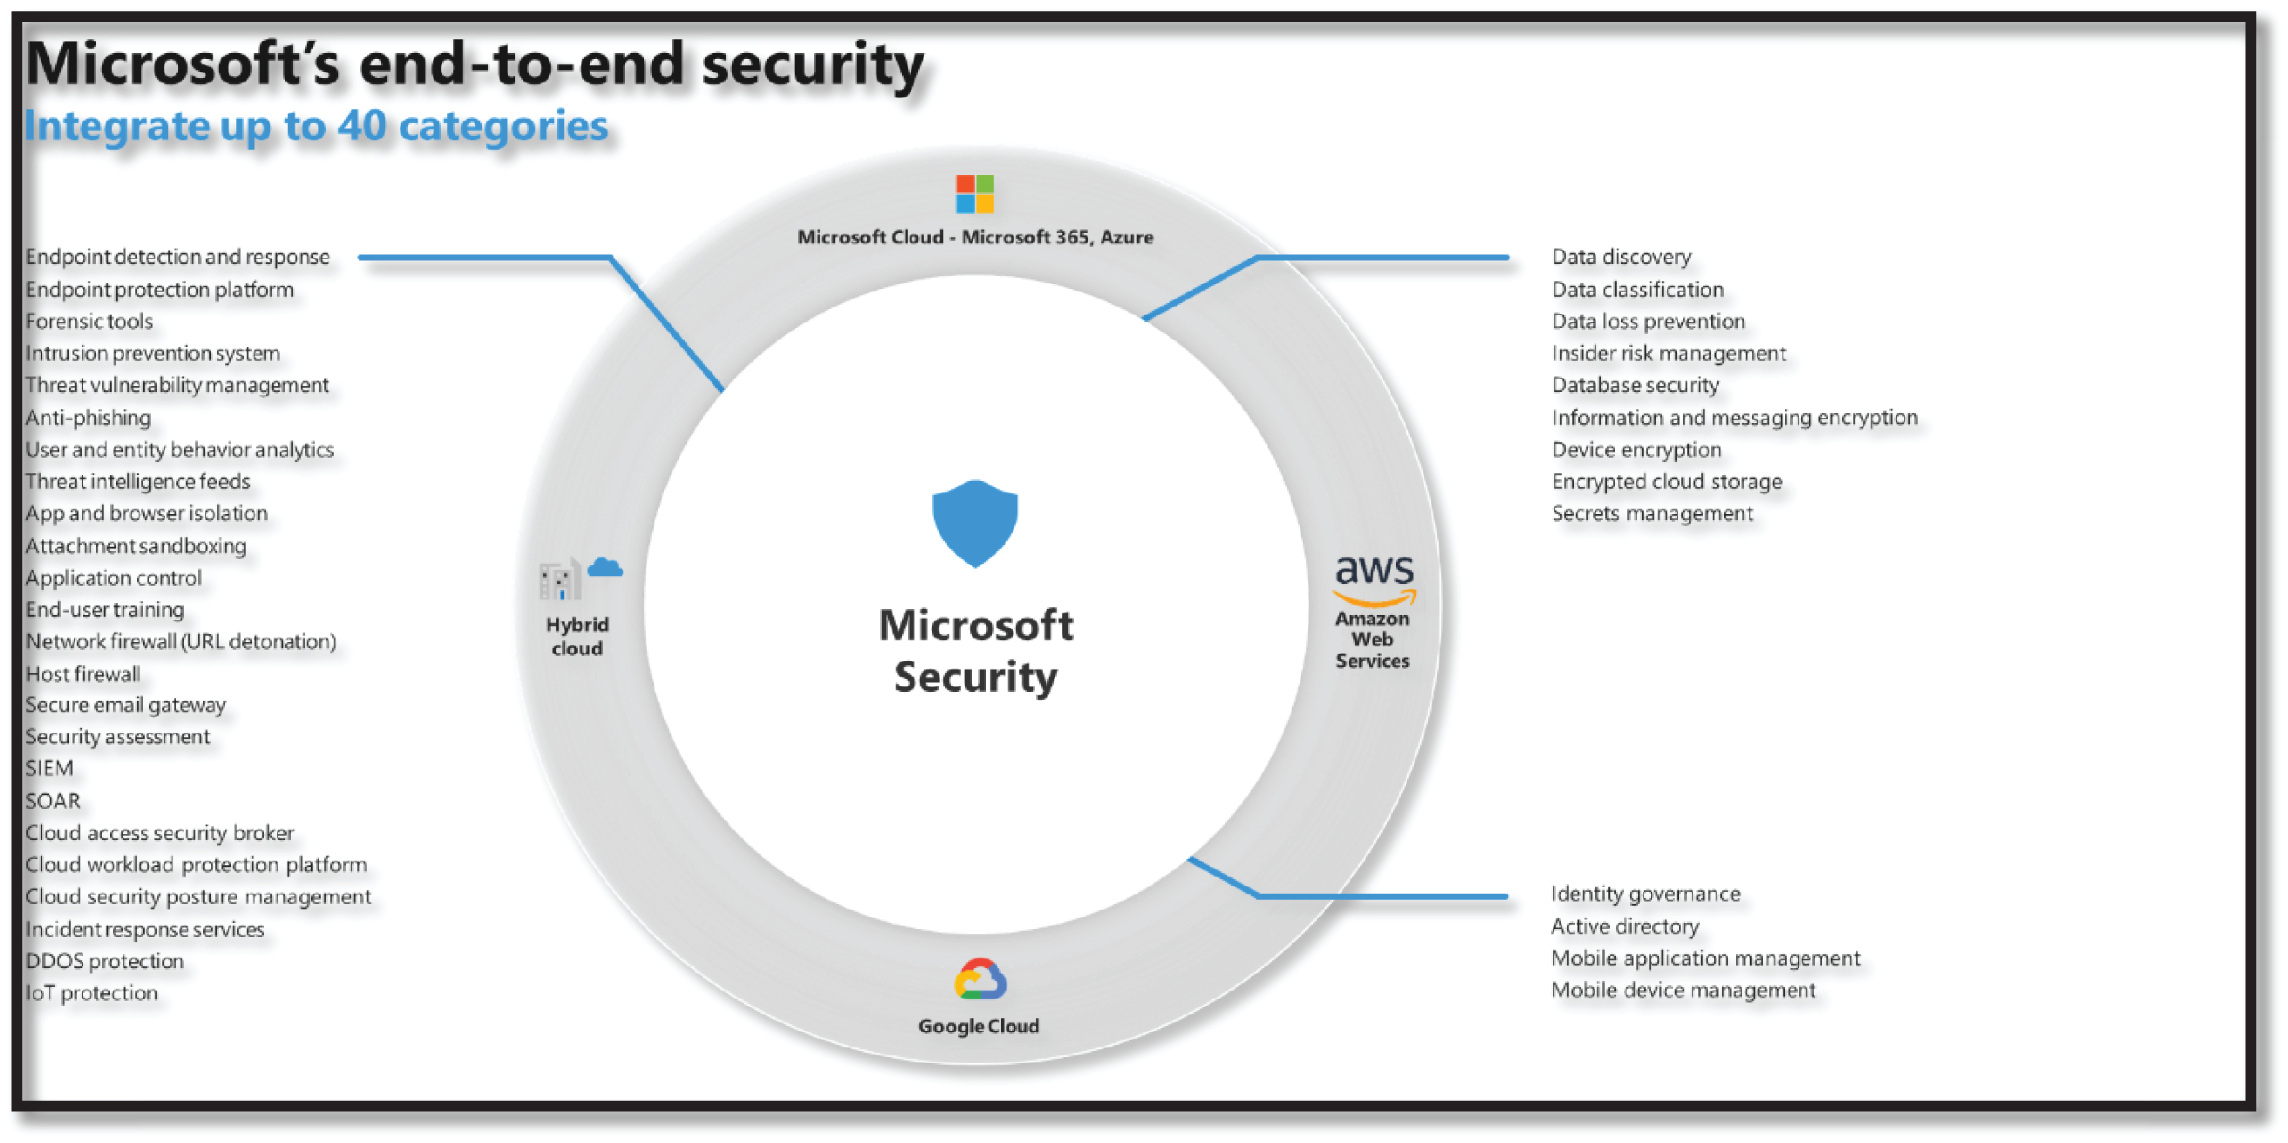
Figure 4.1: Microsoft's end-to-end integrated security features
It is critical to understand the shared responsibility model, including which security tasks the cloud provider handles and which tasks are handled by you as the customer. The workload responsibilities vary depending on whether the workload is hosted on Software as a Service (SaaS), Platform as a Service (PaaS), Infrastructure as a Service (IaaS), or in on-premises datacenters.
Figure 4.2 illustrates the areas of responsibility between the user and Microsoft, according to the type of deployment and services.

Figure 4.2: Shared responsibility on the cloud
In a shared responsibility model, a layered approach to security is described as follows:
- For on-premises solutions, the customer is both accountable and responsible for all aspects of security and operations.
- For IaaS solutions, the platform vendor manages the elements such as buildings, servers, networking hardware, and hypervisor. The customer is responsible or has a shared responsibility for securing and managing the operating system, network configuration, applications, identity, clients, and data.
- PaaS solutions build on IaaS deployments, and the provider is additionally responsible for managing and securing the network controls. The customer is still responsible or has a shared responsibility for securing and managing applications, identity, clients, and data.
- For SaaS solutions, a vendor provides the application and abstracts customers from the underlying components.
The customer continues to be accountable; they must ensure that data is classified correctly, and they share a responsibility to manage their users and endpoint devices.
Microsoft Services for Cloud Security Posture Management and Logging/Monitoring
According to the NIST Cybersecurity Framework, organizations need to develop and implement the necessary protections to restrict or mitigate the effect of a possible cybersecurity incident.
One of the primary strategies to manage cloud resources is to have an end-to-end visibility in terms of cloud security posture, threat, alerts, logging, and monitoring.
This section includes a quick summary of Azure services—Azure Security Center and Azure Defender, which is Microsoft's Cloud Security Posture Management (CSPM), and Azure Sentinel, which is Microsoft's cloud-native SIEM and SOAR technology (see Figure 4.3).
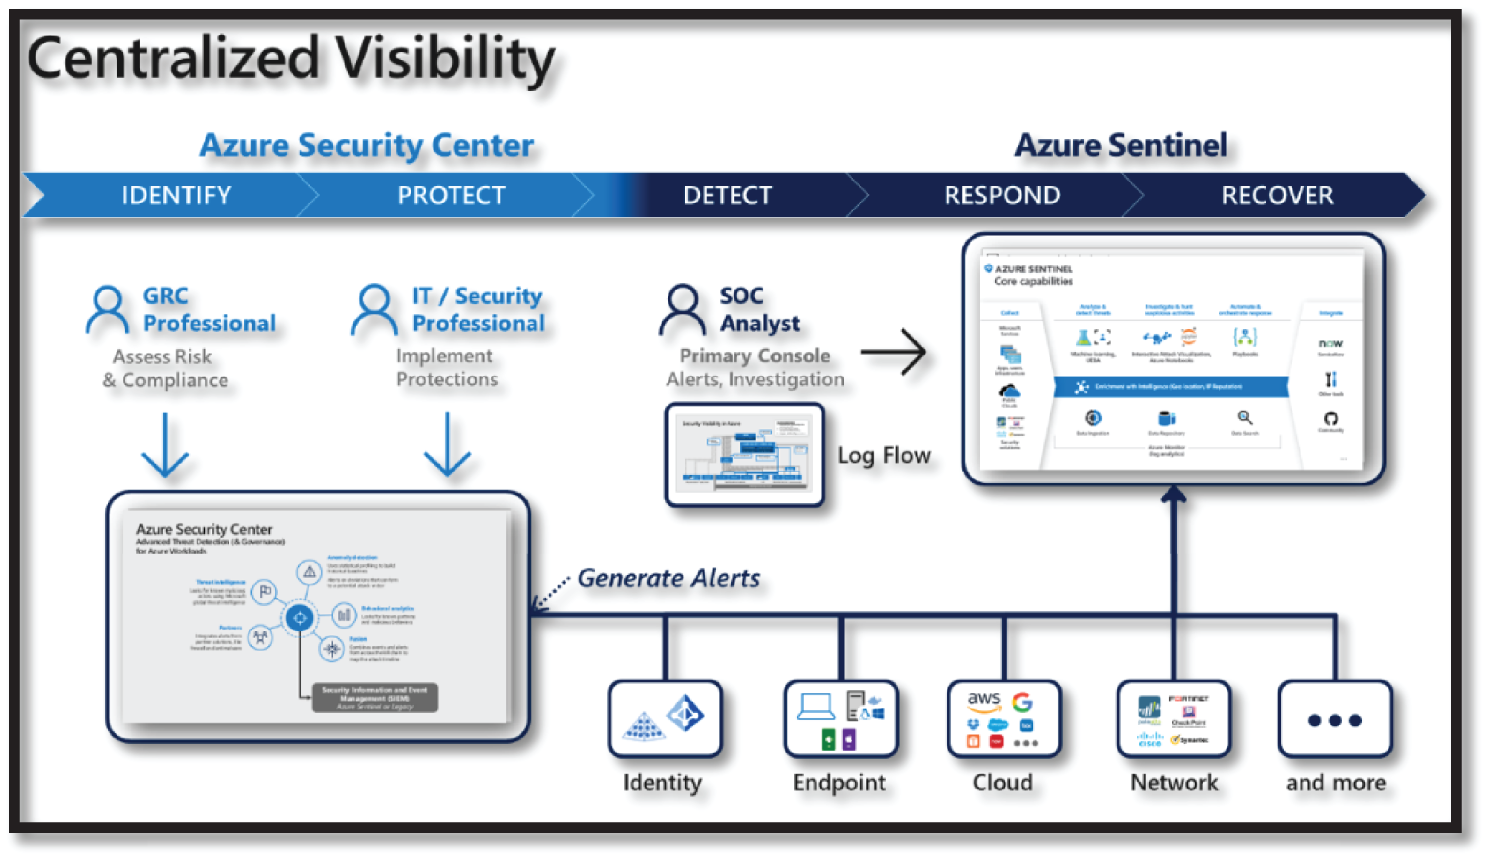
Figure 4.3: Azure Security Center vs. Azure Sentinel
Overview of Azure Security Center and Azure Defender
Azure Security Center (ASC) is focused on the protection and governance of Azure Workloads by assessing risk to them, reducing attack surface, and generating alerts on potential threats using advanced threat detection technologies. The roles who use ASC will typically include security engineers and GRC professionals that report risk to the CISO (Figure 4.4).
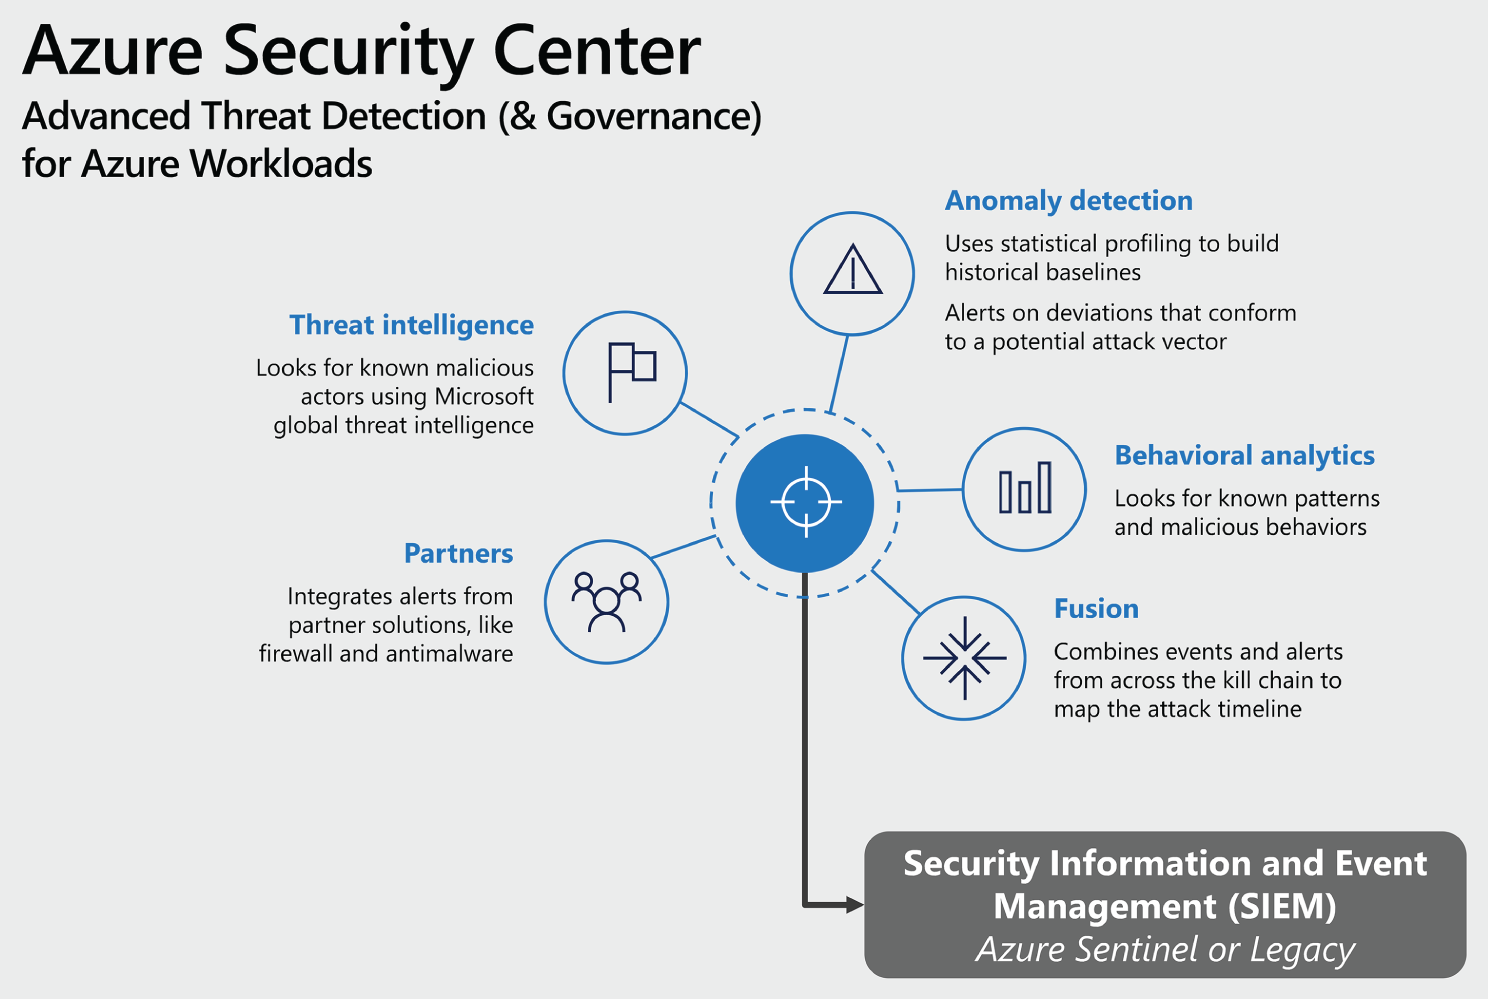
Figure 4.4: Azure Security Center overview
Azure Security Center covers the two broad pillars of cloud security management:
- Cloud Security Posture Management (CSPM): The basic/free version of Security Center is available for all Azure users. This version provides features such as secure score, detection of security misconfigurations in your Azure machines, asset inventory, and more. You can use these features to strengthen your hybrid cloud posture and track compliance with the built-in policies.
- Cloud Workload Protection (CWP): Security Center's integrated cloud workload protection platform (CWPP), Azure Defender, brings advanced and intelligent protection to your Azure and hybrid resources and workloads. Azure Defender allows you to get a range of additional security features such as vulnerability assessment, Just in Time and Just Enough Access, and many more. In addition to the built-in policies, you can also add custom policies and initiatives. You can add regulatory standards—such as NIST and Azure CIS—as well as the Azure Security Benchmark for a truly customized view of your compliance.
Prerequisites to enable Azure Security Center include:
- Paid or free subscription of Microsoft Azure
- Azure Defender subscription with the Owner, Subscription Contributor, or Security Admin role
Follow these steps to enable Azure Security Center:
- Sign in to the Azure portal by visiting
https://portal.azure.com. - From the portal's menu, select Security Center.
- Security Center's overview page opens. See Figure 4.5.
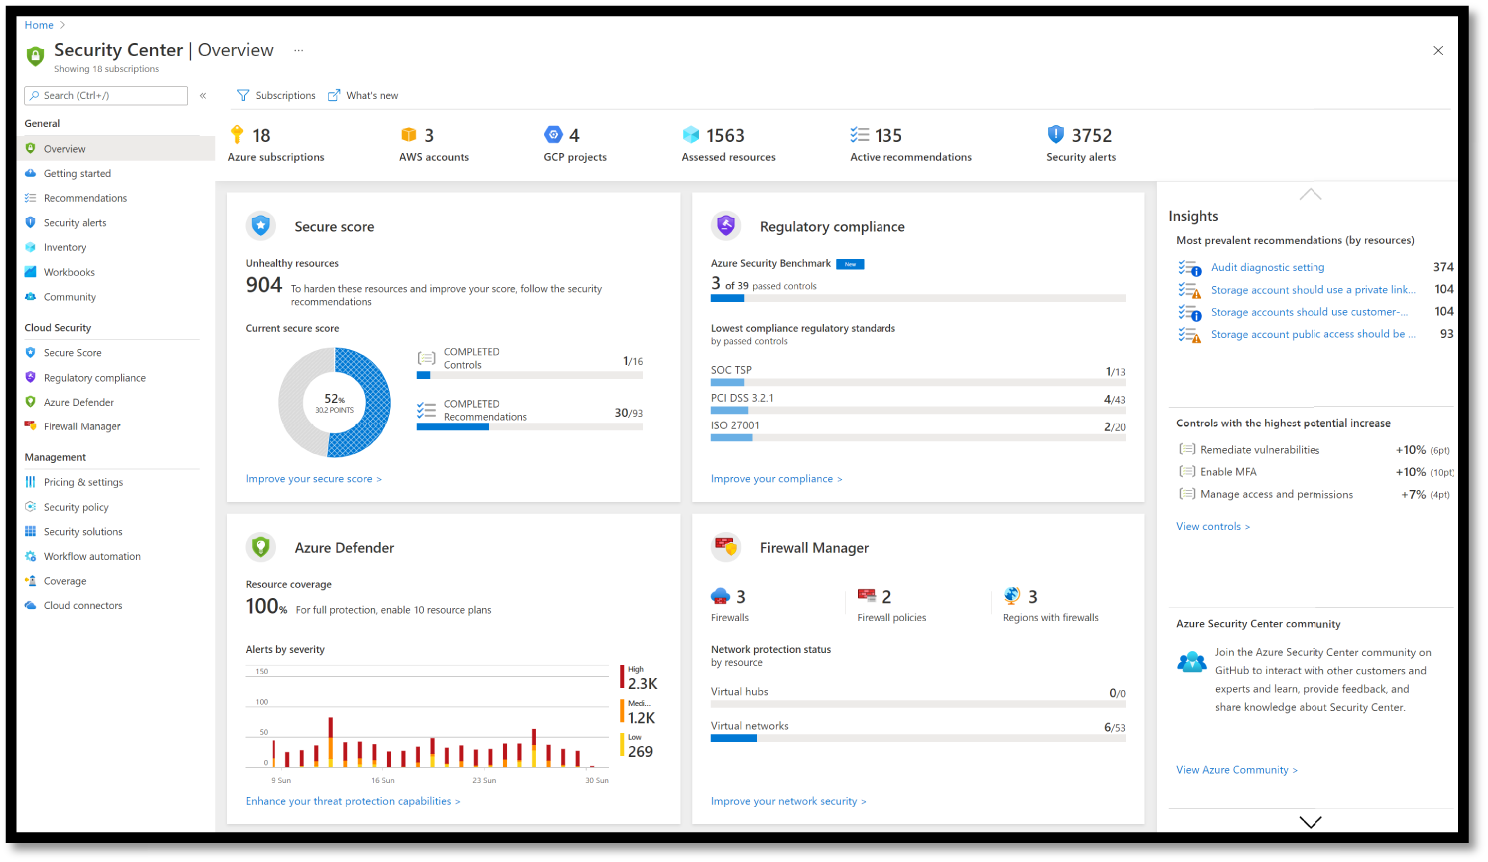
Figure 4.5: The ASC overview dashboard
You can view and filter the list of subscriptions by selecting the Subscriptions menu item. Security Center will adjust the display to reflect the security posture of the selected subscriptions. After launching ASC the first time, you will be able to see:
- Secure Score and Recommendations to improve your connected resources security posture.
- An inventory of your resources that are now being assessed by Security Center, along with the security posture of each resource.
Azure Defender provides threat protection capabilities for your Azure, multi-cloud, and hybrid workloads within your subscription containing the applicable workloads. Enabling it at the workspace level doesn't enable just-in-time VM access, adaptive application controls, and network detections for Azure resources.
In addition, the only Azure Defender plans available at the workspace level are Azure Defender for servers and Azure Defender for SQL servers on machines. You can enable Azure Defender for SQL or Storage accounts at either the subscription level or resource level; however, you can enable Azure Defender for open source relational databases at the resource level only.
Figure 4.6 shows the Azure Defender dashboard in the Security Center, which provides visibility and control of the CWP features.
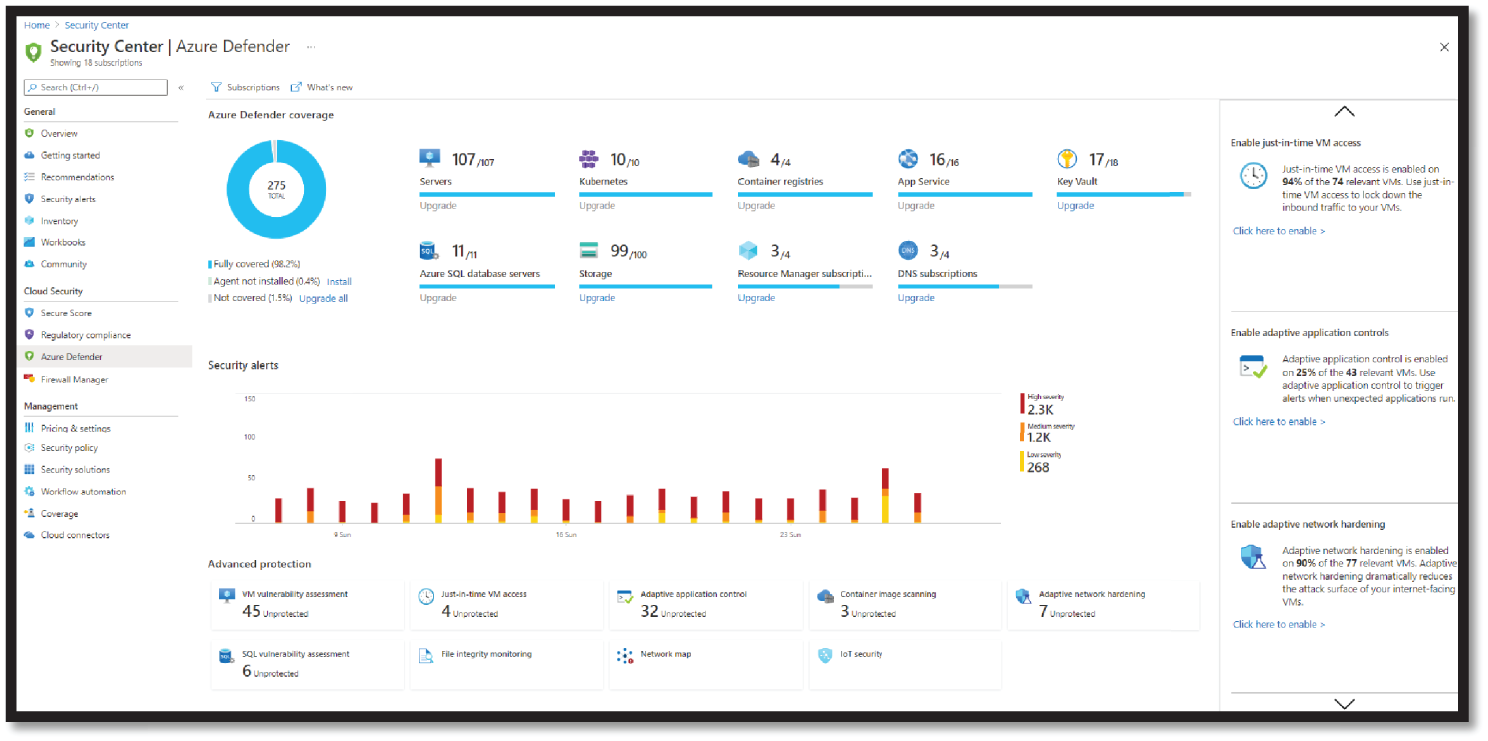
Figure 4.6: The Azure Defender dashboard
Follow these steps to enable Azure Defender:
- From Security Center's main menu, select Pricing & Settings.
- Select the subscription or workspace that you want to protect.
- Select Azure Defender On to upgrade.
- Click Save. See Figure 4.7.
For detailed steps and set up guide, visit https://docs.microsoft.com/en-us/azure/security-center/.
Overview of Microsoft Azure Sentinel
Microsoft Azure Sentinel is a scalable, cloud-native, Security Information Event Management (SIEM) and Security Orchestration, Automation, and Response (SOAR) solution. Azure Sentinel can provide many capabilities to SOC teams such as intelligent security analytics, threat hunting, single view of threats, and single solution for alerts detections, threat visibility, and threat response across the entire enterprise estate.

Figure 4.7: Azure Defender plans
It also allows for monitoring alerts and security-related events from any source (Microsoft security solutions, third parties, costume rules). See Figure 4.8.
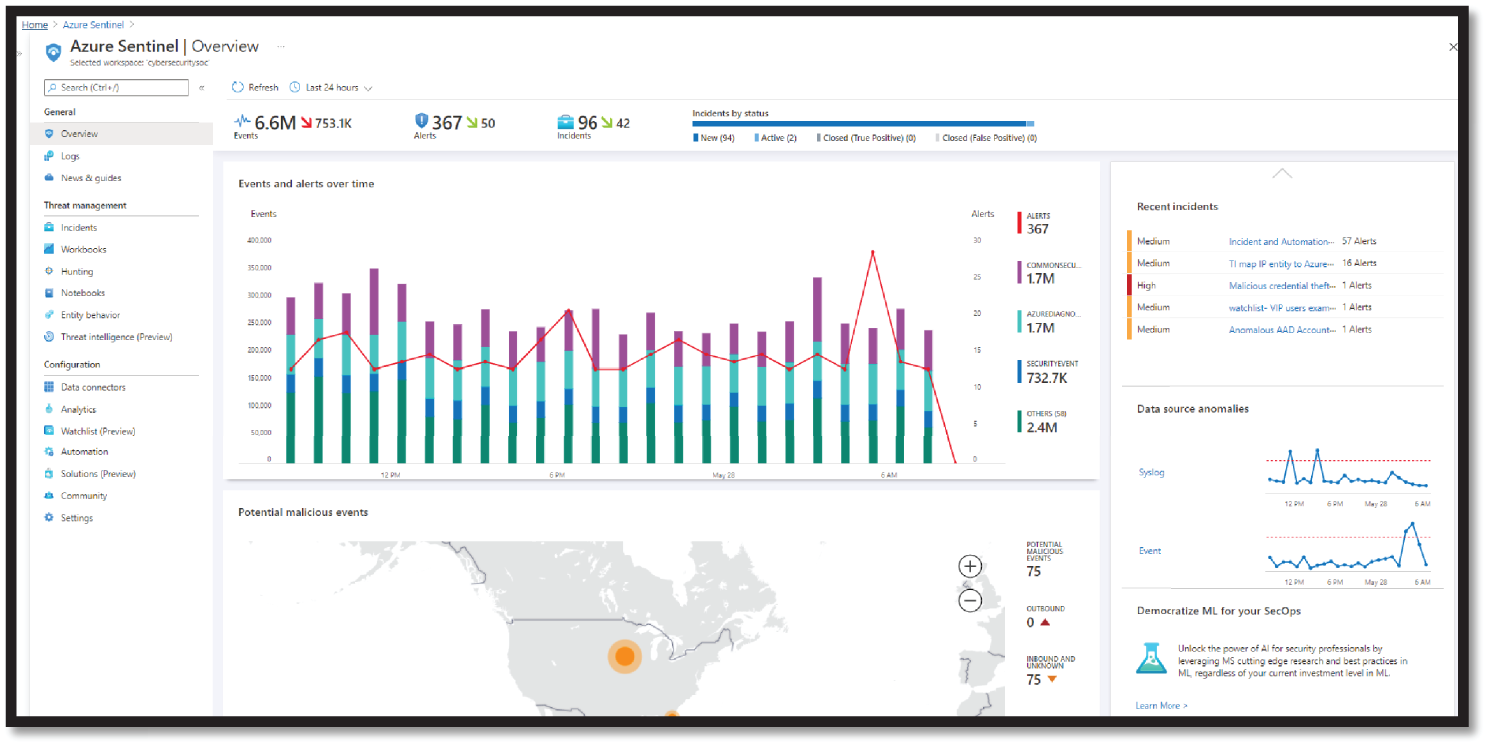
Figure 4.8: Azure Sentinel Overview
Azure Sentinel is designed to simplify the application of advanced technologies like Machine Learning and User and Entity Behavior Analytics (UEBA), to the variety of datasets you monitor and is complemented by other Microsoft Threat Protection solutions that provide a specialized investigation of hosts, email, identity attacks, and more. These can be helpful to both security analysts and SOC managers (Figure 4.8).
Here are the prerequisites for on-boarding Azure Sentinel:
- Active paid or free Azure subscription
- Log Analytics workspace
- Paid or Trial Subscription with a Contributor or a Reader permissions. Additional permissions may be required for you to connect specific data sources.
Follow these steps to enable Azure Sentinel:
- Sign in to the Azure portal by visiting
https://portal.azure.com. - Select the subscription in which Azure Sentinel is to be created.
- Search for and select Azure Sentinel and then click Add. See Figure 4.9.
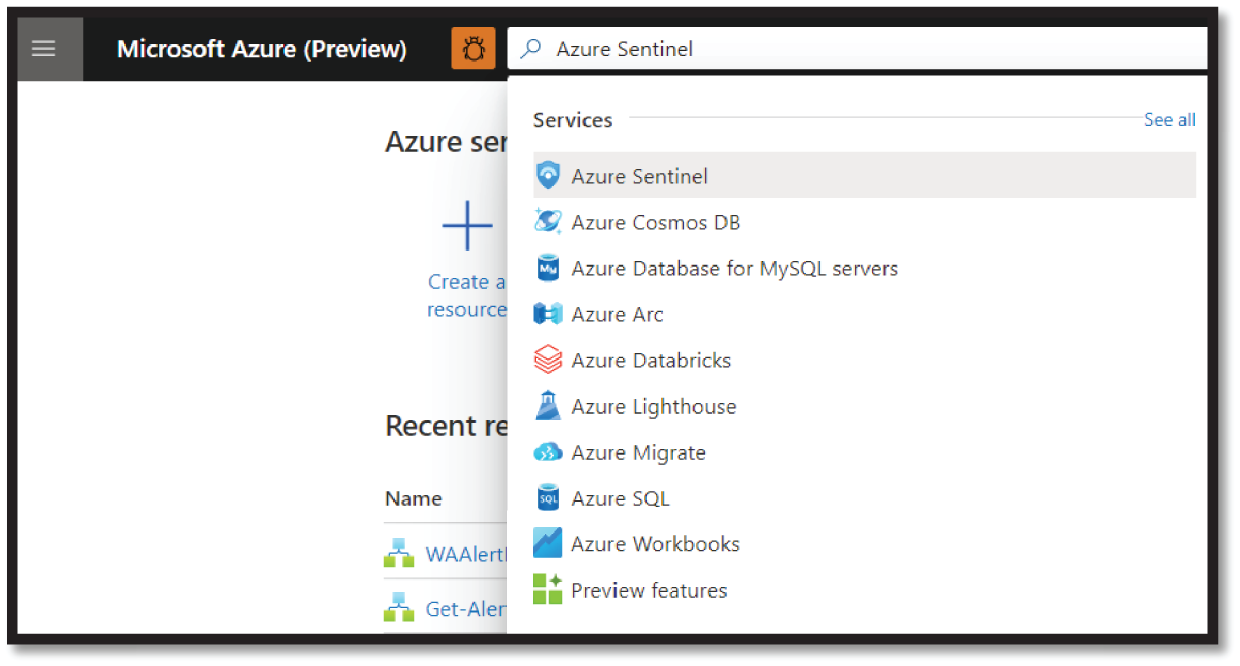
Figure 4.9: Azure Sentinel search
- Select the workspace you want to use or create a new one. You can run Azure Sentinel on more than one workspace, but the data is isolated to a single workspace. See Figure 4.10.
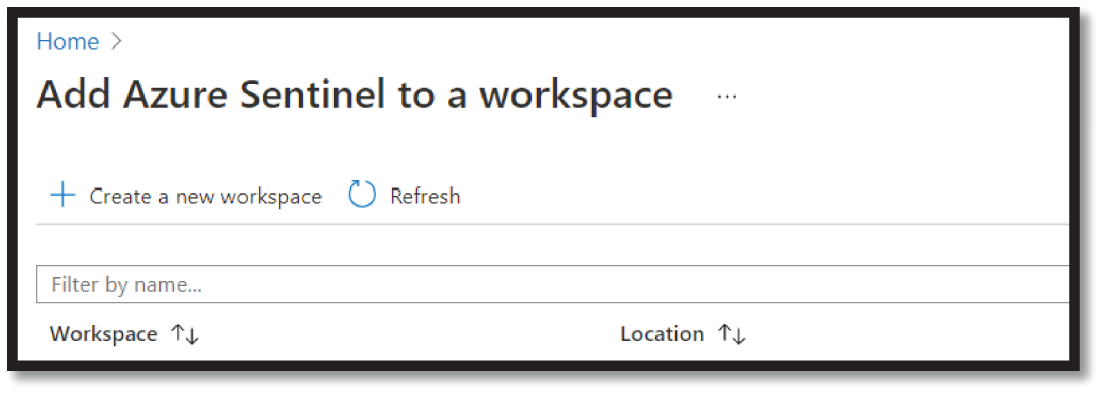
Figure 4.10: Add Sentinel to a workspace
- After enabling Azure Sentinel from the main menu, select Data Connectors. This will open the Data Connectors gallery. Select a data source and then open a connector page button. See Figure 4.11.
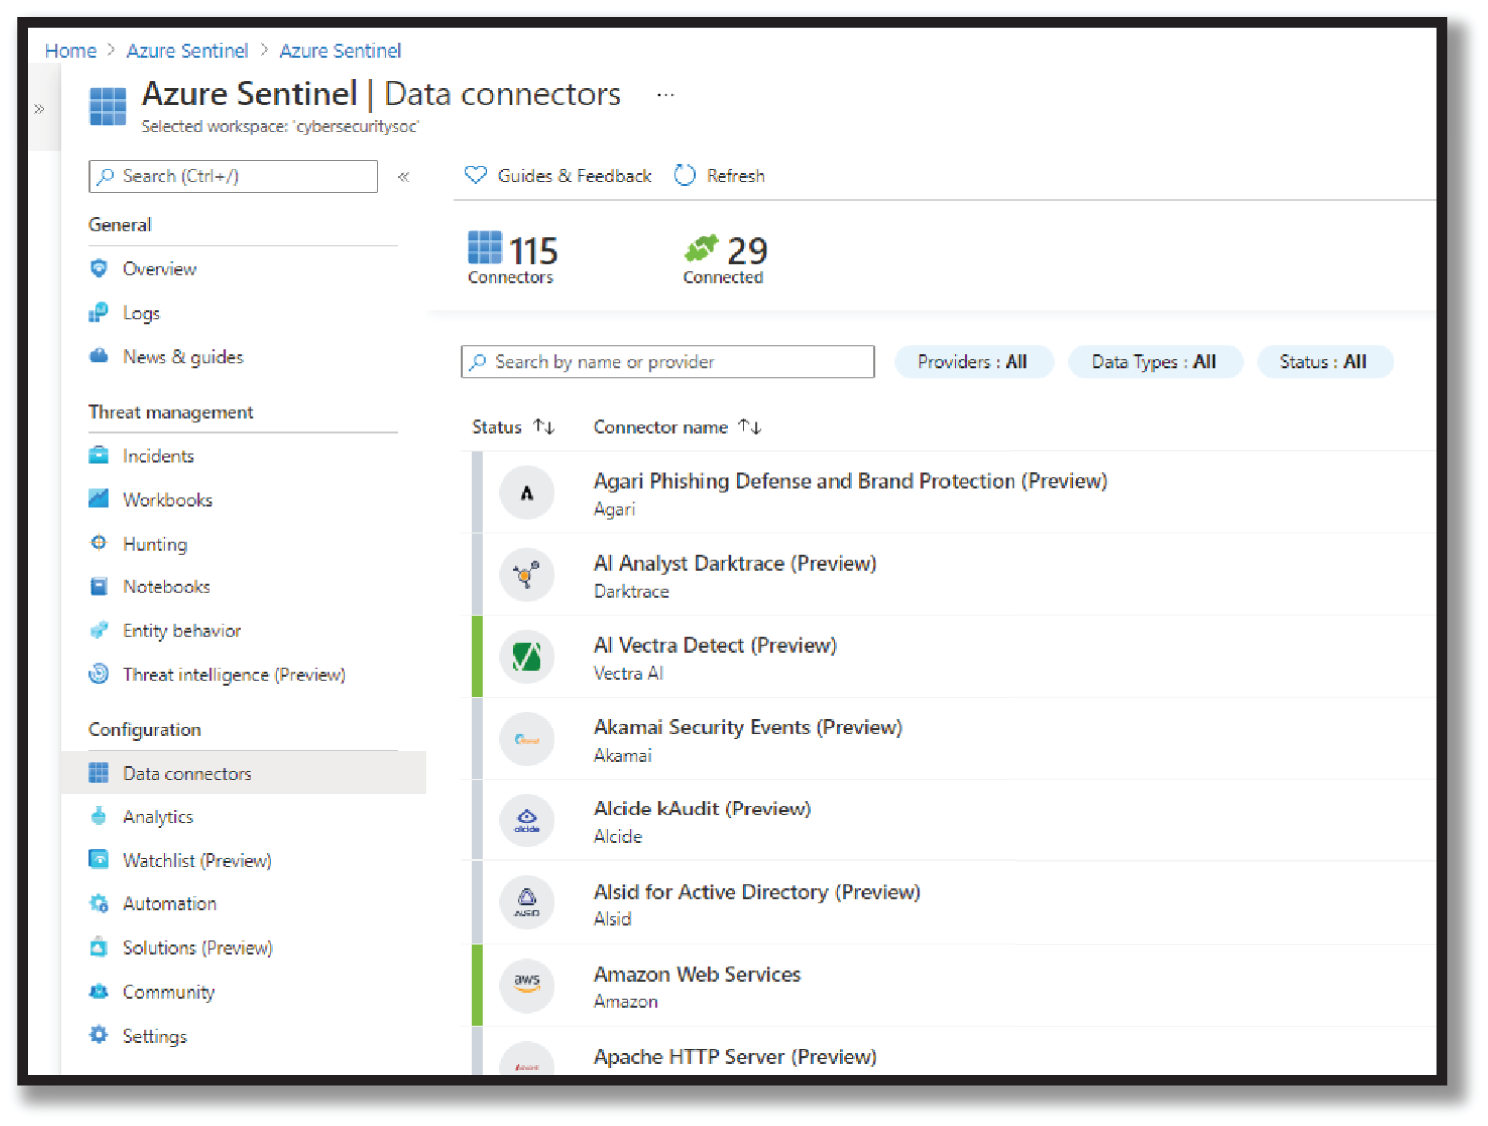
Figure 4.11: Data Connectors
- The Next steps tab on the connector page shows relevant built-in workbooks, sample queries, and analytics rule templates that accompany the data connector. You can use these as is or modify them. Either way you can immediately get interesting insights across your data. This data will help you with investigation and hunting, which is discussed later in this chapter.
- To view all the out-of-the-box detections, go to Analytics and then Rule templates. This tab contains all the Azure Sentinel built-in rules. See Figure 4.12.
For detailed steps and a setup guide, visit https://docs.microsoft.com/en-us/azure/sentinel/quickstart-onboard.
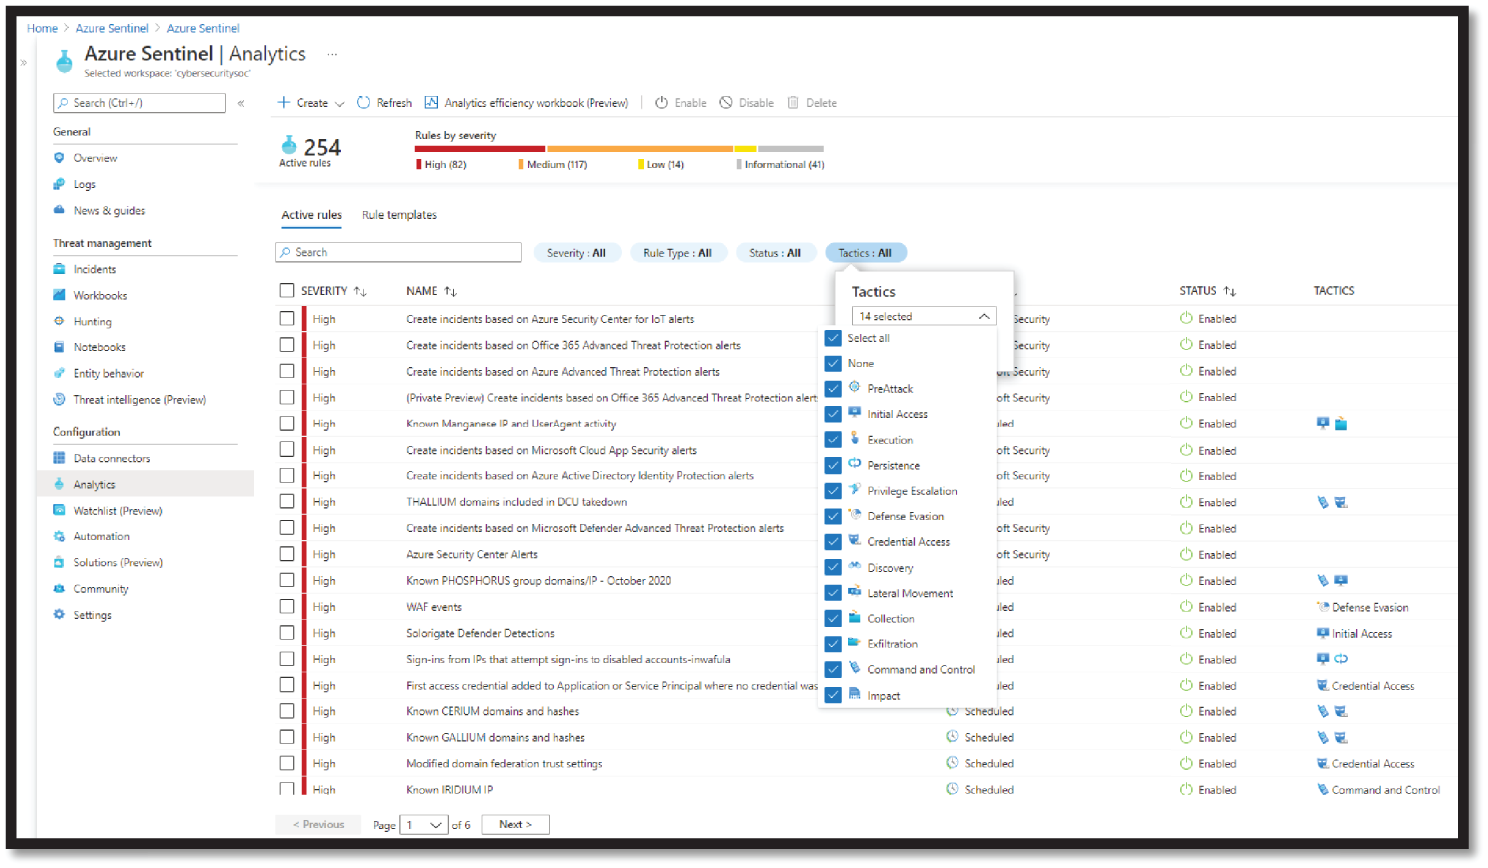
Figure 4.12: Built-in Analytics rule
Using Microsoft Secure and Protect Features
Microsoft provides comprehensive security features to protect end-to-end resources. They offer a wide array of security tools and capabilities for customers to create secure solutions and manage the data and other enterprise resources. These features are part of Azure as well within Microsoft 365; these services allow protection against internal and external threats across the threat kill chain. See Figure 4.13.
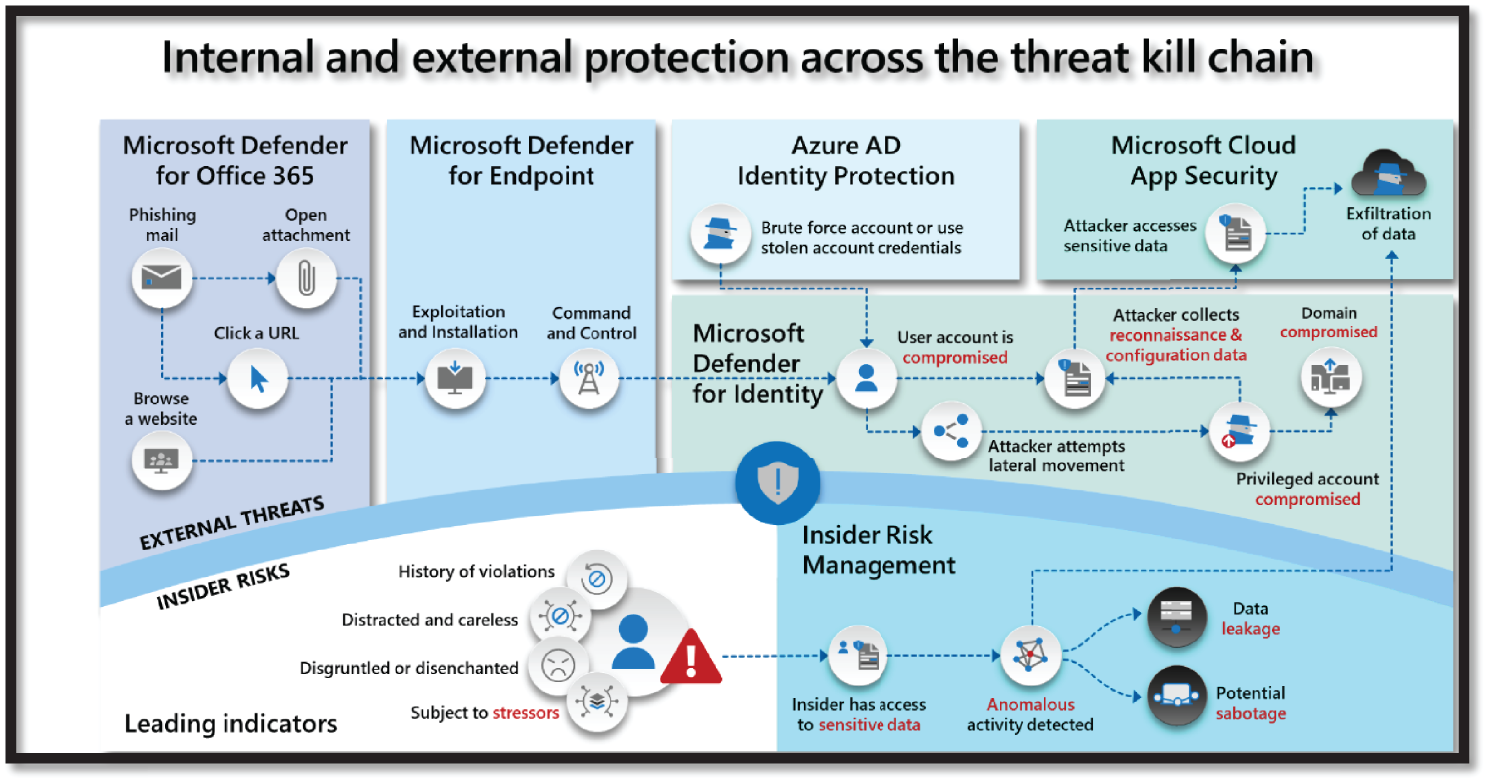
Figure 4.13: Threat kill chain protection with M365
The security and preventions security services from Azure, as shown in Figure 4.14, allow you to implement a layered, defense-in-depth strategy across identity, hosts, networks, and data. This security services and capabilities collection provides a way to understand and improve your security posture across your Microsoft and Azure environments.
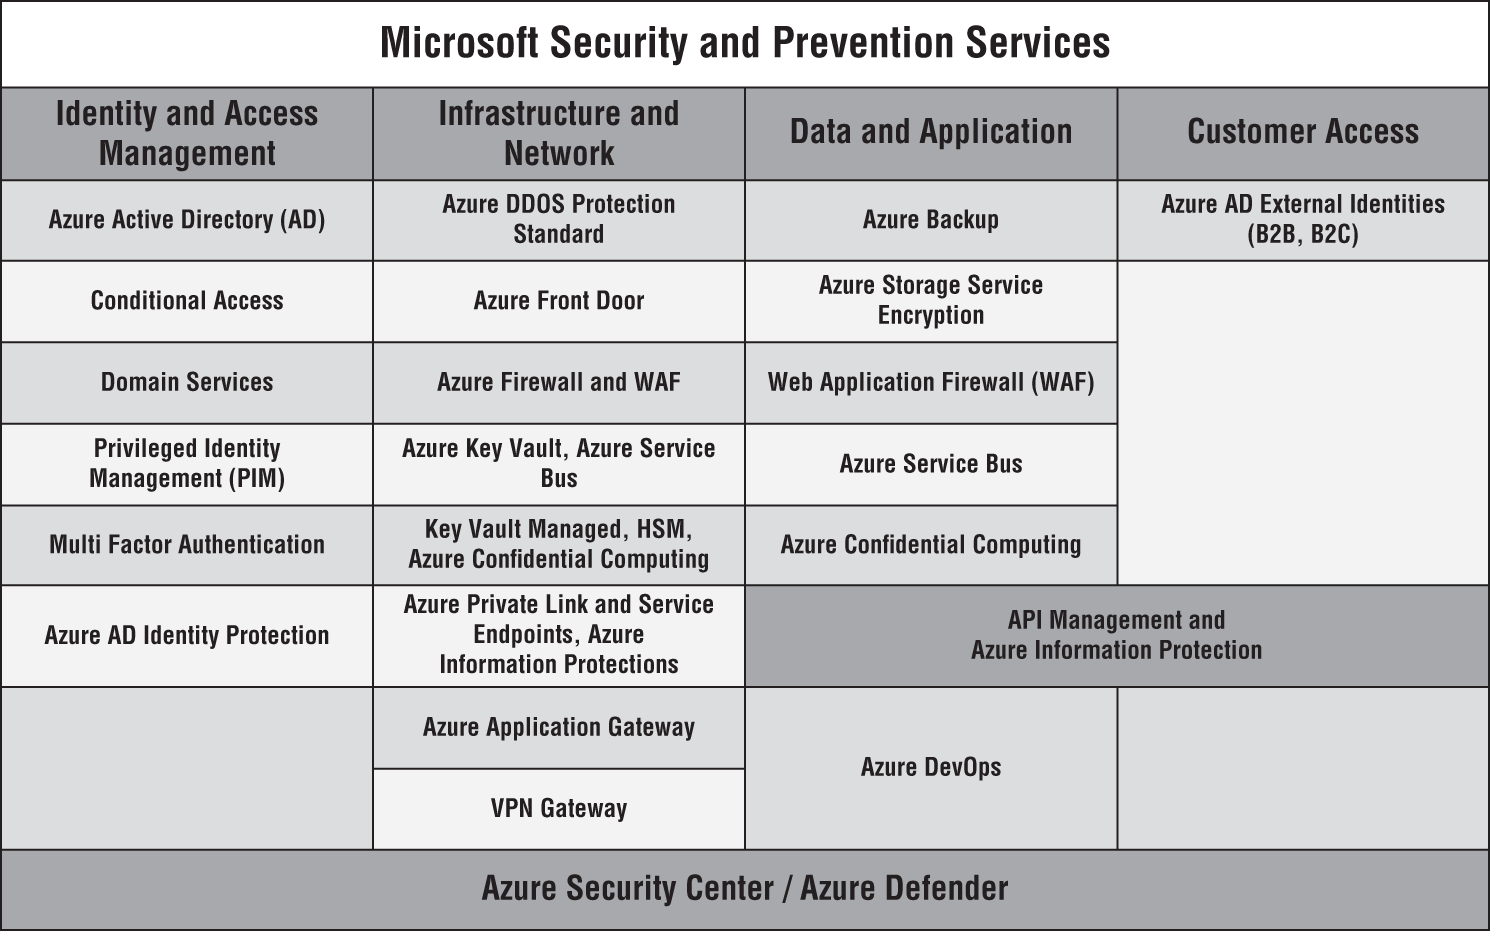
Figure 4.14: Microsoft Security and Prevention Services with Azure
The following sections briefly explain each of these services to understand what capabilities they provide under each domain of Identity & Access Management, Infrastructure & Network, Data & Application, and Customer Access.
Identity & Access Management
- Azure Security Center: ASC and Azure Defender is a unified infrastructure security management system that strengthens your datacenter's security posture and provides advanced threat protection across your hybrid, on-premises, and multi-cloud environment.
- Azure Active Directory (AD): AAD is Microsoft's cloud-based identity and access management services with many built-in security services and features to securely manage the identities.
- Conditional access is the tool used by Azure AD to bring identity signals together, make decisions, and enforce organizational policies. This is a core service used for implementing Zero Trust Access Architecture.
- Domain Services is the tool used by Azure AD to provide managed domain services such as domain join, group policy, Lightweight Directory Access Protocol (LDAP), and Kerberos/NTLM authentication.
- Privileged Identity Management (PIM) is a service in Azure AD that enables you to manage, control, and monitor access to important resources in your organization.
- Multi-factor authentication is the tool used by Azure AD to help safeguard access to data and applications by requiring a second form of authentication.
- Azure AD Identity Protection: This tool allows organizations to automate the detection and remediation of identity-based risks, investigate risks using data in the portal, and export risk detection data to third-party utilities for further analysis.
Infrastructure & Network
- VPN Gateway: Virtual Private Network gateway is used to send encrypted traffic between an Azure virtual network and an on-premises location over the public Internet and to send encrypted traffic between Azure virtual networks over the Microsoft network.
- Azure DDoS Protection Standard: Provides enhanced DDoS mitigation features to defend against DDoS attacks. It is automatically tuned to help protect your specific Azure resources in a virtual network.
- Azure Front Door: A global, scalable entry point that uses the Microsoft global edge network to create fast, secure, and widely scalable web applications.
- Azure Firewall: A managed, cloud-based network security service that protects your Azure Virtual Network resources. It's a fully stateful firewall as a service with built-in high availability and unrestricted cloud scalability.
- Azure Key Vault: A secure secrets store for tokens, passwords, certificates, API keys, and other secrets. Key Vault can also be used to create and control the encryption keys used to encrypt your data.
- Key Vault Managed HSM: A fully managed, highly available, single-tenant, standards-compliant cloud service that enables you to safeguard cryptographic keys for your cloud applications, using FIPS 140-2 Level 3 validated HSMs.
- Azure Private Links: Enables you to access Azure PaaS Services (for example, Azure Storage and SQL Database) and Azure hosted customer-owned/partner services over a private endpoint in your virtual network.
- Azure Application Gateway: An advanced web traffic load balancer enables you to manage traffic to your web applications. Application Gateway can make routing decisions based on additional HTTP requests, such as URI path or host headers.
- Azure Service Bus: A fully managed enterprise message broker with message queues and publish-subscribe topics. Service Bus is used to decouple applications and services from each other.
- Web Application Firewall: WAF provides centralized protection of your web applications from common exploits and vulnerabilities. WAF can be deployed with Azure Application Gateway and Azure Front Door.
Data & Application
- Azure Backup: Provides simple, secure, and cost-effective solutions to back up your data and recover it from the Microsoft Azure cloud.
- Azure Storage Service Encryption: Allows you to encrypt data before storing and decrypts the data when you retrieve it automatically.
- Azure Information Protection: A cloud-based solution enables organizations to discover, classify, and protect documents and emails by applying labels to content.
- API Management: A way to create consistent and modern API gateways for existing backend services.
- Azure Confidential Computing: This service allows you to isolate your sensitive data while it's being processed in the cloud.
- Azure DevOps: Your development projects benefit from multiple layers of security and governance technologies, operational practices, and compliance policies when stored in Azure DevOps.
Customer Access
- Azure AD External Identities: With External Identities in Azure AD, you can allow people outside your organization to access your apps and resources, while letting them sign in using whatever identity they prefer. It also allows you to share your apps and resources with external users via Azure AD B2B collaboration.
- Azure AD B2B lets you support millions of users and billions of authentications per day, monitoring and automatically handling threats like denial-of-service, password spray, or brute force attacks.
We will explore how Microsoft 365 services and Azure security services can help protect, detect, respond, and recover against MITRE ATT&CK Tactics, Techniques, and Procedures (TTP).
Using Azure Web Application Firewall to Protect a Website Against an “Initial Access” TTP
Azure Web Application Firewall (WAF) on Azure Application Gateway provides centralized protection of your web applications from common exploits and vulnerabilities. Web applications are increasingly targeted by malicious attacks that exploit commonly known vulnerabilities. SQL injection and cross-site scripting are among the most common attacks.
Follow these steps to create a WAF policy for preventing web-based attacks:
- On the upper-left side of the portal, select Create a Resource. Search for WAF, select Web Application Firewall, then click Create.
- On the Create a WAF Policy page, from the Basics tab, enter or select the following information. Accept the defaults for the remaining settings, and then select Review + create. Enter the appropriate Project Details, such as Policy for, Subscription, and Resource Group. See Figure 4.15.
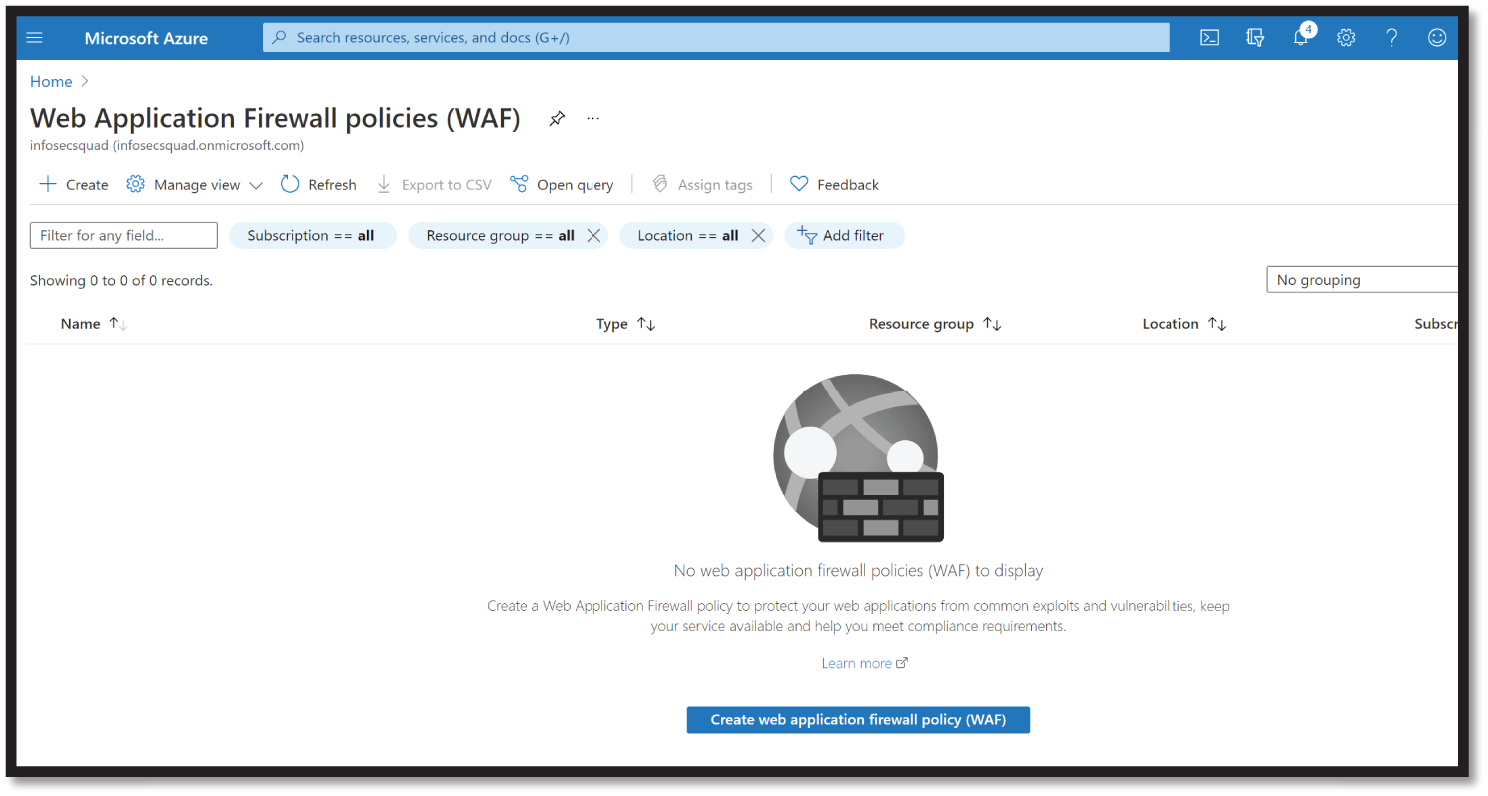
Figure 4.15: WAF policy window
- Provide detail for Instance details, such as Policy name, Location, Policy state, and select Policy mode as Prevention. Click Next : Managed Rules; see Figure 4.16.
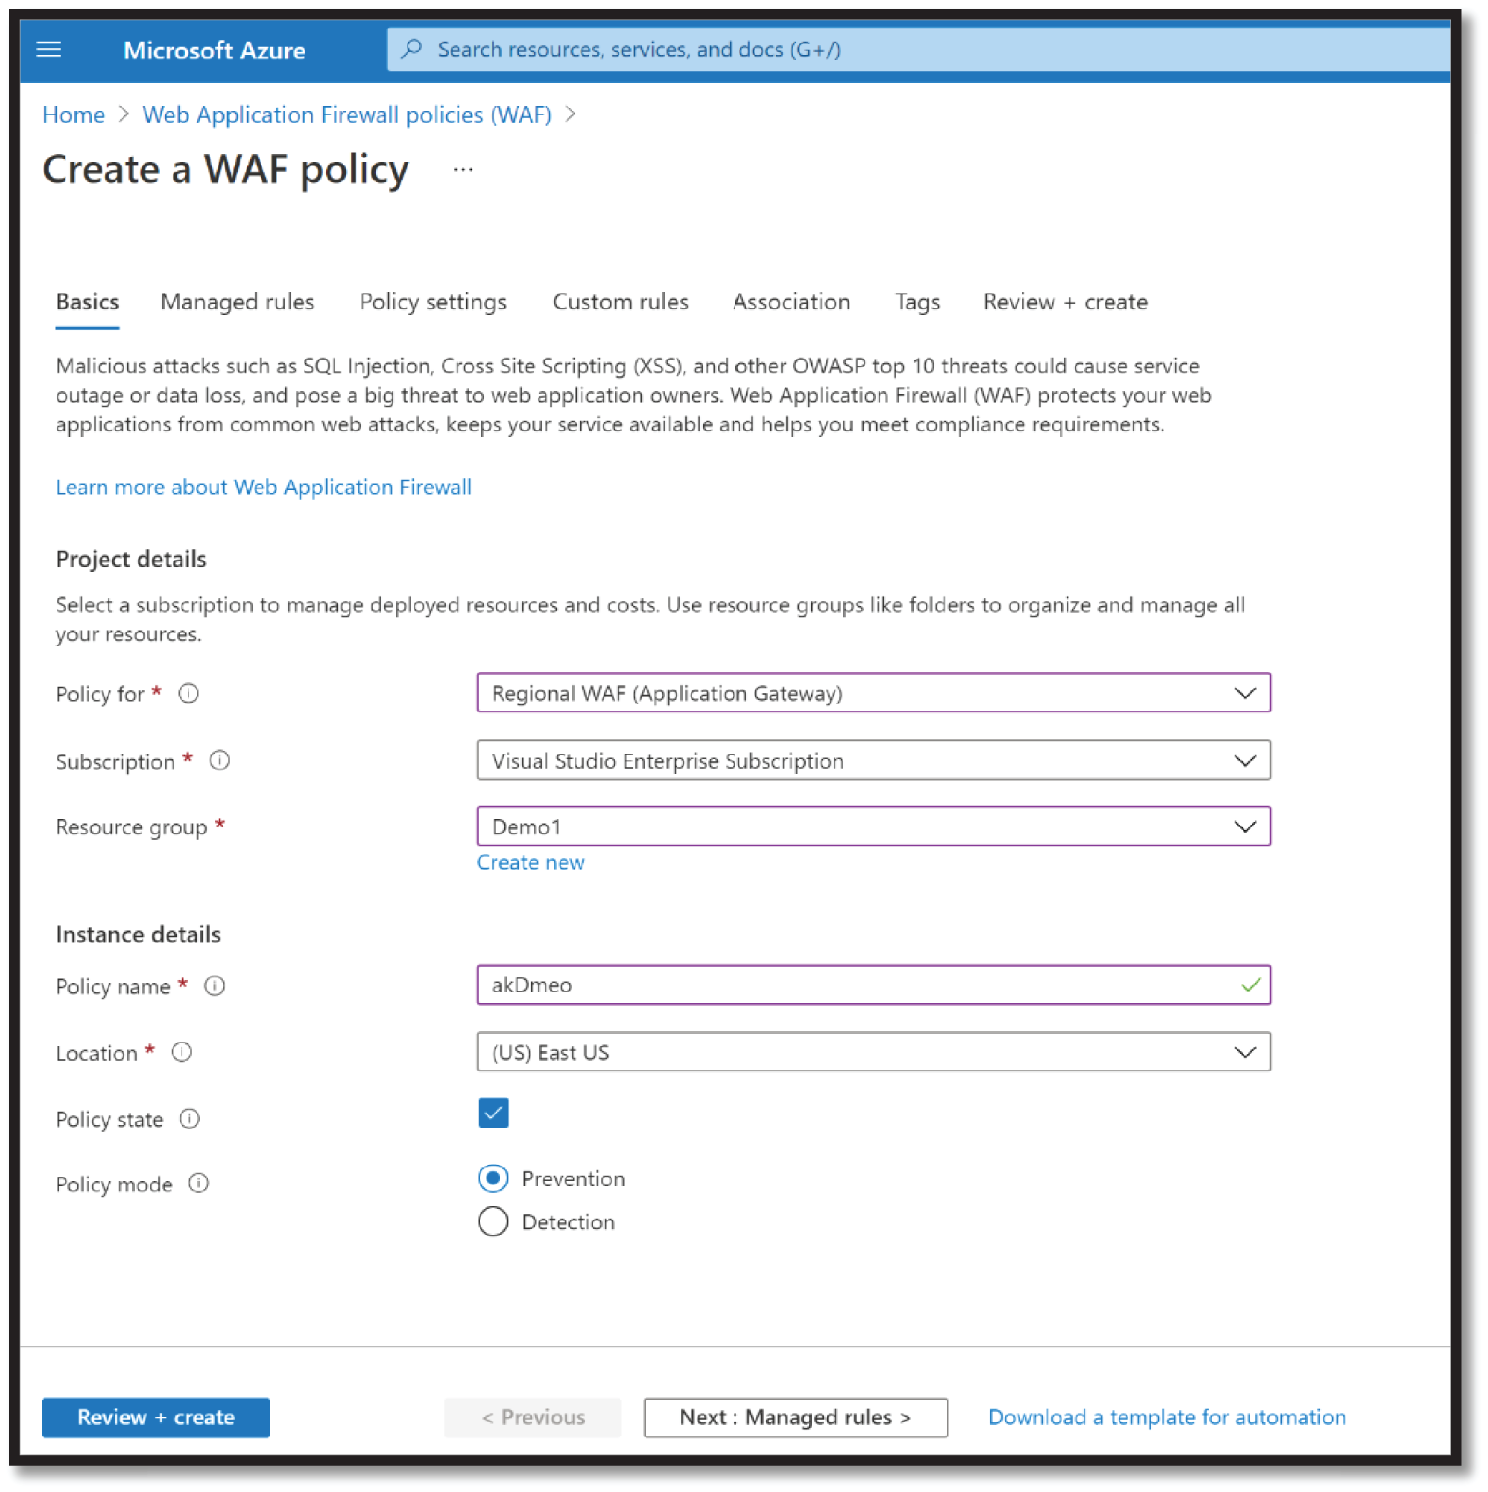
Figure 4.16: Create WAF Policy
- Under Managed rules, select the rule set OWASP 3.2 or 3.1 from the drop-down menu.
- Azure-managed OWASP rules are enabled by default. To disable an individual rule within a rule group, expand the rules within that rule group, select the check box in front of the rule number, and select Disable on the tab. See Figure 4.17.
- To create a custom rule, select Add Custom Rule under the Custom Rules tab. This opens the custom rule configuration page. Figure 4.18 shows an example custom rule configured to block a request if the query string contains the text blockme.
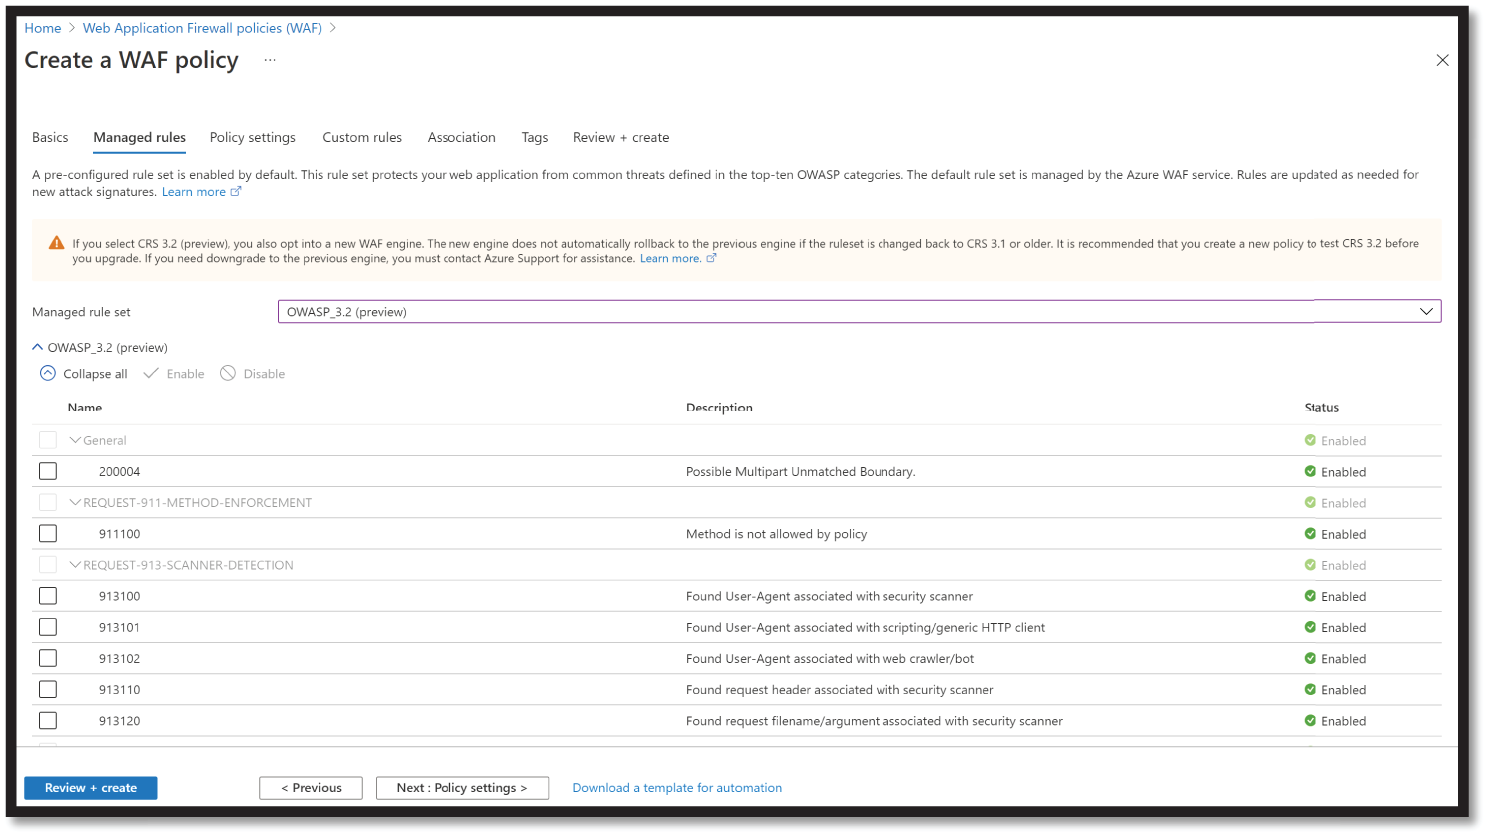
Figure 4.17: Create WAF Rule Set
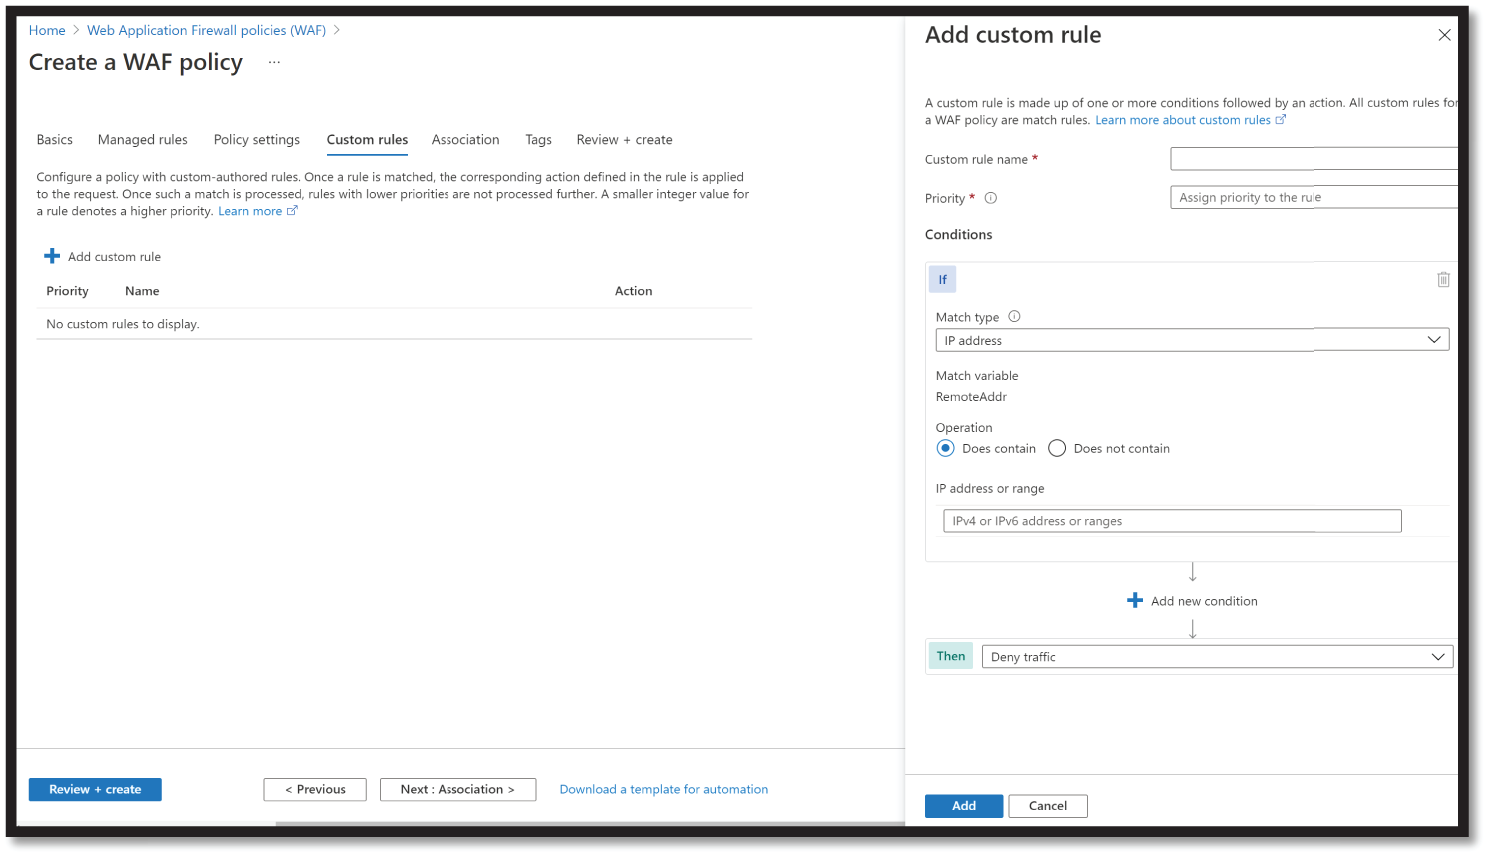
Figure 4.18: Custom Rule Configuration page
Using Microsoft Defender for Office 365 to Protect Against an “Initial Access” TTP
Phishing is considered a top threat. Phishing is an email attack that tries to steal sensitive information in messages that appear to be from legitimate or trusted senders. There are a few specific types of phishing attack:
- Spear phishing uses focused and customized information specific to target individuals.
- Whaling attacks are directed at high-value individuals such as executives for a maximum effect.
- Business email compromises use a forged trusted sender such as a CFO requesting payment from a customer or a CEO asking a CFO to make an immediate payment.
Microsoft Defender for Office 365 can protect an organization with these different types of phishing emails using a number of security capabilities such as:
- Anti-phishing policies in Exchange Online Protection can be quickly turned on or off to block spam and spoofed senders.
- Spoof Intelligence can be used to gain insight and review the detected spoofed senders in the message.
- Implicit email authentication can help enhance standard email authentication checks for all inbound email with sender reputation, history, and behavioral analysis.
To create anti-phishing and anti-malware policies using Security and Compliance Center, follow these steps:
- In the Security & Compliance Center (
https://security.microsoft.com/), go to Email & Collaboration > Policies and rules > Threat policies > Anti-phishing. See Figure 4.19.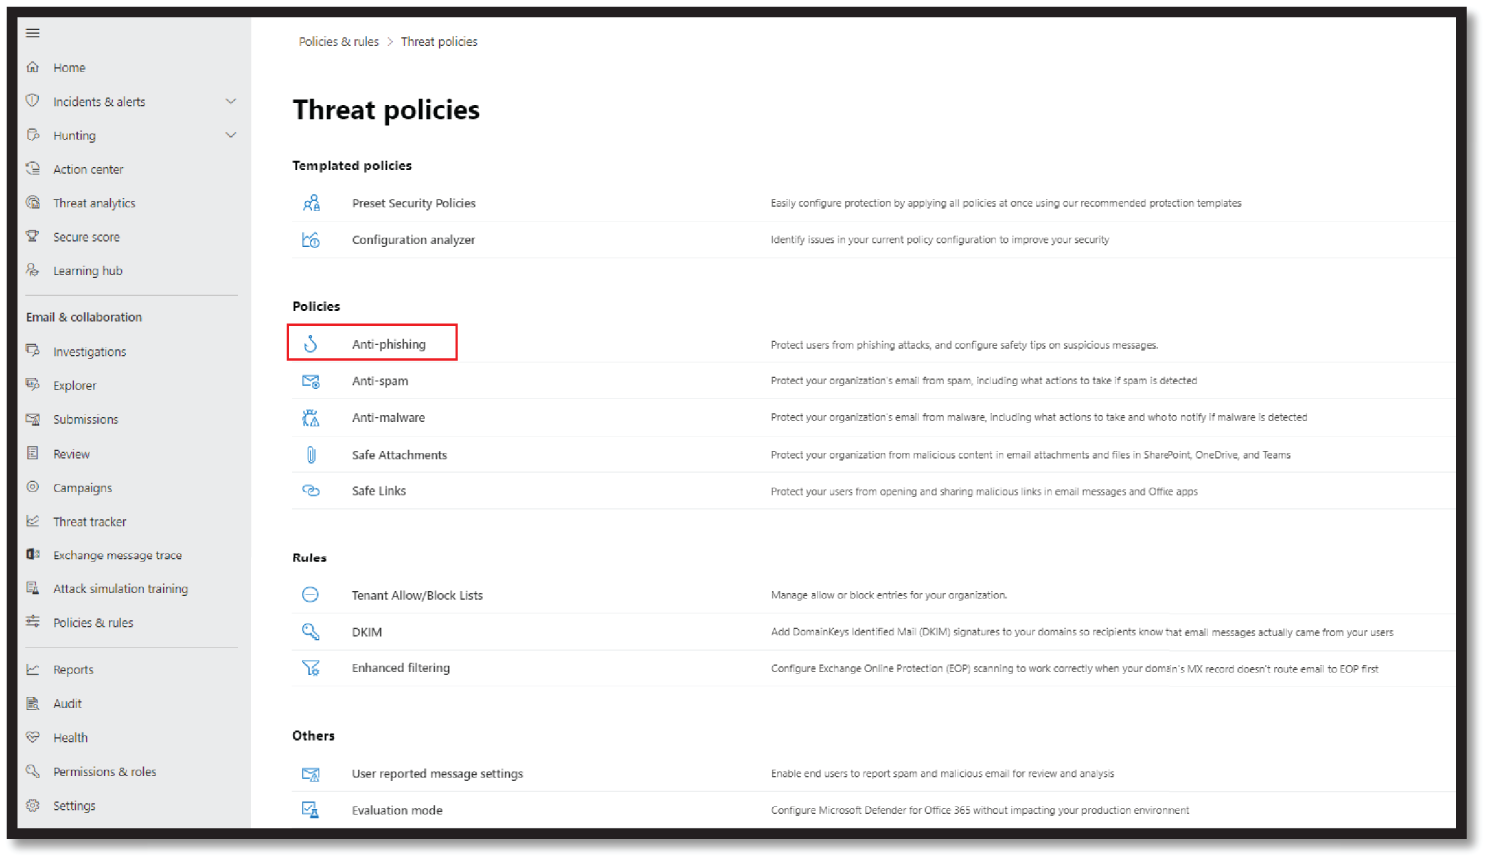
Figure 4.19: Create an anti-phishing policy
- On the Anti-phishing page, click Create. The Create a New Anti-Phishing Policy wizard opens. On the Name your policy page, configure the following settings:
- Name: Enter a unique, descriptive name for the policy.
- Description: Enter an optional description for the policy.
- When you're finished, click Next. On the next page, Users, groups, and domains, enter the required details:
- The Users is: Specifies one or more mailboxes, mail users, or mail contacts in your organization.
- The Groups is a member of: Specifies one or more groups in your organization.
- The recipient domain is: Specifies recipients in one or more of the configured accepted domains in your organization.
- When you're finished, click Next. On the Phishing Threshold & Protection page, select the phishing email threshold as required and check/uncheck other options as shown in Figure 4.20.
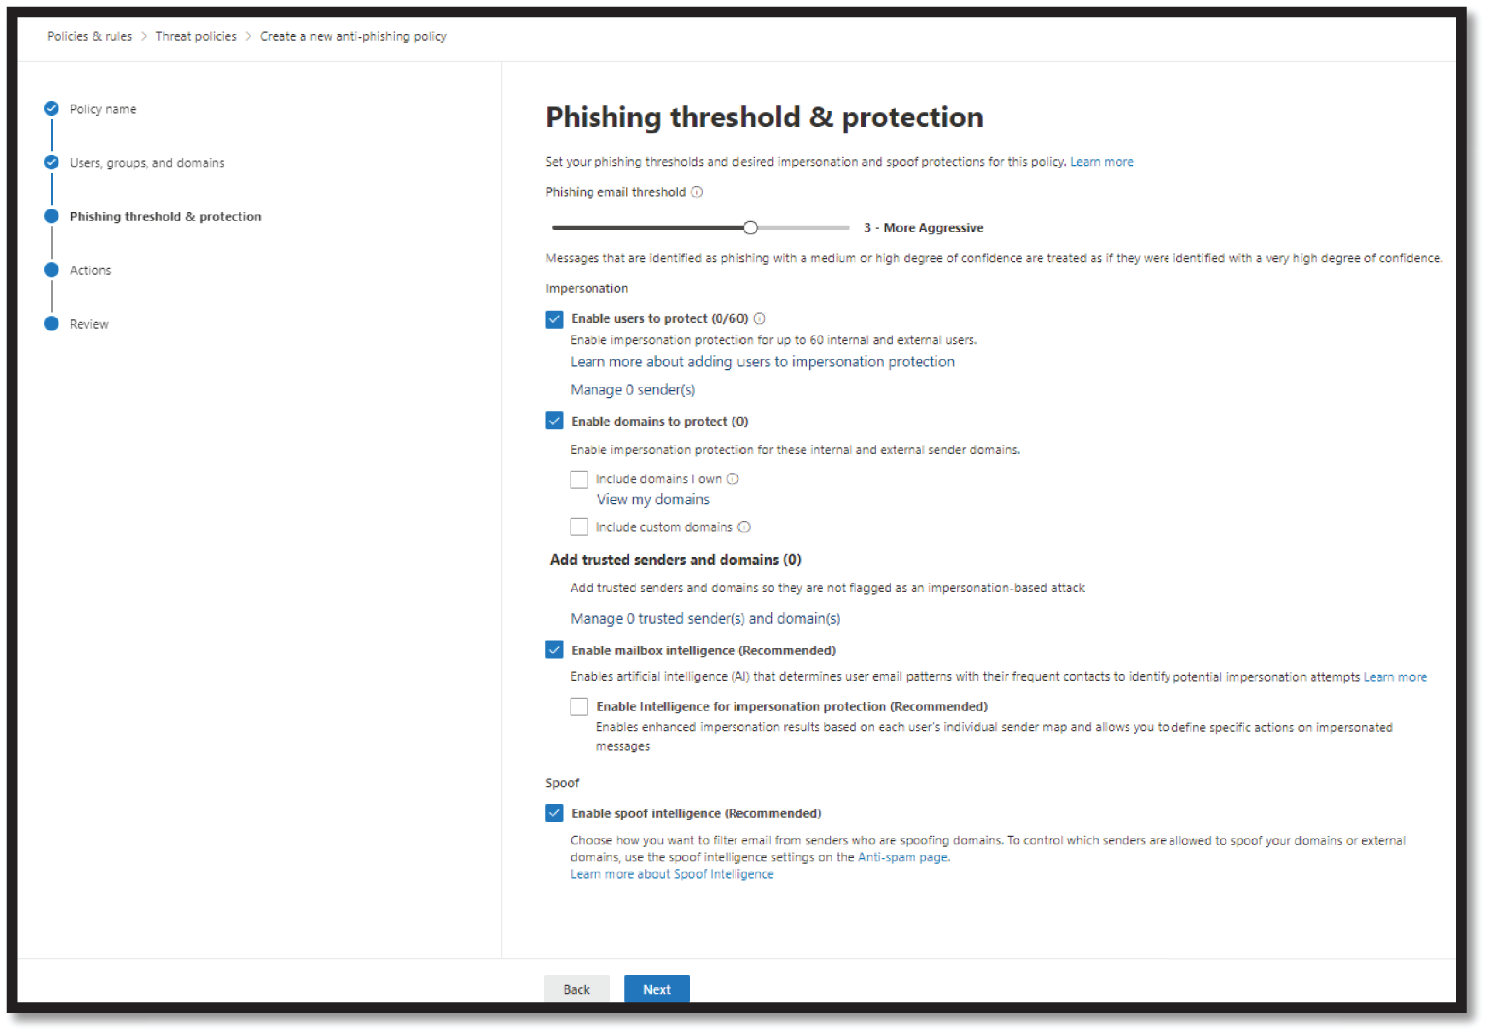
Figure 4.20: Set the phishing threshold and other settings
- When you're finished, click Next.
- On the Actions page, select the options as required and click Next.
- On the Review Your Settings page that appears, review your settings. You can click Edit on each setting to modify it.
- When you're finished, click Submit.
- Click Done when the confirmation page appears.
You can create a custom anti-phishing policy in the M365 Security Center (https://security.microsoft.com/) and the associated anti-phishing policy at the same time using the same name for both.
Using Microsoft Defender Endpoint to Protect Against an “Initial Access” TTP
Microsoft Defender for Endpoint is an enterprise endpoint security platform designed to help enterprise networks prevent, detect, investigate, and respond to advanced threats.
Defender for Endpoint uses a number of built-in technologies of the Windows 10 operating system and a combination of other Microsoft cloud services. Figure 4.21 shows some of these services, which are discussed in the following list.
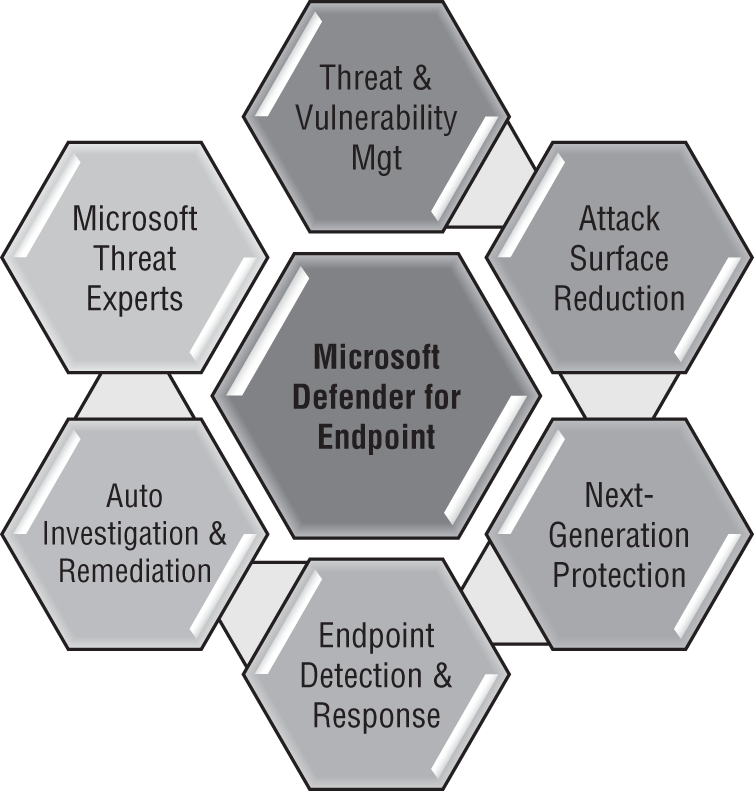
Figure 4.21: Microsoft Defender for Endpoint services
- Threat & Vulnerability Management: This feature allows you to scan, discover, prioritize, and remediate the endpoint vulnerabilities and misconfigurations.
- Attack surface reduction: This feature comes along with a number of other built-in capabilities to reduce the attack surface of an endpoint. These capabilities include network protection, web protection, hardware-based isolation, application controls, control over specific folder access, and many more.
- Next-generation protection: This feature is also known as Microsoft Defender Antivirus, which comes with advanced capabilities such as behavior-based, heuristic, and real-time antivirus protection.
- Endpoint detection and response: Endpoint detection and response capabilities are put in place to detect, investigate, and respond to advanced threats. Their hunting capabilities let you proactively find breaches and create custom detections.
- Automated investigation and remediation: This feature offers automatic investigation and remediation capabilities that help reduce the volume of alerts in minutes at scale.
- Microsoft Threat Experts: Microsoft Defender for Endpoint's new managed threat-hunting service provides proactive hunting, prioritization, and additional context and insights that further empower Security Operation Centers (SOCs) to identify and respond to threats quickly and accurately.
Follow these steps to enable Microsoft Defender for Endpoint:
- Sign in to the Microsoft Endpoint Manager admin center (
https://endpoint.microsoft.com/). - Select Endpoint security > Microsoft Defender for Endpoint, and then select Open the Microsoft Defender Security Center. See Figure 4.22.
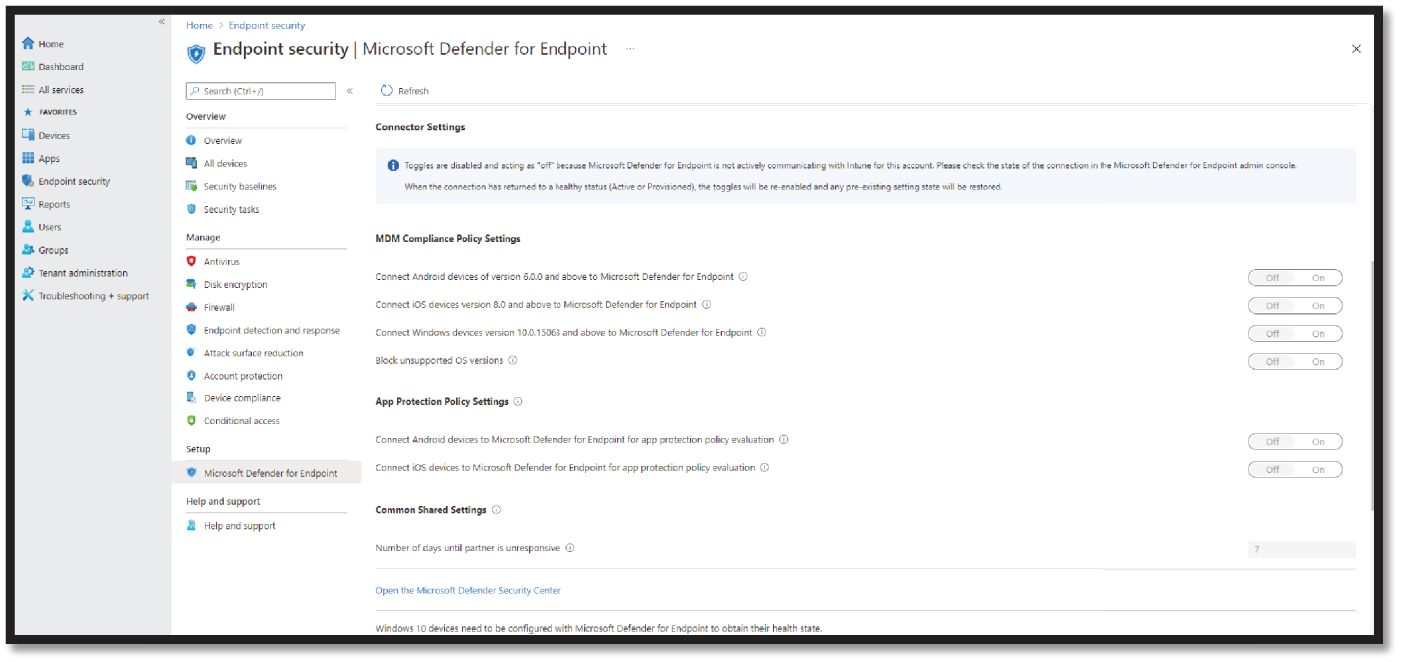
Figure 4.22: Microsoft Defender for Endpoint console
- In Microsoft Defender Security Center:
- Select Settings > Advanced features.
- For Microsoft Intune connection, choose On.
- Select Save preferences.
- Return to Microsoft Defender for Endpoint in the Microsoft Endpoint Manager admin center. Under the MDM Compliance Policy Settings, depending on your organization's needs:
- Set Connect Android devices to Microsoft Defender for Endpoint to On.
- Set Connect iOS devices to Microsoft Defender for Endpoint to On.
- Set Connect Windows devices to Microsoft Defender for Endpoint to On.
When these configurations are ON, applicable devices that you currently manage with Intune, and devices you enroll in the future, are connected to Microsoft Defender for Endpoint for compliance.
- Select Save.
Using Azure Conditional Access to Protect Against an “Initial Access” TTP
With the change in computing to a more cloud-centric model, it has become difficult to control access to the documents and data that an enterprise uses to run the business.
Formerly, all IT teams needed to keep content behind the corporate firewall, and access was governed by who had access to the network, and computers on the network were always company-owned and company-controlled.
In the current model, devices may be owned by the company, the user, or third parties such as vendors, partners, and contractors. In such scenarios, granular access control is the best defense.
Zero Trust is a MITRE-recommended security approach because it creates access limits that deter attacks. By placing security resources as close as possible to the end user, zero trust stops most adversaries at the reconnaissance stage. This means that with zero trust, bad actors and adversaries never enter the network.
Reconnaissance is the first stage in the MITRE framework. Zero trust prevents active scanning and gathering host information by cloaking the network and blocking perpetrator visibility. Preventing cyberattackers from progressing to the next phases significantly reduces the attack surface of any organization implementing zero trust.
For example, in case of initial access, many attackers tunnel into enterprise networks through VPNs. By replacing VPNs, zero trust minimizes the attack surface. In addition, zero trust blocks the ability to use stolen credentials by adding MFA and real-time monitoring.
In the Microsoft environment, Azure Conditional Access works with the Office 365 suite of products and SaaS apps configured in Azure Active Directory. Conditional access is a set of policies and configurations that control which devices or identities access various services and data sources. See Figure 4.23.
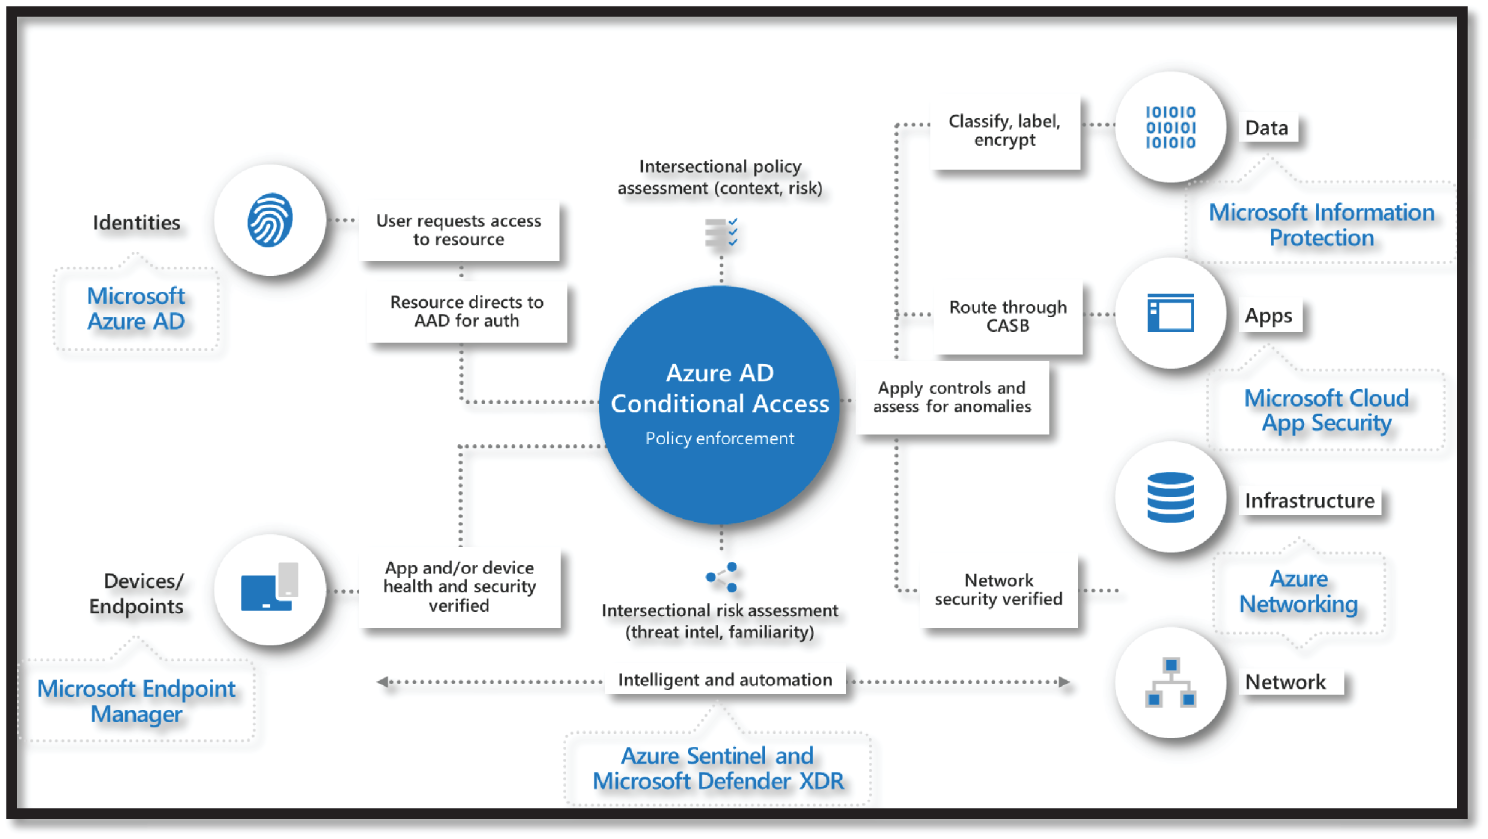
Figure 4.23: Azure AD Conditional Access
Conditional Access relies on signals from either the corporate AD Domain or Microsoft Intune, which is the Mobile Device Management and Mobile Application Management service by Microsoft.
Intune can inform the system about its state and trustworthiness before the device gains access to the data. Mobile devices (iOS, Android, Windows) must be enrolled in Intune, which provides security policy settings and verifies that it is not rooted or jail-broken.
End-user devices must be joined to the enterprise AD domain, where policies and governance are enforced centrally.
Suppose a user's device is not compliant with these policies. In that case, conditional access will guide the user on how to get the device into compliance so access to requested data may be enabled. This allows the users to self-serve their enrollment, so no help-desk call or IT intervention is required.
Let's look at an example of preventing initial access per GPS-based named location using Azure Conditional Access Service.
Admins can refine their Conditional Access policies by determining a user's location with even more precision. GPS-based named locations allow you to restrict access to certain resources to the boundaries of a specific country. Due to VPNs and other factors, determining a user's location from their IP address is not always accurate or reliable.
Leveraging GPS signals enables admins to determine a user's location with higher confidence. This is especially helpful if you have strict compliance regulations that limit where specific data can be accessed.
Users will be prompted to share their GPS location via the Microsoft Authenticator app during sign-in when the feature is enabled.
There are two simple steps:
- Create a GPS-based named location.
- Create or configure Conditional Access with this named location.
You'll first need to create the countries named location and select the countries where you want the policy to apply. Configure the named location to determine the location by GPS coordinates instead of by IP address. See Figure 4.24.

Figure 4.24: Azure Conditional Access
The next step is to create a Conditional Access policy to restrict access to selected applications for sign-ins within the boundaries of the named location, as shown in Figure 4.25.
Now, test the location-sharing experience using the Microsoft Authenticator App. Do make sure that the Authenticator app is installed and configured with your test account.
You will be prompted to share your Authenticator app's geolocation when trying to access the files or data. See Figure 4.26.
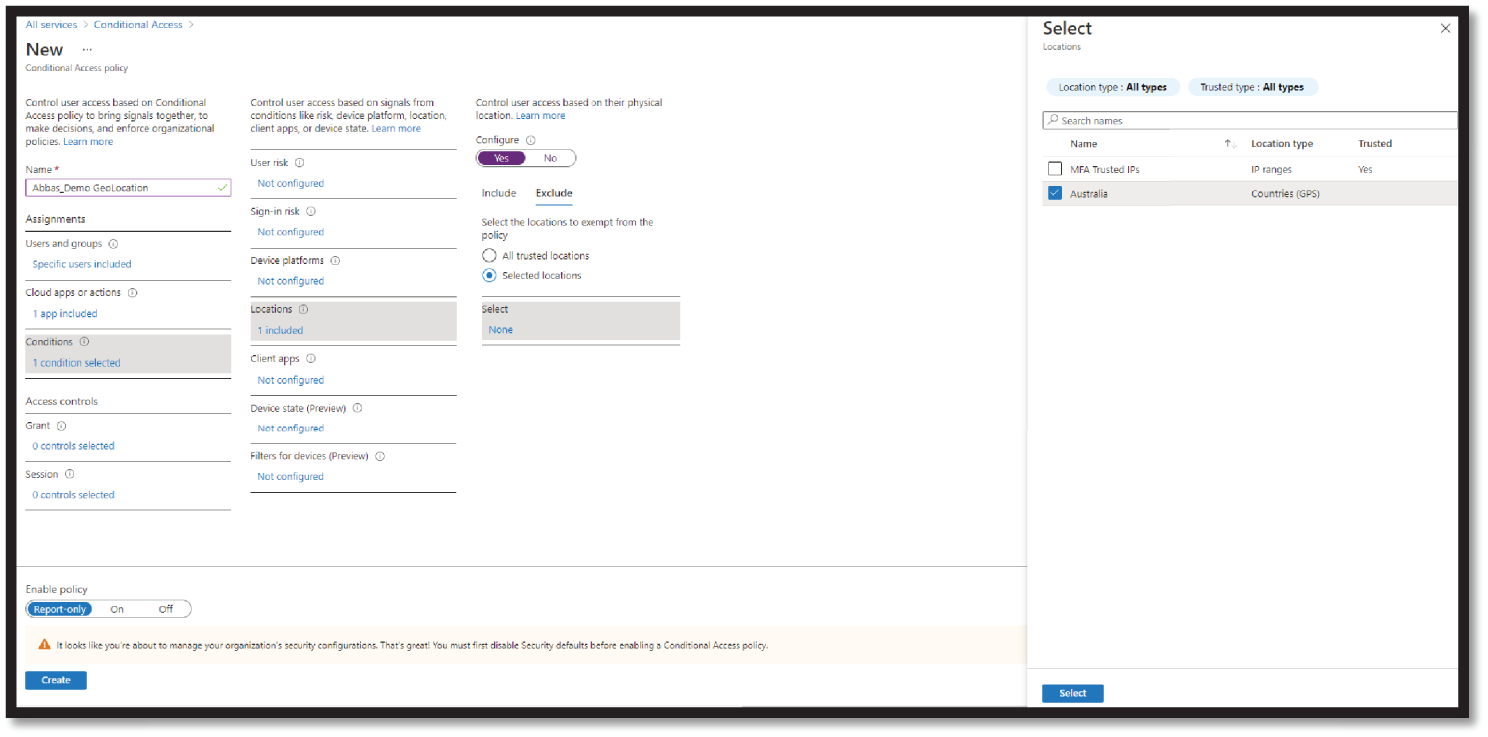
Figure 4.25: Set Conditional Access in Azure AD

Figure 4.26: Grant permission on Authenticator App when prompted to share your geolocation
Further, you may receive the prompt shown in Figure 4.27 the first time. In that case, when prompted, you will need to grant location permission to the Authenticator app.
Your location will be silently shared once per hour from your device, and location sharing will continue for the next 24 hours, so you will not be required to grant permission again unless you have disabled them.

Figure 4.27: Grant permission prompt on your authenticator app
Microsoft Detect Services
Microsoft Detect services help identify suspicious activities and further facilitate mitigating threats such as Privilege Escalation, Credentials access, Lateral Movement, Detecting commands and Controls, and Data exfiltration (see Figure 4.28).
- Azure Defender: Azure Defender, part of Azure Security Center, brings advanced and intelligent protection across the Azure and hybrid resources and workload. Azure Defender provides security alerts and advanced threat protection for virtual machines, SQL databases, containers, web applications, your network, and more.
- Azure Sentinel: Covered in the beginning of this chapter.
Figure 4.28: Microsoft Detect Services
Detecting “Privilege Escalation” TTPs
Privilege escalation can be defined as an attack that involves gaining illicit access of elevated rights, or privileges, beyond what is intended or entitled for a user. This attack can involve an external threat actor or an insider. This attack involves a key stage of the cyberattack chain and typically involves the exploitation of a privilege escalation vulnerability, such as a system bug, misconfiguration, or inadequate access controls.
There are five primary methods attackers used to make privilege escalation work: credential exploitation, vulnerabilities and exploits, misconfigurations, malware, and social engineering.
Using Azure Security Center and Azure Sentinel to Detect Threats Against a “Privilege Escalation” TTP
Let's explore how we can leverage and use Azure Security Center to detect alerts on privilege escalation:
- On the Azure Portal, click the Azure Security Center tab, as shown in Figure 4.29.

Figure 4.29: Security Center service in Azure Portal
- Click Security Alerts and select Add Filter with MITRE ATT&CK tactics, as shown in Figure 4.30.
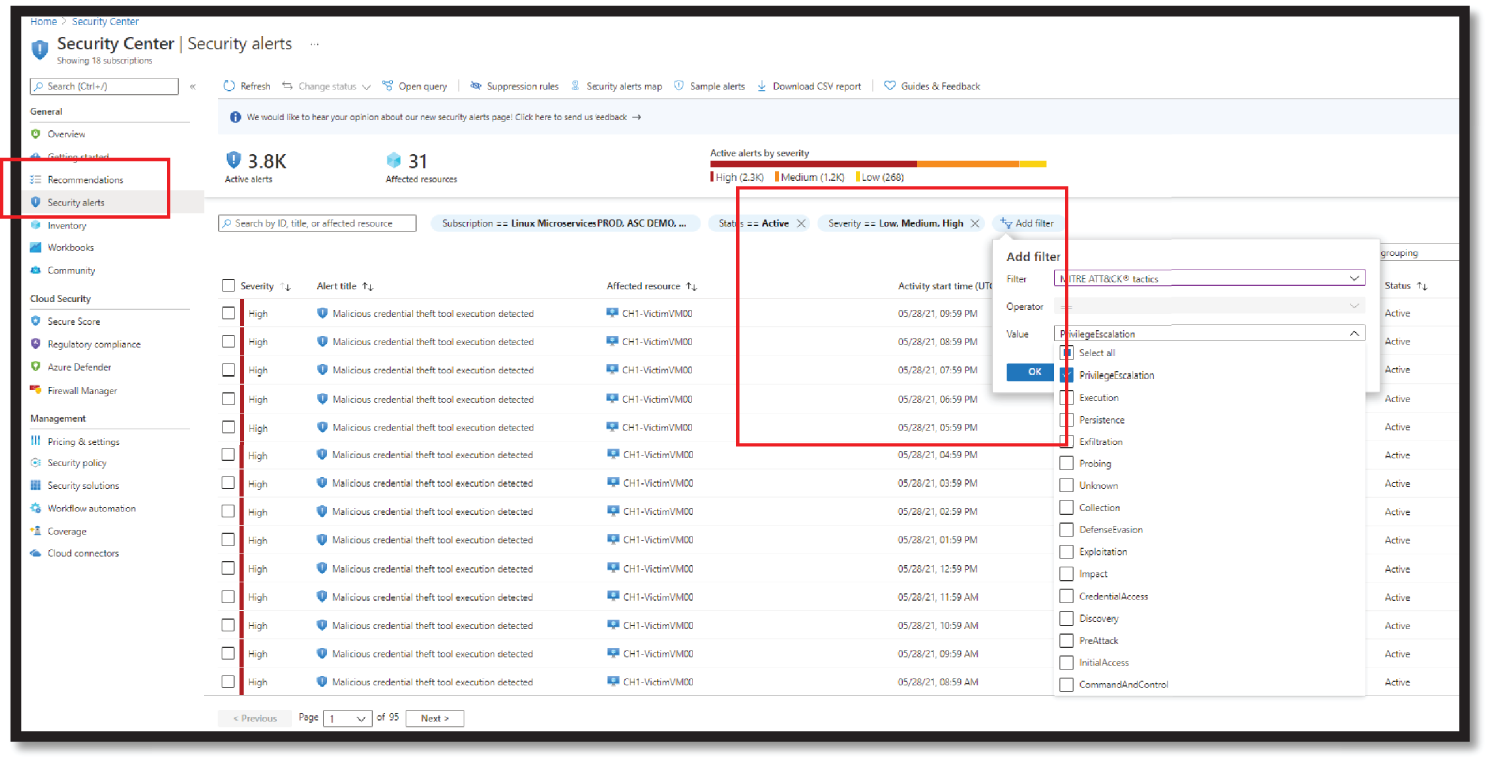
Figure 4.30: Security Alert and Filter in ASC
- Select the alert and click View Full Details for further investigation, as shown in Figure 4.31.
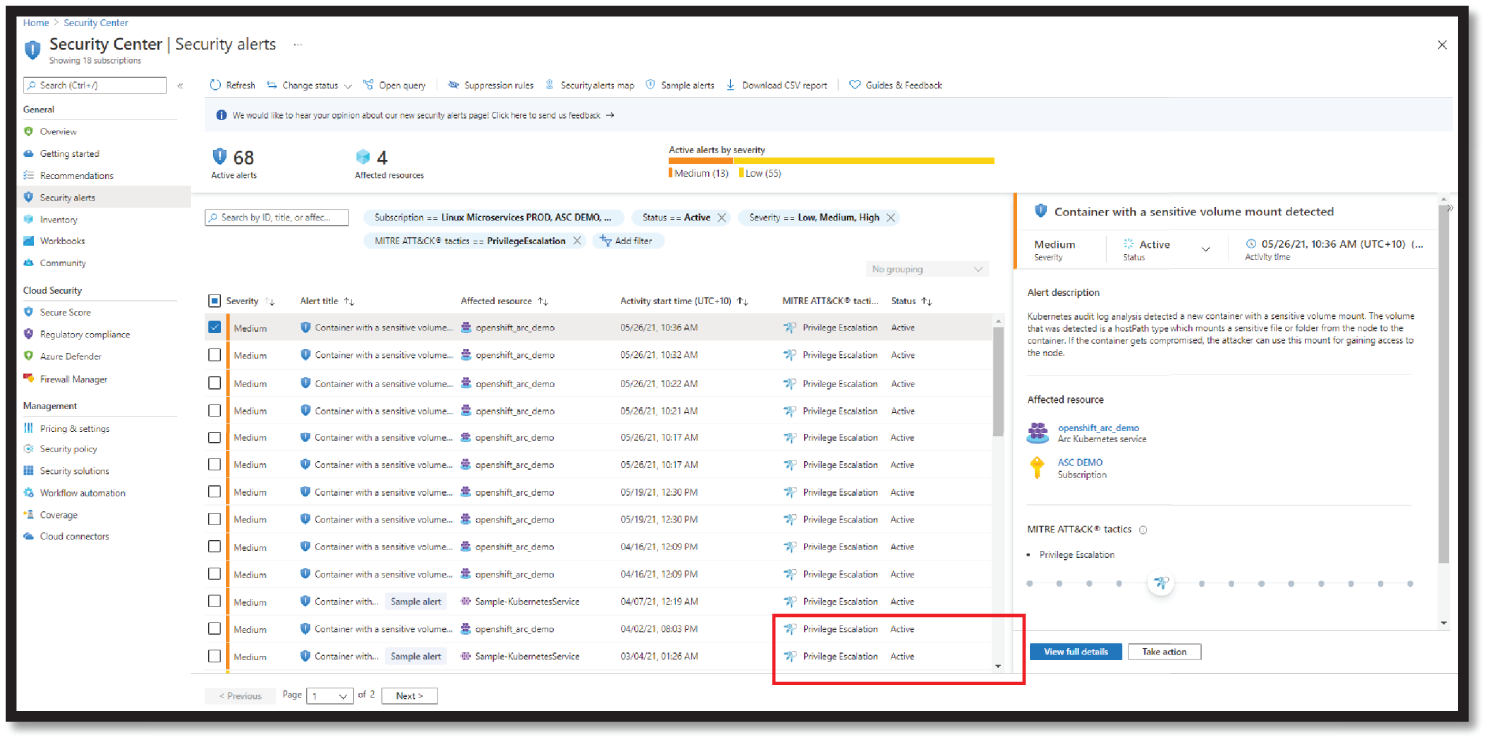
Figure 4.31: View Full details option in ASC
- Review the alert detail and Take Action as required, as shown in Figure 4.32.
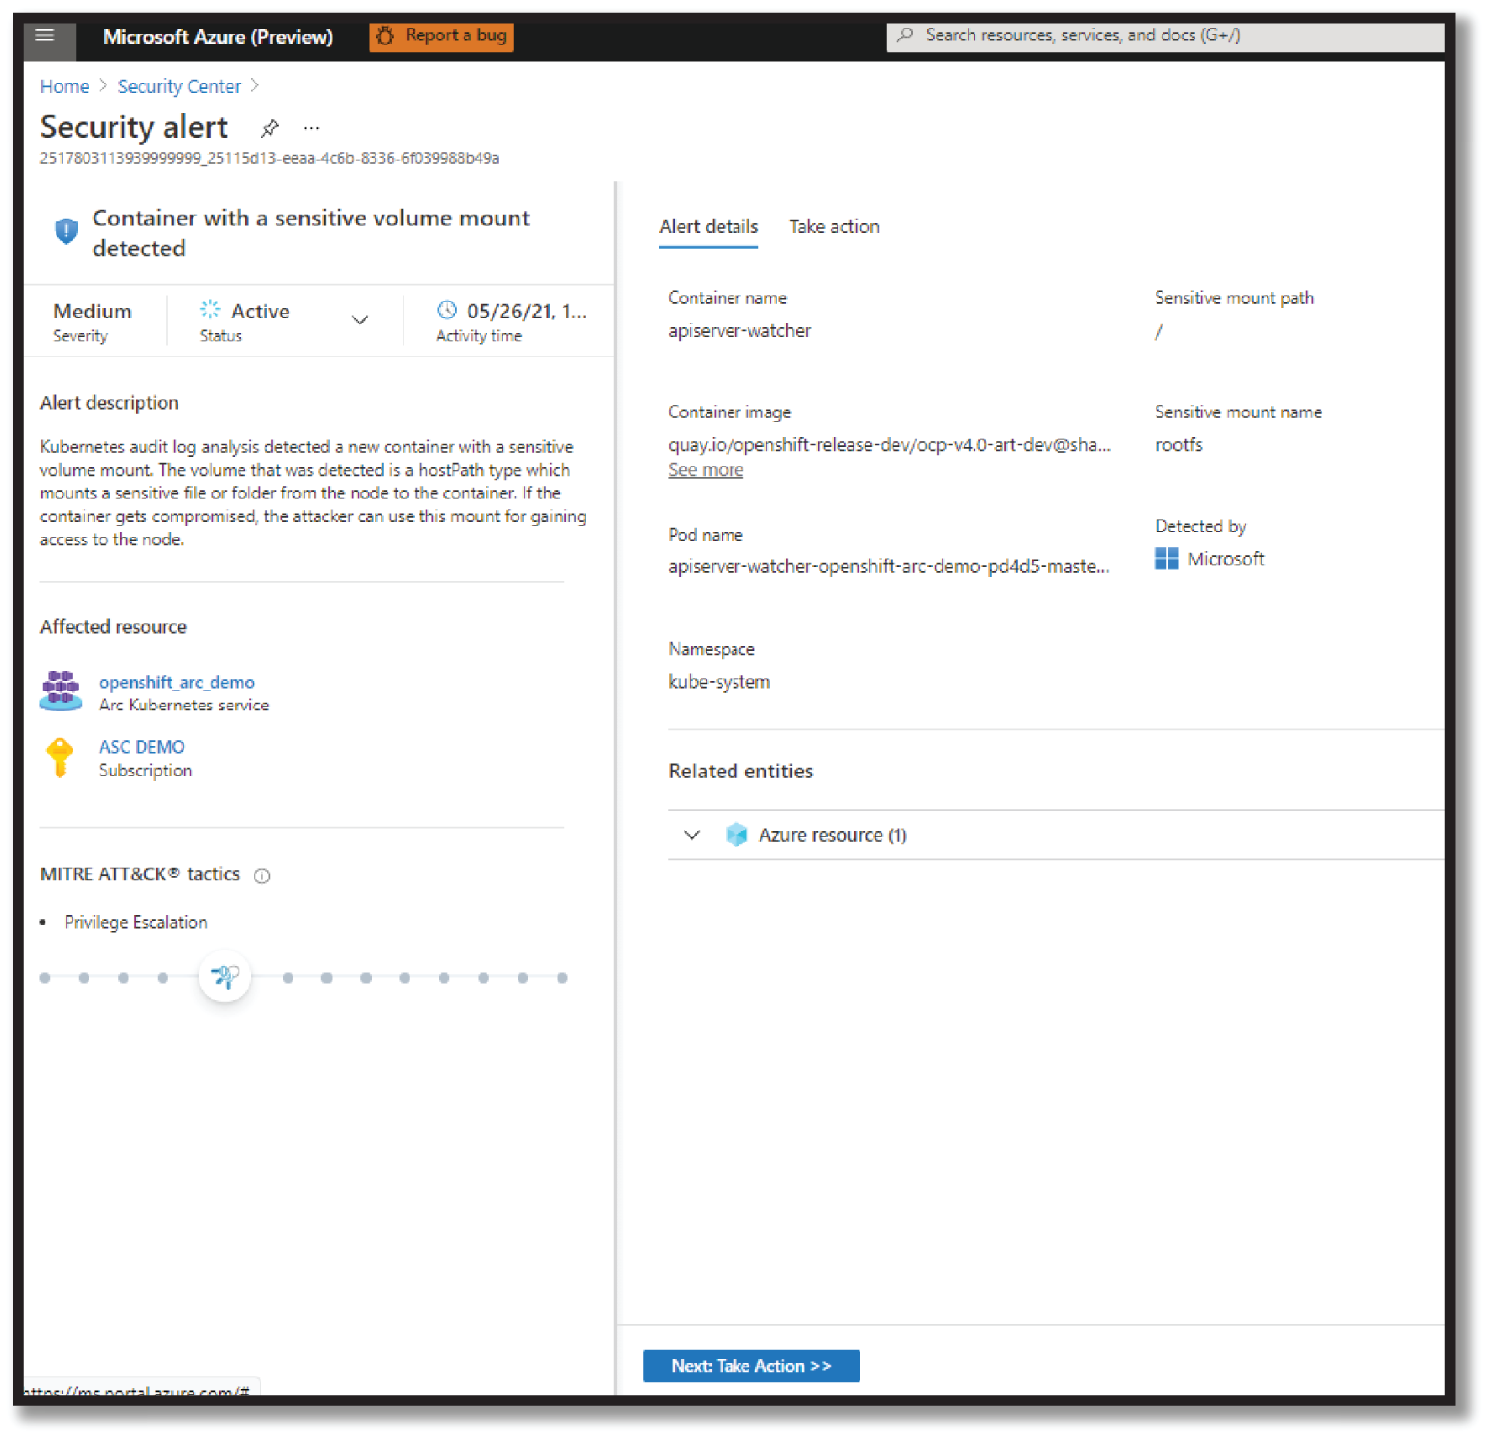
Figure 4.32: Detail Security Alert
Now let's look at how to hunt and investigate the Privilege Escalation tactic using Azure Sentinel:
- Visit
https://ms.portal.azure.comand select Azure Sentinel, as shown in Figure 4.33. Visit this link to learn how to set up Azure Sentinel services:https://docs.microsoft.com/en-us/azure/sentinel/quickstart-onboard. - Within the Azure Sentinel workspace, select Hunting, as shown in Figure 4.34. You can now select any Mitre Tactics and run relevant hunting queries such as the Privilege Escalation query, as shown in Figure 4.34. All Mitre Attack Tactics queries are pre-built in the Azure Hunting section.
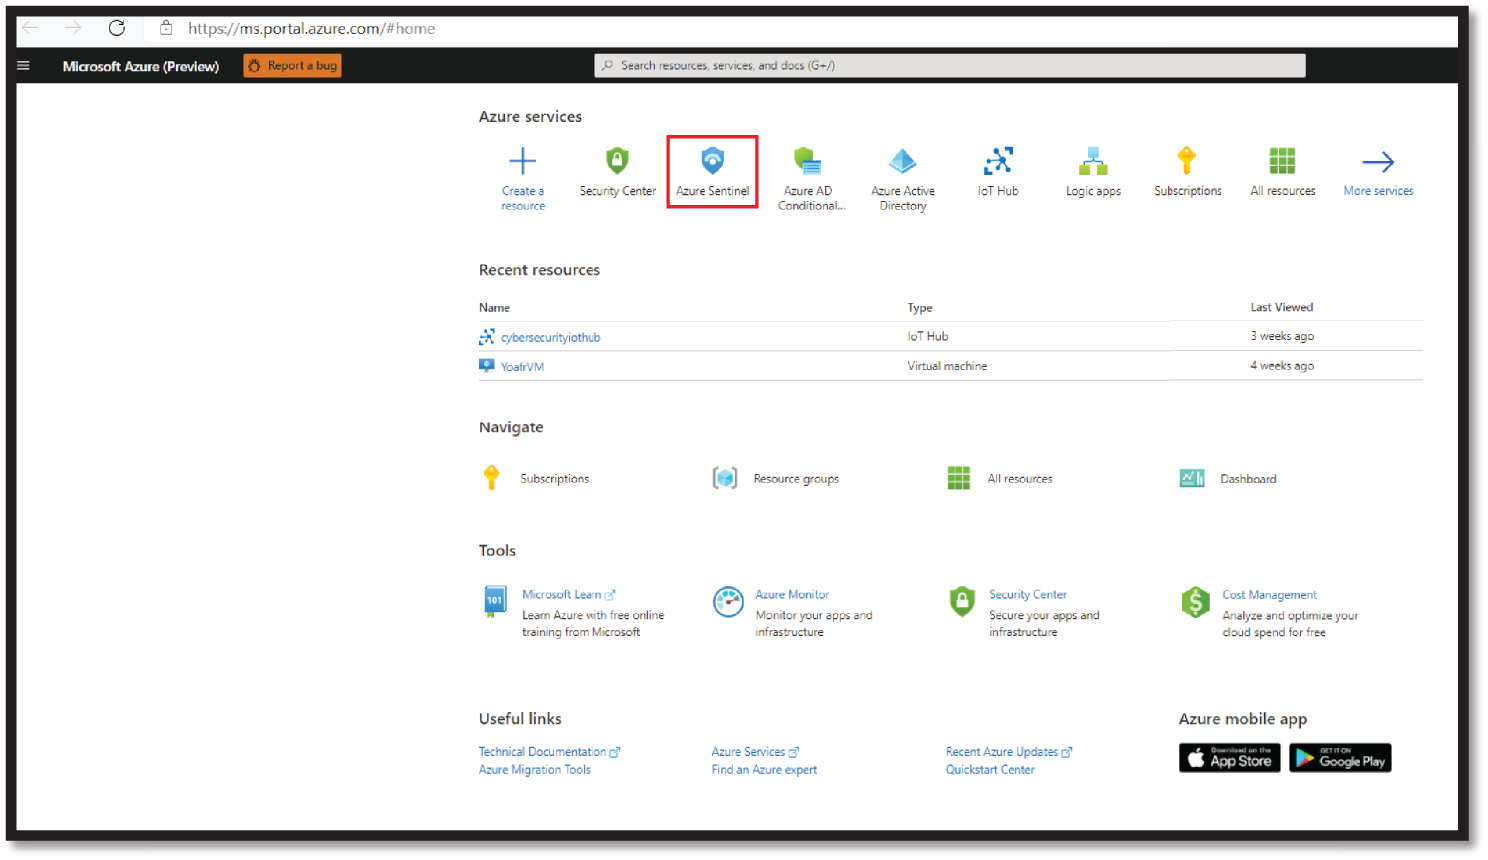
Figure 4.33: Azure Sentinel Service

Figure 4.34: Azure Sentinel Hunting feature
Detecting Credential Access
Credential-based attacks occur when attackers steal credentials to gain access or bypass an organization's security measures to abuse the resources or to steal critical data.
Commonly, attackers use phishing for credential theft as it's a fairly cheap and highly efficient tactic. The effectiveness of credential phishing relies on human interaction to deceive employees, unlike malware and exploits, which rely on weaknesses in security defenses.
An organization or an individual credential theft is usually a targeted effort. Attackers harvest social media sites such as LinkedIn, searching for specific users whose credentials will grant access to critical data and information. The phishing emails and websites utilized in corporate credential theft are much more sophisticated than those used for consumer credential theft.
There are many other ways and types of Credential Access abuse tactics; credentials can be stolen via brute force, although that is a noisy attack for anyone paying the slightest attention to their systems.
Password spraying is another variant of what is known as a brute force attack. In a traditional brute force attack, the perpetrator attempts to gain unauthorized access to a single account by guessing the password repeatedly in a very short period of time.
There are also many examples of stealing hashed passwords and either passing the hash or cracking them offline. Finally, the last set of techniques revolves around an attacker stealing cleartext passwords stored in cleartext files, databases, or even the registry.
Having an endpoint detection and protection solution such as Microsoft Defender for Endpoint deployed with your digital estate can help combat many attack tactics such as Credential Access.
The logs and alerts from your EDR can then be further ingested in your SIEM for detailed analysis.
Using Azure Identity Protection to Detect Threats Against a “Credential Access” TTP
Whether your assets are hosted on-premises or in the cloud, the security perimeter that separates users and data from outside threats can no longer be drawn using network lines. The perimeter is now drawn by identity components of authentication and authorization that span across all your devices, services, hosts, and networks.
While the network perimeter keeps a basic security role, it can no longer guide the security defense strategy because:
- Adversaries have demonstrated a consistent and ongoing ability to penetrate network perimeters using phishing attacks.
- Organizational data, devices, and users often exist and operate outside traditional network boundaries (whether sanctioned by IT or not).
- Port and protocol definitions and exceptions have failed to keep up with the complexity of services, applications, devices, and data.
- Organizations need to adopt different security philosophies and mindsets that are based on rigorous management of authentication and authorization, not firewall rules and exceptions.
Administrators are in control and need protection. The most important identities to protect are the administrators of on-premises and cloud systems, especially identity systems like Active Directory and Azure Active Directory. These administrators have access to all the data hosted on their systems and should be protected, monitored, and restricted appropriate with their high level of responsibility.
Identity Protection allows organizations to accomplish three key tasks:
- Automate the detection and remediation of identity-based risks.
- Investigate risks using data in the portal.
- Export risk detection data to third-party utilities for further analysis.
Identity Protection uses the learnings Microsoft has acquired from their position in organizations with Azure AD, the consumer space with Microsoft Accounts, and in gaming with Xbox to protect your users. Microsoft analyzes trillions of signals per day to identify and protect customers from threats.
The signals generated by and fed to Identity Protection can be further fed into tools like Conditional Access to make access decisions, or fed back to a Security Information and Event Management (SIEM) tool for further investigation based on your organization's enforced policies.
Azure Active Directory Identity Protection includes three default policies that administrators can choose to enable. These policies include limited customization but are applicable to most organizations. All of the policies allow for excluding users such as your emergency access or break-glass administrator accounts. See Figure 4.35.

Figure 4.35: Identity Protection policies examples
Steps to Configure and Enable Risk Polices (Sign-in Risk and User Risk)
Both policies (Sign-in Risk Policy and User Risk Policy) work to automate the response to risk detections in your environment and allow users to self-remediate when risk is detected. See Figure 4.36.
Figure 4.36: Policy Dashboard in Identity Protection
Choosing Acceptable Risk Levels
You must decide the level of risk you are willing to accept for balancing user experience and security posture.
It is recommended to set the user risk policy threshold to High and the Sign-in Risk policy to Medium and above and allow self-remediation options. Choosing to block access rather than allowing self-remediation options, like password change and multi-factor authentication, will impact your users and administrators. Weigh this choice when configuring your policies.
Choosing a High threshold reduces the number of times a policy is triggered and minimizes the impact to users. However, it excludes Low and Medium risk detections from the policy, which may not block an attacker from exploiting a compromised identity. Selecting a Low threshold introduces more user interrupts.
Configured trusted network locations are used by Identity Protection in some risk detections to reduce false positives.
Risk Remediation
Organizations can choose to block access when risk is detected. Blocking sometimes stops legitimate users from doing what they need to. A better solution is to allow self-remediation using Azure AD Multi-Factor Authentication (MFA) and self-service password reset (SSPR).
When a user risk policy triggers: Administrators can require a secure password reset, requiring Azure AD MFA to be done before the user creates a new password with SSPR, resetting the user risk.
When a sign in risk policy triggers: Azure AD MFA can be triggered, allowing the user to prove it's them by using one of their registered authentication methods, resetting the sign-in risk.
Exclusions
Policies allow for excluding users such as your emergency access or break-glass administrator accounts. Organizations may need to exclude other accounts from specific policies based on the way the accounts are used. Exclusions should be reviewed regularly to see if they're still applicable.
Enable Policies
There are two locations where these policies may be configured—Conditional Access and Identity Protection. Configuration using Conditional Access policies is the preferred method, providing more context including:
- Enhanced diagnostic data
- Report-only mode integration
- Graph API support
Follow these steps to Configure User Risk with Conditional Access:
- Sign in to the Azure portal as a global administrator, security administrator, or Conditional Access administrator.
- Browse to Azure Active Directory > Security > Conditional Access.
- Select New Policy. See Figure 4.37.
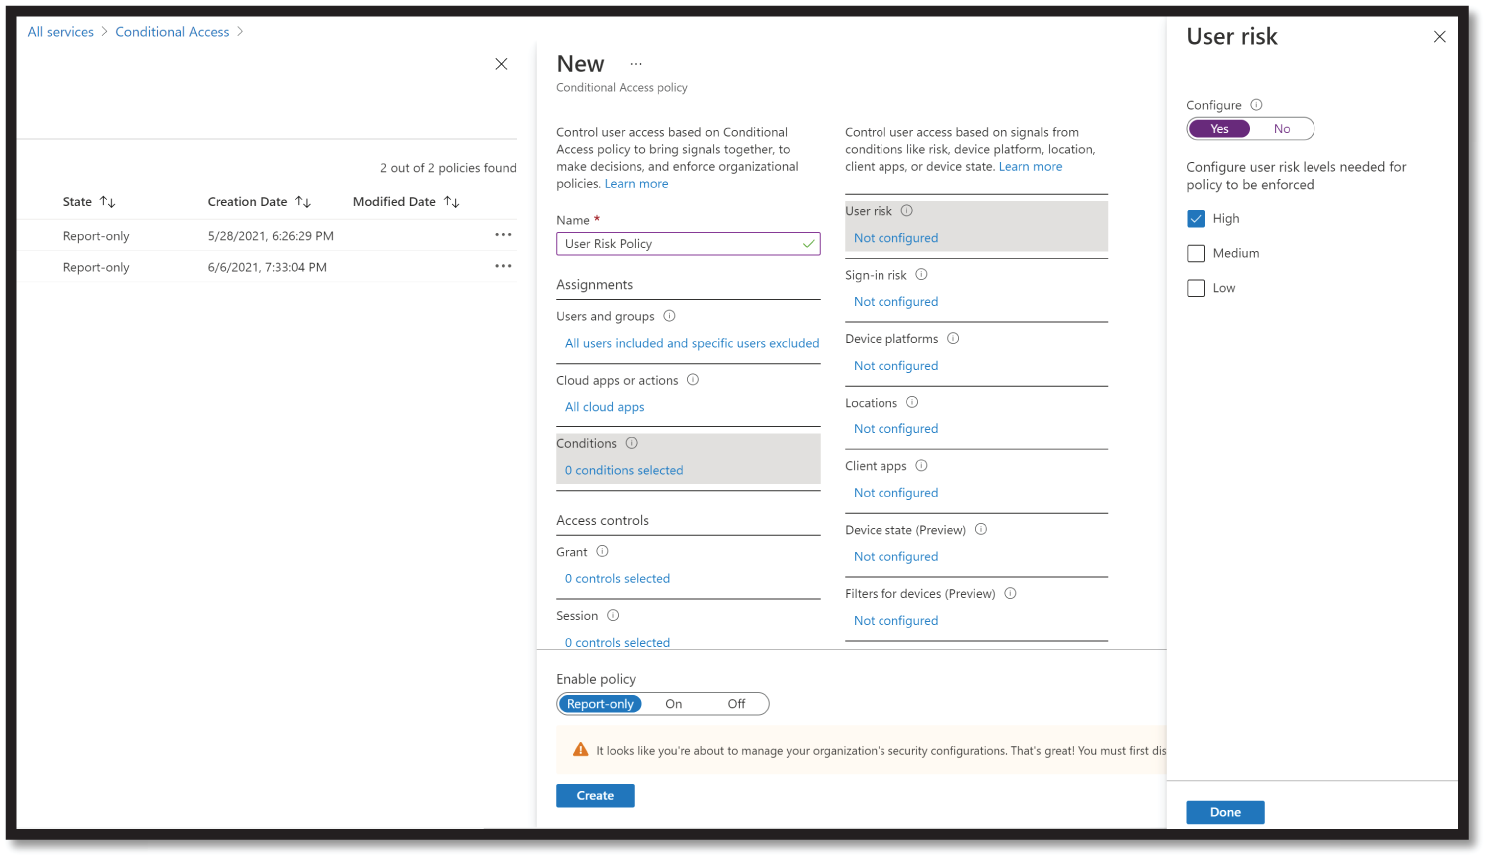
Figure 4.37: User risk policy
- Give your policy a name. We recommend that organizations create a meaningful standard for the names of their policies.
- Under Assignments, select Users and groups. Under Include, select All users. Under Exclude, select Users and groups and choose your organization's emergency access or break-glass accounts.
- Select Done.
- Under Cloud apps or actions > Include, select All cloud apps. Under Conditions > User risk, set Configure to Yes. Under Configure user risk levels needed for policy to be enforced, select High, then select Done. Under Access controls > Grant, select Grant access, Require password change, and select Select.
- Confirm your settings and set the Enable policy to On.
- Select Create to enable your policy.
Follow these steps to configure Sign in Risk with Conditional Access:
- Sign in to the Azure portal as a global administrator, security administrator, or Conditional Access administrator.
- Browse to Azure Active Directory > Security > Conditional Access.
- Select New policy. See Figure 4.38.
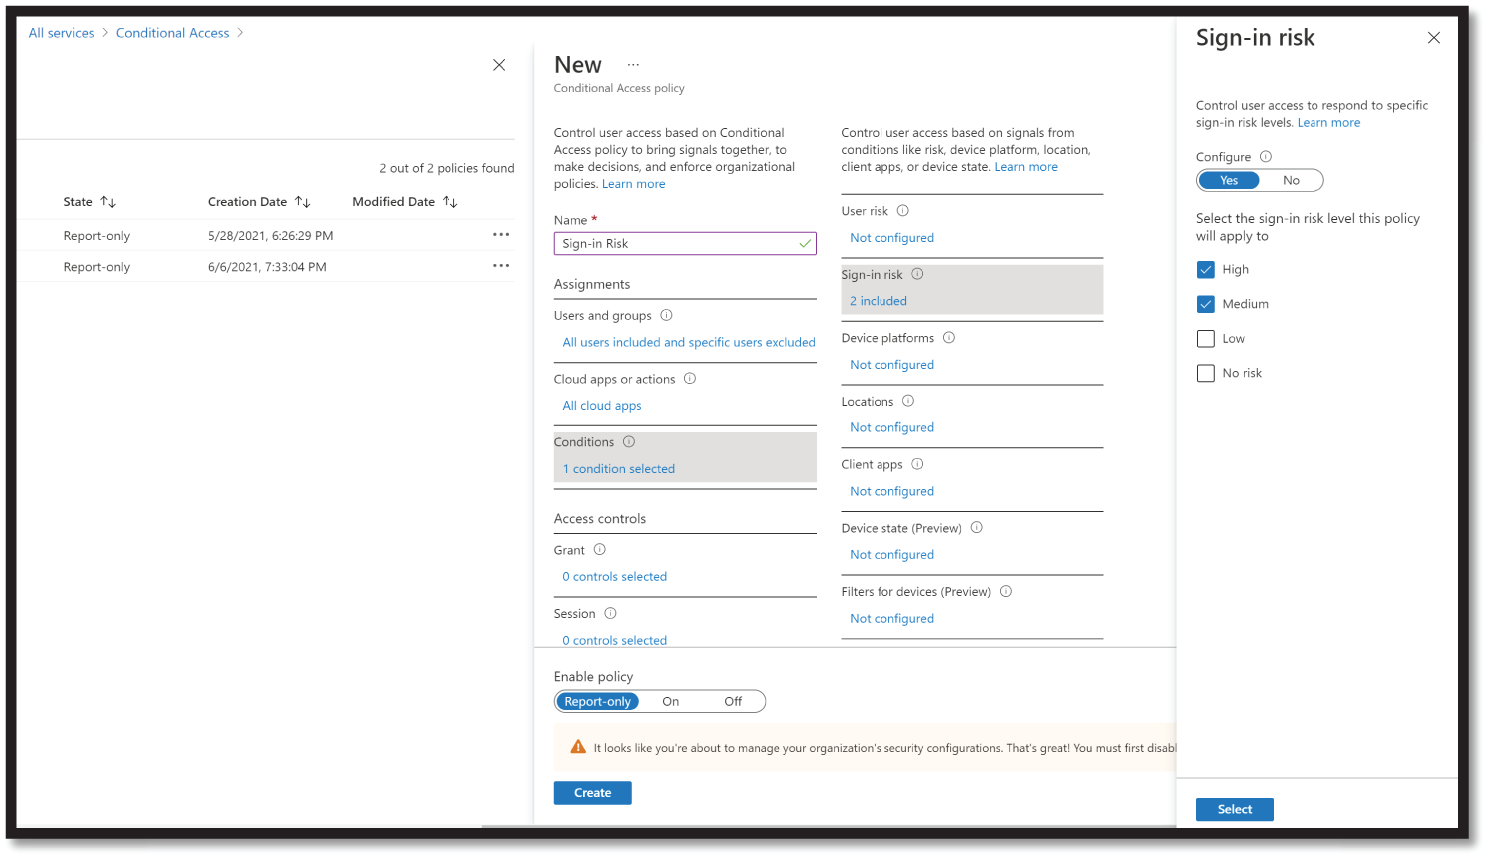
Figure 4.38: Sign in Risk Policy example
- Give your policy a name. We recommend that organizations create a meaningful standard for the names of their policies.
- Under Assignments, select Users and groups. Under Include, select All users. Under Exclude, select Users and groups and choose your organization's emergency access or break-glass accounts.
- Select Done.
- Under Cloud apps or actions > Include, select All cloud apps. Under Conditions > Sign-in risk, set Configure to Yes. Under Select the sign-in risk level this policy will apply to, select High and Medium.
- Select Done.
- Under Access controls > Grant, select Grant access, Require multi-factor authentication, and Select.
- Confirm your settings and set the Enable policy to On.
- Select Create to enable your policy.
Using Azure Security Center and Azure Sentinel to Detect Threats Against a “Credential Access” TTP
We can detect credential access alerts in Azure Security Center using similar steps as provided in privilege escalation. Change the filter to Credential Access, as shown in Figure 4.39.
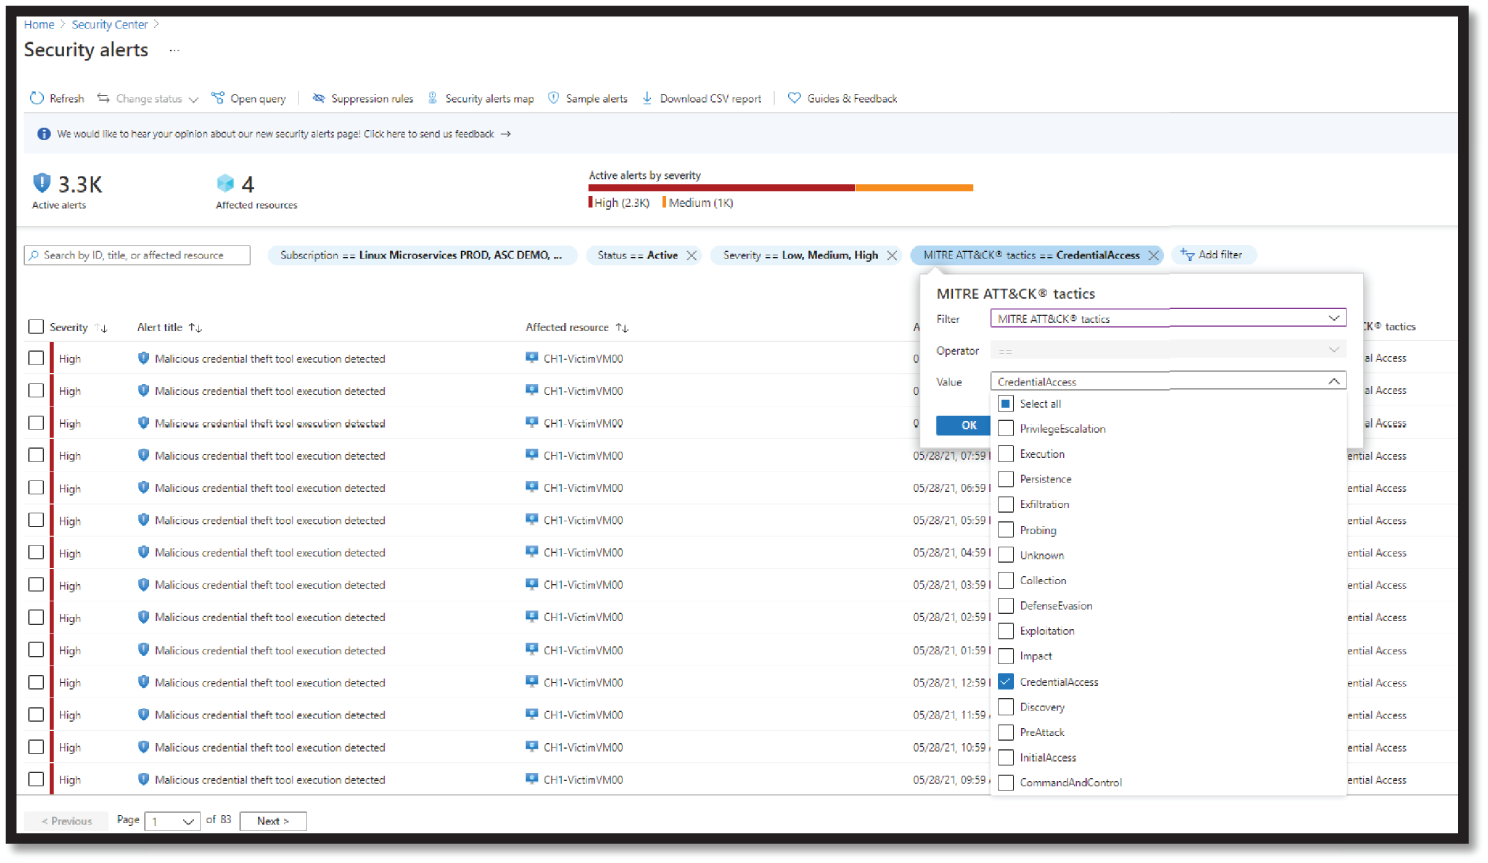
Figure 4.39: Checking Credential Access alert in ASC
Similarly, we can hunt and investigate Credential Access tactics in Azure Sentinel, as shown in Figure 4.40.

Figure 4.40: Hunting Credential Access Tactics Query in Azure Sentinel
Azure Sentinel can also correlate events based on many suspicious behaviors, such as:
- Deployment of executable files, such as remote access tools or password harvesting tools across an enterprise through network shares or removable media
- Deployment and use of remote execution of multi-purpose tools such as PSExec, PowerShell, and Windows Management Instrumentation clients in an enterprise
- Suspicious activity around Windows Administrative Shares
- Suspicious activity around Windows Remote Management
- The exploitation of remote services within the network
- Subverting logon scripts to establish persistence on endpoints and servers
Detecting Lateral Movement
Lateral movement is when an attacker uses non-sensitive accounts to gain access to sensitive accounts throughout your network. Attackers use lateral movement to identify and gain access to the sensitive accounts and machines in your network that share stored login credentials in accounts, groups, and machines. Once an attacker makes successful lateral moves toward your key targets, the attacker can also take advantage and gain access to your domain controllers.
The best way to prevent lateral movement exposure within your organization is to ensure that sensitive users only use their administrator credentials when logging in to hardened computers. In the event the admin needs access to the shared computer, then make sure they log in to the shared computer with a username and password other than their admin credentials.
Use of Privilege Access Workstation (PAW) or Secure Access Workstation (SAW) is another good practice to implement.
Implement a Least Privilege principal and verify that your users do not have unnecessary admin-level permission. Check if all the members in the shared group actually require admin-level rights.
Organizations can also deploy Microsoft Defender for Identity for protection against identity-based attack threats.
Defender for Identity is a cloud-based security solution that leverages your on-premises Active Directory signals to identify, detect, and investigate advanced threats, compromised identities, and malicious insider actions directed at your organization.
Threats signals from Microsoft Defenders for Identity are seamlessly shared with Azure Security Center and Azure Sentinel.
Using Just-in-Time in ASC to Protect and Detect Threats Against a “Lateral Movement” TTP
Threat actors actively hunt for accessible machines with open management ports, like RDP or SSH. If not secured, a virtual machine can be a potential target for an attack. When a VM is successfully compromised, it's used as the entry point to attack further resources within your environment.
As with all cybersecurity prevention techniques, the goal should be to reduce the attack surface. In this case, that means having fewer open ports, especially management ports. Legitimate users also use these ports, so it's not practical to keep them closed.
To solve this issue, Azure Security Center offers Just In Time (JIT). With JIT, you can lock down the inbound traffic to your VMs, reducing exposure to attacks while providing easy access to connect to VMs when needed.
When you enable just-in-time VM access, you can select the ports on the VM to which inbound traffic will be blocked. Security Center ensures “deny all inbound traffic” rules exist for your selected ports in the network security group (NSG) and Azure Firewall rules. These rules restrict access to your Azure VM’s management ports and defend them from attack.
If other rules already exist for the selected ports, those existing rules prioritize the new “deny all inbound traffic” rules. If there are no existing rules on the selected ports, the new rules prioritize the NSG and Azure Firewall.
When a user requests access to a VM, Security Center checks that the user has Azure role-based access control (Azure RBAC) permissions for that VM. If the request is approved, Security Center configures the NSGs and Azure Firewall to allow inbound traffic to the selected ports from the relevant IP address (or range), for the amount of time that was specified.
After the time has expired, Security Center restores the NSGs to their previous states. Connections that are already established are not interrupted.
Follow these steps to enable and configure the JIT VM access in Azure Security Center:
- Open the Azure Defender dashboard and, from the advanced protection area, select Just-in-time VM access. See Figure 4.41.

Figure 4.41: Just-in-time option in Azure Defender
The Just-in-time VM access page opens with your VMs grouped into the following tabs:
- Configured: VMs that have been already been configured to support just-in-time VM access. For each VM, the configured tab shows:
- The number of approved JIT requests in the last seven days
- The last access date and time
- The connection details configured
- The last user
- Not configured: VMs without JIT enabled, but that can support JIT. We recommend that you enable JIT for these VMs.
- Unsupported: VMs without JIT enabled and that don't support the feature. Your VM might be in this tab for the following reasons:
- Missing network security group (NSG): JIT requires an NSG to be configured.
- Classic VM: JIT supports VMs that are deployed through Azure Resource Manager, not classic deployment.
- Other: Your VM might be in this tab if the JIT solution is disabled in the security policy of the subscription or the resource group.
- Configured: VMs that have been already been configured to support just-in-time VM access. For each VM, the configured tab shows:
- From the Not Configured tab, mark the VMs to protect with JIT and select Enable JIT on VMs. See Figure 4.42.
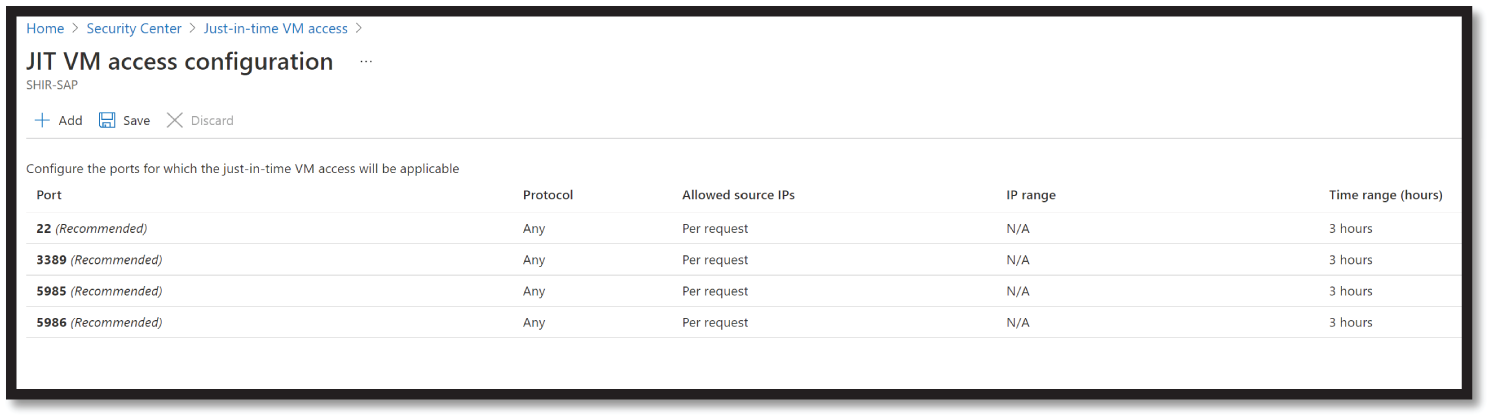
Figure 4.42: Port configuration options
- The JIT VM access page opens listing the ports that Security Center recommends protecting:
- 22 - SSH
- 3389 - RDP
- 5985 - WinRM
- 5986 - WinRM
- To accept the default settings, select Save. To customize the JIT options:
- Add custom ports with the Add button.
- Modify one of the default ports, by selecting it from the list.
For each port (custom and default), the Add Port Configuration pane offers the following options:
- Protocol: The protocol that is allowed on this port when a request is approved
- Allowed source IPs: The IP ranges that are allowed on this port when a request is approved
- Maximum request time: The maximum time window during which a specific port can be opened
- Set the port security to your needs, select OK, and then select Save.
Let's now discuss the steps to edit the JIT configuration on a JIT-enabled VM using Security Center. You can modify a VM's just-in-time configuration by adding and configuring a new port to protect for that VM, or by changing any other setting related to an already protected port. To edit the existing JIT rules for a VM:
- Open the Azure Defender dashboard and, from the advanced protection area, select Adaptive Application Controls. See Figure 4.43.

Figure 4.43: Edit JIT option
- From the Configured tab, right-click the VM to which you want to add a port and select Edit.
- Under JIT VM access configuration, you can either edit the existing settings of a protected port or add a new custom port.
- When you've finished editing the ports, select Save.
Here are the steps to request access to a JIT-enabled VM using ASC:
- From the Just-in-time VM access page, select the Configured tab.
- Select the VMs you want to access.
The icon in the Connection Details column indicates whether JIT is enabled on the network security group or firewall. If it's enabled on both, only the firewall icon appears.
The Connection Details column provides the information required to connect the VM, and its open ports.
- Select Request access. The Request access window opens. See Figure 4.44.

Figure 4.44: Request access window on ASC
- Under Request access for each VM, configure the ports that you want to open and the source IP addresses that the port is opened on and the time window for which the port will be open. It will only be possible to request access to the configured ports. Each port has a maximum allowed time derived from the JIT configuration you've created.
- Select Open ports. (If a user who is requesting access is behind a proxy, the option My IP may not work. You may need to define the full IP address range of the organization.)
Follow these steps to audit JIT access in ASC:
- From Just-in-time VM access, select the Configured tab.
- For the VM that you want to audit, open the ellipsis menu at the end of the row.
- Select Activity Log from the menu. The activity log provides a filtered view of previous operations for that VM along with time, date, and subscription. See Figure 4.45.
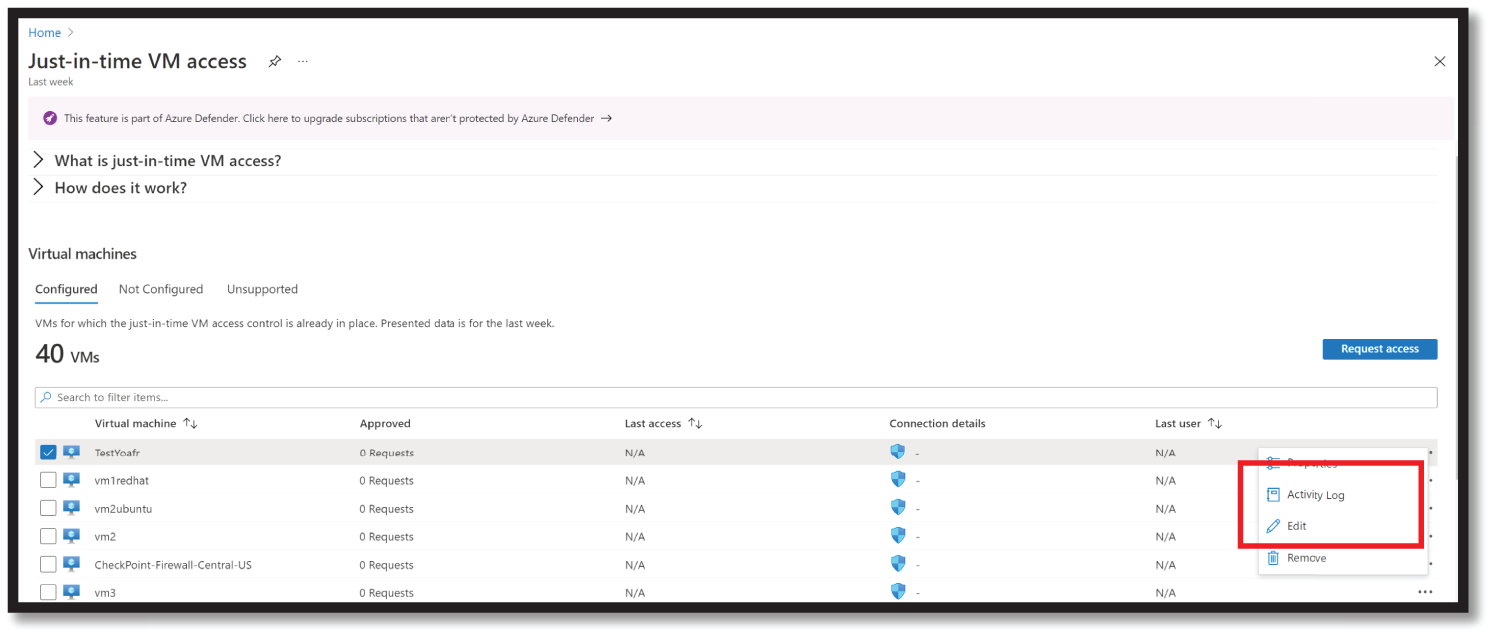
Figure 4.45: Download the activity log
- To download the log information, select Download as CSV.
Using Azure Security Center and Azure Sentinel to Detect Threats Against a “Lateral Movement” TTP
Let's look at how we can detect lateral movement alerts in Azure Security Center using similar steps provided in previous tactics. Change the filter to Lateral Movement, as shown in Figure 4.46.
Similarly, we can hunt and investigate Lateral Movement tactics in Azure Sentinel, as shown in Figure 4.47.
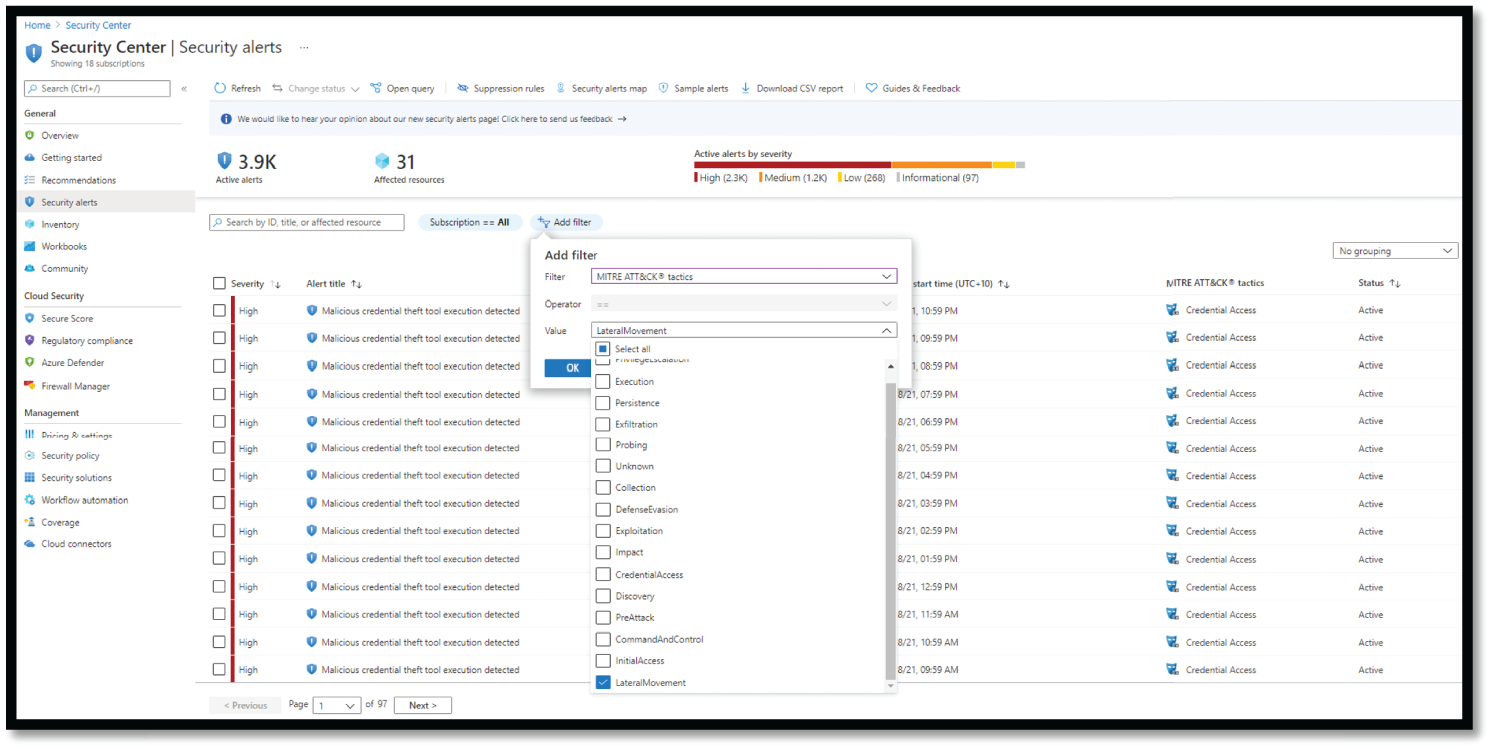
Figure 4.46: Selecting and detecting Lateral Movement alerts in ASC

Figure 4.47: Hunting Lateral Movement in Azure Sentinel
Detecting Command and Control
The command and control tactic (called C2 or C&C) represents how adversaries communicate with systems under their control within a target network. This is one of the most damaging attack methods that's often executed over the DNS.
In this method, an attack starts by infecting a server or computer, which may be behind a corporate firewall; the attacker may execute such an attack in a few different ways, such as:
- Sending a phishing email to trick the user into following a link to a malicious website or opening an attachment that executes malicious code.
- Using password spray attacks to gain access to the environment.
- Through any security vulnerability in the end-user browser plug-ins.
- Via infected and compromised software.
After gaining access to an environment with the C2 technique, the attacker then accomplishes data theft, shuts down the servers or critical infrastructure, reboots the systems, or performs Distributed Denial of Services.
Using Azure Security Center and Azure Sentinel to Detect Threats Against a “Command and Control” TTP
Let's look at as how we can detect Command and Control alerts in Azure Security Center using similar steps as provided in previous tactics. Change the filter to Command and Control, as shown in Figure 4.48.

Figure 4.48: Checking Command and Control Alert in ASC
C&C often uses many different forms of communication such as Beacon, Command, Exfiltration, or Connectivity Checks. A good logging and event correlations system can help detect this type of attack by analyzing different types of log sources such as DNS, Endpoint, Servers, Network Firewalls, WAF, and VPN logs.
Azure Sentinel can be used to hunt and investigate Command and Control tactics, as shown in Figure 4.49.
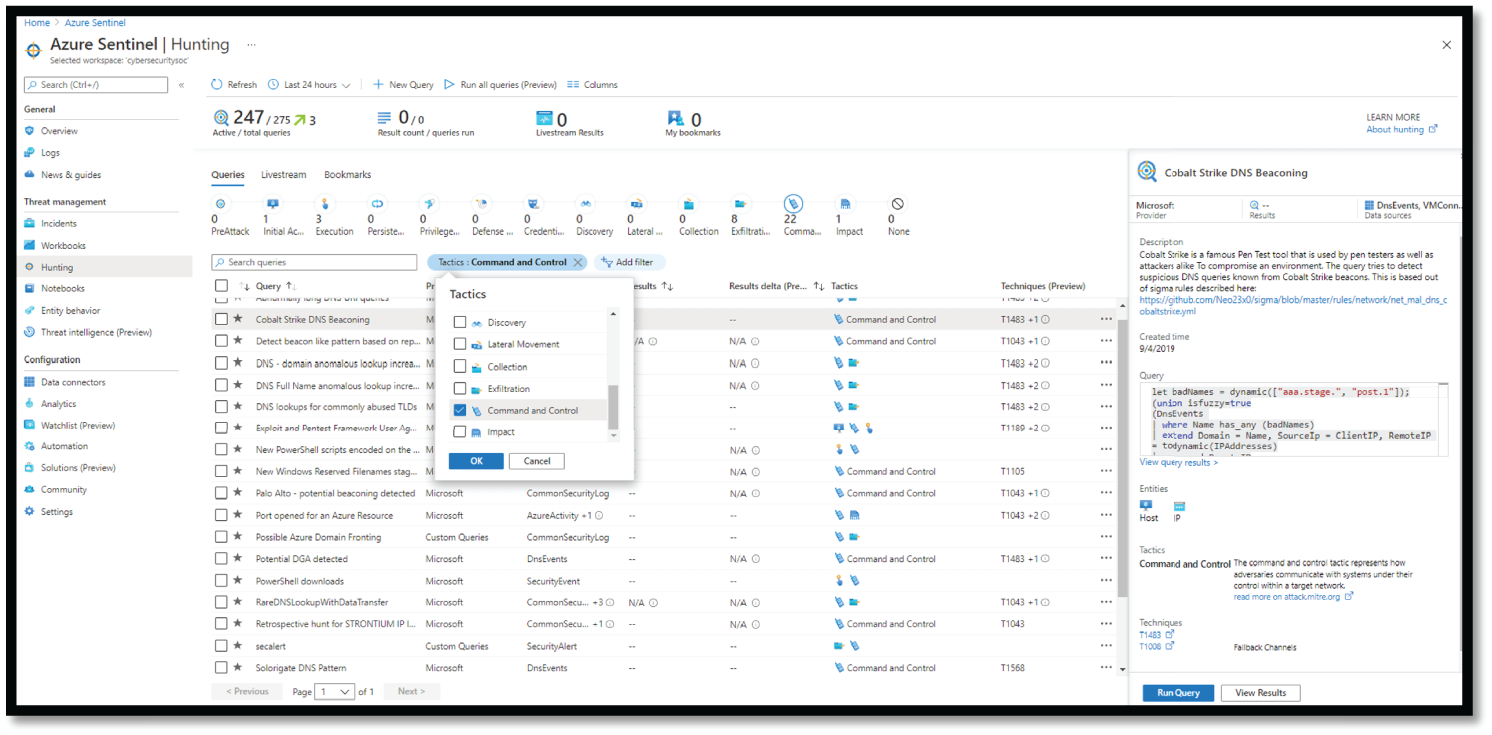
Figure 4.49: Hunting Command & Control Tactic in Azure Sentinel
Detecting Data Exfiltration
Data exfiltration is a technique used by malicious actors to target, copy, and transfer sensitive data. Data exfiltration can be done remotely or manually and can be very difficult to identify and detect, given it often resembles a normal behavior on the network traffic.
Some of the most common attack techniques used by the attacker are social engineering, phishing attacks, physical theft of data from a USB thumb drive, smartphone, laptop, etc., or human error.
It is not possible to protect your data from exfiltration using just a single solution. An organization will be required to implement a layered defense approach such as a DLP solution, CASB, EDR solution, web filtering solution, and a good data governance practice for identifying and classifying the data.
The Microsoft Cloud App Security (MCAS) dashboard can provide lots of information to detect data leakage, risky users, risky applications, and many more; (see Figure 4.50).

Figure 4.50: Microsoft Cloud App Security (MCAS) dashboard
Using Azure Information Protection to Detect Threats Against a “Data Exfiltration” TTP
Azure Information Protection (AIP) is a foundational technology that enables a variety of other Microsoft features, like Office 365 Message Encryption (OME), Office 365 Data Loss Protection (DLP), and others.
With AIP, a customer can protect files or other resources via encryption at that object level. The file might be stored anywhere, but the ability to open the file is protected by AIP and the access controls specified. This means that system administrators (or even those with physical access) of the file storage do not have access to the file.
This technology provides protection against most breach scenarios and is excellent for confidential data. Since access requires an Azure AD–issued access token, you must have Internet connectivity to access an AIP-protected file. Because all access is brokered via a centrally issued token, there is definitive auditing and tracking of AIP protected files—and you can easily revoke access to a given file regardless of where the file is stored. The technology provides enterprise data recovery options so when access to a given file is lost, highly trusted individuals can recover the file.
Azure Information Protection allows you to gain greater control over the security and compliance of your business information via its robust protection via classification and encryption model without the need to ask users to complete complex security tasks during their working day. By automating the permissions process as a native action within SharePoint, AIP ensures that information is secured in a structured, predictable manner, automatically.
Because Azure Information Protection is embedded in other product features, there are several general scenarios where it might be in use:
- Used directly via the Azure Information Protection client. Users apply labels to files, which trigger application of policies that protect the file.
- Used indirectly via Office 365 features like OME or DLP. Users apply policies that Office 365 administrators have determined are commonly needed.
- Used indirectly via bulk classification/labeling engines. System administrators for a file server might apply rules that result in protection of files.
If you're working within a Microsoft Office 365 environment, Azure Information Protection provides you with a deeper understanding—as well as granular control of—where your content is being distributed and how it is being used. This level of visibility helps to:
- Prevent illicit modification, storage, and distribution of business-critical data
- Remove the challenge of unauthorized users viewing sensitive content
- Gain greater control of information by monitoring which users are interacting with content and how they are doing so
- Meet regulatory data protection and compliance standards
To protect your organization from data exfiltration threats, it is crucial to first identify and discover your sensitive content. The following section will help you discover sensitive content using Azure Information Protection.
Discovering Sensitive Content Using AIP
You'll need an Azure subscription that includes Azure Information Protection. Make sure that you can sign in to the Azure portal with a supported administrator account, and have protection enabled. Supported administrator accounts include: Compliance administrator, Compliance data administrator, and Security administrator or Global administrator.
You'll need the Azure Information Protection unified labeling client and scanner installed, as well as the Network Discovery service. Follow these detailed steps if you haven't yet completed this process: https://docs.microsoft.com/en-us/azure/information-protection/quickstart-deploy-client.
To run the scanner, you'll need SQL Server installed on the scanner machine. When working with a standard, cloud-connected environment, your domain account must be synchronized to Azure Active Directory. This isn't necessary if you're working offline. If you're not sure about your account, contact one of your system administrators to verify the sync status.
You must have created sensitivity labels and published a policy with at least one label to the Microsoft 365 compliance center, for the scanner service account.
Follow these steps to create a network scan job:
- Sign in to the Azure portal as a supported administrator, and navigate to the Azure Information Protection area.
- In the Scanner menu on the left, select Network Scan Jobs.
- Select + Add to add a new job. In the Add a New Network Scan Job pane, enter a meaningful name, such as Quickstart, and an optional description.
- Select your cluster name from the drop-down list.
- Select the row to open the Choose IP ranges pane. There, enter an IP address or IP range to scan.
- Keep the default value of One Time.
- Calculate the current UTC time, considering your current time zone, and set the start time to run within five minutes from now. See Figure 4.51.

Figure 4.51: Add Network scan job example in Azure Information Protection
- Select Save at the top of the page.
- Return to the Network scan jobs (Preview) grid and wait for your scan to start running. The grid data is updated as your scan completes, as shown in Figure 4.52.
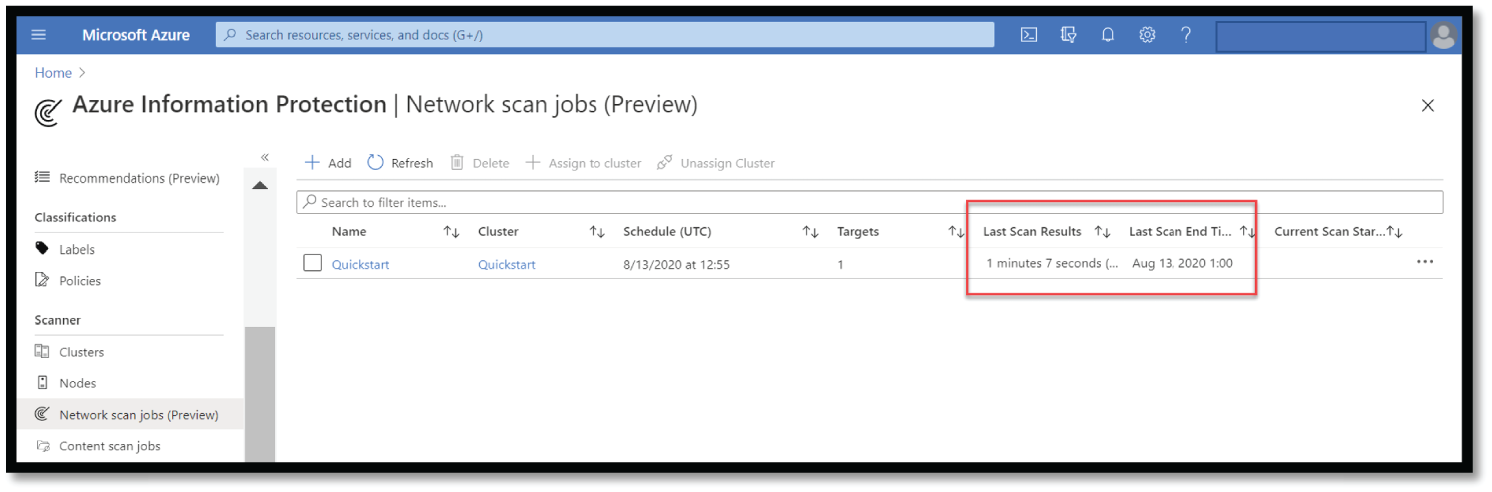
Figure 4.52: Scan job status in AIP
Once your network scan job is complete, you can check for any risky repositories found. For example, if a repository is found to have both read and write public access, you may want to scan further and confirm that no sensitive data is stored there.
To add risky repositories to your content scan job, follow these steps:
- Sign in to the Azure portal as a supported administrator and navigate to the Azure Information Protection pane.
- In the Scanner menu on the left, select Repositories. See Figure 4.53.
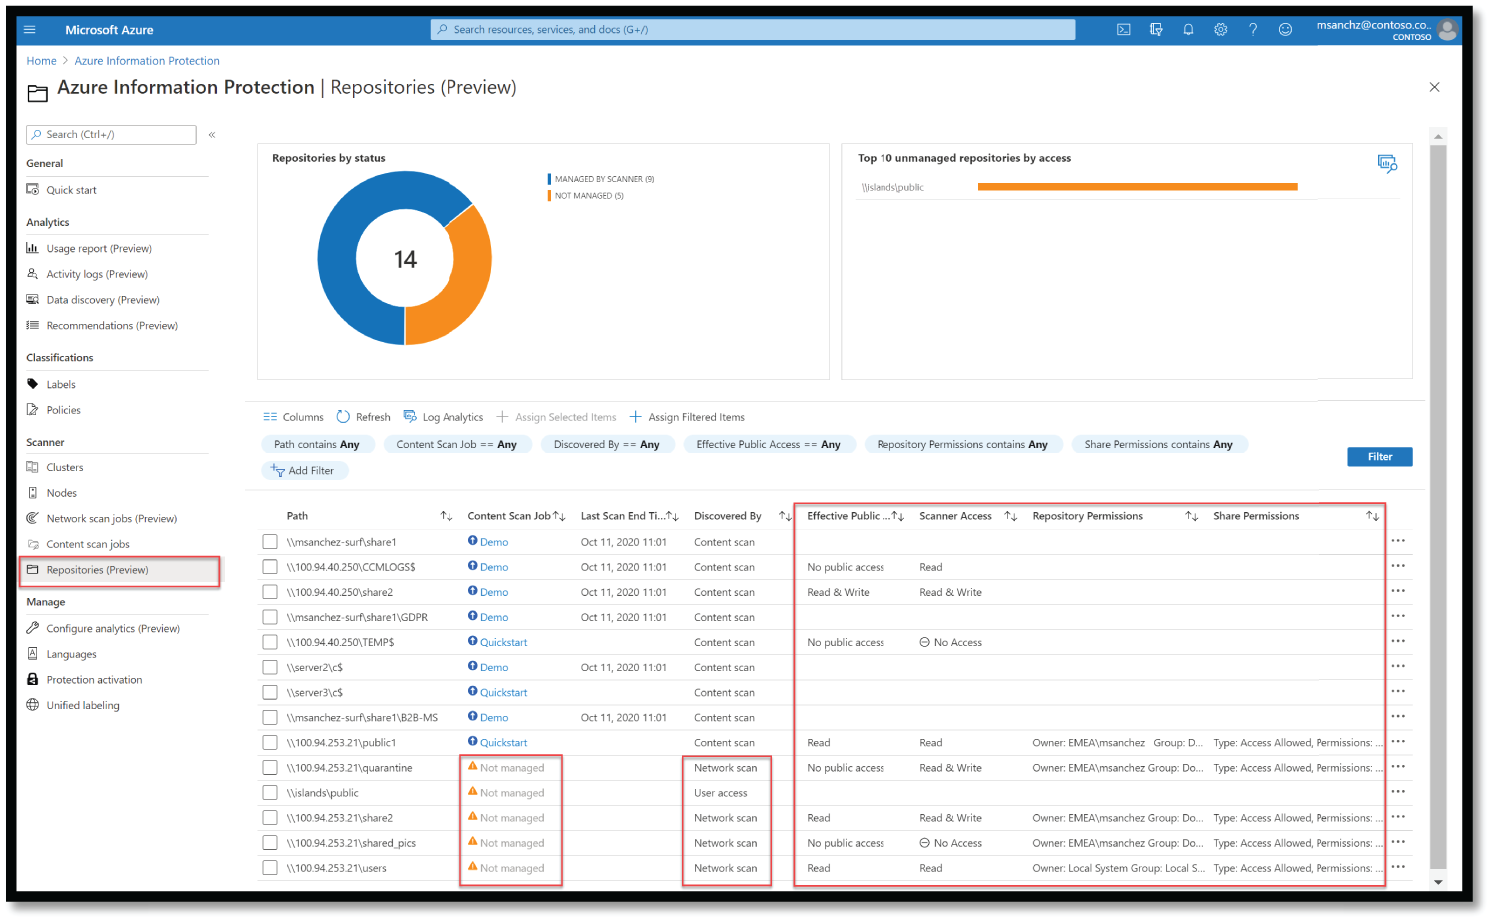
Figure 4.53: Azure Information Protection Repositories
- In the grid below the graphs, locate a repository that is not yet managed by the scanner. Not being managed by the scanner means that they are not included in a content scan job and are not being scanned for sensitive content. Select the row, and then above the grid, select Assign Selected Items.
- In the Assign to Content Scan Job pane that appears on the right, select your content scan job from the drop-down list, and then select Save. See Figure 4.54.

Figure 4.54: Assign to content scan job option in AIP
The next time your content scan job runs, it will now include this newly discovered repository, and identify, label, classify, and protect any sensitive content found, as configured in your policy.
Follow these steps to define and run your content scan job:
- Use the content scan job you prepared with the tutorial prerequisites to scan your content.
- If you don't have a content scan job yet, perform Configure Initial Settings in the Azure portal, and then return here to continue.
- Sign in to the Azure portal as a supported administrator and navigate to the Azure Information Protection pane.
- In the Scanner menu on the left, select Content Scan Jobs and then select your content scan job.
- Edit your content scan job settings, making sure that you have a meaningful name and optional description.
- Keep the default values for most of the settings, except for the following changes:
- Treat recommended labeling as automatic. Set to On.
- Configure repositories. Ensure that there is at least one repository defined.
- Set Enforce to On.
- Select Save and then return to the Content Scan Jobs grid.
- To scan your content, go back to the Content Scan Jobs area and select your content scan job.
- In the toolbar above the grid, select Scan Now to start the scan.
- When the scan is complete, continue with View scan results. See Figure 4.55.
If your results are empty and you would like to run a meaningful scan, create a file named Payment Info in one of the repositories included in your content scan job. Save the file with the following content: Credit card example: 2384 2328 5436 3489. Then run your scan again to see the difference in the results.

Figure 4.55: Network Content Scan result window
Using Azure Security Center and Azure Sentinel to Detect Threats Against a “Data Exfiltration” TTP
Once an attacker has gained initial access in a network, they will be looking for ways to extract data from a system. In our fictitious example, the attacker has gained access to a local administrator account and is now looking to export all the user credentials stored in the Active Directory.
We can detect Data Exfiltration alerts in the Azure Security Center using similar steps as provided in previous tactics. Change the filter to Data Exfiltration, as shown in Figure 4.56.
With the introduction of Azure Sentinel, an organization can now view threats and alerts across their entire IT estate. They can also take advantage of incidents within Sentinel to correlate alerts and entities across all data sources to add contextual information that is meaningful to the investigation process.
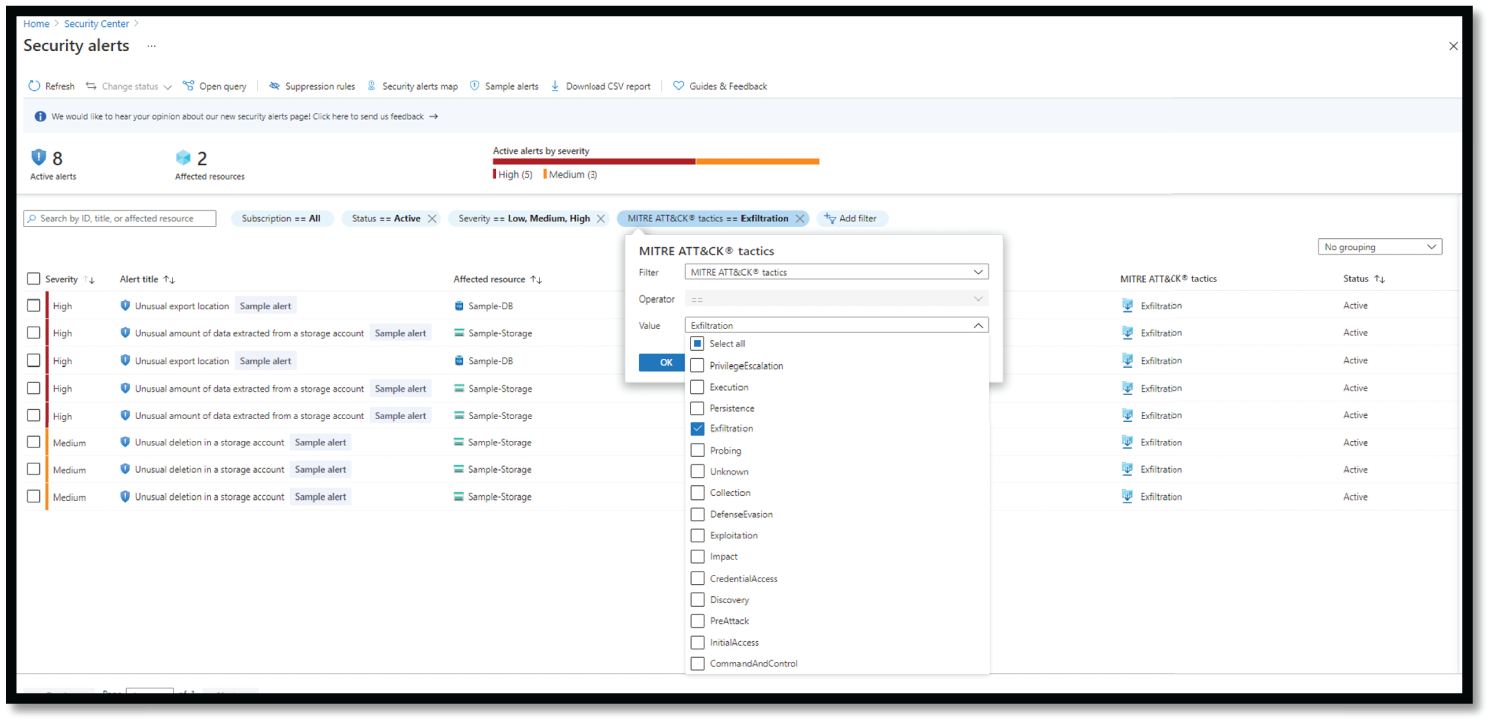
Figure 4.56: Checking Data Exfiltration Alert in ASC
MCAS and Microsoft Defender for Server and Identity events and logs can be seamlessly ingested in Azure Sentinel, and you can use Azure Sentinel to easily hunt and investigate Data Exfiltration, as shown in Figure 4.57.

Figure 4.57: Hunting Data Exfiltration tactic in Azure Sentinel
Detecting Threats and Proactively Hunting with Microsoft 365 Defender
Advanced hunting is a query-based threat-hunting tool that lets you explore up to 30 days of raw data. This allows you to proactively inspect events in your network and further helps you to locate threat indicators and entities.
You can use the same threat-hunting queries to build custom detection rules. These rules run automatically to check for and then respond to suspected breach activity, misconfigured machines, and other findings. See Figure 4.58.
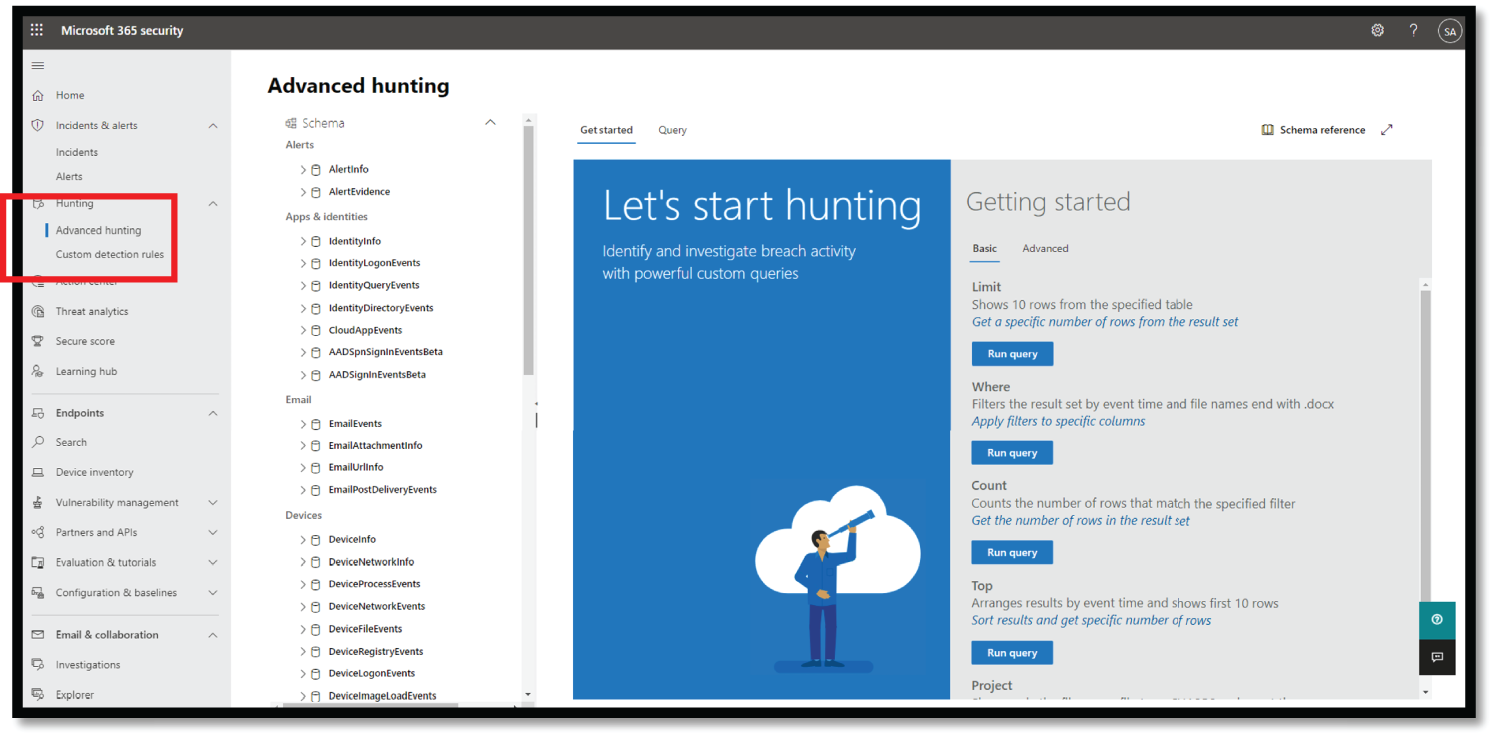
Figure 4.58: Microsoft 365 Security Advanced Hunting option
This capability is similar to advanced hunting in Microsoft Defender for Endpoint. Available in Microsoft 365 Security Center, this capability supports queries that check a broader dataset from:
- Microsoft Defender for Endpoint
- Microsoft Defender for Office 365
- Microsoft Cloud App Security
- Microsoft Defender for Identity
To use advanced hunting, visit https://security.microsoft.com/. You must have Admin or Security Admin rights.
To learn more about advanced hunting with Microsoft 365 Defender, visit https://docs.microsoft.com/en-us/microsoft-365/security/defender-endpoint/advanced-hunting-overview.
Microsoft Investigate, Response, and Recover Features
For the Response domain, if a cyber incident occurs, the effects must be managed by organizations. To comply with this requirement, the company should create a response plan, identify communication lines among the relevant parties, collect and analyze information about the case, conduct all the activities necessary to eliminate the incident, and integrate lessons learned into revised response strategies.
For the Recover domain, organizations need to develop and implement effective activities to restore any capacity or services that have been impaired by a cybersecurity event. Your organization needs to have a recovery plan in place, coordinate recovery activities with outside parties, and incorporate lessons learned into your updated recovery strategy.
The investigate and respond services from Azure, as shown in Figure 4.59, allow you to pull logging data so you can assess a suspicious activity and respond to those alerts. We have covered many of these examples in the previous section of this chapter.
In this section, we cover the use of automation and orchestration. We will also see how artificial intelligence and machine learning can help Security Analyst and Threat Hunter quickly respond to threats and alerts.
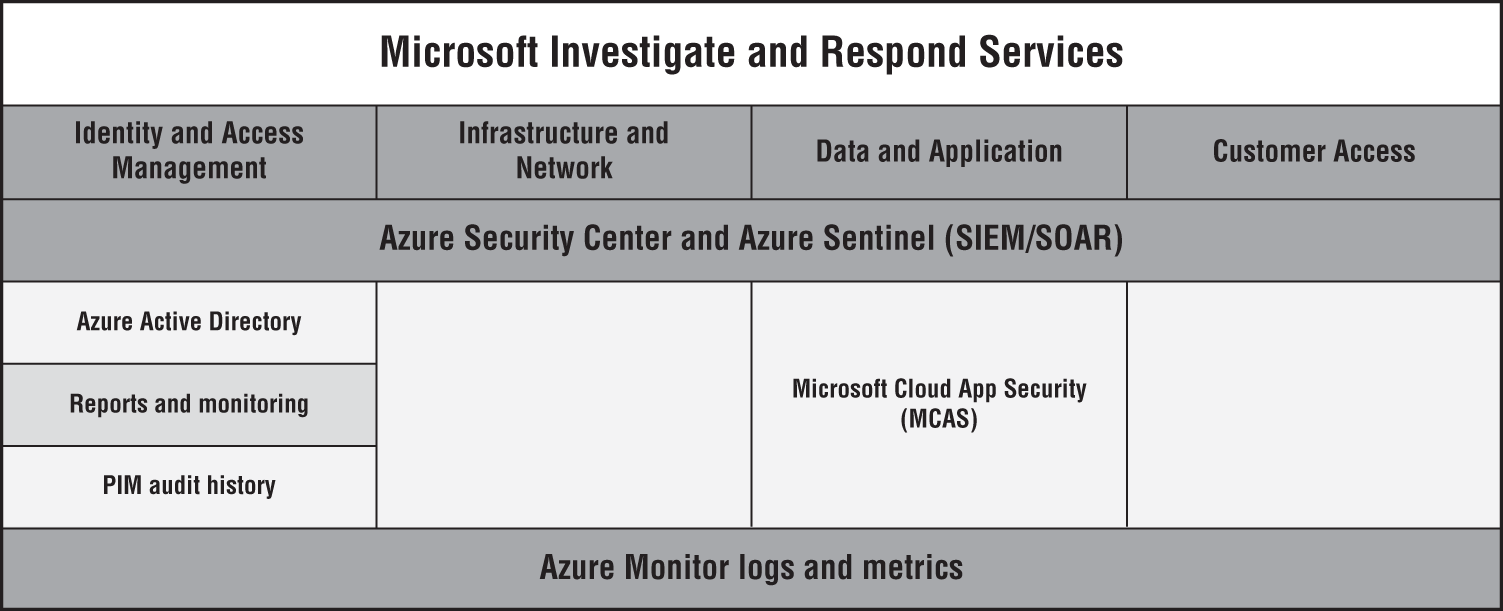
Figure 4.59: Microsoft Investigate and Respond services
Let's look at each of these services briefly to understand what capabilities they provide under each domain of Identity and Access Management and Data and Application.
Core services:
- Azure Security Center: We covered this service in the previous section of this chapter.
- Azure Sentinel: We covered this service in the previous section of this chapter.
- Azure Monitor logs and metrics: This service delivers a comprehensive solution for collecting and analyzing and allows you to take action on telemetry from your cloud and on-premises environments. Azure Monitor collects and aggregates data from a variety of sources into a common data platform where it can be used for analysis, visualization, and alerting.
Identity & Access Management:
- Azure AD reports and monitoring: Azure AD reports provide a comprehensive view of activity in your Azure cloud environment. AD Monitoring lets you route your Azure AD activities logs to different endpoints.
- Azure AD PIM audit history: This audit history shows all roles, assignments and activations within the past 30 days of all the privileged roles.
Data & Application:
- Microsoft Cloud App Security: MCAS provides tools to gain a deeper understanding of what is happening in your cloud environment; it also helps you manage the risky apps, risky users, and data leakage.
Automating Investigation and Remediation with Microsoft Defender for Endpoint
You can save lots of quality time and effort of your Security Operation team by taking advantage of built in automation capabilities for investigation and remediation within Microsoft Defender for Endpoint.
To turn on automated investigation and remediation, follow these steps:
- Go to the Microsoft Defender Security Center (
https://securitycenter.windows.com) and sign in as a Global Admin or Security Administrator. - In the navigation pane, choose Settings.
- In the General section, select Advanced Features.
- Turn on both Automated Investigation and Automatically Resolve Alerts.
- Set up device groups.
- In the Microsoft Defender Security Center (
https://securitycenter.windows.com), on the Settings page, under Permissions, select Device Groups. - Select + Add Device Group.
- Create at least one device group, as follows:
- Specify a name and description for the device group.
- In the Automation Level List, select a level, such as Full – Remediate Threats Automatically. The automation level determines whether remediation actions are taken automatically, or only upon approval. To learn more, see Automation Levels in Automated Investigation and Remediation at
https://docs.microsoft.com/en-us/microsoft-365/security/defender-endpoint/automation-levels?view=o365-worldwide#levels-of-automation.
- In the Members section, use one or more conditions to identify and include devices.
- On the User Access tab, select the Azure Active Directory groups who should have access to the device group you're creating.
- Select Done when you're finished setting up your device group.
Visit the Action Center at https://security.microsoft.com/ to view pending and completed remediation actions (see Figure 4.60).

Figure 4.60: Review and approve pending actions in Action Center
The unified Action Center, as shown in Figure 4.61, brings together remediation actions across Defender for Endpoint and Defender for Office 365. It defines a common language for all remediation actions and provides a unified investigation experience.

Figure 4.61: Review and approve pending actions in Action Center
Using Microsoft Threat Expert Support for Remediation and Investigation
Microsoft Threat Experts is a managed threat-hunting service that provides your Security Operation Centers (SOCs) with expert-level monitoring and analysis to help them ensure that critical threats in your unique environments don't get missed.
Microsoft Threat Expert is a managed threat-hunting service that provides expert-driven insights and data through these two capabilities: Targeted Attack Notification and Access to Experts on Demand.
Targeted Attack Notification
Targeted Attack Notification provides proactive hunting for the most critical threats to your network, including human adversary intrusions, human operated ransomware, or advanced attacks like cyber-espionage.
These notifications show up as a new alert. Additionally, the managed hunting service includes:
- Threat monitoring and analysis, reducing dwell time and risk to the business
- Hunter-trained artificial intelligence to discover and prioritize both known and unknown attacks
- Identifying the most important risks, helping SOCs maximize time and energy
- Scope of compromise and as much context as can be quickly delivered to enable fast SOC response
Follow these steps to enable this service:
- You must be an existing customer for Microsoft Defender for Endpoint.
- You need to apply for Microsoft Threat Experts - Targeted Attack Notifications to get unique insights and analysis that help identify the most critical threats.
- To enroll in Microsoft Threat Experts - Targeted Attack Notifications benefits, go to Settings > General > Advanced features > Microsoft Threat Experts - Targeted Attack Notifications to apply. Once accepted, you will get the benefits of Targeted Attack Notifications. See Figure 4.62.
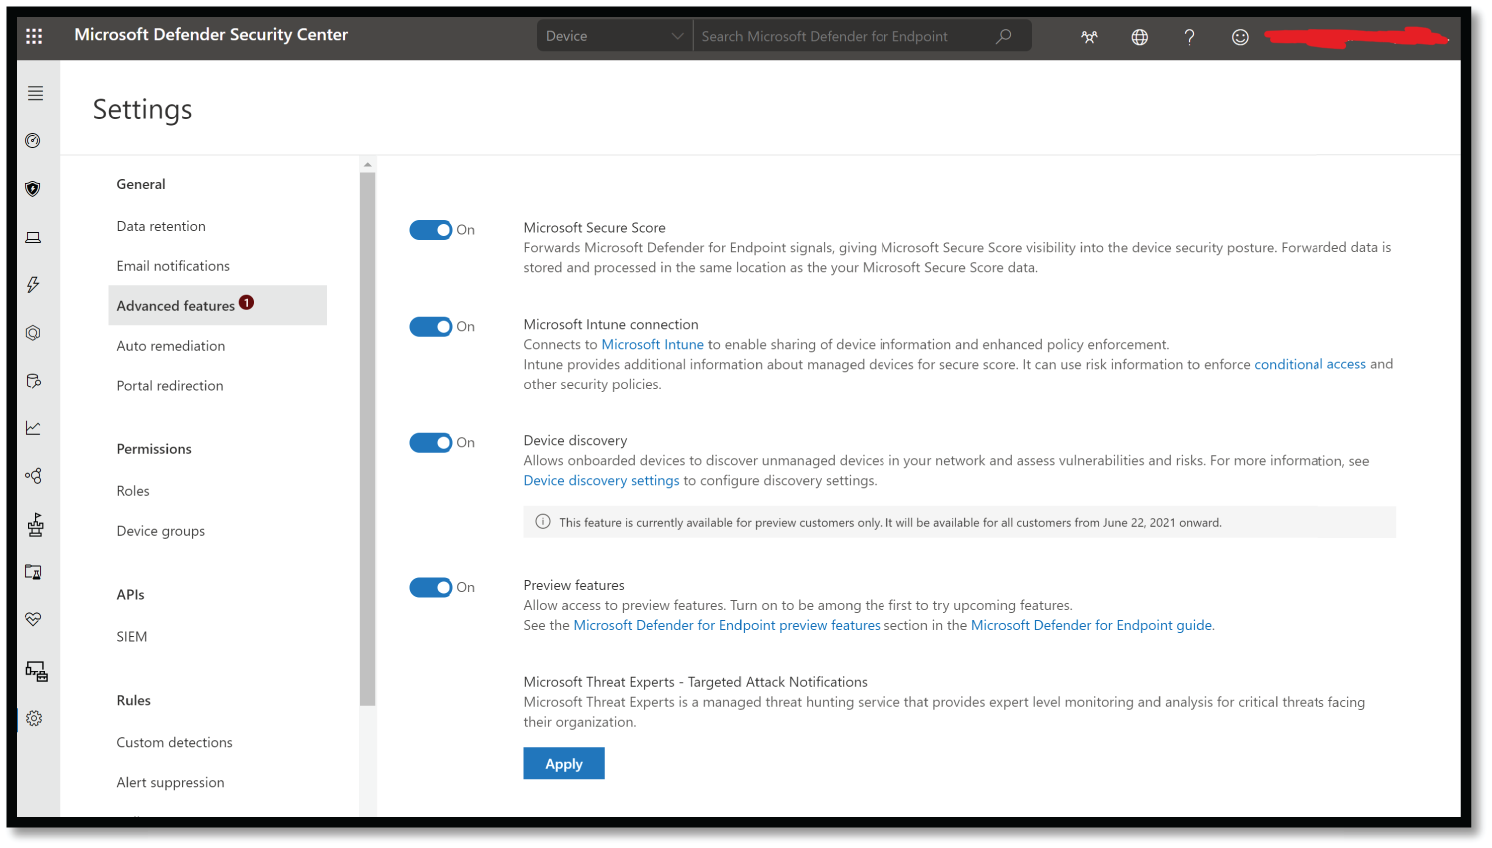
Figure 4.62: Microsoft Threat Experts
Contact your account team or Microsoft representative to subscribe to Microsoft Threat Experts - Experts on Demand to consult with Microsoft's threat experts on relevant detections and adversaries that your organization is facing.
- Enter your name and email address so that Microsoft can get back to you on your application. See Figure 4.63.
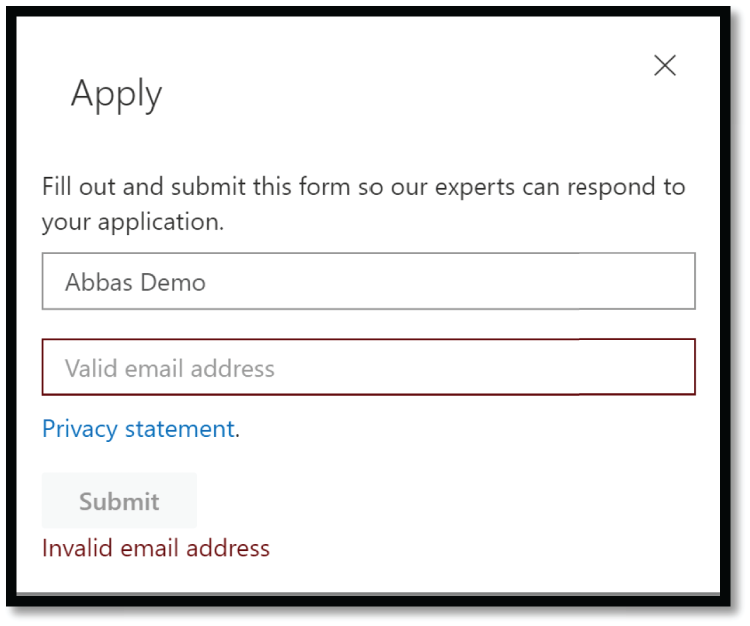
Figure 4.63: Microsoft Threat Expert Application Window
- Read the privacy statement then click Submit when you're done. You will receive a welcome email once your application is approved, as shown in Figure 4.64.

Figure 4.64: Microsoft Threat Expert Application Confirmation
- When accepted, you will receive a welcome email, and you will see the Apply button change to a toggle that is on. In case you want to take yourself out of the Targeted Attack Notifications service, slide the toggle to off and click Save preferences at the bottom of the page.
- You will be able to see the targeted attack notification from the MTE via the following sources:
- The Defender for Endpoint portal's Incidents page
- The Defender for Endpoint portal's Alerts dashboard
- OData alerting API and REST API
- DeviceAlertEvents table in Advanced hunting
- Your email, if you choose to configure it
Experts on Demand
Customers can engage Microsoft's security experts directly from within Microsoft Defender Security Center for timely and accurate responses. Experts provide insights needed to understand better the complex threats affecting your organization, from alert inquiries, potentially compromised devices, the root cause of a suspicious network connection, to additional threat intelligence regarding ongoing advanced persistent threat campaigns.
With this capability, you can:
- Get additional clarification on alerts, including root cause or scope of the incident
- Gain clarity into suspicious device behavior and next steps if faced with an advanced attacker
- Determine risk and protection regarding threat actors, campaigns, or emerging attacker techniques
Consult a threat expert is available in several places in the portal so you can engage with experts in the context of your investigation:
- From the Help and Support Menu, as shown in Figure 4.65.
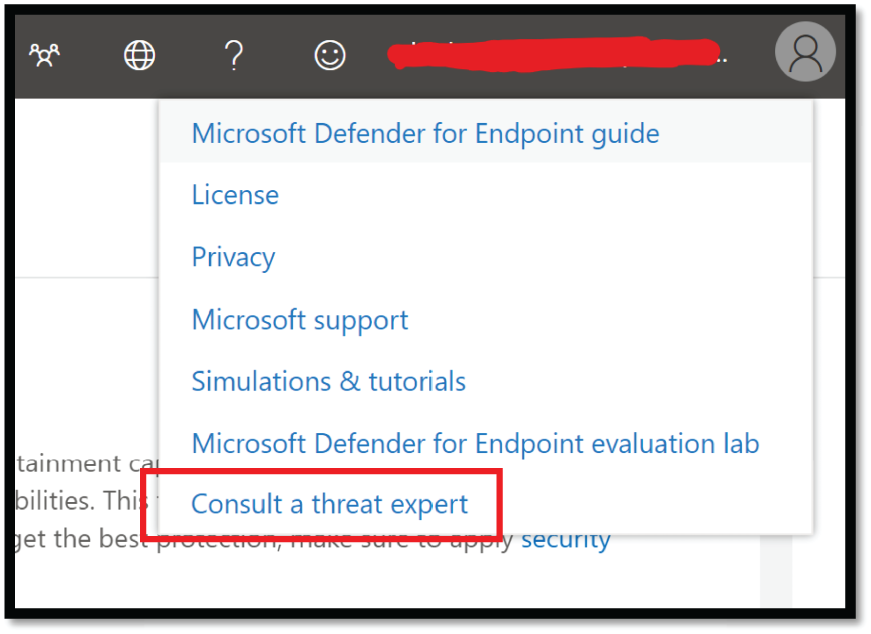
Figure 4.65: Consult a Threat Expert option under support menu
- From the Devices page action menu, as shown in Figure 4.66.

Figure 4.66: Devices action page in Microsoft Defender for Endpoint
- From the Alerts page action menu, as shown in Figure 4.67.
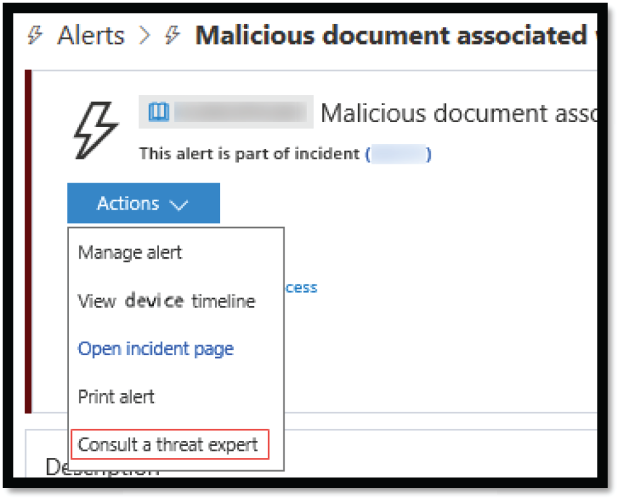
Figure 4.67: A left page action menu on Microsoft Defender for Endpoint
- From the File page action menu, as shown in Figure 4.68.

Figure 4.68: A left page action menu on Microsoft Defender for Endpoint
A popup screen opens. The screen in Figure 4.69 shows when you are on a trial subscription.
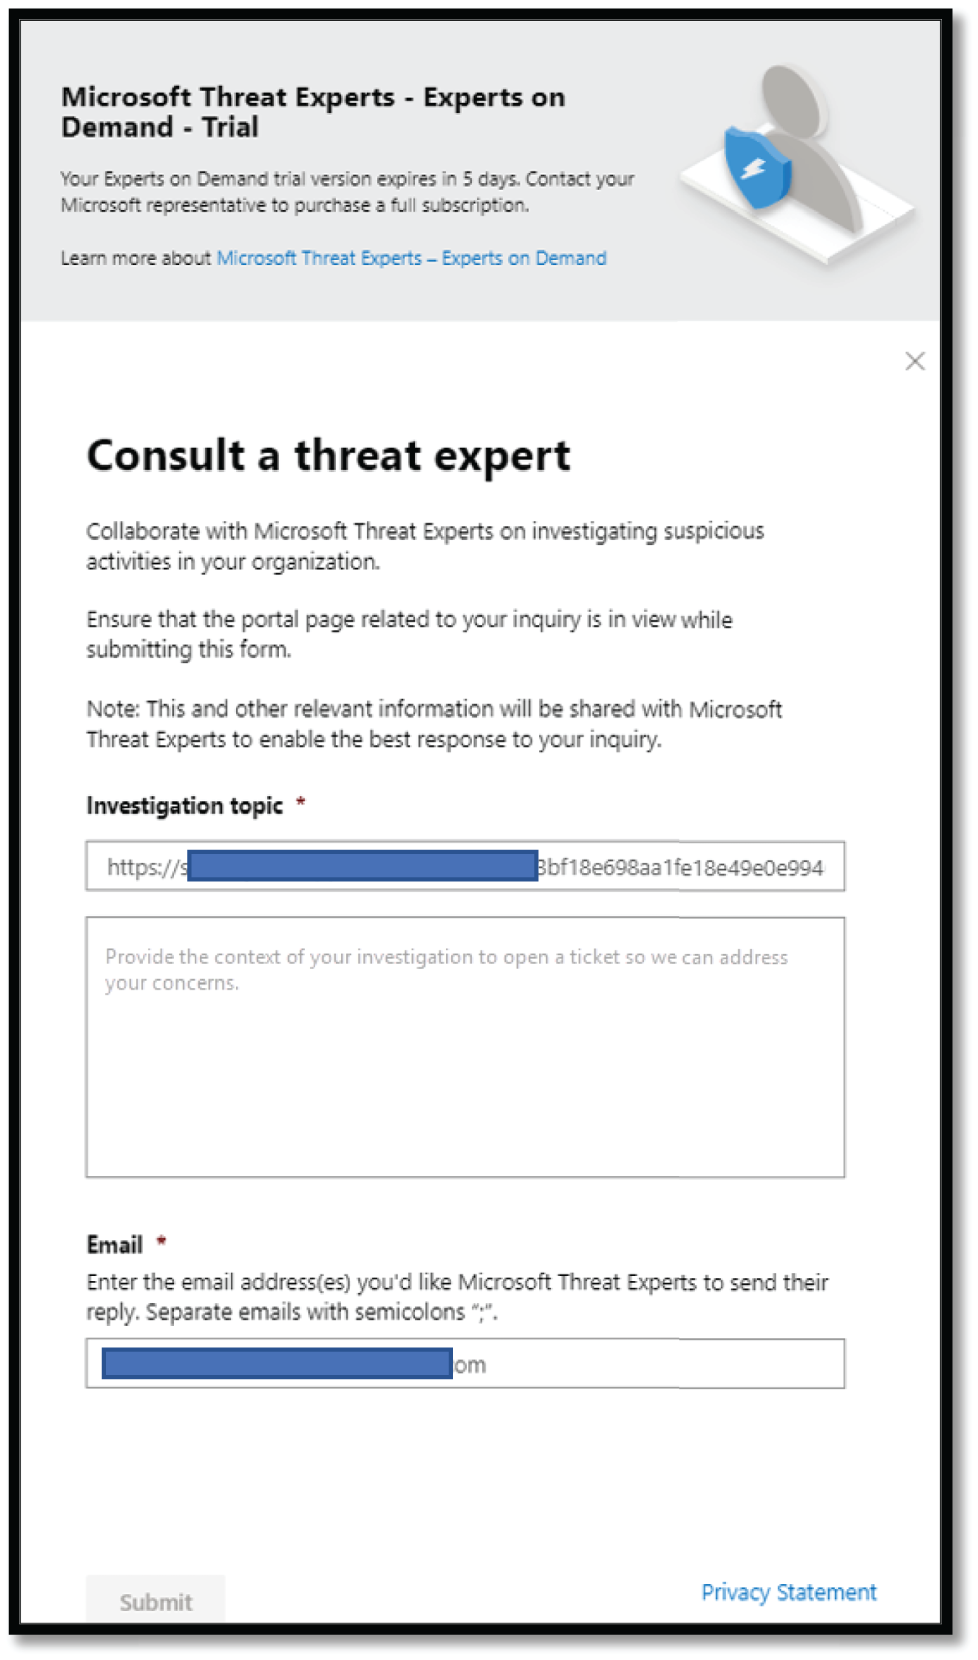
Figure 4.69: MTE screen

Figure 4.70: Consult a threat expert page
The screen in Figure 4.70 shows when you are on a full Microsoft Threat Experts - Experts on-Demand subscription.
The Investigation topic field is pre-populated with the link to the relevant page for your investigation request. For example, a link to the incident, alert, or device details page that you were at when you made the request.
- In the next field, provide enough information to give the Microsoft Threat Experts enough context to start the investigation.
- Enter the email address that you'd like to use to correspond with Microsoft Threat Experts.
The response from Microsoft Threat Experts varies according to your inquiry. However, they will email a progress report to you about your Consult a threat expert inquiry within two days, to communicate the investigation status from the following categories:
- More information is needed to continue with the investigation
- A file or several file samples are required to determine the technical context
- Investigation requires more time
- Initial information was enough to conclude the investigation
It is essential to respond quickly to keep the investigation moving to the next stage.
Finally, the following are a few sample investigation topics that you can consult with Microsoft Threat Experts - Experts on Demand.
Alert Information
- We see this alert: “Suspicious behavior by a system utility was observed.” Can you please share more context on this?
- We see two similar attacks, which generate different alerts. One is “Suspicious PowerShell command line” and the other is “A malicious file was detected based on the indication provided by O365.” What is the difference?
- We see a new type of alert for a living-off-the-land binary: [AlertID]. Can you us how to investigate this and share more details on this alert?
- I see a high number of failed login attempts on our executive-level employees device. I cannot find any further evidence around these sign-in attempts. How can Defender for Endpoint see these attempts? What type of sign-ins are being monitored?
Possible Machine Compromise
- Can you please confirm and clarify on this malicious activity “Unknown process observed?” This message or alert is seen frequently on many devices.
- Can you help validate a possible compromise on the following system on [date] with similar behaviors as the previous [malware name] malware detection on the same system in [month]?
Threat Intelligence Details
- I recently saw a [social media reference, for example, Twitter or blog] post about a threat targeting my industry. Can you help us understand what protection Defender for Endpoint provides against this threat actor, any IoC you can share?
- We detected a phishing email that delivered a malicious Microsoft Word document to a user. The malicious Word document caused a series of suspicious events, which triggered multiple Microsoft Defender alerts for [malware name] malware. Do you have any further information on this malware?
Microsoft Threat Experts’ Alert Communications
- I received this targeted attack notification from Microsoft Threat Experts. We don't have our own incident response team. What can we do now, and how can we contain the incident?
- Can your incident response team help us address the targeted attack notification that we got?
- I received a targeted attack notification from Microsoft Threat Experts. What data can you provide to us that we can pass on to our incident response team?
Automating Security Response with MCAS and Microsoft Flow
Microsoft Flow is a low-code/no-code automation platform that allows you to create simple automated and integrated workflows and connections with a few clicks, as well as enable API integrations with just a bit of copy-and-paste. Similar to other task and workflow programs like Zapier and IFTTT, Flow has the benefit of being free for most Office 365 licenses and has deep integrations with most Office products.
Although you can tie any API into Flow, it is easiest to use with its hundreds of built-in connectors such as MS Word, Excel, SharePoint, Teams, Power BI, Salesforce, ServiceNow, and many others.
The prerequisites to connect Cloud App Security with Microsoft Flow are as follows:
- Verify licensing for Flow and MCAS (Cloud App Security)
- Create API token
- Create new flow
- Configure CAS trigger and select “when an alert is generated”
- Paste API token in authentication settings
For this use case, the flow is as follows: When a new alert is generated, post a message to a channel in Teams, create a new record (ticket) in ServiceNow, and send an email.
Step 1: Generate Your API Token in Cloud App Security
- Go to
https://portal.cloudappsecurity.com. (You need to be logged in with an admin account.) - Click the Settings icon in the upper-right corner.
- Select Security Extensions.
- The first tab is API Tokens. Click the blue + button on the upper-right corner of the token list.
- Name and save your token. See Figure 4.71.
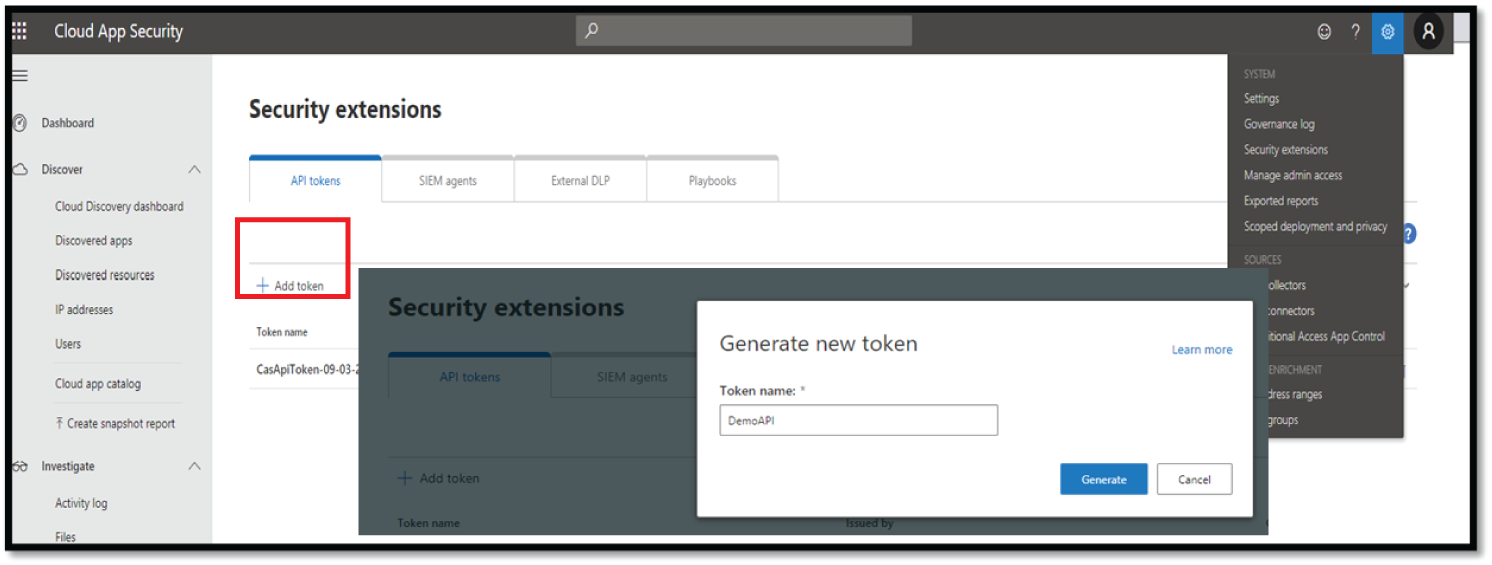
Figure 4.71: Generate new token in MCAS
Step 2: Create Your Trigger in Microsoft Flow
- Go to
https://flow.microsoft.com. - Click My Flows in the left sidebar.
- Click the + New button in the upper-right corner.
- Select Create from Blank.
- In the splash screen, click Create from Blank again.
- In the connector search bar, search for Cloud App Security.
- Select Cloud App Security.
- Select the trigger called, “When An Alert Is Generated.”
- When prompted, enter your API token.
- Click the New Step button.
Step 3: Create the Teams Message Action in Microsoft Flow
- Under Choose Action, search for Teams in the search bar.
- Click the Microsoft Teams icon.
- Under Actions, select Post Message.
- Select Team ID (it will pull information from your instance of Teams).
- Select Channel ID (it will also pull information from Teams).
- Enter your message.
- Once you click in the message box, you will be given a menu that lets you select Dynamic Content or Expressions.
- The dynamic content list gives you any information available from the CAS alert.
- Click Alert Display Name and Alert Category. (These will create blocks in the message box. You can enter any ancillary information you want here as well.)
- Click the New Step button. See Figure 4.72.
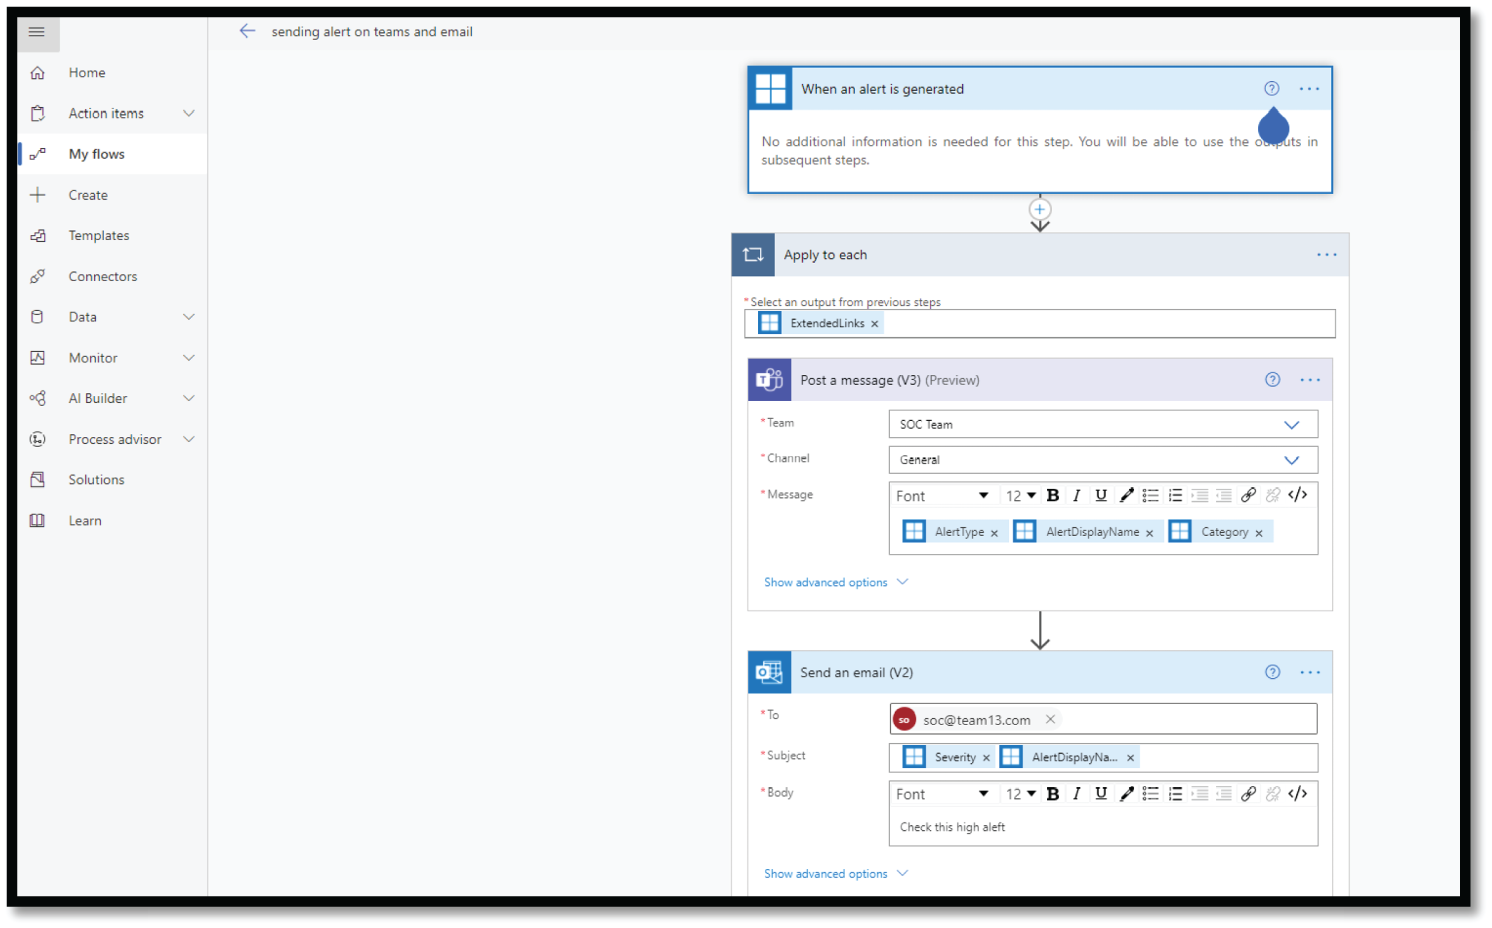
Figure 4.72: Create new Flow in Microsoft Flow application
Step 4: Generate an Email in Microsoft Flow
- Search for Outlook in the search bar.
- Select Office 365 Outlook.
- Under Actions, select Send an Email.
- Enter a recipient.
- Enter a subject.
- Enter the message body. Note: All fields here can use dynamic content.
- Click Save.
- Now that the flow is made and saved, you can rename it by clicking on the descriptor in the upper-left corner.
Connecting the Flow in Cloud App Security
- Go to
https://portal.cloudappsecurity.com. - Click Control in the left sidebar.
- Select Policies.
- Find the event/policy that you want to trigger the flow (or create a new Cloud App Security Policy) and select it.
- In the Alerts section, click the box next to Send Alerts to Flow.
- In the Select Playbooks drop-down, choose the name of the flow you created earlier.
- Click Update (see Figure 4.73).

Figure 4.73: Create new Policy Alert in MCAS
Performing an Automated Response Using Azure Security Center
This section focuses on ASC and Azure Sentinel features for automation in alert and threat response, including some of the automated hunting methods.
Scenario 1: Receive Only Defender Antimalware Alerts Using Azure Security Center Workflow Automation.
Here are the steps:
- Open Azure Security Center, and on the left navigation pane, click Workflow Automation.
- On the Workflow automation blade, click the + Add Workflow Automation button. The blade shown in Figure 4.74 appears.
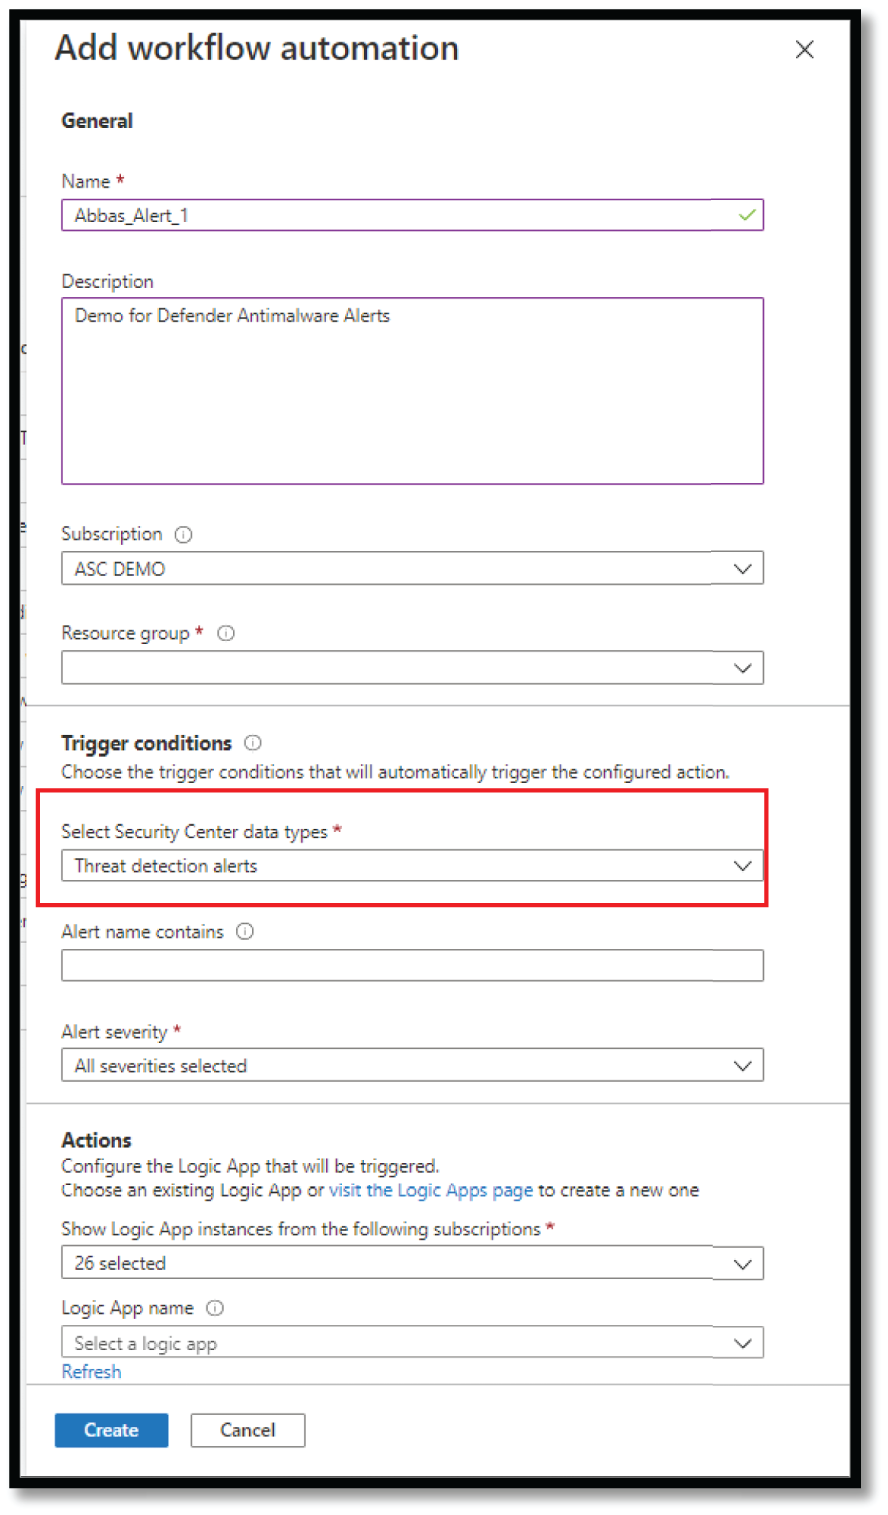
Figure 4.74: Workflow automation tab in ASC
- Under Triggers conditions, you can see that the automation can be triggered by alerts or recommendations. Under Alert severity (see Figure 4.75), you can also select the severity level that you want to target.

Figure 4.75: Alert Severity selection in Add workflow automation
- For this use case and scenario, we need to build a workflow automation that will trigger only when Antimalware Detection arrives in ASC. To accomplish this, we will leverage the Logic App Designer, as shown in Figure 4.76.
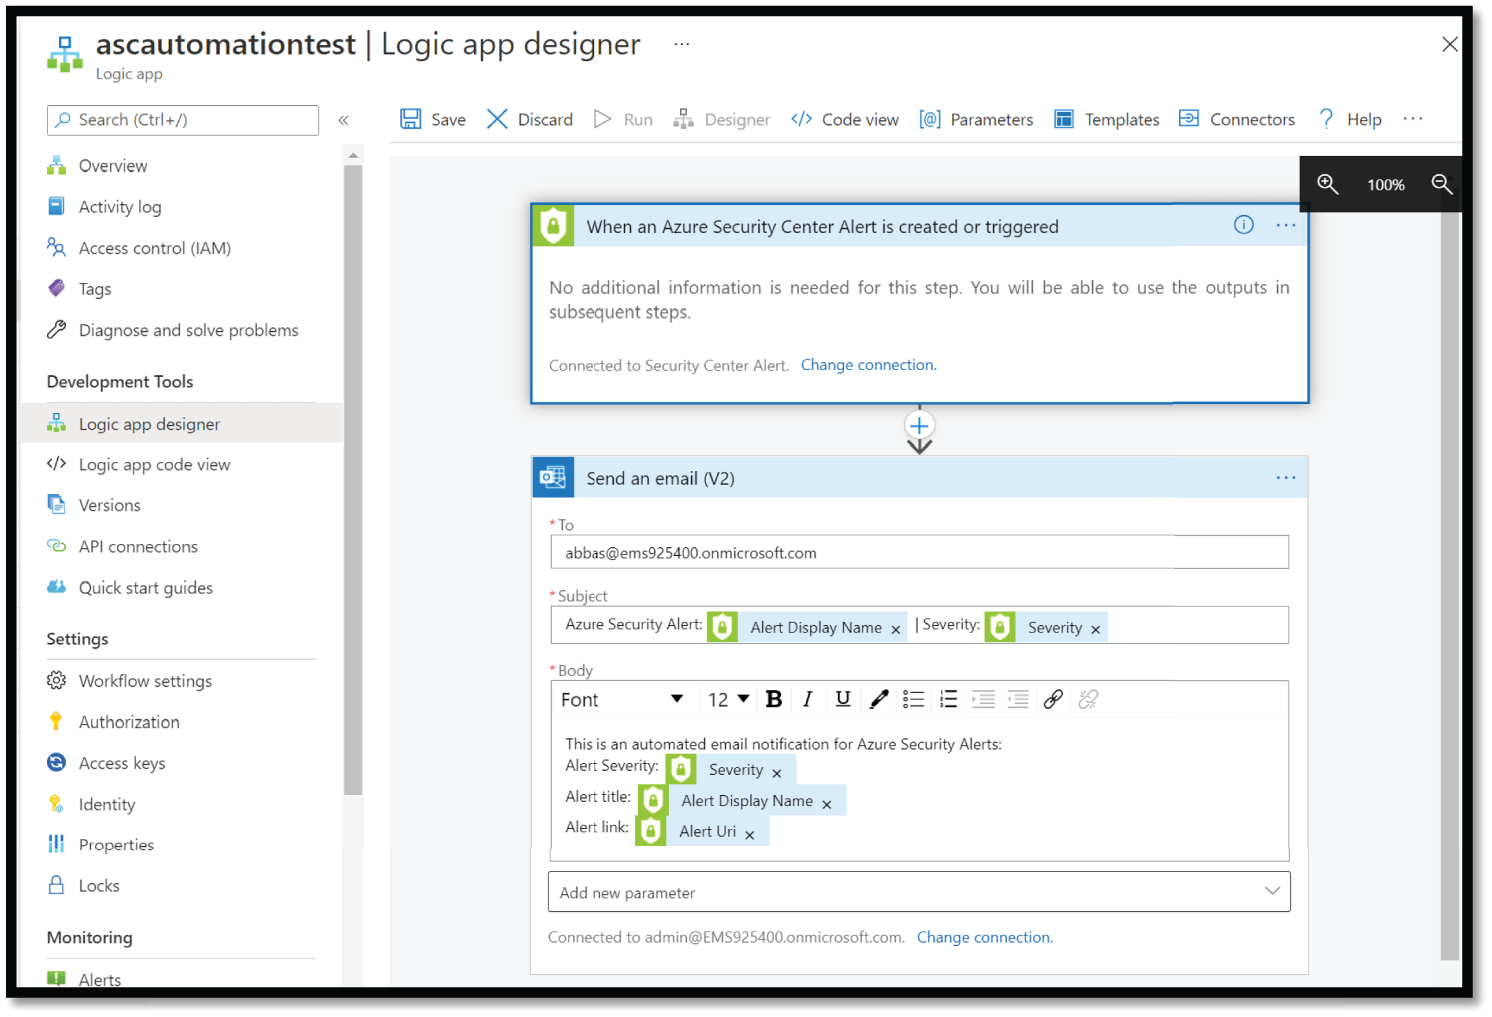
Figure 4.76: Logic App Designer
Create the workflow automation using Logic App Designer by selecting the trigger points such as Send an Email for a specific type and severity of alert.
- After you've defined your logic app, return to the workflow automation definition pane (Add Workflow Automation). Click Refresh to ensure your new Logic App is available for selection. See Figure 4.77.
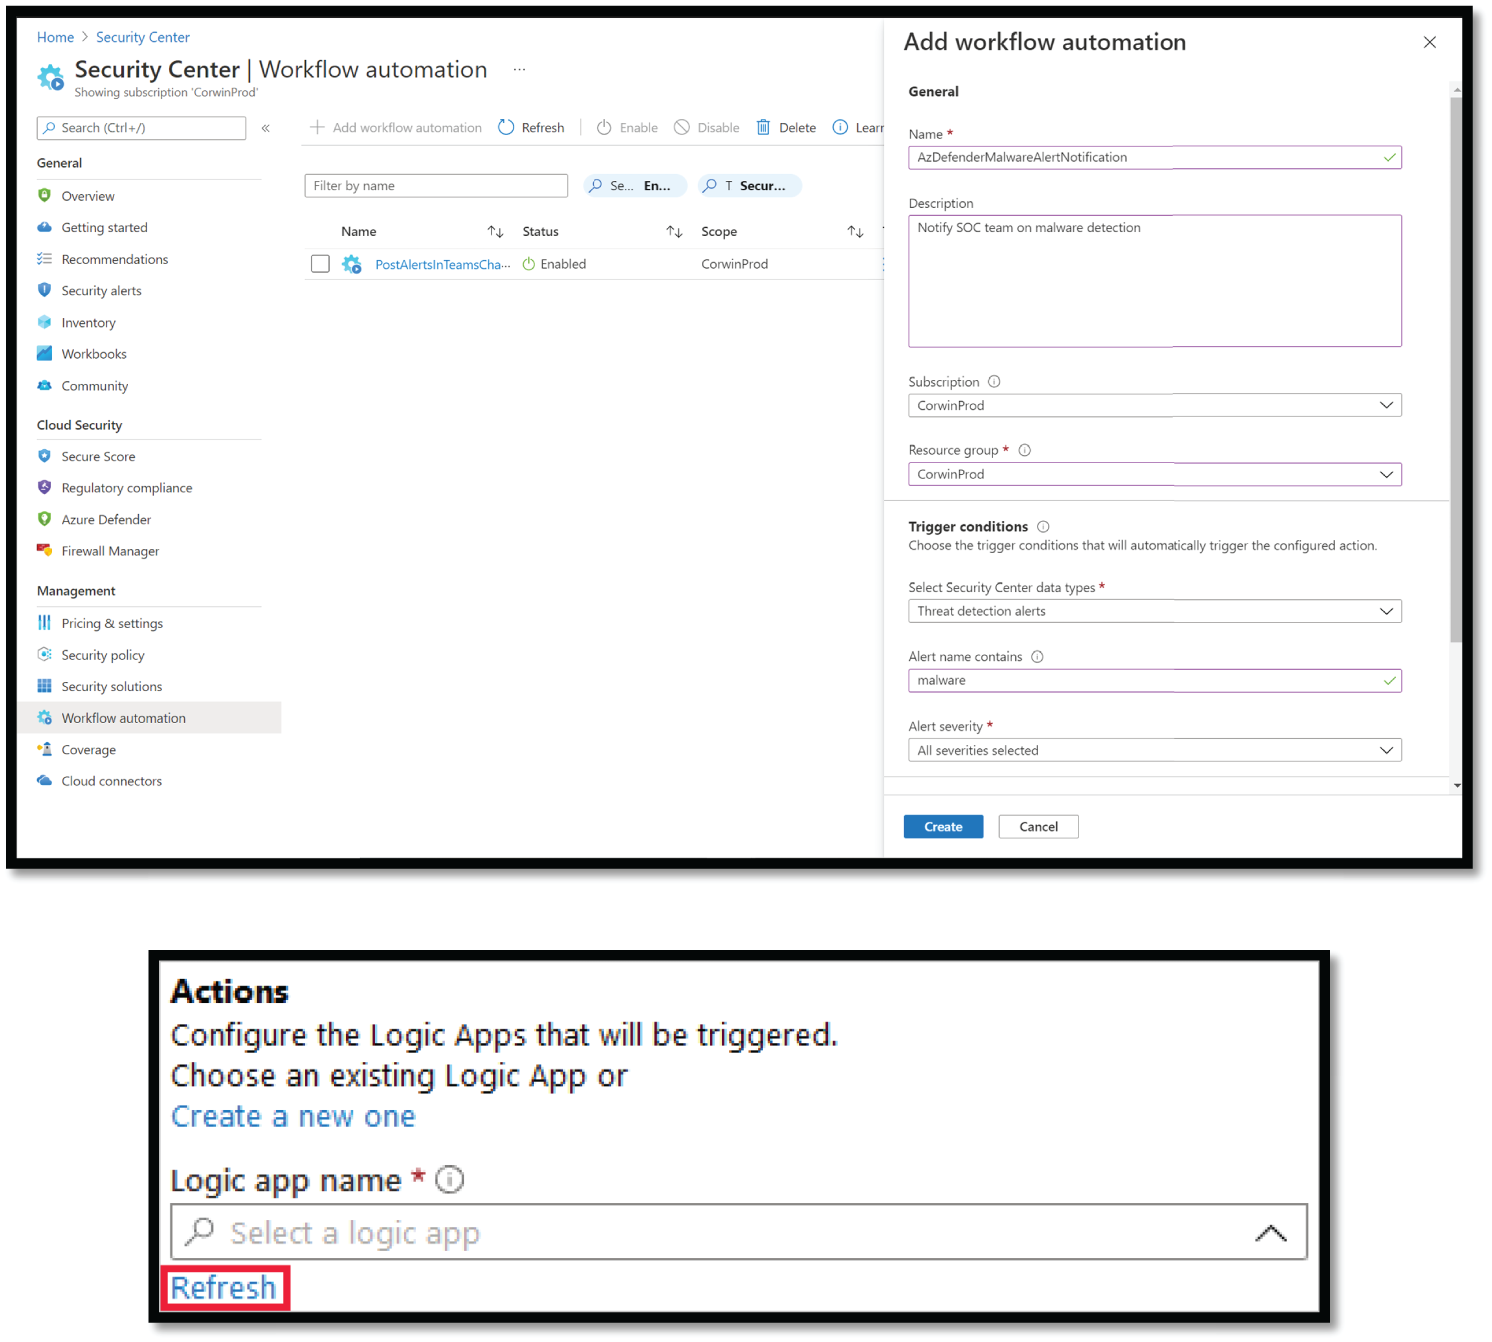
Figure 4.77: Adding workflow automation in ASC
- Select your logic app and save the automation. Note that the Logic App drop-down only shows logic apps with supporting Security Center connectors.
Using Machine Learning and Artificial Intelligence in Threat Response
Machine learning (ML) is now an essential toolkit in security analytics to detect new and advanced variants of attacks that escape the traditional rules-based system. However, a scarce ML talent pool makes it difficult for security organizations to staff applied security data scientists. To democratize the ML toolkit tailored to the security community's needs, Microsoft has introduced built-in ML within many services, including ASC and Azure Sentinel. One such service is Fusion Detections.
Overview of Fusion Detections
Fusion detections using ML combines low- and medium-severity alerts from Microsoft and third-party security products into high-severity incidents. By design, these incidents are low-volume, high-fidelity, and high-severity.
Fusion is enabled by default. Because the logic is hidden and therefore, not customizable, you can only create one rule with this template.
Microsoft recently released 32 new Fusion detections reaching 90 Fusion incident types and Build Your Own Machine Learning framework within Azure Sentinel.
Figure 4.78 shows how a Fusion incident looks in Azure Sentinel portal.
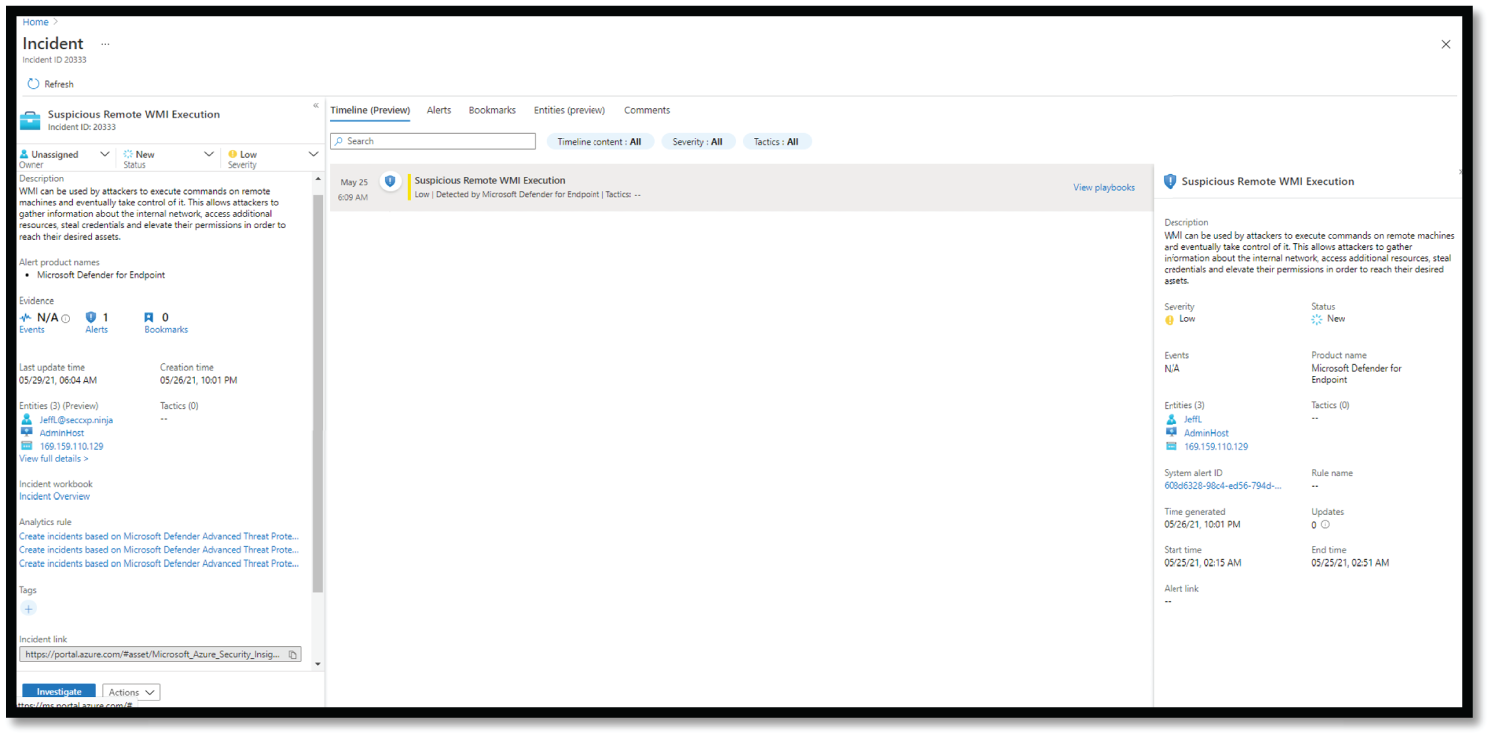
Figure 4.78: Example of a Fusion incident in Azure Sentinel
To enable Fusion detections, select the Analytics blade in the Azure Sentinel portal. In your Active Rules view, a built-in rule of Fusion rule type named “Advanced Multistage Attack Detection” is enabled by default for all Sentinel workspaces. See Figure 4.79. You can disable this any time when it's not required.

Figure 4.79: Enable/disable Fusion detections rule in Azure Sentinel
Overview of Azure Machine Learning
You can either bring your raw data directly to the Azure Databricks ML environment via EventHub or Azure Blobs or you can use the capabilities provided with Azure Sentinel to export the data from Azure Sentinel Log Analytics tables.
Regardless of the export methods used for raw data, you can use the libraries provided by the BYO-ML framework to import the ML model scoring back into Sentinel Log Analytics tables for further processing and creating incidents.
Azure ML is an end-to-end machine learning platform that enables users to build and deploy models faster on Azure. Azure ML allows you to run Jupyter Notebooks on a VM or a shared cluster computing environment.
Let's look at the steps to create an Azure ML workspace in Azure Sentinel:
- From the Azure portal, navigate to Azure Sentinel > Threat management > Notebooks and then select Launch Notebook. See Figure 4.80.
- Select individual notebooks to view their descriptions, required data types, and data sources. See Figure 4.81.
- Create the ML Workspace by selecting and entering the required details, such as your subscription, resource group, etc., and select Review + Create. See Figure 4.82.
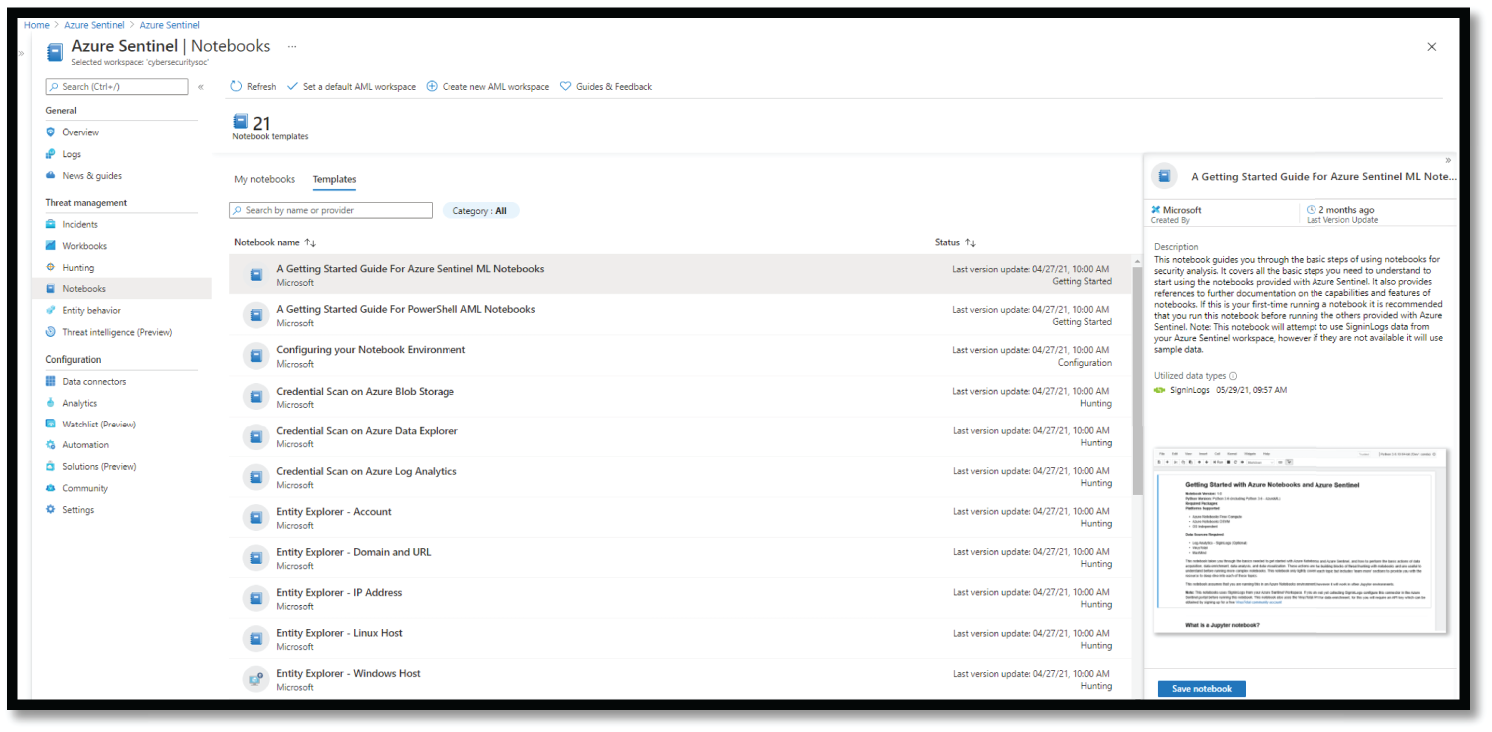
Figure 4.80: Example of Notebooks
- After Validation is passed, select Create. See Figure 4.83.
- Wait for the deployment to complete. Your ML workspace is ready for use once it's completed. See Figure 4.84.
- From the Azure portal, navigate to Azure Sentinel > Threat management > Notebooks, where you can see notebooks that Azure Sentinel provides. Select the notebook you want to use, and then select Launch Notebook to clone and configure the notebook into a new Azure Notebooks project that connects to your Azure Sentinel workspace. When the process is complete, the notebook opens within Azure Notebooks for you to run, as shown in Figure 4.85.
- After selecting Launch Notebook, choose a compute instance. If you don't have a compute instance, select the plus sign (+) to start the Create Compute Instance wizard, as shown in Figure 4.86.
- On the Select Virtual Machine page, provide the required information, and then select Next. See Figure 4.87.

Figure 4.81: Selection of Notebook ML Template in Azure Sentinel
- On the Configure Settings page, provide the required information, and then select Create. See Figure 4.88.

Figure 4.82: Create the ML Workspace in Azure Sentinel
- Once your notebook server is created, within each cell, select the Run icon to execute code in the notebooks. See Figure 4.89.

Figure 4.83: Validation pass window
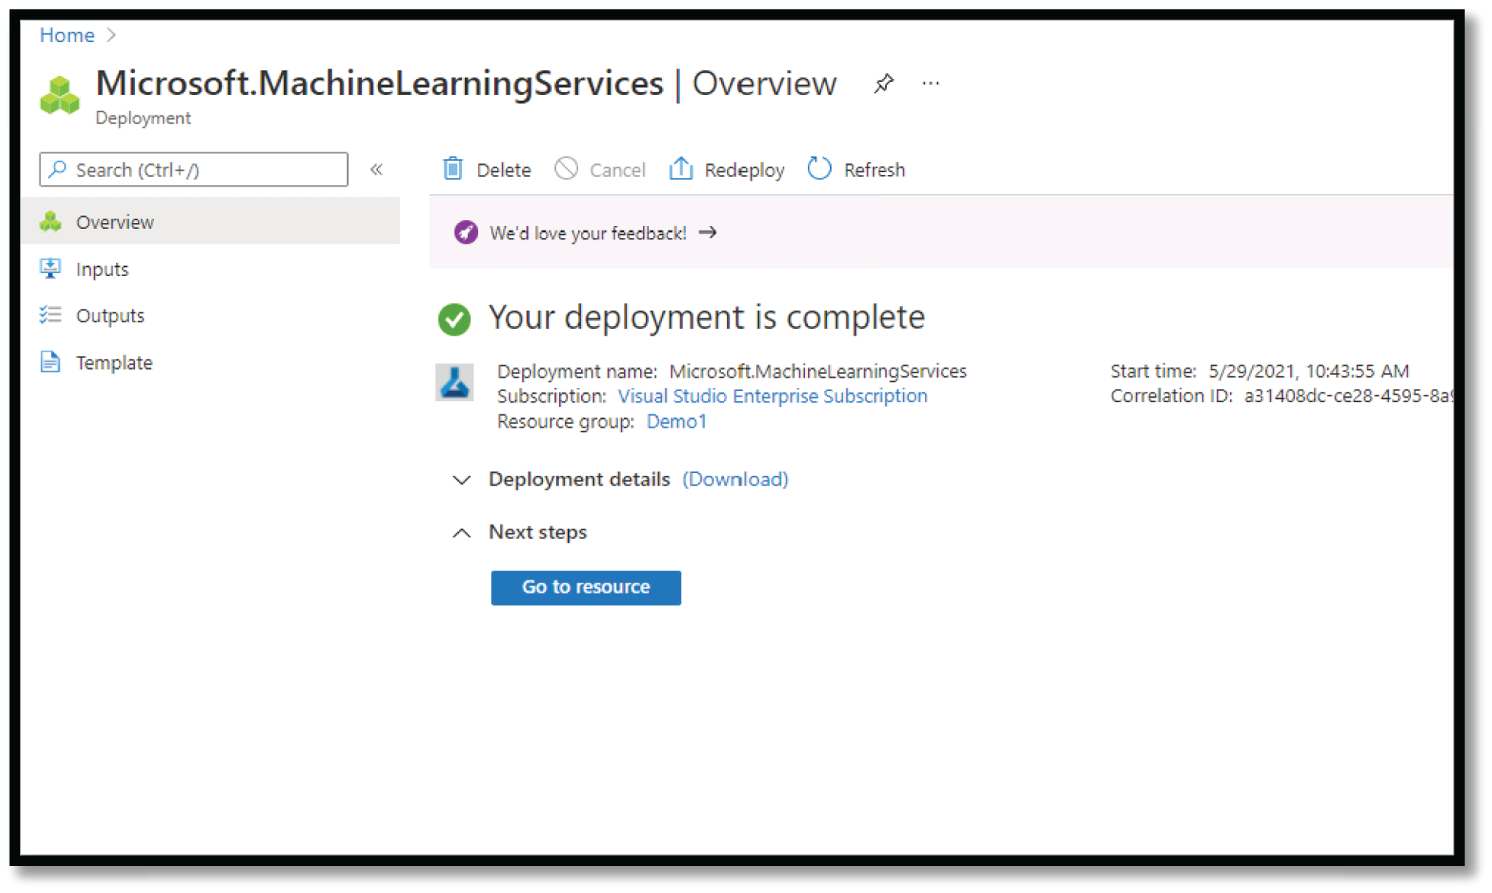
Figure 4.84: Confirmation window

Figure 4.85: Selection of Notebooks in Azure Sentinel
Figure 4.86: Create a compute instance in Notebooks
Figure 4.87: Create Compute instance for Microsoft ML
Figure 4.88: Configuration settings window

Figure 4.89: Run Code window in Azure Notebook
Summary
- Microsoft has a wealth of information for automation and orchestration. Use the technology that best meets your organization's needs.
- Azure Conditional Access within Azure AD can provide a number of options for preventing initial access to your environment such as using MFA, IP-base location block, GSM-based location block, and Identity Threat and Risky User.
- Azure Sentinel is a cloud-powered SIEM, giving you breadth of insight across all your tools in one place and providing several options for automation, orchestration using machine learning run book, playbook, notebook, and AI-based capabilities.
- Microsoft Defender offers a depth of insight into your modern workplace and cloud infrastructure.
- Microsoft leverages MITRE ATT&CK Framework to detect and hunt threats using Azure Security Center, Azure Defender, and Azure Sentinel.
- Workflow automation can help in reducing alert fatigue for your SecOps.
- You can leverage ML and AI capabilities within Azure Security Center using Fusion Detection tactics.
- You can bring your own ML within Azure Sentinel by creating your own ML workspace and using Notebook.