Chapter 3
The Anatomy of Macros
In This Chapter
![]() Exploring the Excel Object Model
Exploring the Excel Object Model
![]() Leveraging variables in your Macros
Leveraging variables in your Macros
![]() Utilizing event procedures
Utilizing event procedures
![]() Handling potential errors in your macros
Handling potential errors in your macros
The engine behind macros is VBA (Visual Basic for Applications). When you record a macro, Excel is busy writing the associated VBA behind the scenes. To fully understand macros, it’s important to understand the underlying VBA typically used in Excel macros.
This chapter starts you on that journey by giving you a primer on some of the objects, variables, events, and error handlers you will encounter in the macro examples found in this book.
An Overview of the Excel Object Model
Visual Basic for Applications is an object-oriented programming language. The basic concept of object-oriented programming is that a software application (Excel in this case) consists of various individual objects, each of which has its own set of features and uses. An Excel application contains cells, worksheets, charts, pivot tables, drawing shapes — the list of Excel's objects is seemingly endless. Each object has its own set of features, which are called properties, and its own set of uses, called methods.
You can think of this concept just as you would the objects you encounter every day, such as your computer, car, or refrigerator. Each of these objects has identifying qualities, such as height, weight, and color. They each have their own distinct uses, such as working with Excel, transporting you over long distances, or keeping perishable foods cold.
VBA objects also have identifiable properties and methods of use. A worksheet cell is an object, and among its describable features (its properties) are its address, height, and formatted fill color. A workbook is also a VBA object, and among its usable features (its methods) are its capabilities to be opened, closed, and have a chart or pivot table added to it.
In Excel you deal with workbooks, worksheets, and ranges on a daily basis. You likely think of each of these objects as all part of Excel, not really separating them in your mind. However, Excel thinks about these internally as all part of a hierarchical model called the Excel Object Model. The Excel Object Model is a clearly defined set of objects that are structured according to the relationships between them.
Understanding objects
In the real world, you can describe everything you see as an object. When you look at your house, it is an object. Your house has rooms; those rooms are also separate objects. Those rooms may have closets. Those closets are likewise objects. As you think about your house, the rooms, and the closets, you may see a hierarchical relationship between them. Excel works in the same way.
In Excel, the Application object is the all-encompassing object — similar to your house. Inside the Application object, Excel has a workbook. Inside a workbook is a worksheet. Inside that is a range. These are all objects that live in a hierarchical structure.
To point to a specific object in VBA, you can traverse the object model. For example, to get to cell A1 on Sheet 1, you can enter this code:
Activeworkbook.Sheets("Sheet1").Range("A1").Select
In most cases, the object model hierarchy is understood, so you don’t have to type every level. Entering this code also gets you to cell A1 because Excel infers that you mean the active workbook, and the active sheet:
Range("A1").Select
Indeed, if you have your cursor already in cell A1, you can simply use the ActiveCell object, negating the need to spell out the range:
Activecell.Select
Understanding collections
Many of Excel’s objects belong to collections, which are essentially groups of like objects. Similarly, your house sits within a neighborhood, which is a collection of houses. Each neighborhood sits in a collection of neighborhoods called a city. Excel considers collections to be objects themselves.
In each Workbook object, you have a collection of Worksheets. The Worksheets collection is an object that you can call upon through VBA. Each worksheet in your workbook lives in the Worksheets collection.
If you want to refer to a worksheet in the Worksheets collection, you can refer to it by its position in the collection, as an index number starting with 1, or by its name, as quoted text. If you run the following two lines of code in a workbook that has only one worksheet called MySheet, they both do the same thing:
Worksheets(1).Select


Worksheets("MySheet").Select
If you have two worksheets in the active workbook that have the names MySheet and YourSheet, in that order, you can refer to the second worksheet by typing either of these statements:
Worksheets(2).Select


Worksheets("YourSheet").Select
If you want to refer to a worksheet in a workbook called MySheet in a particular workbook that is not active, you must qualify the worksheet reference and the workbook reference, as follows:
Workbooks("MyData.xls").Worksheets("MySheet").Select
Understanding properties
Properties are essentially the characteristics of an object. Your house has a color, a square footage, an age, and so on. Some properties, such as the color of your house, can be changed. Other properties, such as the year your house was built, can’t be changed.
Likewise, an object in Excel such as the Worksheet object has a sheet name property that can be changed, and a Rows.Count row property that cannot.
You refer to the property of an object by referring to the object and then to the property. For instance, you can change the name of your worksheet by changing its Name property.
In this example, you rename Sheet1 to MySheet:
Sheets("Sheet1").Name = "MySheet"
Some properties are read-only, which means that you can't assign a value to them directly. An example of a read-only property is the Text property of cell, which provides the formatted appearance of a value in a cell. You cannot overwrite or change it.
Understanding methods
Methods are the actions that can be performed against an object. It helps to think of methods as verbs. For example, you can paint your house; in VBA, that might translate to
house.paint
A simple example of an Excel method is the Select method of the Range object:
Range("A1").Select
Another is the Copy method of the Range object:
Range("A1").Copy
Some methods have parameters that can dictate how the methods are applied. For instance, the Paste method can be used more effectively by explicitly defining the Destination parameter:
ActiveSheet.Paste Destination:=Range("B1")
A Brief Look at Variables
Another concept you will see throughout the macros in this book is the concept of variables. It’s important to dedicate a few words on this concept because it will play a big part in most of the macros you will encounter here.
You can think of variables as memory containers that you can use in your procedures. There are different types of variables, each tasked with holding a specific type of data.
Some of the common types of variables you will see in this book follow:
- String: Holds textual data
- Integer: Holds numeric data ranging from -32,768 to 32,767
- Long: Holds numeric data ranging from -2,147,483,648 to 2,147,483,647
- Double: Holds floating-point numeric data
- Variant: Holds any kind of data
- Boolean: Holds binary data that returns True or False
- Object: Holds an object from the Excel Object model
When you create a variable in a macro, you are declaring a variable. You do so by entering Dim (abbreviation for dimension), then the name of your variable, and then the type. For instance:
Dim MyText as String


Dim MyNumber as Integer


Dim MyWorksheet as Worksheet
After you create your variable, you can fill it with data. Here are a few simple examples of how you could create a variable, and then assign values to it:
Dim MyText as String

MyText = Range("A1").Value


Dim MyNumber as Integer

MyNumber = Range("B1").Value * 25


Dim MyObject as Worksheet

Set MyWorksheet = Sheets("Sheet1")
The values you assign to your variables often come from data stored in your cells. However, the values may also be information that you create. It all depends on the task at hand. This notion will become clearer as you go through the macros in this book.
Although it's possible to create code that does not use variables, you'll encounter many examples of VBA code where variables are employed. There are two main reasons for this.
First, Excel doesn’t inherently know what your data is used for. It doesn’t see numerals, symbols, or letters. It sees only data. When you declare variables with specific data types, you help Excel know how it should handle certain pieces of data so that your macros will produce the results you'd expect.
Second, variables help by making your code more efficient and easier to understand. For example, suppose you have a number in cell A1 that you are repeatedly referring to in your macro. You could retrieve that number by pointing to cell A1 each time you need it:
Sub Macro1()


Range("B1").Value = Range("A1").Value * 5


Range("C1").Value = Range("A1").Value * 10


Range("D1").Value = Range("A1").Value * 15


End Sub
However, this macro would force Excel to waste cycles storing the same number in memory every time you point to cell A1. Also, if you need to change your workbook so that the target number is not in cell A1, but in, say, cell A2, you would need to edit your code by changing all the references from A1 to A2.
A better way is to store the number in cell A1 just once. For example, you can store the value in cell A1 in an Integer variable called myValue:
Sub WithVariable()


Dim myValue As Integer


myValue = Range("A1").Value


Range("C3").Value = myValue * 5


Range("D5").Value = myValue * 10


Range("E7").Value = myValue * 15


End Sub
This approach not only improves the efficiency of your code (ensuring Excel reads the number in cell A1 just once) but also ensures that you only have to edit one line should the design of your workbook change.
Understanding Event Procedures
In many of the example macros in this book, code is implemented as an event procedure. To fully understand why these examples use event procedures, it’s important to get acquainted with events.
An event is nothing more than an action that takes place during a session in Excel. Everything that happens in Excel happens to an object through an event. A few examples of events are opening a workbook, adding a worksheet, changing a value in a cell, saving a workbook, and double-clicking a cell.
The nifty thing is that you can tell Excel to run a certain macro or piece of code when a particulate event occurs. For example, you may want to ensure that your workbook automatically saves each time it closes. You can add code to the BeforeClose workbook event that saves the workbook before it closes.
 In Chapter 2, in the section on adding a new VBA module, you discover how to create a standard VBA module to hold the code you write. However, event procedures are special in that they are not stored in standard modules. As you see in the next few sections, event procedures are stored directly in each object’s built-in modules.
Worksheet events
Worksheet events occur when something happens to a particular worksheet, such as when a worksheet is selected, a cell on the worksheet is edited, or a formula on a worksheet is calculated. Each worksheet has its own built-in module where you can place your own event procedure.
To get to this built-in module, you can right-click the worksheet and select the View Code option, as shown in Figure 3-1.

Figure 3-1: Getting to the built-in module for a worksheet.
Visual Basic Editor will automatically open to the built-in module for the worksheet. At the top of the module are two drop-down boxes.
In the drop-down box on the left, select the Worksheet option. The SelectionChange event in the drop-down box on the right is selected automatically. This action also adds some starter code (see Figure 3-2), where you can enter or paste your code.

Figure 3-2: The default SelectionChange event.
The idea is to choose the most appropriate event from the Event drop-down box for the task at hand. Figure 3-3 illustrates the different events you can choose.

Figure 3-3: Choose the most appropriate event.
The more commonly used worksheet events follow:
- Worksheet_Change: Triggers when any data on the worksheet is changed
- Worksheet_SelectionChange: Triggers each time a new cell or an object on the worksheet is selected
- Worksheet_BeforeDoubleClick: Triggers before Excel responds to a double-click on the worksheet
- Worksheet_BeforeRightClick: Triggers before Excel responds to a right-click on the worksheet
- Worksheet_Activate: Triggers when the user moves from another worksheet to this worksheet
- Worksheet_Deactivate: Triggers when the user moves from this worksheet to another worksheet
- Worksheet_Calculate: Triggers each time a change in the worksheet causes Excel to recalculate formulas
Workbook events
Workbook events occur when something happens to a particular workbook. For example, when a workbook is opened, when a workbook is closed, when a new worksheet is added, or when a workbook is saved. Each workbook is its own built-in module where you can place your own event procedure.
To get to this built-in module, you will need to first activate the Visual Basic Editor (press Alt+F11). Then in the Project Explorer menu, right-click on ThisWorkbook, and then choose the ViewCode option (see Figure 3-4).

Figure 3-4: Getting to the built-in module for a workbook.
The Visual Basic Editor will automatically open to the built-in module for the workbook. This module will have two dropdown boxes at the top.
Select the Workbook option in the dropdown on the left. This action will automatically select the Open event in the dropdown on the right. As you can see in Figure 3-5, this will also added some starter code where you can enter or paste your code.
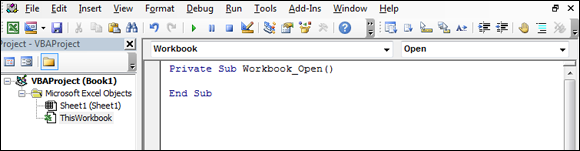
Figure 3-5: The default Open event for the Worksheet object.
The idea is to choose the most appropriate event from the Event dropdown for the task at hand. Figure 3-6 illustrates some of the events you can choose.

Figure 3-6: Click the Event drop-down box to choose the most appropriate event.
The more commonly used workbook events are as follows:
- Worksheet_Open: Triggers when the workbook is opened
- Worksheet_BeforeSave: Triggers before the workbook is saved
- Worksheet_BeforeClose: Triggers before Excel closes the workbook
- Worksheet_SheetChange: Triggers when a user switches between sheets
Error Handling in a Nutshell
In some of the macros in this book, you'll see a line similar to this:
On Error GoTo MyError
This is called an error handler. Error handlers allow you to specify what happens when an error is encountered while your code runs.
Without error handlers, any error that occurs in your code will prompt Excel to activate a less-than-helpful error message that typically won’t clearly convey what happened. However, with the aid of error handlers, you can choose to ignore the error or exit the code gracefully with your own message to the user.
There are three types of On Error statements:
- On Error GoTo SomeLabel: The code jumps to the specified label.
- On Error Resume Next: The error is ignored and the code resumes.
- On Error GoTo 0: VBA resets to normal error-checking behavior.
On Error GoTo SomeLabel
Sometimes an error in your code means you need to gracefully exit the procedure and give your users a clear message. In these situations, you can use the On Error GoTo statement to tell Excel to jump to a certain line of code.
For example, in the following small piece of code, you tell Excel to divide the value in cell A1 by the value in cell A2, and then place the answer in cell A3. Easy. What could go wrong?
Sub Macro1()


Range("A3").Value = Range("A1").Value / Range("A2").Value


End Sub
As it turns out, two major things can go wrong. If cell A2 contains 0, you get a divide by 0 error. If cell A2 contains a non-numeric value, you get a type mismatch error.
To avoid a nasty error message, you can tell Excel that On Error, you want the code execution to jump to the label called MyExit.
In the following code, the MyExit label is followed by a message to the user that gives friendly advice instead of a nasty error message. Also note the Exit Sub line before the MyExit label, which ensures that the code will simply exit if no error is encountered:
Sub Macro1()


On Error GoTo MyExit


Range("A3").Value = Range("A1").Value / Range("A2").Value

Exit Sub


MyExit:

MsgBox "Please Use Valid Non-Zero Numbers"


End Sub
On Error Resume Next
Sometimes, you want Excel to ignore an error and simply resume running the code. In these situations, you can use the On Error Resume Next statement.
For example, the following piece of code is meant to delete a file called GhostFile.exe from the C:Temp directory. After the file is deleted, a nice message box tells the user that the file is gone:
Sub Macro1()


Kill "C:TempGhostFile.exe"


MsgBox "File has been deleted."


End Sub
The code works great if there is indeed a file to delete. But if for some reason the file called GhostFile.exe does not exist in the C:Temp drive, an error is thrown.
In this case, you don’t care if the file is not there because you were going to delete it anyway. So you can simply ignore the error and move on with the code.
By using the On Error Resume Next statement, the code runs its course whether or not the targeted file exists:
Sub Macro1()


On Error Resume Next


Kill "C:TempGhostFile.exe"


MsgBox "File has been deleted."


End Sub
On Error GoTo 0
When using certain error statements, it may be necessary to reset the error-checking behavior of VBA. To understand what this means, take a look at the next example.
Here, you first want to delete a file called GhostFile.exe from the C:Temp directory. To avoid errors that may stem from the fact that the targeted file does not exist, you use the On Error Resume Next statement. After that, you try to do some suspect math by dividing 100/Mike:
Sub Macro1()


On Error Resume Next


Kill "C:TempGhostFile.exe"


Range("A3").Value = 100 / "Mike"


End Sub
Running this piece of code should generate an error due to the fuzzy math, but it doesn’t. Why? Because the last instruction you gave to the code was On Error Resume Next. Any error encountered after that line is effectively ignored.
To remedy this problem, you can use the On Error GoTo 0 statement to resume normal error-checking behavior:
Sub Macro1()


On Error Resume Next


Kill "C:TempGhostFile.exe"


On Error GoTo 0


Range("A3").Value = 100 / "Mike"


End Sub
This code will ignore errors until the On Error GoTo 0 statement. After that statement, the code goes back to normal error checking and triggers the expected error stemming from the fuzzy math.