
Chapter 22
Using Access Macros
IN THIS CHAPTER
- Getting acquainted with macros
- Understanding macro security
- Working with multi-action macros
- Using submacros for actions that are frequently required
- Making decisions with conditions
- Using temporary variables
- Handling errors and debugging your macros
- Understanding embedded macros
- Comparing macros to VBA
Macros have been a part of Access since the beginning. As Access evolved as a development tool, the Visual Basic for Applications (VBA) programming language became the standard in automating Access database applications. Macros in versions prior to Access 2007 lacked variables and error handling, which caused many developers to abandon macros altogether. Access today has these, which make macros a much more viable alternative to VBA than in previous versions. If you're creating a database to be used on the Web, or if you aren't a VBA guru but you still want to customize the actions that your application executes, then building structured macros is the answer.
An Introduction to Macros
A macro is a tool that allows you to automate tasks in Access. It's different from Word's Macro Recorder, which lets you record a series of actions and play them back later. (It's also different from Word in that Word macros are actually VBA code, whereas Access macros are something very different.) Access macros let you perform defined actions and add functionality to your forms and reports. Think of macros as a simplified, step-wise programming language. You build a macro as a list of actions to perform, and you decide when you want those actions to occur.
Building macros consists of selecting actions from a drop-down list, and then filling in the action's arguments (values that provide information to the action). Macros let you choose actions without writing a single line of VBA code. The macro actions are a subset of commands VBA provides. Most people find it easier to build a macro than to write VBA code. If you're not familiar with VBA, building macros is a great stepping-stone to learning some of the commands available to you while providing added value to your Access applications.
Suppose you want to build a main form with buttons that open the other forms in your application. You can add a button to the form, build a macro that opens another form in your application, and then assign this macro to the button's Click event. The macro can be a stand-alone item that appears in the Navigation pane, or it can be an embedded object that is part of the event itself (see the “Embedded Macros” section).
Creating a macro
A simple way to demonstrate how to create macros is to build one that displays a message box that says “Hello World!” To create a new stand-alone macro, click the Macro button on the Macros & Code group on the Create tab of the Ribbon (shown in Figure 22.1).

Figure 22.1 Use the Create tab to build a new stand-alone macro.
Clicking the Macro button opens the macro design window (shown in Figure 22.2). Initially, the macro design window is almost featureless. The only thing in the Macro window is a drop-down list of macro actions.
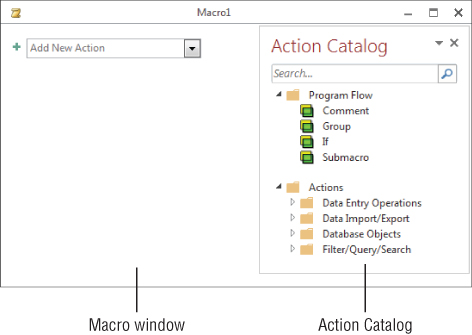
Figure 22.2 The macro design window displaying the Macro window and Action Catalog.
To the right of the Macro window you may see the Action Catalog. There are dozens of different macro actions, and knowing which action to use for a particular task can be an issue. The Action Catalog provides a tree view of all available macro actions and helps you know which action is needed to perform a particular task.
Select MessageBox from the drop-down list in the macro window. The macro window changes to display an area where you input the arguments (Message, Beep, Type, and Title) associated with the MessageBox action.
Set the arguments as follows:
- Message: Hello World!
- Beep: No
- Type: None
- Title: A Simple Macro
Your screen should look similar to Figure 22.3. The Message argument defines the text that appears in the message box and is the only argument that is required and has no default. The Beep argument determines whether a beep is heard when the message box appears. The Type argument sets which icon appears in the message box: None, Critical, Warning?, Warning!, or Information. The Title argument defines the text that appears in the message box's title bar.

Figure 22.3 The Hello World! macro uses the MessageBox action to display a message.
To run the macro, click the Run button in the Tools group of the Design tab of the Ribbon. (The Run button looks like a big red exclamation point at the far left of the Ribbon.) When you create a new macro or change an existing macro, you'll be prompted to save the macro. In fact, you must save the macro before Access runs it for you. When prompted, click Yes to save it, provide a name (such as “mcrHelloWorld”), and click OK. The macro runs and displays a message box with the arguments you specified (shown in Figure 22.4).

Figure 22.4 Running the Hello World! macro displays a message box.
You can also run the macro from the Navigation pane. Close the macro design window and display the Macros group in the Navigation pane. Double-click the mcrHelloWorld macro to run it. You'll see the same message box that displayed when you ran the macro from the design window.
Notice that the message box always appears right in the middle of the screen and blocks you from working with Access until you click OK. These are built-in behaviors of the message box object and are identical in every regard to a message box displayed from VBA code.
When you're satisfied with the Hello World! macro, click the close button in the upper-right corner of the macro window to return to the main Access window.
Assigning a macro to an event
When you're creating macros, you probably don't want end users using the Navigation pane to run them—or worse, running them from the macro design window. Macros are intended for you to automate your application without writing VBA code. In order to make an application easy to use, assign your macros to an object's event.
The most common event to which you might assign a macro is a button's Click event. Follow these steps to create a simple form with a button that runs mcrHelloWorld:
- Select the Create tab on the Ribbon, and then click the Form Design button in the Forms group.
- On the Form Design Tools Design tab of the Ribbon, deselect the Use Control Wizards option in the Controls group. For this example, you don't want to use a wizard to decide what this button does.
- Click the Button control and draw a button on the form.
- Set the button's Name property to cmdHelloWorld. Press F4 to open the button's Property Sheet if it isn't visible on the screen.
- Set the button's Caption property to Hello World!.
- Click the drop-down list in the button's
On Click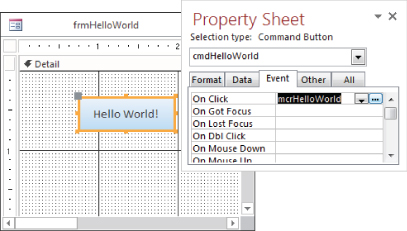
Figure 22.5 Set any object's event property to the macro to trigger that macro when that event occurs.
That's all there is to creating and running a macro. Just select the action, set the action arguments, and assign the macro to an event property.
Understanding Macro Security
The Hello World! macro we built in the last section is as harmless as they come. But not all macros are harmless. You can do almost anything in a macro that you can do in the Access user interface. Some of those things, like running a delete query, can cause data loss. Access has built-in a security environment that helps you prevent unwanted, harmful macros from being run.
When you run forms, reports, queries, macros, and VBA code in your application, Access uses the Trust Center to determine which commands may be unsafe and which unsafe commands you want to run. From the Trust Center's perspective, macros and VBA code are “macros” and shouldn't be trusted by default. Unsafe commands could allow a malicious user to hack into your hard drive or other resource in your environment. A malicious user could possibly delete files from your hard drive, alter the computer's configuration, or generally wreak all kinds of havoc in your workstation or even throughout your network environment.
Each time a form, report, or other object opens, Access checks its list of unsafe commands. By default, when Access encounters one of the unsafe commands, it blocks the command from execution. To tell Access to block these potentially unsafe commands, you must enable sandbox mode.
Enabling sandbox mode
Sandbox mode allows Access to block any of the commands in the unsafe list it encounters when running forms, reports, queries, macros, data access pages, and Visual Basic code. Here's how to enable it:
- Open Access, click the File button, and select Options. The Access Options dialog box appears.
- Select the Trust Center tab, and then click Trust Center Settings. The Trust Center dialog box appears.
- Select the Macro Settings tab (shown in Figure 22.6).
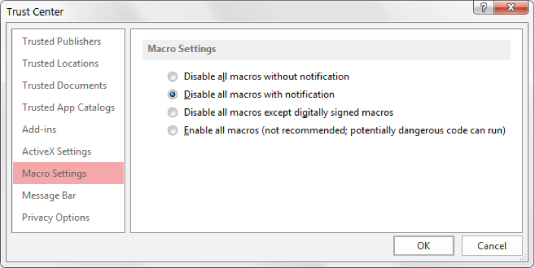
Figure 22.6 Enabling sandbox mode.
- Select either Disable All Macros without Notification or Disable All Macros with Notification.
- Restart Access to apply the security change.
The Macro Settings tab provides four levels of macro security:
- Disable All Macros without Notification: All macros and VBA code are disabled and the user isn't prompted to enable them.
- Disable All Macros with Notification: All macros and VBA code are disabled and the user is prompted to enable them.
- Disable All Macros Except Digitally Signed Macros: The status of the macro's digital signature is validated for digitally signed macros. For unsigned macros, a prompt displays advising the user to enable the macro or to cancel opening the database.
- Enable All Macros (Not Recommended; Potentially Dangerous Code Can Be Run): Macros and VBA code are not checked for digital signatures and no warning displays for unsigned macros.
A digital signature (contained within a digital certificate) is an encrypted secure file that accompanies a macro or document. It confirms that the author is a trusted source for the macro or document. Digital signatures are generally implemented within large organizations that are willing to fund the expense of purchasing and maintaining digital signatures. You, or your organization's IT department, can obtain a digital certificate through a commercial certification authority, like VeriSign, Inc., or Thawte. Search http://msdn.microsoft.com for “Microsoft Root Certificate Program Members” to obtain information on how to obtain a digital certificate.
The default, and generally the best choice, is Disable All Macros with Notification. During the development and maintenance cycles, you'll want all the code and macros in the application to execute without interrupting you with permissions dialog boxes. The next section describes Trusted Locations. You can put your development database in a trusted location to avoid having to enable unsigned code, but still be protected from other databases you may open.
If you or your organization has acquired a digital certificate, you can use it to sign your Access projects:
- Open the Access database to digitally sign; then access any module to open the Visual Basic Editor.
- Choose Tools
 Digital Signature from the Visual Basic Editor menu. The Digital Signature dialog box opens, as shown in Figure 22.7.
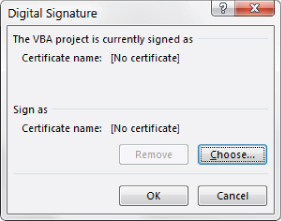
Figure 22.7 Digitally signing an Access project.
- Click Choose to display the Select Certificate dialog box and select a certificate from the list.
- Select the certificate to add to the Access project.
- Click OK to close the Select Certificate dialog box, and click OK again to close the Digital Signature dialog box and save the security setting.
The Trust Center
The Trust Center is where you can find security and privacy settings for Access. To display the Trust Center, click the File button and click Options to open the Access Options dialog box. Select the Trust Center tab, and then click Trust Center Settings.
Here's a description of each section and what it controls:
- Trusted Publishers: Displays a list of trusted publishers—publishers where you clicked Trust All Documents from This Publisher when encountering a potentially unsafe macro—for Office. To remove a publisher from this list, select the publisher and click Remove. Trusted publishers must have a valid digital signature that hasn't expired.
- Trusted Locations: Displays the list of trusted locations on your computer or network. From this section, you can add, remove, or modify folders on your computer that will always contain trusted files. Any file in a trusted location can be opened without being checked by the Trust Center. You can also choose not to allow network locations and to disable all Trusted Locations and accept signed files.
- Trusted Documents: When Trusted Documents is selected, the name of the Access application is added to a special area in the system registry on the user's computer. Then, each time the application is used, it is recognized as a trusted document, and all the macros, code, and other elements of the application are enabled without interrupting the user's workflow.
- Trusted Add-In Catalogs: Displays the list of trusted Office Web App catalogs. Web Apps are embedded web applications that extend the features of Access with content directly from the web or SharePoint websites. Beginning in Access 2016, Microsoft uses the term Add-ins to refer to Web Apps, though they are not related to the traditional Add-ins created with VBA. The Trusted Add-In Catalogs section allows you to add, remove, or modify the SharePoint catalogs you trust.
- Add-ins: Lets you to set up how Access handles add-ins. You can choose whether add-ins need to be digitally signed from a trusted source and whether to display a notification for unsigned add-ins. You can also choose to disable all add-ins, which may impair functionality.
- ActiveX Settings: Lets you set the security level for ActiveX controls.
- Macro Settings: Lets you set the security setting for macros not in a trusted location. (For more information on Macro Settings, see the previous section on sandbox mode.)
- Message Bar: Lets you set whether to display the message bar that warns you about blocked content, or to never show information about blocked content.
- Privacy Options: Lets you choose how Microsoft Office Online communicates with your computer. You can set options to use Microsoft Office Online for help, show featured links at startup, download files to determine system problems, and sign up for the Customer Experience Improvement Program.
Multi-Action Macros
The true power of macros comes from performing multiple actions at the click of a button. Creating a macro that runs a series of action queries is better than double-clicking each action query in the Navigation pane—you may forget to run one or you may run them out of proper sequence.
For this next example, Chapter22.accdb contains two delete queries that remove data from two different tables: tblContacts_Backup and tblProducts_Backup. Chapter22.accdb also includes two append queries that copy records from tblContacts and tblProducts to the backup tables.
The mcrBackupContactsAndProducts macro (also found in the Chapter 22.accdb sample database) automates the running of these four queries so that we have the ability to back up the data in the tblContacts table and the tblProducts table.
Table 22.1 shows the macro actions and action arguments for mcrBackupContactsAndProducts (a portion of which is shown in Figure 22.8).
Table 22.1 mcrBackupContactsAndProducts
| Action | Action Argument | Action Argument Setting |
DisplayHourglassPointer |
Hourglass On |
Yes |
SetWarnings |
Warnings On |
No |
Echo |
Echo On |
No |
Status Bar Text |
Step 1: Deleting Data |
|
OpenQuery |
Query Name |
qryDeleteContactsBackup |
View |
Datasheet |
|
Data Mode |
Edit |
|
OpenQuery |
Query Name |
qryDeleteProductsBackup |
View |
Datasheet |
|
Data Mode |
Edit |
|
Echo |
Echo On |
No |
Status Bar Text |
Step 2: Appending Data |
|
OpenQuery |
Query Name |
qryAppendContactsBackup |
View |
Datasheet |
|
Data Mode |
Edit |
|
OpenQuery |
Query Name |
qryAppendProductsBackup |
View |
Datasheet |
|
Data Mode |
Edit |
|
Echo |
Echo On |
Yes |
Status Bar Text |
<Leave Blank> |
|
SetWarnings |
Warnings On |
Yes |
DisplayHourglassPointer |
Hourglass On |
No |
MessageBox |
Message |
Contacts and Products have been archived. |
Beep |
Yes |
|
Type |
Information |
|
Title |
Finished Archiving |
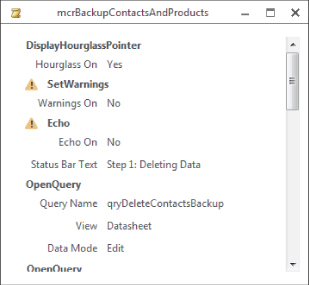
Figure 22.8 mcrBackupContactsAndProducts archives data from the live tables into the backup tables.
The heart of the macro is the four OpenQuery actions that run the four action queries. qryDeleteContactsBackup and qryDeleteProductsBackup clear the contents of tblContacts_Backup and tblProducts_Backup so that the current data can be copied into them. qryAppendContactsBackup and qryAppendProductsBackup append data from tblContacts and tblProducts into the backup tables.
As you look at Figure 22.8, you will note the warning icons next to a few of the actions in the macro (specifically SetWarnings and Echo). These icons simply indicate that the associated actions are potentially unsafe and may require a closer look.
Here's a closer look at the actions this macro performs:
DisplayHourglassPointer: This action changes the cursor to an hourglass or a pointer using theHourglass Onargument. For macros that may take a while to run, set this argument toYesat the beginning of the macro and toNoat the end of the macro. Be sure not to forget to setHourglassoff at the conclusion of the macro; otherwise, the hourglass cursor stays on indefinitely.SetWarnings: This action turns the system messages on or off using theWarnings Onargument. When running action queries, you'll be prompted to make sure you want to run the action query, asked whether it's okay to delete these 58 records, and then asked again for the next action query. SetWarnings Onto No at the beginning of the macro to turn these messages off. SettingWarnings Onto No has the effect of automatically clicking the default button of the warning (usually OK or Yes). Don't forget to set warnings back to Yes at the end of the macro. Once warnings are turned off, the user won't get confirmation messages from Access on important actions like record deletions until warnings are re-enabled.Echo: In effect, the Echo command “freezes” the screen so that the user isn't aware of activities performed by the macro. Set theEcho Onargument to No if you want to hide the results of the macro or Yes if you want to show the results. Set theStatus Bar Textargument to give the user an indication of what's happening. This is useful in longer-running macros to know where in the process the macro is. Be sure to restore the Echo On status to Yes at the end of the macro so that Access resumes its normal appearance. If Echo On is not set back to Yes, the user may think the application has “locked up” because of a problem.OpenQuery: This action is the heart of the mcrBackupContactsAndProducts macro.OpenQueryopens a select or crosstab query or runs an action query. TheQuery Nameargument contains the name of the query to open or run. TheViewargument lets you pick the view—Datasheet, Design, Print Preview, and so forth—for a select or crosstab query. TheData Modeargument lets you choose from Add, Edit, or Read Only to limit what users can do in a select query. TheViewandData Modearguments are ignored for action queries.
Submacros
When automating your application with macros, you might easily get carried away filling the Navigation pane with a bunch of little macros for opening every form and every report. If you have a series of actions that are performed in a number of places, ideally you only want one copy, so that you need to make changes only in one place. Submacros give you that capability: You define the series of actions in one place as a submacro, and then invoke that submacro wherever it's needed. Only the submacro object appears in the Navigation pane, rather than multiple smaller macros.
The macro action drop-down list contains Submacro as an entry. While working on a macro, selecting Submacro from the action list adds an area to the macro where you can input the actions associated with the submacro.
Without using submacros, you'd have to create three separate macros to automate a main menu form with three buttons that open frmContacts, frmProducts, and frmSales. Using submacros, just create a single top-level macro that contains three submacros. Each of the submacros opens one form. Only the top-level macro appears in the Navigation pane. Table 22.2 shows the submacro names, the actions, and submacro actions for mcrMainMenu.
Table 22.2 mcrMainMenu
| Submacro | Action | Action Argument | Action Argument Setting |
OpenContacts |
OpenForm |
Form Name |
frmContacts |
View |
Form |
||
Filter Name |
<Leave Blank> |
||
Where Condition |
<Leave Blank> |
||
Data Mode |
<Leave Blank> |
||
Window Mode |
Normal |
||
OpenProducts |
OpenForm |
Form Name |
frmProducts |
View |
Form |
||
Filter Name |
<Leave Blank> |
||
Where Condition |
[ProductID]=3 |
||
Data Mode |
Read Only |
||
Window Mode |
Dialog |
||
OpenSales |
OpenForm |
Form Name |
frmSales |
View |
Layout |
||
Filter Name |
qrySales2008 |
||
Where Condition |
<Leave Blank> |
||
Data Mode |
Edit |
||
Window Mode |
Icon |
Figure 22.9 shows the creation of mcrMainMenu in progress. The developer has selected Submacro from the Add New Action list, provided a name (OpenContacts) for the submacro, and filled in its properties.
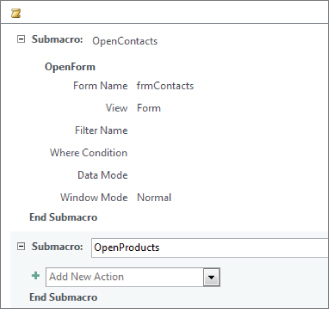
Figure 22.9 Adding a second submacro to a macro.
Next, the developer selected Submacro a second time from the Add New Action list, and provided OpenProduct as its name. None of the arguments for the second submacro has been filled in.
The confusing thing about submacros is that you see two Add New Action lists in Figure 22.9. One is at the very bottom of the main macro, while the second is inside the second submacro. The submacro that is currently being developed (OpenProducts) is enclosed in a lightly shaded box, while the completed submacro (OpenContacts) at the top of the main macro is not contained in a box.
To implement a macro using submacros, create a form (frmMainMenu) with three buttons—in this case, cmdContacts, cmdProducts, and cmdSales. Then set the On Click event properties of these buttons as follows (see Figure 22.10):
| Button Name | On Click Event Property |
| cmdContacts | mcrMainMenu.OpenContacts |
| cmdProducts | mcrMainMenu.OpenProducts |
| cmdSales | mcrMainMenu.OpenSales |

Figure 22.10 The submacro names appear after the macro object in the event property drop-down list.
Open frmMainMenu in Form view and click the Contacts button; frmContacts opens and displays all the records. Click the Products button to display frmProducts, which only displays one record. Click the Sales button to display frmSales in a minimized state, which displays the sales made in 2012.
To see why these forms open differently, take a look at the action arguments for the OpenForm action:
Form Name: This argument is the name of the form you want the macro to open.View: This argument lets you select which view to open the form in: Form, Design, Print Preview, Datasheet, PivotTable, PivotChart, or Layout. For this example, frmContacts and frmProducts open in Form view, while frmSales opens in Layout view.Filter Name: This argument lets you select a query or a filter saved as a query to restrict and/or sort the records for the form. For this example, this argument is set to qrySales2012 for theOpenSalesmacro. qrySales2012 is a query that outputs all the fields in the table and only displays sales between 1/1/2012 and 12/31/2012. This query also sorts the records bySaleDate.Where Condition: This argument lets you enter a SQLWhereclause or expression that selects records for the form from its underlying table or query. For this example, this argument is set to[ProductID]=3for theOpenProductssubmacro, which only shows one record when you open frmProducts.Data Mode: This argument lets you choose the data-entry mode for the form. Select Add to only allow users to add new records, Edit to allow adding and editing of records, or Read Only to allow only viewing of records. This setting only applies to forms opened in Form view or Datasheet view, and overrides settings of the form's AllowEdits, AllowDeletions, AllowAdditions, and DataEntry properties. To use the form's setting for these properties, leave this argument blank. For this example, frmProducts opens in read-only mode, while frmContacts and frmSales allow editing.Window Mode: This argument lets you choose the window mode for the form. Select Normal to use the form's properties. Select Hidden to open the form with its Visible property set to No. Select Icon to open the form minimized. Select Dialog to open the form with its Modal and PopUp properties set to Yes and Border Style property set to Dialog. For this example, frmContacts opens normally, frmProducts opens as a dialog box, and frmSales opens minimized.
If you're careful in planning your macros, you can create one top-level macro object for each form or report and use submacros for each action you want to perform in the form or report. Submacros let you limit the number of macros that appear in the Navigation pane and make managing numerous macros much easier.
Conditions
Submacros let you put multiple groups of actions in a single macro object, but a condition specifies certain criteria that must be met before the macro performs the action. The If macro action also takes a Boolean expression. If the expression evaluates to False, No, or 0, the action will not execute. If the expression evaluates to any other value, the action is performed.
Opening reports using conditions
To demonstrate conditions and the If macro action, frmReportMenu (shown in Figure 22.11), contains three buttons and a frame control (fraView) with two option buttons: Print and Print Preview. Clicking Print sets the frame's value to 1; clicking Print Preview sets the frame's value to 2.
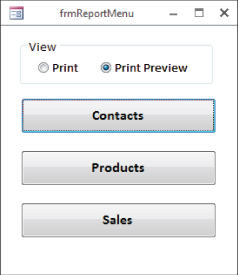
Figure 22.11 frmReportMenu uses a frame to select the view in which to open the Contacts, Products, and Sales reports.
The macro that opens the reports uses submacros, as well as the If macro action. Table 22.3 shows the submacro names, conditions, actions, and action arguments for mcrReportMenu (a portion of which is shown in Figure 22.12), which opens one of three reports. The Filter Name and Where Condition arguments are blank for each OpenReport action.
Table 22.3 mcrReportMenu
| Submacro Name | If Macro Action Condition | Action | Action Argument | Action Argument Setting |
OpenContacts |
[Forms]![frmReportMenu]![fraView]=1 |
OpenReport |
Report Name |
rptContacts_Landscape |
View |
Print |
|||
Window Mode |
Normal |
|||
[Forms]![frmReportMenu]![fraView]=2 |
OpenReport |
Report Name |
rptContacts_Landscape |
|
View |
Print Preview |
|||
Window Mode |
Normal |
|||
OpenProducts |
[Forms]![frmReportMenu]![fraView]=1 |
OpenReport |
Report Name |
rptProducts |
View |
Print |
|||
Window Mode |
Normal |
|||
[Forms]![frmReportMenu]![fraView]=2 |
OpenReport |
Report Name |
rptProducts |
|
View |
Print Preview |
|||
Window Mode |
Normal |
|||
OpenSales |
[Forms]![frmReportMenu]![fraView]=1 |
OpenReport |
Report Name |
rptSales_Portrait |
View |
Print |
|||
Window Mode |
Normal |
|||
[Forms]![frmReportMenu]![fraView]=2 |
OpenReport |
Report Name |
rptSales_Portrait |
|
View |
Print Preview |
|||
Window Mode |
Normal |

Figure 22.12 mcrReportMenu uses an If action to open reports in Print or Print Preview view.
To implement this macro, set the On Click event properties of the buttons (cmdContacts, cmdProducts, and cmdSales) on frmReportMenu as follows:
| Button Name | On Click Event Property |
| cmdContacts | mcrReportMenu.OpenContacts |
| cmdProducts | mcrReportMenu.OpenProducts |
| cmdSales | mcrReportMenu.OpenSales |
The If macro action in mcrReportMenu has two expressions that look at fraView on frmReportMenu to determine whether Print or Print Preview is selected:
[Forms]![frmReportMenu]![fraView]=1: Print view selected[Forms]![frmReportMenu]![fraView]=2: Print Preview view selected
If Print is selected on frmReportMenu, the OpenReport action with the View arguments set to Print executes. If Print Preview is selected on frmReportMenu, the OpenReport action with the View arguments set to Print Preview executes. This structure is set up for each submacro in mcrReportMenu.
Multiple actions in conditions
If you want to run multiple actions based on a condition, add multiple actions within the If and End If actions. Figure 22.13 illustrates this concept.
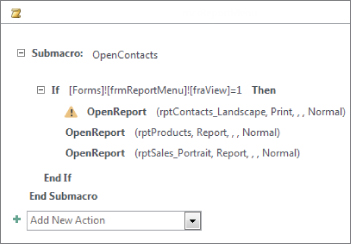
Figure 22.13 Multiple actions within If and End If actions execute as a group.
The If macro action lets you selectively run actions based on other values in your application. Use the If macro action to reference controls on forms or reports and other objects and determine which actions to execute.
Temporary Variables
In previous versions of Access, you could use variables only in VBA code. Macros were limited to performing a series of actions without carrying anything forward from a previous action. Beginning with Access 2007, three new macro actions—SetTempVar, RemoveTempVar, and RemoveAllTempVars—let you create and use temporary variables in your macros. You can use these variables in conditional expressions to control which actions execute, or to pass data to and from forms or reports. You can even access these variables in VBA to communicate data to and from modules.
Enhancing a macro you've already created
A simple way to demonstrate how to use variables in macros is to enhance the Hello World! example created earlier in this chapter (see “Creating a macro”). Table 22.4 shows the macro actions and action arguments for mcrHelloWorldEnhanced (shown in Figure 22.14).
Table 22.4 mcrHelloWorldEnhanced
| Action | Action Argument | Action Argument Setting |
SetTempVar |
Name |
MyName |
Expression |
InputBox("Enter your name.") |
|
MessageBox |
Message |
="Hello " & [TempVars]![MyName] & "." |
Beep |
Yes |
|
Type |
Information |
|
Title |
Using Variables |
|
RemoveTempVar |
Name |
MyName |
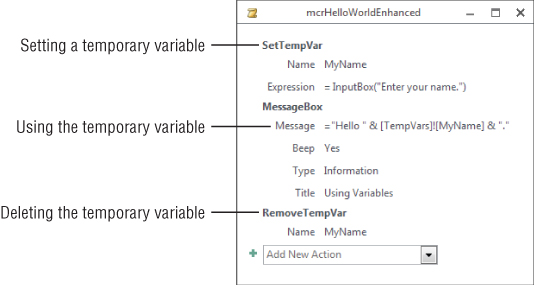
Figure 22.14 mcrHelloWorldEnhanced uses the SetTempVar action to get a value from the user and display it in a message box.
The SetTempVar action has two arguments: Name and Expression. The Name argument (MyName in this example) is simply the name of the temporary variable. The Expression argument is what you want the value of the variable to be. In this example, the InputBox() function prompts the user for his name.
The MessageBox action's Message argument contains the following expression:
="Hello " & [TempVars]![MyName] & "."This expression concatenates the word Hello with the temporary variable MyName, created in the SetTempVar action of the macro. When referring to a temporary variable created with the SetTempVar action, use the following syntax:
[TempVars]![VariableName]The RemoveTempVar action removes a single temporary variable from memory—in this example, MyName. You can have only 255 temporary variables defined at one time. These variables stay in memory until you close the database, unless you remove them with RemoveTempVar or RemoveAllTempVars. It's a good practice to remove temporary variables when you're done using them.
Temporary variables are global. Once you create a temporary variable, you can use it in VBA procedures, queries, macros, or object properties. For example, if you remove the RemoveTempVar action from mcrHelloWorldEnhanced, you can create a text box on a form and set its Control Source property as follows to display the name the user entered:
=[TempVars]![MyName]Using temporary variables to simplify macros
Using temporary variables, you can sometimes eliminate steps from a macro. You can get the form or report name from another control on a form. With a temporary variable, you eliminate the need for creating a structure of multiple OpenForm or OpenReport actions. You can also use more than one variable in a macro.
For this example, use frmReportMenuEnhanced (shown in Figure 22.15), which contains the same fraView shown in Figure 22.12, but adds a combo box (cboReport), which contains a list of reports to run. The Run Command button executes mcrReportMenuEnhanced, which doesn't use submacros to decide which report to open.
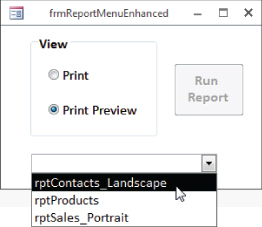
Figure 22.15 frmReportMenuEnhanced uses a combo box to select which report to open.
Table 22.5 shows the conditions, actions, and action arguments for mcrReportMenuEnhanced (shown in Figure 22.16), which opens one of three reports.
Table 22.5 mcrReportMenuEnhanced
| Condition | Action | Action Argument | Action Argument Setting |
SetTempVar |
Name |
ReportName |
|
Expression |
[Forms]![frmReportMenuEnhanced]![cboReport] |
||
SetTempVar |
Name |
ReportView |
|
Expression |
[Forms]![frmReportMenuEnhanced]![fraView] |
||
[TempVars]! [ReportView]=1 |
OpenReport |
Report Name |
=[TempVars]![ReportName] |
View |
Print |
||
Window Mode |
Normal |
||
[TempVars]! [ReportView]=2 |
OpenReport |
Report Name |
=[TempVars]![ReportName] |
View |
Print Preview |
||
Window Mode |
Normal |
||
RemoveTempVar |
Name |
ReportName |
|
RemoveTempVar |
Name |
ReportView |

Figure 22.16 mcrReportMenuEnhanced uses temporary variables to open the report in Print or Print Preview view.
The first two SetTempVar actions in mcrReportMenuEnhanced set the values of the temporary variables—ReportName and ReportView—from cboReport and fraView on frmReportMenuEnhanced. The OpenReport actions use the temporary variables in the Condition column and for the ReportName argument. When using temporary variables as a setting for an argument, you must use an equal (=) sign in front of the expression:
=[TempVars]![ReportName]There are still two OpenReport actions in this macro. Certain arguments—such as View—don't allow the use of temporary variables in expressions. Because one of your variables is a setting for the report's view, you still have to use the Condition column to decide which view to open the report in.
The last two RemoveTempVar lines remove the temporary variables—ReportName and ReportView—from memory. Because these variables probably won't be used later on in the application, it's important to remove them.
Using temporary variables in macros gives you far more flexibility in Access 2016 than in versions prior to Access 2007. You can use these variables to store values to use later on in the macro, or anywhere in the application. Just remember that you have only 255 temporary variables to use, so don't forget to clean up after yourself by removing them from memory once you're finished using them.
Using temporary variables in VBA
You may start out using macros to automate your application, but over time, you may begin using VBA code to automate and add functionality to other areas. What do you do with the temporary variables you've already implemented with macros? Well, you don't have to abandon them; instead, you can use them directly in your VBA code.
To access a temporary variable in VBA, use the same syntax used in macros:
X = [TempVars]![VariableName]If you don't use spaces in your variable names, you can omit the brackets:
X = TempVars!VariableNameUse the previous syntax to assign a new value to an existing temporary variable. The only difference is to put the temporary variable on the left side of the equation:
TempVars!VariableName = NewValueUse the TempVars object to create and remove temporary variables in VBA. The TempVars object contains three methods: Add, Remove, and RemoveAll. To create a new temporary variable and set its value, use the Add method of the TempVars object as follows:
TempVars.Add "VariableName", ValueUse the Remove method of the TempVars object to remove a single temporary variable from memory:
TempVars.Remove "VariableName"To remove all the temporary variables from memory, use the RemoveAll method of the TempVars object as follows:
TempVars.RemoveAllAny VBA variables you create are available to use in your macros, and vice versa. Any variables you remove in VBA are no longer available to use in your macros, and vice versa. Using temporary variables, your macros and VBA code no longer have to be independent from each other.
Error Handling and Macro Debugging
Prior to Access 2007, if an error occurred in a macro, the macro stopped execution, and your user saw an ugly dialog box (shown in Figure 22.17) that didn't really explain what was going on. If he was unfamiliar with Access, he quickly became disgruntled using the application. The lack of error handing in macros is one main reason many developers use VBA instead of macros to automate their applications.
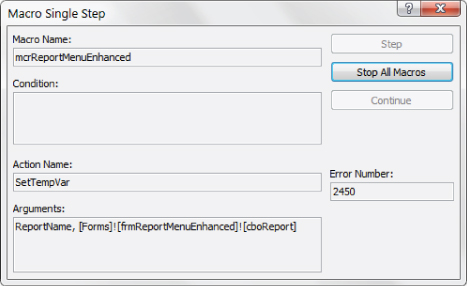
Figure 22.17 Errors in macros cause the macro to cease operation.
A common error that's easy to demonstrate is the divide-by-zero error. For the next example, mcrDivision (shown in Figure 22.18) contains two temporary variables—MyNum and MyDenom—set with the InputBox() function asking for a numerator and denominator. The MessageBox action shows the result—[TempVars]![MyNum]/[TempVars]![MyDenom]—in a message box, and the RemoveTempVar actions remove the variables from memory.

Figure 22.18 mcrDivision divides the numerator by the denominator and generates an error when the denominator is zero.
Run the macro and enter 1 for the numerator and 2 for the denominator; the macro runs and displays a message box saying 1 divided by 2 is 0.5. Run the macro again and enter 0 in the denominator; a divide-by-zero error occurs and the macro stops running. Without error handling, the two RemoveTempVar actions won't run and won't remove the temporary variables from memory.
If an error occurs in another macro—such as a string of action queries—any queries after an error occurs won't run. Adding error handling to your macros allows you to choose what to do when an error occurs while a macro's running.
The OnError action
The OnError action lets you decide what happens when an error occurs in your macro. This action has two arguments: Go to and Macro Name. The Go to argument has three settings and the Macro Name argument is used only with one of these settings, described as follows:
- Next: This setting records the details of the error in the
MacroErrorobject but does not stop the macro. The macro continues with the next action. - Macro Name: This setting stops the current macro and runs the macro in the
Macro Nameargument of theOnErroraction. - Fail: This setting stops the current macro and displays an error message. This is the same as not having error handling in the macro.
The VBA equivalents of these settings are as follows:
On Error Resume Next       'Next
On Error GoTo LABELNAME    'Macro Name
On Error GoTo 0          'Fail
The simplest way to add error handling to a macro is to make OnError the first action and set the Go to argument to Next. This will cause your macro to run without stopping, but you won't have any clue which actions ran and which ones didn't.
Instead, create an error-handling structure. Table 22.6 shows the macro names, actions, and action arguments for mcrDivisionErrorHandling (shown in Figure 22.19).
Table 22.6 mcrDivisionErrorHandling
| Submacro Name | Action | Action Argument | Action Argument Setting |
OnError |
Go to |
Macro Name |
|
Macro Name |
ErrorHandler |
||
SetTempVar |
Name |
MyNum |
|
Expression |
InputBox("Enter Numerator.") |
||
SetTempVar |
Name |
MyDenom |
|
Expression |
InputBox("Enter Denominator.") |
||
MessageBox |
Message |
=[TempVars]![MyNum] & " divided by " & [TempVars]![MyDenom] & " is " & [TempVars]![MyNum]/[TempVars]![MyDenom] |
|
Beep |
Yes |
||
Type |
Information |
||
Title |
Division Example |
||
RunMacro |
Macro Name |
mcrDivisionErrorHandling.Cleanup |
|
ErrorHandler |
MessageBox |
Message |
="The following error occurred: " & [MacroError].[Description] |
Beep |
Yes |
||
Type |
Warning? |
||
Title |
="Error Number: " & [MacroError].[Number] |
||
ClearMacroError |
|||
RunMacro |
Macro Name |
mcrDivisionErrorHandling.Cleanup |
|
Cleanup |
RemoveTempVar |
Name |
MyNum |
RemoveTempVar |
Name |
MyDenom |

Figure 22.19 mcrDivisionErrorHandling uses the OnError action to display a user-friendly error message and remove the temporary variables.
The first OnError action in the macro lets Access know to move to the submacro ErrorHandler when an error occurs. If an error occurs (by entering 0 as the denominator), the macro stops and moves to the ErrorHandler submacro. The ErrorHandler submacro displays a message box—using the MacroError object (described in the next section) to display the error's description in the Message and the error's number in the Title, using the following expressions:
[MacroError].[Description]
[MacroError].[Number]
After the error handler's message box, the ClearMacroError action clears the MacroError object. The RunMacro action moves execution to the macro's Cleanup submacro. The Cleanup section of the macro removes the temporary variables.
The RunMacro action also appears after the MessageBox action in the main section of the macro. Because you're using submacros, the macro stops after it reaches the ErrorHandler submacro. In order to force the cleanup of the temporary variables, use the RunMacro action to run the Cleanup submacro. Otherwise, you'd have to put the RemoveTempVar actions in the main section and in the ErrorHandler section of the macro.
The MacroError object
The MacroError object contains information about the last macro error that occurred. It retains this information until a new error occurs or you clear it with the ClearMacroError action. This object contains a number of read-only properties you can access from the macro itself or from VBA. These properties are as follows:
ActionName: This is the name of the macro action that was running when the error occurred.Arguments: The arguments for the macro action that was running when the error occurred.Condition: This property contains the condition for the macro action that was running when the error occurred.Description: The text representing the current error message—for example, Divide by Zero or Type Mismatch.MacroName: Contains the name of the macro that was running when the error occurred.Number: This property contains the current error number—for example, 11 or 13.
Use the MacroError object as a debugging tool or to display messages to the user, who can then relay that information to you. You can even write these properties to a table to track the errors that occur in your macros. Use this object within an If action to customize what actions execute based on the error that occurs. When used in combination with the OnError action, it gives you additional functionality by handling errors, displaying useful messages, and providing information to you and the user.
Debugging macros
Trying to figure out what's going on in a macro can be difficult. The OnError action and MacroError object make debugging Access macros easier than in previous versions. There are other tools and techniques that are useful when debugging macros. Use the following list as a guideline for troubleshooting macros.
- Single Step: Click the Single Step button in the Tools group on the Macro Tools Design tab of the Ribbon to turn on Single Step mode. The Macro Single Step dialog box (shown in Figure 22.20) lets you see the macro name, condition, action name, arguments, and error number of a macro action before the action executes. From this dialog box, click Step to execute the action, Stop All Macros to stop the macro from running, or Continue to finish the macro with Single Step mode turned off.

Figure 22.20 Use the Macro Single Step dialog box to step through a macro.
MessageBox: Use theMessageBoxmacro action to display values of variables, error messages, control settings, or whatever else you want to see while the macro is running. To see the value of a combo box on a form, set theMessageargument as follows:[Forms]![frmReportMenuEnhanced]![cboReport]StopMacro: Use theStopMacroaction to stop the macro from executing. Insert this action at any point in the macro to stop it at that point. Use this in conjunction with the debug window to check values.- Debug window: Use the debug window to look at any values, temporary variables, or properties of the
MacroErrorobject after you stop the macro. Press Ctrl+G to display the code window after you stop the macro. Just type a question mark (?) and the name of the variable or expression you want to check the value of, and press Enter. Here are some examples of expressions to display in the Debug window:? TempVars!MyNum ? MacroError!Description ? [Forms]![frmReportMenuEnhanced]![cboReport]
These techniques are similar to ones you'd use when debugging VBA code. You can step through sections of code, pause the code and look at values in the debug window, and display message boxes to display variables or errors that occur. Granted, you don't have all the tools available—such as watching variables and Debug.Print—but at least you have the new MacroError object to provide the information you need to figure out what's going wrong.
Embedded Macros
An embedded macro is stored in an event property and is part of the object to which it belongs. When you modify an embedded macro, you don't have to worry about other controls that might use the macro because each embedded macro is independent. Embedded macros aren't visible in the Navigation pane and are only accessible from the object's Property Sheet.
As an example, let's say you want to add a command button to a form that opens a report. You could use a global macro (one that's in the Navigation pane) to open the report, or you could add an embedded macro to the command button.
Embedded macros are trusted. They run even if your security settings prevent the running of code. Using embedded macros allows you to distribute your application as a trusted application because embedded macros are automatically prevented from performing unsafe operations.
One big change since Access 2003 is that when you use a wizard to create a button, it no longer creates an event procedure—it creates an embedded macro. So, if you're used to running a wizard and using the wizard's VBA code for another purpose, you'll have to abandon that technique. Using embedded macros instead of code accomplishes two things:
- It allows you to quickly create a distributable application.
- It allows users not familiar with VBA code to customize buttons created with wizards.
Follow these steps to create an embedded macro that opens frmContacts:
- Select the Create tab on the Ribbon, and then click the Form Design button in the Forms group.
- On the Form Design Tools Design tab of the Ribbon, deselect the Use Control Wizards option in the Controls group. For this example, you don't want to use a wizard to decide what this button does.
- Click the Button control and draw a new button on the form.
- Set the button's Name property to cmdContacts and the Caption property to Contacts.
- Display the Property Sheet for cmdContacts, select the Event tab, and then click the
OnClick - Click the builder button — the button with the ellipsis (…). The Choose Builder dialog box (shown in Figure 22.21) appears.
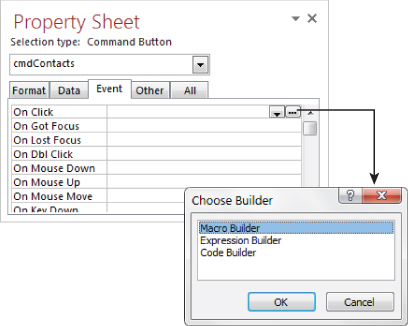
Figure 22.21 Use the builder button in the event property to display the Choose Builder dialog box to create an embedded macro.
- Choose Macro Builder and click OK to display the macro window (shown in Figure 22.22).

Figure 22.22 An embedded macro doesn't have a name. The title bar displays the control and the event in which the macro is embedded.
- Add the
OpenFormForm Nameargument to frmContacts. - Close the embedded macro, and click OK when you're prompted to save the changes and update the property. The
On Clickevent property of cmdContacts now displays[Embedded Macro].
Using an embedded macro has some advantages over using an event procedure containing VBA code. If you copy the button and paste it on another form, the embedded macro goes with it. You don't have to copy the code and paste it as a separate operation. Similarly, if you cut and paste the button on the same form (for example, moving it onto a tab control), you don't have to reattach the code to the button.
Embedded macros offer another improvement to macros in previous versions. If you automate your application with embedded macros and import a form or report into another database (or just copy the control within the same database), you don't have to worry about importing or copying the associated macros. By using embedded macros, all the automation moves with the form or report. This makes maintaining and building applications easier.
Macros versus VBA Statements
In Access, macros often offer an ideal way to take care of many details, such as running reports and forms. You can develop applications and assign actions faster using a macro because the arguments for the macro actions are displayed with the macro (in the bottom portion of the macro window). You don't have to remember complex or difficult syntax.
Several actions you can accomplish with VBA statements are better suited for macros. The following actions tend to be more efficient when they're run from macros:
- Using macros against an entire set of records with action queries—for example, to manipulate multiple records in a table or across tables (such as updating field values or deleting records)
- Opening and closing forms
- Running reports
Choosing between macros and VBA
Although macros sometimes prove to be the solution of choice, VBA is the tool of choice at other times. You'll probably want to use VBA rather than macros when you want to:
- Create and use your own functions. In addition to using the built-in functions in Access, you can create and work with your own functions by using VBA code.
- Use automation to communicate with other Windows applications or to run system-level actions. You can write code to see whether a file exists before you take some action, or you can communicate with another Windows application (such as a spreadsheet), passing data back and forth.
- Use existing functions in external Windows Dynamic Link Libraries (DLLs). Macros don't enable you to call functions in other Windows DLLs.
- Work with records one at a time. If you need to step through records or move values from a record to variables for manipulation, code is the answer.
- Create or manipulate objects. In most cases, you'll find that creating and modifying an object is easiest in that object's Design view. In some situations, however, you may want to manipulate the definition of an object in code. With a few VBA statements, you can manipulate virtually any and all objects in a database, including the database itself.
- Display a progress meter on the status bar. If you need to display a progress meter to communicate progress to the user, VBA code is the answer.
Converting existing macros to VBA
After you become comfortable with writing VBA code, you may want to rewrite some of your application macros as VBA procedures. As you begin this process, you quickly realize how mentally challenging the effort can be as you review every macro in your various macro libraries. You can't merely cut the macro from the macro window and paste it into a module window. For each condition, action, and action argument for a macro, you must analyze the task it accomplishes and then write the equivalent statements of VBA code in your procedure.
Fortunately, Access provides a feature that converts macros to VBA code automatically. On the Tools group of the Design tab of the Ribbon, there is a Convert Macro to Visual Basic button. This option enables you to convert a macro to a module in seconds.
To try the conversion process, convert the mcrHelloWorldEnhanced macro used earlier in this chapter. Follow these steps to run the conversion process:
- Click the Macros group in the Navigation pane.
- Open mcrHelloWorldEnhanced in Design view.
- Click the Convert Macros to Visual Basic button on the Design tab. The Convert Macro dialog box (shown in Figure 22.23) appears.

Figure 22.23 The Convert Macro dialog box.
- Select the options that include error handling and macro comments, and click Convert. When the conversion process completes, the Visual Basic Editor (VBE) is displayed and the
Conversion Finished!message box appears. - Click OK to dismiss the message box.
- In the VBE, open the Project Explorer from the View menu (Ctrl+R) and double-click the module named Converted Macro-mcrHelloWorldEnhanced. The code and Project Explorer are shown in Figure 22.24.
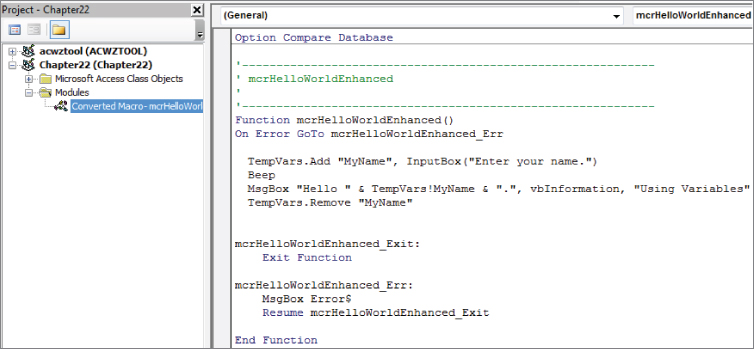
Figure 22.24 The newly converted module.
When you open the VBE for the new module, you can view the procedure created from the macro. Figure 22.24 shows the mcrHelloWorldEnhanced function that Access created from the mcrHelloWorldEnhanced macro.
At the top of the function, Access inserts four comment lines for the name of the function. The Function statement follows the comment lines. Access names the function, using the macro library's name (mcrHelloWorldEnhanced).
When you specify that you want Access to include error processing for the conversion, Access automatically inserts the On Error statement as the first command in the procedure. The On Error statement tells Access to branch to other statements that display an appropriate message and then exit the function.
The statement beginning with TempVars.Add is the actual code that Access created from the macro. Each line of the macro is converted into a line of VBA code, including the TempVars object, the Beep method, and the MsgBox function.
If you're new to VBA and want to learn code, a good starting point is converting your macros to modules. Just save your macros and modules, and then look at the VBA code to become familiar with the syntax. The macro features in Access 2016 make it harder to decide whether to use macros or VBA.