
Chapter 3
Creating Your Own Apps
In This Chapter
![]() Understanding the types of Facebook core apps
Understanding the types of Facebook core apps
![]() Creating a Facebook app
Creating a Facebook app
![]() Installing a Facebook app
Installing a Facebook app
![]() Authenticating a Facebook app
Authenticating a Facebook app
You can develop apps for all kinds of reasons. Some apps conduct surveys, other apps sell things. Some are marketing tools. Some collect charitable contributions. You’re limited only by your ambition and imagination.
Facebook apps are, in effect, web applications that run inside the Facebook interface, and they can do most things non-Facebook web applications can do. The difference between standard web apps that don’t use Facebook API and Facebook apps that do is that the latter also integrate with Facebook, allowing users to interface with their close friends and family in the app experience. A Facebook app can duplicate just about any piece of functionality you see on Facebook.
When developing Facebook apps, in many instances you’re limited by your programming skills. Before getting deeply into this discussion of creating Facebook apps, realize that highly sophisticated games, marketing, and revenue-generating apps are usually developed by professional programmers. (But that doesn’t mean you can’t do it, too.)
Creating and Deploying a Facebook App
Facebook apps are little programs that run inside the Facebook environment. A simple way to look at it is that Facebook is your operating system, similar to Windows, Mac OS, or iOS. Apps run in the core environment — the Facebook program and the capabilities the folks at Facebook have built into the core.
At Facebook’s core
When developing apps for Facebook, it’s helpful to look at the Facebook platform as a group of core technologies. Depending on what your app does, it will integrate with one or more of these core technologies. The most commonly used core technologies are social plugins and platform dialogs.
Social plugins
Social plugins, discussed in Chapter 4 of this minibook, are some of the common objects you use in your daily interaction with Facebook. They include the Like button, the Send button, the Follow button, and Comments dialog boxes. When developing your Facebook apps, you can take advantage of these common objects and use them in your apps.
Platform dialog boxes
Facebook has lots of dialog boxes for posting to your timeline, posting to your friends’ timelines, sending messages, and so on. Your apps can generate these dialog boxes and accept input from users. Platform dialog boxes are discussed in Chapter 4 of this minibook.
A basic app
Creating and deploying apps on Facebook is a huge, deep subject. To help you appreciate the possibilities and familiarize yourself with the process, we delve into setting up and installing a simple app. While creating apps can get complicated, installing them on your Facebook account isn’t difficult, thanks to the great tools the folks at Facebook provide.
In this chapter, you install a basic little app in Facebook to walk through the process. This app doesn’t exploit any Facebook objects, nor does it use social plugins or platform dialog boxes. You look at using these features in Chapter 4 of this minibook.
Creating and deploying an app on Facebook consists of two procedures, one on a non-Facebook server and the other inside the Facebook interface, as follows:
- Create the app and save it on a web server. This step is the hard part that usually requires web page design and programming skills, depending on the scope of your app. The process entails designing the app and making it available on the Internet, so that Facebook can find it and load it on a canvas page. Designing and developing apps is beyond the scope of this book, but you can find several examples of Facebook apps on the web; another resource is Facebook Application Development For Dummies by Jesse Stay (John Wiley & Sons, Inc.).
- Deploy the app on Facebook. This process entails going to Facebook’s app developments pages, installing the app, and making it available to Facebook users. Facebook has several tools for making this part of the process fairly simple.
In this example, you take a simple mind-reading game app and install it on Facebook.
Before you can install apps on Facebook, however, you must first confirm your Facebook account.
App, app — who has the app?
Before you can install an app on Facebook, you need an app. Remember that an app is a separate file (or files, for more complex apps) located somewhere else on the Internet. The app itself is not installed and saved on Facebook’s servers. A Facebook app is a web app that runs inside the Facebook interface. For this example, we created a simple app; if you’re feeling adventurous, you can use your own app.
 Because Facebook doesn’t allow you to upload your apps to its servers, you need access to a web server. The following procedure to upload and save files on an external, non-Facebook server assumes basic knowledge of FTP and computer file directory structure. If you don’t have this knowledge or access to an external server, Facebook partners with Heroku, an app-hosting service that integrates with the Facebook developers’ pages. Get more info on Heroku at https://developers.facebook.com/blog/post/558/.
The following steps show you how to make an app available on a public web server:
- Using Dreamweaver, a source-code editor, text editor, or whatever you use for creating web pages, create a page consisting of the following code:
<script type=text/javascript>
var iRandom;
function Restart()
{
iRandom = Math.floor(Math.random()*10)+1;
alert('Can You Read My Mind?'),
}
function Go()
{
var read = document.getElementById('myRead').value;
if (read>iRandom)
alert('Go Down!'),
if (read<iRandom)
alert('Go Up!'),
if (read==iRandom)
{
alert('You Read My Mind!'),
Restart();
}
}
</script>
<h2>Can You Read My Mind?</h2>
<hr />
<h2><img src="images/mindread.png" alt="Mind Reader" width="300" height="232" hspace="10" align="left" />Are You Psychic?</h2>
<p>I'm thinking of a number between 1 and 10. To test your mind-reading skills, type a number in the field below and click Go. If you guess wrong, you can try again until you get it right. To start the game over, click the Play Again button.</p>
<p>Good Luck!</p>
<p>I'm thinking of a number between 1 and 10:
<input name='MyRead' type=text id='myRead' size="5">
<input type='button' onClick='Go()' value='go'>
</p>
<p>
<input type='button' onClick='Restart()' value='Play Again'>
</p>
<p><em>If this took more than one guess, you're probably not psychic. Sorry.</em></p>
<hr />
<script type=text/javascript>
Restart();
</script>This is a simple HTML form with one field and two buttons, some accompanying text, an image, and some JavaScript. The user guesses a number between 1 and 10 and types it in the field. When the user clicks the Go button, the script matches the number to a number randomly chosen when the page loaded. If he or she guesses correctly, a dialog box confirms the correct guess. If the wrong answer is chosen, the dialog box tells the user whether the number is higher or lower than the randomly generated one, allowing him or her to guess again.
- Name the file index.html.
- Create a subdirectory named apps in the root (main) directory of your public web server, and then create a subdirectory of apps and name it images.
The root directory is the main directory of the site. On the web, subfolders are typically accessed by tacking the directory name onto the back of the site’s domain name, as follows:
- Upload index.html with an FTP client, such as Dreamweaver or whatever you have, to the apps subdirectory you created in Step 3.
- Upload the image file (for example,mindread.png) to the images folder inside the apps folder.
That’s it! To test the app, navigate in your browser to the URL where you saved the page, for example:
You should get the mind reader app shown in Figure 3-1.
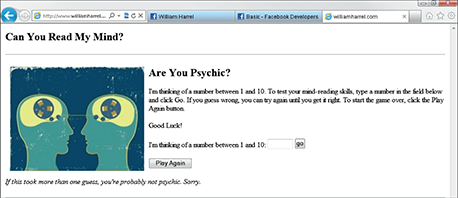
Figure 3-1: Your web app prior to deploying it on Facebook.
Go ahead and try it if you want. If you guess wrong, a dialog box will let you know. Simply enter another number based on the feedback the dialog box provides, telling you to go up or down in the number value. When you get it right, the dialog box tells you that you’re a mind reader.
Installing the Facebook app
Getting the app to work on Facebook is fairly simple, after you know where to start:
- Start your web browser and log in to Facebook.
- In the browser’s address bar, type the following URL: http://developers.facebook.com/.
This takes you to the developers greeting page. From here, you can branch off to pages for building websites, building mobile websites, or building Facebook apps.
- Click the Apps link in the upper-right corner of the menu bar, and then click the Create New App button.
This displays the Create New App dialog box, as shown in Figure 3-2. From here, you can name your new app and give it an app namespace. The app namespace is the directory where Facebook saves data about your app. The namespace needs to be different from other namespace names on Facebook. We named ours mymindread, so you can’t use that name.

Figure 3-2: The Create New App dialog box for starting the app installation process.
- Type a name for your app in the App Name text box.
You can name the app whatever you want; we named ours Mind Reader. You can use that name, too. Facebook saves apps with unique ID numbers that are generated when you save this dialog box.
- Type the App Namespace until you get one that works.
This field requires seven letters. The namespace can’t be the same as any other namespace on Facebook. Also, the namespace can’t have any spaces, uppercase, or nonalphabetic characters. After you type the namespace, a message beside the App Namespace text box displays either a green Available message or a red Failed, depending on whether you type a namespace already in use. Just keep trying until you get an Available message. (Or you can change it later in the process.) The category is optional.
- Click Continue.
You see a security CAPTCHA.
- Type the security code and then click Continue.
The Basic Settings page appears. The following describes each option on the page. You can leave most of these options as is, unless you want to customize your app further:
- Display Name: The name of your app.
- Namespace: The app’s namespace.
- Contact Email: The e-mail address for the app to send data to.
- App Domain: The domain name on the server where you saved your app earlier — just the domain name — such as yourdomain.com.
- Sandbox Mode: Determines whether only app developers (selected) or everyone (deselected) can use the app.
- Select Add Platform.
You are selecting the platform with which your app will be integrated. A dialog box appears.
- Choose App on Facebook as the type of app you want to create.
- Scroll to the lower half of the page, and fill out the necessary fields.
This is where you set up your app’s integration with your external app located on the other server, as shown in Figure 3-3:
- Site URL: This is the base domain and path from which all calls to your web server will load. Including this URL ensures that Facebook always knows that your servers are making the call. Type the entire URL path of the app you just created on your web server here, including the page name.
- Canvas URL: The nonsecure location of the external app. This is the full URL that will be loaded when your canvas app on Facebook.com loads.
- Secure Canvas URL: The secure location of the Canvas URL (it should begin with https://). You'll probably want to include SSL on your web server so that you can load your app securely inside Facebook. Facebook runs in SSL mode by default, and you'll get errors if you try to load a nonsecure app.
- Canvas Page: The Facebook URL for your app. Facebook generates it according to the data you entered in previous fields. This is how users get to your app.
- Mobile Web URL: If you developed a separate version of the app for mobile devices, put that URL here, or use the same Site URL, if the app will run on mobile devices as is.
 Note that Facebook filled in the Canvas Page URL text box, based on the information you typed in the other text boxes. This is the URL to the app itself in Facebook. You could place that URL in the address bar of your browser while logged in to Facebook and go straight to your new app, as could anyone else logged in to Facebook. Posting the canvas page URL on your timeline, in messages, and on other web pages is one way to provide access to users.
 - Click the Save Changes button at the bottom of the page.
Facebook checks the data you entered as it saves the app info. If any entries are not in the correct format, you’re prompted to change them.

Figure 3-3: Use these fields to associate your external content with the Facebook core.
That’s it! Although many apps require additional setup, the simple Mind Reader app does not. It doesn’t require any permissions or other settings.
You can make your app available to users in many ways. In addition to the method described in Step 8, you can also create a link on your business page, as described in the “Adding your app to a business page tab” sidebar in this chapter. For a description of the differences between tabs and canvas pages, see Chapter 2 of this minibook.
After Facebook has successfully saved the data, the app ID is displayed at the top of the page. The app ID is critical to several aspects of promoting your app. For an example, see the “Adding your app to a business page tab” sidebar. The app ID can be used also in your app scripts, inside the app itself.
Authenticating Your App
The Auth dialog box, shown in Figure 3-4, allows the user to install your app on the user’s Facebook home page and authenticate the app. Authenticating an app grants it the permissions it needs to run properly. Permissions define which objects of a Facebook account the app needs. For example, if your app needs to post the user’s timeline, the Auth dialog box requests this permission from the user.
The App Details
The App Details form is available by clicking App Details in the left sidebar of your app setup. Shown in Figure 3-5, the App Details section allows you to define which permissions the app needs to request from the users when they click the app from Facebook’s App Center. (App Center is a directory of apps available when users click Apps in the left sidebar of the news feed). The App Details section enables you to configure exactly how your app will appear and work in App Center.
Here is a description of the options in this form and how they affect your app's appearance in App Center:
- Primary Language: Leave this option set at the default for now. This option determines basic defaults for the language that the user sees when they use Facebook features of your app.
- Display Name: Type the name of your app here. The name will appear across the top of the Auth dialog box.
- Tagline: Type a short tagline, up to 40 characters. The tagline will appear below your app’s name.
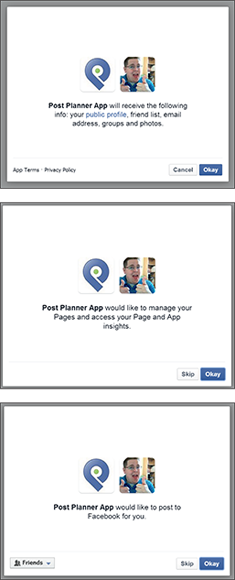
Figure 3-4: Auth dialog box for installing an app (top), what functions the app will be performing (middle), and who will see posts from the app (bottom).
- Description: Enter a description of your app — what it does, why, and so on. You are limited to 130 characters.
- Detailed Description: Enter a detailed description of your app, up to 1000 characters. This description will help users decide whether or not to install your app.
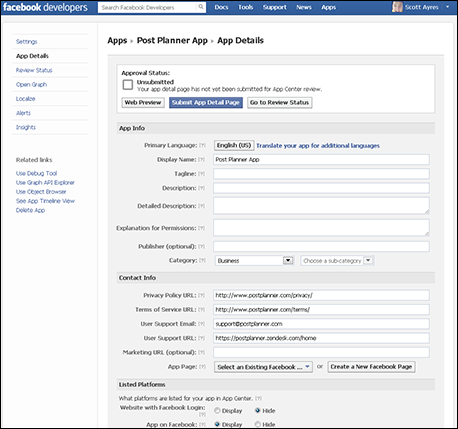
Figure 3-5: Configure how your app will appear in App Center.
- Explanation for Permissions: Type the description of the types of permissions your app needs to get from the user’s Facebook account. This description helps the user decide whether to authenticate the app.
- Publisher: This field is optional. You can add the name of the person or company publishing the app.
- Category: Choose the category and subcategory that best describe your app. This information helps users find your app.
- Privacy Policy URL: Create a link in the Auth dialog box that takes the user to a page on your web server describing your privacy policy. Because your app accesses personal information on Facebook, you can use this option to assure users that their data is safe with you.
- Terms of Service URL: Create a link in your Auth dialog box that takes the user to a page on your web server describing the rules or terms of service for your app.
- User Support Email: Add an e-mail address. When users report or contact your app, their request will be sent to this address.
- User Support URL: Add the URL to your support help desk or FAQ page. When users submit a report or contact the app, their request will be sent to this URL.
- Marketing URL: This field is optional. Add a URL to your promotional website. This link will be visible on your app detail page as Visit App Website.
- App Page: Link a Facebook page to your app. The page must be categorized as an app page for it to link.
- Listed Platforms: Select the platforms you want listed under the Available On section of your app detail page. You can choose between Website with Facebook Login and App on Facebook.
- Images: The remainder of this page is all about images. What you enter here depends on your app. Upload the images according to the sizing listed.
Request permission
In addition to the preceding options, you may need to tweak the permissions of your app. Click Permissions in the left sidebar. You see the Configuring Permissions section, which lets you define the permissions that Facebook requests from the user as well as set the default activity privacy.
The following options are available:
- Default Activity Privacy: Choose the default privacy setting for your app’s activity. Users can change this setting in the Login dialog box. You can choose from Public, Friends, None (User Default), or Only Me.
- User & Friend Permissions: Include required permissions, permissions that typically just request information rather than make changes to the user’s Facebook objects. Note that you must request access to each specific type of data. To get the user’s birthday, interests, location, relationship data, and so on, you’ll need a string in this field for each one.
To enter permission, start typing the permission string in the field, as shown in Figure 3-6. Facebook will then suggest available strings based on what you type.
- Extended Permissions: Typically, the Extended Permissions allow you to make changes to the user’s Facebook objects, such as posting and uploading photos and videos. The user can also revoke any of these permissions after authenticating your app. In most instances, revoking permissions for an app will break it or change how the app works.
To enter a permission, start typing the permission string in the field. Facebook will suggest available strings based on what you type.
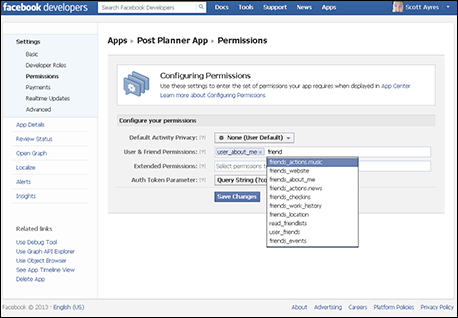
Figure 3-6: Use these fields to request permissions from the user’s Facebook account.
- Auth Token Parameter: Some apps interact with the Graph API. An auth token, or authorization token, is passed to the Graph API to allow the app to interact with it on behalf of Facebook users. This sophisticated concept is designed for use with intricate apps. You can get a full description of app authentication at http://developers.facebook.com/docs/authentication/.