
Chapter 5
Participating in Groups
In This Chapter
![]() Creating your own group
Creating your own group
![]() Customizing your group's image
Customizing your group's image
![]() Establishing group settings
Establishing group settings
![]() Sending invites
Sending invites
![]() Posting and sharing documents
Posting and sharing documents
![]() Deleting groups
Deleting groups
Besides enabling you to connect with your friends one on one, Facebook allows you to create connections based on similar interests and activities by forming groups. A group enables you to create a place (private or public) where members can post pictures, upload videos, post messages, share documents, chat, or schedule events. Pretty much all the features that you experience in Facebook as a whole can be focused specifically to friends in a group. In this chapter, you find out how to create and interact with Facebook groups.
Discovering Groups
Groups can be completely private or totally public. Groups can even be secret, where you can see that the group exists only if you're a member. We discuss these options a little later in the chapter.
Participating in a group is a big reason why people join Facebook. Groups allow you to build a meeting place specific to people with similar interests so you can all connect, share documents, chat, and post updates. Facebook groups are useful because they allow you to
- Organize and communicate with a group of coworkers
- Share important, yet private, information within a closed group
- Plan an event or other collaborative project
- Build a community for those with similar interests
Facebook groups are valuable for creating an additional connection with people you are linked to within an organization such as a church, school, or job. They are also a great way to meet people with common interests, such as baseball card collectors. A group provides a place where you can meet these people and develop connections before you extend the invitation for a one-on-one friend relationship.
If you want to see which groups you belong to already, look on the left side of your news feed (click the Facebook logo at the top of the screen to go to your news feed), as shown in Figure 5-1. In the left sidebar you see the Favorites, Groups, Pages, Lists, and Apps categories (among others). (For more about this part of your page, see Book I.)

Figure 5-1: Click the Create Groups link.
The Groups section displays some of the groups you've been made part of, and typically those in which you’re most active. By default, when someone invites you into a group, you’re automatically included in that group. We tell you how to leave a group later in this chapter.
Creating a Group
Creating your own Facebook group is easy. When you create a group, you are automatically assigned as the administrator (admin) of that group. The group admin can edit the group’s description and settings, add other administrators, and remove or ban members.
To create your own group, follow these steps:
- In the top-right corner of the Groups list, click the +Create Group button.
A dialog box appears, as shown in Figure 5-2, asking for a group name, the friends you would like to add to the group, and the privacy settings of that group.
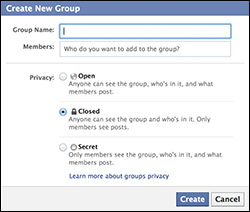
Figure 5-2: Creating a group and adding members.
- In the Group Name text box, type a name for your group.
Give your group a descriptive name. That way, the intended topic of the group is clear, and it’s easier for interested parties to find it (if it’s not a secret group).
- Add a member in the Members text box.
- Repeat Step 3 until you've added all the members’ names.
- Select the privacy settings of the group:
- Open: Anyone can see the group, who’s in it, and what members post.
- Closed: Anyone can see the group and who’s in it, but only members can see posts.
- Secret: Only members see the group, who’s in it, and what is posted.
- Click the Create button.
- (Optional) Select an icon and click OK.
As you can see in Figure 5-3, the group page is similar to your home screen, except what you see is all contained within the group. If the group is set to private, only you and other group members will be able to see the posts.
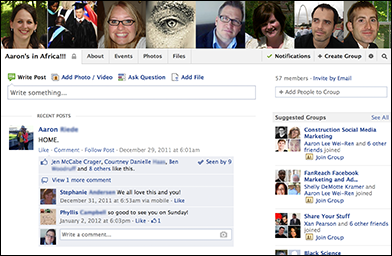
Figure 5-3: The group home screen.
After creating your group, you can invite friends to the group (you must be connected with someone to invite them to your group) and begin posting. Your friends will receive a notification that they have been invited into the group.
You can also grant administrative privileges to other group members. To do that, click the (#) of Members link in the About section below the group cover image on the right side. A list of members appears. Select the gear icon below the member to whom you want to grant admin privileges and choose Make Admin. A dialog box appears, letting you know that if you make that person an admin, the person can edit group settings, add members, and make others admins as well. If you agree, click the Make Admin button.
To take away someone's admin status, click the gear icon below the members name and then click the Remove Admin link. It’s important to note that if you make someone an admin, the person can take away your admin status.
Personalizing Your Group's Image
Groups are always more personal with a little customization. When you create a group, the group page shows a row of members’ profile pictures (see Figure 5-4). If there are enough members, these photos rotate each time the group page is refreshed. If you click a member photo, the screen displays the person's Facebook page.

Figure 5-4: Group member profile pictures are the default group header.
If you’re an administrator of a group, you can also upload and display a customized graphic like the one in Figure 5-5 (just be sure it’s at least 851 pixels by 315 pixels).
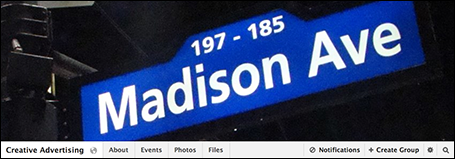
Figure 5-5: A group can have a customized graphic header.
Here are a few ideas for custom graphics:
- A logo (if you own the rights to it)
- A picture of the people in the group
- A picture of a common meeting place
- Any image that is descriptive of the group
The image will be seen on the home screen of your group. If you’re the admin for a group, you can upload a picture by following these steps:
- Navigate to the group page.
- Hover your cursor over the top-right corner, below the group cover image, and click the Change Group Photo icon that appears.
- Click the Upload a Photo option.
- Choose an image file from your computer.
The photo appears as the group’s new cover image.
- (Optional) Click and hold to drag the image; reposition it if necessary.
- Click Save Changes.
You can change the group cover image again any time you like. Or you can revert to the member profile pictures. To change your group cover image, move your cursor over the group image, and then click the Change Group Photo button that appears. A menu is displayed with the following options:
- Upload a Photo: You can upload a new photo from your computer for your group cover image.
- Reposition Photo: You can move around the existing cover image.
- Remove Photo: You can remove the current cover image, and the group member profile pictures will reappear as the cover image.
- Choose from Group Photos: Select photos uploaded by the group.
Establishing the Settings for Your Group
The default settings for your group were set when you created it, with the option to make your group open, closed, or secret. If you’re the administrator for a group, you can modify a few additional settings in the Edit Group settings area.
Find the Edit Group settings by clicking the gear icon in the top right, under the cover photo, and choosing Edit Group Settings from the menu. You can change the following settings:
- Group Name: To rename the group, simply click inside this text box, highlight the current name, and then type over the name to change it.
- Group icon: By default, the group icon is a generic group image. If you didn't choose an icon when you created the group — or you want to change the one you did choose — click the Group Name drop-down list (shown in Figure 5-6). You are presented with around 50 options for icons. Select an icon that is relevant to your group’s purpose. This icon will appear in the left sidebar of the group member’s Facebook home page next to the group’s name, and also on the group’s main page at the bottom of the group’s cover image. It does not appear in the news feed when members update the group.
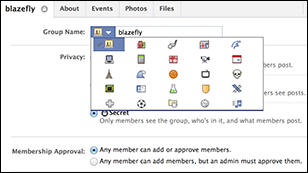
Figure 5-6: Icons help describe a group’s purpose.
- Privacy: Below the name section on the Edit screen are the group visibility options: Open, Closed, and Secret. Select the privacy level you want.
- Membership Approval: Select whether any member can add or approve members or whether an admin has to approve new members.
- Email Address: You have the option of setting up an e-mail address for the entire group. The name you choose can't be less than five characters. Any message sent to this e-mail address will go out to each member of the group. Click the Set Up Group Address button, and type a prefix for the e-mail address. The domain is @groups.facebook.com, as shown in Figure 5-7. Click Set Address to finish.

Figure 5-7: Creating an e-mail address for your group.
- Description: Type a description of your group in the Description text box. If your settings are not set to secret, nonmembers can see the description.
- Tags: Enter keywords that describe your group.
- Posting Permissions: Select who can post to the group — only members or only administrators. Although there may be some instances where you’d want to limit posting, we think it’s best to allow members to post to the group. After all, you created it to share your thoughts and interests, right? Communities thrive on give and take.
- Post Approval: Select whether all group posts need approval by an admin before others can see them in the group timeline.
Be sure to click the Save button to save your changes, or they’ll be lost when you navigate away from the Edit Group settings page.
Inviting People to Join Your Group
Inviting people to join your group is simple. The only requirement is that you be connected to them as a friend on Facebook. You can invite friends into a group in one of three ways:
- Add people to the group when you create it.
- Add people to the group at any time after it has been created.
- Accept requests to join your group.
Adding members when you create a group
When you create a group, the first step after naming it is to select friends to be a part of the group. You do this by entering names in the dialog box (refer to Figure 5-2).
Start by typing the name of the first person you want to add. Facebook automatically displays relevant names (as well as profile pictures) as you type. For example, if you type chri, you will see people from your friends list whose names start with Chri, such as Christy, Christopher, Christina, and so on. When you find the correct person, simply click the name.
Adding members to a group any time
You can add new members to your group any time you want. Click the +Add People to Group box (under the About section) and start typing a name. (Remember that you need to be Facebook friends with someone to add them.) Facebook displays a list of possible people to add. Simply select the person from the list, and he or she is added to the group. You can also click the gear icon below the cover photo to the right and choose Add People.
Accepting a request to join your group
When someone wants to join your group, he or she issues a request by clicking the Join Group button, shown in Figure 5-8. (People can find your group if it is an open or closed group, but not if it’s a secret group.)

Figure 5-8: If your group isn't secret, anyone can ask to join.
You as a group member (or as an administrator) will see a notification that someone has requested to join your group, as shown in Figure 5-9.
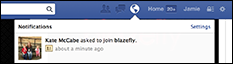
Figure 5-9: Group request notification.
The request is displayed also on the right side of the group screen, as shown in Figure 5-10. To add the person to your group, click the checkmark button; to reject the request, click the X button.
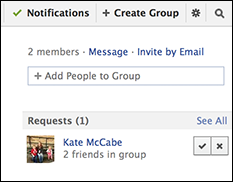
Figure 5-10: Group request on the group screen.
Posting to a Group
The posting permissions on the Edit Group settings page determine who can post to a group. The admin of a group can choose to allow all group members or only admins to post. As we mentioned, we think it’s best if all members of a group are allowed to interact — it just makes for a more interesting community.
To post an update to a group, follow these steps:
- Click the group title (on the left side of the news feed).
The most common groups you interact with will show up here. If the group you’re looking for does not appear, you can select More, which appears above the group list as you hover your cursor over it.
If you don’t find the group here, type the name of the group in the search text box at the top of your screen. As you type, relevant results appear below the search box. Click the group you're looking for to go to the group page.
- At the top of the group screen, click in the Write Post text box and type your update.
- (Optional) Enhance your update by adding a location, photo, video, or poll, or an icon indicating what you are doing.
Click Add Photo/Video to add a photo or video; click Ask Question to take a poll; or click Add File to add a file. See Chapter 2 of this minibook for details on adding a video, a link, and a picture.
- Click Post to post your update.
Sharing Documents in a Group
Members of a group can create and share documents within the group. Documents can be edited by any member of the group at any time. Group members may find this to be a valuable tool for a number of reasons. You may want to use the documents feature in groups, for example, when you're
- Collaborating on a list of items to bring to an event.
- Working together to write a plan for your business or organization.
- Collecting pictures with a narrative of a recent trip that members of the group took together.
To create a group document, follow these steps:
- Click the Files tab below the group cover image.
You see two buttons on the top right: Create Doc and Upload File.
- Click Create Doc.
- Type a title for your document.
- In the large text box, type your document.
Documents have basic formatting options, including bold and italic text, numbered lists, and bulleted lists.
- When you’ve finished typing and formatting your document, click the Save button to save your changes and publish the document to the group.
Group members will see a preview of the document as they would any update in the group’s news feed. Click the Continue Reading link to see the full document. When a member clicks the Files link, a page appears displaying the title of each document. The member can then click a title to view the full document.
To edit the document, a member just clicks the Edit button in the top-right corner. Members can comment below documents as well. Only group admins can delete a document; to do that, just click the Delete link.
Leaving a Group
Sometimes you might lose interest in a group and want to remove yourself. The process of leaving a group is simple.
 If you’re the sole administrator for the group, we highly recommend that you appoint someone else as the admin for the group before you leave. Otherwise, another member can make himself or herself the admin.
To leave a group, click the gear icon below the group cover image and choose Leave Group from the menu. A warning dialog box appears, as shown in Figure 5-11.
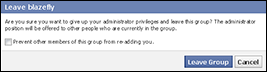
Figure 5-11: Leaving a group.
You can select a box that prevents other members of the group from adding you again. You can also report the group if it's malicious or inappropriate. You might report a group if it
- Harassed you or a friend
- Sent spam or is a scam
- Promoted hate speech, violence, or harmful behavior
- Has been sexually explicit
Report a group only if there is a legitimate reason to do so. When you report the group, Facebook will review the info and determine whether to disable the group.
Deleting a Group
To delete a group, the admin (if it's not you) must remove each member by clicking the gear icon below the person's name in the Members section. Then the admin must remove himself or herself and select the Delete Group option that appears.