
Chapter 10
Storing and Retrieving Game Information
In This Chapter
![]() Using Android’s
Using Android’s SharedPreferences file
![]() Reading and writing XML
Reading and writing XML
![]() Creating SQLite databases
Creating SQLite databases
Playing games on a mobile device comes with the inherent issue that the device is often used for other things — like phone calls — which means your game is more likely to be interrupted at some point than it would be on devices like PCs or consoles. Even when the game itself is not disrupted, there’s usually information that you would like to persist (store between sessions), even if the gaming sessions are bite-size.
Common examples of data you’d want to persist include
![]() Options (such as sound/music settings)
Options (such as sound/music settings)
![]() High scores
High scores
![]() The state of an individual game (where game elements were located; what the score was, and so on)
The state of an individual game (where game elements were located; what the score was, and so on)
When it comes to storing and retrieving data, you have several options:
![]()
SharedPreferences (key-value pairs for primitive data types)
![]() Write to file (either on internal or external storage)
Write to file (either on internal or external storage)
![]() Database (the default supported database type for Android is SQLite)
Database (the default supported database type for Android is SQLite)
![]() The cloud (you can use the network to store the data remotely)
The cloud (you can use the network to store the data remotely)
For practicality’s sake, this chapter deals only with the first three options. Networked games include a lot of popular types of games on mobile platforms, but they’re beyond the scope of this book. However, I do show you how to persist the sound option across user sessions, using the first three data-storage mechanisms. You can choose which one is right for the type of information you choose to store.
 You can download sample files for this chapter at
 http://www.dummies.com/go/androidgameprogramming
Using Shared Preferences for Data Storage
The SharedPreferences framework in Android allows you to store primitive data types such as int, float, and boolean, as key-value pairs. The storage is sandboxed (isolated) relative to your app and isn’t visible to other applications (including those that access your storage).
This arrangement makes SharedPreferences ideal for storing a handful of user settings. Information stored in SharedPreferences persists between sessions, so users don’t have to keep changing settings every time they open the app. This approach will work great for your game’s sound option.
The first item to specify is a String value for the name of your SharedPreferences file. Add the following variable declaration to your WhackAMoleActivity.
public static final String PREFERENCES_NAME = “MyPreferences”;
Here’s where you store the setting for sound whenever the player selects the option to toggle the sound from the Options menu: You add a few lines to the TOGGLE_SOUND case of your onOptionsItemSelected() method. Make sure your modified method matches Listing 10-1.


Here is a brief explanation of what the various lines do:
→13 Creates a reference to your SharedPreferences file.
→15 Calls edit() on the settings instance to get an editor, which you need to make changes.
→16 Puts your key-value pair in the settings file. You updated the setting earlier in this case and changed the value in your WhackAMoleView.
→17 Here the commit() method must be called on the editor to finalize the changes in the file.
You’ll also need the following import:
import android.content.SharedPreferences;
That’s how you save the settings with SharedPreferences.
How do you retrieve the information? You want to load the settings values when the application is launched, so you modify your onCreate() method in WhackAMoleActivity to match Listing 10-2.

Here’s the process in Listing 10-2:
1. Starting with Line 11, you get an instance of your SharedPreferences file to work with.
2. You retrieve the sound setting from the file using your key and set your local variable to the retrieved value.
The true in the getBoolean() method is the default setting for the value.
3. In the last line, you set the value of soundOn in your view to the retrieved value.
The first time the game is run, if the preferences file does not exist, the default value for sound is used. In this case the default is on. After you’ve made these changes, fire up the game and try toggling the sound settings. Now, if you toggle the sound off, and then completely kill the game by backing out with the Back button, the sound setting should be saved when you re-launch the game.
 You can use
 SharedPreferences for many kinds of information, including most of the common usages for games discussed at the beginning of this chapter. But storing a list of high scores or even more complex information will probably get tedious. Read on for an efficient approach to storing and retrieving the information from a file, using a common data structure known as XML.
Using XML for Data Storage
The second method this chapter covers for reading and writing data is using XML.
If you want to see how this method works, comment out the code just added (using SharedPreferences) in Listing 10-2.
 XML stands for eXtensible Markup Language. It’s basically a generalized markup language (like HTML) that allows you to make up your own custom tags. One nice advantage of XML documents is that they are both human- and machine-readable (provided the designer named the tags sensibly!).
The data can be organized hierarchically (grouped with parent and child nodes), but to keep things simple, here you only tell your code to read and write in a single piece of data — the sound setting.
For more complex examples, visit www.w3schools.com/xml.
Again, all your changes will be in the WhackAMoleActivity. You start by adding a writeXML() method with the contents shown in Listing 10-3.

Here is a brief explanation of what the various lines do:
→2 The logic is surrounded by an I/O try/catch.
→3 Here you create a name for your output file, and then create an output stream.
→5 Here you create a StringBuffer which allows us to produce a variable-length string.
→6 Next you append your actual sound setting, wrapped in XML tags you have called “sound_setting”. For each piece of data, you need a separate append statement such as this.
→8 The OutputStreamWriter allows you to write out the file. You create an instance here, passing in your FileOutputStream.
→9-11 These three lines actually write out your file; then they flush and close the stream.
You’ll also need the following imports:
import java.io.FileOutputStream;
import java.io.OutputStreamWriter;
At this point, you call your new method when the user toggles the sound option from the menu, just as you did with SharedPreferences. Modify your onOptionsItemSelected() method to match Listing 10-4

All the code in Listing 10-4 does is add Line 13 to call your writeXML() method.
Next you need a method for reading the XML data from file and updating your sound setting. Add the readXML() method to your WhackAMoleActivity with the contents matching Listing 10-5.


Here is a brief explanation of what the various lines do:
→2 You need a String to hold the current tag being read.
→3-5 This line creates a factory for generating a pull parser, which is an interface for parsing an XML document. The next couple of lines create the parser with the correct parameters.
→7 Starting here, you create the necessary components to read in the document as a stream and parse it one line at a time. The conditionals look at what part of the document you’re parsing, and detect whether you come across a tag that contains “sound_setting”. If the tag is found, the parser reads the contents of that tag, parses it as a boolean data type, and sets your current sound setting to the value of the boolean.
You’ll also need the following imports:
import org.xmlpull.v1.XmlPullParser;
import org.xmlpull.v1.XmlPullParserException;
import org.xmlpull.v1.XmlPullParserFactory;
import java.io.IOException;
import java.io.InputStream;
import java.io.InputStreamReader;
import.java.io.BufferedReader;
import java.io.StringReader;
You can obviously structure your XML documents much more elaborately to store complex game states and use this basic example as a starting point for parsing them.
The last piece is to call your readXML() method, and you want to do that right when the game is launched. Modify your onCreate() method to match Listing 10-6.
Listing 10-6: Modified onCreate() Calling readXML()
@Override
public void onCreate(Bundle savedInstanceState) {
super.onCreate(savedInstanceState);
requestWindowFeature(Window.FEATURE_NO_TITLE);
getWindow().setFlags(WindowManager.LayoutParams.FLAG_FULLSCREEN, WindowManager.LayoutParams.FLAG_FULLSCREEN);
setContentView(R.layout.whackamole_layout);
myWhackAMoleView = (WhackAMoleView) findViewById(R.id.mole);
myWhackAMoleView.setKeepScreenOn(true);
setVolumeControlStream(AudioManager.STREAM_MUSIC);
try {
readXML();
} catch (XmlPullParserException e) {
e.printStackTrace();
} catch (IOException e) {
e.printStackTrace();
}
myWhackAMoleView.soundOn = soundEnabled;
}
The readXML() method throws two types of exceptions, so you need to surround your call with a try and two catches, one for each exception type. After calling readXML(), your local soundEnabled variable will have the stored value, so you can then just set the variable in your view and everything should work fine.
Using this method of storing and retrieving data is overkill for something simple like a sound setting, but it makes more sense for things like high scores or complex game states, much like the next method this chapter goes over: databases.
Using a SQLite Database for Data Storage
The officially supported database for Android is SQLite, which means that functionality for creating and manipulating SQLite databases is built into Android.
SQLite is a smaller version of full-blown SQL databases, but they should have all the functionality you really need. The information in SQLite databases created from a particular application are sandboxed, which means the data is only available to that application, and not outside the application.
To create and interact with a SQLite database, you need to create a new class that handles typical database operations. It’s going to extend the SQLiteOpenHelper class that’s part of the Android SDK.
I include some methods that you won’t be using right away, but which come in handy if you find your code has to do a lot more heavy lifting with databases.
To create the new class, right-click the package icon in Eclipse and select New⇒Class. Name the class DatabaseAdapter, and then modify the contents to match Listing 10-7.


The Android documentation recommends this approach for using SQLite. You create this separate class to assist with database operations. Although you won’t be using all the methods in this class, here’s a brief overview of what’s in this class:
→27 After specifying your imports and global variable declarations, you define a DatabaseHelper class.
→31 This variable holds a string that defines the raw SQL command for creating the only table your database will have, the settings table. For reference on SQLite syntax and queries, visit http://www.sqlite.org/.
→53 This is a method for opening the database, which is necessary for reading and writing from it. The following method is for closing the database, which should be done only when your code is finished interacting with the database.
→60 The next two methods, insertRecord() and updateRecord() do what they say. You want to insert a record if you already know that one doesn’t exist, and update a record if you already know that one exists. But what do you do if you don’t know whether the record exists? That’s why you have the next method.
→73 This method executes a raw SQL command on the database, passing in your sound setting as text and setting the value of the first row in the database to the value of the sound setting. If the record exists, it’s updated; if not, it’s created. This is the method you use when your game has to access the database.
The rest of the methods are fairly straightforward. I include them for your convenience if your game has to handle more extensive interaction with a database and needs them. For the moment, you need use only one more of them, the getRecord() method.
Here’s a closer look at how your code interacts with the database from WhackAMoleActivity. First you want to update or insert a new record into the database when the user changes the sound setting. Modify your onOptionsItemSelected() method in WhackAMoleActivity to match Listing 10-8.
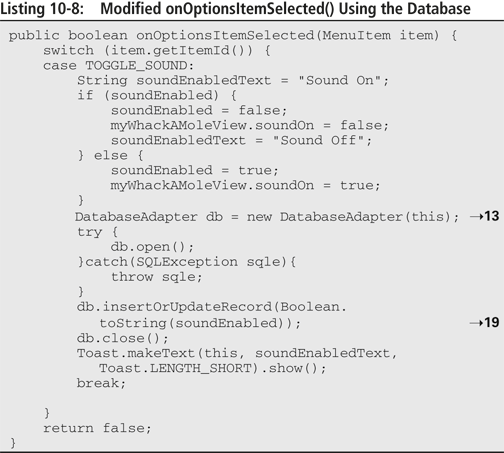
Here’s what happens with Listing 10-8:
1. The game starts its interaction with the database when Line 13 creates an instance of your DatabaseAdapter class.
2. The code opens the database before calling the insertOrUpdateRecord() method on Line 19.
3. The code closes the database and shows the Toast, just as it does with your other data-storage methods.
You need to retrieve the information stored in the database when the game launches, so the next order of business is to modify your onCreate() method in WhackAMoleActivity to fetch the sound setting. Modify your onCreate() method to match Listing 10-9.

Here’s what happens in Listing 10-9:
1. Line 11 creates an instance of your DatabaseAdapter.
2. Line 13 opens the database.
3. Line 17 calls getRecord() from your DatabaseAdapter, passing in a row number of 1.
You only have one row, so you can use this as the default.
4. The method returns a Cursor, a standard data structure for traversing records in a database.
The startManagingCursor() method enables the current activity to handle the lifecycle of the cursor; moveToFirst() moves to the first record.
5. The code stores the string in your single row and parses it as a boolean data type, setting your soundEnabled variable to the value of the string.
If the game were fetching more information from the database, this logic would loop through as many records as needed.
6. The code closes the database.
If you’ve worked through the last six chapters, you’ve got two playable games under your belt after some hands-on experience with
![]() Implementing games with simple interactions with a touchscreen interface
Implementing games with simple interactions with a touchscreen interface
![]() Implementing more complex real-time games with
Implementing more complex real-time games with SurfaceView
![]() Handling images and sounds
Handling images and sounds
![]() Storing and retrieving data in your game
Storing and retrieving data in your game
At this point, if you’ve done all that wrestling, you’ve got the chops to dive into developing your own game. Chapter 11 discusses strategies and tools for trying to make money with your game; then I show you how to package, publish, and update your game.
If you don’t plan on monetizing your game, you might just want to skip ahead to Chapter 12.