Chapter 12
Managing Resources and Performance
IN THIS CHAPTER, YOU WILL LEARN TO:
- UNDERSTAND RESOURCE ALLOCATION
- ALLOCATE RESOURCES TO VIRTUAL MACHINES
- Allocate Resources in the VM Configuration
- Guarantee Resources with Reservations
- Constrain Resource Usage with Limits
- Control Resource Allocation Using Shares
- USE RESOURCE POOLS
- Create a Resource Pool
- Control CPU Allocation with a Resource Pool
- Control Memory Allocation with a Resource Pool
- MONITOR PERFORMANCE
- Identify a Resource-Constrained ESXi Host
- Identify a Resource-Constrained Virtual Machine
In a VMware vSphere environment, managing resources and managing performance go hand in hand. Performance will suffer if resources are over- or under-allocated. To avoid this situation, you need to understand how to assign resources, control allocation during times of resource contention, and identify when resource contention is occurring.
Understand Resource Allocation
Understanding how to use resource allocation effectively will help you configure virtual machines correctly and support more virtual machines with fewer resources.
So, what is resource allocation? Resource allocation is the division of a physical server’s finite resources—namely, computer power, memory, network bandwidth, and storage capacity—among multiple virtual machines. This division of resources by the administrator might be static, as in the maximum amount of RAM assigned to a virtual machine, or it might be dynamic, as in controlling what percentage of CPU cycles a virtual machine gets during times of CPU contention. You must know how VMware ESXi allocates resources to virtual machines and how to modify that default behavior to achieve the desired results.
Understanding resource allocation starts with understanding the three ways in which resources are assigned to a virtual machine. First, resources such as CPU, memory, network, and storage are assigned to a virtual machine via the virtual machine configuration itself. For example, when you create a virtual machine, you must decide how many virtual CPUs (vCPUs) should be assigned to that VM, or how much memory should be assigned to the VM. These resource assignments are fairly static, but they can easily be adjusted—a core benefit of virtualization and abstraction of resources.
Second, you can apply certain controls to dynamically modify the behavior of the assigned resources by guaranteeing certain resource levels or by constraining resource usage. Specifically, you will use reservations to guarantee resource levels and limits to constrain resource usage.
Third, and finally, you can adjust how ESXi grants resource access during times of resource contention. Using a mechanism called shares, administrators can fine-tune how resources are granted when those resources are in short supply. When an ESXi host has plenty of memory, there is no need to control how that memory is granted—there is enough to go around, so every VM gets whatever it needs. When that ESXi host runs low on memory, though, you need a way to control which VMs get memory and how much memory those VMs get. This is where shares come into play. Shares are only active when there is resource contention; reservations and limits are always active although they can behave differently depending on the resource.
The next section discusses these controls in more detail and provides specific information on how to use these tools to control resource allocation for individual virtual machines. In the vast majority of situations, you are primarily going to be concerned with how CPU and memory are allocated, so the content in this section and throughout the chapter will focus heavily on controlling CPU and memory allocation.
Allocate Resources to Virtual Machines
Efficiently allocating resources to virtual machines is a key skill that every VMware vSphere administrator needs to master. If you allocate too many or too few resources, performance is negatively impacted. VMware vSphere provides a number of ways to help you make sure that resources are allocated and used efficiently, as you’ll see in this section.
Allocate Resources in the VM Configuration
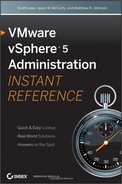
The first way in which you control resource allocation is by assigning resources in the configuration of the virtual machine. When you create a virtual machine, you assign certain levels of resources to that virtual machine. For example, Figure 12.1 shows the memory configuration for a virtual machine.
Figure 12.1: This virtual machine is configured with 4 GB of RAM, so any guest operating system installed here will never see or use more than 4 GB of RAM.
In the same way that the configuration of a physical machine establishes a limit on how many resources are available to that physical machine, the configuration of a virtual machine controls how resources are allocated to that virtual machine and the guest operating system running inside that virtual machine. If a virtual machine is configured for 4 GB of RAM, that virtual machine has only 4 GB of RAM visible to it. Any guest operating system installed in that virtual machine will not see or use more than 4 GB of RAM in the static configuration. Again, the resources can be easily adjusted, sometimes while the VM is powered on. The same is true for CPU resources as well.
Of course, one key difference between a physical machine and a virtual machine is the ease of adding resources to a virtual machine. If the 4 GB of RAM assigned to the virtual machine in Figure 12.1 proves insufficient, it is very easy for you to add more RAM to the system by modifying the configuration. In some cases, you can make this change while the virtual machine is running using the hot-add feature. Hardware hot-add is discussed in more detail in Chapter 9.
If, on the other hand, the guest operating system in that virtual machine is not fully utilizing the RAM that has been assigned to it in the VM configuration, it’s also very easy to reduce the RAM assigned to the VM.
NOTE VMware ESXi utilizes some advanced memory-management technologies that lessen, or perhaps even eliminate, the impact of assigning too much memory to a virtual machine. The same cannot be said for virtual CPUs. Assigning multiple vCPUs when the workload can’t effectively use multiple vCPUs can negatively impact performance. This fact underscores the importance of “right sizing” virtual machines to give them only the resources they actually need.
This ease of modification—which allows you to quickly and easily add or remove resources assigned to a virtual machine—means that you should be sure to right size virtual machines instead of continuing to provision virtual machines the same way that physical machines are provisioned. Physical machines are provisioned with the maximum amount of resources the administrator thinks the system might need, because adding more resources is more difficult. Virtual machines should be provisioned for only what they need; should the guest operating system and application prove to need more or less than what is assigned, you can easily change it.
Guarantee Resources with Reservations
Just because you have assigned resources to a virtual machine in the virtual machine’s configuration doesn’t necessarily guarantee resource availability. If you need to guarantee that certain levels of resources are available to a particular virtual machine, you will need to use a reservation. A reservation is a guarantee of a certain amount of a certain type of resource so long as the VM is successfully powered on, so a virtual machine is assured of having at least that amount of the resource available to it.
The Resources tab of a virtual machine’s properties, shown in Figure 12.2, is where you will set a reservation for a virtual machine. For CPU, the reservation is specified in megahertz (MHz); for memory, the reservation is set in megabytes (MB).
Figure 12.2: You can set reservations on CPU or memory on the Resources tab of the Virtual Machine Properties window.

NOTE You cannot set these same types of reservations on storage (disks) or network resources.
So how do reservations work?
- When you set a CPU reservation, that amount of CPU time is guaranteed to the virtual machine when needed. If the virtual machine uses less than its CPU reservation, the excess clock cycles can be assigned to other virtual machines. For example, if a virtual machine with a 1 GHz reservation is using only 500 MHz of CPU time, the remaining 500 MHz in the reservation may be used by other virtual machines or the hypervisor.
- When you set a memory reservation, that memory is set aside for that virtual machine. ESXi allocates memory on-demand; that is, memory is not granted to a virtual machine until it accesses the memory. In this case, memory guaranteed by a reservation cannot be used by any other virtual machine once it has been accessed (and allocated) to the assigned virtual machine. Furthermore, VMware’s advanced memory technologies, like idle page reclamation, do not reclaim idle pages that are part of a reservation. The memory is available for use only by the virtual machine to which it was assigned and reserved.
As you can see, CPU reservations and memory reservations are similar in function, but different in approach. Given the different nature of these resources, however, these behaviors make sense. If you are setting reservations on virtual machines, be sure to reserve only enough resources to guarantee a minimum level of performance. Otherwise, you run the risk of preventing other virtual machines from starting up or operating properly due to a lack of unreserved capacity.
NOTE A virtual machine will only power on if there are enough unreserved resources—both CPU and memory—available to satisfy the reservations on that virtual machine.
To assign a CPU or memory reservation to a virtual machine, follow these steps:
1. In vSphere Client, right-click on the virtual machine to which you wish to add the reservation and select Edit Settings.
2. In the Virtual Machine Properties window, select the Resources tab.
3. To assign a CPU reservation, select CPU from the list of resources on the left and specify a reservation, in MHz, on the right.
To assign a memory reservation, select Memory from the list of resources on the left, and then specify a reservation (in MB) on the right.
4. Click OK to save the settings and close the Virtual Machine Properties window.
Looking back at Figure 12.2, you’ll note a small triangle that indicates the maximum amount of a resource that may be specified in a reservation. This limit is derived from the resources available to that virtual machine based on the ESXi host on which it is running or the resource pool in which it has been placed. Resource pools are discussed in the “Use Resource Pools” section later in this chapter.
Figure 12.3: Assigning a limit prevents the virtual machine from ever using more of that resource than is specified in the limit.

Constrain Resource Usage with Limits
There might be situations in which you need to constrain, or limit, the amount of a particular resource that is consumed by the virtual machine. For example, you might want to limit how much CPU time a virtual machine uses, or limit how much memory a virtual machine is allowed to use. The limits functionality within VMware vSphere provides this ability. By default, VMware vSphere sets the limits for CPU and memory to Unlimited; that is, there is no artificial limit. Use limits with caution, particularly with memory. Using limits might cause ballooning and/or swapping, which impacts VM operating system and application performance.
NOTE Clearly, a virtual machine does have limits to its computing power or memory. These limits are specified by the configuration of the virtual machine itself. For example, a virtual machine specified with 1 virtual CPU (vCPU) can never use more than 1 logical CPU (core or thread) at a time. Similarly, a virtual machine configured with 1 GB of RAM can never address more than 1 GB of RAM at a time. Because a virtual machine already has “built-in” limits, many vSphere administrators do not use the limits functionality to constrain resource usage.
As with reservations, limits are specified on the Resources tab of the Virtual Machine Properties window. Figure 12.3 shows a virtual machine with a CPU limit of 1200 MHz assigned.
As with reservations, CPU limits and memory limits behave differently:
- With a CPU limit, the ESXi hypervisor simply does not allow the VM to use more CPU cycles than specified in the limit. Because the hypervisor controls the scheduling of VMs onto logical CPU cores, it is easy to enforce a CPU limit by simply not scheduling the VM onto an available logical CPU core.
- With a memory limit, the hypervisor uses the balloon driver—a guest OS–specific driver installed with the VMware Tools—to control guest OS memory usage. As the guest OS memory usage approaches the limit, the balloon driver starts to “inflate,” or request memory from the guest OS. The balloon driver takes the memory assigned to it by the guest OS and passes that memory back to the hypervisor for use by other virtual machines or the hypervisor itself. As guest OS memory usage decreases and falls below the limit, the balloon will “deflate,” or return memory to the guest operating system. In this manner, the memory usage of the guest OS within the virtual machine is kept below the specified limit.
NOTE If the VMware Tools are not installed, VMware vSphere can still enforce the memory limit. Instead of using the balloon driver to control guest OS memory usage, the hypervisor will forcefully swap virtual machine memory pages out to the VMkernel swap file when the memory limit is reached. Because this has a dramatic impact on performance—disk access is many thousands of times slower than memory access—use limits carefully on VMs that do not have VMware Tools installed, or ensure that you have the VMware Tools installed on all VMs.
It’s important to understand that you should use limits carefully. VMware ESXi will not allow access to resources controlled by limits, even when those resources are underutilized. Improper use of limits can significantly impair the performance of the virtual machines and the operating systems and applications running in them.
To specify a CPU or memory limit for a virtual machine, follow these steps:
1. In vSphere Client, right-click on the virtual machine to which you want to assign a CPU or memory limit.
2. Select Edit Settings from the context menu.
3. In the Virtual Machine Properties dialog box, click the Resources tab.
4. If you wish to set a CPU limit, select CPU from the list of resources on the left. Then deselect the Unlimited check box and specify a CPU limit in MHz.
To set a memory limit, select Memory from the list of resources on the left. Deselect the Unlimited check box and specify a memory limit in MB.
5. Click OK to save the changes and return to vSphere Client.
Once the limit is set, it is enforced as described earlier, depending on whether it is a CPU limit or a memory limit.
As you’ve seen so far, both reservations and limits are absolute values—you can guarantee at least 2,400 MHz of CPU capacity or limit memory usage to 512 MB of RAM, for example. These controls are in effect at all times, whether the ESXi host on which the virtual machine is running has plenty of resources to allocate or is running low on resources. Alternatively, shares are a way for you to adjust resource allocation behavior only when resources are constrained.
Control Resource Allocation Using Shares
So far in this chapter, we have discussed how to use the VM configuration, reservations, and limits to control resource allocation for individual virtual machines. In all three instances, these controls are effective when the ESXi host has plenty of resources as well as when the ESXi host is running low on one or more of these resources (i.e., is resource-constrained). The last way of affecting resource allocation is through the use of shares. This control, unlike the other three controls, is only effective during times of resource contention. Shares do not impact the resource allocation behaviors of a host when the host is not running low on a particular resource.
Shares allow you to control the proportions of resources that are allocated to virtual machines when those resources are in contention. These proportions are calculated by comparing the number of shares assigned to the specific virtual machine to the total number of shares assigned overall. Consider an ESXi host with five virtual machines and the following shares assigned:
- RedVM, 2,000 shares
- GreenVM, 2,000 shares
- BlueVM, 2,000 shares
- YellowVM, 3,000 shares
- OrangeVM, 1,000 shares
The total number of shares assigned among all these VMs is 10,000 shares. That total is compared to the number of shares assigned to each VM to determine the proportion of resources that will be granted to each VM during periods of resource contention. Table 12.1 shows the results of this example.
Table 12.1: Using shares to allocate resources proportionally

As you can see in Table 12.1, ESXi uses the shares to determine the proportion of resources allocated to each virtual machine. Keep in mind, however, that these proportions only apply when the resources are under contention. If these shares were applied to memory and the host server was running out of memory, these shares would affect how the hypervisor allocated RAM to each of the virtual machines. If these shares were applied to memory but the ESXi host had plenty of RAM to give all the virtual machines all the memory they requested, there would be no need for shares.
Because shares work only when a resource is under contention, they are a valuable addition to the use of reservations and limits. Reservations and limits are absolute; they don’t change as the availability of resources changes, and they don’t provide a way to determine how limited resources should be allocated among a group of virtual machines. Shares give vSphere administrators that flexibility.
You can assign shares on CPU, memory, and storage and network with Network IO Control (NIOC) enabled on the vDS. When assigning shares, you can choose from three predefined selections—Low, Normal, or High—or choose Custom, which allows you to specify a number of shares to assign to the VM. For CPU and storage, the default setting is Normal. This translates into 1,000 shares per vCPU. A 4 vCPU VM would have 4,000 shares with the Normal value. For memory, the default setting is also Normal, which is equal to ten times the assigned memory value or 10 shares for each MB of memory assigned. For a VM that is assigned 1,024 MB of memory, the default number of shares for memory is 10,240.
NOTE The predefined High setting doubles the default Normal number of CPU and memory shares. The predefined Low setting halves the default number of CPU and memory shares. Another way to think of this is to remember that each higher tier of shares is double the previous tier. For example, the Normal setting is twice as much as the Low setting, and the High setting is twice as much as the Normal setting.
To change the number of shares assigned to a virtual machine for a particular resource, follow these steps:
1. Within vSphere Client, right-click on the virtual machine you’d like to modify and select Edit Settings.
2. Click the Resources tab.
3. From the list on the left, select the resource for which you’d like to change the number of shares assigned to the VM.
4. Change the assigned shares value to Low, Normal, or High. To set a custom value, select Custom and then specify the number of shares to be assigned for that resource to that virtual machine. Figure 12.4 shows the number of shares for CPU being set to a custom value.
Figure 12.4: The Custom setting allows you to assign the number of shares for a particular resource.

5. Click Finish to save the changes and return to vSphere Client.
For a quick review of the shares assigned to a virtual machine, select the virtual machine from the inventory and click the Resource Allocation tab. This tab will show you the reservation, limit, and number of shares assigned.
The ability to fine-tune resource allocation settings within a VMware vSphere environment on a per-VM basis is useful, but what about when you want to control resource allocation for an entire group of virtual machines? Surely, there has to be a better way. There is, and it’s called a resource pool.
Resource pools allow administrators to set resource allocation settings for CPU and memory for multiple virtual machines at the same time. Unlike setting resource allocation values on individual virtual machines, using resource allocation settings with resource pools only allows you to adjust CPU and memory. You cannot set storage shares on a resource pool.
To control resource usage for multiple VMs using a resource pool, you must perform three basic steps:
1. Create the resource pool on the appropriate ESXi host or cluster.
2. Assign the desired CPU or memory resource usage settings.
3. Use drag-and-drop to put virtual machines into the resource pool.
The last step, using drag-and-drop to put virtual machines into the resource pool, is straightforward enough that it needs no further discussion. The other two steps are covered in the next few sections.
Create a Resource Pool
You can create resource pools on individual ESXi hosts or shared resource pools assigned to clusters of ESXi hosts. You also have the option of creating nested resource pools inside other resource pools. Resource pools created within a cluster are also called parent resource pools. When created inside another resource pool, they are called child resource pools. In any case, the process for creating a resource pool is the same.
To create a resource pool, follow these steps:
1. In the Hosts And Clusters inventory view of vSphere Client, right-click on a host, cluster, or existing resource pool and select New Resource Pool.
2. Specify a name for the resource pool.
3. In the CPU Resources section, specify the settings for how CPU resources should be handled for virtual machines within this pool. More details on how these settings work is provided in the next section, “Control CPU Allocation with a Resource Pool.”
4. In the Memory Resources section, specify the settings for how memory resources should be allocated for virtual machines in this pool. The next section also provides more information on how these controls work.
5. Click OK to create the resource pool and return to vSphere Client.
Now that the resource pool has been created, you can adjust its settings to modify how ESXi will allocate resources to virtual machines located in that resource pool.
Control CPU Allocation with a Resource Pool
By using a combination of reservations, limits, and shares, you can control CPU allocation for all the virtual machines within a resource pool.
Use CPU Reservations with a Resource Pool
To guarantee a minimum amount of CPU resources for a resource pool, specify a CPU reservation. The amount of the reservation, specified in megahertz (MHz) as with individual virtual machines, is guaranteed for use by all the virtual machines in the resource pool. This is not a reservation for each VM in the resource pool, but rather a reservation for all the VMs as a group to share.
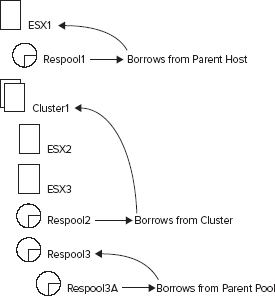
Within the resource pool, you might wish to assign CPU reservations to individual virtual machines. This configuration is fully supported, but the behavior might be a bit different from what you expect. The key to understanding how resource pool reservations and VM reservations interact is found in the Expandable Reservation option, as shown in Figure 12.5.
Figure 12.5: The Expandable Reservation option allows a VM having a higher reservation within the resource pool to borrow resources from its parent container.

When Expandable Reservation is unchecked, as it is in Figure 12.5, the resource pool has a finite amount of CPU resources that can, in turn, be reserved by virtual machines within the resource pool. In the figure, the resource pool has a nonexpandable reservation of 1,200 MHz. This means that you can assign up to 1,200 MHz of reservations to individual virtual machines within the resource pool. If you attempt to reserve more than 1,200 MHz to individual virtual machines in the resource pool, that attempt will fail. Note that this is not a limit on how many CPU cycles the resource pool or its member VMs can use, but rather a limit on how many CPU cycles member VMs can reserve.
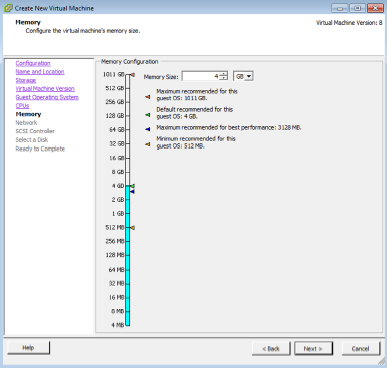
If, on the other hand, the Expandable Reservation option is checked, the resource pool is permitted to “borrow” resources from its parent container. Again, this “borrowing” only pertains to individual VM reservations and does not affect CPU limits. The parent container of the resource pool depends on where it was created:
- The parent of a resource pool created on an individual ESXi host is the host itself and is hidden.
- The parent of a resource pool created on a cluster is the cluster.
Figure 12.6 graphically illustrates the relationships between clusters, ESXi hosts, and resource pools with regard to how resources might be borrowed from a parent container with expandable reservations.
Figure 12.6: Expandable reservations allow objects to borrow resources from their parent object.
The default setting on a new resource pool is an expandable reservation of 0 MHz, which means you will be able to reserve CPU resources borrowed from the parent object, up to the maximum available in the parent host, cluster, or resource pool.
Follow these steps to assign a CPU reservation to a resource pool:
1. Within the Hosts And Clusters inventory view of vSphere Client, right-click on the resource pool to which you want to assign a CPU reservation.
2. Select Edit Settings.
3. Specify a value, in MHz, that you want reserved for the resource pool and its member VMs.
4. Uncheck the Expandable Reservation box if you want to limit the CPU reservations by member VMs to the amount assigned to the resource pool itself.
5. Click OK to save the changes and return to vSphere Client.
Use CPU Limits with a Resource Pool
In addition to using CPU reservations with resource pools, you have the option of using CPU limits with resource pools. Figure 12.7 shows an example of a resource pool with a limit specified.
Figure 12.7: Setting a CPU limit prevents the resource pool and its member VMs from using more than the specified amount of CPU resources.
CPU limits function in much the same way when used on a resource pool as when used on a virtual machine. Of course, the key difference is that the limit applies to all the virtual machines in the resource pool rather than a single virtual machine.
To set a CPU limit for a resource pool, perform these steps:
1. Within the Hosts And Clusters inventory view of vSphere Client, right-click on the resource pool to which you want to assign a CPU limit.
2. Select Edit Settings.
3. Deselect the Unlimited check box.
4. Specify a limit, in megahertz (MHz), to which the resource pool should be constrained.
5. Click OK to return to vSphere Client.
The maximum limit that you can specify for a resource pool created on an ESXi host is the capacity of the host itself. Similarly, the maximum limit that you can specify for a resource pool created on a cluster is the aggregate capacity of the cluster. For a child resource pool—that is, a resource pool created within another resource pool—the maximum amount that can be specified for the limit is whatever limit is applied to the parent. For example, if a parent resource pool has a limit of 4,800 MHz, any child pools within it cannot have a limit set greater than 4,800 MHz.
In addition to CPU reservations and CPU limits, you can assign CPU shares to a resource pool. The next section describes that functionality.
Use CPU Shares with a Resource Pool
Using shares with a resource pool allows you to specify the priority of the resource pool for access to resources. This priority is relative to other resource pools or virtual machines in the same parent container—that is, on the same ESXi host, in the same cluster, or in the same parent resource pool. Assigning shares to a resource pool does not affect the priority of virtual machines within the resource pool relative to each other; the shares assigned to each individual virtual machine in the resource pool determine that priority.
In Figure 12.8, there are two resource pools—Green and Blue. Green has 2,000 shares assigned, and Blue has 1,000 shares assigned. When resources are allocated between the two resource pools, Green will receive approximately two-thirds of the resources and Blue will receive approximately one-third of the resources. Thus, the shares assigned to the resource pools only establish priority relative to each other. Within the Green resource pool, the VMs have equal priority relative to each other, but within the Blue resource pool, VM3 has double the priority of VM4. The shares assigned to the pools have no impact on determining the priority of the VMs.
Figure 12.8: Shares only establish priority relative to other objects at the same level in the hierarchy.

To assign shares to a resource pool to control CPU usage relative to other peer resource pools, follow these steps:
1. In the Hosts And Clusters inventory view of vSphere Client, right-click on the resource pool you want to modify.
2. Select Edit Settings.
3. From the Shares drop-down list, select Low, Normal, High, or Custom.
4. If you selected Custom, specify a number of shares to assign to the selected resource pool.
5. Click OK to return to vSphere Client.
Be sure to understand the cascading effect of using shares on both the resource pools and the virtual machines within them. Otherwise, virtual machines could end up getting drastically lower priority to resources than expected. This is true not only for CPU resources, but also for memory resources, as described in the next section.
Control Memory Allocation with a Resource Pool
In all cases, using a reservation, limit, or shares on a resource pool to control memory allocation for the virtual machines in this resource pool behaves the same way as it does for CPU resources. You assign these controls in the same way as described in the previous section. Refer to the procedures in the previous section, “Control CPU Allocation with a Resource Pool,” for specific details on how to assign a reservation, limit, or shares on a resource pool. Assigning any of these controls for memory is done in the same way as for CPU resources.
Controlling resource allocation using reservations, limits, and shares is only part of the picture. The rest of the picture involves being able to identify when hosts or virtual machines are resource-constrained so that, as an administrator, you know when to use the resource allocation controls.
There’s another side to resource allocation and resource management, and that’s the monitoring side. It’s not enough for you to know how to adjust vSphere’s default behaviors with regard to resource allocation; you also need to know how to identify when virtual machines aren’t getting the resources they need. Once you’ve identified a virtual machine that isn’t getting enough resources, you can use the settings outlined earlier in this chapter to adjust how resources are allocated to that virtual machine.
Although other resources exist that could become bottlenecks—consider storage, for example—this section focuses on only two major resources: CPU and RAM.
Identify a Resource-Constrained ESXi Host
So, how do you identify when an ESXi host is CPU- or memory-constrained? Usually, making the identification is reasonably simple. Rectifying the problem, however, might be a bit more complicated, depending on the environment.
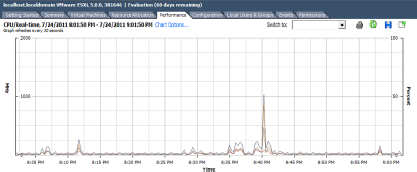
vSphere Client provides a Performance tab when an ESXi host is selected in the Hosts And Clusters inventory view. This Performance tab provides performance graphs and statistics on the ESXi host. These make it easy to identify when an ESXi host is resource-constrained.
Figure 12.9 shows the default view on the Performance tab for an ESXi host. In this particular example, the host is quite clearly not CPU-constrained. The memory graphs aren’t visible in this example, so it’s not possible to tell whether the host is RAM-constrained.
Figure 12.9: The Performance tab provides enough information to identify whether an ESXi host is resource-constrained.
The Performance tab within vCenter Server provides the majority of the information you need to identify when an ESXi host is resource-constrained. Table 12.2 provides more information on where you should look in vSphere Client to find information on ESXi host resource constraints.
Table 12.2: Identifying resource constraints in vCenter Server
| To identify ESXi constraints for this resource. . . | . . . Look in this area of vCenter Server |
| CPU | Summary Tab ⇒ Resources Pane ⇒ CPU Usage |
| Performance Tab ⇒ Overview ⇒ CPU (%) | |
| Performance Tab ⇒ Overview ⇒ CPU (MHz) | |
| Memory | Summary Tab ⇒ Resources Pane ⇒ Memory Usage |
| Performance Tab ⇒ Overview ⇒ Memory (MB) | |
| Performance Tab ⇒ Overview ⇒ Memory (Mbps) | |
| Performance Tab ⇒ Overview ⇒ Memory (%) | |
| Disk | Performance Tab ⇒ Overview ⇒ Disk (Kbps) |
| Performance Tab ⇒ Overview ⇒ Disk (Milliseconds) | |
| Network | Performance Tab ⇒ Overview ⇒ Network (Mbps) |
While identifying when an ESXi host is resource-constrained is usually straightforward, sometimes you might need to dig deeper. In those cases, tools like esxtop or vm-support are helpful. The Advanced view of the Performance tab also exposes specific performance counters that might be necessary.
NOTE The esxtop and vm-support tools are available from the Tech Support Mode or remote SSH session of a VMware ESXi host.
Identify a Resource-Constrained Virtual Machine
All too often, administrators trying to diagnose a performance problem within a guest operating system running in a virtual machine on VMware ESXi make the mistake of using guest OS–native tools to determine resource utilization. For example, a Windows administrator might use Performance Monitor or Task Manager to observe memory or CPU utilization of a Windows Server–based virtual machine, or a Linux administrator might use top to observe resource usage on a Linux-based virtual machine. Unfortunately, while these tools are familiar, they don’t provide the whole picture. Can you guess why these tools won’t provide the right information?
Guest OS–native tools are only able to report on the usage of what the ESXi hypervisor allocates to the guest, not what is actually available on the host. This is a key distinction that’s important for all vSphere administrators to understand. The resources that the guest OS sees are only those resources allocated to it, not the full resources actually available on the host. So, when a guest OS reports 100 percent CPU usage, that doesn’t mean the host is CPU-constrained. It only means that the guest OS is using 100 percent of the cycles given to it by the hypervisor. What if the hypervisor is only giving that VM 10 percent of its available cycles because of limits or shares? Using only guest OS–native tools would provide only part of the picture. To effectively diagnose resource-related issues with a virtual machine, you must use tools both inside and outside the virtual machine.
The next two sections describe how to use tools both inside and outside the guest OS to help identify when a virtual machine might be CPU- or RAM-constrained.
Identify a CPU-Constrained VM
As mentioned earlier, vSphere administrators attempting to identify whether a VM is CPU-constrained should start by looking both inside and outside the guest operating system. From inside the guest operating system, use guest OS–native tools to determine current CPU usage. From outside the guest operating system, use vCenter Server’s performance-monitoring tools to determine both how much the VM is being granted as well as how much the VM is actually using.
NOTE The performance graphs within vSphere Client are available in environments that are not using vCenter Server. Just connect vSphere Client directly to an ESXi host to view performance information.
Here are two common scenarios that arise when evaluating CPU usage in a VMware vSphere environment:
The guest OS shows high CPU usage, but the ESXi host has plenty of spare CPU capacity. In this situation, the guest OS in the virtual machine is using all the CPU cycles granted to it by the hypervisor and is starving for more as indicated by %RDY in esxtop or Ready MS in the vSphere Client. If application performance within the virtual machine is not at acceptable levels, then ensure that no limits have been placed on the virtual machine or the resource pool(s) in which this virtual machine resides. Adding a second CPU might help performance, if the applications within the virtual machine are sufficiently multithreaded to take advantage of the extra processing power. If not, migrating the virtual machine to an ESXi host with faster CPU cores might help improve performance.
The guest OS shows high CPU usage, and the ESXi host’s CPU utilization is also very high. In this case, the VM needs lots of CPU cycles, but the ESXi host is already heavily loaded. If application performance is acceptable, no further changes are needed; otherwise, you should also check the CPU Ready counter (available in esxtop or the Advanced view of the Performance tab in vSphere Client) to determine if the guest OS is using all the cycles it can get or if it is waiting on cycles from the host. A high CPU Ready counter would indicate that the guest OS in the virtual machine would use more CPU cycles if they were made available. In this case, using shares to grant this virtual machine higher-priority access to CPU resources might correct the performance issue. Adding a second virtual CPU might not help, as the ESXi host still might not have enough cycles to provide, and the application has to be sufficiently multithreaded as to be able to take advantage of the additional CPU core. Migrating this VM to a less heavily loaded host might also help. Alternately, you can migrate other workloads to other hosts in order to free up resources for this virtual machine. If VMware DRS is enabled and configured for fully automatic operation, this process would be handled without administrator intervention.
Many of these same techniques apply when diagnosing a virtual machine that is thought to be RAM (memory)-constrained, as you’ll learn next.
Identify a RAM-Constrained VM
In much in the same way as you would look both inside and outside the virtual machine to determine CPU contention, you need to look at counters and information from both sides to identify a RAM-constrained virtual machine.
Here are two common scenarios that you will encounter when dealing with memory contention issues:
The guest OS reports high memory usage, but the ESXi host shows plenty of memory capacity. In this instance, the guest operating system is using all the memory given to it by the hypervisor. If the hypervisor is not showing signs of memory pressure, adding memory to the virtual machine might resolve the issue. Also be sure that no memory limits have been applied to the virtual machine or the resource pool(s) in which the virtual machine resides. If limits have been applied, removing them might help resolve the issue and relieve memory pressure within the guest operating system.
The guest OS reports high memory usage, and the ESXi host’s memory utilization is also high. When both the guest OS and the ESXi host are reporting high memory usage, identifying the real source of the problem is a bit more difficult. Adding memory won’t fix the problem, as the host is also running low on memory. In this case, review reservations to ensure that memory has not been needlessly allocated in memory reservations. Recall that with memory reservations, once the guest OS has accessed reserved memory, that reserved memory is never reclaimed by the hypervisor for other purposes. This could lead to a high-memory-usage situation where some machines are being starved for memory. The Memory Swap Used (Average) counter, available in the Advanced view of the Performance tab, will provide a reasonably good idea of whether the ESXi host is actually under memory pressure. If the host is indeed under memory pressure and all other measures have been taken, you must migrate VMs to other hosts and/or add memory to the host in order to alleviate the problem.