Chapter 10
Importing and Exporting Virtual Machines
IN THIS CHAPTER, YOU WILL LEARN TO:
- UNDERSTAND THE MIGRATION PROCESS
- Understand the Types of Migrations
- Review the Components in a Migration
- PERFORM A PHYSICAL-TO-VIRTUAL MIGRATION
- Perform a Hot Migration
- Perform a Cold Migration
- Clean Up After a Migration
- Troubleshoot Physical-to-Virtual Migrations
- PERFORM A VIRTUAL-TO-VIRTUAL MIGRATION
- Migrate to or from a Different VMware Platform
- Migrate from a Competing Product
- Use a Virtual-to-Virtual Migration for Reconfiguration
- Troubleshoot Virtual-to-Virtual Migrations
- IMPORT AN OPEN VIRTUALIZATION FORMAT TEMPLATE
- Understand OVF Templates
- Deploy an OVF Template
Virtualized infrastructures built using VMware vSphere exist to run virtual machines (VMs). In addition to creating those virtual machines from scratch, administrators also have the option of importing machines into the environment. These VMs can also, should the need arise, be exported out of the environment. This chapter discusses how to import and export virtual machines.
Understand the Migration Process
Migrating systems, whether they are physical systems or virtual systems, into a VMware vSphere environment is a key task that virtually every vSphere administrator will need to perform. While VMware has gone to great lengths to make the migration process as easy as possible, it is still important for vSphere administrators to understand the types of migrations that are possible and the components that are involved in these migrations.
Understand the Types of Migrations
When it comes to importing or exporting virtual machines, there are two basic types of migrations you will encounter:
Physical-to-Virtual (P2V) Migration This type of migration involves importing an instance of an operating system running on a physical system into VMware vSphere and placing that operating system instance onto a corresponding virtual machine. Because this procedure is what brings existing workloads into your virtualization installation, it’s a key task for establishing or expanding your VMware vSphere environment.
Virtual-to-Virtual (V2V) Migration This type of migration involves importing or exporting from virtual machine format to virtual machine format. V2V is also commonly used to describe the major relocation of a VM from one cluster or datacenter to another. You might perform a V2V migration to import virtual machines from a competing virtualization solution, or even a different VMware platform. Similarly, you might perform a V2V migration to export an existing VMware vSphere virtual machine to run on a different VMware platform. Finally, you might even use a V2V migration to reconfigure an existing virtual machine, as you’ll see later in this chapter.
NOTE There is also a third type of migration, but it is rarely used: a virtual-to-physical (V2P) migration. VMware doesn’t provide any tools for performing a V2P, so administrators who need to perform a V2P migration will have to find and acquire third-party tools.
Within these two basic types of migrations, there are two different ways of performing the actual migration. You can perform:
Hot migration In this type of migration, the source system (physical or virtual) is running and active while the migration is being performed.
Cold migration In this type of migration, the source system (physical or virtual) is shut down and inactive while the migration is being performed.
Physical-to-virtual migrations might be either hot or cold migrations, but most virtual-to-virtual migrations will be cold migrations.
In addition to understanding the types of migrations you might perform as a VMware vSphere administrator, you must also understand the various components involved in performing these migrations. Depending upon the type of migration, different components might be involved.
Review the Components in a Migration
To import virtual machines into or export virtual machines out of a VMware vSphere environment, a number of components are required.
vCenter Converter Standalone
VMware vCenter Converter Standalone is central to all the different types of migrations you might perform. You typically install vCenter Converter Standalone on the same system as VMware vCenter Server, although you can install it on a separate computer that has access to vCenter Server. Although it is easiest to use vCenter Converter Standalone in conjunction with vCenter Server, it isn’t specifically required.
NOTE vCenter Converter Standalone communicates with vCenter Server over TCP port 443, which is the port for Hypertext Transfer Protocol (HTTP) over Secure Sockets Layer (SSL).
vCenter Converter Standalone Agent
To perform a hot migration, vCenter Converter Standalone uses a piece of software on the source system (physical or virtual) called the vCenter Converter Standalone Agent. This software installs on the source system and assists in the process of migrating the source system while the operating system instance on that source system is still running.
vCenter Converter Boot CD
If performing a hot migration is not an option, you can use the vCenter Converter Boot CD to boot the source system and perform a cold migration. Some older operating system versions and some applications might be incompatible with hot migrations, so performing a cold migration is the only way to get these source systems into your VMware vSphere environment.
NOTE Because vCenter Converter Standalone 5 does not directly support cold cloning, you must use the Boot CD from an earlier vCenter Converter edition. To obtain the Boot CD, you must download the vCenter Converter 4.1.x installation package.
Perform a Physical-to-Virtual Migration
Importing physical systems into VMware vSphere is a fundamental task to almost every VMware vSphere environment. Unless you are building the entire IT infrastructure from scratch, you will have physical systems that need to be imported into the virtualization solution. Performing a physical-to-virtual migration is how you will go about bringing those physical systems into your VMware vSphere installation.
A physical-to-virtual migration might be a hot migration, in which the source system is running while the migration is occurring, or a cold migration, in which the source system is unavailable while the migration is occurring. Both of these are discussed in the following sections.
Perform a Hot Migration
A hot migration, as explained earlier, is a migration that occurs while the source system is running. Hot migrations are supported for systems running Windows 2003 SP2, R2 or later, several versions of Red Hat Enterprise Linux, several versions of SUSE Linux Enterprise Server, and several versions of Ubuntu.
vCenter Converter Standalone accomplishes a hot migration by installing an agent, the vCenter Converter Standalone Agent, onto the source system. This agent enables the physical-to-virtual migration by allowing vCenter Converter Standalone to read data out of the source system while it is still running. Without the agent, a hot migration would not be possible.
To perform a hot migration of a system running Windows Server 2003 R2, follow these steps:
1. Launch VMware vCenter Converter Standalone.
2. Click Convert Machine.
3. Select Powered-On Machine from the Select Source Type dropdown and select Local Or Remote Machine, then click Next.
4. Select VMware Infrastructure Virtual Machine from the Select Destination Type drop-down.
5. Supply the IP address or fully qualified domain name (FQDN) of vCenter Server, and an appropriate user name and password. Click Next.
6. Specify a name for the new virtual machine and pick a location in the virtual machine inventory where you want to store the new virtual machine. Click Next.
7. Select the datastore where you would like the virtual machine’s virtual hard disks created and stored. If you selected a cluster or a resource pool in a cluster when you initiated the import process, the Conversion Wizard will prompt you to select a specific host on which the new virtual machine should run. After selecting a specific host, click Next.
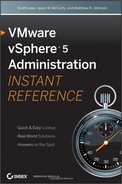
8. If you would like to resize volumes during the import process or make other changes, you can do so now (Figure 10.1). Specify a new size for each of the volumes or, to maintain the size, leave the size the same as the current size. Click Next when you are ready to continue.
9. Review the settings for the migration. If everything is correct, click Finish. Otherwise, click Back to make changes.
Figure 10.1: When importing volumes, vCenter Converter Standalone offers options to selectively import certain volumes, to change the size of volumes, and to make other changes.
vCenter Converter Standalone will create an active task for the conversion. You can use the Tasks pane in vCenter Converter Standalone to track the progress of the physical-to-virtual migration. When the migration is complete, you can start using the new virtual machine.
NOTE Since the newly created virtual machine is an exact copy of the physical source system, you must first shut down the physical source system before powering on the destination virtual machine. This will result in a small amount of downtime when the applications on that system will not be available. Be sure to plan for this downtime when conducting physical-to-virtual migrations in your environment.
A few post-conversion clean-up tasks are recommended once the physical-to-virtual migration is complete. Refer to the section titled “Clean Up After a Migration,” later in this chapter, for more information.
Perform a Cold Migration
In the event you can’t perform a hot migration, you can instead use a cold migration. With a cold migration, you use a boot CD to boot up the source system. The boot CD has its own operating system and also includes a version of the vCenter Converter application.
There are a number of reasons why you might want to perform a cold migration instead of a hot migration:
- The source system may have applications installed on it that are not compatible with a hot migration. Microsoft Windows Active Directory domain controllers are one example.
- You might not want users or other systems to be able to access the source system while it is being converted.
- You might not want the vCenter Converter Standalone Agent installed into the source operating system for change control or other organizational reasons.
VMware provides an .iso file that contains the boot CD image. Before starting a cold migration of a physical system, you will need to burn that .iso image to a physical CD.
To perform a cold migration of a physical source system, follow these steps:
1. Boot the source system from the CD you created with the vCenter Converter cold clone .iso file. You may need to modify the system so that it boots from the CD instead of from any local hard drives.
2. Press any key to boot the system from the CD.
3. When prompted, select the radio button labeled I Accept The Terms In The License Agreement. Click OK.
4. If you are not using Dynamic Host Configuration Protocol (DHCP) or if you need to manually adjust the network configuration, click Yes when asked if you want to update the network parameters.
5. If you chose to update network parameters, make the changes you need and then click OK.
6. When the VMware vCenter Converter window opens, click the Import Machine button in the toolbar. This launches the Import Wizard.
7. At the Source screen of the Import Wizard, click Next.
8. If you want to maintain the size of the disks on the source system, select Import All Disks and Maintain Size. Otherwise, select Select Volumes and Resize To Save Or Add Space and specify a new size for the volume listed. Click Next when you are ready to proceed.
9. Select vSphere Virtual Machine as the destination, and then click Next.
10. Provide the name or IP address of the vCenter Server and appropriate authentication information for that instance of vCenter Server. Click Next to continue.
11. Specify a name for the virtual machine and select a location in the virtual machine inventory where you would like to place the destination virtual machine. Click Next.
12. Select the host, cluster, or resource pool where you want the destination virtual machine to run. If you select a cluster or a resource pool within a cluster, you must also select a destination host on which to run the virtual machine.
13. Select the datastore where you would like to place the virtual machine disk files for the destination virtual machine. Use the Advanced button to place files in separate datastores. Click Next to proceed.
14. Specify the number of network interfaces for the destination virtual machine and the networks to which those interfaces should connect. Click Next.
15. Select Install VMware Tools and Remove All System Checkpoints (Recommended), then click Next. Because you will typically want the destination virtual machine to be an exact copy of the source system, don’t select the check box to customize the system.
16. Review the settings for the migration. If everything is correct, click Finish. Otherwise, use the Back button to go back and change settings as necessary.
A task appears in the VMware vCenter Converter window that shows the progress of the cold migration. After the migration completes, you can shut down the source system and power on the destination virtual machine. A few post-migration cleanup tasks are recommended after the migration is complete. Some of these configuration changes are described in the next section.
Clean Up After a Migration
After you have completed a physical-to-virtual migration and the physical source system has been imported and re-created as a virtual machine on VMware vSphere, there are some additional cleanup tasks you should perform. These tasks are necessary because the migration process, by its very nature, creates a copy of the operating system instance in a VM that is identical to what was on the source physical system. However, the virtual machine is not the same as the source physical system—it has different hardware. To help optimize the performance of the operating system instance after the import has completed, you should remove unnecessary and missing hardware entries.
On a Windows-based system, you’ll first need to tell Windows to show you missing hardware entries in Device Manager. Follow these steps:
1. Log on to the new Windows-based virtual machine with an account that has administrative privileges.
2. Right-click on My Computer and select Properties. If My Computer is not showing on the Desktop, use the Start Menu to open Control Panel, then double-click the System icon.
3. Click the Advanced tab.
4. Click the Environment Variables button.
5. At the bottom of the Environment Variables dialog box in the section marked System Variables, click the New button.
6. For Variable Name, specify DEVMGR_SHOW_NONPRESENT_DEVICES.
7. For Variable Value, specify 1.
8. Click OK to create the new system environment variable and return to the Environment Variables dialog box. The new system environment variable will be listed at the bottom of the dialog box.
9. Click OK to return to the System Properties dialog box.
10. Click OK to return to the Windows desktop.
Once you’ve completed these steps, you can use Device Manager to remove drivers and entries for hardware that is no longer present in the virtual machine after the physical-to-virtual conversion.
To remove references to missing hardware using Device Manager, follow these steps:
1. Log on to the new Windows-based virtual machine with an account that has administrative privileges.
2. Right-click on My Computer and select Properties. If My Computer is not showing on the Desktop, use the Start Menu to open Control Panel, then double-click the System icon.
3. Click the Hardware tab.
4. Click the Device Manager button.
5. Within the Device Manager console, select View ⇒ Show Hidden Devices.
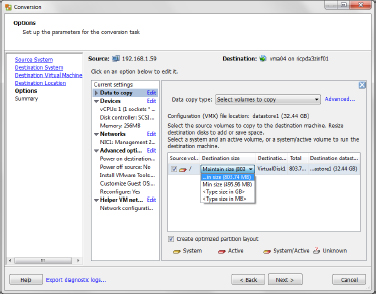
6. Navigate the Device Manager tree to remove missing hardware entries. These are noted with a dimmed icon in the list, as shown in Figure 10.2.
Figure 10.2: The dimmed icon for the VMware PVSCSI controller indicates that the hardware is no longer present in the virtual machine.
In addition, you will want to ensure that you have properly “right-sized” the new virtual machine for its needs. The physical-to-virtual migration process simply re-creates an identical virtual machine. You might need to adjust the memory configuration or the number of virtual CPUs to ensure that the new virtual machine is optimally configured.
Of course, not all physical-to-virtual migrations go smoothly, and there might be migrations that fail. In the next section, we’ll provide some information on troubleshooting physical-to-virtual migrations.
Troubleshoot Physical-to-Virtual Migrations
A number of factors can contribute to problems with physical-to-virtual migrations. Insufficient memory on the source system, lack of free disk space on the source system, unrecognized hardware, missing or damaged drivers on the source system, and file system errors are all possible causes for a failed physical-to-virtual migration.
To help ensure successful migrations, follow these guidelines:
- Perform file system maintenance on the source system. Clean up files, free up disk space, defrag, and run Chkdsk (or fsck) to ensure the file system is consistent. You’ll want to confirm that the source has at least 200MB free on the system volume.
- When performing a hot migration, shut down all unnecessary services.
- Avoid converting diagnostic or utility partitions.
- Ensure that you have the proper network connectivity between the source system and the destination vCenter Server system or ESX/ESXi hosts. TCP ports 443 and 902 should be open.
Perform a Virtual-to-Virtual Migration
Unlike physical-to-virtual migrations—which, by their very nature, involve importing systems into a VMware vSphere environment—virtual-to-virtual migrations might involve either importing or exporting virtual machines. In addition, almost all virtual-to-virtual migrations are cold migrations; the source virtual machine will have to be powered off in order to perform the migration.
TIP In the event you can’t afford the downtime of a virtual machine in order to perform a virtual-to-virtual migration, just treat the source virtual machine like a physical system. Install the vCenter Converter Standalone Agent on the source virtual machine and perform the equivalent of a physical-to-virtual hot migration.
Virtual-to-virtual migrations are typically used in a few different instances:
- To export a virtual machine from VMware vSphere to run on a different VMware platform, like VMware Workstation or VMware Fusion
- To import a virtual machine currently running on another VMware platform, such as VMware Workstation or VMware Server, into VMware vSphere
- To reconfigure an existing VMware vSphere virtual machine by resizing its virtual machine disks or aligning its partitions
- To import a virtual machine currently configured for a competing virtualization solution, such as Microsoft Hyper-V Server
Try not to let the term “virtual-to-virtual” confuse you. You can use vCenter Converter Standalone in this sort of mode to do quite a few things. In the next few sections, we’ll look at the most common uses of vCenter Converter Standalone for manipulating virtual machines.
Migrate to or from a Different VMware Platform
VMware vSphere is not VMware’s only virtualization platform. VMware has a number of others, such as VMware Workstation, VMware Server, and VMware Fusion. While these products share a great deal of commonality with VMware vSphere, there are enough differences that VMs created on one platform might not run on another platform without modification. For example, VMware vSphere VMs can use virtual machine hardware version 8, but VMs on VMware Workstation 7.1 use virtual machine hardware version 7. Without modification to the VM, a virtual machine created on VMware vSphere won’t run on VMware Workstation 7.1.
Fortunately, vCenter Converter Standalone can perform a virtual-to-virtual migration to resolve this issue. You can use VMware Converter Standalone to import VMs created on another VMware virtualization platform and to export VMs created on VMware vSphere so they will run on a different VMware virtualization platform. The process to import and export VMs using vCenter Converter Standalone is described in the next two sections.
Import VMs from a Different VMware Platform
If you have virtual machines created using a different VMware virtualization platform but you want to run those virtual machines on VMware vSphere 5, you can use vCenter Converter Standalone to import the virtual machine and perform the necessary reconfiguration to enable it to run in your vSphere environment.
vCenter Converter Standalone can import the following types of VMware virtual machines:
- VMware Workstation virtual machine
- VMware Player virtual machine
- VMware Server virtual machine
- VMware Fusion virtual machine
During the import process, vCenter Converter Standalone also offers the option of customizing the virtual machine so that the virtual machine you end up with might be very different from the one with which you started.
To import a virtual machine created using VMware Workstation or VMware Server, follow these steps:
1. Launch VMware vCenter Converter Standalone.
2. Click Convert Machine.
3. Select VMware Workstation Or Other VMware Virtual Machine from the Select Source Type drop-down.
4. Specify the local or Universal Naming Convention (UNC) path to the folder where the virtual machine files are stored, then click Next.
5. Select VMware Infrastructure Virtual Machine from the Select Destination Type drop-down.
6. Supply the IP address or fully qualified domain name (FQDN) of vCenter Server or an ESXi host, and an appropriate user name and password. Click Next.
7. Specify a name for the new virtual machine and pick a location in the virtual machine inventory where you want to store the new virtual machine. Click Next.
8. Select the datastore where you would like the virtual machine’s virtual hard disks created and stored. If you selected a cluster or a resource pool in a cluster when you initiated the import process, the Conversion Wizard will prompt you to select a specific host on which the new virtual machine should run. After selecting a specific host, click Next.
9. On the Options screen of the Conversion Wizard dialog box, choose whether you would like to resize volumes during the import process. Also choose whether you want to install the VMware Tools, customize the virtual machine, or remove all System Restore checkpoints. Click Next when you are ready to continue.
It’s recommended to remove System Restore checkpoints. The other two options depend upon the particular circumstances surrounding this virtual machine. In most cases, you will want to install the VMware Tools and not perform any customization.
10. Review the settings for the migration. If everything is correct, click Finish. Otherwise, click Back to make changes.
vCenter Converter Standalone will create an active task in the Tasks pane where you can monitor the progress of the task. Once the task has completed, you will have a new virtual machine in your inventory.
NOTE The process for importing a virtual machine created in VMware Fusion is fundamentally the same, but with some additional steps in the beginning to get the virtual machine files from the Mac OS X–based computer to a location accessible to vCenter Converter Standalone.
Export VMs to a Different VMware Platform
You can use vCenter Converter Standalone not only to import virtual machines from another VMware platform, but also to export virtual machines to another VMware platform.
To export a virtual machine for use with a different VMware platform, like VMware Workstation 7, follow these steps:
1. Launch VMware vCenter Converter Standalone.
2. Click Convert Machine.
3. Select VMware Infrastructure Virtual Machine from the Select Source Type drop-down.
4. Supply the IP address or fully qualified domain name (FQDN) of vCenter Server or an ESXi host, and an appropriate user name and password. Click Next.
5. Select the appropriate virtual machine from inventory. Click Next.
6. Select VMware Workstation or other VMware virtual machine from the Select Destination Type drop-down.
7. Select VMware Workstation 7.0.x from the Select VMware Product drop-down.
8. Specify the virtual machine name and a local or Universal Naming Convention (UNC) path to store the virtual machine files, then click Next.
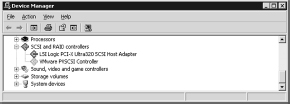
9. On the Options screen of the Conversion Wizard dialog box, select whether you would like to pre-allocate disk space and whether to split volumes into 2GB increments during the export process. Also select how many network interface cards (NICs) the exported virtual machine should have, and whether each of those NICs should connect to a Network Address Translation (NAT) network, a bridged network, or a host-only network. Click Next when you are ready to continue. (See Figure 10.3)
Figure 10.3: The vSphere administrator has several options for network connectivity when exporting VMs out of VMware vSphere.
10. Review the settings for the migration. If everything is correct, click Finish; otherwise, click Back as necessary to make changes.
As with most other import and export processes we’ve discussed, vCenter Server Standalone will create an active task that is visible in the Tasks pane once the export actually begins. You can monitor the progress of the export using this active task. Please note that you will not be able to use or edit the new virtual machine until the export is complete.
After the export is complete, you will need to add the new virtual machine to the other VMware platform. The procedure for adding the newly exported virtual machine varies based on the specific platform.
Migrate from a Competing Product
In addition to importing and exporting virtual machines to and from VMware platforms besides VMware vSphere, vCenter Converter Standalone can import virtual machines from some competing virtualization products. This functionality is invaluable during a migration from another virtualization product to VMware vSphere. For example, perhaps you initially deployed Microsoft Hyper-V Server to perform some testing of virtual machine images, but now you want to deploy those images into your VMware vSphere environment for additional testing. You can use vCenter Converter Standalone to help with this process.
The following competing virtualization platforms are supported for import:
- Microsoft Virtual PC 2004 and Virtual PC 2007 (Windows guests only)
- Microsoft Virtual Server 2005 and 2005 R2
- Microsoft Hyper-V Server (Windows and Linux guests only)
- Parallels Desktop for Windows and Mac OS X 2.5, 3.0, and 4.0
The process for performing an import of a virtual machine created using a competing virtualization platform is the same as for importing a virtual machine created using a different VMware platform. The instructions provided in the earlier section titled “Import VMs from a Different VMware Platform” are equally applicable to importing virtual machines from a competing virtualization platform.
Use a Virtual-to-Virtual Migration for Reconfiguration
As mentioned earlier, using a virtual-to-virtual migration is one way to reconfigure an existing VMware vSphere virtual machine. Consider this situation: you have a virtual machine that has been allocated too much disk space. Using a virtual-to-virtual migration, you could resize the disk volumes during the migration to reclaim disk space.
To resize the disk volumes for a virtual machine using a virtual-to-virtual migration, follow these steps:
1. Launch VMware vCenter Converter Standalone.
2. Click Convert Machine.
3. Select Powered-on Machine from the Select Source Type dropdown and select Remote Machine, and then click Next.
4. Select VMware Infrastructure Virtual Machine from the Select Destination Type drop-down.
5. Supply the IP address or fully qualified domain name (FQDN) of vCenter Server or an ESXi host, and an appropriate user name and password. Click Next.
6. Specify a name for the new virtual machine and pick a location in the virtual machine inventory where you want to store the new virtual machine. Click Next.
7. Select the datastore where you would like the virtual machine’s virtual hard disks created and stored. If you selected a cluster or a resource pool in a cluster when you initiated the import process, the Conversion Wizard will prompt you to select a specific host on which the new virtual machine should run. After selecting a specific host, click Next.
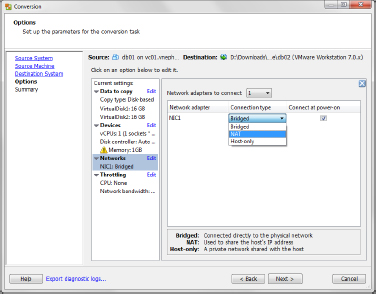
8. Because you are specifically performing this virtual-to-virtual migration to resize the virtual machine’s hard disks, you can do so here. For each volume listed, use the drop-down list to choose the minimum size or to specify the size of the volume after the migration. Figure 10.4 shows the drop-down list for a virtual machine. Click Next when you are ready to continue.
Figure 10.4: The drop-down list provides the minimum size possible for a virtual machine’s hard disk.

9. Review the settings for the migration. If everything is correct, click Finish. Otherwise, click Back as necessary to make changes.
As you have seen in other migrations, vCenter Converter Standalone will create an active task that is visible in the Tasks pane. You can use this task to monitor the progress of the virtual-to-virtual migration. When the migration is complete, you can power on the virtual machine and start using it.
NOTE If you did not customize the virtual machine as part of the virtual-to-virtual migration, the new virtual machine created as part of the process will be an exact copy of the original virtual machine. This means that you should be sure to power down the original before powering on the new one.
In addition to resizing virtual disks, vCenter Converter Standalone can also be used to reconfigure a virtual machine in the event that an error has occurred and it is no longer able to boot. VMware provides a specific option for using vCenter Converter Standalone in this particular way.
To use vCenter Converter Standalone to reconfigure an unbootable virtual machine so it will boot, perform these steps:
1. Launch VMware vCenter Converter Standalone.
2. Click Configure Machine.
3. Select VMware Infrastructure Virtual Machine from the Select Source Type drop-down.
4. Supply the IP address or fully qualified domain name (FQDN) of vCenter Server or an ESXi host, and an appropriate user name and password. Click Next.
5. Select the appropriate virtual machine from inventory. Click Next.
6. Select the check boxes marked Remove System Restore Checkpoints On Destination and Reconfigure Destination Virtual Machine, as in Figure 10.5. Click Next to continue.
Figure 10.5: When using vCenter Converter Standalone to reconfigure a virtual machine, there’s no need to install the VMware Tools or customize the VM.

In almost all other cases, since you are simply reconfiguring an existing system, you will not want to select either of the other two check boxes.
7. Click Finish to perform the reconfiguration.
vCenter Converter Standalone will reconfigure the virtual machine so that it will boot properly. (Note that this does not fix problems with the guest operating system within the virtual machine. In these cases, the administrator must usually revert to guest OS–specific techniques, like performing a repair installation.) Like other procedures with vCenter Converter Standalone, a task is present in the Tasks pane by which you can monitor the progress of the task.
Troubleshoot Virtual-to-Virtual Migrations
While virtual-to-virtual migrations aren’t the same as physical-to-virtual migrations, many of the recommendations for ensuring successful physical-to-virtual migrations, described in “Troubleshoot Physical-to-Virtual Migrations,” earlier in this chapter, also apply here.
Some additional considerations for virtual-to-virtual migrations include:
- Make sure you have all the correct files necessary to import a virtual machine from a competing virtualization platform. For example, if you might have the .vhd (Virtual Hard Disk) file for a Microsoft Virtual PC virtual machine, but not the .vmc (Virtual Machine Configuration), vCenter Converter Standalone can’t import the virtual machine. Similarly, for VMware virtual machines created on other VMware platforms you must have both the .vmx (virtual machine configuration) file and the .vmdk (virtual hard disk) files.
- If the source is a virtual machine created in Microsoft Virtual PC, remove the Virtual PC Additions prior to importing the virtual machine.
Import an Open Virtualization Format Template
The idea of a virtual appliance—a prepackaged virtual machine that is already installed and configured with the necessary software to perform a specific task—has been discussed at VMware for quite some time. One thing VMware needed was a standard way of packaging and deploying virtual appliances. The Open Virtualization Format (OVF) is one such standard. Ratified by the Desktop Management Task Force (DMTF) as a standard, the OVF 1.1 standard is fully supported by VMware vSphere and by several other virtualization products. Additional virtualization vendors have announced support for OVF in their products. Using OVF, creators of virtual appliances have a way of packaging and distributing their products in a format that multiple vendors will understand.
This section describes OVF templates and how to deploy virtual appliances using them.
Understand OVF Templates
This book primarily addresses OVF templates as they relate to VMware vSphere, but it is important to remember that OVF is designed to a platform-neutral, format-neutral specification.
According to the DMTF, OVF was designed to meet the following requirements:
- OVF supports both single-VM and multiple-VM configurations; the latter is key to VMware’s vApp functionality.
- OVF is both vendor- and platform-agnostic, supporting multiple virtual hard disk formats. In addition, OVF does not depend upon any specific host platform, hypervisor, or operating system.
- OVF is extensible, allowing the specification to accommodate present as well as future requirements.
NOTE Readers interested in more details on OVF are encouraged to download and review the official OVF Specification from the DMTF at http://www.dmtf.org/standards/published_documents/DSP0243_1.1.0.pdf.
An OVF template (sometimes also referred to as an OVF package) will consist at minimum of an OVF descriptor with an .ovf extension. In addition, the template may include one or more hard disk images, and may include a Manifest (.mf file), certificate (.cert file), and additional resource files (like .iso files).
An OVF template can be distributed as separate files, or the OVF package can be distributed as a single file using the .ova extension. OVF templates distributed as a single file use the standard UNIX TAR format. This means that you can both assemble and extract OVF packages using standard TAR-compliant tools.
The OVF descriptor is an XML document that contains the definitions for the number of virtual machines in the package, the virtual machine hardware for each of the virtual machines, references to other files (virtual machine disk files, for example), the operating system running within the virtual machines, network and storage configuration, and so on. The complete description of one or more virtual machines is encapsulated in the OVF XML document. It is this document that VMware vSphere and other virtualization solutions use to deploy the OVF template.
Deploy an OVF Template
Now that you have an idea of what an OVF template is, let’s deploy an OVF template into your VMware vSphere environment. As an example, we’ll work with the vSphere Management Assistant (vMA), a command-line interface designed for use with VMware vSphere. vMA is distributed as an OVF template.
NOTE The vSphere Management Assistant is available for download from VMware’s website at: http://www.vmware.com/download/download.do?downloadGroup=VMA50
To deploy the vMA using an OVF template, perform the following steps:
1. From within vSphere Client while connected to a vCenter Server instance, select File ⇒ Deploy OVF Template.
2. If you have already downloaded the vSphere Management Assistant, use the Browse button to find and select the OVF file you downloaded, then click Next when you are ready to continue.
3. Click Next at the OVF details screen.
4. Click Accept, then click Next.
5. Specify a name for the new virtual machine and select a location in the virtual machine inventory. Click Next to continue.
6. Choose a host or cluster on which to deploy this OVF template. When you are ready to continue, click Next.
7. If you selected a cluster that has DRS disabled or configured for manual automation, you must select a specific ESX/ESXi host on which to run the new virtual machine. Click Next to continue.
8. Select a datastore where the virtual machine’s virtual hard disks should be stored. Click Next to continue to the next step.
9. Map the vMA’s Management Network to an applicable network defined in your VMware vSphere environment. While this virtual appliance has only a single network connection, some virtual appliances may have multiple network connections. Each network connection must be mapped to the appropriate network in the destination VMware vSphere environment. Click Next when you are ready to continue.
10. Review the settings. If everything is correct, click Finish. Otherwise, click Back to go back and make any necessary changes.
11. vCenter Server will display a dialog box that shows the progress of deploying the virtual machine from the OVF template. If you chose to deploy from a URL, vCenter Server will download the necessary files from the specified URL. Depending upon the size of the virtual appliance, this may take some time. vCenter Server will also show an active task in the Tasks pane of vSphere Client.
After the new virtual machine has been fully deployed, you can configure it in the same fashion as any other virtual machine. Depending upon the software within the virtual machine, there may be additional configuration steps necessary before it is fully functional.