Chapter 2
Installing and Configuring ESXi
IN THIS CHAPTER, YOU WILL LEARN TO:
- PREPARE FOR INSTALLATION
- INSTALL ESXI
- Install ESXi Manually
- Automate ESXi Installation
- CONFIGURE POST-INSTALL OPTIONS
- Configure ESXi from the Console
- Install the vSphere Client
- Configure ESXi from within the vSphere Client
They say that when you build a house, one of the most important steps in that process is building the foundation, since everything will depend on its integrity. When deploying a virtual infrastructure, the underlying installation and its configuration are equally important. In this chapter, we are going to cover the most common approaches to deploying ESXi.
With the release of vSphere 4, VMware signaled that the 32-bit era was nearing its “virtual” end. vSphere is now only available in 64-bit. While 64-bit hardware has been available for several years, some organizations may run a mix of classic ESX and vSphere until all their hardware has been upgraded so that it’s capable of running vSphere. VMware is fully aware of this; the new version is capable of running and managing older versions as well as vSphere—in other words, a mix of the two. Some environments tend to keep it simple by deploying each host through the interactive installation method. There is no real problem with this—a host can be completely installed in 20 to 30 minutes by someone who knows what they’re doing. Scripted installations can be carried out by creating a ks.cfg file and putting it on a CD, thumb drive, FTP site, or website.
There is a downside to manual installations: as the number of hosts that are to be manually installed increases, the likelihood of errors and inconsistencies in the builds and configurations across those hosts increases. It’s important to have consistency across your builds, so implement a suitable deployment methodology. For example, without consistency in your datastore and networking setup, processes like vMotion may work inconsistently or not at all.
When planning to install ESXi version 5.0, it is important to know what hardware is required. The following lists are current as of the time of this writing. For the most up-to-date information, refer to the Hardware Compatability Guide (HCL) on the VMware website at the following URL:
Processor Types The following 64-bit processor types are acceptable:
- 64-bit x86 CPUs.
- All AMD Opteron processors.
- Must have at least two cores.
- Supports only LAHF and SAHF CPU instructions.
- All Intel XEON 3000/3200, 3100/3300, 5100/5300, 5200/5400, 7100/7300, 7200/7400, 7500 processors.
RAM You need a minimum of 2 GB of RAM. Additional RAM is needed for each virtual machine added. We recommended that you start with 3 GB of RAM or more.
Network Adapters Follow these guidelines for network adapters:
- For best performance, select adapters with dedicated Gigabit Ethernet cards for VMs, such as Intel PRO/1000 adapters or better.
- For security purposes, keep the Management Network on its own virtual LAN (VLAN) or network interface card (NIC) (or use teamed NICs for redundancy).
- The more NICs you have on a virtual switch, the more redundancy there is in case of a failure.
- Broadcom NetXtreme 570x Gigabit controllers are acceptable.
Adapters and Controllers Keep the following in mind when selecting Fibre Channel adapters, SCSI adapters, or internal RAID controllers:
- Use only Fibre Channel Host Bus Adapter (HBA) cards as outlined in the Hardware Compatibility Guide.
- Basic SCSI controllers are Adaptec Ultra160 and Ultra320, LSI Logic’s Fusion-MPT, and most NCR/Symbios controllers.
- RAID adapters supported include Dell PERC (Adaptec RAID and LSI MegaRAID), HP Smart Array, and most IBM (Adaptec) ServeRAID controllers.
- Supported serial-attached SCSI (SAS) controllers include LSI1068E (LSISAS3442E), LSI 1068 (SAS 5), IBM ServeRAID 8k SAS controller, Smart Array P400/256MB controller, and the Dell PERC 5.0.1 controller.
- Supported onboard Serial ATA (SATA) controllers include Intel ICH9, NVIDIA MCP55, and ServerWorks HT1000.
Installation and Storage Factors Here are the hardware requirements for installation and storage:
- You will need a SCSI disk, Fibre Channel LUN, or RAID LUN with unpartitioned space. In a minimum configuration, the disk or RAID is shared between the Service Console and the virtual machines.
- For hardware iSCSI, you will need a disk attached to an iSCSI controller, such as the QLogic QLA405x. Software iSCSI is not supported for booting or installing ESXi.
- Serial Attached SCSI (SAS) disk drives are supported for installing ESXi and for VMFS partitions.
- For Serial ATA (SATA), you will need a disk connected through supported SAS controllers or supported onboard SATA controllers. Only SATA disk drives connected behind supported SAS controllers or supported onboard SATA controllers are supported in ESXi hosts.
SATA Drives When installing ESXi on SATA drives, consider the following:
- Ensure that your SATA drives are connected through supported SAS controllers or supported onboard SATA controllers.
- Do not use SATA disks to create Virtual Machine File System (VMFS) datastores shared across multiple ESXi hosts.
VMware has put together a list of prerequisites that you should be aware of before traveling down the virtualization highway. Take a moment to become familiar with this list. That way, you can avoid frustration down the road if something doesn’t work the way you expect it to.
For a production environment, the most important thing is to make sure all hardware is listed in the Hardware Compatibility Guide before you purchase it. Check specific pieces of hardware like NICs and SAS and SATA controllers. If problems occur during or after an installation, hardware compatibility is the last thing you want to deal with. However, it is often the first thing support will ask about.
Additionally, check to make sure that the hardware clock (in BIOS) is set to coordinated universal time (UTC). If you’re planning to build multiple ESXi hosts, document the settings in BIOS for the CPU and ensure they are the same on all hosts. If the settings in BIOS are not the same on all hosts, you may not be able to move a virtual machine from one host to another without having to power the virtual machine down. With documentation, you won’t have to guess what is and is not enabled or disabled on other hosts.
TIP Be careful when upgrading firmware and BIOS. Some hosts may lose their settings in the BIOS after an upgrade. After upgrading these software pieces, it is a good idea to double-check and make sure the settings you originally had in place have not changed.
TIP There are circumstances where administrators are required to know which physical NIC is which from inside the operating system—for example, when troubleshooting. This is not always easy to accomplish post-installation. One strategy is to label the NICs at installation by plugging one cable in at a time, labeling it, and repeating (look for the link light).
ESXi is the direction VMware has taken. They no longer provide the ESX hypervisor platform. ESXi’s configuration options have been stripped down, making installing ESXi a small part of the overall implementation. The installation of ESXi is extremely fast and easy, partly because system, network, and storage devices as well as the IP addressing (set to DHCP) are configured with defaults. In fact, you have to configure only two things: which storage device to install on and the root password.
NOTE Third-party drivers are available that integrate with the vSphere installation. However, if you are using a DVD to install vSphere, you must use that DVD drive to install the custom drivers as well. You will be required to remove the vSphere DVD and insert the custom driver’s DVD, install the driver, and then replace the vSphere DVD to complete the installation. If you are using an International Organization for Standards (ISO) image to install vSphere, the custom drivers must also be on an ISO image. Unfortunately, if a USB device is the installation device, it cannot be removed for this process. If you forget to install custom drivers at this stage, you can install them later.
Install ESXi Manually
The interactive method is the most widely used method for installation. Administrators from novice to expert can use this method to get a host up quickly and easily. Follow these steps:
1. Insert the installation media into the appropriate drive and reboot.
2. The first screen is very generic, as you can see in Figure 2.1. The choices are ESXi Installer or Boot From Local Disk. Highlight the first option and press Enter.
3. The ESXi installer screen will appear. After a few moments of loading various modules, you will be presented with the Welcome screen. Press Enter to continue.
4. On the EULA screen, read the agreement and when you are ready, press F11 (Accept and Continue).
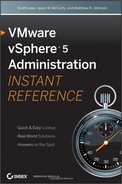
5. The Select A Disk screen (Figure 2.2) lists the available disks on the system. Highlight the drive you wish to install on and press Enter.
Figure 2.1: Initial ESXi installation screen

Figure 2.2: Selecting a disk on which to store EXSi
Previously Formatted Drives
If you are installing on a drive that has a version of ESXi already installed, you will see a message asking what you want to do:
- Upgrade ESXi and preserve your VMFS datastore
- Install ESXi and preserve your VMFS datastore
- Install ESXi and overwrite your VMFS datastore
Consider your choices carefully. Remember, this list of storage devices could contain production data or virtual machine storage areas that are not physically located on the host and could be shared with other hosts. There might even be virtual machines running on these remotely attached hard drives. Smart administrators disconnect shared storage devices during an installation to avoid this potential issue. Don’t be that admin who formatted production volumes and then had to restore or rebuild those deleted virtual machines!
As an extra check, make sure the size of the LUN matches expectations for the storage.
There are many ways to address attached storage. One of the best ways to handle this is to make sure the host is powered off and to simply unplug the fiber to the remote storage, or whatever physically connects the storage to the host. Another option is to ask the SAN administrator to disable the port(s).
The moral of the story is to be certain that when you go through the installation, there is no chance of deleting important storage.
6. Next, you will select your keyboard layout. Accept the default and press Enter to continue.
7. Now enter in your root password. Press the down-arrow button to highlight the Confirm Password field. Reenter your password, then press Enter to continue.
Password Guidelines
When you create a password, you should include a mix of characters from four character classes: lowercase letters, uppercase letters, digits, and special characters such as an underscore or dash.
Your password must meet the following length requirements:
- Passwords containing characters from one or two classes must be eight characters long.
- Passwords containing characters from three classes must be seven characters long.
- Password containing characters from all four classes must be six characters long.
An uppercase character that begins a password does not count toward the number of character classes used. A digit that ends a password does not count toward the number of character classes used.
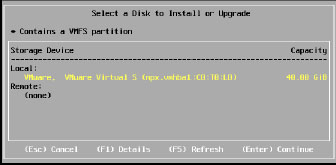
8. At this point, a system scan begins, then you see a screen labeled Confirm Install (Figure 2.3). This message is a warning that the disk will be repartitioned. Press F11 to begin the install.
9. When you see the Installation Is Complete screen, remove your installation media and press Enter to reboot. The next screen will show the IP address and other system information.
Figure 2.3: Warning about disk repartition
While the physical part of the installation is finished, there are still some tasks to complete before the ESXi host is ready to go into production. See the “Configure Post-Install Options” section later in this chapter.
Automate ESXi Installation
Automated installations are fast and useful way to build hosts. There are times when a fast build is necessary—think disaster recovery. Additionally, automated installations ensure all builds are exactly the same. And most important, why spend unnecessary time doing something that can be accomplished while you relax and watch the process do what it is designed to do?
This section discusses several ways to automate ESXi installation:
- Installation script (ks.cfg file) on a USB device
- vSphere Auto Deploy
- vSphere ESXi Image Builder CLI
Perform a Scripted Installation Using a USB Device
A friend of mine says he does his best work while getting coffee (he scripts everything). An installation script is nothing more than a text file called ks.cfg. Essentially it is an answer file. The best approach to scripting installs is to create a master script, and then make copies of it for each ESXi host in your inventory, customized with the IP address, hostname, and any other pertinent information needed. An added benefit of this strategy is increased knowledge of the moving parts encompassing an ESXi host.
Sample ks.cfg Script
The following code is an example of a ks.cfg file. This file is used to perform a scripted installation; it is the answer key. This is only an example—you can add to or subtract from it—but it is a good starting point for a scripted installation.
#
# Sample scripted installation file
#
# Accept the VMware End User License Agreement
vmaccepteula
# Set the root password for the DCUI and Tech Support Mode
rootpw mypassword
# Install on the first local disk available on machine
install --firstdisk --overwritevmfs
# Set the network to DHCP on the first network adapter
network --bootproto=dhcp --device=vmnic0
# A sample post-install script
%post --interpreter=python --ignorefailure=true
import time
stampFile = open('/finished.stamp', mode='w')
stampFile.write( time.asctime() )
Where can you find an install script? The default ks.cfg installation script is located in the initial RAM disk at /etc/vmware/weasel/ks.cfg. You can specify the location of the default ks.cfg file with the ks=file://etc/vmware/weasel/ks.cfg boot. Take a copy of what is in the ks.cfg file, use a program similar to Win32pad that produces a plain .txt file, save the file in Unix format, and then edit as necessary.
NOTE The ks.cfg file must be copied to the root directory of the USB drive. Only FAT16 and FAT32 file systems are supported.
Follow these steps to install via a script:
1. Insert the installation media and power on the host. The installation will boot from the CD/DVD and draw answers from the USB device.
2. When the ESXi installer screen appears, press Shift+O to edit boot options.
3. At the command prompt, type: ks=usb.
4. The process should take off. When complete, reboot as prompted.
Scripting the install of ESXi is a great step toward provisioning resources quickly. It is worth mentioning here the additional methods available to you.
A Bit About Cloud Computing
Imagine for a moment you needed more capacity in a VMware cluster. You could install an additional ESXi host and configure it with the same setup as all the other ESXi hosts in that cluster. But even if you script the build and everything is automated, the process can still take a few hours. Now imagine you have Host Profiles (a golden image or template) set up and working alongside vSphere Distributed Switch. You can take a host from one cluster that is underutilized, remove it, and place it into the other cluster that needs resources. You just apply the host profile and the switching, and the cluster then has more resources.
You could have spare hardware to put in place. Or you could perform a physical-to-virtual (P2V) conversion and then commandeer that hardware and install ESXi.
The two primary aspects of cloud computing you must consider are:
- How easy is it to add additional capacity and resources to the cloud?
- How easy is it to move applications or servers to and from different clouds?
Virtualization is moving toward a device-like host that is as simple as possible to plug into the virtual infrastructure so that additional resources (CPU, memory, network, storage) can be added with minimal effort.
Use vSphere Auto Deploy
By using vSphere Auto Deploy, system administrators can manage large vSphere deployments efficiently. Auto Deploy leverages a Pre-Boot Execution Environment (PXE) boot infrastructure to load the ESXi image directly into the host memory and does not store ESXi state on the disk. The vCenter Server stores and manages ESXi patches and updates via the image profile. Optionally, you can specify the host profile to apply. Keep in mind that you will need to set up Dynamic Host Configuration Protocol (DHCP) and Trivial File Transfer Protocol (TFTP) servers if you do not already have these in your environment. You will need administrative privileges in order to configure these components to work with Auto Deploy.
Once you have the preliminaries in place, follow these steps to use vSphere Auto Deploy:
1. Install vSphere Auto Deploy.
NOTE Auto Deploy can be installed on a vSphere server or a standalone Windows server. It comes preinstalled on the vCenter Server Appliance.
2. Connect the vSphere Client to the vSphere server that the Auto Deploy server registered with during the install.
3. Make sure you are on the home screen within the vSphere client. In the Administration section, select Auto Deploy. (See Figure 2.4.)
4. On the Auto Deploy page that appears, click Download TFTP Boot Zip.
5. Unzip the file and copy it to the directory where the TFTP server stores its files.
6. Configure the DHCP server to point to the TFTP server using option 66, sometimes referred to as next-server.
7. On the DCHP server, configure option 67, sometimes referred to as boot-filename, to point to the boot file name undianly.kpxe.vmw-hardwired.
8. Set the host to PXE boot.
9. Specify a host profile. You can create a new host profile, use an existing one, or save one from an already existing host.
10. Create rules to assign image profiles and optional host profiles to the host.
Figure 2.4: Auto Deploy icon

When the server is powered on, it will contact the DHCP server, which will direct it to Auto Deploy server to install the host.
NOTE Couple Auto Deploy with Image Builder CLI to create and deploy custom ESXi installs for your environment.
Use vSphere ESXi Image Builder CLI
ESXi Image Builder CLI is used to create ESXi installation images. These images can contain a customized set of updates, patches, and drivers. Additionally, Image Builder CLI can manage VMware Installation Bundle (VIB) and image profiles. VIBs are software packages. Image profiles define which VIBs to use.
NOTE Image Builder must be installed on a Windows server that has .NET 2.0 and PowerShell 1.0 or 2.0 installed.
Here are several different scenarios in which you could use Image Builder:
Auto Deploy Create image profiles to auto-deploy new hosts.
Add custom drivers Add third-party driver or extensions to an existing image profile.
Upgrade Upgrade from 4.0 or 4.1 systems. Create an image profile that includes vSphere 5.0 base VIB and any custom extensions, and then export the profile to an ISO image.
Reduced footprint images Use Image Builder CLI to clone your ESXi base image profile and remove VIBs.
Examples of Common Tasks within Image Builder
The following are examples of tasks that administrators would perform within Image Builder.
Clone an Image Profile To clone an image profile, follow these steps:
1. From the PowerShell prompt, run the following command to add the depot that contains the profile you want to clone to the current session:
Add-EsxSoftwareDepot -DepotUrl depot_url
2. Run the New-EsxImageProfile cmdlet to create the new profile and use the -CloneProfile parameter to specify the profile you want to clone.
New-EsxImageProfile -CloneProfile Old_Profile -Name "Test Profile"
Add VIBs to an Image Profile To add VIBs to an image profile, follow these steps:
1. From the PowerShell prompt, run the following command to add the depot that contains the profile you want to clone to the current session:
Add-EsxSoftwareDepot -DepotUrl depot_url
2. To list all image profiles in all the currently visible depots, run the following command:
Get-EsxImageProfile
3. To add a package to an image profile, run the following command:
Add-EsxSoftwarePackage -ImageProfile My_Profile -SoftwarePackage partner-package
NOTE An image profile is locked if it is assigned to one or more hosts. Clone the image profile and add the VIBs to the new profile.
Configure Post-Install Options
Once your ESXi installation is complete, there are still steps that need to be taken before you are ready to deploy Virtual Machines to the host.
1. Configure ESXi from the console.
2. Install the vSphere Client.
3. Configure ESXi from within the vSphere Client.
Configure ESXi from the Console
This section will cover additional steps needed to configure ESXi from the console. Some of the options available from the ESXi console can be configured from the vSphere Client once the server is up on the network. This will be covered in later chapters in the book.
Your first step is to configure the Management Network. Once the host has booted after the install, you will be presented with a gray and yellow screen (Figure 2.5) listing the version and build of ESXi you are running, some basic hardware information about the server it is running on, and the hostname of the server. Along the bottom of this screen, there are two options: (F2) Customize System/View Logs and (F12) Shutdown/Restart. Note that the F12 option is not shown in Figure 2.5.
Figure 2.5: ESXi has rebooted.

1. Press F2 and the Authentication Required screen will appear. Log in as root.
2. Once logged in, you should see the System Customization screen. Use the down-arrow button to select Configure Management Network and press Enter.
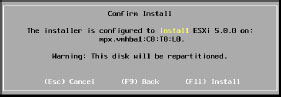
3. The first option in the list is Network Adapters (Figure 2.6). Select this option, choose the network adapter that you want to use for the default management network, and press Enter.
4. Now select the IP Configuration option and press Enter.
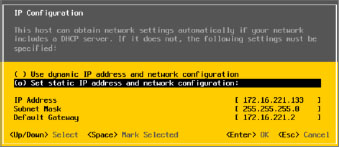
5. If you are using DHCP for the management network, then you should not have to change anything in the IP Configuration screen. You will configure the ESXi install with a static IP address. Select the Set Static IP Address And Network Configuration option and press the spacebar.
6. The bottom portion of the screen (Figure 2.7) is now available to change. Enter the appropriate IP address, Subnet Mask, and Default Gateway. Press Enter.
7. You should be back on the Configure Management Network screen. Now select DNS Configuration and press Enter.
8. Enter the addresses for the Primary DNS server and Alternate DNS server. Then enter the fully qualified domain name. Press Enter.
9. From the Configure Management Network screen, select Custom DNS Suffixes. Enter the DNS domain for your environment. This will be used to append to any short unqualified names for DNS queries. Press Enter to return to the Configuration Management Network screen.
10. Press Esc to exit back to the System Customization screen.
11. You will be prompted to apply the network changes and restart the management network. Press Y to accept.
12. Select Test Management Network and press Enter.
13. A screen displaying the network settings assigned to the server appears. Review the information and then press Enter. This will test communication to the defined default gateway and DNS servers, and attempt to resolve the hostname with DNS. Press Enter to perform the test and Enter again once the test has completed.
14. At this point, the base install of ESXi is complete and you should be able to communicate with it on the network. Press Esc to quit the System Customization screen and return to the main ESXi screen. This will log you out of the console.
Figure 2.6: Selecting multiple Network Interface Cards
NOTE You can select more than one adapter for fault-tolerance and load-balancing configurations by highlighting each adapter you want to use and pressing the spacebar.
NOTE It is recommended that any production ESXi host be configured with a static IP address. Configuring the IP address statically reduces the chance for resolution issues later on.
Figure 2.7: IP Configuration screen
TIP Be sure to add a DNS entry for each host. Also, when adding hosts to vCenter, always use the fully qualified domain name (FQDN); features like High Availability (HA) and vMotion depend on this information. If your environment does not have DNS, you will want to add a host file after installation.
Install the vSphere Client
Follow these steps to install the vSphere Client on your computer. Doing so will allow you to use a graphical user interface (GUI) to access either vCenter or an ESX or ESXi host remotely.
1. Open your browser.
2. Note the IP address on the ESXi console window and enter your IP address into your web browser, like this:
http://172.16.231.133/
3. If the Choose A Digital Certificate window appears, click OK.
4. If the browser is Internet Explorer (IE), the next window to appear is a security certificate window; click Continue To This Website.
5. The Choose A Digital Certificate window may reappear; if so, click OK a second time.
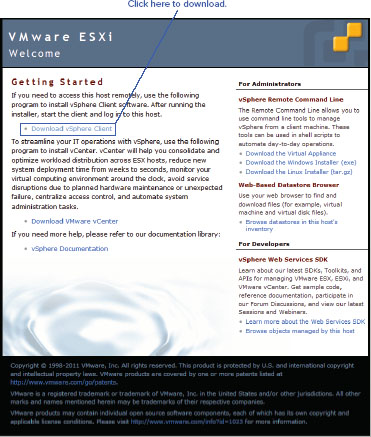
6. The VMware ESXi Welcome browser page should load (see Figure 2.8). Click Download vSphere Client.
7. When the Do You Want To Run Or Save This File window opens, choose Run. Follow the prompts to finish the install.
Figure 2.8: VMware ESXi Welcome page
Configure ESXi from within the vSphere Client
Now that you have the vSphere client installed, you will want to log in and perform a few more tasks before you start deploying virtual machines.
ESXi Licensing
Licensing can be entered via vCenter or through the host directly. We will cover licensing through the vCenter client.
To enter licensing on a standalone host:
1. Sign into the vSphere client. From the home screen, select Inventory. Click the Configuration tab; under Software, click Licensed Features.
2. In the top-right corner, click Edit and then click the radio button “Assign a new license key to this host.”
3. Click the Enter Key button and type your license key (including the dashes), and click OK twice (see Figure 2.9).
Figure 2.9: Assigning a license

Add Datastores
VSphere 5 datastores support SCSI, iSCSI, Network File System (NFS), Fibre Channel, or Fibre Channel over Ethernet (FCoE) attached disks.
Naming Convention for Datastores
Datastores are essentially hard drives where you can store anything from virtual machines to templates to ISO files. They should be carefully named so that your infrastructure is easy to navigate and has intuitive organization. The characteristics of the storage can be used to name the datastores; for example, which clusters the storage belongs to, if the datastores are replicated for disaster recovery, if the datastore is a 15,000 RPM drive for databases, or the hexadecimal/decimal name of the LUN (if it is on a SAN).
For SAN storage, keep in mind that the way SAN administrators see LUNs and the way vCenter and ESXi see LUNs is not always the same (hexadecimal as opposed to decimal). Consider the example of a LUN named R003_DMZ_84_086a. A naming convention similar to the following will help not only the SAN team but also the administrators who manage the infrastructure:
R = Replicated storage
003 = Third LUN
84 = EMC DMX
086a = LUN device as seen by SAN administrators in hexadecimal format
Local storage, however, may not need such an elaborate naming convention.
To add datastores, follow these steps:
1. Sign in to the vSphere client. From the home screen, select Inventory. Click the Configuration tab. Under Hardware, click Storage.
2. In the upper-right section of the Storage screen, click Add Storage.
3. The Add Storage screen should open up. Select a storage type: Disk/LUN or Network File System. Choose Disk/LUN (see Figure 2.10) and click Next unless you want to add an NFS.
4. The next screen lists the available disks from which to select. Click the disk you want to use for the datastore. Click Next.
5. Select the file system version. If this is the first ESXi host in your environment, then you will want to go with VMFS-5. If you have existing ESX or ESXi hosts, then you will want to give your choice some consideration as it will dictate compatibility with existing hosts. For our purposes, we assume this is your first ESXi host and we will select VMFS-5 and click Next.
6. Now, you should be presented with the Review the Current Disk Layout Screen. Click Next.
7. You are now ready to name your datastore. Enter a descriptive name and click Next.
8. On the Disk/LUN Formatting screen, select whether you want to use the maximum available space or a custom amount of space from the disk. Take the default selection and click Next.
9. The Ready to Complete screen should now be up. This is a summary screen of the options you have selected for you to review one last time before adding the datastore. Click Finish.
Figure 2.10: Selecting a disk for a new datastore

After a few moments, the new datastore should show up on the storage screen under the Configuration tab.
Configure Network Time Protocol
You will want to configure an NTP server so that all your host and Virtual Machine clocks are in sync. Follow these steps:
1. Sign in to the vSphere client. From the home screen, select Inventory. Click the Configuration tab; under Software, click Time Configuration. This screen will show the current date and time, whether the NTP client is running, and which NTP servers are currently configured.
2. In the top right, click Properties. The Time Configuration window is the place to adjust the date and time. Or you can click Options in the lower right to configure the NTP daemon.
3. On the General tab, the service can be started, stopped, restarted, or changed to start automatically, start and stop with the host, or start and stop manually (see Figure 2.11).
4. Click NTP Settings in the window on the left.
5. Click Add and enter the NTP server address and click OK. Select Restart NTP Service to apply changes and click OK.
6. Make sure the firewall allows for NTP traffic.
Figure 2.11: Setting an NTP server

Configure Active Directory Authentication
Some environments may want to configure VMware to authenticate to Active Directory (AD) for several reasons. For example, if security roles for the company are already being managed by a team other than the VMware administrators, then the role of VMware administrator can be granted by simply adding the administrator to the appropriate AD group. Another benefit of using AD authentication is minimizing the number of passwords required. You can log in to Virtual Center Server with your AD credentials and do not need a separate ID with its own password.
To configure Active Directory authentication, follow these steps:
1. Sign in to the vSphere client. From the home screen, select Inventory. Click the Configuration tab; under Software, click Authentication Services.
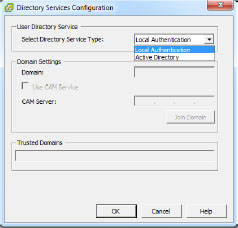
2. Click Properties in the top-right corner of the screen.
3. This should bring up the Directory Services Configuration screen. In the User Directory Service section, drop down the Select Directory Service Type list and change it from Local Authentication to Active Directory (see Figure 2.12).
4. Once Active Directory is selected, the Domain Settings area will become active. In the Domain field, supply the fully qualified domain name of the domain you wish to join.
5. Now click Join Domain. The Join Domain window will open. Enter a username and password that has permission to join a machine to the domain and click Join Domain.
Figure 2.12: Selecting the directory service type
Configure the Firewall
The firewall will need to be addressed one way or another. If you have monitoring software, you will need to open a port to allow the SNMP protocol through for monitoring. Some organizations may turn off the firewall or open other ports for other software applications. To find the firewall and configure it, follow these steps:
1. Sign in to the vSphere client. From the home screen, select Inventory. Click the Configuration tab; under Software, click Security Profile.
2. Click Properties in the middle-right corner.
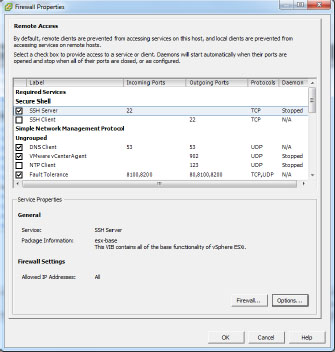
3. The resulting window allows you to configure ports in the firewall. Simply check or uncheck a desired service or client to allow or disallow access through the firewall. The Options button allows for fine-grained control of the highlighted service: Start, Stop, Restart, and so forth (see Figure 2.13).
Figure 2.13: ESXi firewall properties
Configure Management Network
Many large organizations have a strategy of teaming their NICs and sometimes their power on key servers. In this way, an organization can bring down half of its network for routine maintenance without impacting networking or power on a server. Obviously, this is a highly desirable way to run a successful operation because it limits the amount of downtime. With VMware virtualization, and specifically High Availability (HA), you must keep a special consideration in mind as well. If the Management Network has only one physical NIC, and if something happens to that one piece of hardware and HA is enabled, vCenter will see the host as down and potentially restart the virtual machines that were on that host on another host. If the host is down, this is desirable. If only the physical NIC is down, however, this is bad, as virtual machines may be trying to run in more than one location.
To solve this issue, take the following steps to attach two or more physical NICs to the Management Network vSwitch so that networking can be achieved through redundant paths if necessary:
1. Sign in to the vSphere client. From the home screen, select Inventory. Click the Configuration tab; under Hardware, click Networking. Find the vSwitch that has the Service Console (Management Network) and click its Properties link (as shown in Figure 2.14).
2. Click the Network Adapters tab, click Add, and put a check mark in the box next to the VMNIC that will be the second in the team. Obviously, unclaimed adapters (as shown in Figure 2.15) are not being used by any other networking; an adapter can be used by only one vSwitch at a time.
3. Click Next. If the order of the NICs is important, adjust it here by clicking the Move Up or Move Down buttons. Click Next.
4. Review the changes and click Finish.
Figure 2.14: Click the Properties link for the Management Network vSwitch

NOTE Adding or removing NICs does not affect the underlying virtual machines in the vSwitch you’re working on, as long as they have at least one NIC with which to communicate and the upstream switches from NICs support port groups. If all NICs are removed from a vSwitch, the underlying virtual machines can still communicate among themselves, but not to the outside world.
Figure 2.15: Adding unclaimed adapters

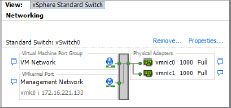
Now, the Management Network has two physical channels to which it can communicate with vCenter and HA (as you can see in Figure 2.16).
Figure 2.16: The Management Network has two NICs
Set Up a Remote Connection to the Management Network
Before moving on to configuring the Management Network, we have to be able to get into it, either by physically standing in front of the ESXi console on the server or by remotely connecting to it. If we choose the latter, we will have to perform some initial steps. Those steps are detailed here.
Create an Account with SSH Access To create an account with SSH access, follow these steps:
1. Sign in to the vSphere client. From the home screen, select Inventory. Click the Local Users and Groups tab. Then click the Users button at the top-left side of the Local Users and Groups window.
2. Right-click in the white space and select Add (see Figure 2.17).
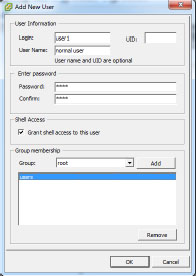
3. Fill in the login, user name, and password, and select the option Grant Shell Access To This User (as shown in Figure 2.18). Under Group Membership, use the drop-down box to assign this user to the Users group. Click Add and then OK to create the user.
Figure 2.17: Adding users
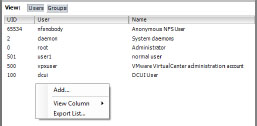
Figure 2.18: Adding a user with shell access
NOTE Be very aware of the syntax of the username. In VMware, usernames are case-sensitive.
Elevate Privileges to Root Access Root access to the Service Console is disabled by default. When security is important and root access is to be protected, most VMware administrators will have a secondary login to a host and then they will elevate their privileges up to root. The command su - elevates from a non-root account to the root account. While adding a user account to a host is not necessarily part of configuring the Management Network, it is still a better strategy than allowing root access.
NOTE To be granted shell access, users must also have an administrator role for an inventory object on the host. VMware defines inventory objects as folders, datacenters, clusters, resource pools, datastores, and networks. See the section in Chapter 11 on “Manage Permissions” for instructions on how to assign a role to a user.
Once the user has been assigned an administrator role on any inventory object, the user account will then have the ability to use WinSCP to transfer files to an ESXi host and to use the PuTTy SSH client to connect into the specific ESXi host. Follow these steps to get root access:
1. Open an SSH session and log in to the host with the user you granted shell access to; then issue the following command: su -
2. The console will return a password prompt. Enter the root password.
Notice that after you entered in root’s password, the $ prompt changed to #, which shows that you are logged in as root (as shown in Figure 2.19).
Figure 2.19: Elevating to root
When you’re finished using root, instead of clicking the X to log out, type exit to drop the session back down to regular user status. This is helpful if additional non-administrator-level tasks need to be completed rather than just logging back in. Typing exit again will drop the session altogether.