Chapter 17
Backup and Recovery
WHAT’S IN THIS CHAPTER
- Different Types of Failures and Why They Occur
- Planing for Disasters
- How Backup Works
- Choosing the Right Backup Configuration for Your Environment
- Recovering Databases When a Problem Occurs
Data is a critical asset for an organization to maintain information about its customers, inventory, purchases, financials, and products. Over the course of many years, organizations amass information to improve the daily customer experience, as well as to leverage this information to support strategic decisions. Downtime is unacceptable and can be costly for the organization; for example, without their databases, a stock brokerage house cannot take stock orders and an airline cannot sell tickets. Every hour the database is down can add up to millions of dollars of business opportunities lost. To keep their business activities going, organizations deploy high-availability solutions, such as failover clustering, database mirroring, replication, and log shipping so that when a database server fails, they can continue to run their business on a standby database server. All these topics are covered in other chapters in this book.
In addition, the underlying storage for the database may be protected by the use of fault tolerant or highly available storage technologies such as Redundant Array of Inexpensive Disks (RAID). Even with these fault-tolerant technologies, businesses still need to have database backups to allow recovery from a data-corrupting event, from data loss, or as part of a disaster recovery plan to cover the complete failure of the primary data center.
Although a high-availability solution tries to keep the business data online, a database backup plan is crucial to protect the business data asset. If a data-error problem exists and the database is unrecoverable, the DBA can use the database backup to recover the database to a consistent state. Moreover, a good database backup strategy can reduce the amount of data loss for certain kinds of errors encountered during the course of the daily database activities. This chapter first presents an overview of backup and restore. Then you walk through planning and developing a backup plan, managing backups, and performing restores. You also explore data archiving and disaster recovery planning.
A variety of failures can bring down your database — anything from a user error to a natural disaster could take your database offline. Your backup and recovery plan needs to account for the possibility of these failures and more.
Hardware Failure
Hardware is more reliable than it has been in the past. However, components can still fail, including the CPU, memory, bus, network card, disk drives, and controllers. A database system on a high-availability solution can mitigate a hardware failure such that if one database server fails, SQL Server can failover to the standby database server. All this helps keep the database online. However, high-availability solutions cannot protect against a faulty controller or a disk that causes I/O failures and corrupts the data.
Use SQLIOSim to help identify the optimal disk configuration or troubleshoot I/O faults. SQLIOSim replaces SQLIOStress in prior releases. You can get more information or download SQLIOSism from http://support.microsoft.com/default.aspx?scid=kb;en-us;231619. You can read more about running SQLIOSim in the Wiley Wrox book Professional SQL Server 2005 Performance Tuning, in Chapter 12, “How Fast and Robust Is Your Storage.”
Data Modification Failure
Data Modification failures are another way that your system can “fail.” Data Modification Failures occur when the data is intentionally changed, but the change has unintentional side effects. This can happen when a user executes a poorly constructed query, or when an application has a bug that executes a query that deletes, updates, or inserts erroneous data. It can also occur when a user has too much privilege and has access to data that they should not.
User Error
A common user error is incorrectly restricting the scope of a TSQL query and modifying more rows than expected during an update or delete operation. As a preventive measure, users should test all data modification queries using a SELECT statement to test the action of their query, and the scope in the WHERE clause. After testing with a SELECT, you can achieve additional peace of mind by wrapping the whole data modification into an explicit transaction, starting the batch with a BEGIN TRANSACTION. Then users can verify that the correct number of rows was updated before executing a COMMIT TRANSACTION. If the data modifications were not performed inside a transaction, the data will be permanently changed. In some cases a bad update can be reversed when it is an UPDATE, but in the case of a DELETE, the data must be reentered, which makes recovery a lot harder, and requires the use of a data recovery operation, either to reload an affected table completely, or to recover the data from a restored database backup.
In large data update operations, it is common practice to take a copy of the affected tables using BCP so that you have an additional option to recover data in the event of an undetected bug in your TSQL code. This is not always an option, especially if the table is large or there is not adequate space on disk to store the bcp data. Another reason for not using BCP is if the database has complex foreign key relationships. This can make it much harder to reconstruct “damaged” data other than to restore a complete database backup.
Application Failure
The user application may contain a bug that causes unwanted data modifications. To prevent this possibility, the application should go through a strict QA process to uncover any such bugs. However, there is no guarantee that an undetected bug may not cause unwanted data modifications in the future. When the bug is detected and corrected, the DBA may need to recover the database from backup or possibly use a log explorer utility. The process needs to identify the time that the problem occurred and to recover to that point in time.
Too Much Privilege
Sometimes applications use SQL Server logins that have more privilege than necessary. That is, instead of restricting security to just what the application needs, it is faster and easier to just grant DBO or sysadmin security. As a result, the application with this privilege may delete data from the wrong table because of either a bug or a user accidentally using a free-form query window. To reduce this risk, give application users only the database permissions required to do their work, and restrict sysadmin and DBO permissions only to users who need them and have the experience to know how to use them.
DBA, this also applies to you. It is fairly common for DBAs to type in a quick update to fix some problem. Just as you press the key to execute the query, you realize that you have made a huge mistake but are powerless to stop the execution. That sinking feeling that you have messed things up happens quickly. This is another reason to have a Test or QA system available to run all queries on first before running them in production. Make your mistakes on the test or QA system, not in production. If you don’t have the ability to test on a Test or QA system first, then try using a low-privileged account as well as your high-privilege account. Use the low-privilege account for routine activity, switching to your high-privilege account only when necessary. This also raises your awareness, enabling you to avoid mistakes.
Software Failure
The operating system can fail, as can the relational database system. A software driver may be faulty and cause data corruption; for example, the I/O hardware controller may function correctly, but the software driver may not. One preventive measure is to keep the system current with service packs and patches, including security patches. The DBA may choose any of the following patch-management solutions:
- Automatic updates from Windows Update
- Microsoft Update
- Corporate Windows Server Update Services (WSUS)
- SMS
- System Center Configuration Manager
- A partner solution to keep the servers updated
Unfortunately, some of these updates may require you to restart the SQL Server process or reboot the Windows OS that causes some planned downtime. However, planned downtime can be mitigated by a high-availability solution, such as a Failover Cluster, that enables you to fail over to a standby database server. Choose a maintenance time frame when there is lowest user activity; identify the patches that require a reboot ahead of time, and apply them at one time whenever possible to enable only a single reboot. Record each software driver version, and check the vendor website for the most current updates. In addition, the driver must be approved for the computer hardware and the Windows version. Having a supported and updated driver version can make a significant difference to the reliability and performance of the hardware device.
You should never do anything for the first time on a production database; test your patches on a Test or QA system before applying them to production. Then you can apply them all at once. You will know from your testing if a reboot is required. This should occur during a “planned” maintenance period. If you use clusters, you may failover, apply patches, and reboot one server while the other still provides access. That way, users see only a minimum interruption in service.
Local Disasters
An unexpected disaster can devastate an area, resulting in an inoperable or completely destroyed data center. In such cases, you need to relocate the data center, and that is where disaster planning comes into play: to quickly bring up the new data center and reopen for business. Depending on the disaster, data loss may occur because the location is inaccessible, and you may be unable to extract the last few data records. To reduce the exposure from a local disaster, a company can set up a disaster recovery site by means of data mirroring, a geographically dispersed failover cluster, log shipping, or replication.
You (or your company) should have a plan for high availability, backup/recovery, and disaster recovery. There may be a plan for each, or they may all be included in a single document. In a small company, by default this task may fall directly on your shoulders. For larger companies, you may be part of a team that plans for these events. In all cases, a risk/benefit analysis must be done. You must consider the likelihood of the event occurring, the cost of the downtime and other potential costs associated with the event, and the cost of the solution. Your first job will be the research and documentation regarding the risks, costs, and benefits. Management will then decide which events to plan for and make the risk decision. The DBA is not the risk decision-maker — that’s management’s job. However, it is your job to ensure that management understands the issues and that a decision is made. It is then your job to implement whatever plan is necessary and to test the plan on a regular basis.
In this section you learn the basics of a backup/recovery plan and a disaster recovery plan. There is enough information about recovery plans to fill up entire books, so consider this a basic introduction. High availability is not covered here but you can find information on it in Chapters 15, 16, 18, and 19.
Backup/Recovery Plan
You or your team has the primary responsibility for the backup/recovery plan, including the following:
- Analyze business requirements.
- Categorize databases by recovery criteria.
- Document the plan.
- Validate, implement, and test the plan.
- Establish a failed backup notification policy.
- Maintain the plan.
Analyze Business Requirements
First, you must gather some requirements for your plan. You need to have answers to the following questions:
- Who are the stakeholders/owners for each application or database? You need to determine the people from whom you should ask questions. You must also identify the decision-makers who can approve your final plan.
- What is the purpose for this database? Knowing a database’s purpose, such as whether it is for a data mart, a data warehouse, or the general ledger accounting database, gives you great insight into what might be necessary for your plan.
- What is the acceptable downtime for the application/database in the case of an error, such as a disk drive error? This is also known as the Recovery Time Objective (RTO). You ask this question because it takes time to restore the database when a problem has occurred. Knowing the answer helps you design a backup/restore plan that works within the downtime constraints.
Often the first answer to this last question is, “There is no acceptable downtime.” And this is a common answer from the business. A standard response to that is to let the company know that although that is potentially possible, they now added at least one, and possibly two, ‘0’s to the end of the check they need to write to pay for the solution. This then leads into a more meaningful conversation around the costs associated with their answers. Now that there is a cost associated with the various options, you begin to get closer to the real need. This is an iterative process as you communicate with management and business users.
You may also need to get several answers, depending on business cycles. For instance, while finance is closing the monthly books, the cost of any downtime is extremely high. During the rest of the month, the cost of downtime is much less. You may choose to implement a different plan during month-end close than you do during the rest of the month. This might include more frequent log backups, or you may choose to implement a single plan that meets the strictest requirements. In either case, document everything.
It may be that this question should be broken down into two questions: What is the cost of downtime? How much cost is reasonable for the business to absorb?
- What data changes and how often? You ask this question to determine what types of backups are necessary. Maybe data changes during the nightly batch only and is read during the rest of the day. Maybe some tables change frequently, but others are historical. Maybe there are numerous updates but they occur on a small number of rows, while the rest of the database is read-only.
If the database is already in production, looking at the transaction log growth can also provide useful information.

The answer to these questions may change over time. As business processes change or as the business grows, the business requirements change. Therefore, your backup/restore plan may need to change. Review the requirements with the business on a regular basis that you deem reasonable. Document each review.
- How much data loss is acceptable? This is another tricky question, and is also known as the Recovery Point Objective (RPO). What is the value of the data? What harm would befall the company if this data or part of it became lost? When thinking about this subject, you must also consider any regulatory requirements, as well. Some data must be kept available for a certain period of time. Some businesses may have a low tolerance for data loss, whereas others may tolerate a great deal of data loss. It depends not only on the value of the data, but also how much risk the business is willing to accept. You must also consider non-SQL Server options. For example, maybe the business cannot accept any loss of customer orders, but customer orders are entered manually and a paper copy is kept. If yesterday’s orders were lost, someone could reenter the data. This might be a preferable solution — or not. The point is to consider all your business options, not just SQL Server backup/restore.
- What is the size and growth of the database? If this database has not been implemented, you are not likely to get great information, but get the best you can. For all implemented databases, your normal monitoring procedures can provide this information. You should also work in concert with any project teams that develop new projects around this database, which may change the answers to this and any of the other questions. For more information on estimating the size of your database, read the “Estimating the size of a database” topic in Books Online at http://msdn.microsoft.com/en-us/library/ms187445.aspx.
- What is the maintenance window for this database? Certain maintenance tasks that must be done on the database affect the online response. Items such as Database Console Commands (DBCCs), index maintenance, and potentially backups are among these items. Your plan must ensure that your work stays within the maintenance window.
- What are the budget constraints for this database? Often, there is no specific answer to this question. Instead, evaluating the risks and the costs is a negotiation process with the business. However, a specific budget exists; you certainly need to know what it is.
- What is the notification plan for this database? When errors occur for which you must restore, who should be notified? How should you notify them? In addition, how can you know when a database error occurs?
Categorize Databases by Recovery Criteria
If you have many databases, you can do yourself a favor by categorizing the databases into groups. Then you can have a plan for each group. You might categorize by the following criteria:
- Criticality: Is this database mission-critical?
- Size: Large databases need more time for backup/restore than small databases. However, you can mitigate the time with filegroup backups or other interim measures. Filegroup backups are covered later in this chapter.
- Volatility: Databases with a larger volume of data change need a different plan than inactive databases.
Once you categorize, you can name the groups something useful, like the following:
- Mission-Critical Large
- Mission-Critical Small
- Business-Critical
- Moderate Impact
- Low / No Impact / Noncritical
For each category, choose the following:
- Recovery model:
- Full: Used when no data loss is acceptable.
- Bulk Logged: Used when your database is using the Bulk Logged recovery model.
- Simple: Used when we can afford to lose data between full backups.
- Backup plan: All groups need a periodic full database backup. Depending on the category and recovery model, choose between differential backups, file/filegroup backups, and log backups. Also choose whether to use compression and which backup media to use.
- Backup frequency: How often should each of the backups be executed?
- Backup security policy: The Backup security policy will detail how long backups are retained, as well as how they are electronically and/or physically secured. For tape media, what is the rotation policy? How can you implement offsite storage? If you use disk-to-disk backups (using an external D2D device), or on-disk backups (writing backups to a separate set of local disks), how can you secure access to the backup file store?
Disaster Recovery Planning
Disaster recovery requires considerable planning. A local disaster can cause severe financial loss to the organization. To reduce this, the organization must quickly execute the disaster recovery (DR) plan to bring its systems online. It requires a robust disaster recovery plan and periodic DR drills to ensure that everything works as planned. Often, organizations have well-intended disaster recovery plans, but they have never tested them for readiness; then, in a real disaster, the plan does not go smoothly. DR planning is based on the specific organization’s business requirements, but some general areas need to be addressed to put any plan into action.
- Use project management software, such as Microsoft Project, whereby people, resources, hardware, software, and tasks and their completion can be input to provide a systematic approach to managing the tasks, resources, and critical paths.
- Develop a checklist of detailed steps for recovery. More information on what should be on this checklist is covered in the next section.
Disaster recovery solutions with Windows failover clusters are commonly used to provide hardware redundancy within the data center site and can be configured across data centers by using a geographically dispersed Windows Server Failover Cluster. Prior to Windows Server 2008, this required expensive SAN based solutions. Windows Server 2008 eased the restrictions around subnets, and heartbeat latency, which now makes it easier to implement a geographically dispersed cluster. However, this is still an extremely complicated, expensive option. Moreover, AlwaysOn Availability groups, database mirroring, replication, and log shipping can all be inexpensively deployed as alternate disaster recovery solutions.
Some organizations have a standby disaster recovery site available to take over all operations or, at the least, the mission-critical operations. A few of these organizations failover to the disaster recovery site periodically to validate that their plan can work in a real disaster. Others may not have a disaster recovery plan but an agreement with another organization that offers disaster recovery capabilities.
If you are going to implement a Disaster Recovery Site, then you need compatible hardware at the DR Site. If this hardware is not already available, you need a plan to acquire the hardware required to bring the organization online quickly. Document the current necessary hardware. For computers, consider the number and type of CPUs and speed, Intel versus AMD, hyper-threading, number of cores, disk drive capacity, RAID level, and the amount of physical memory required. Preferably, try to acquire the exact hardware to minimize surprises. For the storage subsystem, consider the disk space requirements, the number of LUNs required, and the RAID level. For the network, acquire a similar network infrastructure to maintain the same performance. Some questions to ask include the following:
- How quickly can these computers be made available? Who will deliver or pick up the hardware?
- Will the computers be preconfigured, or will the DR team need to configure them? Who will provide the expertise, and what is the availability for that staff resource?
- Will the storage be preconfigured with the LUNs and RAID levels, or will the DR team need to configure it? Who will provide the expertise, and what is the availability for that staff resource?
- Who will acquire the network equipment, and who will have the expertise to set it up and configure it?
- Will the DR site have Internet access — to download service packs, for hotfixes, and for e-mail?
Make a detailed list of all software required, any hotfixes, and service packs. Take an inventory of how each is going to be available to the DR team. Make sure that the software is at the required version level and that licensing keys are available and valid. Determine who is responsible to make available the software and the contact information for that staff member. If the software is in a certain location, know who has the physical keys and what access they have. In this scenario, 24/7 access is required. In the event of a disaster, you need a list of staff resources to be contacted, which must be current and therefore periodically updated. Know who is responsible to maintain this list and where it will be found during a disaster. You also need to know the chain of command and who is onsite and offsite.
Additionally, you should create a detailed plan of the onsite roles required to execute the plan and who will fill those roles. Ensure that there is a backup resource in case a staff resource is missing. Determine how many staff are needed in each role, how they will arrive at the site, and who will be the overall project manager or lead to escalate any issues. Assign and record who has the passwords and what logins are required to make the systems available for business.
As mentioned previously, the DR site must be accessible 24/7 and conveniently located. As larger DR deployment can take days to execute, the site should have beds for staff to take naps and easy access to food and transportation. Identify who has the key to access the remote site; if that person is not available, who is the designated replacement? Can resources remotely access the site if they must work from a remote location, and what is required to have remote access turned on? Are the backups for all the databases available at the DR site, or who is responsible to bring them there? If that staff resource is unavailable, who is the designated replacement?
To ensure that the DR plan will work during a real disaster and to reduce loss, as a best practice, periodically simulate a disaster drill and put the DR planning in action to identify any steps that were not taken into account, how quickly the organization can be expected to be online again, and areas that can be streamlined to speed the process. Most importantly, ensure that the plan will execute as expected, smoothly and quickly. To get the most effect from this simulated scenario, everyone should approach it as if it were a real disaster and take all actions exactly as planned.
Creating the Disaster Recovery Plan
To create your Disaster Recovery plan, start by collecting some important information. First, interview the business owners of any applications that use databases under your control. You need to find out from them what their requirements are in the event of a disaster. This information enables you to start categorizing the databases under your control into different classes of disaster recovery options. This categorization might be as simple as Databases That Need Disaster Recovery, and Databases That Don’t Need Disaster Recovery. Or, if everyone needs disaster recovery, but some need to be able to continue running while other systems are okay with hours, days, or weeks of down time before they are online at the disaster recovery site, this could be another way to categorize the databases.
You will also need to document the following information:
- Contact list
- Decision tree
- Recovery success criteria
- Location of keys, backups, software, and hardware
- Infrastructure documentation
You should have a contact list of management people who can declare and activate the emergency callout. All necessary contact information must be available. Make sure that you know how to contact people in the event of an emergency and that relevant staff are potentially waiting for a call, email, text, page, and so on. You also need to document alternate contact points in the event that people are out of phone coverage, on a flight somewhere, with a dead phone battery, or otherwise un-contactable. Having that alternate contact point could make the difference between finding someone to help, and not being able to get your Disaster recovery plan started. The procedures for responding must also be documented (such as who makes calls).
You should also have a contact list for everything else. This list should include vendors, technicians, off-site storage people, service people, parts suppliers, transportation companies, and so on — everyone! The list should also include backups when primaries cannot be contacted.
Departments should have fallback operational procedures; although, this might not be in your documents. It is more likely this would be in departmental documentation. However, both plans should sync and make sense when put together.
The decision tree specifies what you need to do based on the circumstances. You may have a separate decision tree for disaster recovery than the one you use for normal recovery. When a disaster strikes and mission-critical processes are down, things can get stressful. The decision tree prompts you, so you mostly just follow the plan, instead of making on-the-fly mistakes. The decision tree must be logical, clear, and easy to understand and follow because you will be using it under duress. Keep it simple to the point where it can be completed while still encompassing enough to cover most scenarios.
The decision tree should classify database loss scenarios, such as natural disasters — for example, hurricane, earthquake, and so on — that can affect a wide area. You may not rely on locally held backups, software, or hardware. The tree must cover single-location loss — power loss, fire, explosion; you might recover to a site close to the affected location.
The specific decision tree for your purposes should include normal recovery scenarios, such as single server/data corruption or single database loss, disk drive, controller, memory failure, user error, and application failure. You should work to recover the missing data quickly, while not affecting other systems.
Another item you might include in your decision tree is loss of performance or service. In these cases, the database is not damaged but inaccessible or slow. You should debug and correct this quickly. Refer to Chapter 13 for guidance on performance tuning T-SQL.
The decision tree should also prioritize recovery steps. Thinking about these steps can enable you to make a plan that minimizes downtime and maximizes parallel work between all the players who need to be involved.
The decision tree should identify the most critical databases so that recovery can be completed in the best order for the business. Don’t forget about dependencies between databases.
Critical processes should be identified in the decision tree: SQL Server Integration Services (SSIS), SQL Server Analysis Services (SSAS), SQL Agent, Extract, Transform, Load (ETL) processes, and so on. What should be done for each of these processes? For instance, you might need to stop a process scheduler until the restore is complete.
You may also include security failures, whereby the database health is okay, but security is compromised due to malicious software, individual access, virus attack, and so on. You should discover security breaches and protect data. Refer to Chapter 8 for guidance on securing the database instance.
The recovery success criteria can be layered and may include service-level agreements (SLAs). When talking about SLAs, two terms come up very frequently and are discussed in the following list:
- Recovery Time Objective (RTO): Recovery Time Objective is the amount of time that you have to restore a particular system to operation in the event of a disaster. An RTO of 8 hours means that the affected system must be operational after a disaster within 8 hours from the disaster occurring.
- Recovery Point Objective (RPO): Recovery Point Objective is a measure of the amount of data that can be lost from a system in the event of a disaster. An RPO of 8 hours means that it is acceptable to lose any data entered in the 8 hour period before a disaster.
The first measure of success could be that you have met the SLA on RTO, such that the system is online again within the RTO period. The second level of success is that the RPO has been met, and that no more than the acceptable amount of data as defined by the RPO has been lost. Be sure you understand and document these criteria; you are likely to be measured by them.
Your documentation should include everything you need to get the job done. The location of keys or keyholders and the ability to contact and arrange for offsite storage people to deliver backups is important. Hardware, or access to and a prompt response from hardware people, as well as software support and availability of the software disks is also necessary. You should also have easy access to the levels of software, service packs, and driver levels for your server.
Any other infrastructure documentation you might need should also be included, such as naming conventions, DNS, or network information — anything you need to get the job done.
List recovery steps in the correct order based on business needs. Don’t assume you will think calmly and make the best decisions on-the-fly when bad things happen. Make all the basic decisions in advance, and when the bad thing happens, engage your brain, but follow the documented process.
Validating, Implementing, and Testing the Plan
This is often not nearly as difficult as getting the proper information from the business — so don’t worry. If you can get the true needs of the business, then you can usually implement your backup/restore plan. Of course, no plan is good if it doesn’t work, and you won’t know whether it works until you test it.
The people who need to implement this plan should practice it regularly through testing. You should plan for regular testing. Test at some well known period, maybe every 6 months. Also test anytime changes are made to the systems that require changes to plans. Make sure that any new staff understands the plans. Ideally, have new staff training that includes at least a discussion of these plans, and preferably include a practice run through for code Disaster scenarios. Anytime there is a significant percentage change in staff since the last planned test, run another test.
Make sure that testing includes setting up secondary servers, completing the restores, and making the applications/data available. You should simulate failures as well, and practice the responses to them. Simulated failures might be loss of the most recent full backup or a transaction log. You should consider that the restore sight might be in a different time zone, or a database might be much, much larger than it used to be. What happens if key people do not respond or your contact list is inaccurate? What if access cards no longer work or keys are not available?
Failed Backup Notification Policy
Because the success of your plan depends on successful backups, you need a plan to receive notification when backups fail. Remember you don’t have a backup until it’s copied to a separate server, restored, and checked to be valid, so routinely restoring backups and validating should be an integral part of your planning.
You should also use DBCC commands to ensure that you back up a healthy database. In addition, the database backups should occur after other normal maintenance tasks, such as database shrinking and index maintenance. This is because when you have to restore from a database backup, you are restoring a database ready to go and not a database in need of additional maintenance.
Maintaining the Plan
Following are four steps to successfully maintain the plan:
- Communicate the plan: For effective communication, the documentation should be publicly available within your company; and IT, the business users, and management should be informed of its content and location.
- Establish a policy to periodically rehearse the plan: Some companies carry out a drill every other year; others do this annually. You might have a complete companywide call out once a year and an IT test more frequently. In any case, you must test the plan on a schedule. Infrastructure changes and software and hardware updates can all conspire to make your plan unusable. You may have worked hard to do all the steps up to this point, and you may have done them all perfectly, but when disaster strikes, you will be measured solely by your ability to actually recover, not by how fine a plan you may have. Rehearsal is the only way to guarantee success.
- Establish a policy to periodically validate the plan: The policy to periodically validate the plan centers around the changing business environment. The business may have changed processes, or the ability or willingness to absorb risk, or some other factor that may have invalidated your plan. You should revalidate the information you gathered from the business and reassess your plan on a scheduled basis. In addition, be aware of new projects and how they may affect your planning.
- Revise the plan as needed: The last requirement is to keep the plan up to date. Revisit the plan, and revise whenever needed. It is fairly common to come up with a plan and then let it grow stale on the shelf. This often renders the plan useless or, even worse, dangerous to use.
OVERVIEW OF BACKUP AND RESTORE
Before you can effectively formulate a backup and restore plan, you need to know how backup and recovery work on a mechanical level. SQL Server has several different backup and restore processes that you can use, depending on the needs of your organization. This section examines how backup and restore work and helps you choose the best plan for your needs.
How Backup Works
Database backup is a procedure that safeguards your organization’s investment to reduce the amount of data loss. A database backup is the process of making a point-in-time copy of the data and transaction log into an image on either disks or tapes. SQL Server implements versatile backup processes that can be used separately or together to produce the optimal backup strategy required by an organization. Moreover, SQL Server can perform the database backup while it is online and available to users. In addition, it supports up to 64 concurrent backup devices. The following types of backup are available:
- Full backup: This is a copy of all data in the database, including the transaction log. Using this backup type, you can restore the database to the point in time when the backup was taken. It is the most basic of the backups and is often required prior to any of the other backup types. When restoring from a full database backup, all the database files are restored without any other dependencies, the database is available, and it is transactionally consistent.
- Partial backup: This is a way to back up only those parts of the database that change. This reduces the size of the backup and the time it takes to backup and restore. It is a copy of the primary filegroup and read/write filegroups. To take advantage of this type of backup, you need to group together the tables that change into a set of filegroups and the tables that are static or history in a different set of filegroups. The filegroups containing historical data will be marked read/write or read-only. A partial backup normally includes the primary filegroup and read-write filegroups, but read-only filegroups can optionally be included. A partial backup can speed up the backup process for databases with large read-only areas. For example, a large database may have archival data that does not change, so there is no need to back it up every time, which reduces the amount of data to back up.
- File/filegroup backup: This is a copy of selected files or filegroups of a database. This method is typically used for large databases for which it is not feasible to do a full database backup. A transaction-log backup is needed with this backup type if the backup includes read/write files or filegroups. The challenge is maintaining the files, filegroups, and transaction-log backups because larger databases have many files and filegroups. It also requires more steps to restore the database.
During a file or filegroup backup, a table and all its indexes must be backed up in the same backup. SQL Server checks for this and sends an error when this rule is violated. To take advantage of file/filegroup backups, you may need to plan the location of your indexes with the backup plan in mind.
- Differential backup: This is a copy of all the data that has changed since the last full backup. The SQL Server 2012 backup process identifies each changed extent and backs it up. Differentials are cumulative: If you do a full backup on Sunday night, the differential taken on Monday night includes all the changes since Sunday night. If you take another differential on Tuesday night, it includes all the changes since Sunday night. When restoring, you would restore the last full database backup and the most recent differential backup. Then you would restore any transaction-log backups since the last differential. This can mean quicker recovery. Whether differentials are good for you depends on what percentage of rows change between full database backups. As the percentage of rows changed approaches the number of rows in the database, the differential backup gets closer to the size of an entire database backup. When this occurs, it is often better to get another full database backup and start a new differential.
Another benefit to use differentials is realized when a group of rows is repeatedly changed. Remember that a transaction log backup includes each change that is made. The differential backup includes only the last change for a row. Imagine a database that keeps track of 100 stock values. The stock value is updated every minute. Each row is updated 1,440 times per day. Consider a full database backup on Sunday night and transaction-log backups during the week. At the end of the day Friday, restoring from all the transaction logs would mean that you have to replay each change to each row. In this case, each row would be updated 7,200 times (1,440 times/day times 5 days). When you include 100 stocks, the restore would have to replay 720,000 transactions. If you had done a differential backup at the end of each day, you would have to replace only the 100 rows. The differential keeps the most recent version only; and in some situations, it can be a great solution.
- Partial differential backup: This works the same as a differential backup but is matched to data from a partial backup. It is a copy of all extents modified since the last partial backup. To restore requires the partial backup.
- File differential backup: This is a copy of the file or filegroup of all extents modified since the last file or filegroup backup. A transaction-log backup is required after this backup for read/write files or filegroups. Moreover, after the restore, you need to restore the transaction log as well. Using the file backup and file differential backup methods increases the complexity of the restore procedures. Furthermore, it may take longer to restore the complete database.
- Copy-only backup: This can be made for the database or transaction log. The copy-only backup does not interfere with the normal backup restore procedures. A normal full database backup resets the differential backups made afterward, whereas a copy-only backup does not affect the next differential backup; it still contains the changes since the last full backup. A copy-only backup of the transaction log does not truncate the log or affect the next normal transaction log backup. Copy-only backups are useful when you want to make a copy of the database for testing or development purposes without affecting the restore process. Copy-only backups are not supported in SSMS and must be done via T-SQL.
The transaction log in SQL Server is a main component for a relational database system that maintains the ACID properties for transactions: atomicity, consistency, isolation, and durability. SQL Server implements the write ahead logging (WAL) protocol, which means that the transaction-log records are written to a stable media prior to the data being written to disk and before SQL Server sends an acknowledgment that the data has been permanently committed. Stable media is usually a directly attached disk drive, but it can be any device that guarantees that on power loss, no data will be lost. Even on direct attached systems, this can be a challenge; as disk drives implement write caches, RAID controllers, even at the simplest level, also implement caches, which either need to be write-disabled, or battery-backed. Any external storage system such as a SAN system must also be checked to confirm that the cache is battery-backed and will guarantee the consistency of any written log records during a power failure. There is a new trend for using solid state storage devices, which can take many forms. If you leverage these devices, you need to ensure that they either deliver guarantees around writes if a power failure occurs, or that they are used in places where write cache performance is not an issue, such as if used for tempdb, where all data is deleted in the event of a system restart. An increasingly common trend on high-performance systems that need the highest levels of Transaction Log write performance is to place the Transaction Log on solid state storage. Although this is great from a performance perspective, you must also guarantee that the log records can survive a power outage.
The SQL Server database engine expects the Transaction Log to be consistent on restart; if it is not, it will identify the database as corrupted because the data consistency of the database cannot be determined.
In addition, when a data modification occurs, SQL Server generates a new log sequence number (LSN) used on restart to identify the consistency of the data while performing database recovery. The LSN is used when restoring the transaction log; SQL Server uses it to determine the sequences of each transaction log restored. If, for example, a transaction-log backup from a backup log chain is not available, that is known as a broken log chain, which prevents a transaction-log recovery past that point. Backing up the transaction log to point-in-time recovery is a critical part of a backup strategy. A DBA can perform three types of transaction-log backup:
- Pure transaction-log backup: This is when there have not been any bulk-logged operations performed on the database. That is, every data modification performed is represented in the transaction log. The database recovery model can be in Full or Bulk-Logged mode, provided that no bulk-logged operation has been performed. This is the most common transaction-log backup type because it best protects the data and provides the capability to recover to a point in time.
- Bulk transaction-log backup: This is when bulk-logged operations have been performed in the database, so point-in-time recovery is not allowed. To improve performance on bulk operations — that is, to reduce transaction logging — the database can be set in the bulk-logged recovery model whereby only the allocation pages are logged, not the actual data modifications in the transaction log. During a transaction-log backup, SQL Server extracts and includes the bulk-logged data inside the transaction-log backup to allow recoverability.
There is no syntax difference between the pure transaction log backup and the bulk transaction log backup. SQL Server works automatically to back up whatever is available and necessary. The descriptions of the three transaction-log backups can help you understand the difference between the recovery models.
- Tail transaction-log backup: This is a transaction-log backup that you make after the database has been damaged. Imagine you take a full database backup every night and do transaction-log backups on the hour. Your data files are corrupted at 1:30 P.M. Your last log backup occurred at 1:00 P.M., so you can recover until that time. What about the transactions that occurred between 1:00 P.M. and 1:30 P.M.? The transaction log disk is still good, but you cannot do a normal transaction log backup now because the database is not accessible. The tail transaction-log backup enables you to do a final transaction log backup, even when the database is unavailable to capture the transactions between 1:00 P.M. and 1:30 P.M. That way, you can restore up to 1:30 P.M. Whew — what a save! The biggest risk here is forgetting to do the backup. When you have confirmed that you must go through a restore, do this backup first.
A tail transaction-log backup cannot be performed if the database is in the bulk-logged recovery model and bulk operations have been performed because the transaction-log backup would need to retrieve the data modifications for the bulk operations from the data files, which are not accessible.
Copying Databases
There are times when you don’t need a backup of the database, but might want a copy of the data instead. This section covers several ways that you can copy a database.
Detach/Attach
Detach/Attach is a great way to move a database to a new server. However it can also be used to create a copy. The Detach/Attach feature detaches the database or shuts down SQL Server. After the files are detached, you can use the OS to copy the database files to a backup device. To back up the database files using this method, you detach the database like this:
 EXEC MASTER.dbo.sp_detach_db @dbname = N'AdventureWorks2012',
 @keepfulltextindexfile=N'TRUE'
To restore, you attach the database files like this:
EXEC MASTER.dbo.sp_attach_db @dbname = N'AdventureWorks2012',
@filename1=N'C:ProgramFilesMicrosoft SQL ServerMSSQL11.MSSQLSERVER
MSSQLDataAdventureWorks2012_Data .mdf'
,@filename2=N'C:ProgramFilesMicrosoft SQL ServerMSSQL11.MSSQLSERVER
 MSSQLDataAdventureWorks2012_log.ldf' ;
The drive letter “C” as well as the rest of the file location should be changed to reflect the directory where your data files are stored. The example uses the default location for data files.
If you attach an encrypted database, the database owner must open the master key of the database by using the following command:
OPEN MASTER KEY DECRYPTION BY PASSWORD = '<password>'
Microsoft recommends you enable automatic decryption of the master key by using the following command:
ALTER MASTER KEY ADD ENCRYPTION BY SERVICE MASTER KEY
BCP
The second backup option is done through BCP. You can run it via a simple batch script and export all the data from a database. This doesn’t capture everything in the database, but it can be a useful way to get a copy of specific data within the database.
If you need to export more than 2 billion rows from a table, you MUST use BCP from SQL Server 2008 onward. There was a bug in older versions of BCP (SQL Server 2005, and older ) that prevented it from exporting or importing more than 2 billion rows, and it also failed to report any error.
Following are two example BCP command lines that show how to export (OUT) and import (IN) a table called People from the Seattle_SQL server to the London_SQL server.
BCP address OUT address.dat -SSeattle_SQL -T -c -dPeople
BCP address IN address.dat -SLondon_SQL -T -c -dPeople
Scripting Wizard
SSMS provides a scripting wizard that enables you to generate scripts for selected objects within the database. This is a great way to keep a record of the scripts needed to regenerate a database and can be a good way to get a version check on any recent changes to the DB.
Use this with a source code control system to determine the delta between previously generated scripts and scripts currently generated to find changes to objects in the database.
Import/Export Wizard
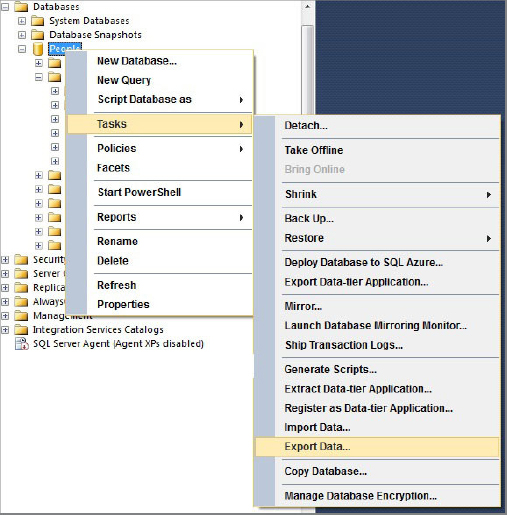
SSMS provides Import/Export capabilities which are accessed from the Tasks item on the database context menu (see Figure 17-1).
As you can see, you can drive this from either end. In the following example you walk through an export driven from the source database.
1. Select Export Data to start the wizard. The wizard welcome screen appears as shown in Figure 17-2.

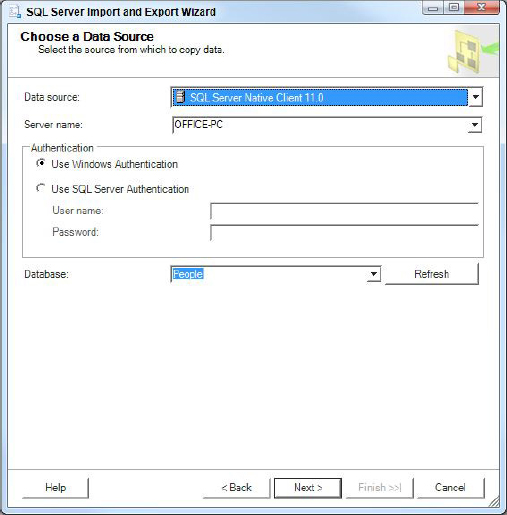
2. Select Next in the welcome screen and you are taken to the Choose a Data Source page, shown in Figure 17-3. Enter the server name and authentication method for this server, and then you can select the database you wish to export data from.
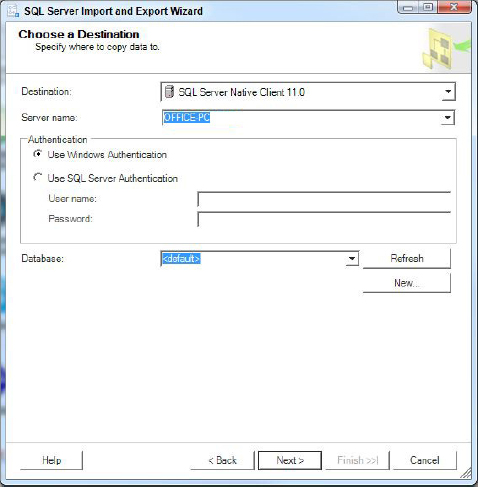
3. The next page in the wizard enables you to choose a Destination (see Figure 17-4). Again, choose a server, authentication method, and then database name. The wizard defaults to using the default database for the login used to authenticate against this server.
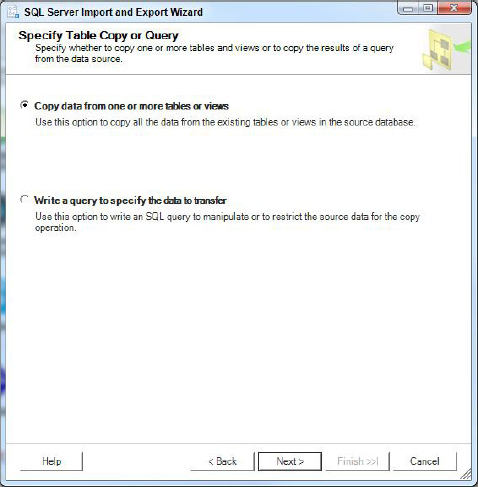
4. On this page choose Table Copy to use a table copy, or Query to write a query to select data. In this example, choose the first option to copy data from one or more tables or views (see Figure 17-5).
5. The wizard now presents you with a list of all the tables and views that are available. In the example database, there are only a small number of tables that you can see in Figure 17-6. Select the tables and views to be exported.

6. You now have the option to run the package immediately, or to save the SSIS package. If you choose to save the package, you can specify if you want to save it to SQL Server, or the file system. You can also define a package protection level to secure the package contents. You can see these options in Figure 17-7. The penultimate stage of the wizard (shown in Figure 17-8) shows you the selections you have made.


7. Select Finish to execute the selections made during the wizard. In this case it executes one SSIS package to export the selected tables from the Source Server, creates the new tables in the destination server, and imports the data to the newly created tables. The wizard then reports on the status of the package execution. Figure 17-9 shows everything completed successfully.

One thing to note is that if you get errors here and you go back to make changes and re-run the package, you may encounter additional errors caused because the wizard doesn’t attempt any cleanup if it fails part way through.
The most obvious errors you might encounter are when tables are created, but the data import fails, possibly due to transaction log being full. In this case you can resolve the issue by either manually deleting any tables or viewing the created tables in the destination database and rerunning the package again.
When you run the package, the SQL Agent service does not need to be running.
Extract Data Tier Application (DAC)
If your database uses the set of features that are compatible with Data Tier Applications, then you have the added option to create a Data Tier Application (DAC) using this wizard in SSMS. The DAC contains just the DB schema, without data, but this can be useful for transferring schema from development to test to QA and onto production. See the DAC documentation in BOL for complete details on using DACs.
Copy Database Wizard
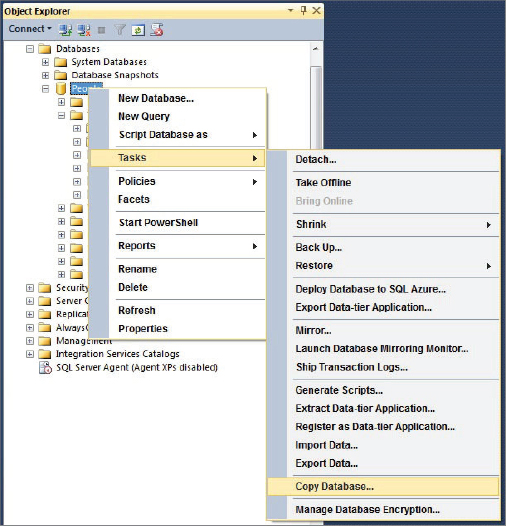
SSMS provides a Copy Database Wizard. This can either utilize attach/detach or SMO to make a copy of a database and move it to another server. Using Attach/Detach requires the database to be taken offline. Using the SMO method enables the copy to be made while the database remains online. The Copy Database Wizard is found on the database context menu under the Tasks menu item as shown in Figure 17-10. See the following steps on how to use this wizard.
1. Open the Copy database wizard and you will see the welcome page shown in Figure 17-11.

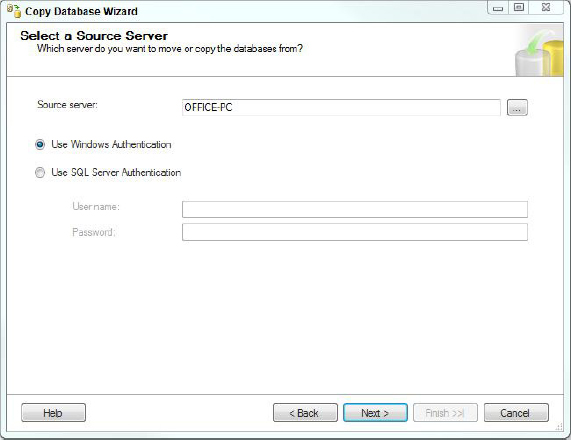
2. On the next page select your source server, as shown in Figure 17-12.
3. Select the destination server as shown in Figure 17-13.

4. On the next page choose how you would like the wizard to make the transfer. You can choose between Detach/Attach, or using SMO. Figure 17-14 exemplifies choosing the SMO method.

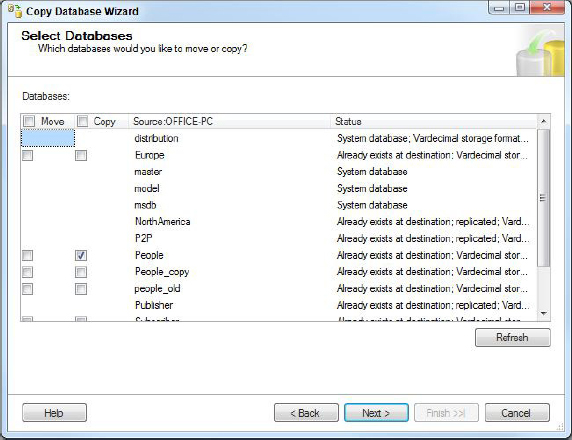
5. Select which databases to copy. You can choose to either copy or move the selected databases, and this choice is on a per database basis, so you can move some databases, and copy others if that’s what you want to do. Figure 17-15 shows the People database being selected to be copied.
6. Now specify what the new database will be called, and which files will be created. By default these options are pre-populated with the information from the source database. There are other options available on this page (see Figure 17-16) that determine what action to take if the destination database exists.

7. Next specify which objects outside the selected databases you want to include with the copy, as shown in Figure 17-17.

8. Configure the SSIS package that will perform the database copy, as shown in Figure 17-18.

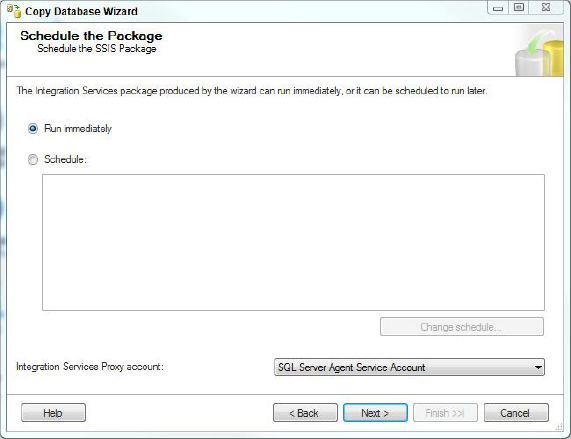
9. Now schedule the package. At this point you can choose to run the package immediately, or schedule it for execution later. In Figure 17-19 runs the package immediately. Be sure to confirm all the choices made before running the package (see Figure 17-20).
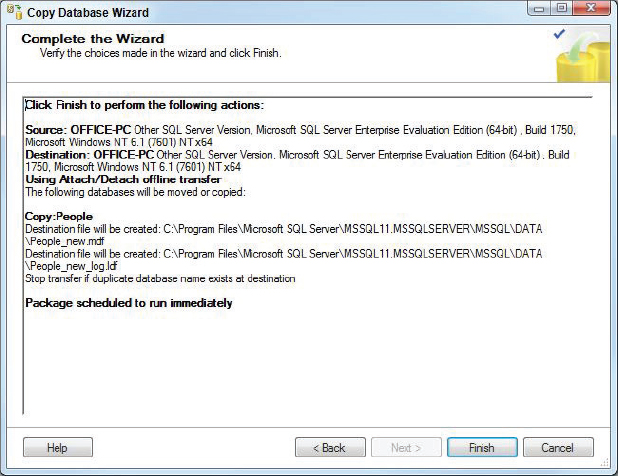
10. Select Finish to run the package and copy the selected databases and objects from the source to the destination server. While the package is executing, the wizard reports the status of each step. Upon completion, the Wizard displays the results of executing the package.
Make sure you have SQL Agent running on the Destination server. This is where the package is scheduled to execute, through a SQL Agent Job, even if the package is specified to execute immediately. This behavior is different from the import export wizard that does not need SQL Agent to immediately run the packages it creates.
Backup Compression
SQL 2008 Enterprise edition introduced backup compression. With SQL Server 2012, backup compression is now available in Standard Edition. This feature enables the backup files to be stored in compressed form. This can lead to both shorter backup times and smaller files containing the backup. The trade-off you make is increased CPU usage to do the compression, in exchange for less I/O due to the smaller files. Generally, the result of backup compression is greatly reduced backup times. Whether you can benefit from using compression is relative to the availability or scarcity of CPU and I/O resources, as well as the degree of compression obtained. You can determine the state of your system by looking at the following performance counters in Performance Monitor. For more information on monitoring Performance Counters, see Chapters 12, “Monitoring Your SQL Server” and 13, “Performance Tuning T-SQL.”
- Windows performance monitor counters for your disks.
- SQL Server performance counters:
- SQLServer:Backup Device/Device Throughput Bytes/sec.
- SQLServer:Databases/Backup/Restore Throughput/sec.
Backup media beginning with SQL Server 7 used a media format called Microsoft Tape Format (MTF). This is the same format that Windows operating system backups used, enabling SQL Server backups to coexist on the same media with Windows backups. This was especially convenient for users with a single tape drive. Beginning with SQL 2008 however, compressed backups use a different media format, which is incompatible with Windows backups. This leads to some restrictions regarding the use of backup compression:
- Compressed and uncompressed backups cannot coexist in the same media set.
- Prior versions of SQL Server cannot read compressed backups.
- NT backups and compressed backups cannot coexist in the same media set.
If you violate one of these restrictions, SQL Server returns an error.
A new server-level configuration option, backup compression default, enables your default backups to be either compressed or uncompressed. You can set this option via sp_configure and from SSMS. Backup compression is turned off by default. You may override the default using the with compression or with no_compression option in the backup T-SQL command or using the Backup dialogs in SSMS or the Database Maintenance Plan Wizard.
Log backup compression for the primary database in log shipping is always dependent on the default backup compression value.
How much compression you achieve depends on several factors:
- Databases that are compressed do not see additional compression in backups.
- Encrypted data does not compress as well as unencrypted data.
- Character data types compress better than other data types.
- Greater levels of compression are achieved when a page has multiple rows in which a column contains the same value.
Comparing Recovery Models
Understanding the recovery models is essential to developing an effective backup strategy. The recovery model determines how the transaction log is managed by SQL Server. The model you choose depends on the backup/restore plan you have for a database. In the full recovery model, the transaction log records all data modifications, makes available all database recovery options, and implements the highest data protection while using the most transaction-log space. This recovery model can be used with all database backup operations, it is capable of point-in-time recovery, and it enables backing up the transaction log. Most OLTP production systems and mission-critical applications that require minimal data loss should use the full recovery model.
The first transaction log backup cannot be completed until after a full database backup has been done.
The bulk-logged recovery model performs minimal logging for certain database operations, including bulk import operations, such as the following:
- BCP
- BULK INSERT
- SELECT INTO
- CREATE INDEX
- ALTER INDEX REBUILD
- DBCC DBREINDEX
Instead of logging every modification for these database operations, the bulk-logged recovery model logs the extent allocations and flags the changed extents. As a result, these operations execute faster, as they are minimally logged, but it presents possible data-loss risks for recovery. A transaction-log backup copies everything in the transaction log, checks the extents flagged as changed, and copies them from the data files into the log backup. In addition, after a bulk-logged operation, point-in-time recovery using transaction-log backup is disallowed.
Consider the same scenario presented earlier. The database uses the bulk-logged recovery model. The full database backup occurred at 1:00 P.M. A transaction log backup occurs at 1:30 P.M. Then a bulk-logged database operation is performed. Next, the physical drives containing the data files fail at 2:00 P.M. You cannot recover up to 2:00 P.M. because the transaction-log backup would need to access the data files to retrieve the data modifications performed during the bulk-logged operations. You cannot perform a tail-log backup. As a result, data will be lost and you can only recover up to 1:30 P.M.
When you do bulk operations in this mode, you are at risk of losing data until you complete a log backup after the bulk operations. You can minimize the data loss in this scenario with some bulk-logged database operations by implementing shorter transactions that perform transaction-log backups during and immediately after the bulk-logged operations. Oftentimes, this recovery model is used when the DBA performs bulk-logged operations and then switches back to full after the bulk-logged operation completes, to improve the performance for bulk operations. In addition, this model is commonly used in an OLAP or Report database for which there are nightly bulk data loads. A backup is taken, and afterward no data is modified during the day, so if the data is lost because of a failure, it can be restored from backup.
The simple recovery model implements minimal logging, just like the bulk-logged recovery model, except that it keeps the transaction-log records only until the next checkpoint process occurs, writing the dirty changes to the data files. Then the checkpoint process truncates the transaction log. Transaction-log backups are not allowed; therefore, point-in-time recovery is not available. Typically, this recovery model is used for development or test servers, where data loss is acceptable and data can be reloaded. Moreover, this model may be used by an OLAP and Reporting database for which there may be only a nightly data load and then a full or differential backup is performed. With this model, if the database were to fail during the data load, you would have to start from the beginning, unless a full or differential backup was taken during the process. In addition, if a DBA switches from one of the other recovery models to this one, the transaction-log continuity is broken, as it truncates the transaction log. In addition, during the time that the database is in this recovery mode, the database is more exposed to potential data loss.
Transactional replication, log shipping, or data mirroring is not allowed in the simple recovery model, as there is no persistent storage of transactions in the transaction log.
Choosing a Model
Choosing the best recovery model depends on the amount of acceptable data loss, the database’s read-and-write daily activities, and how critical that database is to the daily business of your organization. Following are recommendations for choosing between the full, bulk-logged, and simple recovery models.
Full Recovery Model
Choose the full recovery model for a mission-critical database to keep data loss to a minimum because it is fully logged; and in case of damaged data files, the tail transaction log can be backed up and used to restore the database to a given point in time. Therefore, OLTP production systems usually use the full recovery model, except when the database is modified nightly, as is sometimes the case with OLAP or Reporting databases.
Bulk-Logged Recovery Model
You can use the bulk-logged recovery model to increase bulk operations’ performance because it does minimal logging. For example, you could do a nightly bulk operation and then switch back to full recovery. The bulk-logged model will fully log, as is the case with the full recovery model, except for the bulk operations. Therefore, you could use bulk-logged recovery as a permanent recovery model, except it poses a risk of data loss. As long as there are no bulk-data operations, the DBA can back up the transaction log; but oftentimes, unknown to the DBA, the tail transaction-log backup recovery may no longer be available if a bulk operation has been performed. To guard against someone doing bulk operations without a database backup and to reduce that data risk, you should switch to bulk-logged only when a bulk operation needs to be performed. Bulk-logged can be a permanent recovery model in an OLAP or Report database where there is no daily modification activity, as there is limited data loss risk if the databases are backed up right after any nightly data load. There is no chance of data loss throughout the day, as nothing would have changed. In addition, some data loss may be acceptable, as the OLAP and Reporting databases can be reloaded from the OLTP data source whenever needed.
Simple Recovery Model
The simple recovery model does not save the transaction log; instead, the checkpoint process truncates it. Therefore, no one has to maintain the transaction log. This recovery model is commonly used for development, read-only, and test systems for which transaction-log backups are not required. If there is data loss, a new copy of the data can be reloaded from the OLTP data source. If the DBA switches to this recovery model from one of the others, the transaction- log continuity is broken because there is no way to back up the transaction log. In this recovery model, there is no point-in-time recovery because the DBA cannot back up the transaction log. Therefore, any restore would be from the previous full, and any differential, backups.
Switching Recovery Models
SQL Server provides complete flexibility to switch among the recovery models. However, be aware of the limitations when switching among them, as switching can result in data loss during recovery. The following list outlines the limitations of switching recovery models:
- Switching from full to bulk-logged: Because bulk-logged database operations may be performed, a transaction-log backup is recommended at a minimum so that the DBA can recover to this last transaction log if the tail transaction log is not available. To change to this recovery model, use this command:
ALTER DATABASE < db_name> SET RECOVERY BULK_LOGGED
- Switching from full to simple: Because the transaction-log continuity is broken by this recovery model, a transaction-log backup is recommended, at minimum, before the switch. After the recovery model switch, transaction-log backups and point-in-time recovery are disallowed. To change to this recovery model, use the following command:
ALTER DATABASE < db_name> SET RECOVERY SIMPLE
- Switching from bulk-logged to full: Because bulk-logged database operations may have been performed and to minimize potential data loss if the tail transaction log is not accessible, a transaction-log backup is recommended after the switch. To change to this recovery model, use the following command:
ALTER DATABASE < db_name> SET RECOVERY FULL
- Switching from bulk-logged to simple: In this recovery model there is a greater chance of data loss in case of a database failure, so at a minimum, a transaction-log backup is highly recommended before the switch. To change to this recovery model, use the following command:
ALTER DATABASE < db_name> SET RECOVERY SIMPLE
- Switching from simple to full: To enable the full recovery model to start to apply transaction-log backups, a full, differential, file, or filegroup backup is required after the switch. To change to this recovery model, use the following command:
ALTER DATABASE < db_name> SET RECOVERY FULL
- Switching from simple to bulk-logged: To enable the bulk-logged recovery model to start to apply transaction-log backups, a full, differential, file, or filegroup backup is required after the switch. To change to this recovery model, use the following command:
ALTER DATABASE < db_name> SET RECOVERY BULK_LOGGED
The recovery model is configured for each database. You can also switch the recovery model from SQL Server Management Studio by opening the Database Properties and choosing Options, as shown in Figure 17-21.

Backing Up History Tables
SQL Server maintains the backup history for the server in the MSDB database in a group of tables from which it can identify the backup available for a database. In the Restore dialog, SQL Server presents the restores available for the database. The tables are as follows:
- Backupfile: A row for each data or log file backed up
- Backupfilegroup: A row for each filegroup in a backup set
- Backupmediafamily: A row for each media family
- Backupmediaset: A row for each backup media set
- Backupset: A row for each backup set
A media set is an ordered collection of all tapes or disks from all devices that took part in the backup. A media family is a collection of all backup media on a single device that took part in the backup. A media backup is a tape or disk device used for backup.
The following three backup information statements return information from the history backup tables:
- RESTORE FILELISTONLY: Returns a list of database and log files in a backup set from the backup file table:
RESTORE FILELISTONLY FROM NorthAmerica_Backup
- RESTORE HEADERONLY: Returns all the backup header information for all the backup sets in a device from the backupset table:
RESTORE HEADERONLY FROM NorthAmerica_Backup
- RESTORE LABELONLY: Returns information about the backup media of a backup device from the backupmediaset table:
RESTORE LABELONLY FROM NorthAmerica_Backup
RESTORE HEADERONLY, RESTORE FILELISTONLY, RESTORE VERIFYONLY and RESTORE LABLELONLY do not actually restore anything and therefore are completely safe to run. They provide only information. It may be a bit confusing though; just remember to look for the contextual use of RESTORE.
Permissions Required for Backup and Restore
SQL Server provides granular permission for both backup and restoring a database. A Windows or SQL Server authenticated user or group can be given permission to perform the backup and restore operations. To have permission to back up a database, a user must have at minimum the following permissions:
- Server role: none
- DB role: db_backupoperator
To restore a database, a user must have at minimum the following permissions:
- Server role: dbcreater
- DB role: db_owner
Backing Up System Databases
SQL Server system databases are critical to the operation of each SQL Server instance. These databases are not often modified, but they contain important information that needs to be backed up. After creating a new SQL Server instance, develop a backup plan to perform a full backup of all the system databases, except for tempdb. SQL Server re-creates tempdb every time it is restarted because it does not contain any data to recover. Backing up these system databases takes only minutes, so there is no excuse for not having a proper backup. You could often schedule these backups nightly and do extra backups to your local hard drive before and after any changes you make. That keeps you safe until the current night’s normal backup.
Master
The master database contains the login information: metadata about each database for the SQL instance. Moreover, it contains SQL Server configuration information. For example, the database is altered every time you do the following:
- Add, remove, or modify a database level setting.
- Add or delete a user database.
- Add or remove a file or filegroup in a user database.
- Add, remove, or modify a login’s security.
- Modify a SQL Server serverwide configuration.
- Add or remove a logical backup device.
- Configure distributed queries or remote procedure calls (RPC).
- Add, modify, or remove a linked server or remote login.
Although these modifications occur infrequently, when they do, consider doing a full database backup. If a backup is not performed, you stand to lose the modifications if a previous backup of the master is restored. Moreover, as a precautionary measure, before and after adding any service pack or hotfix, perform a new backup of the master database.
MSDB
The msdb database contains SQL jobs, backup jobs, schedules, operators, and backup and restore histories and can contain Integration Services packages and other items. If you create a new job or add a new Integration Services package and msdb were to fail, the previous backup would not contain these new jobs and would need to be recreated.
tempdb
tempdb cannot be backed up. Because it is re-created every time SQL Server is restarted, no data in it needs to be recovered.
Model
Typically, the model database changes even less frequently than the other system databases. Model is the template database used when a new database is created. If you want a certain database object to be present in every new database, such as a stored procedure or table, place it in Model. In these cases, it should be backed up; otherwise, any Model modifications will be lost and need to be re-created. In addition, keep scripts of any changes you make to the model, just to add another layer of safety.
Full-Text Backup
Full-text search performs fast querying of unstructured data using keywords based on the words in a particular language. It is primarily used to search char, varchar, and nvarchar fields. Prior to querying, the full-text index must be created by a population or crawl process, during which full-text search performs a breakdown of the keywords and stores them in the full-text index. Each full-text index is then stored in a full-text catalog. Then a catalog is stored in a filegroup. Unlike previous versions of SQL Server, in SQL Server 2012 a full backup includes the full-text indexes. In SQL 2005, full-text indexes were part of a catalog that existed in a filegroup with a physical path and was simply treated as a database file. SQL Server 2012 treats all the catalog as a virtual object–simply a collection of full-text indexes. Full-text indexes are now stored and treated like other indexes for the purpose of backups. To backup all the full-text indexes, you must discover the files that contain any full-text index and then backup the file or filegroup.
The end result is that backups for full-text indexes are completely incorporated into the standard backup architecture. You can place full text indexes on separate filegroups and the Primary filegroup, or allow them to live in the same filegroup as the base table. This improvement makes administration easier than in prior releases.
Verifying the Backup Images
With any backup solution, a critical operation is verifying the backup images that they will restore. Often, a DBA may be meticulously doing backups, but along the way the database becomes corrupted, and every backup from that point on is not usable. Plan on doing periodic restores to verify recoverability. In addition, perform database consistency checks to validate the database structures. Use the RESTORE VERIFYONLY T-SQL command to perform validation checks on the backup image. It does not restore the backup, but it performs validation checks, including the following:
- Confirms the backup set is readable.
- Page ID.
- If the backup were created WITH CHECKSUMS, then it will validate it.
- Checks destination devices for sufficient space.
However, the RESTORE VERIFYONLY command does not completely guarantee that the backup is restorable. That is why you need a policy to randomly restore a backup to a test server. RESTORE VERIFYONLY simply provides another level of validation. Here’s the syntax:
RESTORE VERIFYONLY FROM <backup_device_name>
Following is an example resulting message:
The backup set on file 1 is valid.
RESTORE VERIFYONLY does not work on database snapshots. If you plan to revert (restore) from a database snapshot, then use DBCC CHECKDB to ensure that the database is healthy.
For higher reliability, to guard against a malfunctioning backup device that may render the entire backup unrecoverable, use mirroring of backup sets for redundancy. They can be either disk or tape and have the following restrictions:
- Backup devices must be identical.
- To create a new, or extend an existing, backup, the mirror backup set must be intact. If one is not present, the media backup set cannot be used.
- To restore from a media backup set, only one of the mirror devices must be present.
- If one mirror of the media backup set is damaged, no additional mirroring can be performed on that media backup set.
For example, use the following command to use a backup device mirroring on the AdventureWorks2012 database:
BACKUP DATABASE NorthAmerica

TO TAPE = '.	ape0', TAPE = '.	ape1'

MIRROR TO TAPE = '.	ape2', TAPE = '.	ape3'

WITH FORMAT, MEDIANAME = 'NorthAmericaSet1'
How Restore Works
Restore brings back the database in case of a failure and is a major function of a transactional relational database system. When a DBA restores a database, three restore phases must happen:
- Copy Phase
- Redo Phase
- Undo Phase
RESTORE VERSUS RECOVERY
The terms restore and recovery are often confused and misused. Restore is what occurs when you use the RESTORE T-SQL command to get a database back.
Recovery is a process that brings a database into a consistent state. This means that committed transactions are applied to disk (redo phase) and transactions that are begun but not yet committed are rolled off (undo phase). The result is a database that contains only committed transactions — a consistent state.
Each time the server starts, an automatic recovery process runs. At startup, you do not know how SQL Server last stopped. It could have been a clean shutdown, or a power outage could have brought the server down. In the case of the power outage, there may have been transactions that were begun but not yet completed. Recovery does the work necessary to ensure that committed transactions are included and not yet committed transactions are removed.
The last step in a restore process that you begin is also recovery. The RESTORE command enables you to specify when recovery runs. If recovery has not yet run, you may restore a differential or continue to restore transaction logs. After recovery has run, no more log restores may occur, and the database is brought online.
In the copy phase, the database image is created and initialized on disk, and then the full backup is copied. That can be followed by any differential and transaction-log backups. These are done via the RESTORE T-SQL command.
After the full backup has been applied and any differential and transaction logs have been restored, the DBA allows recovery to run. During the recovery process, SQL Server performs both a redo phase and an undo phase. During the redo phase, all committed transaction records that were in the transaction log but not in the data files are written to the data files. The WAL protocol guarantees that the transaction records that were committed have been written to the transaction-log stable media. Then, during the redo, SQL Server evaluates the transaction-log records and applies the data modifications to the data files in the database.
The duration of the redo phase depends on how many data modifications SQL Server performed, which depends on what SQL Server was doing at the time of the failure and the recovery interval setting. For example, if SQL Server just finished updating 10 million rows from a table and committed the transaction but was unexpectedly shut down right after, during recovery it would have to redo those data modifications to the data. The SQL Server recovery interval setting influences recovery time according to how many dirty pages are kept in memory before the checkpoint process must write them to stable media. By default, the recovery interval is set to 0, which means that SQL Server keeps less than a minute of work that is not yet written to the data files. With that setting, during recovery, there is minimal redo work before the database becomes available for users. The higher the recovery interval value, the longer the recovery may take.
After the redo phase is the undo phase, where any transactions that did not complete are rolled back. Depending on the amount of work and the length of the transactions at the time before shutdown, this phase can take some time. For example, if the DBA was in the middle of deleting 10 million rows, SQL Server is required to roll back all those rows during recovery. SQL Server does make the database available to users while in the undo phase, but users should expect some performance impact while in the redo phase.
To mitigate the risk and extent of data loss, one of the DBA’s most important tasks is database backup and planning for recovery. You need to develop a backup plan that minimizes data loss and can be implemented within the maintenance window of time allowed. Choose the best SQL Server backup capabilities to achieve the preferred backup plan — one that meets the continuity and data loss requirements for the business. You must also set up the backup procedure and monitor it every day to ensure that it works successfully. That includes validating that the database backup restores properly.
An organization may be current with its backups and assume that it has the necessary backups to restore the database, only to find that the database was corrupted and some of the recent database backups will not restore. Cases like these can go undiscovered for months until someone needs to restore a database and finds out that it is not recoverable. To reduce this risk, run the database-consistency checks against each database and design a process to test the recoverability of the database backup. In addition, send database backups offsite to protect them in case of a local disaster, but keep local copies of recent backups in case you need to perform a quick restore.
Another critical task is disaster recovery planning. If the organization data center were to be completely destroyed, you should quickly deploy a new data center with minimum data loss and minimum business disruption. Disaster recovery planning is not complete until a team periodically simulates a data center failure and proceeds through the test drill to deploy a new data center.
Recoverability Requirements
Any backup planning should start with the end goal in mind: the recoverability requirements. You have already covered the planning in the previous section, “Making Plans,” but following are a few more things you might also consider:
- Perhaps only part of the database must be online. You can consider a piecemeal restore to reduce your restore time, especially on larger databases for which a restore can take a long time. Determine what parts of the database must be available, and arrange the data into filegroups so that you can recover the most critical filegroups first. Archived data or reporting data is less critical and can be recovered last.
- The organization may allocate newer, redundant hardware and RAID array with a high-availability solution to mitigate downtime. A company might also consider faster and more backup devices to quickly restore the database.
- Determine how easy or difficult it would be to re-create lost data for each database. For some databases, data can be easily re-created by extracting data from another system or from flat-file data loads. Typically, decision-support databases use ETL tools to extract data; for example, if some unrecoverable data loss occurred, the ETL tool can be executed to reload the data.
- What is the acceptable downtime in a media failure, such as a failed disk drive? As disk technology continues to become less expensive, most organizations deploy databases on a fault-tolerant disk array that reduces the exposure of one of the disk drives failing, causing the database to become unavailable. For example, on a RAID 5 set, loss of a single drive can cause a noticeable performance slowdown. If a second drive in the same RAID 5 were to fail, the data would be lost. To mitigate this risk, have spare drives in the disk array system and get a service-level agreement from the hardware provider to deliver and install the drives. Another common scenario is a department inside the organization deploying a database in a less than ideal hardware environment. With time, the database becomes mission critical to that department, but it lives under the DBA’s radar with no accountability. The DBA should attempt to identify all database sources within the organization and develop a recovery plan.
- Determine which databases have any external dependencies on other databases, requiring both databases to be restored for users to perform their daily activity. Determine whether there is any linked server(s), external application(s), or mainframe connectivity on which a database has dependencies.
- Identify the available hardware that can be allocated for redeployment and where it is located.
- Identify the staff required for backup, restore, and disaster recovery. They need to understand the disaster recovery procedures and where they fit in these procedures. Record when all staff members are available, their contact numbers, the chain of communication, and the responsibility of each member. Determine the chain of command and find out, if the lead is unavailable, whether backup members have the expertise to carry out the duties for backup, restore, and disaster recovery. Find out the expertise of the staff and what additional training they might need to support the environment. Identify any training classes that may be beneficial.
- Finally, document any information about stored SQL jobs, linked servers, and logins that may be needed when the database is restored onto another database server.
Data Usage Patterns
Part of your recovery plan should include analyzing how your data is used in a typical scenario. Determine for each database how often the data is modified. You′ll require different backup strategies for a database that may have a data load once a day than for others that may be read-only or some that change every minute. Separate the tables that are modified from read-only tables. Each type can be placed on different filegroups and a backup plan developed around it.
Identify the usage pattern of the databases during the day to determine the backup strategy to use. For example, during high activity, a DBA may schedule more frequent differential or transaction-log backups, whereas full backups may be performed during off-peak hours.
Determine the disk space used by the transaction log during peak times and the log’s performance. For example, during peak times, the transaction log may fill the available disk drive allocated to it. Moreover, during peak times, the number of disks allocated for the transaction log may not be adequate to sustain the database’s performance. The database recovery model setting affects both disk space and performance.
For a database in the full recovery model, consider switching to bulk-logged mode during bulk operations to improve performance, as that will incur minimal transaction logging. Prior to the start of the bulk operations, you should at minimum perform a transactional or differential backup to guard against the risk of a data-drive failure when the tail transaction log may not be accessible.
Also consider how the database is to be used. If the database is mission critical, apply redundancy around the hardware. Start with a highly redundant storage system, using RAID10, and then add on additional hardware capabilities as you can afford them, up to and including a completely duplicate hot standby system using a failover cluster. Identify what level of data loss the company can afford, and plan to back up the transaction log to meet the time requirement. Also use the full recovery model so that you can get recovery to the point of failure.
Maintenance Time Window
Sometimes, the backup strategy is dictated by the maintenance time window available to perform database defragmentation, backups, statistics updates, and other maintenance activities. To keep enhancing the customer experience, organizations demand more timely information and give customers greater access to information, and customers are therefore more dependent on having this information. This presents a challenge to create the best customer experience, mitigate the risk of data loss, and enable quick restores if the database system fails.
The task of the DBA is to find the best backup strategy to meet the organization’s business requirements. Usually, the maintenance time window is limited. SQL Server implements various backup options that can be used in combination to meet these requirements. The following are some of the challenges you face when designing a backup strategy:
- Available backup time may be limited in a mission-critical, highly available database. Organizations often have SLAs and must finish their maintenance by a certain time when users are back on the system. If the backup takes longer, it may delay other database activities, which might not finish by the time users log in to the system, costing a company opportunity loss.
- There may be a large number of databases to back up during the maintenance time window. You can try to optimize your time for all available backup media by performing concurrent backups within the capacity of the database server.
- A growing database puts pressure on the maintenance window. Additional backup devices, higher-performance database servers, and faster I/O may be needed to relieve the pressure. Sometimes the maintenance time window can be increased, but oftentimes it cannot. You may need to consider a SAN copy solution to speed the backup process.
- Other database activities are likely performed on all the databases in the database server (for example, database-consistency checking, defragmentation, update statistics, and perhaps data loads). As the database grows, these other activities may take longer to perform, too.
- Software updates, security patches, service packs, and database structure updates may need to fit within this maintenance time window.
- Full-text catalogs may need to be processed.
- As more organizations see the benefit of decision-support systems such as SQL Server Analysis Services, the analysis services database may need to be processed during this time.
To meet these requirements, a small database can use a full database backup every night. However, as the database becomes larger, that may not be possible. A good next step is to perform a full database backup on the weekend and nightly full differential backups. As the database becomes larger, consider moving read-only and read/write data to different filegroups, and then use full partial backups during the weekend and partial differential backups at night. As the database continues to grow, consider nightly backup of individual files.
Other High-Availability Solutions
When your database has been deployed in a high-availability solution, such as AlwaysOn, failover clustering, log shipping, or data mirroring, it may require additional backup considerations:
- If you use the AlwaysOn technology new in SQL Server 2012, you can modify your backup plans. For example, one reason to create a secondary replica might be to offload the IO load from backups from the Primary Replica to the Secondary. In this model, you would not take backups from the Primary Replica, or other Secondary Replicas, but have a dedicated Secondary Replica specifically for taking backups from. You can specify a Replica to be the preferred location to run backups using the BACKUP_PRIORITY configuration setting for the availability group. For more information on the new AlwaysOn technologies see Chapter 25, “AlwaysOn Availability Groups.”
- In log shipping, the transaction log is backed up by the log-shipping process. No other transaction-log backup should be permitted, as that will break the log chain and prevent any additional transaction log restores on the standby server. If that occurred, you would need to reconfigure log shipping.
- In data mirroring, if the mirror server is down, the principal server transaction log queues all modifications to be sent to the mirror in the transaction log. The transaction log cannot be truncated past the point where it has not sent data modifications to the mirror server.
- A failover cluster is a single database, so there are no special considerations. However, if the failover cluster is integrated with log shipping or data mirroring, the transaction-log limitations already mentioned apply.
- Any use of replication requires you to make a detailed backup recovery plan that includes the synchronization of the source database, the distribution database, and the subscribers. Replication can introduce a new level of complexity to the backup/recovery plan. Although you can recover a replicated database from a backup, additional criteria must be met to make this successful. You should consider if using backups is a reasonable solution for recovering the subscriber databases. In the case of small databases, it may be easier and more reliable to simply regenerate and apply a new snapshot from the publisher.
In transaction replication, if the subscriber is down, the transaction log cannot be truncated past the point in which it has not replicated those data modifications to the subscriber server.
DEVELOPING AND EXECUTING A BACKUP PLAN
SQL Server provides three methods for planning and executing backups. You can use the graphical interface of Management Studio, Database Maintenance Plans, or the T-SQL backup commands. This section covers all of these methods.
Using SQL Server Management Studio
SQL Server Management Studio (SSMS) exposes backup management capabilities for a DBA to either develop a scheduled maintenance plan or directly perform a backup. Before you start, decide the destination for the backup image. It can be a backup location such as a directory path with a filename or a separate backup device.
If you use a backup device, first you need to create a logical device that defines where SQL Server will copy the backup image. From SQL Server Management Studio, select Server Objects ![]() Backup Devices
Backup Devices ![]() New Backup Device. You see the dialog shown in Figure 17-22. There are two destination options:
New Backup Device. You see the dialog shown in Figure 17-22. There are two destination options:

- Tape: Requires that a local tape drive be present on the database server
- File: Requires a valid disk destination
You do not need to use backup devices when backing up to disk because the location is hard-coded. Instead, create unique backup filenames that include the database name, the backup type, and some date/time information to make the name unique. This is much more flexible than using a backup device. To perform a database backup from SQL Server Management Studio, follow these steps:
1. Select the database you want to back up, right-click, and choose Tasks ![]() Backup. The Back Up Database dialog appears, as shown in Figure 17-23.
Backup. The Back Up Database dialog appears, as shown in Figure 17-23.

2. In the Source area of this dialog, configure the following:
- Database: Choose the database to back up.
- Recovery model: This value is grayed out because it cannot be changed. This is in full recovery model. If it were simple recovery model, the transaction log could not be backed up because the transaction log is truncated by the checkpoint process and files, and filegroup backups would not be available, except for read-only files or filegroups.
- Backup type: Choose among Full, Differential, or Transaction Log.
- Copy Only Backup: Enables you to do a backup that does not affect the transaction chain or truncate the log.
- Backup component: Choose from the following options:
- Database: Backs up the database.
- Files and filegroups: Backs up files or filegroups. This option presents a dialog from which you can choose one or more files or filegroups.
3. In the Backup Set area of this dialog, configure the following:
- Name: Give the backup set a name for easier identification. This name distinguishes the backup from others in the backup device.
- Description: Provide an optional description for this media set.
- Backup set will expire: Configure these options based on your business’s retention policy; this guards against SQL Server’s backup process overwriting the backup set.
- After: This determines the number of days, from 0 to 99,999, after which the set can be overwritten. Zero is the default, which means the set never expires. You can change the serverwide default by choosing SQL Server Properties
 Database Settings. Change the default backup media retention (in days).
 - On: Specify a date on which the backup set will expire.
4. SQL Server supports up to 64 backup devices. In the Destination area of this dialog, configure the following:
- Disk: Specify a full valid destination path with a filename or a disk backup device.
- Tape: Specify a tape drive or a tape backup device. The tape drive must be local to the database server.
Clicking the Contents button shows the media set or media family of the device selected.
5. While in the Back Up Database dialog, select the Options page to see the dialog shown in Figure 17-24.

6. In the Overwrite Media section, you can choose to back up to the existing media set, in which case you have to configure these options:
- Append to the existing backup set: Preserves the existing backups by appending to that media set. This is the default.
- Overwrite all existing backup sets: Erases all the existing backups and replaces them with the current backup. This overwrites all existing backup sets unless the Check Media Set Name and Backup Set Expiration box is checked.
Alternatively, you can choose to back up to a new media set and erase all existing backup sets, which erases all backups in the media and begins a media set, according to your specifications.
7. The Reliability section of this dialog has three check boxes that are all good recommended practices because a backup is of no value if it is not recoverable. Check these boxes:
- Verify Backup When Finished: After the backup finishes, SQL Server confirms that all volumes are readable.
- Perform Checksum Before Writing to Media: SQL Server does a checksum prior to writing to media, which can be used during recovery to verify that the backup was not tampered with. There is a performance penalty with this operation.
- Continue on Error: Backup should continue to run after encountering an error such as a page checksum error or torn page.
8. The Transaction Log section of this dialog contains options that only apply during transaction-log backups. If you are performing a transaction log backup, select whichever of these is appropriate to the log backup you are trying to accomplish:
- Truncate the Transaction Log: During normal transaction-log backups, it is common practice to manage the size of the transaction log and to truncate it after it has been backed up to a backup media.
- Back Up the Tail of the Log and Leave the Database in the Restoring State: This option is useful when the data files of the database are not accessible. (For example, the physical drives have failed but the transaction log in separate physical drives is still accessible.) As a result, during database recovery, apply this as the last transaction-log backup to recover right to the point of failure.
9. The Tape Drive section of the dialog contains check boxes to let you specify how to handle the tape. The two options include:
- Unload the tape after backup
- Rewind the tape before unloading
10. In the Compression section of this dialog, specify one of three compression options for the backup:
- Use the Default Server Setting
- Compress Backup
- Do Not Compress Backup
11. Click OK and the backup process executes.
Database Maintenance Plans
Another approach to executing the backup plan is to develop database maintenance plans for each database, schedule them, and have SQL Server e-mail you a backup history report.
The purpose of the database maintenance plan is ease of use and reuse. A database maintenance plan is beneficial because it includes many of the normal maintenance actions you must do for a database, but grouped all together, executed on a schedule, with history and reporting. You can create a plan manually or use the wizard, which walks you through a series of dialogs.
To create maintenance plans for one or more databases from SQL Server Management Studio, choose the folder Management ![]() Maintenance Plans, and then right-click and choose New Maintenance Plan. After naming the maintenance plan, you go to the maintenance plan design screen and perform the following steps:
Maintenance Plans, and then right-click and choose New Maintenance Plan. After naming the maintenance plan, you go to the maintenance plan design screen and perform the following steps:
Note that you may need to display the Maintenance Plan Tasks toolbox, as this does not show up by default anymore. To do this press CTRL+ALT+X, or use the View ![]() Toolbox menu option. Now perform the following steps:
Toolbox menu option. Now perform the following steps:
1. Choose the Back Up Database Task, and drag it to the Designer.
2. Right-click the Back Up Database Task, and choose Edit to open the Backup Database Task dialog, as shown in Figure 17-25.
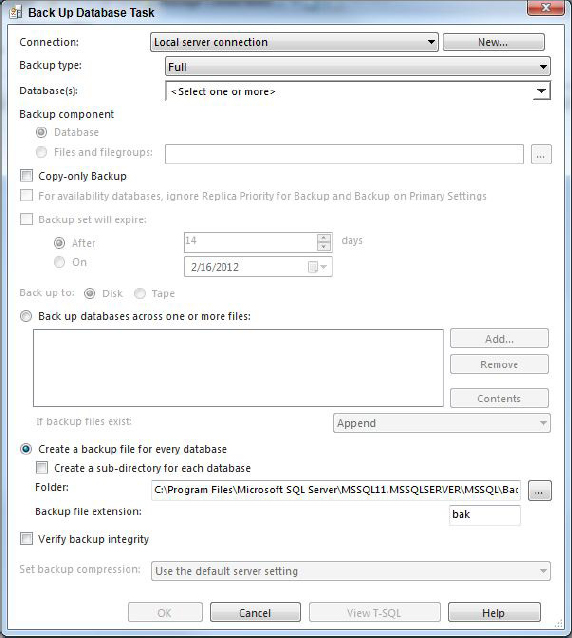
3. In the Connection field, choose Local Server Connection, or if this maintenance plan is to back up databases on another server, choose New Connection and provide the connection information.
4. In the Database(s) field, choose one or more databases. You can choose more than one database if they have identical backup requirements.
5. In the Backup Component field, choose either Database or Files and Filegroups. If you choose Files and Filegroups, you need to specify which files or filegroups to back up.
6. You may optionally choose an expiration date for the backup set. This prevents accidental overwrites.
7. In the Back Up To field, choose either Disk or Tape.
8. You can choose a list of hard-coded files to backup your databases to or have the maintenance plan create an automatically named backup file for each database.
a. If you choose Back Up Databases Across one or More Files:
1. Click the Add button to configure the backup location. For disk, provide the full path to the filename or the disk backup device. For tape, provide the tape location or the tape backup device. You can use more than one file or backup device. If more than one is chosen, all the databases will be backed up across them, up to the 64 backup devices that SQL Server supports.
2. On the If Backup Files Exist field, select whether to append to the existing backup file or to overwrite; the default is Append.
b. If you choose Create a Backup File for Every Database:
1. Choose the Create a Backup File for Every Database option.
2. Select the root directory for the backups.
3. Choose a backup file extension.
9. Click the Verify Backup Integrity check box as a recommended practice.
10. For transaction log backups, you can optionally choose to back up the tail of the log.
11. In the Set Backup Compression field, specify whether the backup should be compressed.
12. Click OK.
13. Click the Reporting and Logging button on the Maintenance Plan [Design] Menu tab, and choose how to receive the backup history report. If you choose e-mail, Database Mail must be configured. Moreover, a SQL Server Agent Operator must be configured to e-mail the report. Then click OK.
14. Click the Schedule button, and set up the schedule for this maintenance plan.
When you allow a maintenance plan to create a backup file for each database, it creates a file formatted as NorthAmerica_backup_2012_09_01_090243_2394128 for the NorthAmerica database. This includes the backup type and date and time of the backup, which is good because it means all the backup file names indicate when the backup was taken, and what type of backup is contained within the file. The down side of using this option is that you get a single backup file and cannot get the performance benefits of a multi-file backup.
You can include additional backup database tasks for other database backups with various backup requirements. For example, one Back Up Database Task may be performing full database backups on several databases; another may be performing differential backups; whereas a third may be performing filegroup backups. They share the same schedule.
Earlier in this chapter you organized your databases into categories based on the backup/restore needs. You could create maintenance plans that satisfy the needs of each category. Then, when a new database is created on that server, you simply categorize it, adding it to the appropriate maintenance plan.
When the maintenance plan is complete, it is automatically scheduled as a SQL job in SQL Agent.
Using Transact-SQL Backup Commands
All the backup commands using SQL Server Management Studio and all functionality are available directly using T-SQL. For a full list of BACKUP syntax refer to Books Online at http://msdn.microsoft.com/en-us/library/ms186865(v=sql.110).aspx. Following are some examples of the syntax:
- Create a logical backup device for the NorthAmerica database backup:
EXEC sp_addumpdevice 'disk', 'NorthAmericaBackup',
'C:BACKUPNorthAmerica.bak';
Your drive letters may be different, so you may have to change the filename reference. If you use a file share, you should use the UNC name instead of a shared drive letter, as shown here: myservermyshareBackupNorthAmerica.bak.
- Create a full NorthAmerica database backup:
BACKUP DATABASE NorthAmerica TO NorthAmericaBackup;
- Create a full differential backup:
BACKUP DATABASE NorthAmerica TO NorthAmericaBackup WITH DIFFERENTIAL;
- Create a tail transaction-log backup. This type of backup is used only after a database failure when the transaction logs are still available:
BACKUP LOG NorthAmerica TO tailLogBackup WITH NORECOVERY;
The prior tail log backup assumes you have created a new backup device called tailLogBackup.
- Create a backup filename for the NorthAmerica database backup:
DECLARE @devname varchar(256)
SELECT @devname = 'C:BACKUP NorthAmerica_Full_'+ REPLACE
(REPLACE(CONVERT(Varchar(40), GETDATE(), 120),'-','_'),':','_') + '.bak';
- Create a full NorthAmerica database backup:
BACKUP DATABASE NorthAmerica TO DISK = @devname;
- Create a backup filename for the NorthAmerica differential backup:
DECLARE @devname varchar(256)
SELECT @devname = 'C:BACKUPNorthAmerica_Differential_' + REPLACE
(REPLACE(CONVERT(Varchar(40), GETDATE(), 120),'-','_'),':','_') + '.bak';
- Create a full differential backup:
BACKUP DATABASE NorthAmerica TO DISK = @devname WITH DIFFERENTIAL;
- Create a backup filename for the NorthAmerica database backup:
DECLARE @devname varchar(256) SELECT @devname = 'C:BACKUPNorthAmerica_Log_' + REPLACE (REPLACE(CONVERT(Varchar(40), GETDATE(), 120),'-','_'),':','_') + '.bak'; - Create a normal transaction log backup:
BACKUP LOG NorthAmerica TO DISK = @devname;
When using disk files, place each backup in its own backup file, and name the file appropriately. The name should include the unique database name (which might include some server part, if you have databases named the same in several servers), backup type, and date information. The preceding examples use yyyy_mm_dd hh_mm_ss as the date part. It is not unusual to create a stored procedure or user-defined function (UDF) that accepts parameters and returns the name of the backup file.
Do not use mapped drive letters in your backup filenames. If backing up to files on file shares, use the UNC name. Mapped drive letters may vary depending on who is logged in to the physical server. You can create permanent mapped drive letters, but UNC names are preferred.
Managing your backups is another important DBA task. The better your maintenance procedure, the faster and more accurately the backups will be identified and quickly restored. Meticulously running backups does little good if the backups cannot be identified or, worse, were lost or overwritten. The following tips should help your backup management program:
- Descriptively label all the backups to prevent overwriting or misplacing a backup. You can use a naming scheme similar to the one previously mentioned using something like the following: <Server_Name>_<database_name>_<year>><month>_<day>.bck
- Set up a retention policy to prevent a tape or disk backup from being overwritten. These may be dictated by corporate policy, government regulations, cost, space, or logistics.
- Tapes can go bad, so set up a reuse policy. Define how many times a tape may be reused before throwing it away. This adds a tape cost, but a worn tape can stop a successful restore.
- Set up a storage location where the backups can easily be organized, found, and accessed. For example, if you’ re not available and someone else needs to perform the restore, that person must be able to get to the location and correctly identify the backups. You should also keep a copy of the backups stored offsite in a location where they will be protected from a local disaster. This offsite location should allow 24-hour access in case you need a backup. Moreover, keep a copy of the more recent backups locally in case they are quickly needed for a restore.
- The backup storage location should be secured such that unauthorized individuals do not have access to sensitive data. Furthermore, for the most sensitive data, use SQL Server column-level encryption.
- You must backup and maintain any encryption keys used with databases that are encrypted. These keys must be backed up again when the accounts (commonly the service account or machine account) change. These certificates must be maintained or the database will not be restorable or the data will not be accessible.
- Set up a logistical procedure to promptly move a copy of each backup to the offsite location to prevent it from being destroyed in a disaster.
BACKUP AND RESTORE PERFORMANCE
SQL Server supports 64 backup devices and uses multiple backup devices in parallel to back up and restore for faster throughput. The backup devices should be on a different controller from the database for better throughput. For disk devices, consider the RAID level used for fault tolerance and performance. Using RAID 5 on drives used to store backups is a bad idea because the additional overhead of calculating parity can reduce IO throughput, and therefore slow down backups. RAID 10 is the preferred choice for write performance, especially if your RAID controller has the intelligence to split writes across both sides of the mirror. This can dramatically increase write throughput. Work with your storage vendor to get recommendations for your storage hardware.
In many cases, disk based backups are written to large slow disks because of the cost savings from using cheaper, large capacity disks. This immediately has a performance impact on the ability of backup to write to these disks. This is just something that backups have to live with, as very few companies are willing to spend large amounts of money on a high performance disk subsystem to store backups.
A combination of full, differential, and transaction-log backups can improve performance by reducing the amount of data that needs to be read from the database and written to the backup device. If you take a full backup of a 5 TB database every day, that’s a lot of data to be backing up so often. If only a small percentage of the DB changes every day, then taking a full backup once a week (on the weekend, or other slack period perhaps), with daily differential backups can dramatically reduce the amount of data being read and written during the week.
Network bandwidth can become an issue when backing up to a network device or other server. Ideally backups should use a dedicated network with enough bandwidth to satisfy all of the backup, and restore throughput needs.
Recovery is the action of restoring a database, and bringing it back to a consistent state. This section explains the various methods of recovery, through both Management Studio and T-SQL. You also learn how to restore the system databases.
Restore Process
It is a DBA’s task to ensure that backups are consistently taken and validated to restore. Each backup sequence is labeled and stored to enable quick identification to restore a database. These restore procedures include the following:
- Full Database Restore
- Transaction-Log Restore
- Partial Database Restore
- File/File Group Restore
- Database Snapshot Restore
- History Tables Restore
Versions prior to SQL Server 2005 required file initialization by filling the files with zeros to overwrite any existing data inside the file for the following SQL Server operations: creating a database; adding files, logs, or data to an existing database; increasing the size of an existing file; and restoring a database or filegroup. As a result, for a large database, file initialization would take significant time. Beginning with SQL Server 2005, however, data files can use instant file initialization, provided that the SQL Server service account is assigned to the Windows SE_MANAGE_VOLUME_NAME permission, which can be done by assigning the account to the Perform Volume Maintenance Tasks security policy. Instant file initialization reduces the time required to create a database or perform other tasks by initializing the new file areas with zeros. Instant file initialization works only on data files and not on Transaction Log files.
Full Database Restore
A full restore contains the complete backup image of all the data in all the files and enough of the transaction log to enable a consistent restore of committed transactions and uncommitted transactions. A full restore can be the base restore for differential and transaction-log restores to bring the database to a certain point in time. During the full restore, choose whether you want to overwrite the current database, whether the database should be left in operation mode, or whether to allow additional restores, such as differential backups or transaction logs. You also need to choose with move if the database files are to be moved to a different directory location or filename. Then perform the full database restore, followed by all differential and transaction-log backups. The advantage of this process is that it recovers the database in fewer steps. However, it is slow; you need a maintenance window to perform it.
A full differential restore image contains all extents that have been modified since the last full backup. Typically, it is smaller and faster than a full backup image, provided there is not a high turnover of modification activity. A differential restore is commonly used to augment the full restore. During the restore, the full backup is restored, the database is left in NORECOVERY mode, and the differential restore is performed.
Transaction-Log Restore
As mentioned previously, a mission-critical database reduces data-loss exposure by performing periodic transaction log backups. The transaction-log restore requires a full database backup, a file backup, or a filegroup backup as its base. Then you apply the differential restores and next apply all transaction-log backups in sequence, with the oldest first, to bring the database to a point in time — either by completing all the transaction-log restores or by stopping at a specific point. For example, you can restore the database to a point before a certain error by using one of the following transaction-log restore options:
- With Stopat: Stop the transaction restore at the specified time.
- With Stopatmark: Stop the transaction-log restore at the marked transaction.
- With Stopbeforemark: Stop the transaction-log restore before the marked transaction.
You can insert a transaction-log mark in the transaction log by using the WITH MARK option with the BEGIN TRANSACTION command. During each mark, a row is inserted into the logmarkhistory table in msdb after the commit completes. Normally, restoring to a point in time requires that you specify the exact time for the restore point. Perhaps a batch process went awry and you want to restore the database to the point immediately prior to the beginning of the batch process. What time did the batch process begin? That is hard to determine unless you have some sort of log-reading utility. This is where logmarks are helpful. For the first transaction in the batch process, add a logmark with a unique name for the batch. That way, if you need to restore to the beginning of the batch, you can restore to the logmark — easy.
An example of a transaction-log restore sequence might be as follows:
1. Restore the full database with NORECOVERY.
2. Restore any differential backups with NORECOVERY.
3. Restore each transaction log with NORECOVERY. You can use the STOP clause to restore the database to a point in time.
4. If you have the tail transaction log, restore it. Then set the database to RECOVERY.
After the database is recovered, no additional restores can be performed without starting over.
Partial Database Restore
A partial backup contains the primary filegroup, all the read/write filegroups, and any read-only filegroups specified. A filegroup is read-only if it were changed to read-only prior to its last backup. A partial restore of a read-only database contains only the primary filegroup. This kind of backup is typically used when a database has read-only filegroups and, more important, large read-only filegroups that can be backed up to save disk space.
A partial differential backup image contains changes in the primary filegroup and any changes to read/write filegroups. Restoring a partial differential requires a partial backup image.
File/Filegroup Restore
This is also called a piecemeal restore. You first restore the primary filegroup using the PARTIAL keyword. Then, the remaining filegroups can be restored. Each filegroup, when consistent, can be brought online while the other filesgroups are being restored. This allows the DBA to make parts of the database available more quickly, without having to wait on the entire database restore. The following is an example of restoring a database in piecemeal by filegroup, starting with the Primary filegroup:
RESTORE DATABASE NorthAmerica FILEGROUP='PRIMARY' FROM NorthAmerica_
Backup WITH PARTIAL, NORECOVERY;
RESTORE DATABASE NorthAmerica FILEGROUP='NorthAmerica' FROM
AdventureWorks_Backup  WITH NORECOVERY;
RESTORE LOG NorthAmerica FROM NorthAmerica_Backup WITH NORECOVERY;
RESTORE LOG NorthAmerica FROM NorthAmerica_Backup WITH NORECOVERY;
RESTORE LOG NorthAmerica FROM NorthAmerica_Backup WITH NORECOVERY;
RESTORE LOG NorthAmerica FROM TailLogBackup WITH RECOVERY;
The Filegroup NorthAmerica, which is read/write, is recovered next:
RESTORE DATABASE NorthAmerica FILEGROUP='NorthAmerica' FROM
NorthAmerica_Backup WITH NORECOVERY;
RESTORE LOG NorthAmerica FROM NorthAmerica_Backup WITH NORECOVERY;
RESTORE LOG NorthAmerica FROM NorthAmerica_Backup WITH NORECOVERY;
RESTORE LOG NorthAmerica FROM TailLogBackup2 WITH RECOVERY;
The Filegroup NorthAmerica4, which is read-only, is restored last and does not require transaction logs, as it is read-only:
RESTORE DATABASE NorthAmerica FILEGROUP='NorthAmerica' FROM
NorthAmerica_Backup WITH RECOVERY;
File and filegroup backups require that the recovery model is either full or bulk-logged to enable transaction-log backups, unless the database is read-only.
The previous code example is appropriate when you place many backups in a single device. If you put each backup in its own file, then you must use the filenames in the RESTORE commands.
Database Snapshot Restore
SQL Server supports database snapshots whereby a read-only, point-in-time copy of the database can be taken. The snapshot file, when taken, contains no data because it uses the “copy on first write” technology. As the database is modified, the first time a value is modified, the old value is placed in the snapshot file. This type of restore is not intended for restore of media failures. It is generally used when you want to make a series of changes to the database and then revert back to the original version prior to the changes. If the changes are minimal, this can occur quickly. A common use for this is when testing–make changes during the test; then revert to the original version. A restore from snapshot returns the database to the point in time when the snapshot was taken. There are limitations to snapshots, as well. Blobs, read-only or compressed filegroups, offline files, and multiple snapshots prevent you from reverting using a snapshot. Reverting a database by restoring a snapshot backup also breaks any backup chain that may have existed before the restore. This means that after a snapshot restore, you must take a full backup (or file backup) before attempting to take any log backups
To create a database snapshot, use the following syntax:
 CREATE DATABASE NorthAmerica_dbss9AM ON ( NAME = NorthAmerica_Data
, FILENAME =′C:Program FilesMicrosoft SQL Server
MSSQL11.MSSQLSERVERMSSQLDataNorthAmerica_data
To restore from a snapshot, use this syntax:
USE MASTER
RESTORE DATABASE NorthAmerica
FROM DATABASE_SNAPSHOT=′NorthAmerica_dbss9AM′
Beginning with SQL 2005, there has been a much-improved page-level reporting structure available. Page errors are now logged in the suspect_pages table in MSDB. Along with the ability to log page errors, the SQL team has provided the DBA with the ability to restore suspect pages. SQL Server can restore pages while the database remains online and available, even the filegroup and file that contains the suspect pages. Other versions of SQL Server allow only offline restore of suspect pages.
Only data pages can be restored, which excludes allocation pages, full-text indexes, the transaction log, and the database and file boot pages. Page restore also does not work with the simple recovery model.
The restoration process for page restore is just like that of a file restore, except you provide the page numbers you want to restore. The syntax follows:
RESTORE DATABASE <dbname>
PAGE = '<file:page>,. . .'
FROM <backup file or device>
WITH NORECOVERY
You then restore any differential backup and then log backups with NORECOVERY. Then you create a normal log backup and restore it:
 BACKUP LOG <dbname> TO <filename>
 RESTORE LOG <dbname> FROM <filename> WITH RECOVERY
You can identify suspect pages from the suspect_pages table in msdb, the SQL error log, SQL event traces, some DBCC commands, and Windows Management Instrumentation (WMI) provider for server events. Page restores can be a great thing–the ability to restore pages quickly without having to restore the whole database. This is especially useful when you have hardware failures like controller or disk drive intermittent failures.
History Tables Restore
The msdb database maintains restore metadata tables, which are restored as part of msdb database restore. The following list details the meta data tables, and what each contains:
- dbo.restorefile: Contains one row for each restored file, including files restored indirectly by filegroup name
- dbo.restorefilegroup: Contains one row for each restored filegroup
- dbo.restorehistory: Contains one row for each restore operation
SQL Server Management Studio Restore
To restore a database from SQL Server Management Studio, perform the following steps:
1. Choose the Database folder, right-click the database of your choice, and choose Tasks ![]() Restore
Restore ![]() Database. The Restore Database dialog, as shown in Figure 17-26, exposes the restore capability.
Database. The Restore Database dialog, as shown in Figure 17-26, exposes the restore capability.
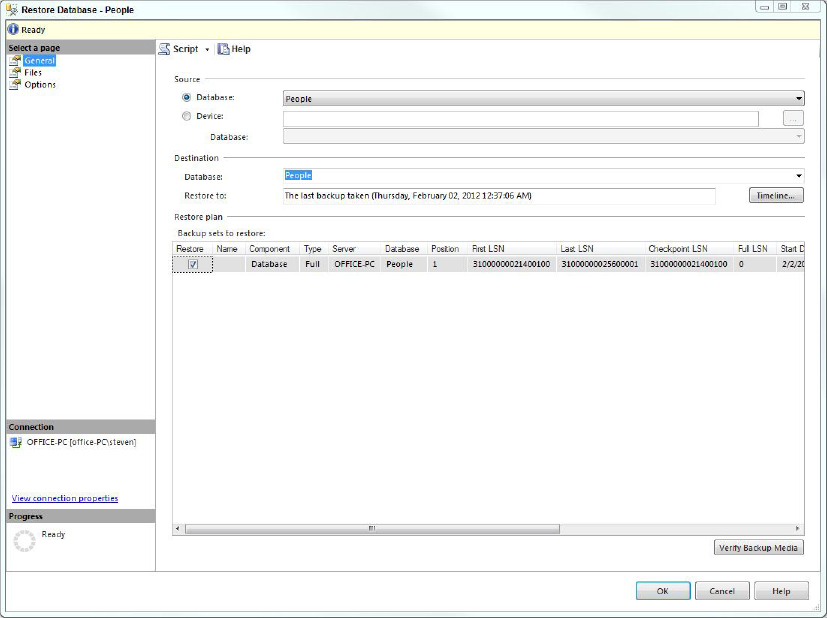
2. In the Restore Database dialog, in the Destination for Restore area, select from the following options:
- To Database: Choose the name of an existing database or type the database name.
- To a Point in Time: For a transaction log restore, choosing a stop time for the restoration is equivalent to STOPAT in the Restore Log command. A point in time is commonly used when a database is being restored because of a user or application data modification error and you have identified the time when the error occurred. Therefore, you want to stop the restoration before the error. This option is not possible for the Simple recovery model because the transaction log is truncated.
3. In the Source for Restore area of this dialog, choose between the following options:
- From Database: The name of the database to restore; this information is retrieved from the backup history tables in msdb.
- From Device: Choose either the backup device or the backup file name to restore from. This may be used when restoring a database onto another SQL Server 2012 instance and there is no restore data in the backup tables in msdb.
4. Next, select the backup sets to restore from the list at the bottom of the dialog. When selecting the restore source, it populates this field with the backup sets available for the database. It also provides an option to choose which backup sets to restore.
5. From the Restore Database dialog, select the Options page, and you’ll be taken to the dialog shown in Figure 17-27.

6. Choose from the following options in the Restore Options section of this dialog:
- Overwrite the Existing Database: Use this check box when the database you want to restore already exists in the SQL Server instance. Checking this box overwrites the existing database; this is equivalent to the REPLACE option in the Restore Database command.
- Preserve the Replication Settings: Use this check box when you restore a publisher database; it is equivalent to the PRESERVE_REPLICATION option in the Restore Database command.
- Prompt Before Restoring Each Backup: Use this check box when you swap tapes that contain backup sets.
- Restrict Access to the Restored Database: Use this check box when you need to perform additional database operations or validation before allowing users to access the database. This option limits database access to members of db_owner, dbcreator, or sysadmin and is equivalent to the RESTRICTED_USER option in the Restore Database command.
- Restore the Database Files As: Here you can choose to restore the database in another directory and with a different filename. For example, if a new database copy has been created in the same directory, you need to change the filename of the restored database. This is equivalent to the MOVE option in the Restore Database command. If the filenames are not changed, SQL Server generates the following error:
  Restore failed for Server 'Server1'.
 (Microsoft.SqlServer.SmoExtended)System.Data.SqlClient.SqlError:
  Exclusive access could not be obtained because the database is in
  use.(Microsoft.SqlServer.Smo)
7. In the Recovery State section of this dialog, select one of these options:
- Restore with RECOVERY: The default setting recovers the database, which means that no more backup images can be restored and the database becomes available to users. If additional backup images need to be restored, such as a full database restore followed by several transaction logs, the recovery should be performed after the last step because after recovery, no additional backup images can be restored without starting the restore over. This is equivalent to the WITH RECOVERY option in the Restore Database command.
- Restore with NORECOVERY: After a backup image is restored, the database is not recovered to enable additional backup images to be applied, such as a database differential or a transaction log backup. Moreover, the database is not user accessible while in NORECOVERY. This state is used on the mirror server in data mirroring and is one of the states available on the secondary server in log shipping. This is equivalent to the WITH NORECOVERY option in the Restore Database command.
- Restore with STANDBY: After a backup image has been restored, the database is left in a state in which it allows additional backup images to be restored while allowing read-only user access. In this state for the database to maintain data consistency, the undo and uncommitted transactions are saved in the standby file to allow preceding backup images to commit them. Perhaps you plan to apply additional backup images and want to validate the data before each restore. Oftentimes, this option is used on the secondary server in log shipping to allow users access for reporting. This is equivalent to the WITH STANDBY option in the Restore Database command.
T-SQL Restore Command
All the restore commands using SQL Server 2012 Management Studio and all functionality are available directly from T-SQL. For example, to conduct a simple restore of a full database backup, use this syntax:
RESTORE DATABASE [NorthAmerica] FROM  DISK ='
C:Program
FilesMicrosoft SQL ServerMSSQL11.MSSQLSERVERMSSQLBackupNorthAmerica.bak'
The following is a more complex example of a database restore using a full database, differential, and then transaction-log restore, including the STOPAT option. This option enables the DBA to stop the restore at a point in time before a data modification that caused an error. As a good practice, the STOPAT option has been placed in all the transaction-log backups. If the stop date is in the previous transaction-log backup, it stops there. Otherwise, if the stop date has been passed over, the restore process must be started again.
 --Restore the full database backup
 RESTORE DATABASE NorthAmerica FROM NorthAmericaBackup
    WITH NORECOVERY;
 --Restore the differential database backup
 RESTORE DATABASE NorthAmerica FROM NorthAmericaBackup
    WITH NORECOVERY;
 -- Restore the transaction logs with a STOPAT to restore to a point in time.
 RESTORE LOG NorthAmerica
    FROM NorthAmericaLog1
    WITH NORECOVERY, STOPAT = 'Nov 1, 12:00 AM';
 RESTORE LOG NorthAmerica
    FROM NorthAmericaLog2
    WITH RECOVERY, STOPAT = 'Nov 1, 2012 12:00 AM';
Databases that use transparent encryption automatically have their backups encrypted with the same key. When you restore these backups, the server encryption key must also be available. No key — no access to the data. The encryption keys must be saved for as long as the backups.
Restoring System Databases
The cause of the master database failure determines the procedure to follow to recover it. For a failure that necessitates the installation of a new SQL Server instance, if you have a copy of the most recent master full database backup, follow these steps:
1. Install the new SQL Server instance.
2. Start the SQL Server instance.
3. Install service packs and hotfixes.
4. Stop the SQL Server agent; if you don’t, it may take the only single-user connection. In addition, shut down any other services that may be accessing the SQL Server instance because that may take the only connection.
5. Start the SQL Server instance in single-user mode. There are several ways to set SQL Server to single user mode: by using SQL Server Configuration Manager, executing the SQL Server binary from the command line, or from Windows Services, locating the SQL Server service. In all cases, add the -m startup parameter to set SQL Server to single user mode, and then restart. The recommended approach is to go to SQL Server Configuration Manager, under SQL Server Services, and locate the SQL Server instance. Stop that SQL service. Then, on the Startup Parameters tab of the Service properties dialog, add the -m startup parameter to the service, and restart the SQL service, as shown in Figure 17-28.

6. Use SQLCMD or an administration tool to log on to the SQL Server instance with a system administrator account. Restore the master database by executing the following command:
RESTORE DATABASE [MASTER] FROM  DISK =
N'C:Program
FilesMicrosoft SQL ServerMSSQL11.MSSQLSERVERMSSQLBackupmaster.bak'
7. If SQL Server does not start because the master database is corrupted and a current master backup is not available, the master database must be rebuilt. Execute the SQL Server Setup.exe to repair the system databases.
The rebuildm.exe application, available in SQL Server 2000, has been discontinued.
8. After the rebuild and SQL Server starts, if a current copy of the master database backup is available, set the SQL Server instance in single-user mode and restore it, according to the previous instructions. If a current master database backup is not available, any modifications to the master database (for example, login security, endpoints, or linked server) will be lost and need to be redeployed.
9. Additionally, setup.exe creates a new msdb and model during the system database rebuild. If a current copy of the model and msdb are available, restore them. If not, all modifications performed to the model and msdb need to be redeployed. The syntax to rebuild the master database is as follows:
start /wait setup.exe /qn INSTANCENAME=<InstanceName> REINSTALL=SQL_Engine
10. Then attach the user databases.
If only the model or msdb databases are damaged, you can restore them from a current backup. If a backup is not available, then you have to execute Setup.exe, which re-creates all the system databases. Typically, model and msdb reside in the same disk system with the master, and if a disk-array failure occurred, most likely all three would be lost. To mitigate disk failure, consider using a RAID array where master, model, and msdb reside. tempdb does not need to be restored because it is automatically re-created by SQL Server at startup. tempdb is a critical database and is a single point of failure for the SQL Server instance; as such, it should be deployed on a fault-tolerant disk array.
Archiving a large amount of data from large tables can be challenging. For example, selecting millions of rows from a billon-row table, copying them, and then deleting them is a long-running delete process that may escalate to a table lock and reduce concurrency, which is not acceptable, unless no one will be using the table. A commonly used procedure is to periodically delete a small number of rows to improve table concurrency because the smaller number of rows may take page locks and use an index for faster access, completing faster.
An efficient procedure to archive large amounts of data is to use a sliding time window table partitioning scheme. There are two approaches to this solution: using SQL Server table partitioning or using a partitioned view.
SQL Server Table Partitioning
SQL Server supports table partitioning, whereby a table can be carved into as many as 15,000 pieces, with each residing on its own filegroup. Each filegroup can be independently backed up. Different filegroups can also be located on different storage; for example, current data can be held on fast disks, possibly even on solid state disks. Older/archive data can then be moved to larger, slower disks and more easily deleted when the data is no longer needed. The deletion of a partition can be achieved extremely quickly, and with virtually no impact to queries against the current data.
Look at a partitioning example in which each partition contains one month’s data. With table partitioning, a new empty partition is created when the next monthly data becomes available. Then the oldest partition can be switched out into a table and moved to an archive table monthly. The basic steps to create a table partition are as follows:
1. Create a partition function that describes how you want the data partitioned.
2. Create a partition schema that maps the pieces to the filegroups.
3. Create one or more tables using the partition scheme.
Following is an example of creating a partition table using a monthly sliding window:
--Create partition function
 CREATE PARTITION FUNCTION [OrderDateRangePFN](datetime)
 AS RANGE RIGHT
 FOR VALUES (N'2009-01-01 00:00:00'
, N'2009-02-01 00:00:00'
, N'2009-03-01 00:00:00'
,N'2009-04-01 00:00:00'),
 --Create partition scheme
 CREATE PARTITION SCHEME [OrderDatePScheme]
 AS PARTITION [OrderDateRangePFN]
 TO ([filegroup1], [filegroup2], [filegroup3], [filegroup4], [filegroup5]);
 --Create partitioned table SalesOrderHeader
 CREATE TABLE [dbo].[SalesOrderHeader](
   [SalesOrderID] [int] NULL,
   [RevisionNumber] [tinyint] NOT NULL,
   [OrderDate] [datetime] NOT NULL,
   [DueDate] [datetime] NOT NULL,
   [ShipDate] [datetime] NULL,
   [Status] [tinyint] NOT NULL
 ) ON [OrderDatePScheme]([OrderDate]);
This example places each partition on a different filegroup. Splitting and merging partitions requires data movement. You can achieve high-speed splits and merges without table locking or reducing concurrency if you place the partitions on the same filegroup. When partitions are on the same filegroup, switching out a partition or merging is only a schema change and occurs quickly. There are several other smaller restrictions for high-speed partitioning, but the filegroup restriction is more important.
Partitioned View
This technique has been available since earlier versions of SQL Server. It uses a partition view to group independent, identical tables together (for example, a new table for each month). Following is the procedure:
1. Create individual, identical tables with a check constraint to limit the data that can reside in each.
2. Create a view to unite all these tables together.
3. Load the data through the partition view. SQL Server evaluates the table constraint to insert the data in the correct table.
4. Before the next date period, create a new table with the date period constraint and include it as part of the view definition. Then load the current data through the view.
5. To archive, remove the oldest table from the view definition and then archive it. Each table can be placed in its own filegroup and backed up individually.
This technique does not have the 15,000-partition limitation, but it requires more management because each table is independent and managed.
Backup and recovery are the last defenses to recover an organization data asset when everything else fails. The backup and restore functionality must guarantee that many years of customer information, buying patterns, financial data, and inventory can be recovered. SQL Server 2012 is a scalable and highly available RDBMS solution supporting some of the largest databases with the highest number of concurrent users running mission-critical applications. These key backup and restore functionalities ensure that it can support a larger database with less management. If you followed along throughout this chapter, you should now both understand the details needed to create a robust plan for backing up your company’s data and possess one or more documents that constitute your recovery plan.