
RIBA Plan of Work
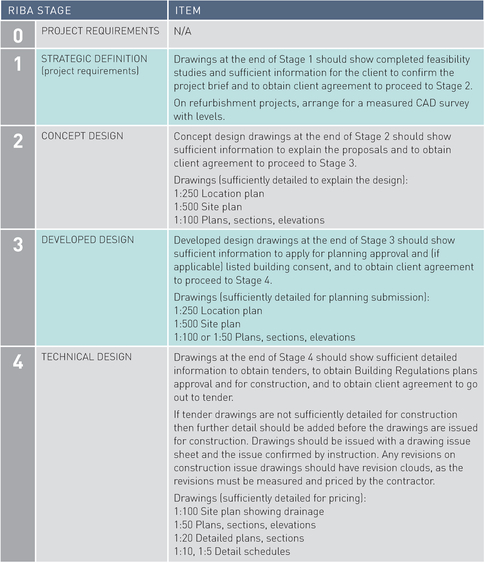
In 2013 the RIBA published a new Plan of Work, with Stages 0–7 replacing the old RIBA Work Stages A–L. The Plan of Work details the tasks and outputs required at key stages of a project from inception to completion. On small and domestic projects services are not normally required at Stages 0 and 7.
The Plan of Work is a free digital document available online from the RIBA.12 It can be made practice-specific and the type of procurement can be selected, so the plan can be tailored for an individual project or become the office standard Plan of Work.
For the small practice taking on small projects and working almost exclusively with domestic clients it is highly likely that you will be using traditional procurement13 for all projects. You might find it useful to produce a practice-specific Plan of Work, fusing traditional procurement with information relating to fees for each stage, as shown in Figure 2. A digital copy of the Plan of Work on your desktop or a printed copy on the wall beside your desk is a helpful reminder of what you should be doing at each stage of a project, and what information to produce before a stage is complete and you can invoice.
Project plan
A project plan is a project-specific development of the Plan of Work. It will contain information relating to drawings, documents and procedures for each stage of the project. On a domestic project it might be sufficient to use the Plan of Work and a detailed pre-contract programme.
Consistency
Consistency in your approach to office administration and project management generally is the key to efficient performance in the small office. If the practice has a lot of small jobs in the office at the same time, and all the jobs follow the same Plan of Work and fee invoices are sent out in line with the work stages, this will speed up administration. If you use the same Plan of Work, the same construction contract, the same version of the NBS specification, the same tender document format, and so on, you will become familiar with these documents and more efficient at putting them together.

Use the Plan of Work to help you invoice
Before sending out an invoice at any particular stage to a client, check the Plan of Work first to be sure that not only drawings, but updated specifications, budget and programme have also been issued, sustainability and health and safety checks made, and submissions and approvals obtained. Then check that your client is happy with everything and ready to proceed to the next stage. Only then send out your invoice, confident that your client is aware of what work the invoice relates to and is happy with the work you have done.
The architect’s appointment
Contracts are mandatory
The ARB Architects Code: Standards of Conduct and Practice14 and the RIBA Code of Conduct15 both state that all appointment contracts must be explained, understood and agreed with your clients and confirmed in writing. However, all too often the terms are not agreed and the documents are not signed before some early-stage work commences on the project. Pending formal appointment, many clients expect their architect to attend meetings or provide ideas and advice for free, hoping that the carrot of a new project is sufficient reward. The same clients do not expect their lawyers, plumbers or hairdressers to visit their properties and work for free (it’s highly unlikely they would), but somehow architects – despite all the liability they carry – are fair game. If you are providing services in advance of appointment for the full project, it should be on a pre-agreed basis, such as for an hourly charge.
Small projects
It is a mistake to think that a very small project does not warrant a proper appointment contract. Small projects such as a basement extension to an existing house, or even a loft conversion, are the very ones where problems are most likely to occur. A small domestic project can also develop into a larger project halfway through the design, or even when the project is on site, so it is good practice to set up all projects in a consistent way with an appropriate appointment contract.
Consistency
If your practice does one medium-sized project a year you can afford to spend some time selecting or tailoring the appointment contract with your client, as the amount of time you spend doing this relative to the fee income on the project is not significant. However, if your practice takes on lots of small projects you may have to prepare ten or fifteen appointment contracts in a year. For this reason, it is a good idea to make the contract you use consistent across all your projects so you are familiar with the contract and new versions can be prepared, signed and filed quickly and efficiently, allowing you to get on with the design work.
Getting the contract signed
The first bit of paperwork in a new project file should be the signed contract confirming your appointment. No work should be done on a project until the signed contract is in the project file. If a client arranges for a few hours’ work on an hourly charge basis prior to a more formal appointment, this should be confirmed in an email to which the client is invited to respond and accept, so you have written confirmation of your appointment.
Forms of contract
The contract with your client for a new project can be the standard RIBA appointment contract, or a contract you have drawn up specifically for your practice. Your insurers may prefer that you use the RIBA documents, as these have been carefully worded to provide protection for both the client and the architect. You must ensure that your clients fully understand the terms they are agreeing to, and in particular the clauses that relate to dispute resolution and professional indemnity insurance.
The RIBA produces a range of appointment contracts and these are updated every five years or so.
The contracts you are most likely to use on small projects are as follows:
Letter contracts are only suitable for small, straightforward projects. Further guidance on the use of letter contracts can be found in the RIBA Guide to Letter Contracts, and a standard format can be downloaded from the RIBA Bookshop free of charge.16
Risk
If you provide services to clients without a written and signed contract, or if a contract is not updated when circumstances change, you run the risk of not being paid for part or all of the work done. It is worth remembering that clients who drag their feet in signing a contract or agreeing to revisions to the budget are the very ones who might not pay, especially if the project is a feasibility study and does not go ahead, or if a project is not granted planning permission. Any court action to recover outstanding fees would stand little chance of winning if there was no written and signed agreement on fees.
How to charge for Stage 1 work
Few clients would want to sign a contract with an architect for a new project prior to some initial discussion, a visit to the site and some guidance on budget, so it is important to provide a preliminary consultation. This advice should be provided at your client’s expense and not yours.
What might work well for a small practice receiving regular enquiries about domestic projects is to have a standard procedure for dealing with, and charging for, preliminary enquiries, as follows:
After the first phone call, an email can be sent to the new client confirming your terms, the hourly charge rate and what services can be provided on this basis until a more formal appointment is agreed.
For a new client the cost of 2–4 hours’ work by an architect is an excellent investment and should help them to move from a vague idea of what they want, with little idea of what it costs, to having a good understanding of what the project will involve, how much it will cost, how long it will take and how an architect will help them through the process.
Your clients will be more likely to prepare carefully for the meeting and less likely to waste your time if they are paying you on an hourly charge basis.
Revisions to the appointment contract
The architect’s appointment contract is usually prepared and sent out after the first consultation meeting, but the brief and budget recorded in the documents are likely to change as the project develops at each stage. At the end of each stage, check the brief and the budget and email your client to check that they are happy to accept any additional cost before proceeding to the next stage. Keep a copy of the emails and the client’s responses with the original appointment document. Never allow your client to say that the cost of the project increased without their consent, or that the brief was altered without their consent. Keeping your client informed of the brief and the budget and their agreement will ensure that you do not have to do any abortive work and your fees will always be based on the latest estimate.

Revisions to the appointment contract – Stages 0–7
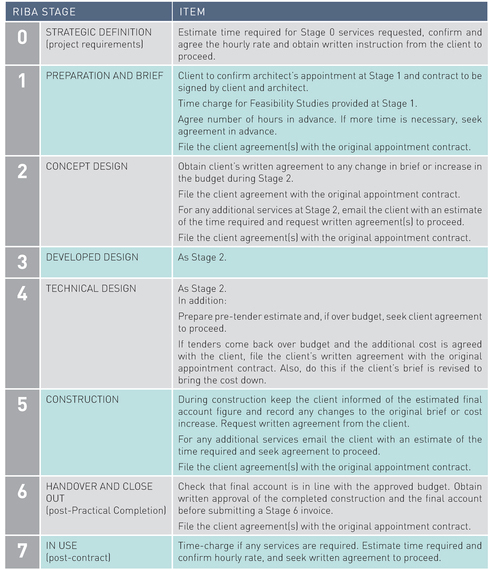
Summary
CDM: Construction (Design and Management) Regulations 2015
The CDM Regulations were introduced more than twenty years ago to improve the health and safety of operatives on site during construction and when carrying out maintenance on buildings, and to ensure that buildings were designed in such a way as to make it safe to build and maintain them. If an accident happens, the current CDM Regulations ensure that there will be a duty holder who can be held accountable, and a paper trail showing what risks were identified and what preventative measures were taken.
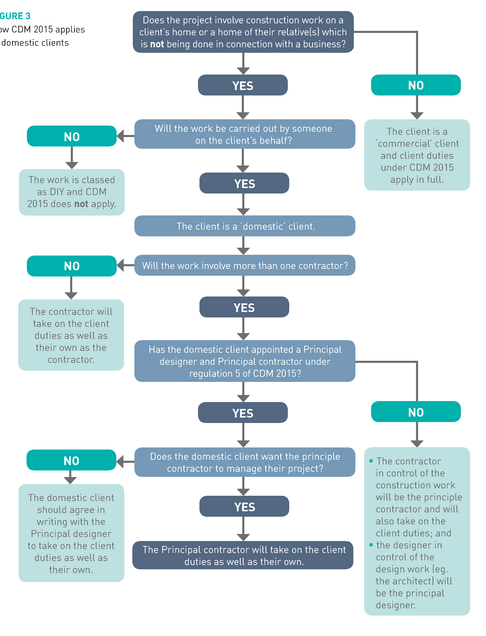
The Regulations apply to all construction projects where one or more designers and one or more contractors are appointed. For very small projects where no designer is appointed and there is only one contractor, the CDM Regulations do not apply.
The duties of the various parties under the CDM Regulations 2015 are dealt with differently on a domestic project than on a commercial project. These duties are summarised in the table below. It is only since 2015 that domestic clients have had any duties – before that they were exempt. The domestic client must appoint a principal designer and a principal contractor, but the other client duties are passed to the principal contractor or, subject to written agreement, to the principal designer.
If the domestic client fails to appoint a principal designer or a principal contractor, the designer in control of the design will be the principal designer and the contractor in control of the construction work will be the principal contractor and will also take on the client duties.
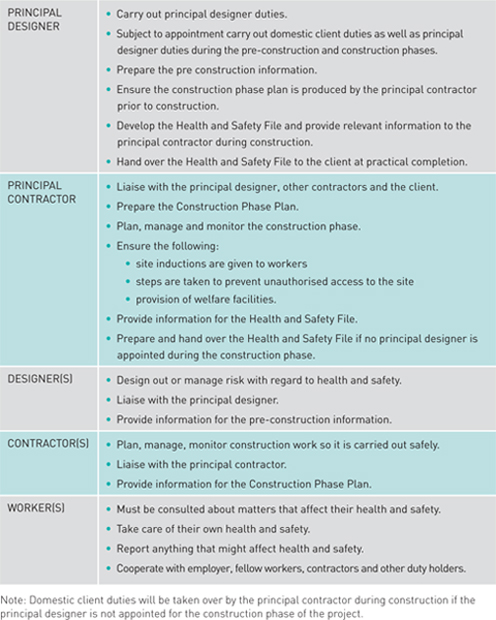
Roles and duties on domestic projects
![ROLE MAIN DUTIES
DOMESTIC CLIENT • Appoint a designer at pre-construction stage as ‘principal designer’.• Appoint a contractor as ‘principal contractor’ for the construction phase (if more than one contractor will be on site).• Ensure that welfare facilities are provided.• Hand over any existing information relating to health and safety.• Make suitable arrangements for managing the project.• Review arrangements during the project.• Provide information about the site.• Allow sufficient time and resources for the project.• Establish a single point of contact.• Arrange for the project to be notified to the Health and Safety Executive (if the project is notifiable).• Ensure that the following documents are prepared:• Pre-construction information• Construction Phase Plan• Health and Safety File.• Pass some domestic client duties to other duty holders:• To the principal contractor during the construction phase (default], or;• To the principal designer for the pre-construction and construction phases, subject to written agreement.
PRINCIPAL DESIGNER • Carry out principal designer duties.• Subject to appointment carry out domestic client duties as well as principal designer duties during the pre-construction and construction phases.• Prepare the pre construction information.• Ensure the construction phase plan is produced by the principal contractor prior to construction.• Develop the Health and Safety File and provide relevant information to the principal contractor during construction.• Hand over the Health and Safety File to the client at practical completion.
PRINCIPAL CONTRACTOR • Liaise with the principal designer, other contractors and the client.• Prepare the Construction Phase Plan.• Plan, manage and monitor the construction phase.• Ensure the following:• site inductions are given to workers• steps are taken to prevent unauthorised access to the site• provision of welfare facilities.• Provide information for the Health and Safety File.• Prepare and hand over the Health and Safety File if no principal designer is appointed during the construction phase.
DESIGNER(S) • Design out or manage risk with regard to health and safety.• Liaise with the principal designer.• Provide information for the pre-construction information.
CONTRACTOR(S) • Plan, manage, monitor construction work so it is carried out safely.• Liaise with the principal contractor.• Provide information for the Construction Phase Plan.
WORKER(S) • Must be consulted about matters that affect their health and safety.• Take care of their own health and safety.• Report anything that might affect health and safety.• Cooperate with employer, fellow workers, contractors and other duty holders.
Note: Domestic client duties will be taken over by the principal contractor during construction if the principal designer is not appointed for the construction phase of the project. The regulations can be read in fall online.17 Guidance to the CDM Regulations is also available online.18](https://imgdetail.ebookreading.net/20201209/1/9781000702330/9781000702330__small-practice-and__9781000702330__Images__fig00031.jpg)
The regulations can be read in full online.17 Guidance to the CDM Regulations is also available online.18
CDM: Principal designer and other appointments
Principal designer
On small and domestic projects the architect will nearly always be appointed as the ‘principal designer’ as defined in the CDM Regulations 2015 (see page 140). You may also assume responsibility for domestic client duties. You should check with your professional indemnity insurers that you are covered to provide this service, as it is completely separate from the services you provide as an architect.
If you are appointed as ‘principal designer’, this role should be noted in your appointment with an explanation of the work you will do and an estimate of how many hours are required at the different stages. A separate fee for this service should be agreed.
Your clients may not be aware of the CDM Regulations, so you must explain the duties and further clarify that, subject to written agreement, you will be taking over the domestic client duties under the Regulations and providing principal designer services up to Practical Completion.
Other designers
It will be the responsibility of the principal designer to coordinate other designers working on the project and ensure that their designs also comply with the Regulations. Other designers might include specialist glaziers, kitchen designers, mechanical engineers or plumbers.
Principal contractor
On small projects the main contractor will be named as the principal contractor in the construction contract. It will then be the main contractor’s duty to ensure that subcontractors also comply with the regulations.
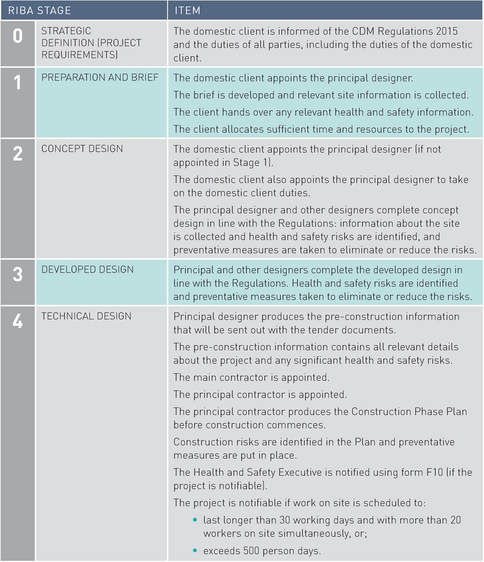
CDM Regulations for a domestic project using traditional procurement
Appointment of other consultants and specialist contractors
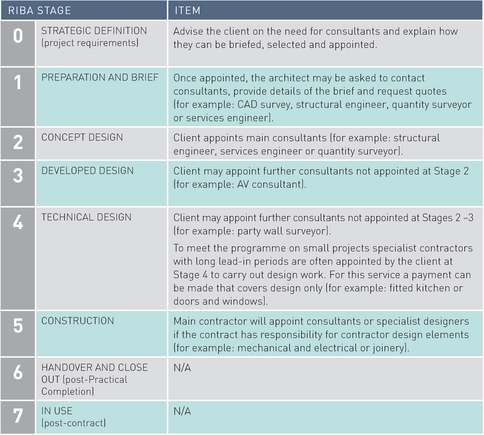
Quotes from other consultants
On a small or domestic project it is likely that the client will expect the architect to provide advice on the need for other consultant appointments or specialist companies who provide design or surveying services. Your client will also expect you to decide what consultant services are necessary, to contact the consultants and discuss the brief and their PI insurance cover, and to arrange for a quote for their services. These quotes should be addressed to your client and copied to you so you can confirm that the quote is reasonable. Invoices from consultants should also be addressed to your client and only copied to you if your client wants you to check them before payment is made.
Consultant appointment
It is not a good idea for you as the architect to appoint consultants directly unless this is something you have carefully considered and agreed with your PI insurer. If you are pitching for larger jobs it may be a requirement that you appoint other consultants. This will increase your turnover and perhaps allow the practice to punch above its weight – but there are costs and risks associated with such appointments, and these should be carefully considered.
Occasionally, a domestic client will recommend a consultant engineer or a contractor they have used before. If so, check the consultant or the contractor out in the same way you would check anyone you have not worked with before, by looking at their website, taking up references from other architects or clients, visiting their work and carrying out financial checks.
The consultants and other designers you are likely to work with on small and domestic projects will depend on the complexity and value of the jobs and can include some or all of the following:
If the work you do is consistent in type and value you may find that you can arrange to work with the same consultants, contractors and specialist subcontractors year after year. Not only does this make projects easier to manage, it is a huge benefit to your clients if you can arrange the whole team knowing that you are putting forward experienced consultants and contractors you can vouch for and whose charges are reasonable for the quality of service provided.
Consultant appointments for a small project and traditional procurement
Approvals and party wall agreements
Approvals
Even on a small domestic project a number of approvals may be necessary. Establish at Stage 1 which approvals are applicable to the project:
Planning
Planning applications are normally made online using the Planning Portal19 at the end of Stage 3.
Prior to making a submission to planning always check the planning website for the local authority and find out whether the proposed development is in a conservation area, whether an existing building is listed, whether the proposed works are permitted development and what restrictions on development are applicable to your application and the planning history for the address. It is no longer possible to get free pre-application advice from planning over the phone or at the planning office. Pre-applications can be made to check whether the proposal is likely to get planning permission, but the fee is significantly higher than the planning fee and the process can take as long as eight weeks. After the pre-app, a full planning application must be made for a separate fee, and this will take another eight weeks.
Explain the planning process to your clients and show the approval periods on the pre-contract programme. Check with the client whether Stage 4 work should commence before planning permission is granted.
Building Control
Plans approval and site inspections and completion certification can be carried out by the local authority Building Control or by private inspectors, who will notify the local authority of their appointment.
Party wall
Small and domestic projects often require multiple agreements with adjoining owners if works are proposed on or adjacent to the party walls.
In accordance with the Party Wall etc. Act 1996 these agreements with neighbours must be in writing, and the agreement must refer to the relevant section of the Act. Disputes with adjoining owners or failure to reach agreement can cause long delays and disruption, so good early communication and agreement is important. Where appropriate a party wall surveyor should be appointed to deal with all party wall matters, including the serving of notices under the Act, the drawing up of party wall agreements, and the carrying out of condition surveys before and after construction.
In advance of sending out formal notices the client should show the proposals to adjoining owners who are affected, and explain the works. Formal notice under the Act should then be issued. Depending on which section of the Act applies, one or two months’ notice must be given.
The date for issue of notices and the period of notice should be shown on the pre-contract programme.
Sustainability
Due to worldwide concern over climate change our awareness of the importance of ‘sustainability’ has increased. Countries around the world are working together, recognising that unless all countries cooperate a global solution will not be found.
Along with 180 countries the UK signed up to the Kyoto Protocol in 1995, but the United States and China did not ratify the protocol – so while some progress in the right direction was made, the targets were not met.
The UK’s decision in June 2016 to exit the European Union has not yet (by the time of writing) had any effect on legislation relating to climate change and carbon reduction.
The Building Regulations in the UK, despite the regular updates to Part L in particular, only go some of the way to meet the targets for reduced consumption of energy and carbon emissions that the UK has agreed to meet.
Refurbishment of existing buildings
In facing the challenge to reduce UK energy consumption and carbon emissions associated with the built environment architects must accept that we are not starting from scratch with a programme to build new zero or low carbon buildings on green field sites. The reality is that our cities throughout the UK, especially London, are already built up with millions of existing buildings and a huge amount of work needs to be done to improve the existing buildings especially the housing stock as much of it is over a hundred years old. Reducing energy consumption from the existing housing stock is a major challenge and calls for innovative technical solutions, long-term strategies and tax incentives, achievable targets and proper funding at government level.
Many small architectural practices and sole practitioners work on existing buildings throughout the UK repairing the existing fabric of buildings, improving the thermal performance and reducing the consumption of energy, and giving old buildings a new lease of life. Refurbishment work does not have the eco glamour of large newbuild low carbon projects that use innovative technology, but refurbishment has a small carbon footprint compared to new build and is important if we are to achieve the target reduction in UK carbon emissions.
Client commitment to sustainability
Some clients are passionate about energy-saving technology and measures; others show little or no interest. It will be up to you as the architect to provide the information clients need to make informed decisions about appropriate measures for their particular project and budget. You might find it useful to have a checklist in the office manual of all the energy-saving measures that can be considered, from loft insulation to wind turbines, and a list of items to check on site that can have an impact on sustainability. Keep your client informed at all stages about the costs and benefits of the energy-saving measures included in the project, and be aware that if savings need to be made these items may be the first to go if the client does not understand the real benefit.
Designing buildings with low embodied energy and a small carbon footprint that reduce fossil fuel use can add to the work required to detail, specify and construct the building. Your fee should reflect this extra work, and any additional construction cost should be offset against future savings. This aspect should be discussed with clients.
Sustainability checklist for a small project with traditional procurement

Pre-contract programme and construction programme
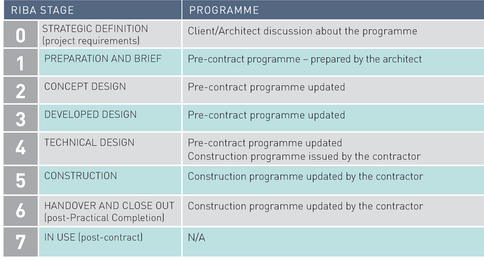
A pre-contract programme sets out all the key stages of the project and can be prepared and issued to the client at Stage 1, as soon as the brief has been confirmed. The programme should then be revised and reissued at each stage of the project. You can also show on the programme the stages at which you will invoice the client and approximate dates for valuations when the project is on site. Domestic clients often need to carefully manage cashflow and move money between accounts to have money ready to pay invoices. The more warning you give them of when payments are due the better prepared they will be to make prompt payment to you, the other consultants and the contractor.
See Figure 4 Pre-contract programme overleaf.
Construction programme
A construction programme should be provided by the contractor at the precontract meeting, and it should show all the key stages of the construction on site. The programme should also show periods for drawing approvals and latest dates for long-order items and long manufacture periods, as delivery periods for items such as doors and windows can be up to sixteen weeks. In some cases orders may need to be placed with specialist suppliers or subcontractors prior to the appointment of the main contractor. If there are delays on the project the programme should be updated by the contractor and issued with any request for an extension of time. A valuation forecast can also be added to the programme by the contractor. This will help clients have money ready to pay when interim certificates are issued. It is also helpful to monitor progress on site.
See Figure 5 Construction programme on page 158.

FIGURE 4.
Pre-contract programme
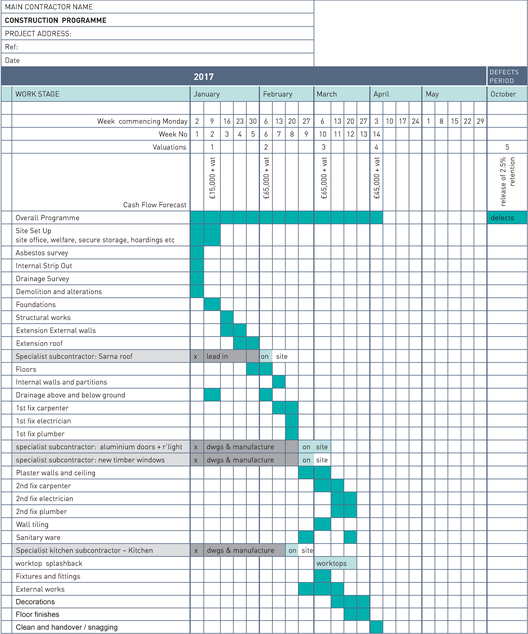
FIGURE 5
Construction programme
Programmes for a small project with traditional procurement
Drawings and drawing issue sheet
Drawings
The project drawings will normally include:
The title block on the drawings will include:
In addition, the title block may contain a copyright symbol and an instruction not to scale from the drawing.
For new buildings, the architect will set up the drawings from scratch. For works to existing buildings, a full CAD survey with levels should be commissioned. This survey should highlight walls that are not plumb and floors that are not level, as well as if the building is not orthogonal.
Domestic clients and other inexperienced clients are likely to change their minds throughout the design process and will often want to wait until the last minute to select finishes or furniture layouts, so be clear about what information you need to show on drawings at each stage of the design and show no more than this. Remember that the more lines and objects there are on a drawing or schedule, the longer it will take to revise. If you show the same information on three different drawings, all three may have to be revised. Try to get final decisions from your client as soon as possible in the design process, and remember to update the programme and the budget at each stage and obtain agreement to any increase in cost or delay to the programme.
Traditional procurement is still widely used for small projects and domestic projects. This means that the design, or most of it, will be complete before tenders are obtained at Stage 4. The design and detail will be developed during Stages 1, 2, 3, 4 and 5 in accordance with the RIBA Plan of Work as shown below.
Drawings for a small project using traditional procurement

Depending on the size and complexity of the project there may be more than one drawing issue at each stage.

A3/PDF drawings
Many small architectural practices only have A3 printers. On small jobs both architects and contractors may prefer to use A3 drawings and PDFs, as they can easily be printed in-house and in the domestic client’s house or the small contractor’s office. A3 drawings can be bound into an A4 tender document and kept in an A3 file on site, and revised drawings added to the file as they are issued. A3 drawings are also easy to archive.
Increasingly, small contractors are using digital devices including mobile phones to look at PDFs of drawings and specifications. The danger of looking at a large drawing on a small digital device is that the whole drawing or document is not seen and not all the operatives on site will have access to the device with the information. You should insist that an up-to-date hard copy of the current drawings and the specification are on site in one place and kept up to date throughout the construction period, and accessible to the operatives carrying out the work. If it is written into the preliminaries the contractor must comply with the requirement.
The text on drawings should be big enough to be clearly legible, and preferably black on white. It is not enough that the architect can clearly see what is written on the drawings. The client or contractor, possibly with poor eyesight, should also be able to read the drawings with relative ease. Remember that the lighting on site is not always as good as it is in the office.
Drawing issue sheet
Every issue of drawings to your client at the pre-contract stage should be recorded on a drawing issue sheet such as the example shown in Figure 6. The same sheet should be used for going out to tender, and any further drawings issued during construction should be recorded on the drawing issue sheet and the issue confirmed by a site/architect’s instruction. At Practical Completion the drawing issue sheet will show all the drawings issued during the project, the date they were issued, to whom they were issued and for what purpose. A copy of the drawing issue sheet can be included in the Health and Safety File/Building Manual handed over to the client.


FIGURE 6.
Drawing issue register
Specification and cost control
Specification
The outline specification will be developed from a broad list of headings at Stage 1 to a more detailed description of the project at Stage 3.
At Stage 4 a fully detailed specification is written using a standard format such as:
NBS Minor Works and NBS Intermediate software is licensed and regularly updated to be compatible with the latest version of the construction contracts. Most good small contractors are familiar with the NBS.
The NBS specification and preliminaries will be included in the tender documents sent out to tender and used by the contractors to price the tender. The work sections in the NBS specification are set out in alphabetical order and in the same sequence as construction:
Most of the work should be fully specified but there may be some items that will be performance or part-performance specified such as mechanical and electrical work. If any part of the work is performance specified you must use a construction contract with provision for contractor design such as JCT Minor Works with Contractor Design or the RIBA Domestic or Concise building contracts. In order for tender pricing to be accurate the drawings and specifications sent out to tender should describe and specify the works in detail. If the tender documents are not fully detailed and include too many large provisional sums there is a risk that the cost of the project will increase during construction.
Cost control
At each stage of the project the specification and the budget should become more detailed. When you prepare a budget you should know where your figures come from. This might be from a pricing book, a quote from a supplier or contractor, a £/m2 rate based on a similar job recently tendered, or by estimating how long work will take and using day rates for the different trades. A budget for a small newbuild project could be set out as follows:
Construction cost budget
STAGE (1, 2 OR 3) CONSTRUCTION COST BUDGET

Budgets for refurbishment work will include VAT and the format will depend on the scope of the work. Contractors pricing a refurbishment tender often estimate the cost of small quantities of work on the length of time the work will take and the cost of materials, rather than using a £/m2 rate.
When calculating the fee on a small project where a quantity surveyor is not appointed, you must ensure that your fee covers the time you will spend preparing pre-contract budgets, sending out tenders, analysing tenders and agreeing the cost of variations, interim valuations and the final account.
Quantity surveyor advice
It is unlikely that a quantity surveyor will be appointed if the contract value is less than £250,000, so you must write and develop the specification and produce the budgets at Stages 1, 2 and 3. It is important to get the budget right at the earliest stage of the project, otherwise your client could hold you responsible for incorrect advice or for the project going over-budget in the later stages. If you do not have the expertise to produce an accurate budget you must arrange for a quantity surveyor to be appointed, even if on an hourly charge basis for a few hours.
If the project budget is over £250,000, or if the construction is particularly complicated, a quantity surveyor should be appointed. The quantity surveyor will update the budgets from your specification and drawings at each key stages of the project. If appointed for the whole project the quantity surveyor will also prepare a pre-tender estimate and analyse the tenders. Once the project is on site they will agree the cost of variations with the contractor, interim valuations and the final account.
Contingency
A contingency figure should be included in the early stage budgets and the contract sum to allow for the cost of additional work that invariably has to be instructed on site but cannot be foreseen at design stage. Otherwise, you must obtain client consent for the additional cost every time an instruction is issued that has a cost implication.
Specification and budget for a small project with traditional procurement


Selecting a contractor
Traditional procurement
For small and domestic projects traditional procurement is still widely used. This means the project is tendered at Stage 4 of the Plan of Work, when the design is complete. If there is a contractor design element in the contract this element of the design will be completed in Stage 5 during construction. The advantage of traditional procurement for domestic clients in particular is the knowledge that the scheme has been fully designed and priced competitively before the client signs a contract with a contractor.
Tender list
For contracts above £50,000 and below £1,000,000 it is common to have three or four contractors on a tender list. Fewer than this can be problematic if one or two drop out during the tender period, or fail to submit a tender. More than this and the good contractors will lose interest, as their chance of getting the job is reduced. The cost for a contractor of pricing a tender is significant, even if the project is relatively small such as a refurbishment or extension of a domestic property, so the tendering contractors want to know they have a reasonable chance of winning the tender.
Contractor selection
You should have a long list of contractors in the office. Before you go out to tender at Stage 4 make sure that every contractor on the tender list is properly checked out (and that the checks are up to date) and that each contractor is one you would be happy to recommend to your client. Remember that a contractor who is ideal for one client might not be right for another client.
Always choose contractors who have the same attitude towards their work as you do. Otherwise, no matter how hard you work or how many drawings are produced, how many phone calls you make or how many extra site visits you carry out, the finished work will not meet your standards.
If a competent and experienced contractor is appointed, the quality of the completed work on site will be good and it will be relatively easy and enjoyable to administer the contract. Your client will be more relaxed during the construction and pleased with the end result. You are likely to make a decent profit on the project and you may even learn from the contractor. If on the other hand a contractor is appointed who is not quite up to the job, all parties will struggle the whole way through and the end result will probably be disappointing.
Sometimes a domestic client will want to put a contractor on a tender list because they have done work for a neighbour at a low price. The contractor may well be a good contractor whose prices are reasonable but you should still carry out a financial check and take up a reference, check the contractor’s website and if possible visit a job they have done recently. If you find anything untoward this should be discussed openly with your client and if you don’t think the contractor is up to the job you should say so. Doing this before a contractor is added to the tender list takes time but may well save time, effort and stress further down the line.
Good small contractors
Good small contractors are like gold dust and are usually busy with work programmed into future months, so always phone to check they are willing to tender and provide details of the project and relevant dates before adding them to the tender list. Confirm their willingness to tender in writing saying when the tenders will go out, and copy in your client so they are included in the process.
Always contact the contractors who have tendered on your projects to thank them for their tender and to let them know whether their tender has been successful. Provide further feedback if requested. Contractors often ask whether the lowest tender figure was selected, what the lowest tender figure was and the basis on which a contractor was selected. The contractors will have spent a significant amount of money pricing your tender and you may want the same contractors to price future tenders, so the simple courtesy of providing feedback is good business.
Tender
Tender documents
For traditional procurement where the contractor is appointed at Stage 4, the tender process is as follows:
For small projects, and most domestic projects, the documents sent out to tender to the selected list of contractors, with a copy to your client, will include the following:


Allow three to four weeks for a single-stage selective tender, as the contractors must ask subcontractors to price part of the works.
Formats for pricing will vary depending on the size and complexity of the project and whether or not a quantity surveyor is appointed. But whatever the size of the project the format used for pricing and analysing tenders, valuations and final accounts should be fit for purpose and efficient to use – and, if possible, consistent from project to project. The document the contractor is asked to price should be set out logically and in the same sequence as the construction on site.
The pricing document will include any provisional sums or prime cost sums (see figure 12).
Provisional sums
A provisional sum is an allowance in the tender document for work that may be necessary but cannot be measured or priced at tender stage. The contractor should include sufficient time in their construction programme to carry out this work. Provisional sums can be ‘defined’, such as new consumer units (allowed for in the contractor’s programme), or ‘undefined’, such as additional work in connection with services (not allowed for in the contractor’s programme).
On refurbishment projects a contingency sum (for example 6% of the construction cost) can be included and will allow for works that may be necessary to build the project but cannot be defined at design stage, such as replacement of rotten timbers or live plaster, or additional work in connection with drainage. If a contingency sum is not included in the contract sum then each additional item instructed on site with a cost implication must be referred to the client for approval.
Prime cost sums
A prime cost sum is an allowance in the tender for work or materials provided by a contractor or supplier named by the client, such as the supply and fitting of an aluminium sliding door. The contractor will add a percentage for profit and attendance.
Pricing document and tender analysis
For a small domestic project a pricing document at tender stage could be a detailed schedule of work or it could be a priced activity schedule like the example in Figure 9, where the tendering contractors will be expected to measure and price the sections of work based on the detailed drawings and NBS Minor Works Specification sent out with the tender. If the project is fully designed and specified in detail the contractors’ tenders should include everything, even if the price is not broken down in the same way it would be in a full bill of quantities. If parts of the project are not fully designed, the price for these items can only be provisional and must be priced during construction when details are issued. The same spreadsheet used for the tender can be used for checking and analysing the tenders, as shown in Figure 9.
With traditional procurement, if a project is not fully designed and specified in detail at tender stage and large elements of work are covered by provisional sums, there is a high risk that costs will increase during construction and be more difficult to control. The risk should be explained to your client before going out to tender.
At the same time as checking the figures the contractor’s insurances should be checked and the start-on-site date and the contract period confirmed. When you feel confident that you have got the right contractor at the right price, a recommendation can be made to the client.
Contractors can be asked to provide with their tenders day rates for each trade and the percentage that will be added to materials if work is carried out on a day-works basis. This will enable you to control and agree the cost of variations on site. This information can be included in the tender analysis and recommendation to your client.
When analysing a tender on a spreadsheet with three or four columns of figures against the specified work items, it is quite easy to check the maths and see when one contractor has over- or under-priced an item.
If the tenders are all over budget it may be possible to negotiate a reduced scope of works with the input of the client and a preferred contractor to bring the scheme back in line with the budget.

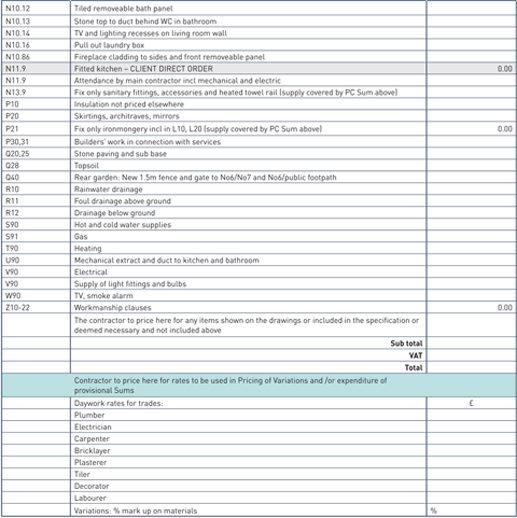
FIGURE 9
Pricing document
What might at first glance appear to be the lowest tender may not be the best tender to choose, so check all the figures and anything that might cause a problem during construction. Watch out for the following in tenders from small contractors:
Another thing to watch out for on the contractor’s construction programme is if there is not enough work programmed in the early stages. The job is reported at site meetings as being on programme, but then towards the end, when too much work is programmed, the contractor will need more time and may try to justify an extension of time with costs. Even if additional costs are not agreed, this is annoying for the client, as it delays possession.
Traditional procurement and forms of contract
The construction contracts most widely used for traditional procurement on small projects are as follows:
If all the work your practice does is of a particular type and within certain financial limits you may be able to use the same contract on all your projects. This way you will become familiar with the content and better able to explain the contract to your clients – in particular the clauses relating to disputes, payment and insurance. When working with domestic clients it is important that you thoroughly explain the contract and have them confirm that they have understood it. Otherwise there is a risk that if something goes wrong a client might claim that the architect did not properly explain the relevant section in the contract.
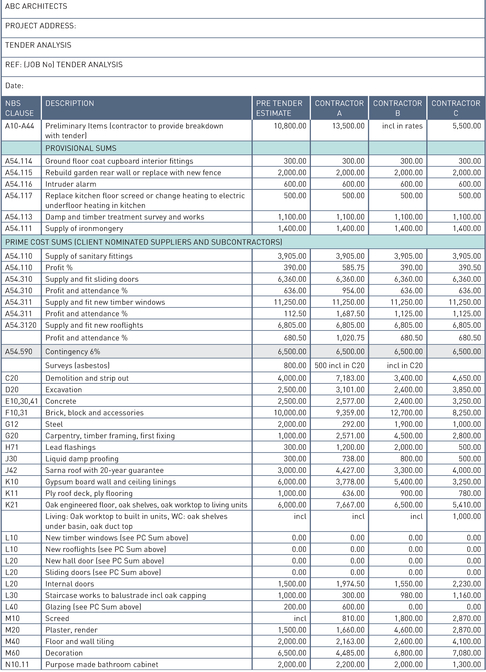

FIGURE 10
Tender analysis for a small project where no QS is appointed.


FIGURE 11
Interim valuation
Selecting a contractor and tendering using traditional procurement

Pre-contract meeting
The pre-contract meeting should be set up as soon as a contractor is appointed, and an agenda for the meeting should be issued to the contractor, the client and other consultants. If the type of work you do is repetitive you should have a standard agenda that can be quickly modified to include any particular items that are specific to the current project.
This meeting might be the first time your client and the contractor will sit around a table with you and discuss the project. The meeting should be minuted with action items that should be actioned before construction starts.
The pre-contract meeting should be held a minimum of two weeks prior to the start date to allow the contractor sufficient time to place orders, arrange labour, and issue the Construction Phase Plan, the construction programme and method statements. Time is also needed for both the contractor and the client to arrange the insurance cover required by the contract.
Client insurance
When domestic clients move out of a property during construction the arrangement of client insurance can be complicated. It is not always possible to extend existing building and contents insurance, and a new policy with a new insurance company may be the best option. This can take a few weeks for the client to sort out.
A word of warning: domestic clients can find the insurance clauses in contracts difficult to understand, and insurance can be difficult to obtain. Their insurance brokers will often confuse the matter further because they want to sell expensive new policies. Clients will often ask the architect to liaise with their insurance broker, but it is best to explain that the contract is clear about what insurance cover is required, that you as the architect are not an insurance expert, and clients should rely on the advice of their broker or the insurance company they deal with.
Ideally, all insurances should be in place before the pre-contract meeting. The contract should be signed and the signatures witnessed at the precontract meeting, and if this is not possible then at the latest the day before construction starts.
The agenda for the pre-contract meeting should be circulated in advance to give all parties time to prepare information and to add items to the agenda.
The agenda for a pre-contract meeting for the refurbishment of an existing dwelling might include the following items:
Site Instructions/Architect’s Instructions
The contract will call for all instructions to be given by the architect and to be confirmed in writing and priced by the contractor within a time limit, usually seven days. The instructions given during the contract will be referred to as ‘Site Instructions’ or ‘Architect’s Instructions’. They will be priced by the contractor within seven days (or as stipulated in the contract), and the prices agreed with the architect or, on larger projects, with the quantity surveyor.

FIGURE 12
Site Instruction/Architect's Instruction
The final account will be made up of the original tender items and the items listed on the architect’s instructions.
In some cases, the architect may state on the instruction ‘Cost to be agreed prior to construction’.
Instructions will only be issued in Stage 5 during construction, and a typical architect’s instruction/site instruction can be set out as in the example opposite:
Site visits
Where work is carried out on an existing building and the construction is complex and the programme short, regular and frequent site visits during construction are important. On a small project such as a loft conversion, different trades move in and out of the building within days and defective existing or new construction can easily be covered, so site visits should be carried out weekly and, in addition, at key stages of construction.
As project/site architect, you should do the following:
It is easy to check good work on site that is well executed, and it is easy to condemn work that is badly executed or products that do not comply with the specification. It is, however, quite difficult to know what to do when work is almost acceptable yet not quite right. Any concerns should be noted and raised with the contractor straight away. If the issue cannot be resolved on site a decision should be made back at the office, perhaps with guidance from a colleague, on what further information or action is necessary – then instruct the contractor.
The RIBA’s Good Practice Guide: Inspecting Works contains more detailed guidance for the site architect, suggesting how the eye can be trained to see as much as possible on site and what to look out for at every stage of construction.20
Site visits by the architect in traditional procurement

When visiting sites pre-contract or during construction or post-contract, always follow the office health and safety policy procedure for site visits.
Extension of time/Liquidated and ascertained damages (LADs)
The contract will state the date for completion, and the main contractor’s construction programme will show the same date for completion.
Extension of time
The client will sometimes delay the works by adding work to the contract during construction, or there might be a delay because a neighbour has not signed a party wall agreement, for example. When this happens the contractor should mitigate any delay but may become entitled to an extension of time, with costs in accordance with the construction contract. The costs must be based on actual losses, the works must be affected and delayed, and there must be no other contractual provision for reimbursement. The claim must be made at the proper time.
When the contractor claims for an extension of time full details should be provided, and the architect must assess the claim and grant the appropriate extension of time. The revised date for completion can be recorded on a site instruction, or you can issue a notification of revision to completion date. Costs will normally include the contractor’s prelims for the extended period.
In order to properly assess a request for an extension of time it is important to have accurate records including site instructions, photographs of progress on site and a marked-up copy of the construction programme, showing when elements were actually started and completed.
Liquidated and ascertained damages (LADs)
If the contractor delays the works and does not meet the completion date, damages called liquidated and ascertained damages (LADs) can be levied from the contractor. However, these damages must be based on the client’s actual losses arising out of the delayed completion, and the amount per week will be stated in the contract. For domestic work it may be difficult to assess the level of damages if the client is living in the property during construction. If the client is in rented accommodation, the rent and other actual costs would be included in the damages.
If the contractor fails to complete by the completion date, the architect must issue a non-completion certificate. If this certificate is not issued by the original completion date then it may not be possible to levy any damages from the contractor and the client could hold the architect responsible for any loss.
In reality, on many small domestic projects extensions of time are agreed with the client and the contractor at no extra cost to either party, because the client and the contractor may be jointly responsible for the delay and the contractor has covered the associated costs in his price for the variations. Any agreement relating to extensions of time must be confirmed in writing.
Certificates
A number of certificates will be issued during construction on site. The same format can be used for all the certificates, with the wording slightly altered for the different types of certificate. It is important to record the relevant dates on the certificates.
Certificates issued throughout the contract will include the following:
On larger contracts, sometimes on domestic projects too, the works are handed over in phases and further certificates or statements are issued as follows:
A typical interim certificate will look like the certificate shown in Figure 13.

FIGURE 13
Interim certificate
Valuations, estimated final account and agreed final account
During the pre-contract stages (1–4) of a small project where no quantity surveyor is appointed, clients will rely on the budget advice provided by the architect. Once a contractor has been appointed (Stages 5–6) and a contract sum agreed, the client will rely on your valuations and your estimates of the final account to know what the likely total cost of the project will be. Some clients will take a fairly relaxed view as long as they are confident that the project is well managed and nothing significant has happened to increase the agreed contract sum. Other clients may want you to agree all costs in advance, have different options priced up and costed prior to instruction, request monthly final account estimates and then check and query items on every valuation.
On small jobs where the architect is providing all the cost information, it may be convenient to use the same spreadsheet for the pre-tender estimate, pricing tenders, valuations, final account estimates and final account. Your clients will become familiar with the format and find it much easier to follow the expenditure and any increase in cost during construction and when agreeing the final account.
Formats for pricing, valuations and final account will vary depending on the size and complexity of the project and whether or not a quantity surveyor is appointed, but whatever the size of the project the format used for valuations and final accounts should be fit for purpose, appropriate for the scale and value of the project and efficient to use, and if possible the same format should be used on all projects in the office.

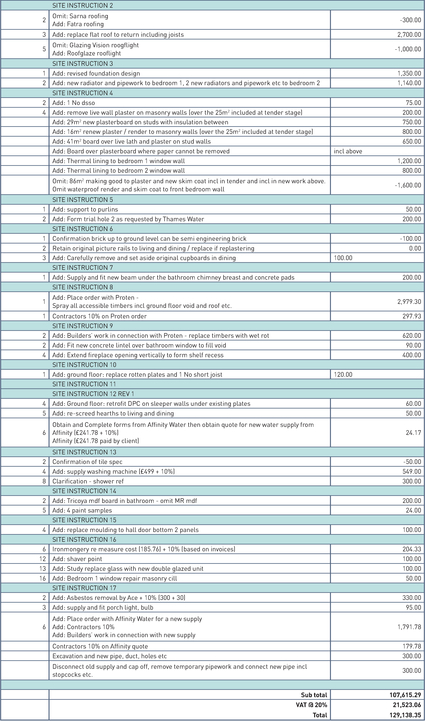
FIGURE 14
Final account
Health and Safety File/Building Manual
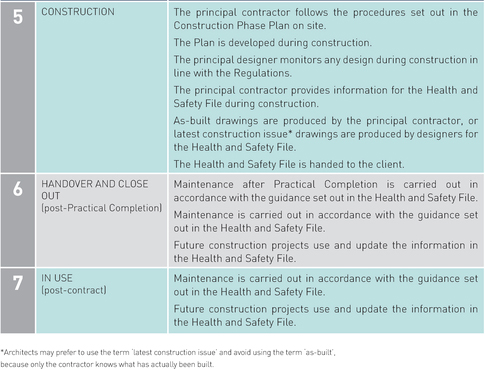
The purpose of the Health and Safety File/Building Manual is to provide the client at Practical Completion with the relevant certificates, guarantees, instructions and information necessary to safely run and maintain the property. It is also a record of what works have been undertaken and by whom. The file is held on the premises and should be updated during any further works on the property. On a domestic project the file will contain more information than the minimum health and safety information required under the CDM Regulations (see page 140).
At Practical Completion, the principal designer (usually the architect) will compile and hand over the Health and Safety File/Building Manual to the client. The principal contractor will provide most of the information required. Designers will provide the relevant latest construction issue or as-built drawings. The information provided by the principal contractor should be handed to the principal designer a minimum of one week prior to Practical Completion so the documents can be checked and the complete updated document handed to the client at Practical Completion.
Health and Safety File/Building Mannual – contents for a domestic project
As-built drawings
At the end of Stage 5 – Practical Completion – the architect will hand over to the client the Health and Safety File/Building Manual and a set of drawings. Although the term ‘as-built’ is widely used it is more correct to issue these drawings as ‘latest construction issue’ because, strictly speaking, only the contractor knows exactly what has been built. It is only necessary to provide drawings that may be of use to the client and the number of drawings will depend on the scope of the works. For a domestic project these drawings might include the following:
Some of the above drawings may be contractor design drawings or specialist subcontractors’ drawings.
As an architect carrying out small projects you are likely to receive many phone calls from previous clients wanting to know what colour paint was used for a particular space, or what type of light bulb they should buy to replace the bulb in a light fitting, or the reference for a heated towel rail so the valve can be replaced, for example. You can refer the client to the Health and Safety File/Building Manual, where all this information should be available. Alternatively, you should be able to quickly check this information for your client from the digital file for the particular project, even if it was completed some years ago.
An efficient and helpful response to such requests from previous clients will not only help your clients but it may also be the service that puts your practice in mind when your clients hear that a family member or a friend is looking for a good architect.
Snagging and defects
Snagging
Small contractors on domestic projects will often invite the architect to snag the works before they are complete, expecting the architect to be a finishing foreman who will make a list of incomplete items and also give the contractor an early indication of the standard expected. It is a good idea to put snagging on the pre-contract meeting agenda, and make it clear to the contractor before the works commence that the works must be complete and cleaned before snagging can commence. A period for snagging and clearing snagging items should also be included on the contract programme.
Small contractors on domestic projects will also ask for Practical Completion when there are items remaining on the snagging list, especially if the client has moved back into the property or did not move out. Unless there is a good reason why not, all items on the snag list should be cleared before Practical Completion is granted.
Inspect the works then issue one snag list to the contractor, incorporating any items the client has picked up and including any paperwork that is required.
When the contractor has cleared all the items on the snag list carry out an inspection to check the works are complete and invite the client to check with you and agree that a Practical Completion certificate can be issued. Remind your client that from the date of Practical Completion the client’s insurance will take over from the contractor’s insurance.
Handover
Before arranging the handover meeting with the client check all of the following:
At the handover meeting with the contractor and the client:
Defects
Most construction contracts will have a defects liability period after Practical Completion, which will normally be six or twelve months. During the defects liability period urgent items should be dealt with immediately by the contractor, such as leaks, or equipment or fittings that are noisy or do not work. All other items, such as shrinkage cracks, should be left until the end of the defects liability period.
At the end of the defects liability period the architect should arrange with the client to carry out an inspection and issue a list of defects. Clients should be asked to keep a list of any defects they notice during the liability period. This could be a light that flickers or a kitchen plinth that falls down or a floorboard that squeaks, for example – things that might not be noted by an architect when carrying out a site inspection. The list can be given to the architect before the inspection, and the items included on the list. It is best for the architect to compile one list including any items the client has picked up, rather than the architect issuing one list and the client a separate list. The client should always liaise with the contractor through the architect.
As soon as the items on the defects list have been cleared, a final inspection should be made. A final certificate is then issued, releasing the final balance of the retention – normally 2.5%.
Project archive
You should not archive projects until Stage 6, after the issue of the certificate releasing the final retention. When the project is ready to archive the files should be thinned down to the information that will be retained for a minimum of six years, but preferably twelve years or even longer.
The documents can be in paper or digital form. Copies of all correspondence by email during the contract should also be retained. In the event of a claim, email correspondence can be vital to establish relevant dates. The archive should also include copies of all photographs taken during construction, as these could be vital in the event of a claim or to investigate a latent defect. The information in the project archive will depend on the scope of the project, but on a domestic project will almost always include some or all of the following.
Project archive list
It is acceptable to keep some or all of the above information on a digital device, as long as there is a further backup copy elsewhere.
Archives can be stored in various ways, all of which are acceptable. What is important is to have all the relevant information and to be able to retrieve information efficiently.
A summary sheet listing the project archives should be kept up to date with a copy in the office manual, so the location of any project archive can be accessed with ease by anyone in the office.
What makes a project successful?
Subject to appointment, the architect is responsible for taking the project through Stages 0–7 and checking at each stage that the client is satisfied with the design, the budget, the programme and the services provided by all members of the team, including the contractor.
Success could mean any or all of the following achievements:
Feedback
Do not wait until the project is finished and handed over to get feedback from your client. It is better to get feedback at the end of each stage, so if your client has any concerns they can be addressed and the same concern will not arise during the next stage. Things do go wrong and difficulties do arise on projects, especially small domestic projects. It is how you handle these situations that matters.
Teamwork
Be positive with your clients and remember that what is a small domestic project for your practice may be a huge project for your clients. See things from their point of view and help them to enjoy the process of design and construction.
Be mindful of your responsibility as the architect to pull the project and the team together, and be generous in your recognition of the contribution of all the members of the team on each project – including the client, the consultants, the contractor and subcontractors – because they all have a vital role to play in the success of ‘your’ project!