22. Creating Classes, Records, and Collections
IN THIS CHAPTER
Trapping Application and Embedded Chart Events
Using Property Let and Property Get to Control How Users Utilize Custom Objects
Excel already has many objects available, but there are times when a custom object would be better suited for the job at hand. You can create custom objects that you use in the same way as Excel’s built-in objects. These special objects are created in class modules.
Class modules are used to create custom objects with custom properties and methods. They can trap application events, embedded chart events, ActiveX control events, and more.
Inserting a Class Module
From the VB Editor, select Insert, Class Module. A new module, Class1, is added to the VBAProject workbook and can be seen in the Project Explorer window (see Figure 22.1). Two things to keep in mind concerning class modules:
• Each custom object must have its own module. (Event trapping can share a module.)
• The class module should be renamed to reflect the custom object.
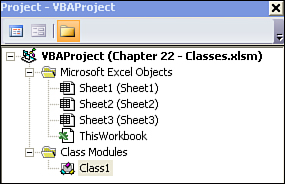
Figure 22.1. Custom objects are created in class modules.
Trapping Application and Embedded Chart Events
Chapter 9, “Event Programming,” showed you how certain actions in workbooks, worksheets, and nonembedded charts could be trapped and used to activate code. Briefly, it reviewed how to set up a class module to trap application and chart events. The following goes into more detail about what was shown in that chapter.
Application Events
The Workbook_BeforePrint event is triggered when the workbook in which it resides is printed. If you want to run the same code in every workbook available, you have to copy the code to each workbook. Alternatively, you can use an application event, Workbook_BeforePrint, which is triggered when any workbook is printed.
The application events already exist, but a class module must be set up first so that they can be seen. To create a class module, follow these steps:
- Insert a class module into the project. Rename it to something that will make sense to you such as
clsAppEvents. Select View, Properties Window to rename a module. - Enter the following into the class module:
Public WithEvents xlApp As Application
The name of the variable,
xlApp, can be any variable name. TheWithEventskeyword exposes the events associated with theApplicationobject. xlAppis now available from that class module’s Object drop-down list. Select it from the drop-down, and then click the Procedure drop-down menu to its right to view the list of events that is available for thexlApp’s object type (Application), as shown in Figure 22.2.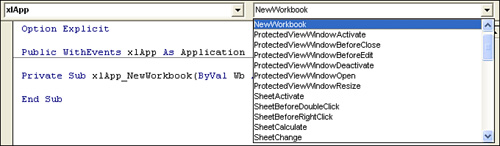
Figure 22.2. Events are made available after the object is created.
→ For a review of the various application events, see the “Application-Level Events” section, p. 176.
Any of the events listed can by captured, just as workbook and worksheet events were captured in an earlier chapter. The following example uses the NewWorkbook event to set up footer information automatically. This code is placed in the class module, below the xlApp declaration line you just added:
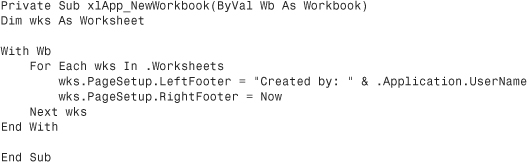
The procedure placed in a class module does not run automatically as events in workbook or worksheet modules would. An instance of the class module must be created and the Application object assigned to the xlApp property. After that is complete, the TrapAppEvent procedure needs to run. As long as the procedure is running, the footer will be created on each sheet every time a new workbook is added. Place the following in a standard module:
Public myAppEvent As New clsAppEvents
Sub TrapAppEvent()
Set myAppEvent.xlApp = Application
End Sub
Caution
The application event trapping can be terminated by any action that resets the module level or public variables including editing code in the VB Editor. To restart, run the procedure that creates the object (TrapAppEvent).
In this example, the public myAppEvent declaration was placed in a standard module with the TrapAppEvent procedure. To automate the running of the entire event trapping, all the modules could be transferred to the Personal.xlsb and the procedure transferred to a Workbook_Open event. In any case, the Public declaration of myAppEvent must remain in a standard module so it can be shared between modules.
Embedded Chart Events
Preparing to trap embedded chart events is the same as preparing for trapping application events. Create a class module, insert the public declaration for a chart type, create a procedure for the desired event, and then add a standard module procedure to initiate the trapping. The same class module used for the application event can be used for the embedded chart event.
Place the following line in the declaration section of the class module. The available chart events are now viewable (see Figure 22.3):
Public WithEvents xlChart As Chart

Figure 22.3. The chart events are available after the chart type variable has been declared.
Let’s create a program to change the chart scale. Three events are set up. The primary event, MouseDown, changes the chart scale with a right-click or double-click. Because these actions also have actions associated with them, you need two more events: BeforeRightClick and BeforeDoubleClick, which prevent the usual action from taking place.
The following BeforeDoubleClick event prevents the normal result of a double-click from taking place:

The following BeforeRightClick event prevents the normal result of a right-click from taking place:
![]()
Now that the normal actions of the double-click and right-click have been controlled, ChartMouseDown rewrites the actions initiated by a right-click and double-click:

After the events are set in the class module, all that is left to do is declare the variable in a standard module, as follows:
Public myChartEvent As New clsEvents
Then create a procedure that will capture the events on the embedded chart:

Note
The BeforeDoubleClick and BeforeRightClick events are only triggered when the user clicks the plot area itself. The area around the plot area does not trigger the events. However, the MouseDown event is triggered from anywhere on the chart.
Creating a Custom Object
Class modules are useful for trapping events, but they are also valuable because they can be used to create custom objects. When you are creating a custom object, the class module becomes a template of the object’s properties and methods. To understand this better, in the following example you create an employee object to track employee name, ID, hourly wage rate, and hours worked.
Insert a class module and rename it to clsEmployee. The clsEmployee object has four properties:
• EmpName—Employee name
• EmpID—Employee ID
• EmpRate—Hourly wage rate
• EmpWeeklyHrs—Hours worked
Properties are variables that can be declared Private or Public. If declared Private, the properties are only accessible within the module they are declared in. These properties need to be accessible to the standard module, so they will be declared Public. Place the following lines at the top of the class module:
Public EmpName As String
Public EmpID As String
Public EmpRate As Double
Public EmpWeeklyHrs As Double
Methods are actions that the object can take. In the class module, these actions take shape as procedures and functions. The following code creates a method, EmpWeeklyPay(), for the object that calculates weekly pay:
Public Function EmpWeeklyPay() As Double
EmpWeeklyPay = EmpRate * EmpWeeklyHrs
End Function
The object is now complete. It has four properties and one method. The next step is using the object in an actual program.
Using a Custom Object
After a custom object is properly configured in a class module, it can be referenced from another module. Declare a variable as the custom object type in the declarations section:
Dim Employee As clsEmployee
In the procedure, set the variable to be a New object:
Set Employee = New clsEmployee
Continue entering the rest of the procedure. As you refer to the properties and method of the custom object, a screen tip appears, just as with Excel’s standard objects (see Figure 22.4).
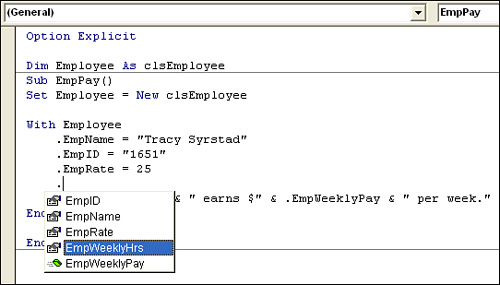
Figure 22.4. The properties and method of the custom object are just as easily accessible as they are for standard objects.
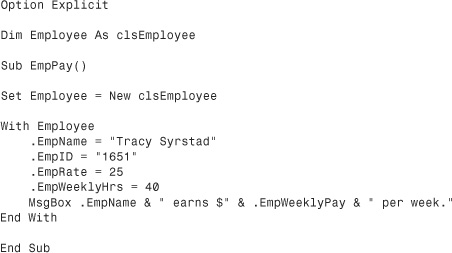
The procedure declares an object Employee as a new instance of clsEmployee. It then assigns values to the four properties of the object and generates a message box displaying the employee name and weekly pay (see Figure 22.5). The object’s method, EmpWeeklyPay, is used to generate the displayed pay.
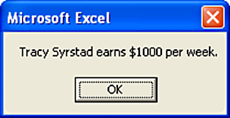
Figure 22.5. Create custom objects to make code more efficient.
Using Property Let and Property Get to Control How Users Utilize Custom Objects
As declared in the earlier example, public variables have read/write properties. When they are used in a program, the values of the variables can be retrieved or changed. To assign read/write limitations, use Property Let and Property Get procedures.
Property Let procedures give you control of how properties can be assigned values. Property Get procedures give you control of how the properties are accessed. In the custom object example, there is a public variable for weekly hours. This variable is used in a method for calculating pay for the week but doesn’t consider overtime pay. Variables for normal hours and overtime hours are needed, but the variables must be read-only.
To accomplish this, the class module must be reconstructed. It needs two new properties, EmpNormalHrs and EmpOverTimeHrs. However, because these two properties are to be confined to read-only, they are not declared as variables. Property Get procedures are used to create them.
If EmpNormalHrs and EmpOverTimeHrs are going to be read-only, they must have values assigned somehow. Their values are a calculation of the EmpWeeklyHrs. Because EmpWeeklyHrs will be used to set the property values of these two object properties, it can no longer be a public variable. There are two private variables, NormalHrs and OverHrs, which are used within the confines of the class module:
Public EmpName As String
Public EmpID As String
Public EmpRate As Double
Private NormalHrs As Double
Private OverHrs As Double
A Property Let procedure is created for EmpWeeklyHrs to break the hours down into normal and overtime hours:

The Property Get EmpWeeklyHrs totals these hours and returns a value to this property. Without it, a value cannot be retrieved from EmpWeeklyHrs:
Property Get EmpWeeklyHrs() As Double
EmpWeeklyHrs = NormalHrs + OverHrs
End Property
Property Get procedures are created for EmpNormalHrs and EmpOverTimeHrs to set their values. If you use Property Get procedures only, the values of these two properties are read-only. They can be assigned values only through the EmpWeeklyHrs property:
Property Get EmpNormalHrs() As Double
EmpNormalHrs = NormalHrs
End Property
Property Get EmpOverTimeHrs() As Double
EmpOverTimeHrs = OverHrs
End Property
Finally, the method EmpWeeklyPay is updated to reflect the changes in the properties and goal:

Update the procedure in the standard module to take advantage of the changes in the class module. Figure 22.6 shows the new message box resulting from this updated procedure:
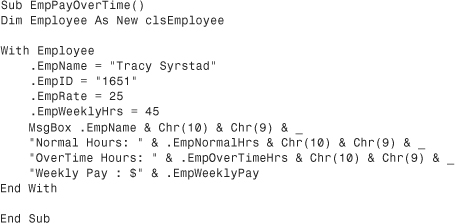
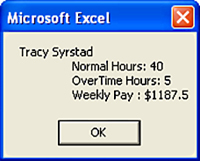
Figure 22.6. Use Property Let and Property Get procedures for more control over custom object properties.
Collections
Up to now, you have been able to have only one record at a time of the custom object. To create more, a collection that allows more than a single record to exist at a time is needed. For example, Worksheet is a member of the Worksheets collection. You can add, remove, count, and refer to each worksheet in a workbook by item. This functionality is also available to your custom object.
Creating a Collection in a Standard Module
The quickest way to create a collection is to use the built-in Collection method. By setting up a collection in a standard module, you can access the four default collection methods: Add, Remove, Count, and Item.
The following example reads a list of employees off a sheet and into an array. It then processes the array, supplying each property of the object with a value, and places each record in the collection:

The collection, colEmployees, is declared as a new collection and the record, recEmployee, as a new variable of the custom object type.
After the object’s properties are given values, the record, recEmployee, is added to the collection. The second parameter of the Add method applies a unique key to the record, which, in this case, is the employee ID number. This allows a specific record to be accessed quickly, as shown by the second message box (colEmployees("1651").EmpWeeklyPay) (see Figure 22.7).

Figure 22.7. Individual records in a collection can be easily accessed.
Note
The unique key is an optional parameter. An error message appears if a duplicate key is entered.
Creating a Collection in a Class Module
Collections can be created in a class module. In this case, the innate methods of the collection (Add, Remove, Count, Item) are not available; they need to be created in the class module. The advantages of creating a collection in a class module are
• The entire code is in one module.
• You have more control over what is done with the collection.
• You can prevent access to the collection.
Insert a new class module for the collection and rename it clsEmployees. Declare a private collection to be used within the class module:
Option Explicit
Private AllEmployees As New Collection
Add the new properties and methods required to make the collection work. The innate methods of the collection are available within the class module and can be used to create the custom methods and properties:
Insert an Add method for adding new items to the collection:
Public Sub Add(recEmployee As clsEmployee)
AllEmployees.Add recEmployee, recEmployee.EmpID
End Sub
Insert a Count property to return the number of items in the collection:
Public Property Get Count() As Long
Count = AllEmployees.Count
End Property
Insert an Items property to return the entire collection:
Public Property Get Items() As Collection
Set Items = AllEmployees
End Property
Insert an Item property to return a specific item from the collection:
Public Property Get Item(myItem As Variant) As clsEmployee
Set Item = AllEmployees(myItem)
End Property
Insert a Remove property to remove a specific item from the collection:
Public Sub Remove(myItem As Variant)
AllEmployees.Remove (myItem)
End Sub
Property Get is used with Count, Item, and Items because these are read-only properties. Item returns a reference to a single member of the collection, whereas Items returns the entire collection so it can be used in For Each Next loops.
After the collection is configured in the class module, a procedure can be written in a standard module to use it:

This program is not that different from the one used with the standard collection, but there are a few key differences.
• Instead of declaring colEmployees as Collection, declare it as type clsEmployees, the new class module collection.
• The array and collection are filled the same way, but the way the records in the collection are referenced has changed. When referencing a member of the collection, such as employee record 2, the Item property must be used.
Compare the syntax of the message boxes in this program to the previous program. The For Each Next loop goes through each record in the collection and multiplies the EmpRate by 1.5, changing its value. The result of this “bonus” is shown in a message box similar to the one shown previously in Figure 22.7.
Case Study: Help Buttons
You have a complex sheet that requires a way for the user to get help. You can place the information in comment boxes, but they are not very obvious, especially to the novice Excel user. Another option is to create help buttons.
To do this, create small labels with a question mark in each one on the worksheet. To get the button-like appearance shown in Figure 22.8, set the SpecialEffect property of the labels to Raised and darken the BackColor. Place one label per row. Two columns over from the button, enter the help text you want to appear when the label is clicked. Hide this help text column.

Figure 22.8. Attach help buttons to the sheet and enter help text.
Create a simple userform with a label and a Close button. Rename the form HelpForm, the button CloseHelp, and the label HelpText. Size the label large enough to hold the help text. Add a macro behind the form to hide it when the button is clicked. At this point, you could program each button separately. If you have many buttons, this would be tedious. If you ever need to add more buttons, you also will have to update the code. Or you could create a class module and a collection that will automatically include all the help buttons on the sheet, now and in the future.
Private Sub CloseHelp_Click()
Unload Me
End Sub
Insert a class module named clsLabel. You will need a variable, Lbl, to capture the control events:
Public WithEvents Lbl As MSForms.Label
In addition, you need a method of finding and displaying the corresponding help text:
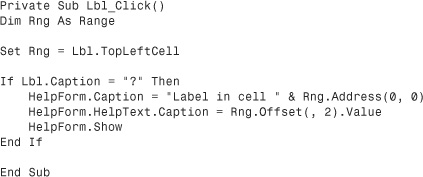
In the ThisWorkbook module, create a Workbook_Open procedure to create a collection of the labels in the workbook:
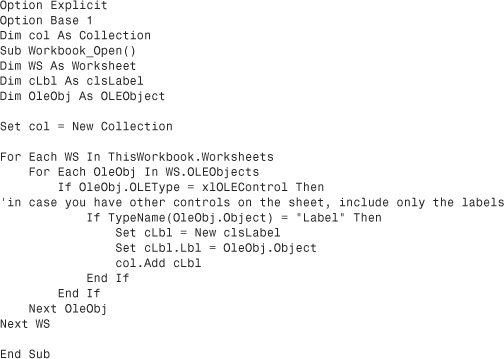
Run Workbook_Open to create the collection. Click a label on the worksheet. The corresponding help text appears in the help form, as shown in Figure 22.9.
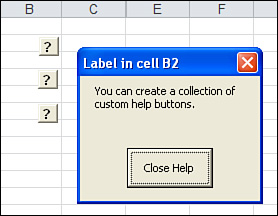
Figure 22.9. Help text is only a click away.
User-Defined Types
User-defined types (UDTs) provide some of the power of a custom object, but without the need of a class module. A class module allows the creation of custom properties and methods, while a UDT allows only custom properties. However, sometimes that is all you need.
A UDT is declared with a Type..End Type statement. It can be Public or Private. A name that is treated like an object is given to the UDT. Within the Type, individual variables are declared that become the properties of the UDT.
Within an actual procedure, a variable is defined of the custom type. When that variable is used, the properties are available, just as they are in a custom object (see Figure 22.10).
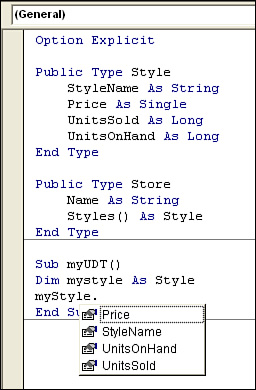
Figure 22.10. The properties of a UDT are available as they are in a custom object.
The following example uses two UDTs to summarize a report of product styles in various stores. The first UDT consists of properties for each product style:
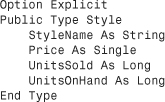
The second UDT consists of the store name and an array whose type is the first UDT:
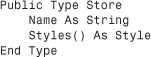
After the UDTs are established, the main program is written. Only a variable of the second UDT type, Store, is needed because that type contains the first type, Style (see Figure 22.11). However, all the properties of the UDTs are easily available. In addition, with the use of the UDT, the various variables are easy to remember—they are only a dot (.) away:


Figure 22.11. UDTs can make a potentially confusing multivariable program easier to write.
Next Steps
In Chapter 23, “Advanced Userform Techniques,” you learn about more controls and techniques you can use in building userforms.