
3. Listening to Audio and Watching Video

Many people buy the BlackBerry Curve for its multimedia capabilities. Being able to watch videos and play music while on the go is an attractive feature, and we will cover how to do just that.
Using Roxio Media Manager (Windows)
Before you can watch those videos and listen to that music, you have to get them onto your BlackBerry Curve. When you download the BlackBerry Desktop Software, you can choose to download it with or without the Roxio Media Manager. Earlier we suggested that you download and install the BlackBerry Desktop Software with Roxio Media Manager. If you have not done so, please follow the earlier instructions on downloading and installing the BlackBerry Desktop Software with Roxio Media Manager.
Roxio Media Manager is a special version of the Media Manager application that integrates with the BlackBerry. It allows you to move audio and video to and from your BlackBerry. It can automatically convert the media on-the-fly so that it fits the BlackBerry screen better and is smaller in size while retaining the quality.
>>>Step-by-Step: Working with Roxio Media Manager
1. To start moving multimedia files to your BlackBerry, run the BlackBerry Desktop Manager, connect your BlackBerry Curve to your computer via the USB cable, and click Media in the BlackBerry Desktop Manager.

2. On the Media Screen, click Media Manager to launch Roxio Media Manager.

3. The first time you click Media, you are asked to agree to an End User License Agreement (EULA). Roxio Media Manager then starts.
4. The first time Roxio Media Manager starts, it asks you if it should scan your computer for multimedia files and automatically make them available. It is a good idea to do this, because it will save you time later. However, if you do not want to or are unsure, click Remind Me Later.
>>>Step-by-Step: Configuring Roxio Media Manager
Before we get to moving files to your BlackBerry Curve, you should configure Roxio Media Manager so that it handles these files the way you want it to.
1. Click Tools, Options to bring up the Roxio Media Manager options. Make sure the BlackBerry tab is selected.

2. The first option is for Photo Files. This allows you to configure what Roxio Media Manager does when it moves photos to your BlackBerry. For the best quality, set Photo file type to As is. This tells the software to leave the photo unchanged when it moves it to your BlackBerry. If you have a media card in your BlackBerry, you should leave this option set to As is.
Note
If you do not have a media card in your BlackBerry Curve, you may want to set the Photo file type to jpg and set the Photo size to something that is closest to your BlackBerry Curve’s screen size. The screen sizes are as follows:
• BlackBerry Curve 8300:320×240
• BlackBerry Curve 8500:320×240
• BlackBerry Curve 8900:480×360
Setting the options this way means that you can fit many more photos onto your BlackBerry. Because you are reducing the photos’ size to be as close as possible to the BlackBerry Curve’s screen size, you can enjoy them on your BlackBerry. But if you send them to someone else (covered later), they may appear quite small on that person’s computer screen. This is still a great option for saving space if you have no media card inserted.
3. The next option is Video Files. This allows you to configure what Roxio Media Manager does when it moves video files to your BlackBerry.

By default, the Video file type is set to mp4, and the Resizing is set to Maintain Aspect Ratio.
The other setting is Video size / resolution. This is set to Best Quality Video - largest file size.
Whether or not you have a media card inserted into your BlackBerry Curve, it is best to leave this option set as is. This tells Roxio Media Manager to convert the video to mp4 format, keep the video’s aspect ratio when it resizes it, and, when it compresses it using mp4, to produce the best-quality video.
It is unlikely that you will set Roxio to leave the video as is, because it may not have the correct aspect ratio, or it might be too large.
The Video size / resolution setting is where you set the size that the video will be converted to. This is not the size on disk or in memory, but rather the screen size.
Note
Video compression is a technique that goes through a video frame by frame, trying to compress the amount of space it takes up on a disk or in memory. It does this using a number of methods, including looking for parts of frames that are static and parts that are repeated often. In this instance the video is also reduced in screen size so that it fits on your BlackBerry Curve’s screen.
4. The last option on the screen is Audio Files. This tells Roxio what to do with audio files that you have on your computer.
The three settings are Audio format, Audio Sample Rate, and Audio bitrate. By default, the Audio format is set to As is. This tells Roxio not to convert the audio files to another format.
The choices for Audio format are mp3 and aac.
Note
MP3 stands for MPEG-1 Audio Layer 3. It is the most common compression technique used to reduce the size of audio files. It reduces the size that an audio file takes up in memory or on a disk but preserves the audio quality as close to the original as possible.
AAC stands for Advanced Audio Coding. AAC is an audio compression technique that was designed as a successor to MP3. It typically produces higher-quality audio than MP3 while compressing the audio files to the same size as MP3 does. AAC is used heavily by Apple but is not exclusive to Apple and is freely available to everyone.
Note
One thing to remember about audio compression is that when you compress an audio file, in most cases you reduce the quality of that audio. Although most ears cannot pick up that loss in audio quality, it still happens. If you take an uncompressed audio file that is at its highest quality and compress it once, you get audio loss. If you take that compressed audio file and compress it again, you will get more audio loss. The more you recompress an audio file, the worse it sounds.
This information is important to remember when you decide what to do with audio files when Roxio sends them to your BlackBerry Curve. If you know that all your audio files are in WAV format (which is uncompressed), you will likely choose the Audio format MP3 or AAC. Both of these choices tell Roxio to compress the audio before sending it to your BlackBerry. However, if your audio files are all MP3 or AAC, it would be inadvisable to set the Audio format to MP3 or AAC, because this tells Roxio to compress the audio. This would mean that the audio would be compressed twice, further reducing its quality.
It is probably best to leave the audio settings at their defaults if you are unsure what the source of your audio will be. In reality it is highly likely that all the audio files on your computer have already been compressed to either MP3 or AAC, so leaving the default values would preserve the audio’s quality.
Note
One more thing about AAC files: If you purchase audio on iTunes, your audio files are saved in AAC format. The files are actually saved as MPEG-4 files, but AAC is the core of the audio compression used in MPEG-4 (or MP4), so the filenames end in .m4a, which stands for MPEG-4 Audio. Because AAC allows files to contain Digital Rights Management (DRM), which allows a seller to restrict who can listen to those audio files, if you purchase audio in iTunes and it is not DRM-free, those files are not copied to your BlackBerry Curve. This is because those audio files can be played only on computers, iPods, and iPhones that are registered to you. If you later convert your iTunes music to iTunes Plus music that is DRM-free, you can move those files to your BlackBerry.
5. If you click the General tab of the Options screen, you see two settings.

Don’t warn me when rotating photos tells Roxio not to display a warning message when rotating photos.
When you rotate a photo in Roxio, you slightly reduce its quality, because it takes your photo that is already compressed using JPEG (jpg), rotates it, and saves it again to the JPEG format, which compresses it again. If you do not mind this recompression or slight loss in picture quality, check this box. You can ignore the second option.
6. If you click the QuickShow tab, you can adjust how QuickShow displays your pictures when you select QuickShow.

You can use QuickShow by selecting multiple photos in Roxio, right-clicking, and choosing QuickShow. This starts the QuickShow slide show.
7. If you click the File Locations tab, you can change where Roxio saves your media files on your computer when it moves or copies them from your BlackBerry.

Note
Watching Folders is a feature of Roxio Media Manager that is worth taking a look at before we continue. The idea of telling Roxio to watch folders is a way of automating the task of moving multimedia files to the Roxio Media Library. From there, you can select them and copy or move them to your BlackBerry. After you set it up and enable it, Roxio starts a small service each time you start Windows. This service watches the directories you tell it to. When it sees new files appear in that directory, it immediately places these files in the Roxio Media Library in preparation for the next time you connect your BlackBerry. Using this technique, you do not have to remember which files you may or may not have moved to your Media Library.
For example, if you typically save your pictures into a specific folder on your computer, and you want your BlackBerry Curve to always have those same pictures, you would set that folder as a watched folder. The same goes for video files, music files, or even regular documents such as Microsoft Word and PDF files.
8. To set up folder watching, from the main Media Manager screen, click Tools.
9. Select Watched Folders.
10. Roxio may have already prepopulated this list with folders that it thinks you want to synchronize.

11. You can remove a folder it has selected by clicking the folder and then clicking the Remove Folder button.
12. To remove all the folders, click the Clear All button.
13. Click the Add Folder button to choose new folders that you want Roxio to watch.
14. When all your folders are selected, make sure you check the box next to Start Folder Watching. This tells Roxio that you want to start watching these folders for changes.
15. At the bottom of the screen are three check boxes. Watch folders at startup tells Roxio that you want to start a small service when Windows starts that continually watches these folders.
>>>Step-by-Step: Using Roxio Media Manager
Now to the main reason to use Roxio Media Manager—to move that media to your BlackBerry Curve. On the main screen of Roxio Media Manager are three icons—Manage Pictures, Manage Music, and Manage Videos.

Each of these icons opens the Media Manager screen and selects the specific category of media. For example, if you click Manage Music, you see the Manage Media screen, and Music is selected.
Note
Before we continue, we should discuss how the Media Manager works. When you first start Roxio Media Manager, it asks if you want it to scan your computer and find media. If you say yes, it does so. When it finds media on your computer, it catalogs it in the Media Library. Your pictures, music, and videos remain on your computer in the same place they were before, but Media Manager creates a catalog or library of that media so that you can easily search it and manipulate it.
When you see the Media Manager main screen, you are looking at the Media Library. The library is broken into media types such as Pictures, Video, Music, Documents, Playlists, and Voice Notes.
1. You can expand each media type to see how the library has further categorized it. For example, if you expand the Music type, you see that Roxio has categorized your music into Genre, Artist, and so on. This helps you find what you are looking for more quickly, especially when your library grows very large and you have hundreds or thousands of music files.

To move or copy media to your BlackBerry Curve, you must first select where that media must be moved or copied. The Manage Media screen is split in two, with your BlackBerry on the bottom and your Media Library on top.
Note
If you do have a media card installed, it is highly recommended that you move or copy your media files to the media card and not the actual BlackBerry. This is because the media card has much more memory than your BlackBerry. If you fill up the memory on your BlackBerry with media, your BlackBerry may become slow. So it is always best to put your media on the media card.
Of course, if you do not have a media card, you must put your media on your BlackBerry. If you are in this situation, try to reduce the amount of space that the media takes up by configuring Roxio Media Manager to compress the files as much as possible, as discussed earlier.
2. If you expand the display by clicking the + to the left of your BlackBerry Curve, you see the different folders on your BlackBerry. You see folders for Music, Video, Pictures, and Documents. If your BlackBerry Curve has a media card inserted (this would be a Micro-SD card), you see this on the screen.
3. If you expand the display under the media card, you see more folders, and again you see folders for Music, Videos, Pictures, and Documents.

4. When you have found the media files you want to copy or move to your BlackBerry, simply select them. To select multiple files that are not next to each other, hold down the Ctrl key and click each file you want to move or copy. Release the Ctrl key after you select the last file. If you want to copy or move many files that are next to each other, click the first file, and then hold down the spacebar and click the last file.
5. The next decision you need to make is whether you want to just put a copy of the files on your BlackBerry or move them off your computer onto your BlackBerry. It is probably better to copy the files rather than move them, but it is up to you.
If you want to copy the files to your BlackBerry, make sure that you have selected where those files must be copied to on your BlackBerry, and click the Copy Down button.
6. You are prompted with a message asking if you want to Convert for Optimal Playback, Copy with no Conversion, or Advanced Conversion Options.
The Copy with no Conversion choice is selected by default. You probably made these choices earlier, when you configured Roxio Media Manager, but Media Manager prompts you again in case you changed your mind.

7. For now, leave the default choice, and click OK. The files are copied to your BlackBerry Curve.
Using BlackBerry Media Sync (Windows)
Although you can use Roxio Media Manager to organize and synchronize all your multimedia, you may already be using Apple’s iTunes. If this is the case, you have a solution that will synchronize your music from iTunes to your BlackBerry Curve. The product you would use is called BlackBerry Media Sync.
Setting Up Media Sync
BlackBerry Media Sync is specifically designed to synchronize your music from iTunes. It does not handle video files such as movies and TV shows that you may already have in iTunes. For those, you still need to use the Roxio Media Manager.
>>>Step-by-Step
1. To set up and use BlackBerry Media Sync, close the Roxio Media Manager. You are returned to the BlackBerry Desktop Manager’s Media screen.

2. On the right of this screen, click the Start button to launch BlackBerry Media Sync.
3. If you have not already installed BlackBerry Media Sync, you are prompted to do so. If you accept, BlackBerry Media Sync is downloaded and installed. After it has been installed, click BlackBerry Media Sync again to launch it.
4. The first time you run BlackBerry Media Sync, you see a Welcome screen, which is actually a setup screen.

5. The first field is called Name your device. It is prepopulated with BlackBerry Curve, and in parentheses is your BlackBerry’s PIN. You can overwrite this with anything you like.
6. The next field is Music location. If you have a media card inserted in your BlackBerry Curve, it defaults to the media card and shows its size.
7. The next field is Keep this amount of memory free. This field defaults to 10%. This tells Media Sync to leave at least 10% of the memory free when it synchronizes your music.
8. The second section on the Welcome screen is Music. The only field is Select Music Library. This allows you to select where the music comes from.

Your choices are iTunes for Apple iTunes and Windows Media Player. Both of these applications build their own libraries of music and let you create playlists. Media Sync can synchronize playlists from either. At this point you should choose either iTunes or Windows Media Player.
Note
It is highly recommended that you always put multimedia files on the media card. If you do not want to, however, you can click the drop-down field and choose your BlackBerry Curve. If you do not have a media card, you must leave the location set to your BlackBerry Curve.
9. If you choose iTunes, click the Import button. This imports all your album art from your iTunes library so that when a song is sent to your BlackBerry Curve, the album art is sent along with it.
10. When you click Import, iTunes opens, and you see the Importing iTunes album art screen.

11. Click OK to see the main BlackBerry Media Sync screen.
Note
Leaving memory free is always a good idea. It is even more important when you do not have a media card and you are using your BlackBerry Curve’s main memory for your music.
12. This screen shows your BlackBerry Curve and, next to it, a graphical representation of your memory.
The percentage of used space in yellow is the amount of memory used by other content. The percentage of space taken up by playlists that have been synchronized using Media Sync is shown in gray. The percentage free space is shown in black.

13. On the lower half of the screen you see your playlists.
These are playlists that you have previously created in either iTunes or Windows Media Player.
In Media Sync, you can only select which playlists to send to your BlackBerry Curve; you cannot create them.
14. After you have put check marks next to the playlist or playlists you want to send to your BlackBerry Curve, you are almost ready to synchronize.
15. Before you synchronize, right next to the large Sync button you see Add random music to free space.
If you put a check mark next to this, Media Sync synchronizes the playlists you selected. If any free space is left, Media Sync adds random songs to your BlackBerry Curve. This can be fun, because it is a surprise to see what music has been chosen for you.
16. When you are ready to synchronize, click the Sync button.
Note
If you need to create a new playlist, exit Media Sync, start either iTunes or Windows Media Player, and create a new playlist. Then drag the music from your library into that playlist to populate it with music.
17. After Media Sync has finished synchronizing, unplug your BlackBerry Curve, run the Media Player on your BlackBerry, choose Music, and then Playlists. You should see your newly synchronized playlist.

Along with the playlist, the actual music has been synchronized to your BlackBerry Curve. So if you want to play a specific song, escape from Playlists and go to either All Songs, Artists, Albums, or Genres to find the song.
Using PocketMac and Missing Sync for BlackBerry (Mac OS X)
If you are an Apple Mac user running OS X, you can use two applications to synchronize multimedia to and from your BlackBerry—PocketMac for BlackBerry and Missing Sync for Blackberry. We cover both applications in this chapter.
>>>Step-by-Step: PocketMac for BlackBerry
We discussed this application in the Prologue, so you should have it installed already. If not, please take a few minutes to follow the installation instructions for PocketMac for BlackBerry in the Prologue.
1. When you have PocketMac for BlackBerry installed and running, connect your BlackBerry Curve to your Mac via the USB cable.
2. When you are prompted to turn on Mass Storage Mode, choose Yes.
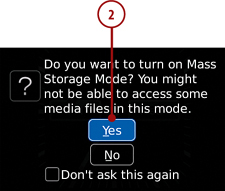
Note
Mass Storage Mode allows your BlackBerry Curve’s media card to be seen as a Volume on your Mac. If your BlackBerry is on your company’s BES, this feature might have been disabled for security reasons, and unfortunately you will not be able to synchronize your music.
3. In PocketMac for BlackBerry, click the BlackBerry icon to see the settings.

4. Click the iTunes tab. This tab allows you to select one or more playlists from iTunes and copy or “push” those playlists and their music to your BlackBerry Curve.
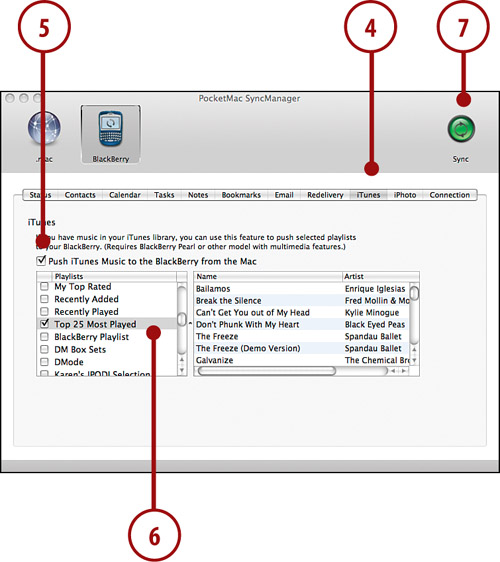
5. Check the box next to Push iTunes Music to the BlackBerry from the Mac.
6. Put a check mark next to the playlists you want to be pushed to your BlackBerry.
7. To synchronize your music to your BlackBerry Curve, click the green Sync button on the top right of the window.
Note
PocketMac for BlackBerry does not allow you to create new playlists; it can only synchronize existing playlists. If you need to create a new playlist, close PocketMac for BlackBerry, open iTunes, and create one or more new playlists. Drag the songs you want to those playlists. When your playlists are ready, run PocketMac for BlackBerry again, return to this screen, and choose those playlists.
>>>Step-by-Step: Missing Sync for BlackBerry
We discussed this application in the Prologue, so you should have it installed already. If not, please take a few minutes to follow the installation instructions for Missing Sync for BlackBerry in the Prologue.
Let’s start with music.
1. On the main Missing Sync for BlackBerry screen, check the box next to Music and double-click Music to see the settings.

2. On the Music Settings screen, check the boxes next to the iTunes Playlists that you want on your BlackBerry Curve.
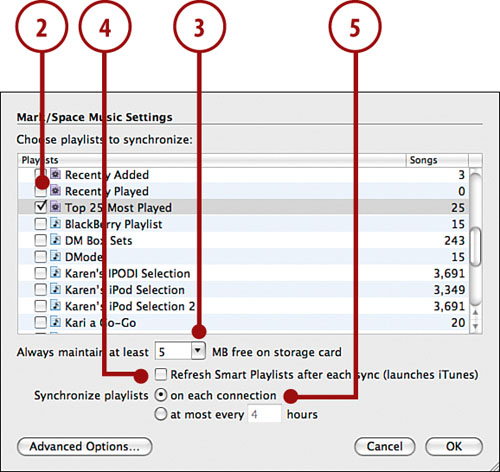
3. You can change the Always maintain at least XMB free on storage card, or leave it at the default of 5MB.
4. If you want Missing Sync for BlackBerry to refresh the Smart Playlists (which are the dynamic playlists in iTunes, such as Top 25 Most Played), check this box.
5. Choose when to synchronize your playlists—either on each connection, or by choosing a number of hours between syncs.
Note
Missing Sync for BlackBerry does not allow you to create new playlists; it can only synchronize existing playlists. If you need to create a new playlist, close Missing Sync for BlackBerry, open iTunes, and create one or more new playlists. Drag the songs you want to those playlists. When you have your playlists ready, run Missing Sync for BlackBerry again, return to this screen, and choose those playlists.

7. On the Advanced screen, you can add extra music file types if your BlackBerry Curve supports them.

8. Click OK.
9. Click OK again to return to the main Missing Sync screen.
>>>Step-by-Step: Synchronizing Photos with Missing Sync
Missing Sync for BlackBerry can also synchronize photos with your BlackBerry Curve. This includes importing photos you have taken on your BlackBerry Curve to iPhoto, and exporting photos from iPhoto to your BlackBerry Curve.
1. On the main Missing Sync for BlackBerry screen, check the box next to Photos, and double-click Photos to see the settings.

2. To export photos from iPhoto, check the box next to Export photos to device.

3. You see the iPhoto albums. You can check the ones you want exported to your BlackBerry Curve.
4. For Size, leave it at Full-size images.
5. Choose how often you want the pictures to be exported. By default this is set to on each sync, but you can change it to sync every X hours.
6. Click OK.
Note
If you do not have a media card in your BlackBerry Curve, you may want to set the Size to Scale images no larger than and set the Photo size to something that is closest to your BlackBerry Curve’s screen size. The screen sizes are as follows:
• BlackBerry Curve 8300:320×240
• BlackBerry Curve 8500:320×240
• BlackBerry Curve 8900:480×360
Setting the options this way means that you can fit many more photos on your BlackBerry. Because you are reducing the photos’ size to be as close to the BlackBerry Curve’s screen size as possible, you can enjoy them on your BlackBerry. But if you send them to someone else (covered later), they may appear quite small on that person’s computer screen. This is still a great option for saving space if you have no media card inserted.
7. Click the Import button next to the Export button to have Missing Sync import photos from your BlackBerry Curve.

8. If you want to import photos from your BlackBerry Curve into iPhoto, check the box next to Import photos from device.
9. Select where to download the photos to. By default this would be an album in iPhoto that you created previously. However, it could just be a folder on your Mac, such as the Pictures folder.
10. If you always want to import all photos, even if they have already been imported, check the box next to Import all items, including those previously imported.
11. If you want to remove any photos from your BlackBerry Curve after they have been imported into iPhoto, check the box next to Remove items from device after importing.
12. Click OK.
Note
To copy videos to your BlackBerry Curve, simply drag them onto Missing Sync for BlackBerry while it is running. They are automatically converted and prepared for your BlackBerry Curve. If you want to see where your videos go while waiting for the next sync, from the main Missing Sync screen, click the Install button. Your videos are listed there.

>>>Step-by-Step: Synchronizing Videos with Missing Sync
Missing Sync for BlackBerry can synchronize videos with your BlackBerry Curve. This includes videos you have taken on your BlackBerry Curve being imported to your Mac, and videos on your Mac being converted and exported to your BlackBerry Curve.
1. On the main Missing Sync for BlackBerry screen, check the box next to Video, and double-click Video to see the settings.

2. If you want to import video from your BlackBerry Curve to your Mac, check the box next to Import videos from device.

3. Select where they will be downloaded to. This defaults to an iPhoto album called Photos. You can select a different album.
4. If you always want to import all video, check the box next to Import all videos, including those previously imported.
5. If you want to remove videos from your BlackBerry Curve after they have been imported to your Mac, check the box next to Remove videos from device after importing.
6. Click OK.
Enjoying Multimedia on Your BlackBerry Curve
Now that you’ve learned how to get pictures, music, and video onto your BlackBerry Curve, we cover how to take pictures and record movies on the go, as well as play back those great tunes you synchronized earlier.
>>>Step-by-Step: The BlackBerry Curve Camera
All BlackBerry Curve models have cameras. The cameras on the BlackBerry Curve 8300 series and the BlackBerry Curve 8520 are 2-megapixel. The camera on the BlackBerry Curve 8900 is a 3.2-megapixel with autofocus.
With the exception of the BlackBerry Curve 8520, all models have a camera flash.
1. To activate the camera, press the right-side convenience button. By default this button launches the camera.

2. When the camera starts, press the right-side convenience button again to take a picture.
3. When you have previewed the pictures on the screen, press the right-side convenience button again to be ready for your next shot.
The BlackBerry Curve camera can also be used to shoot video.
Note
If you have the BlackBerry Curve 8900, the right-side convenience button has two positions, halfway in and all the way in. If you press the button lightly, it goes in halfway, the camera begins to focus, and you see a white box on the screen. When the camera is in focus, the box turns green. At that point, press the button all the way in, and the camera takes the picture.
4. From the BlackBerry Home Screen, click the Applications folder.

5. In the Applications folder, click the Video Camera icon.
6. To record video, click the trackball or trackpad, and start shooting.
7. To pause recording video, click the trackball or trackpad again.
8. To stop recording, scroll to the stop icon, and click the trackball or trackpad. Your BlackBerry then saves the video.

Note
If you want to use the camera’s flash as a video light, before you start recording, press the spacebar. This activates the video light. Record as normal. The surprisingly bright light will illuminate your subjects. To turn off the light, stop recording first, and then press the spacebar again.
Note
Taking photos with the BlackBerry Curve’s camera works very well in bright-light situations, but when you are indoors or in other low-light situations, the pictures can get grainy and blurry.
To combat this, when you are in low-light situations, try to keep your BlackBerry as still as possible when taking the picture. Try to hold you breath, because this helps lessen your body movement. When you press the button to take the picture, try to squeeze the button instead of pressing it. This also helps lessen the BlackBerry’s movement.
>>>Step-by-Step: The BlackBerry Curve Media Player
The Media Player is a single built-in BlackBerry application that allows you to play your music and videos and view your photos.

To access the Media Player, click the Media Player icon on the BlackBerry Home Screen.
We now go through all the Media Player’s functions. Music is first.
1. To listen to music, click Music.

2. The main Music screen allows you to browse all your music, or browse by Artists, Albums, or Genres.

3. The Sample Songs menu allows you to play any sample songs that were pre-loaded on your BlackBerry Curve.
4. The Shuffle Songs menu plays your music in random order.
5. The Playlists menu shows your playlists.
6. To create a new playlist click [New Playlist].

7. You are asked to choose between a Standard Playlist and an Automatic Playlist.

Note
A Standard Playlist is one that you create and manually add songs to. When you create and set up an Automatic Playlist, your BlackBerry watches when you import music and automatically adds to the playlist based on criteria such as artist.
8. Choose Standard Playlist. (To create an Automatic Playlist, go to step 14.)
9. Type a name for your playlist.

10. Click the Menu button, and choose Add Songs.
11. If your music list is large, you can start typing the song or artist name, and the list of songs is filtered automatically based on the letters you type.

12. Click a song to add it to your playlist.
13. When all your songs are listed, press the Escape key and choose Save.
14. To create an Automatic Playlist, click New Playlist as before and then choose Automatic Playlist.


Note
Your BlackBerry generates Automatic Playlists based on your choices on this screen. For example, if you wanted this playlist to contain all songs by Depeche Mode, you would click the + next to Artists and choose Depeche Mode. You must already have at least one song by that artist on your BlackBerry in order to do this. After you save the playlist, your BlackBerry automatically creates this playlist for you. It continues to do so when you add new music to your BlackBerry.
15. Type a name for the playlist.

16. Use the + to the right of each category to add Artists, Albums, or Genres.
Note
While music is playing, you can use other applications on your BlackBerry Curve.
At any time, use the Volume Up/Down button to control the music’s volume, no matter which application you are using.
If you receive a phone call while listening to music, your BlackBerry Curve pauses the music. When the call ends, it resumes playing.
Working with Videos
The BlackBerry Curve Media Player can also play back your videos. These could be videos you have recorded on your BlackBerry Curve, or videos that you have synchronized from your computer.
1. To access Videos, click the Videos icon from the Media Player main screen.
2. To play a video, use the trackball or trackpad to scroll to the video, and click.

3. To record a video, use the trackball or trackpad to scroll up to Video Camera, and click. To learn more about recording video, read “The BlackBerry Curve Camera” section earlier in this chapter.
4. To send a video to someone using Bluetooth, press the Menu button and choose Send Using Bluetooth. Some preloaded videos will not send via Bluetooth. A good example is the John Mayer video.

5. While a video is playing, you can skip forward or backward by clicking the trackball or trackpad, scrolling to the progress bar above the play button, clicking the trackball or trackpad again, and scrolling left or right to go backward or forward.

>>>Step-by-Step: Working with Ring Tones
The Media Player allows you to work with your ring tones. These may be ring tones you have downloaded from websites, or imported from your computer.
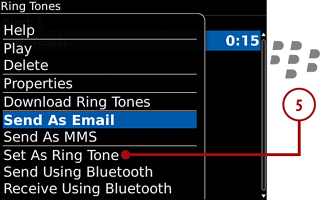
1. To access ring tones, click the Ring Tones icon from the Media Player’s main screen.
2. Under My Ring Tones, you will find any ring tones that you have received from others or that you created and sent to yourself.

3. To send your ring tones to others via email, MMS, or Bluetooth, press the Menu button, and choose either Send As Email, Send As MMS, or Send Using Bluetooth.

4. Ring tones that are not in the My Ring Tones area are locked and cannot be sent to others.

5. To set any of the ring tones as your current ring tone, press the Menu button and choose Set As Ring Tone.
>>>Step-by-Step: Working with Pictures
The Media Player allows you to work with pictures. These could be pictures that you have taken on your BlackBerry Curve, or pictures that you have exported from your computer.
1. To access Pictures, click the Pictures icon from the Media Players main screen.
2. To take a picture, use the trackball or trackpad to scroll up to Camera, and click.

3. To view the pictures on your BlackBerry Curve, click All Pictures. They appear in a grid pattern.
4. To view one of the pictures, click it.

5. To zoom in on a picture, while it is open click the trackball or trackpad and choose Zoom.
6. The Zoom slider appears on the top left of the picture. Scroll up or down with the trackball or trackpad to zoom in and out.
7. To rotate the picture, click the trackball or trackpad, and choose Rotate.

8. To set a picture as your BlackBerry Curve’s Home Screen image, click the trackball or trackpad, and choose Set As Home Screen Image.
9. To reset your Home Screen image to the theme default, choose Reset Home Screen Image.

10. To send the picture to someone or a computer using Bluetooth, click the trackball or trackpad, and choose Send Using Bluetooth.

11. Select the Bluetooth device that you previously associated your BlackBerry with.

12. The picture is sent.

13. To send someone the picture by email, click the Menu button, and choose Send As Email.

14. A new email opens on the BlackBerry Curve’s screen with the picture attached. Choose a recipient, and send.

>>>Step-by-Step: Working with Voice Notes
Media Player allows you to work with your voice notes. Voice notes are the electronic equivalent of the old dictaphones that used small cassette tapes.
1. To access voice notes, click the Voice Notes icon from the Media Player’s main screen.
2. To record a voice note, use the trackball or trackpad to scroll up to Record, and click.

3. Click the trackball or trackpad to start recording the voice note.

4. To listen to a voice note, click it.

5. To send a voice note to someone via email, MMS, BlackBerry messenger, or Bluetooth, scroll to the voice note, click the Menu button, and choose the appropriate menu option.
Configuring the Media Player
The Media Player can be configured to work the way you like, so let’s explore how to do that.
1. To configure the Media Player, from any Media Player screen, click the Menu button and choose Options.
2. Under General is Device Memory Limit, set to 15MB. This setting limits the amount of memory used in the BlackBerry Curve’s main memory for pictures. If you have a media card inserted, you can lower this value to 5MB, which gives your applications more space to use. If you do not have a media card inserted, all multimedia you load is stored in your BlackBerry’s main memory. You should leave this at 15MB.

3. Under Pictures, the first setting is Sort By. This can be set to Most Recent or Name.
4. Next is Thumbnails Per Row. This is set to 4, but you can change it from 3 all the way up to 8.
5. Next is Slide Show Interval. It is set to 2 seconds, but you can change it from 1 second all the way up to 15 seconds.

6. Next is Reserved Pictures Memory. This can be set to 0 to 2MB. This setting is really irrelevant, though, because it is overridden by the Device Memory Limit.
7. Next is a button called Exclude Folders. If you click it, you can choose which folders on your media card must be excluded when using the Media Player. This can be useful if you use applications that store their own multimedia on the media card, and you don’t want them showing up in your list of available multimedia.
8. Under Media, the first option is Turn Off Auto Backlighting. It is set to Yes. Setting it to Yes tells your BlackBerry Curve to disable the normal automatic backlighting mechanism when playing media such as videos. If you set this to No, your BlackBerry continues to use its automatic backlighting mechanism while you play media, which may reduce battery life.

9. Next is Audio Boost. Turning this on makes any media you are playing extra loud.
10. Next is Headset Equalizer. By default this is set to Off. But if you click, you can set the equalizer to a multitude of options that will enhance audio when played through a headset (Bluetooth or cable attached).