
2. Managing Contacts

Your contacts are probably the most important part of your life. They’re certainly a central point on your BlackBerry Curve. You send email, Short Message Service (SMS) text messages, Multimedia Message Service (MMS) messages, and photos to your contacts. You also use your contacts to invite your friends to social networking sites such as Facebook, MySpace, and Twitter.
Knowing how to fully utilize the Contacts application on your BlackBerry Curve will increase your productivity and help you keep in touch more efficiently.
Getting Contacts onto Your BlackBerry Curve
Before you configure the Contacts application, you need to put some contacts into it. There are many ways to do this, from entering them manually to synchronizing them from your computer.
>>>Step-by-Step: Synchronizing with a Windows Computer
If you are using a computer running Windows, you will use the BlackBerry Desktop Manager to synchronize your contacts. You should already have BlackBerry Desktop Manager installed if you followed the instructions in the Prologue. If you didn’t, take a few minutes to follow those steps and install the BlackBerry Desktop Software.
1. Run the BlackBerry Desktop Manager, and connect your BlackBerry Curve to your computer using the USB cable.
2. Click Synchronize.
3. On the Synchronize screen, click the Synchronization menu item.

4. Click the Synchronization button next to Configure synchronization for my desktop program.

5. On the Intellisync Setup screen, click the check box next to Address Book, and click Setup.

6. You are prompted to choose the desktop program you want to synchronize with. The selection list is based on what is actually installed. For now, choose Windows Address Book/Mail.

7. Click Two-way sync and click Next.

8. On the last screen, click Finish.
>>>Step-by-Step: Customizing How the Contacts Are Synchronized
If you want to further customize how your contacts are synchronized, such as conflict resolution and filtering contacts, click the Advanced button on the Intellisync Setup screen.
1. Click the Conflict Resolution button.

2. Click Cancel to return to the preceding screen.

3. Click the Filters button.
4. On the Filters screen, click New, give the filter a name such as Test, and click OK.

5. To configure this filter, click the Field button to choose a contact field, such as Business State.

6. Click the Operator button to choose the condition, such as equals or contains. Then type the value into the Value field.
For example, if you want to synchronize only contacts that have a Business State of New Jersey, you would select a field of Business State, an Operator of equals, and a Value of New Jersey.
7. After you have set up the filter, click the Add to List button. Each filter can have multiple filter conditions, so you can then repeat the steps but select different fields.
8. For now, click the Cancel button to return to the preceding screen, and then click Cancel again to return to the screen before that.
9. Click the Map Fields button. (See page 76.)
If you’ve ever wanted to change the field mappings between your computer and your BlackBerry Curve, this is where you make those changes. Scroll through this list for future reference.
10. Click the Cancel button twice to return to the Intellisync Setup screen, and then click OK.

11. Click Synchronize on the top left to return to the main Synchronization screen.
To synchronize with your BlackBerry Curve right away, click the Synchronize button.
Synchronizing with an Apple Mac
If you are using an Apple Mac, you can use either PocketMac for BlackBerry or Missing Sync for BlackBerry to synchronize your contacts. You should already have one of these installed if you followed the steps in the Prologue, but if not, take a few minutes to follow those steps and install PocketMac for BlackBerry or Missing Sync for BlackBerry.
>>>Step-by-Step: PocketMac for BlackBerry
We discuss PocketMac for BlackBerry first.
1. Run PocketMac for BlackBerry. Connect your BlackBerry Curve to the computer using the included micro-USB or mini-USB cable.
2. Click the picture of the BlackBerry to configure PocketMac for BlackBerry.


4. Click the check box next to Sync Contacts Between the BlackBerry and Mac.
5. Put a check mark next to the application that you want to synchronize your contacts with.
You have a number of choices, depending on which applications you have installed on your Mac.
Choose AddressBookContacts for now. You can come back and change it later.
6. Click the Advanced Preferences button.
7. The first choice you can make on the Advanced Preferences screen is between synchronizing contacts in all categories in your Address Book, or selected categories. There may be a situation where you want only personal contacts or business contacts on your BlackBerry. On the BlackBerry, groupings of contacts are called Categories, but on the Mac they are called Groups. If you want to limit which groups of contacts are synchronized to your BlackBerry Curve, click Sync Only Categories Selected Below, and put check marks next to the groups you want to synchronize.
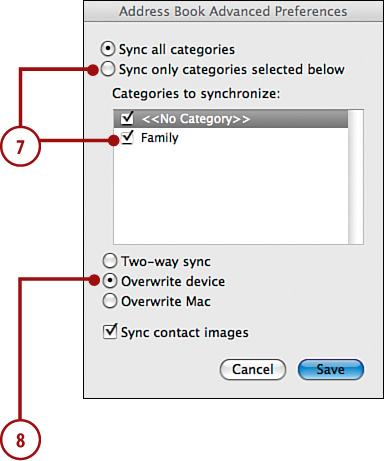
8. The next choice is how the synchronization occurs. The default choice is Two-way sync. Two-way sync means that PocketMac for BlackBerry compares the contacts on your BlackBerry Curve and on your Mac to see which one has the more recent changes. It then synchronizes the newer version of the contact.
Overwrite device tells PocketMac for BlackBerry to overwrite all contacts on your BlackBerry with the contacts on your Mac. This option is useful if you have decided to make changes to your contacts only on your Mac, and you will never make changes to contacts on your BlackBerry. If you choose this option, you must remember that if you modify a contact or add a new contact on your BlackBerry, it will be overwritten when you synchronize.
Overwrite Mac tells PocketMac for BlackBerry to overwrite all contacts on your Mac with the contacts on your BlackBerry. This option is useful if you have decided to make changes to your contacts only on your BlackBerry, and you will never make changes to contacts on your Mac. If you choose this option, you must remember that if you modify a contact or add a contact on your Mac, it will be overwritten when you synchronize.
9. At the bottom of the screen is a check box next to Sync Contact Images. When you check this, PocketMac for BlackBerry includes any contact images that you have added to contacts either on your BlackBerry Curve or Mac.

10. After you have made your choices, click the Save button.
To synchronize your BlackBerry Curve right away, click the Sync icon.
>>>Step-by-Step: Missing Sync for BlackBerry
Next we cover synchronizing using Missing Sync for BlackBerry.
1. Run Missing Sync for BlackBerry, and then connect your BlackBerry Curve to the computer using the included micro-USB or mini-USB cable.

After your initial synchronization via cable, Missing Sync for BlackBerry can synchronize your BlackBerry via Bluetooth as soon as it detects it is in range. For many people this is a very convenient option.
2. Put a check mark next to Contacts. You then can set up how the Contacts synchronize to your BlackBerry Curve.
3. Under the heading Contact Settings are the three choices described above.

4. Below the Contact Settings are two Synchronize options. If you select All Contacts, Missing Sync for BlackBerry always synchronizes all contacts, no matter what group they are in. If you do not want to synchronize all contacts but rather contacts in specific groups such as Family or Work, choose Selected Groups. After that, select which groups you want to synchronize. Remember that groups on your Mac are called categories on your BlackBerry.
5. Click OK to return to the previous screen.
Creating Contacts on the Go
You can create new contacts or modify contacts while on the go in a number of ways. This is likely the most common way you will add contacts to your BlackBerry Curve. After all, it is a device to be used while out of the house or office.
>>>Step-by-Step: Manually Entering Contact Information
Follow these steps to add contact information by hand:
1. From the BlackBerry Home Screen, click the Contacts icon.
2. If the cursor is at the top of the list of contacts, click Add Contact.

3. If the cursor is not at the top of the list of contacts, click the Menu button, and choose New Contact.

4. Enter the contact’s information on this screen.

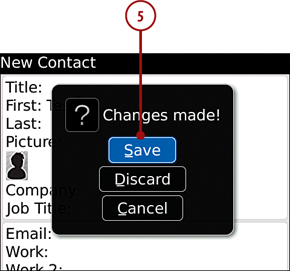
5. Click the Escape button to exit.
6. Choose Save when prompted.

>>>Step-by-Step: Adding a Contact from an Email
You also can add contact information from an email message.
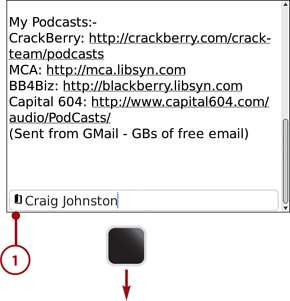
1. Scroll up to the From or CC field, and scroll over the name you want to add to your contacts.

2. Click the trackball or trackpad, and choose Add to Contacts.
Note
If you do not see Add to Contacts, it means that this person is already in your Address Book.
3. Modify any of the information that is automatically imported into the new contact.
4. Click the Escape button to exit.
5. Choose Save when prompted.
>>>Step-by-Step: Importing a vCard
vCard stands for VersitCard, a universal standard format for sending business cards. These vCards can contain all kinds of contact information, including pictures and even audio clips. If someone attaches their vCard to an email, you can import that vCard into your Address Book right from your BlackBerry Curve.
1. If someone emails you his or her vCard, scroll to the bottom of the email until the cursor is on the vCard, which looks like a small open book with the person’s name next to it.
2. Click the trackball or trackpad, and choose Add to Contacts.
Working with Contacts
You can work with the contacts on your BlackBerry Curve, including deleting existing contacts, editing contacts, and adding a picture or ring tone for a contact.
>>>Step-by-Step: Deleting a Contact
Follow these steps to delete a contact:
1. From the BlackBerry Home Screen, click the Contacts icon.
2. Scroll to the contact you want to delete, or start typing the person’s name to automatically filter the display.

3. After the contact is selected, click the Menu button, and choose Delete.
4. Choose Delete in the confirmation dialog box.

>>>Step-by-Step: Editing a Contact
Follow these steps to edit a contact:
1. From the BlackBerry Home Screen, click the Contacts icon.
2. Scroll to the contact you want to edit, or start typing the person’s name to automatically filter the display.

3. After the contact is selected, click the Menu button, and choose Edit.
4. Make your edits, and click the Escape button to exit.
5. Choose Save when prompted.
>>>Step-by-Step: Adding a Picture for One of Your Contacts
Follow these steps to add a contact’s picture (the first 3 steps are identical to Editing a Contact):
1. From the BlackBerry Home Screen, click the Contacts icon.
2. Scroll to the contact you want to add a picture to, or start typing the person’s name.
3. After the contact is selected, click the Menu button, and choose Edit.
4. Scroll over the picture, click the trackball or trackpad, and choose Add Picture.

5. You see a new window showing all the pictures on your BlackBerry.
6. After you choose the picture you want, you see a new window, allowing you to edit the portion of the picture you want to use as the contact’s picture.
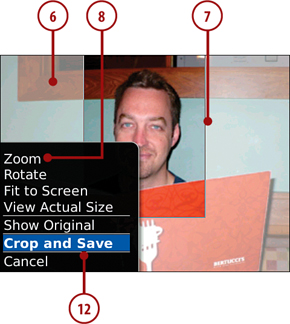
7. Start by using the trackball or trackpad to move the crop area around.
8. If you need to zoom in or out, click the trackball or trackpad and choose Zoom. You then see the Zoom slider appear on the left of the screen.
9. Use the trackball or trackpad to zoom in or out.
10. When you are satisfied with the zoom level, click the trackball or trackpad.
11. If you need to, again move the crop area around with the trackball or trackpad.
12. When you are satisfied with the area to be cropped and used as the picture, click the trackball or trackpad and choose Crop and Save.
>>>Step-by-Step: Adding a Custom Ring Tone for One of Your Contacts
Follow these steps to add a special ring tone for a contact:
1. From the BlackBerry Home Screen, click the Contacts icon.
2. Scroll to the contact you want to add a ring tone to, or start typing the person’s name.
3. Click the trackball or trackpad, and choose Add Custom Ring Tone.
4. When you make this choice, a new field is created at the bottom of the contact called Custom Ring Tone.

5. Click Browse to see a list of the ring tones you already have stored on your BlackBerry. When you find the Ring Tone you want to use, click to select it.
6. Scroll all the way to the top of the list of ring tones to see ring tones you have added.

Configuring the Contacts Application
There may be some things you want to change about how the Contacts application works on your BlackBerry Curve.
>>>Step-by-Step: Changing How the Contacts Application Works
Follow these steps to adjust the Contacts application:
1. Open Contacts from the BlackBerry Home Screen.
2. Press the Menu button and choose Options. The two categories are General Options and Desktop. With General Options, you can change settings that affect the Contacts application. With Desktop, you can change settings relevant only to the Desktop synchronization. If you have a corporate BlackBerry, you see the Desktop category even though you may be synchronizing your contacts wirelessly.

3. Click General Options.
4. Under General Options, you can change the sort order of your contacts by modifying the Sort By field. Your choices are First Name, Last Name, and Company.
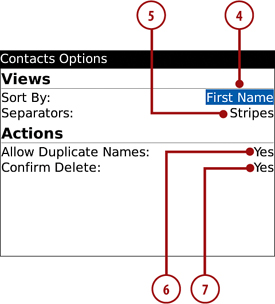
5. The next option is Separators. You can change this to None, Stripes, or Lines. This changes how the Contact List is displayed—with no separator, separated by lines, or with contacts listed with alternating-color stripes as a background.
6. The next option is Allow Duplicate Names. Setting this option to No prevents duplicate names in your Contacts application when you synchronize from multiple sources. Unfortunately, you must leave this set to Yes if you sync with Google, as covered in the next section.
7. Last is Confirm Delete. Setting this to No allows you to delete a contact without having to confirm that’s what you want to do.
8. Press the Escape button to go back to the main Contacts Options screen.
9. Scroll to Desktop and select it.

10. The first option is Wireless Synchronization. If you have a personal BlackBerry, this says Not Available, and the option cannot be changed. If you have a company BlackBerry, you can set this to Yes or No. Setting it to No stops the wireless synchronization of your contacts.
11. The second option on this screen is actually not an option but rather an indication of how many contacts you have.
Synchronizing Contacts with Online Services
Many online services allow you to synchronize your BlackBerry contacts with your account online. This is normally done via a Desktop Manager Add-In, which means you need to synchronize your online contacts while connected to a computer. But sometimes the online service provides a way to synchronize your BlackBerry contacts wirelessly. One such service is Google Sync, which wirelessly synchronizes your Gmail contacts and Google Calendar with your BlackBerry.
>>>Step-by-Step: Synchronizing with Google
The first step of getting your BlackBerry set up to synchronize wirelessly with Google is to install the Google Sync application on your BlackBerry. Luckily, this can also be done over the air.
1. From your desktop computer, visit the Google Sync website at http://www.google.com/mobile/blackberry/sync.html.
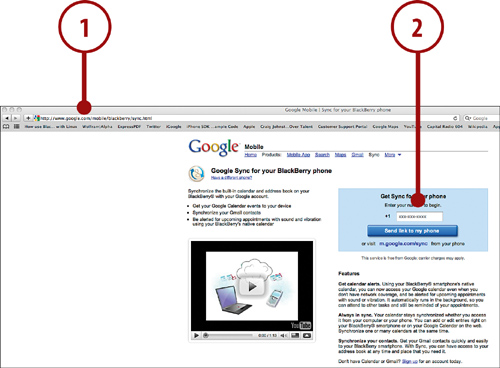
2. Type the phone number of your BlackBerry Curve, and click Send link to my phone. Google sends you an SMS that contains a link to install the application wirelessly.
3. When the SMS arrives on your BlackBerry Curve, open it and click the link. You are taken to a mobile-friendly web page with a link to install the application.

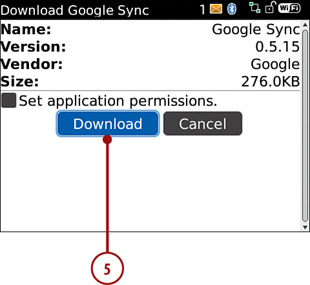
4. Click Install Now to start the installation. Your BlackBerry shows you information about the application.

5. Click the Download button.
6. After the application installs, a dialog box states that the application has successfully installed. Click Run to start Google Sync.
7. The first screen asks you to type in your Google username and password. Type them in and click Next.
8. You should be taken to the Options screen next.

9. To synchronize your Google Contacts with your BlackBerry Contacts, check the box next to Sync Contacts.
10. You can change the synchronization interval by clicking the When To Sync setting. The default is Automatic, but you can set it to Manual. When you set it to Manual, you have to manually start the synchronization process by running Google Sync, clicking the trackball or touchpad, and choosing Sync Now.
