
10. Social Networking and Instant Messaging on Your BlackBerry Curve

Instant Messaging applications such as AOL Instant Messenger, Google Talk, and ICQ have been popular for a long time now. Social Networking sites are fairly new but extremely popular. With your BlackBerry Curve, you can log in to your Facebook account to see what your friends are doing, upload pictures, and update your status. You can tweet about what you are up to on Twitter, and you can IM your buddies in real time. Your BlackBerry Curve also has a special IM application called BlackBerry Messenger that enables you to become friends with anyone in the world who has a BlackBerry.
Instant Messaging
Let’s start with Instant Messaging (IM). Previously in Chapter 9, “Working with BlackBerry Applications,” you learned how to find and install applications using BlackBerry App World. In this chapter, you will find all the IM clients for the BlackBerry Curve.
>>>Step-by-Step: IM Applications
Begin working with IM applications by going to BlackBerry App World.
1. You can find all your favorite IM applications in BlackBerry App World.

2. After you download one or more IM applications, you can find them in the Instant Messaging Folder on your BlackBerry Home Screen.

3. When you first run an IM application, you need to provide your login information.

4. Under the Sign In button, you can choose whether you want your BlackBerry to remember your login information, sign in automatically, or sign in as invisible.
5. All IM applications offer the same options. To configure your IM application, after you log in, press the Menu and choose Options.

6. Under Contacts, you can see Show Offline Contacts. The options are Yes, No, and Group. When you choose Group, your contacts will appear under separate headings making them easier to find.
7. Show Blocked Contacts enables you to choose whether to show or hide contacts that you blocked.
8. Show Display Pictures enables you to set whether to display or hide your contact’s display pictures.
9. Under Conversations, you can see Save Message History. This enables you to save your conversations.
10. Show Conversations in Message List enables you to display your conversations with people in the BlackBerry’s Messages application.
>>>Step-by-Step: Using IM to Chat
After you configure how you want your IM application to work, it’s time to chat.
1. To chat with someone, scroll to his or her name, and click the trackball or trackpad.

2. While in a conversation, you can either type out smiling faces like :-) or press Symbol and choose them from the list. Depending on the IM application you use, there will be more or less emoticons available.

3. To send someone a file, press Menu, and choose Send File.

4. On the next screen, you need to choose what kind of file it is, or if it is not listed on the screen, choose File.

5. Use the trackball or trackpad to navigate to the file you want to send and click.


>>>Step-by-Step: BlackBerry Messenger
BlackBerry messenger is a special IM application designed specifically for BlackBerry users. If you know someone’s BlackBerry PIN, no matter where in the world they are, you can add them to your BlackBerry Messenger contacts. You can also add people using their email addresses, but they do need to have a BlackBerry.
BlackBerry Messenger is special because it uses the BlackBerry network to communicate, which means it is always on and always available.
1. To open BlackBerry Messenger, click the icon in the Instant Messaging folder.

2. If it is the first time you are using BlackBerry Messenger, you are asked to type in your name. After you do this, you can see your contact list.

3. To configure BlackBerry Messenger, press Menu, and choose Options.

4. Vibrate When Receiving a Ping determines whether your BlackBerry Curve vibrates when someone pings you.
5. Ask Password Question When Adding Contacts determines whether people you add to your BlackBerry Messenger contacts must first type in a password to be added.
6. Allow Forwarding of Requests configures whether your requests to add someone to your contacts can be forwarded to another email address or BlackBerry. Set this to No to ensure that when you invite someone, the response you get is from that person and not someone else he might have forwarded your request to.
7. Show Conversations in Message List controls whether conversations you have with your BlackBerry Messenger contacts show in the main BlackBerry Messages application.
8. Consecutive messages that you send and receive are normally grouped together in a conversation. Set Group Messages in Conversation to No to stop this from happening.

9. Sort Conversations By changes the way that conversations are sorted. By default it is by activity, which means that the more recent conversation is at the top.
10. Press Enter Key to Send controls whether you can press Enter to send what you have typed. If you set this to No, you can press Enter to start a new line as you type. You need to click Send to send your text if you have this set to No.
11. Allow On the Phone Presence Status can be set to Yes or No. This controls whether BlackBerry Messenger automatically changes your status to reflect when you are on a phone call.

12. Allow Now Playing Presence Status controls whether you want BlackBerry Messenger to change your status to reflect the current song that you are listening to on your BlackBerry Curve.
>>>Step-by-Step: Using BlackBerry Messenger
Like other IM applications, during a conversation with someone, you can send files and take other actions.
1. Invite to Conference enables you to invite more than one contact to a conference chat.

2. Send a File enables you to send a file to the contact.
3. Send Voice Note enables you to send a voice note that you recorded earlier to the contact.
4. Send My Location enables you to send your current location to the contact. The location is determined from the internal or external GPS.
5. Ping Contact enables you to send a ping to a contact. Sending a ping is a way to nudge the person to respond to you.
6. At any time, you can change your BlackBerry Messenger status by pressing Menu and choosing My Status.

Social Networking
Social networking sites such as Facebook, MySpace, and Twitter are popular and enable more of us to keep in touch more often. Using these sites doesn’t stop when you are on the road because your BlackBerry Curve has social networking applications.
If you look in the Social Networking category on BlackBerry App World, you see a list of social networking applications. Download the ones you are interested in.

Let’s take a look at Facebook. Before running the Facebook for BlackBerry application, you must already have a Facebook account. If you do not, visit http://www.facebook.com from a desktop computer and sign up for one.
>>>Step-by-Step
1. When you run the Facebook application for the first time, you see the Facebook Setup Wizard. It is important to pay close attention to this screen before continuing, especially the options under the Connect your Facebook account with section.
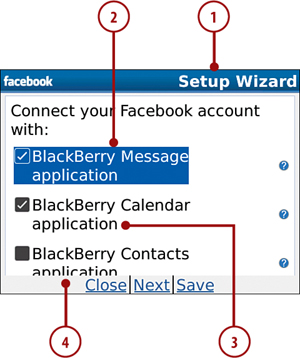
2. If you check the BlackBerry Message application option, it means that while you use BlackBerry Messenger and you receive an update in Facebook, the Facebook application can alert you of the update in real time.
3. If you check the BlackBerry Calendar application box, anytime you accept a meeting in Facebook, it is placed in your BlackBerry calendar.
4. If you select the BlackBerry Contacts application check box, the BlackBerry Facebook application looks through your entire BlackBerry address book to see if anyone is on Facebook.
5. You need to select the email address that your Facebook update notifications go to. You also need to ensure that you allow email updates to be sent in Facebook. When you finish, click Save.

>>>Step-by-Step: Configuring Facebook
Before you start using Facebook, let’s configure it first.
1. Press Menu, and choose Options. The top half of the Options screen is the same as the Setup Wizard screen, and you can make changes to the selections you made earlier if you want to.

If you scroll down to the bottom of the Options screen, you see some extra settings.
2. Leave email notification messages on mail server sets whether your BlackBerry leaves the Facebook notification emails on the email server, or deletes them when it has taken note of the update.
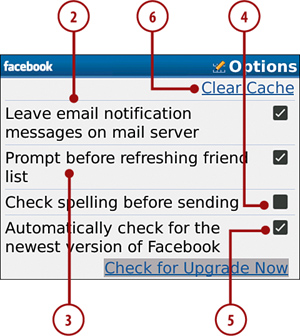
3. The Prompt before refreshing friend list controls whether you want to be prompted before your BlackBerry refreshes your list of Facebook friends.
4. Check spelling before sending controls whether you want the Facebook application to check your spelling before it posts any updates you write.
5. If Automatically check for the newest version of Facebook is checked, your BlackBerry looks for newer versions of Facebook and offers to upgrade.
6. Clear Cache allows you to clear the Facebook cache. The Facebook application keeps a lot of information in a local cache so that it can quickly update the screen. If you are running low on memory, clearing this cache can help.
>>>Step-by-Step: Using Facebook
Let’s take a look at the Facebook main screen.
1. You can type your status updates right on the main screen.

2. Highlights of your friend’s status updates are below.
Along the top of the screen is a list of icons.
3. View Status Updates takes you to the main Facebook screen. Instead of scrolling to this icon in the future, you can also press the S key to jump to it directly.
4. Notifications displays your notifications and your friend’s notifications. Instead of scrolling to this icon in the future, you can also press the N key to jump to it directly.
5. Upload a Photo enables you to upload a photo to one of your Facebook photo albums. Instead of scrolling to this icon in the future, you can also press the U key to jump to it directly.
6. When you click the camera icon, you see a list of all the photos on your BlackBerry Curve. You can either select one of them, or click Camera to take a photo in real time.

7. On the next screen, you can write a photo caption.

8. Choose which Facebook album the photo must be uploaded to.
9. If you want to tag the photo, click Tag This Photo.
10. When you choose to tag a photo, you can move the box to the appropriate person and click the trackball or trackpad to select the person.

11. Next type in the person who is in the photo. As you type, your friends appear in a drop-down list.

12. The Friends icon shows all your Facebook friends. When you click a friend, you can view his profile, write on his wall, poke him, or send him a message. You can press the F key to jump to it directly.

13. The Add a Friend icon enables you to add a friend. You can type in his or her email address and an optional message. You can press the J key to jump to it directly.

14. The Wall icon enables you to write on someone’s wall. When you click this icon, you can type your friend’s name in. As you type, the BlackBerry filters a drop-down list. You can press the W key to jump to it directly.

15. The Message icon enables you to send a message to one of your friends. You can press the M key to jump to it directly.

>>>Step-by-Step: Twitter
Let’s take a look at Twitter next. Oddly there is no Twitter application in the BlackBerry App World, but you can find great BlackBerry Twitter clients on other sites. One such client is ÜberTwitter. To download ÜberTwitter OTA, use the BlackBerry browser, and go to http://www.ubertwitter.com/bb/download.php.

When ÜberTwitter is installed, run it. You can usually find it in the Downloads folder on the BlackBerry Home Screen.
Before your use ÜberTwitter or any Twitter application, you must have a Twitter account. Go to http://www.twitter.com to sign up for one.
1. On the main ÜberTwitter screen, you see the tweets of people you are following.

2. If you click someone’s tweet, you can see the entire tweet. If you click again, you can Reply, Reply All, ReTweet, or Direct Message.

3. To update your own status (in other words tweet), press Menu, and choose Update My Status.
4. If you want to add a picture to your tweet, click the trackball or trackpad, and choose Take Picture. You then can take a picture with your BlackBerry Curve’s camera.

5. To see who is following you on Twitter, press Menu, and choose My Followers.

6. To see Twitter users near you, press Menu, and choose Everyone Near You.

>>>Step-by-Step: QIK
Another popular application in the social category is QIK. QIK enables you to upload or stream videos directly from your BlackBerry Curve. Like most applications, you find QIK in BlackBerry App World.
Before you use QIK on your BlackBerry, sign up for an account at http://www.qik.com.
1. After you log in to QIK, press Menu, and choose Settings.

2. Video Camera Integration has three choices. This controls what QIK does with videos that you record using QIK. You can automatically upload them to your QIK account, ask before uploading, or never upload (Off).
3. Location Privacy controls if the video you record contains your GPS coordinates, and if it does, how accurate it is. Your choices are Off, City Level, Street Level, and Precisely.
4. Connectivity controls how QIK connects to the QIK servers to upload your videos. If available, it is best to choose Wi-Fi. It is free and it is the fastest choice. Use 3G Network enables you to use your cellular carrier’s network.

>>>Step-by-Step: Using QIK
Now you are ready to use QIK.
1. Before you start, type in a title and description of the video.

2. Select whether the video is public or private.
3. Select whether the audio is muted.
4. Click the red button to start recording the video. When you stop recording, the video uploads to your QIK page.
5. If you want to stream a video in real time, press Menu, and choose Start Streaming. As you record a video, it is streamed to your QIK page for others to watch.