8. Working with Date and Time and the Calendar

Your BlackBerry Curve has a fully functioning calendar. You can use this calendar to schedule meetings, accept invitations to meetings, and even to look up someone’s availability if you have a corporate BlackBerry on a BES.
In addition to the calendar, your BlackBerry Curve keeps perfect time because it can update its time from the BlackBerry clock (operated by RIM) or your wireless carrier’s network time. Your BlackBerry Curve is also well aware of time zones, so it can be used anywhere in the world.
Configuring Time, Date, and Calendar
Before we work on the calendar, you need to ensure that your time and date are correct and that you use the correct time zone.
>>>Step-by-Step: Configuring Time and Date
All BlackBerry Curves support time zones, daylight savings time, and automatic time synchronization. Here is how to ensure your BlackBerry Curve is always on the right time.
1. From the BlackBerry Home Screen, click the Settings icon.

2. From the Settings folder, click the Options icon.

3. From the Settings screen, click Date/Time.

4. Verify that you have the correct Time Zone selected. Click the name of the time zone to see the full list.

5. After you select the correct time zone, ensure that the time is correct. Change it if necessary.
6. Select to display the time in 12-hour or 24-hour format.
7. Ensure the date is correct and correct it if necessary.
8. Select whether you want your BlackBerry Curve to synchronize the time automatically. You can choose to synchronize time with the wireless network (Network) or BlackBerry time (BlackBerry).
9. Network Time shows the actual network time.
10. Network Date reflects the actual date.
11. When you have your date and time set correctly, press the Escape key, and choose Save to save your settings.
>>>Step-by-Step: Configuring the Calendar
Now that your BlackBerry is set to the correct date and time, you are ready to use your calendar. Before you add any new appointments, you might want to configure the Calendar the way you want it.
1. To open the Calendar application, click the Calendar icon on the BlackBerry Home Screen.

2. Click the Menu key, and choose Options.

3. The Calendar Options screen shows General Options, Conference Call Options, and options specific to the calendars you synchronize on your BlackBerry Curve. If your BlackBerry Curve is running OS 4.5 or lower, you cannot see the Conference Call options listed.

4. If you have a corporate BlackBerry, you can see your corporate calendar account listed as Desktop.

5. Click General Options.
6. Set the day that is the first day of your week. This is typically Sunday but might differ where you live.

7. Set the time of day you start your day.
8. Set the time of day you end your day.
9. Under View, set the Initial View. Your choices are Day, Week, Month, and Agenda. This view can be changed while using the Calendar application.
10. Show Free Time in Agenda View controls whether the Agenda View displays items that day in Free Time. If you set this to No, you only see appointments listed with no indication of when you are free.
11. Show End Time in Agenda View controls whether the Agenda View displays the end time for each appointment. If you set this to No, each appointment will be listed but only the start time will appear.
12. Snooze enables you to set the default Snooze time in minutes. This setting controls the number of minutes that Snooze lasts.

13. Default Reminder enables you to set the default number of minutes a meeting reminder pops up before the actual start of the meeting.
14. Enable Quick Entry enables you to start typing a new appointment title while viewing the calendar.
15. Confirm Delete controls whether the BlackBerry Curve prompts you to confirm you actually want to delete an appointment.
16. Keep Appointments controls how long the BlackBerry keeps appointments after they occur. This can be set to 15 Days, 30 Days, 60 Days, 90 Days, and Forever.
17. Show Tasks controls whether the BlackBerry Curve includes Tasks in its views.
18. Show Alarms controls whether Alarms that you set display in the Calendar views.
>>>Step-by-Step: Conference Call Options
Conference Call Options is visible only if your BlackBerry Curve runs OS 4.6 or later. This is useful if you have your own conference call bridge and need to include the bridge details in some meetings.
1. Under the Moderator section, you can enter the phone number to be called and the access code that the moderator must use to take control of the conference call.

2. Under the Participant section, you can enter the phone number to be called (which is typically the same number) and the access code that the participant must use to join the conference call.
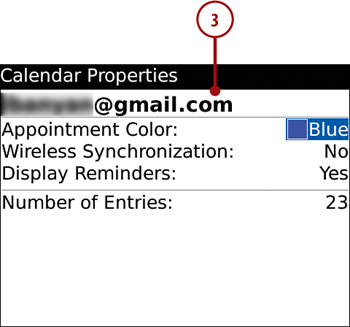
3. For personal calendars, click the email address.
4. For corporate calendars, click Desktop.
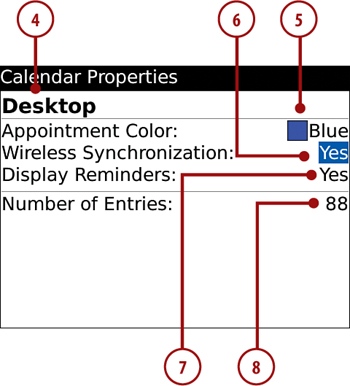
5. Appointment Color enables you to set the color of each calendar’s appointments.
6. Wireless Synchronization works only for corporate calendars, and controls whether your BlackBerry synchronizes the calendar wirelessly between the device and your corporate calendar.
7. Display Reminders controls whether the BlackBerry displays reminders. Remember that these are settings for a particular calendar, so you might not want reminders for personal appointments, but only for corporate appointments.
8. Number of Entries is a display only field that displays how many calendar entries are in that particular calendar.
Navigating the Calendar
The Calendar application can display a number of different views:
• Day

• Week

• Month

• Agenda

>>>Step-by-Step: Changing Calendar Views
You can change those views in two ways:
1. If you have the Enable Quick Entry set to No as we previously discussed, you can press D for Day View, W for Week View, M for Month View, or A for Agenda View.
2. If you have the Enable Quick Entry set to Yes, you can press Menu, and choose the view you want to switch to.

>>>Step-by-Step: Selecting the Calendar
By default, the Calendar application shows all calendars in the same view. If you have more than one calendar, you might want to switch between calendars instead of having them all in one view.
1. Press Menu, and choose Select Calendar.

2. Select your calendar, or choose to Show All Calendars.

Using the Calendar
Now that you know how to navigate the calendar and configure it, let’s find out how to send and accept appointments.
>>>Step-by-Step: Creating and Sending an Appointment
You can create an appointment for yourself or invite others to be part of the appointment.
1. To create a new appointment, if you are in Week or Day View, scroll to the time you want your appointment to start and click the trackball or trackpad.

2. The New Appointment screen displays.
3. Ensure that you create the appointment using the correct calendar by selecting it in the Send Using field.
4. Type a subject for the appointment.
5. Type a location for the appointment.
6. If the appointment is an all day event, check the All Day Event box.
7. Change the start and end date and time for the appointment. Appointments can span multiple days.

8. If you want to adjust the length of the appointment, modify the Duration field. When you make adjustments to this field, the end date and time of your meeting change.
9. Choose the time zone for the meeting.
10. Change the Show Time As field to reflect how your time needs to be represented during that appointment. Your choices are Free, Tentative, Busy, and Out of Office. This is very useful in a corporate environment.
11. Change the Reminder if you need to.

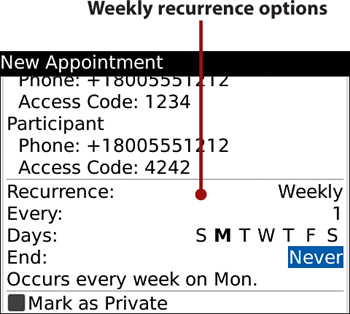
12. If you host a conference call, check the Conference Call box. If you previously set up the Conference Call settings, those values will be inserted into the meeting. If not, you can type them in now.
13. If the appointment recurs, click to set it to Daily, Weekly, Monthly, or Yearly.

14. If this appointment is private, check the Mark as Private box.
15. Enter any notes for this appointment.
16. If you want to invite others to the appointment, press Menu, and choose Invite Attendee.

17. You can choose people from your BlackBerry Address Book. If you use a corporate BlackBerry, you can perform a Lookup to find coworkers.

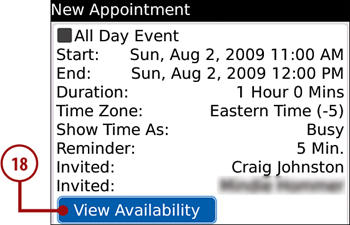
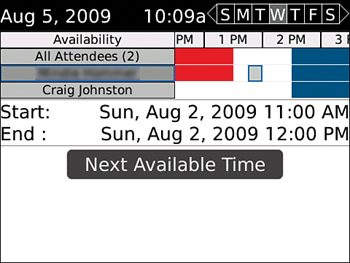
18. If you use a corporate BlackBerry, you see an extra button called View Availability.
19. To save your appointment and send out invitations to your appointment if you added attendees, press Escape, and choose Save.
>>>Step-by-Step: Receiving and Responding to Appointments
When someone invites you to an appointment or meeting, you receive that request on your BlackBerry Curve. You can then act upon it.
1. When you receive a meeting request, it arrives in your messages list. The icon for the meeting request looks different from the emails and other types of messages.

2. When you click the meeting request, you see the details of that request.

3. When you are ready to respond, click the trackball or trackpad, and choose how to respond.

4. If you choose to respond with comments, you are taken to a screen to type those. After you have typed your comments, click the trackball or trackpad, and choose Send.

5. The meeting request response replaces the meeting request in your message list.

6. If you go back to the Calendar application, you see the appointment you accepted.

>>>Step-by-Step: Configuring Alarms
In addition to appointments, you can set alarms. These alarms are separate from the daily alarms that you can set in the Clock application, which we cover next.
1. To create a new alarm, press Menu, and choose New Alarm.

2. Type in the subject of the alarm.

3. Change the date and time of the alarm.
4. Choose whether the alarm is a one time alarm or a recurring alarm.
5. If you choose a recurring alarm, extra options appear to enable you to configure the recurring information.
6. To save the alarm, press Escape, and choose Save.


Synchronizing the Calendar with a PC and Mac
If you don’t have a corporate BlackBerry and do not use a wireless synchronization program such as Google Sync, you can synchronize your BlackBerry with a PC or Mac.
>>>Step-by-Step: Synchronize with Windows
To synchronize your BlackBerry Curve with Windows, you need to install the BlackBerry Desktop Manager. If you have not yet done this, please take a few minutes to follow the instructions in the Prologue.
1. Run Desktop Manager and connect your BlackBerry Curve using its USB cable.
2. Click Synchronize.

3. When in the Synchronize screen, click Synchronization.

4. Click the Synchronization button.

5. When the Intellisync screen opens, check the box next to Calendar.
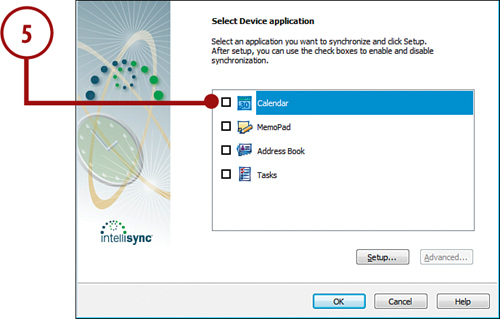
6. On the Calendar Setup screen, choose the desktop application to synchronize your BlackBerry Curve with.

7. Choose the type of synchronization.

8. The next screen shows the Calendar date range options. If you chose Yahoo!, you can click the Options button to type in your Yahoo! Username and password. Other calendar applications like Outlook will not require a password.

9. After you click Next, you see the Congratulations screen, and when you click Finish, you return to the Intellisync screen.

10. If you want to further configure the Calendar synchronization settings, ensure that Calendar is selected, and click the Advanced button.
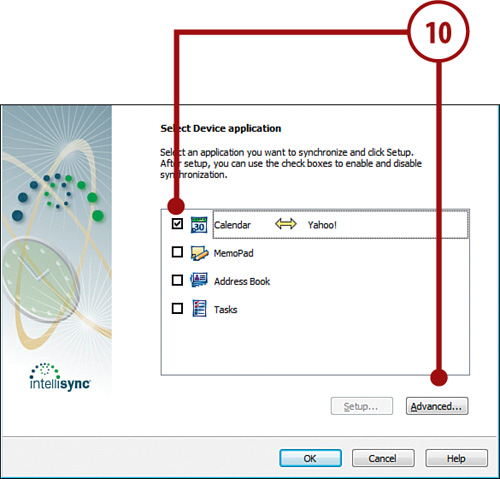
11. The Advanced Calendar screen shows five sections: Folder Mapping, Confirmations, Conflict Resolution, Filters, and Field Mapping.

12. Folder Mapping is not used in Calendar synchronization.
13. Confirmations enables you to choose when to receive confirmations in Windows when synchronization occurs.
14. If you click the Conflict Resolution button, you can set up how Intellisync handles conflicts between the BlackBerry and the desktop calendar program.
Note
If you are doing two-way synching, conflicts can occur between the BlackBerry and the desktop program. For example, if a particular calendar item is changed in both places. You choices are
• Add All Conflicting Items. This creates duplicate copies of a conflicting item enabling you to rectify the conflict after the fact.
• Ignore All Conflicting Items. This simply ignores any conflicts.
• Notify Me When Conflicts Occur. This tells Intellisync to pop up a dialog box indicating when a conflict occurs and enables you to resolve it in real time.
• Device Wins. This means that if there is a conflict, the version of the item on the BlackBerry always wins, and the item in the desktop application will be ignored.
• Server Wins (in this case Yahoo! Wins). This means that if a conflict occurs, the version of the item in the desktop application (or in this case Yahoo!) wins and the item on the BlackBerry will be ignored.

15. If you click the Filters button, you can create filters that filter out certain appointments.

16. To create a new filter, click New.


18. Select a field, operator, and value to create a new condition. For example, filter appointments where the Subject contains the word Testing. Click Add to List to add the condition to the filter.

19. If you have multiple conditions in a filter, click the Rules tab to set whether all conditions must be met, or just some of them.

20. Click the Map Fields button if you need to change the mappings of fields in the desktop application to the ones on the BlackBerry.

21. Back on the main Intellisync screen, click OK to save your changes. These calendar synchronization options are used each time you connect your BlackBerry to your computer.

Synchronize with a Mac
You can use two programs to synchronize calendars with your Mac: PocketMac for BlackBerry and Missing Sync for BlackBerry.
If you haven’t already installed one of these applications on your Mac, take a few minutes to follow the instructions in the Prologue.
>>>Step-by-Step
1. Run Pocketmac for BlackBerry, and connect your BlackBerry Curve using the USB cable.

2. Click the picture of the BlackBerry to set up PocketMac for your BlackBerry.
3. Click the Calendar tab.
4. Put a check mark next to Sync Calendar between the BlackBerry and Mac.
5. Put a check mark next to the application you want to synchronize with.
6. Click the Advanced Preferences button to the right of that application.
7. The first two radio buttons enable you to configure which calendar categories to synchronize. The categories on the BlackBerry translate into calendars on the Mac.
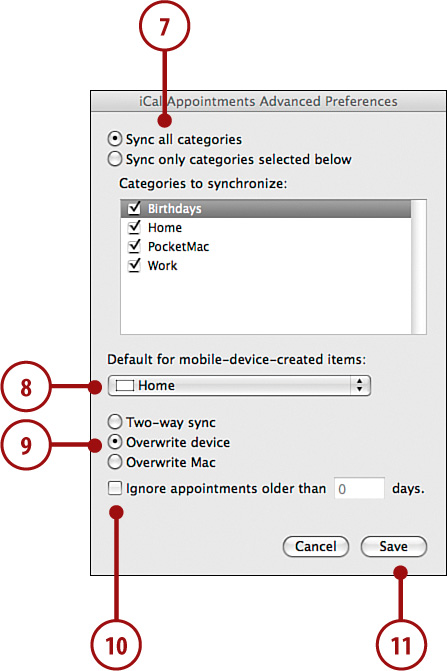
8. The Default for mobile-device-created items enables you to set which calendar category items created on your BlackBerry will synchronize to on your Mac.
9. The last three radio buttons enable you to configure the type of synchronization:
• Two-way sync is when calendar items on your Mac are sent to your BlackBerry and items on your BlackBerry are sent to your Mac.
• Overwrite device is a one-way synchronization where the calendar items on your Mac overwrite ones on your BlackBerry.
• Overwrite Mac is a one-way synchronization where the calendar items on your BlackBerry overwrite ones on your Mac.
10. If you want to limit how far back the appointments go, check the box labeled Ignore appointments older than, and type in a number of days.
11. Click Save to save your changes.
>>>Step-by-Step: Missing Sync for BlackBerry
Remember that after the first time you synchronize your BlackBerry with Missing Sync for BlackBerry through the USB cable, you can do all future syncs using Bluetooth. This means that when your BlackBerry comes within range of your Mac, it synchronizes.
1. Connect your BlackBerry to your Mac using the USB cable, and run Missing Sync for BlackBerry.

2. On the main screen, put a check mark next to Calendar.
3. Double-click Calendar to change the settings.
4. Under Calendar Settings, choose the type of synchronization that occurs:
• Synchronize is a two-way synchronization.
• Overwrite device with desktop data on next sync only tells Missing Sync to overwrite all data on the BlackBerry the next time it synchronizes but to return to the previous method of synchronization after that.
• Always overwrite device with desktop data tells Missing Sync to always overwrite the calendar data on your BlackBerry with the data on the Mac.

5. Under Synchronize, you can choose to synchronize all Mac calendars with the BlackBerry or just the selected ones. Calendars on the Mac translate into Calendar categories on your BlackBerry.

6. Put events created on the device into tells Missing Sync that any appointments created on the BlackBerry must be synchronized to a particular calendar on the Mac. The default is Home.
7. The Sync setting enables you to control how far back in time and how far forward in time to synchronize calendar items.
8. Click OK to save your changes.
>>>Step-by-Step: The Clock Application
If your BlackBerry Curve runs OS 4.6 or higher, you have a Clock application that includes the Alarm functionality which was previously a separate application on older BlackBerry Curves. It adds a large clock face, Timer, and Stopwatch. You can also use the clock as a bedside clock.
1. To run the Clock application, click the Clock icon on the BlackBerry Home Screen.

2. The main clock screen appears. The majority of the screen is taken up with a clock whereas the bottom portion of the screen displays any alarms that you set.

>>>Step-by-Step: Configuring the Clock Application
The Clock application is surprisingly flexible and has many options that you can use to personalize it.
1. To configure the clock application, press Menu, and choose Options.

2. The clock options appear. Under the Clock heading, you can change the Clock Face. Besides the default of Analog, your choices are:
• Digital

• Flip Clock

• LCD Digital

3. Home Time Zone enables you to set your home time zone, which might be different from the time zone you are in.

4. When Charging enables you to set what the BlackBerry Curve must do when you plug it in to charge. Your options are Do Nothing, Display Clock, and Enter Bedside Mode.
5. If you click the Set Time button, you go to the BlackBerry’s main Date/Time options screen.
6. Under the Alarm heading, you can change how the alarm sounds. You can change Alarm Type to Tone, Vibrate, or Tone+vibrate.
7. You can change Alarm Tune so that something different plays when the alarm sounds.
8. Volume controls how loud the tune plays. The options are Low, Medium, High, Escalating. When set to Escalating the alarm sounds start off soft and get progressively louder until it is silenced.

9. Snooze Time controls how long the alarm must snooze for when you click snooze.
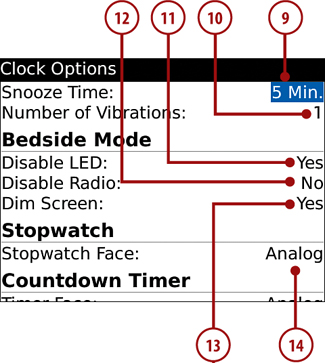
10. Number of Vibrations controls how many times your BlackBerry vibrates if it is set to vibrate when the alarm goes off. It can be set to 1, 2, or 3.
11. Disable LED controls whether to disable the notification LED when your BlackBerry enters Bedside Mode, which is designed to turn the clock into a bedside clock. This is useful to stop it from flashing and waking you up.
12. Disable Radio controls whether your BlackBerry disables its cellular radio when it enters Bedside Mode. This is useful when trying to save on battery life.
13. Dim Screen controls whether your BlackBerry dims the screen when it enters Bedside Mode. It is useful to set this to Yes so that the screen doesn’t keep you awake.
14. Under the Stopwatch heading there is one setting: Stopwatch Face. You can set this to Analog or Digital; this is for the Stopwatch functionality only.
15. Under the Countdown Timer, settings control the functionality of the Timer. Timer Face controls whether the Timer has an Analog or Digital face. This is only for the Timer.

16. Timer Tune controls what tune plays when the Timer runs out.
17. Volume controls how loud the tune plays.
18. Vibrate controls whether the Timer should also vibrate when the timer expires.
>>>Step-by-Step: Using the Clock
Now that the Clock application is set up, let’s see how you can use it. As you saw from the options, it is a clock, alarm clock, stop watch, and timer.
1. To set the alarm, click the trackball or trackpad and the alarm time appears.
2. Use the trackball or trackpad to scroll through the time.

3. Click the trackball or trackpad to save the alarm settings.
4. To enter Bedside Mode manually, press Menu, and choose Enter Bedside Mode.

5. To start the Timer function, press Menu, and choose Timer.

6. To set the Timer, press Menu, and choose Set Timer.

7. Use the trackball or trackpad to change the amount of time the Timer needs to countdown. Click Start to start the Timer.

8. To use the Stopwatch, press Menu, and choose Stopwatch.

9. Press the green start/stop button to start and stop the Stopwatch or the reset icon to reset the Stopwatch.