
35. Sending Email Using ASP.NET
A Typical Contact Form
I often hear from readers asking me how to create a form in Expression Web that collects information from a site visitor and sends an email containing the information collected from the form. Many sites offer just such a contact form. In fact, these forms have become so commonplace on the Internet that Expression Web users expect to be able to create one with a few clicks here and there. Such an expectation is certainly understandable, but the truth is that creating a contact form with email capabilities isn’t that easy.
In this chapter, we’ll walk through creating an email contact form that sends email using ASP.NET. One of the main benefits of using ASP.NET is that you can take advantage of the ASP.NET validation controls available in Expression Web 3. As you’ll see later in this chapter, these validation controls provide a powerful means of ensuring that the data you collect is what you expect.
The first step in creating an email contact form is to create the actual form itself.
Creating the Contact Form
The first step in creating our contact form is to create the form itself. We’ll create a fairly simple form, but you can easily add additional fields to the form later. To create the form, follow these steps:
1. Click File, New, Page.
Note
![]()
If you’d like to download the completed form, you can do so from the website that accompanies this book.
2. Select ASPX from the page types and make sure to select C# as your language.
3. Type Enter your name: and press Enter.
Tip
![]()
If the Tag Properties panel isn’t visible, select Panels, Tag Properties to activate it.
4. Add a new ASP.NET TextBox control from the Standard section of the ASP.NET controls in the Toolbox.
5. Make sure that the TextBox you just added is selected, and activate the Tag Properties panel.
6. Change the ID property of the TextBox to Name, as shown in Figure 35.1. If you wish, you can also change the width of the TextBox so that it’s wider than the default size.
Figure 35.1 The Tag Properties panel is a convenient and easy way to set properties on ASP.NET controls.

7. Press the right arrow key to deselect the TextBox control, and press Enter twice to add two new lines.
8. Type Enter your email address:, and press Enter.
9. Add a new TextBox control.
10. Set the ID property of the TextBox control to Email.
11. Add two new lines after the TextBox control.
12. Type Enter your message: and press Enter.
13. Add a new TextBox control.
14. Set the ID of the TextBox control to Message.
15. Set the TextMode property to MultiLine.
16. Set the Height property to 200 and the width property to 400.
17. Press Enter twice to add two new lines.
18. Add a new ASP.NET Button control.
19. Set the Width property to 140.
20. Set the Text property to Send Message.
21. Set the ID property to Send.
22. Save the page as default.aspx.
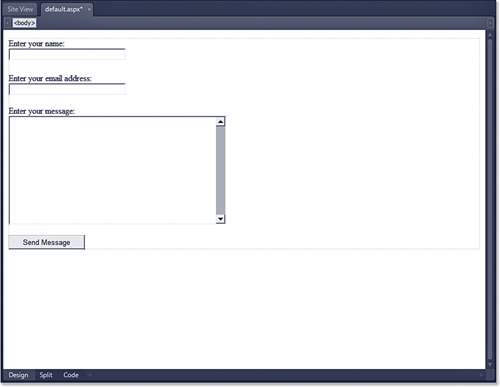
Your form should now look like the one shown in Figure 35.2.
Figure 35.2 The form’s design has been completed, but it doesn’t do anything yet.
We now have the necessary ASP.NET controls to collect information from site visitors. However, visitors can submit the form without adding any information or entering a valid email address. Fortunately, ASP.NET offers controls that will allow us to add form validation easily.
Adding and Configuring ASP.NET Validation Controls
When you use forms in a site, you should always validate the user’s input so that you ensure that you get the data you are looking for. In our case, we want to make sure that none of the form fields are empty. We also want to make sure that the email appears to be a valid email address so that we can send a copy of the form to the visitor who filled it out. We’ll use two different ASP.NET validation controls to do this: the RequiredFieldValidator and RegularExpressionValidator controls.
Adding the Validation Controls
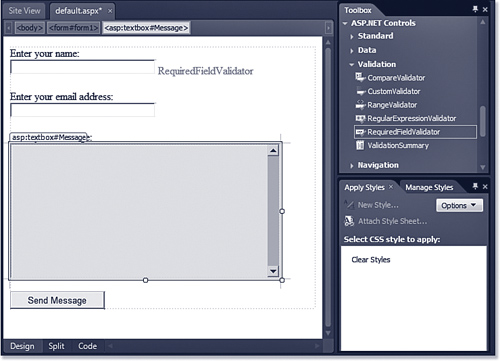
Because we want to ensure that visitors fill in all our fields, we’ll add a RequiredFieldValidator to each control. Click the Name TextBox control, and then press the right arrow key to move the insertion point just to the right of the TextBox. Press the spacebar to add a couple of spaces, and then drag and drop a RequiredFieldValidator control from the Validation section of the toolbox as shown in Figure 35.3.
Figure 35.3 The ASP.NET validation controls are located in the Validation section of the Toolbox.
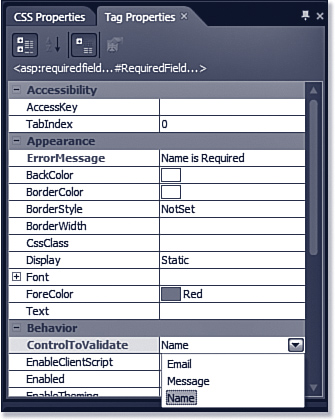
Select the RequiredFieldValidator control you just added to the page and set the ErrorMessage property to Name is Required. Click the drop-down next to the ControlToValidate property and select Name, as shown in Figure 35.4.
Figure 35.4 The ControlToValidate property associates a validator control with a control on the page.
Repeat the same process to add a RequiredFieldValidator control next to the Email TextBox and the Message TextBox control. Set the ErrorMessage property appropriately for each of the TextBoxes, and select the correct control for the ControlToValidate property. Your form should now look like the one shown in Figure 35.5.
Figure 35.5 The form now has a RequiredFieldValidator control next to each TextBox.

![]() For more information on ASP.NET validation controls, see Chapter 29, “Form Validation with ASP.NET” of the print version of this book.
For more information on ASP.NET validation controls, see Chapter 29, “Form Validation with ASP.NET” of the print version of this book.
Finally, we need to add a RegularExpressionValidator to the Email TextBox so that we can ensure that the text entered in that field is in the form of an email address.
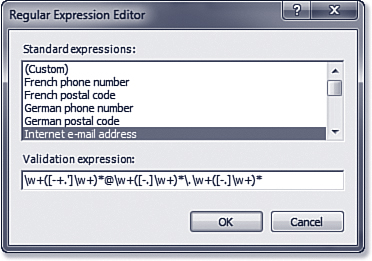
Add a RegularExpressionValidator control to the right of the RequiredFieldValidator control that you added to the Email TextBox earlier. Set the ErrorMessage property to Email Invalid and set the ControlToValidate property to Email. Click the ellipse next to the ValidationExpression property and select Internet Email Address from the list of expressions, as shown in Figure 35.6. Click OK.
Figure 35.6 The ValidationExpression property of the RegularExpressionValidator control makes it easy to validate form data against popular patterns.
We have one final step to complete the configuration of the validation controls. If a site visitor enters a value in the Email TextBox that isn’t in the format of an email address, the error message for the RegularExpressionValidator control will appear too far away from the Email field, as shown in Figure 35.7 because ASP.NET is reserving space for the RequiredFieldValidator control that’s also used by the Email field.
Figure 35.7 The RegularExpressionValidator’s error message appears too far from the Email field by default.
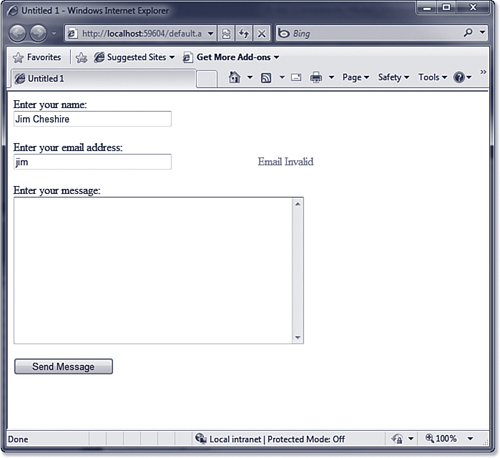
To fix this problem, select the RequiredFieldValidator control next to the Email field and change the DisplayMode property from Static to Dynamic. ASP.NET will then no longer reserve space on the page for the RequiredFieldValidator control, and the error message for the RegularExpressionValidator control will appear immediately to the right of the Email field.
Our form now has a significant amount of functionality with regard to validation, but it doesn’t do anything when you submit it. For the form to send email, we’ll need to add some ASP.NET code to it.
Writing ASP.NET Code to Send Email
When a visitor fills out our form and clicks the Send Message button, we want an email to be sent to an email address that we specify and a copy to be sent to the user who filled out the form. You might be surprised at how little code is required to send email using ASP.NET. Listing 35.1 shows the code that is used to send the email. (Line numbers appear for reference only.)
Listing 35.1 Code to Send Email
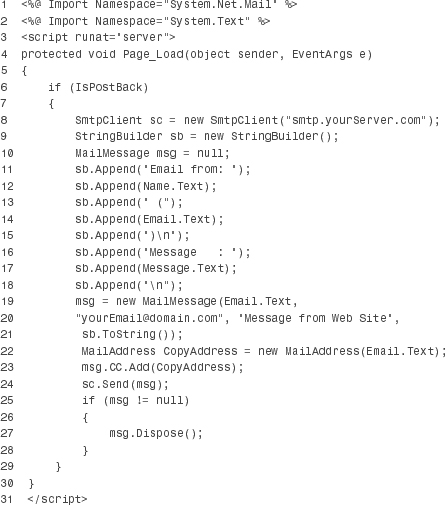
Lines 1 and 2 of this code are @Import directives that import a couple of .NET Framework namespaces that we use in the code. By importing these namespaces, we can refer to classes within them (such as StringBuilder and MailMessage) without using the entire name. In other words, instead of System.Text.StringBuilder, after we import the System.Text namespace, we can simply use StringBuilder.
Note
![]()
Namespaces and classes are terms used in object-oriented programming. It’s not necessary to understand what these terms mean in order to use this code. If you are interested in learning more about object-oriented programming, read Sams Teach Yourself Object Oriented Programming in 24 Hours from Sams Publishing.
Line 3 is a typical <script> element with the addition of a runat attribute set to server. The runat attribute lets ASP.NET know that the code in the <script> block is server-side ASP.NET code and not client-side script.
Line 4 is the signature of the Page_Load event. It specifies that the code within the curly braces (lines 5 and 28) runs every time the ASP.NET page loads. Obviously, we don’t want the form to try to send email unless the page is loading because the Send Message button was clicked, so line 6 checks to see whether the loading of the page is caused by a postback (the result of a form being posted) and runs the code to send mail only when a postback occurs.
Line 8 creates a new SmtpClient instance. SmtpClient is a class in the .NET Framework that allows you to easily connect to an Internet mail server. You will want to replace “smtp.YourSever.com” with the address of your SMTP mail server. The SMTP mail server is typically the same SMTP server that you use when configuring your email software, but if you don’t know what it is, ask your hosting company.
Line 9 creates a new instance of the StringBuilder class. The StringBuilder class is a specialized class that efficiently handles combining string (text) values.
Line 10 declares a MailMessage object. The MailMessage class is part of the .NET Framework as well and allows for easily sending mail using the .NET Framework.
Lines 11–18 use the Append method of the StringBuilder class to build the body of the email message. The value that appears in parenthesis after the Append method is tacked onto the end of the existing StringBuilder value until the entire mail message has been created.
Lines 19–21 set the msg variable declared on line 10 to a new instance of the MailMessage class. When we create the MailMessage instance, we specify the sending address of the email, the destination email address, the subject of the email, and the body of the email. The body of the email is created using the ToString method of the StringBuilder. The ToString method gives you a string made up of all the text you appended to the StringBuilder in lines 11–18.
Line 22 creates a new MailAddress instance that is used to copy the user who filled out the form when the mail is sent. Line 23 adds the MailAddress created in line 22 to the CC for the mail.
Finally, line 24 sends the message using the Send method of the SmtpClient instance that you created on line 8.
Lines 25–28 is cleanup code that uses the Dispose method to clean up the MailMessage after the mail has been sent. Doing this is a best practice when dealing with the .NET Framework.
Tip
![]()
If you get an error when submitting the form, you can get more information about what went wrong by changing the @Page directive on the page. Simply change <%@Page Language= "C#"%> to <%@Page Language= "C#" Debug="True"%> and you’ll get additional information about any errors.
Be sure to remove the Debug attribute (or set it to False) before your page goes live.
I realize that this is a lot of code to throw at those of you who aren’t programmers. If you find yourself feeling completely lost at this point, don’t worry about it—you don’t need to understand all this code to send email with ASP.NET. Simply copy the code to your page, replace smtp.yourServer.com with your server name, and replace [email protected] with your email address and you’re good to go.
If you browse the form at this point, fill in the information, and click Send Message, you should receive an email with the information you entered into the form.
Lagniappe: Displaying a Confirmation Page
When you click Send Message in the form, the mail is sent as expected, but the user isn’t presented with any kind of helpful message indicating that an email has been sent. It would be much more user-friendly to have a confirmation page that lets the user know that his or her form submission was successful.
If you’d like to display a confirmation page after sending the email, first create a confirmation page that displays a helpful message such as “Thank you for sending your message!” You’ll then need to add one line to the ASP.NET code to redirect the user to the confirmation page after the form is submitted.
Save your confirmation page as confirm.aspx, and then add the following line of code immediately below line 28 in Listing 35.1:
Response.Redirect("confirm.aspx");
This line of code causes the user’s browser to be redirected to a page called confirm.aspx after the form is submitted.