

Securing web applications
In this chapter, we describe how to secure web applications that are running in a CICS Liberty JVM server. You learn how to configure Liberty with your preferred security provider, and the various ways you can request credentials from users.
Specifically, we describe the different registry types that are available to Liberty in CICS, along with some of the more popular methods of authentication and authorization.
This chapter includes the following topics:
7.1 Overview
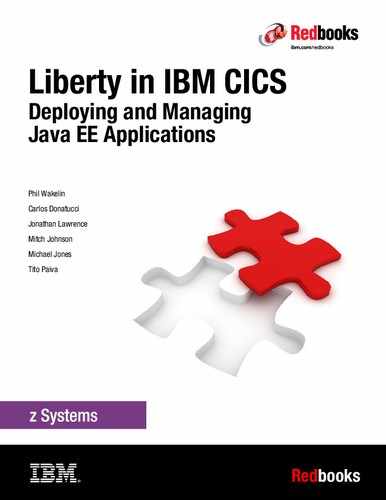
A high-level overview of security in Liberty JVM servers is shown in Figure 7-1.

Figure 7-1 Security in Liberty JVM servers overview
As you secure your web applications, consider the following points:
•Decide whether you are going to use SAF-integrated security. If you are using this security, you must set up the Liberty angel process and some basic security profiles. For more information, see 7.2.1, “Starting the angel process” on page 177.
•You must decide how you are going to secure the client’s connection with your server. For more information about the use of TLS to achieve connection level security, see Chapter 6, “Configuring Transport Layer Security support” on page 141.
•Decide which mode of authentication you are going to use in your applications. Each application can use a different mode of authentication. The authentication method is typically outlined in the application’s deployment descriptor (web.xml). For more information, see 7.4, “Authentication scenarios” on page 185.
•Decide on one or more modes of authorization. After users successfully authenticate with the server, several options are available for authorizing them. You use the deployment descriptor (web.xml) of your applications to restrict specific URLs. You can use roles that are specified in your source code with EJBROLEs in your SAF registry. You can also use CICS transaction and resource security. For more information, see 7.5, “Authorization scenarios” on page 200.
•Decide whether to use SSO in your Liberty JVM servers. For more information about IBM SSO technology Lightweight Third Party Authentication (LTPA), see 7.6, “Configuring SSO by using Lightweight Third-Party Authentication” on page 213.
7.2 z/OS security configuration for Liberty JVM servers
In this section, we describe the setup of z/OS security for use in Liberty JVM servers. You can skip this section if you are not planning to use SAF security in your CICS Liberty JVM server.
This section, we describe how to set up everything you need and integrate z/OS security with your Liberty JVM server. If you follow the guidelines that are presented in this section, you set up the Liberty angel process and create the security profiles that are required for authenticating users.
7.2.1 Starting the angel process
The Liberty angel process is a started task that allows Liberty to use z/OS authorized services. CICS Liberty JVM servers rely on this process to communicate with a SAF security registry, such as RACF.
The angel process started task JCL includes versions of CICS TS, which support integrated security (that is, CICS TS v5.2 onwards).
You can find this JCL in your CICS USSHOME directory. For our example CICS regions, the following location was used:
/usr/lpp/cicsts/cicsts54/wlp/templates/zos/procs/bbgzangl.jcl
You must change the JCL before you can run it as a started task. The value of ROOT also must be changed to match your CICS job’s USSHOME/wlp. For our example region, the following ROOT value was used:
/usr/lpp/cicsts/cicsts54/wlp
For each LPAR where you are planning to use a security-integrated CICS Liberty JVM server, you need a started task for the angel process. After the JCL is updated, submit it as a started task.
|
Note: As of this writing, the angel process cannot communicate at a more granular level than an address space. As a result, only one connection to an angel process from any one address space can be made. Therefore, only one secure Liberty JVM server can be run in a CICS region.
|
7.2.2 Setting up access to the angel process
Now that the angel task started, security must be configured to allow Liberty JVM servers to connect to the angel process. The examples in this subsection use RACF. If you do not have RACF, run the equivalent commands in your SAF security provider.
The user ID under which the angel process runs requires the SAF STARTED profile to be set up. This process sets the user ID for the started task. In our system, we use the user ID WLPUSER as the user ID for the started task; therefore, we issued the RACF commands that are shown in Example 7-1.
Example 7-1 Creating the required SAF STARTED profile
RDEFINE STARTED BBGZANGL.* UACC(NONE) STDATA(USER(WLPUSER))
SETROPTS RACLIST(STARTED) REFRESH
The user ID that is associated with your CICS region’s job requires READ access to several profiles in the SERVER class. This access allows Liberty to successfully perform authorization and authentication checks by using the angel process.
To allow the CICS Liberty JVM server to connect to the angel process, you must create and set up access to the SERVER class profile BBG.ANGEL. The commands for our example region whose job runs under the user ID CICSREGN are shown in Example 7-2.
Example 7-2 Setting up and giving access to the server class process BBG.ANGEL
RDEFINE SERVER BBG.ANGEL UACC(NONE)
PERMIT BBG.ANGEL CLASS(SERVER) ACCESS(Read) ID(CICSREGN)
Next, the CICS JVM server must be allowed to access to the services that are necessary for the CICS Liberty security feature. This access ultimately allows Liberty to use SAF to authenticate and authorize user credentials.
SAF uses several authorized user registries and SAF authorized services to perform authentication and authorization. We must create a RACF profile that is named SAFCRED for these services in the SERVER class. The CICS region’s user ID needs READ access to this profile. How this access is set up is shown in Example 7-3 (CICSREGN is our CICS region user ID).
Example 7-3 Setting up the SAF unauthorized services profile
RDEFINE SERVER BBG.AUTHMOD.BBGZSAFM.SAFCRED UACC(NONE)
PERMIT BBG.AUTHMOD.BBGZSAFM.SAFCRED CLASS(SERVER) ACCESS(READ) ID(CICSREGN)
In addition to the SAF services, Liberty JVM servers must use the z/OS authorized services. We meet this requirement by setting up the BBGZSAFM profile, which allows the CICS region user ID READ access. The RACF commands that we issued in our system to set up this profile and the required access are shown in Example 7-4.
Example 7-4 Setting up the AUTHMOD.BBGZSAFM profile
RDEFINE SERVER BBG.AUTHMOD.BBGZSAFM UACC(NONE)
PERMIT BBG.AUTHMOD.BBGZSAFM CLASS(SERVER) ACCESS(READ) ID(CICSREGN)
Finally, we must create a SERVER profile for the IFAUSAGE services (PRODMGR). We also must give the CICS region user ID READ access. The commands that were issued in our system to perform this step are shown in Example 7-5.
Example 7-5 Creating the profile for the IFAUSAGE services and giving read access
RDEFINE SERVER BBG.AUTHMOD.BBGZSAFM.PRODMGR UACC(NONE)
PERMIT BBG.AUTHMOD.BBGZSAFM.PRODMGR CLASS(SERVER) ACCESS(READ) USER(CICSREGN)
After creating all of these profiles and setting up access, the SERVER resource must be refreshed by using the command that is shown in Example 7-6.
Example 7-6 RACF refresh command for the SERVER resource
SETROPTS RACLIST(SERVER) REFRESH
If you want to verify that the angel process was set up correctly, start a CICS Liberty JVM server and open messages.log. If the angel process was set up correctly, the message that is shown in Example 7-7 on page 179 is displayed in the log.
Example 7-7 Liberty message indicating it successfully connected to the angel process
I CWWKB0103I: Authorized service group SAFCRED is available.
7.2.3 Profile prefix and required SAF profiles
In this chapter, we describe how to set up and specify access rights for profiles that are specific to our Liberty JVM server. To differentiate between servers and profiles, Liberty uses a profile prefix. The profile prefix is a High Level Qualifier (HLQ) for security profiles, which Liberty uses when looking up profile access rights for user IDs.
Throughout this chapter, we use the profile prefix SC8CICS. The profiles do not need to be unique (several Liberty JVM servers can use the same profile prefix). If you are using only one Liberty JVM server, and therefore one set of profiles, we recommend that you use the APPLID of your CICS region as the profile prefix.
For more information about the steps required to configure a profile prefix, see 7.3.2, “Configuring a SAF registry” on page 181. Some matching profiles in advance must be set up in advance.
First, an APPL class profile must be defined for our prefix and activated. For our SC8CICS prefix, we used the command that is shown in Example 7-8.
Example 7-8 Creating and setting active the SC8CICS profile in the APPL class
RDEFINE APPL SC8CICS UACC(NONE)
SETROPTS CLASSACT(APPL)
For Liberty to authenticate users, their user IDs need READ access to this profile. This access does not authorize these users to run any programs in Liberty (for more information about setting up this access, see 7.5, “Authorization scenarios” on page 200).
Example 7-9 Setting READ access for WEBUSER
PERMIT BBGZDFLT CLASS(APPL) ACCESS(READ) ID(WEBUSER)
Liberty uses an unauthenticated user ID to call SAF services to attach the real user IDs. This user ID must be in your system and also needs READ access to the APPL profile. You configure the name of this ID as described in 7.3.2, “Configuring a SAF registry” on page 181.
We use the user ID WSGUEST as our specified unauthenticated user. The WSGUEST ID is the recommended user ID for Liberty servers on z/OS. If you want to use this ID in your system, you must create the user ID.
To grant WSGUEST access to the SC8CICS APPL profile, we run the command that is shown in Example 7-10.
Example 7-10 Granting READ access to WSGUEST
PERMIT BBGZDFLT CLASS(APPL) ACCESS(READ) ID(WSGUEST)
SETROPTS RACLIST(APPL) REFRESH
Our CICS region user ID must be granted permission to the WLP z/OS System Security Access Domain (WZSSAD) to make authentication calls for our specified prefix.
To set up this permission, we add a profile for our prefix in BBG.SECPFX and grant READ access to the CICS region user ID. The commands that are shown in Example 7-11 show how we set up the profile for our prefix SC8CICS, and gave our CICS region user ID CICSREGN READ access.
Example 7-11 Setting up the SC8CICS profile for WZSSAD
RDEFINE SERVER BBG.SECPFX.SC8CICS UACC(NONE)
PERMIT BBG.SECPFX.SC8CICS CLASS(SERVER) ACCESS(READ) ID(CICSREGN)
SETROPTS RACLIST(SERVER) REFRESH
7.3 Configuring a Liberty security registry
A security registry is a store of user credentials that is used to authenticate and authorize incoming requests. You can create this registry and specify user IDs and passwords in the server configuration file. It also can be an existing store of user credentials, such as an LDAP active directory or a SAF security registry. The registries are configured through the Liberty JVM server’s configuration file (server.xml).
In this section, we describe how to set up some simple registries, which can then be used with any of the security models.
The following types of registries are described:
•Basic user registry: Allows you to specify user IDs and passwords directly in the server.xml configuration file.
•SAF registry: Allows user IDs that are stored in RACF or other SAF security registries to be used for authentication and authorization.
•LDAP registry: Allows user credentials that are stored in an LDAP server to be used for authentication and authorization.
7.3.1 Configuring a basic user registry
A basic user registry is the simplest registry option that is available. A basic user registry allows you to specify a list of valid users or groups directly in the server configuration file for Liberty.
You can authenticate credentials against this registry in CICS Liberty; however, your applications run under the default CICS user ID or the user ID that is specified in your URIMAP.
|
Note: If the cicsts:security feature is installed, CICS attempts to use your basic user registry for its task attach operation. As a result, if you are planning to use a basic user registry, we recommend that you do not use the cicsts:security feature in the same JVM server. Ideally, set SEC=NO for the CICS region.
|
The Liberty angel process is not required for this registry option because authentication is not be tested against your SAF security provider.
Basic user registries list in full the credentials for all of the users and groups that you want to make available to your applications. User names must be specified with passwords, which can be in plain text or encrypted.
|
Note: Although encoded, passwords are not secure when stored in the server.xml. Instead, a user that is viewing the file without knowing the encryption keys cannot read the password. It is recommended that you restrict access to files that contain passwords for any important user ID on the system.
|
A simple user registry with three users and two groups is shown in Example 7-12.
Example 7-12 Basic user registry in server.xml that is used by our server for this scenario
<basicRegistry id="basic" realm="customRealm">
<user name="mitch" password="pAs5w0rd"/>
<user name="carlos" password="pa$$word!"/>
<user name="jplaw" password="{xor}Lz4sLCgwLTs="/>
<group name="webUsers">
<member name="mitch"/>
<member name="carlos"/>
</group>
<group name="admin">
<member name="mitch"/>
<member name="jplaw"/>
</group>
</basicRegistry>
As shown in Example 7-13, users mitch and carlos use a plain text password. User jplaw features an encrypted password that was specified. Users mitch and carlos are in the group webUsers, and the group admin contains users mitch and jplaw. These groups can be used by applications to grant access to certain URLs or to lock out users.
7.3.2 Configuring a SAF registry
SAF is a security provider-neutral interface that is defined by MVS, which allows running programs to use system authorization services to authenticate and authorize user IDs. In our system SAF, a combination with the Liberty angel process allows us to use RACF user IDs to access applications.
SAF is used in Liberty (along with the angel process as described in 7.2, “z/OS security configuration for Liberty JVM servers” on page 177) to authenticate users. These users can be specified in the headers of incoming HTTP requests or within the configuration of your applications.
To configure your Liberty JVM server to use a SAF registry, start by adding the cicsts:security-1.0 feature to your server configuration’s feature manager, as shown in Example 7-13.
Example 7-13 Enabling the cicsts:security-1.0 feature in server.xml
<featureManager>
. . .
<feature>cicsts:security-1.0</feature>
. . .
</featureManager>
This feature enables security integration with CICS, which means that any incoming credentials are authenticated and authorized with your SAF security provider (for example, RACF).
To enable SAF, a set of SAF credentials configuration must be provided in the Liberty JVM server’s configuration file (server.xml). As part of this configuration, you can specify something called a profile prefix. This profix is used by the angel process as the HLQ for SAF profiles it must look up. If you do not specify a prefix, the default profile prefix (BBGZDFLT) is used.
For our examples, we use the prefix SC8CICS because all of our regions APPLIDs start with this prefix. This prefix matches the security prefix SIT parameter (SECPRFX) on our CICS region. As a result, our Liberty security profiles names match up clearly with our CICS security profiles. Our SAF credentials configuration resembles the credentials that are shown in Example 7-14.
Example 7-14 SAF credentials for our CICS Liberty JVM server in server.xml
<safCredentials profilePrefix="SC8CICS"
unauthenticatedUser="WSGUEST"/>
Next, the SAF registry element must be added to your server configuration. The element is simple: You provide is an ID for the XML element. We also provide a value for “realm”, which specifies a name for the registry. You will see the value of the realm attribute appear at times in messages.log. The XML element we used is shown in Example 7-15.
Example 7-15 SAF Registry configuration for server.xml
<safRegistry id="saf" realm="SC8CICS"/>
The security provider that is defined for our use is not identified. Because SAF is a security provider-neutral interface, this same element works with RACF and any other security provider.
This SAF registry element is all you need to enable your SAF registry. To validate your configuration, you can attempt to connect to the CICS Liberty default application.
The CICS Liberty default application is a simple in-built application, which is automatically installed on start. This application uses the special authorization role CICS_ALL_AUTHENTICATED, which authorizes all authenticated users to call the application. With this role, it also specifies a login configuration of BASIC, which requires callers to include a user ID and password in their HTTP header or by using a browser’s prompt.
|
Note: We recommend disabling the CICS default application for production environments by adding -Dcom.ibm.cics.jvmserver.wlp.defaultapp=false to the JVM profile for your Liberty JVM server.
|
You can access the default application by browsing to the application’s address in your browser. In our environment, we use the following URL to access the default application:
http://wtsc80:57080/com.ibm.cics.wlp.defaultapp/
If you do not know your default application’s address, you can find it in the messages.log file for your JVM server.
The application requests a user ID and password to log on to the application. Provide a valid user ID that is authorized to log on to CICS. If you followed the set-up process correctly, you see a window similar to the window that is shown in Figure 7-2.

Figure 7-2 Output of the default application Liberty is configured with a SAF registry
7.3.3 Configuring an LDAP registry
Liberty JVM servers in CICS can connect to external LDAP servers and use them to authenticate incoming requests. The connection is made by using HTTP or HTTPS. We recommend the use of HTTPS to connect to the LDAP server where possible to ensure that requests are encrypted.
|
Note: This scenario requires a basic understanding of LDAP hierarchies because it involves applying filters to directory information trees.
|
The following options are available for using this registry:
•Mapping incoming LDAP credentials that are successfully authenticated to a SAF security user ID.
•Use the LDAP without mapping for authorization, which results in CICS transactions running under the CICS default user or under a user ID that is specified in an applicable URIMAP.
This IBM Redbooks publication focuses on the first option because the second option functions the same way as the basic user registry.
To enable this functionality in CICS Liberty JVM servers, you must add the LDAP registry and distributed identity features to the feature manager’s list of features in your server configuration file. The features are shown in Example 7-16.
Example 7-16 LDAP registry feature in Liberty in server.xml
<feature>ldapRegistry-3.0</feature>
<feature>cicsts:distributedIdentity-1.0</feature>
|
Note: Liberty continues to develop and improve its features. The version number of this feature can change. Check the latest CICS documentation to determine which versions are supported in your version of CICS.
|
The ldapRegistry feature enables Liberty to connect to a specified LDAP registry over HTTP to authenticate incoming credentials. The cicsts:distributedIdentity-1.0 enables mapping from LDAP identities to SAF user IDs. After this process is complete, you can add an LDAP registry to your server configuration by using the ldapRegistry XML elements, as shown in Example 7-17.
Example 7-17 LDAP registry configuration in server.xml
<ldapRegistry baseDn="dc=example,dc=org" bindDn="cn=admin,dc=example,dc=org" bindPassword="password" host="ldap.hostserver.com" id="ldapRegistry" ignoreCase="true" ldapType="Custom" port="12345" recursiveSearch="true"
sslEnabled=”true” sslRef=”Ldap_SSL” realm="LdapRealm">
<customFilters
userFilter= "(&(cn=%v)(objectclass=inetOrgPerson))"
userIdMap="*:cn"/>
</ldapRegistry>
<ssl id=”Ldap_SSL” keyStoreRef=”LdapKeyStore”
trustStoreRef=”LdapTrustStore”/>
<keyStore id="LdapKeyStore" location="${server.config.dir}/LdapKeyStore.jks"
type="JKS" password="{xor}R9MNjj8JL=" />
<keyStore id="LdapTrustStore" location="${server.config.dir}/LdapTrustStore.jks"
type="JKS" password="{xor} R9MNjj8JL=" />
Example 7-17 shows the LDAP registry that is for this scenario. The following sets of XML elements are used for the LDAP registry:
•The ldapRegistry element contains all of the information about the target LDAP server, including the base Distinguished Name (DN) and the host address. The bindDN and bindPassword that are specified in the ldapRegistry element. These credentials are used by Liberty to log in to LDAP. The bindDN must include access rights to look up other DNs within the specified domain. This bindDN often is an admin ID or a user ID that was created specifically for this purpose.
•The customFilters element specifies which filters are applied to incoming user credentials. Specifying this customFilters element allows your users to log on with simplified credentials rather than the full LDAP DN.
The elements that are shown in Example 7-17 on page 184 include a filter for user credentials that are coming in to our server. The userFilter attribute specifies an object class to be filtered for incoming credentials. In our case, the inetOrgPerson object is checked for matching credentials. We also included &(amp;(cn=%v), which means that we try to filter our credentials against the Common Name (CN) portion of the DNs that are found in inetOrgPerson.
Ultimately, this process results in users needing to provide only the CN potion of their LDAP credentials. If a matching inetOrgPerson object exists, the user can log in.
Consider that we use HTTPS with TLS client authentication to connect to LDAP. This configuration is done by specifying sslEnabled=true in the ldapRegistry element. TLS settings then can be configured by using the SSL element. For more information about configuring TLS in CICS Liberty JVM servers, see Chapter 7, “Securing web applications ” on page 175.
If you are planning to map LDAP credentials to SAF registry user IDs, you must enable SAF in Liberty. To enable SAF, add the safCredentials element to your server configuration file (server.xml).
You must specify a profile prefix as part of your SAF credentials. This prefix is used as the HLQ for any SAF profiles that your Liberty JVM server must look up. If you do not specify this prefix, the default prefix is BBGZDFLT. For our example, we use SC8CICS. The SAF credentials element that we use is shown in Example 7-18.
Example 7-18 SAF credentials configuration in server.xml
<safCredentials profilePrefix="SC8CICS"
unauthenticatedUser="WSGUEST"/>
After you complete this step, your registry is ready to use. We describe how to use this registry for basic authentication and configure a mapping in 7.4.2, “Basic authentication by using LDAP credentials” on page 189.
7.4 Authentication scenarios
This section describes some of the basic scenarios for configuring authentication in a Liberty JVM server. It also describes some of the different options available to you, and shows you how to configure applications for different authentication mode.
This section does not include instructions for setting up TLS. However, we do recommend that TLS is set up when running these scenarios to ensure that your connection is secure. For more information about setting up TLS, see Chapter 6, “Configuring Transport Layer Security support” on page 141.
By default, Liberty uses Lightweight Third Party Authentication (LTPA) to attempt to optimize the authentication process. For more information about LTPA, see 7.6, “Configuring SSO by using Lightweight Third-Party Authentication” on page 213.
Much of this section involves changing key pieces of configuration in your applications. A login configuration is a piece of XML configuration, which describes the authentication mode that is used by an application. The following settings are described in this chapter:
•BASIC, which specifies that callers provide a user name and password. For more information, see 7.4.1, “Basic authentication with a SAF registry” on page 186.
•FORM, which specifies that an HTML form is provided by the application, which users can use to provide credentials. For more information, see 7.4.3, “Form-based login” on page 192.
•CLIENT-CERT, which specifies that the TLS/SSL certificate should identify the user. For more information, see 7.4.4, “Certificate-based client authentication” on page 196.
7.4.1 Basic authentication with a SAF registry
This section describes a simple scenario in which we enhance an application for basic authentication by using a SAF registry.
We recommend that TLS is used with basic authentication in Liberty whenever possible. The instructions in this section describe only the setup for basic authentication. For more information about setting up TLS, see Chapter 6, “Configuring Transport Layer Security support” on page 141.
The examples in this section use SAF-based credentials; that is, those credentials that are connected to a SAF security provider. Therefore, we suggest that you complete the process that is described in 7.3.2, “Configuring a SAF registry” before working through this scenario. However, this scenario can be combined with any of the other registries. The security mode is specified at the application level, and is not specific to the registry that is being used by the server.
In this scenario, we use the sample application that is provided by the CICS team on the cicsdev GitHub that is named cics-java-liberty-restapp-ext. The source code for this application is available at the cics-java-liberty-restapp-ext page of the GitHub website.
To enable the basic authentication security mode, we must edit the deployment descriptor for the REST app extensions application. That is, we must add several XML elements to the web.xml file in the dynamic web project for the application.
If a project is not yet created for the REST application extensions application, follow the instructions that are described in Chapter 2, “Deploying a web application” on page 27. Ensure that you select the Generate web.xml deployment descriptor in the Web Module pane of the New Dynamic Web Project wizard, as shown in Figure 7-3 on page 187.

Figure 7-3 Generating web.xml by using the New Dynamic Web Project wizard
If you created the project and did not create a web.xml deployment descriptor, you can use the Eclipse Java EE tools to generate one. Right-click the dynamic web project and click Java EE Tools → Generate Deployment Descriptor Stub.
We start by adding some security descriptions into our deployment descriptor file (web.xml). First, we must add in a security constraint. The security constraint describes the resources that must be protected in the application and how they are protected. The security constraints configuration that we used in our system is shown in Example 7-19.
Example 7-19 web.xml security constraints for enabling basic authentication
<security-constraint>
<display-name>
com.ibm.cicsdev.restappext_SecurityConstraint
</display-name>
<web-resource-collection>
<web-resource-name>
com.ibm.cicsdev.restappext
</web-resource-name>
<description>
Protection for urls in restapp
</description>
<url-pattern>/*</url-pattern>
</web-resource-collection>
<auth-constraint>
<description>
All authenticated users of my application
</description>
<role-name>cicsAllAuthenticated</role-name>
</auth-constraint>
</security-constraint>
In Example 7-19 on page 187, consider the url-pattern /* in the url-pattern configuration. This pattern specifies that any URL within the application’s context-root is subject to the specified security requirements.
The authentication constraint in this case a special role that is named cicsAllAuthenticated. This role allows any user who is authenticated to CICS access to the application. CICS creates the role when you install a CICS bundle with access to the role given to anyone who can successfully authenticate with the registry.
|
Note: The cicsAllAuthenticated role is created automatically when you install your application by using CICS bundles. If you intend to install your application by using the application XML element, you must define the role manually.
|
Finally, you must add a login configuration to the application’s web.xml file to specify basic authentication as our security mode. The login configuration tells the server which authentication method to use for requests that are coming into the application. The XML elements are shown in Example 7-20.
Example 7-20 Log in configuration in web.xml, which enables basic authentication
<login-config>
<auth-method>BASIC</auth-method>
</login-config>
Deploy the application to the CICS region by using a CICS bundle, as described in Chapter 2, “Deploying a web application” on page 27. We use the taskInformation service to verify that our security configuration is resulting in our user ID being propagated to CICS. The taskInformation service returns some basic information to the caller about the CICS TASK that is running for that request, including the associated user ID.
In our environment, we can access this service at the following URL:
http://wtsc80:57080/com.ibm.cicsdev.restappext/rest/taskInformation
If you are visiting this URL for the first time, you are prompted to log in, as shown in Figure 7-4 on page 189. Enter a valid user ID and password. In our examples, we are use the user ID WEBUSER as our login user ID.

Figure 7-4 Log in prompt from the application
The application returns some basic information about the CICS task that ran the request. If your security was correctly configured, you see the user ID WEBUSER as the value of the User ID field. The response from our environment is shown in Example 7-21.
Example 7-21 Example response from the taskInformation service
{"transid":"CJSA","userid":"WEBUSER ","tasknum":"16318"}
7.4.2 Basic authentication by using LDAP credentials
To complete this scenario, you must set up an LDAP registry in a CICS Liberty JVM server as described in 7.3.3, “Configuring an LDAP registry”.
In this scenario, we use the sample application that is provided by the CICS team on the cicsdev GitHub that is named cics-java-liberty-restapp. The source code for this application is available at the cics-java-liberty-restapp-ext page of the GitHub website.
To enable the basic authentication security mode, we must edit the deployment descriptor for the restapp application. That is, we must add some elements to the web.xml file in the dynamic web project for the restapp application.
If you did not yet create a project for the restapp application, follow the instructions that are described in Chapter 2, “Deploying a web application” on page 27. Ensure that you selected the Generate web.xml deployment descriptor option in the Web Module pane of the New Dynamic Web Project wizard, as shown in Figure 7-5 on page 190.

Figure 7-5 Generating web.xml by using the New Dynamic Web Project wizard
If you created the project but did not create a web.xml deployment, you can use the Eclipse Java EE tools to generate one. Right-click the dynamic web project and select Java EE Tools → Generate Deployment Descriptor Stub.
We start by adding some security descriptions into your deployment descriptor; that is, your web.xml file. We must specify a security constraint in our deployment descriptor, which informs the Liberty server that certain resources are protected. We also must add in a configuration for the login that specifies basic authentication as our login method.
First, we must add in a security constraint. The security constraint describes the resources that must be protected in the application and how they are protected. How the security constraint is set up in our application is shown in Example 7-22.
Example 7-22 Security constraint configuration in web.xml for our application
<security-constraint>
<display-name>
com.ibm.cicsdev.restapp_SecurityConstraint
</display-name>
<web-resource-collection>
<web-resource-name>
com.ibm.cicsdev.restapp
</web-resource-name>
<description>Protection for urls in restapp</description>
<url-pattern>/*</url-pattern>
</web-resource-collection>
<auth-constraint>
<description>
All authenticated users of my application
</description>
<role-name>cicsAllAuthenticated</role-name>
</auth-constraint>
</security-constraint>
In Example 7-22 on page 190, consider the url-pattern /*. This pattern specifies that any URL that is accessed in Liberty that belongs to this application is subject to the specified security requirements.
The authentication constraint in this case is a special role that is named cicsAllAuthenticated. This role allows any user who is authenticated to SAF access to the application.
Finally, you must add a login configuration to the application to specify basic authentication as our authentication method. The XML elements that were required to enable basic authentication login are shown in Example 7-23.
Example 7-23 Log in configuration XML elements in web.xml for enabling basic authentication
<login-config>
<auth-method>BASIC</auth-method>
</login-config>
Using the value BASIC as your auth-method value prompts you to log in you attempt to connect to the application by using your browser. We need an LDAP user to test our application. In our environment, we use an LDAP user that is named LdapUser. The full DN for the user ID is shown in Example 7-24.
Example 7-24 Our example LDAP user DN
cn=LdapUser,dc=example,dc=org
In our LDAP server, we use case-insensitive DNs, which is the default behavior for most LDAP servers. However, it can be changed. We recommend that you check whether your DNs are case-sensitive before proceeding.
We need a way of mapping LdapUser on to a valid SAF registry ID. We use RACF and RACMAPS because RACF is the security provider on our systems. However, the mapping mechanism works in the same way in other SAF security providers. In our system, we chose to map the LdapUser credentials to the SAF registry user ID LDAPUSER.
To map LdapUser to LDAPUSER in RACF, we must set up a RACMAP. This RACMAP lists the full DN for the user ID we plan to map and the LDAP server’s host name and the user ID to which we want to map incoming requests. How we set up the mapping for our server ldaps://ldap.hostserver.com is shown in Example 7-25.
Example 7-25 RACMAP we created for our LDAP mapping in RACF
RACMAP ID(LDAPUSER) MAP
USERDIDFILTER(NAME('cn=LdapUser,dc=example,dc=org'))
REGISTRY(NAME('ldaps://ldap.hostserver.com'))
WITHLABEL('Mapping to LDAPUSER')
Now, when a user logs in by using the correct credentials for LdapUser, they are mapped and the resulting CICS task starts under the user ID LDAPUSER.
Although we created a RACMAP with a one-to-one mapping in this scenario, many-to-one mappings can be created.
Our application is now ready to use. Deploy the REST application com.ibm.cicsdev.restapp. We can now send an access request to the service along with the LDAP credentials we use to log in. In our system, we use the following URL:
http://wtsc80:57080/com.ibm.cicsdev.restapp/rest/cicsinfo
If we use a browser, we are prompted for our credentials when we first connect. If we enter our LDAP user name and its corresponding password, we receive an HTTP 200 response and can access the services.
7.4.3 Form-based login
In this section, we describe how to set up the REST application com.ibm.cicsdev.restapp that is provided at the cicsdev GitHub website. We also describe how to add a restraint to web.xml, which enables form-based login.
Form-based login allows you to specify a customized login page to present to users when they attempt to access your applications from a browser.
This scenario uses the sample application that is provided by the CICS team on the cicsdev GitHub that is named cics-java-liberty-restapp. The source code for this application is available the cics-java-liberty-restapp page of the GitHub website.
If a project is not yet for the REST application, ensure that you click the Generate web.xml deployment descriptor option in the Web Module pane of the New Dynamic Web Project wizard, as shown in Figure 7-6 on page 193.

Figure 7-6 Generating web.xml by using the New Dynamic Web Project wizard
We start by creating two HTML pages in our com.ibm.cicsdev.restapp project. The first page is our form login page, which is presented to our users when they attempt to access the applications. The second page is an error page that is presented to users who fail to provide valid login credentials.
In our project, we created a file that is named login.html, which is stored in the WebContent directory of the project. The file login.html is a simple page with a form that features input fields for user names and passwords, along with a submit button. The code that we used in our application is shown in Example 7-26.
Example 7-26 The login.html page code
<html>
<head><title>Login Form</title></head>
<body>
<form action="j_security_check">
Enter your user name:
<input type="text" name="j_username"/>
<br/>
Enter your password:
<input type="password" name="j_password"/>
<input type="submit"/>
</form>
</body>
</html>
This page displays two simple form entry boxes that allow a user to enter the required information. Because the password field features type password, any information that is entered in that field is masked.
The names and actions that start with j_ are all keywords for the form login, which tells the application server which fields are to be used for the login.
Next, we create an error page for when the credentials that a user provides are invalid. For our project, we created an HTML page that is named errorPage.html. This page returns a text response that notifies the user that the authentication failed. The source code for our error page is shown in Example 7-27.
Example 7-27 errorPage.html file source code
<html>
<head>
<title>Access Denied.</title>
</head>
<body>
Login Failure. Access Denied.
</body>
</html>
With these two pages created and in place, we can edit our deployment descriptor (web.xml) to include form based login. First, we add a security constraint. The security constraint describes the resources that must be protected in the application and how they are protected. The configuration that we used to protect our REST application is shown in Example 7-28.
Example 7-28 Security constraint configuration in web.xml
<security-constraint>
<display-name>
com.ibm.cicsdev.restapp_SecurityConstraint
</display-name>
<web-resource-collection>
<web-resource-name>
com.ibm.cicsdev.restapp
</web-resource-name>
<description>
Protection for urls in restapp
</description>
<url-pattern>/*</url-pattern>
</web-resource-collection>
<auth-constraint>
<description>
All authenticated users of my application
</description>
<role-name>cicsAllAuthenticated</role-name>
</auth-constraint>
</security-constraint>
As shown in Example 7-28 on page 194, consider the URL pattern /*. This pattern specifies that any URL in Liberty that belongs to this application is subject to the specified security requirements.
The authentication constraint in this case is a special role that is named cicsAllAuthenticated. This role maps to the ALL_AUTHENTICATED_USERS role, which allows any user who is authenticated to CICS access to the application.
|
Note: The cicsAllAuthenticated role is created automatically when you install your application by using CICS bundles. If you intend to install your application by using the application element, you must define the role manually.
|
Finally, we add a login configuration to the application to specify form-based login as our authentication method and the location of our login and error pages. The configuration that we added to the web.xml deployment descriptor is shown in Example 7-29.
Example 7-29 Log in configuration in web.xml for form-based login
<login-config>
<auth-method>FORM</auth-method>
<form-login-config>
<form-login-page>/login.html</form-login-page>
<form-error-page>/errorPage.html</form-error-page>
</form-login-config>
</login-config>
The paths to the pages are relative, not absolute. For form-based login, they start from the WebContent directory in our dynamic web project.
When we attempt to login to any services that are contained in the com.ibm.cicsdev.restapp application, we are presented with the form that we specified in the deployment descriptor, as shown in Figure 7-7.

Figure 7-7 Login form
If we provided incorrect user information (that is, information that normally results in an HTTP 401 response), we see with the error page that we specified, as shown in Figure 7-8.

Figure 7-8 Custom error form
7.4.4 Certificate-based client authentication
Certificate-based client authentication allows you to use information that is provided in a client’s TLS certificate to identify and map to an associated user ID. It also provides all of the normal benefits that are associated with a secure TLS connection, as described in Chapter 6, “Configuring Transport Layer Security support” on page 141.
As described in Chapter 6, “Configuring Transport Layer Security support” on page 141 we created a certificate for the user ID WEBUSER and stored it in our RACF registry and browser key store. When we use certificate authentication as our authentication method, the certificate that is provided by the client is looked up in the RACF registry. Because we associated the certificate with the user ID WEBUSER in our RACF registry, WEBUSER is the user ID that is used for the CICS task.
To run this scenario, follow the process that is described in 6.4, “TLS client authentication” on page 152. When you complete that section, you should have a Liberty JVM server set up to use two-way TLS handshakes (that is, a connection in which the client and server must provide valid TLS certificates).
You should also have a certificate that is associated with WEBUSER stored in your browser’s certificate store on your own workstation. It is a simple step from that point to enable Liberty to use that certificate to resolve the user ID.
For this scenario, we work with the rest app extensions application that is found in the cicsdev GitHub repository, found at the following URL.
http://wtsc80:57080/com.ibm.cicsdev.restappext/rest/taskInformation
Download the source code for this application and create a dynamic web project to store it in your Eclipse environment. Ensure that when you are proceeding through the New Dynamic Web Project wizard, you select the Generate web.xml deployment descriptor option in the Web Module window, as shown in Figure 7-9 on page 197.

Figure 7-9 Selecting the Generate web.xml deployment descriptor option
Now that we have a project to work with, we must add a security constraint to the deployment descriptor (web.xml). Open the web.xml file and add a security constraint that protects all URLs that are provided by that application. This scenario uses the cicsAllAuthenticated role to authenticate users. This role allows anyone who is authenticated and authorized to use CICS to access the application.
The configuration we used to protect all URLs with this role is shown in Example 7-30.
Example 7-30 Protecting all URLs by using the cicsAllAuthenticated role in web.xml
<security-constraint>
<display-name>client authentication restraint</display-name>
<web-resource-collection>
<web-resource-name>
authentication.testing.clientauth
</web-resource-name>
<description>Protection for urls in the app</description>
<url-pattern>/*</url-pattern>
</web-resource-collection>
<auth-constraint>
<description>cicsAllAuthenticated role</description>
<role-name>cicsAllAuthenticated</role-name>
</auth-constraint>
</security-constraint>
Next, we must enable the login configuration for our extended rest application to be CLIENT-CERT. Add the elements that are shown in Example 7-31 to your web.xml deployment descriptor file.
Example 7-31 Log in configuration XML elements in web.xml for enabling client authentication
<login-config>
<auth-method>CLIENT-CERT</auth-method>
</login-config>
Now, we must deploy the application to CICS. For this scenario, we install the application by adding the application XML element to the server’s configuration file (server.xml).
After you complete the basic configuration for the application is made in your server’s configuration file, expand on it to add the cicsAllAuthenticated role. Add an application binding configuration for the web application. Then, add the security-role to match. In our server, the configuration that was used is shown in Example 7-32.
Example 7-32 Application binding in server.xml to create the cicsAllAuthenticated role
<webApplication id="com.ibm.cicsdev.restappext"
location="com.ibm.cicsdev.restappext"
name="com.ibm.cicsdev.restappext">
<application-bnd>
<security-role name="cicsAllAuthenticated">
<special-subject type="ALL_AUTHENTICATED_USERS"/>
</security-role>
</application-bnd>
</webApplication>
|
Tip: If you install this application as CICS bundle, the cicsAllAuthenticated role is provided for you. Therefore, you do not need to change anything in your CICS Liberty JVM server’s configuration file.
|
The ALL_AUTHENTICATED_USERS subject is a special security subject that specifies access for any user that can be successfully authenticated in the system. However, the user must still have the correct access to run the transaction ID that is associated with Liberty programs that are running in your CICS region. For more information about the use of your SAF registry for securing CICS resources, see 7.5.3, “CICS transaction security with URIMAPs” on page 210.
We can now use the TaskInformation service in our REST application to verify that our user ID is being propagated to the CICS task. Complete the following steps:
1. Ensure that your browser still includes the certificate for WEBUSER that you created when completing the steps that are described in 6.4, “TLS client authentication” on page 152. If the certificate is not included, see 6.4, “TLS client authentication” on page 152 and use the command that shown in that section to export the certificate to your machine by using the RACDCERT EXPORT command.
2. Browse to the address of the TaskInformation service in your browser. In our system, we did not change any of the web context root or URI extensions; therefore, we can access our version of the TaskInformation service at the following URL:
https://wtsc80:57443/com.ibm.cicsdev.restappext/rest/taskInformation
If this is your first time visiting the URL, you are prompted to select a certificate, as shown in Figure 7-10.

Figure 7-10 Certificate prompt
3. Select the certificate that you created for WEBUSER and select OK.
The service returns to your browser some basic information about the CICS task it is running under, including the user ID field. This field shows WEBUSER as our current user ID. The response we received from the service is shown in Example 7-33.
Example 7-33 The response given by the service
{"transid":"CJSA","userid":"WEBUSER ","tasknum":"16382"}
Enabling fail over to basic authentication
You can authenticate clients who do not have valid certificates by using basic authentication.
To enable this capability, you must add the web container application security element to your Liberty JVM server’s configuration file (server.xml). Add the webAppSecurity element to your server.xml file. Then, add the attribute allowFailOverToBasicAuth, with the value set to true. The configuration that we used in our environment to enable this capability is shown in Example 7-34.
Example 7-34 webAppSecurity configuration for failOverToBasicAuth in server.xml
<webAppSecurity allowFailOverToBasicAuth="true"/>
7.5 Authorization scenarios
In this section, we describe some of the basic scenarios for configuring the authorizing function in CICS Liberty JVM servers.
This section also describes how to use SAF registry groups to restrict access to specific roles by editing an application’s deployment descriptor (web.xml) and setting up corresponding EJBROLEs. For more information, see 7.5.1, “URL-specific authorization by using EJBROLEs” on page 200.
We also describe how to set up your SAF registry to authorize roles inside your application code, which were defined by using the @RolesAllowed annotation. For more information, see 7.5.2, “Programmatic role authorization by using EJBROLEs” on page 205.
Finally, we provide more information about CICS transaction and resource security, which is useful for authorizing users to certain transaction IDs and setting up URIMAPs. For more information, see 7.5.3, “CICS transaction security with URIMAPs” on page 210.
7.5.1 URL-specific authorization by using EJBROLEs
In addition to specifying security for entire applications, individual URLs can be secured by using SAF registry groups and EJBROLEs. In this scenario, we describe how to use EJBROLEs and groups to set up different security levels for different URLs in the same applications.
In this section, we describe how to install an application by using CICS bundles. Although this scenario also works for applications that are installed by using an application element in server.xml, it does not work for applications that are installed in drop-ins because drop-ins lacks CICS security integration.
To run through this scenario, you must set up a SAF registry. For more information, see 7.3.2, “Configuring a SAF registry” on page 181.
Confirm that the cicsts:security-1.0 feature is still installed in your server.xml file, as shown in Example 7-35.
Example 7-35 Enabling the cicsts:security-1.0 feature in server.xml
<featureManager>
<feature>cicsts:security-1.0</feature>
</featureManager>
To configure Liberty use SAF security roles, we must add the safAuthorization element to our server’s configuration file (server.xml). This element is simple; it needs only an ID attribute specified. The configuration we used for this scenario is shown in Example 7-36.
Example 7-36 safAuthorization configuration in server.xml
<safAuthorization id="saf"/>
URLs can be restricted in web applications by using specific roles. These roles are outlined by the application in its deployment descriptor (web.xml). You can then create corresponding EJBROLEs in your SAF registry and grant your user groups access to different sets of groups.
First, you must have an application to which the restrictions are applied. In this scenario, we use the com.ibm.cicsdev.restapp application that is available at the GitHub website.
The security constraints are specified as part of the application'’ deployment descriptor; that is, the web.xml file for the corresponding project. If you did not yet create a project for the REST application, ensure that you enable the generate web.xml deployment descriptor option.
If you created the REST application project while working through another section of this publication and did not create the deployment descriptor, you can use Eclipse to generate one for you. Right-click the project in Eclipse and then, click Java EE Tools → Generate Deployment Descriptor Stub.
We now must add our security configuration to the application. First, we add the login configuration to our web.xml deployment descriptor file. We add the elements that are shown in Example 7-37 to specify basic authentication.
Example 7-37 Log in configuration in web.xml, which enables basic authentication
<login-config>
<auth-method>BASIC</auth-method>
</login-config>
Next, we add two security constraints for our application, which allows us to use different security settings for two different URLs. The first security constraint is protecting the services that are under InfoResource; the second protects the service under ReverseResource.
By using the configuration that is shown in Example 7-38, the application restricts access to the URL rest/cicsinfo so that only users in the role webusers have access.
Example 7-38 Security constraint configuration that allows only webusers access
<security-constraint>
<display-name>
com.ibm.cicsdev.restapp.webusers_Restraint
</display-name>
<web-resource-collection>
<web-resource-name>
InfoResourceRestraint
</web-resource-name>
<description>
Protection for urls in restapp
</description>
<url-pattern>/rest/cicsinfo</url-pattern>
</web-resource-collection>
<auth-constraint>
<description>Web users only</description>
<role-name>webusers</role-name>
</auth-constraint>
</security-constraint>
Next, we want to restrict the services that are under /reverse so that only users in the admin role can access it. To enable this restriction, we add the configuration that is shown in Example 7-39 on page 202 to the web.xml deployment descriptor for the web application alongside the one for the webusers.
Example 7-39 Security constraint configuration in web.xml that limits access to reverseResource
<security-constraint>
<display-name>
com.ibm.cicsdev.restapp.admin_Restraint
</display-name>
<web-resource-collection>
<web-resource-name>
ReverseResourceRestraint
</web-resource-name>
<description>Protection for urls in restapp</description>
<url-pattern>/rest/reverse</url-pattern>
</web-resource-collection>
<auth-constraint>
<description>Admin only</description>
<role-name>admin</role-name>
</auth-constraint>
</security-constraint>
Our web application is now configured to handle the roles for our two user groups. We also must create the corresponding roles in RACF.
We create two roles: webusers and admin. The EJBROLEs that are used by our applications must be defined in a specific format, as shown in the following example:
<profilePrefix>.<application name>.<role name>
Consider the following points:
•profilePrefix must be as specified in the safCredentials element, as shown in Example 7-39. For our example, we use SC8CICS.
•The application name value must match that of the application as it appears in Liberty. If this value was not changed, it is com.ibm.cicsdev.restapp.
•The value of role name must match the role that is specified in the deployment descriptor. In our example, we need one EJBROLE each for admin and for webusers.
You can change this format by using the safRoleMapper and profilePattern configuration elements in server.xml.
The following groups are in our system:
•WEB: Contains all of the user IDs that we expect to use the web applications only.
•ADMIN: Contains all of the CICS administrator user IDs.
We can use RDEFINE and PERMIT to create and allow access to the EJBROLEs for our two groups of user IDs. The format of the command in our system that uses RACF is shown in Example 7-40.
Example 7-40 Setting up the EJB roles for our application
RDEFINE EJBROLE SC8CICS.com.ibm.cicsdev.restapp.webusers
UACC(NONE)
RDEFINE EJBROLE SC8CICS.com.ibm.cicsdev.restapp.admin
UACC(NONE)
PERMIT SC8CICS.com.ibm.cicsdev.restapp.webusers CLASS(EJBROLE)
ACCESS(READ) ID(WEB)
PERMIT SC8CICS.com.ibm.cicsdev.restapp.admin CLASS(EJBROLE)
ACCESS(READ) ID(ADMIN)
SETROPTS RACLIST(EJBROLE) REFRESH
|
Note: In the current version of Liberty, Liberty issues a RACROUTE REQUEST=LIST with GLOBAL=NO to support earlier versions of z/OS. Therefore, to pick up changes to EJBROLEs, you must create the roles before starting CICS or restart CICS after the roles are set up.
|
If you did not install the REST application as a CICS bundle, follow the instructions that are provided in Chapter 2, “Deploying a web application” on page 27.
Now that our groups and roles are set up, we can demonstrate the functionality by using two user IDs that belong to two different groups. The first user ID WEBUSER (see Figure 7-11) can access only the webusers role because it is in the WEB group. It cannot access the admin role because it is not in the ADMIN group. The second user ID MICHAEL is part of the ADMIN group only; therefore, the user ID can access the admin role, but cannot access the webusers role.

Figure 7-11 Log in prompt for our application by using the user ID WEBUSER
No matter which URL we attempt to access, we are prompted for the user ID. The output when the user ID WEBUSER is used is shown in Figure 7-12 and Figure 7-13 on page 204. We received an HTTP 200 (request successful) response when we accessed the cicsinfo services because the cicsinfo service is protected by the webusers role. However, accessing the reverse services results in an HTTP 403 (unauthorized) response because WEBUSER is not in the admin group.

Figure 7-12 Response from /rest/cicsinfo for user ID WEBUSER

Figure 7-13 Response from /rest/reverse for user ID WEBUSER
In Figure 7-15 and Figure 7-16 on page 205, we can see the behavior when we access the same services by using the user ID MICHAEL (see Figure 7-14). The behavior is reversed to what is shown in Figure 7-12 on page 203 and Figure 7-13. Because MICHAEL is in the admin group and therefore can access the admin role, the user ID can successfully call the reverse service. However, it is not a member of the WEB group; therefore, attempting to access the cicsinfo services returns an HTTP 403 response code.

Figure 7-14 Login credentials that use user ID MICHAEL

Figure 7-15 Response from /rest/cicsinfo for user ID MICHAEL

Figure 7-16 Response from /rest/reverse for user ID MICHAEL
7.5.2 Programmatic role authorization by using EJBROLEs
Enterprise Java beans (EJBs) give you the option of specifying roles specifically within the EJB code. These roles can be used with Java security roles to restrict access to certain pieces code at the program level.
You can use programmatic roles with the URL-specific authorization, as described in 7.5.1, “URL-specific authorization by using EJBROLEs”. If you choose to use both options, any users need read access to the URL level role and the programmatic role. The URL level role is checked first, followed by the programmatic role when the associated code is first started.
Java security roles are specified users or groups of users that are specified by some part of a Java application, either in the code or within its deployment descriptor. You can use the @RolesAllowed annotation to specify specific roles for specific pieces of code before injecting them into other applications (see Example 7-41).
Example 7-41 Example role for Administrator
@RolesAllowed("Administrator")
public Item getItem(int id) throws IOException {
. . .
}
EJBROLEs are security profiles that are set up in a SAF registry, which can be mapped to Java security roles in your applications.
This scenario guides you through setting up EJBROLEs in SAF for use with roles that are specified in your applications. We use an application that is provided by the CICS team that is named cics-java-liberty-ejb. This application is available from the GitHub website.
This application is composed of several smaller projects that contain EJBs, which are collected as one Enterprise Archive (EAR). We also included a CICS bundle project, which can be used to export all of the pieces to CICS and install it as a BUNDLE resource.
Before we install the CICS bundle that contains our EJBs, we must update one of the dynamic web projects to include the required security constraints. Several projects are available for the EJB application in your workspace. The project that must be updated is called com.ibm.cicsdev.ejb.stock.web.
Open the deployment descriptor for com.ibm.cicsdev.ejb.stock.webproject; that is, the web.xml file. We add a security constraint that contains our Administrator role and a login-config that requires the caller to provide credentials.
Begin by adding a security constraint that affects all URLs in this particular application. The configuration that we used is shown in Example 7-42.
Example 7-42 Security constraint that specifies the Administrator role in web.xml
<security-constraint>
<display-name>
com.ibm.cicsdev.ejb.stock.web_Restraint
</display-name>
<web-resource-collection>
<web-resource-name>
com.ibm.cicsdev.ejb.stock.web
</web-resource-name>
<description>Protection for all URLs</description>
<url-pattern>/*</url-pattern>
</web-resource-collection>
</security-constraint>
Next, we must add a login configuration that defines the authentication method to be used. For the purposes of this scenario, we use basic authentication (that is, authentication that features a user name and password). To specify basic authentication, we can add the XML elements that are shown in Example 7-43 to the deployment descriptor with the security constraint we just added.
Example 7-43 Log in configuration XML elements in web.xml for enabling basic authentication
<login-config>
<auth-method>BASIC</auth-method>
</login-config>
We also must update our Liberty JVM server’s server configuration by adding features to support roles, SAF security, JAX-RS, and EJB-Lite. The following features must be added into the feature manager list in the server.xml file:
•<feature>ejbLite-3.2</feature>
•<feature>jaxrs-2.0</feature>
•<feature>cicsts:security-1.0</feature>
Next, we must configure Liberty to use a SAF registry to authenticate incoming requests. We add the following XML elements:
•safRegistry: Specifies that we use SAF as our security registry
•safCredentials: Specifies the basic SAF information
•safAuthorization: Specifies that we use SAF roles and not Java security roles
All of these elements are simple pieces of configuration. How we configured our SAF settings is shown in Example 7-44.
Example 7-44 SAF configuration in server.xml for this subsection
<safRegistry enableFailover="false" id="saf" realm="ITSO"/>
<safCredentials profilePrefix="SC8CICS"
unauthenticatedUser="WSGUEST"/>
<safAuthorization id="saf"/>
The profilePrefix attribute in the safCredentials element specifies the HLQ for the SAF profile. When we define our EJBROLE, we must ensure that this element is the HLQ with the rest of the role following shortly afterward.
|
Note: If you do not specify a profile prefix in your server configuration, a default prefix of BBGZANGL is used instead when matching a role with EJBROLEs. Accordingly, you must adjust your SAF profiles.
|
The EJBROLEs that are used by our applications must be defined in a specific format, as shown in the following example:
<profilePrefix>.<application name>.<role name>
Consider the following points:
•profilePrefix must be as specified in the safCredentials element, as shown in Example 7-44 on page 206. For our example, we use SC8CICS.
•The application name value must match the application as it appears in Liberty. If you did not change any of our projects, by default this name is com.ibm.cicsdev.ejb because the EJB that contains the restriction is contained within that project.
•The value of role name must match the role that is specified in the EJB. In our example, you can see the value of this role that is annotated on the class com.ibm.cicsdev.ejb.CatalogueBean.
You can change this format by using the safRoleMapper and profilePattern configuration elements in server.xml.
Use RDEFINE and PERMIT RACF commands to create and allow access to the EJBROLE for user ID WEBUSER. The format of the command in our system that uses RACF is shown in Example 7-45.
Example 7-45 Setting up the EJB role for our application
RDEFINE EJBROLE SC8CICS.com.ibm.cicsdev.ejb.Administrator
UACC(NONE)
PERMIT SC8CICS.com.ibm.cicsdev.ejb.Administrator CLASS(EJBROLE)
ACCESS(READ) ID(WEBUSER)
|
Note: In the current version of Liberty, Liberty issues a RACROUTE REQUEST=LIST with GLOBAL=NO to support earlier versions of z/OS. To pick up changes to EJBROLEs, you must create the roles before starting CICS or restart CICS after the roles are set up.
|
Now that everything is set up, we can start our application. In this scenario, we assume that the application is installed as a CICS bundle. The projects you downloaded from the cicsdev GitHub website include a CICS bundle project that is com.ibm.cicsdev.ejb.bundle. For more information about installing this application as a CICS bundle, see Chapter 2, “Deploying a web application” on page 27.
After the application is started, we can make a call to the EJB store front to see what items are listed. The store front on our systems uses the following URL:
http://wtsc80:57080/shop/
On first call, you find the shop is empty. We must add stock to the catalog, which is an operation that is protected with the @RolesAllowed(Administrator) role in the corresponding EJB (see Figure 7-17).

Figure 7-17 Empty EJB sample shop
To add stock, we must make a call to the createItem REST service that is provided by the EJB shop example. This particular service uses methods that are protected by the Administrator role; therefore, we must send credentials for WEBUSER by using HTTP POST with our JSON data.
We are sending the JSON data that is shown in Example 7-46. This data causes the web shop to update by adding an item that is named Golf Club to its stock list.
Example 7-46 JSON data used by our HTTP POST request.
{"name":"Golf Club", "stock":1}
The following methods can be used to send data to the URL by using HTTP POST:
•You can use a JAX-RS browser extension to handle the request. Multiple options are available for most browsers. Ensure that the extension you use can handle authentication headers; otherwise, you receive a 401 response code from the server.
•You can use curl if it is installed on your system. Specify the JSON data with the user credentials and URL.
•You can call the service from Java. We provided a sample program that can send an HTTP POST request to a specified URL with some JSON data. This sample requires only base Java 8 to run (no other libraries are required). You must update the code to use your host name, ports, and servlet path (if you changed it) and include your own user credentials.
Now that the stock list is updated for the shop, we can reissue a request to the store front to view the items in the shop. If your previous JAX-RS request was successful, you should see the Golf Club item listed, as shown in Figure 7-18.

Figure 7-18 Shop front after added stock is added
7.5.3 CICS transaction security with URIMAPs
In addition to the web security that is provided by Liberty, applications that are running in Liberty JVM servers are subject to CICS transaction and resource security. Any user IDs that are authenticated in Liberty must also include the correct access rights to run transactions, access files, or call programs.
This section describes CICS security for web applications in a Liberty JVM server.
By default, HTTP requests that are received by Liberty run under the CICS Liberty default transaction ID of CJSA. This scenario guides you through the steps you must complete to change the transaction ID and set up CICs transaction security for your new transaction ID.
We use the REST extensions application that is provided by the CICS team as our example application in this chapter. The project is available from the cics-java-liberty-restapp-ext page of the GitHub website.
Install the project as a CICS bundle in your region. For more information, see Chapter 2, “Deploying a web application” on page 27.
We must define a new transaction for our URIMAP to use. Although we use the transaction ID JURI, you can use any code that is not in use. To define and install our JURI transaction, we used the command that is shown in Example 7-47.
Example 7-47 CEDA commands defining and installing our JURI transaction in CICS
CEDA DEFINE TRANSACTION(JURI) GROUP(ITSOWLP)
PROGRAM(DFHSJTHP)
CEDA INSTALL TRANSACTION(JURI) GROUP(ITSOWLP)
You receive a warning when defining this transaction because the value of the PROGRAM attribute started with the letters DFH. This warning can be safely ignored. The program DFHSJTHP acts as a dummy program in this scenario. It does not run any code. Instead, it allows your Java code to run under the specified transaction.
Now that your transaction and application are enabled in CICS, we can define a new URIMAP for any requests that are coming in to the application. Log on to CICS and use CEDA to define a new URIMAP.
The URIMAP must apply to the path */TaskInformation on the HTTP and the HTTPS ports for your CICS Liberty JVM server. The command structure for our JVM server and application is shown in Example 7-48.
Example 7-48 CEDA commands for defining and installing our URIMAP for CICS Liberty
CEDA DEFINE URIMAP(RESTMAP) GROUP(ITSOWLP)
PATH(*/TaskInformation)
SCHEME(HTTP) USAGE(JVMSERVER)
HOST(wtsc80)
PORT(*) TRANSACTION(JURI)
CEDA INSTALL URIMAP(RESTMAP) GROUP(ITSOWLP)
|
Note: URIMAPs that specify SCHEME(HTTP) are applied to HTTP and HTTPS requests. If you specify SCHEME(HTTPS), the URIMAP is applied to HTTPS requests only.
|
After they are installed, any web requests coming in to this application in Liberty run under the transaction ID JURI instead of CJSA. The next step is to create a RACF profile for our new transaction and give WEBUSER read access.
To create this profile and grant access, create a TCICSTRN profile for JURI and run a PERMIT command for WEBUSER. The commands that we used are shown in Example 7-49.
Example 7-49 Setting up security for JURI
RDEFINE TCICSTRN SC8CICS.JURI NOTIFY(CICSREGN) UACC(NONE)
PERMIT SC8CICS.JURI CLASS(TCICSTRN) ID(WEBUSER) ACCESS(READ)
SETROPTS RACLIST(TCICSTRN) REFRESH
Our JURI profile is prefixed with SC8CICS. This security prefix is used for our production regions. You must include any security prefix that you use. The security prefix for your CICS region is set by using the SECPRFX SIT parameter.
The service TaskInformation in the application com.ibm.cicsdev.restappext returns to the caller some basic information about the TASK that is assigned to it in CICS. We use this application to establish that our URIMAP was successfully applied and check whether WEBUSER can run the JURI transaction. To perform this check, we use basic authentication, as described in 7.4.1, “Basic authentication with a SAF registry” on page 186.
To verify that your URIMAP is configured correctly, make a call to the TaskInformation service from your browser. In our setup, the following URL is used:
http://wtsc80:57080/com.ibm.cicsdev.restappext/rest/TaskInformation
You should receive JSON data that resembles the data in Example 7-50.
Example 7-50 Example response from the TaskInformation service
{"transid":"JURI","userid":"WEBUSER ","tasknum":"16212"}
Our URIMAP was applied successfully because the transid field returned the value of JURI and not CJSA.
Setting a user ID for unprotected applications
Not every application in Liberty might be running with security constraints that are specified in their deployment descriptor. This scenario describes how to assign a user ID to requests that are coming into an application without security constraints, by using a URIMAP in CICS. For this scenario, we use the REST extensions application that is available from the cics-java-liberty-restapp-ext page of the GitHub website.
Because you do not need to change this application, it can be deployed as described in Chapter 2, “Deploying a web application” on page 27. Ensure no URIMAPs are active in your CICS region; for example, the URIMAP RESTMAP created earlier in 7.5.3, “CICS transaction security with URIMAPs” on page 210.
For the purposes of this section, it is assumed that your CICS region is running with security active; that is, the SIT parameter SEC=YES is set for your CICS region.
Running the unsecured REST extensions application under a specific user ID is easy to accomplish. Only a matching URIMAP must be installed. We use the TaskInformation service from the REST extensions application. Therefore, we must make its URL the basis of the URL that is specified in the URIMAP.
We also must specify the host machine for the CICS region. In our CICS region, we defined and installed our URIMAPs by using the commands that are shown in Example 7-51.
Example 7-51 CEDA commands for defining and installing our URIMAP for CICS Liberty
CEDA DEFINE URIMAP(RESTMAP) GROUP(ITSOWLP)
PATH(*/TaskInformation)
SCHEME(HTTP) USAGE(JVMSERVER)
HOST(wtsc80)
PORT(*) USER(UMAPUSER)
CEDA INSTALL URIMAP(RESTMAP) GROUP(ITSOWLP)
The USER attribute for the URIMAP is set to UMAPUSER. This attribute redefines the user ID to be UMAPUSER when the CICS task is attached. In this scenario, we do not change the transaction ID; therefore, the user ID UMAPUSER must be granted access to CJSA to run.
Now, we can check the outcome of our URIMAP by calling the TaskInformation service. In our system, we access this service at the following URL by using an HTTP GET request:
http://wtsc80:57080/com.ibm.cicsdev.restappext/rest/taskInformation
The service returns information about the user ID and transaction ID that is used by the request. You receive get a response that includes the user field specified as UMAPUSER. The response from the service that is running in our system is as shown in Example 7-52.
Example 7-52 Response from the taskInformation service with the URIMAP in place
{"transid":"CJSA","userid":"UMAPUSER","tasknum":"16587"}
7.6 Configuring SSO by using Lightweight Third-Party Authentication
Lightweight Third-Party Authentication (LTPA) is an IBM single-sign on technology that reduces the number of times a user’s credentials are checked against a security registry. When a new authentication request occurs, the user ID and password (or other credentials) are authenticated as normal, but on response the server returns a signed authentication token to the requester, as shown in Figure 7-19.

Figure 7-19 Basic authentication flow by using identity tokens
The client can then provide this token in subsequent requests. If the token is still valid, the server uses it to derive the user ID, skip the authentication step, and proceed to authorization.
This configuration can simplify the authentication process in systems where components that must communicate with one another are spread across multiple environments. Particularly, where users are required to enter credentials manually.
If you use the cicts:security-1.0 or appSecurity-2.0 features in your Liberty JVM server, Liberty uses LTPA tokens by default in its authentication process. Next, we describe how to configure theses tokens, how to disable them, and how to ensure that they are sent over SSL only.
7.6.1 Configuring LTPA
LTPA is easy to set up. First, you must enable an authentication mode for use in your applications. The authentication mode is not too important because LTPA is compatible with most modes.
For the purposes of using tokens for the first time, we recommend the use of basic authentication because it is the easiest to work with and does not require setting up TLS certificates. After the basic scenario is working, you can add TLS to secure the connection between the client and server.
LTPA does not require any other features to be added to the server configuration file (server.xml). An LTPA configuration XML element is added to your configuration. The LTPA keys configuration we used is shown in Example 7-53.
Example 7-53 Example configuration in server.xml for LTPA. Password is encoded.
<ltpa keysPassword="{xor}Lz4sLCgwLTs=" keysFileName="${server.output.dir}/resources/security/ltpa.keys"
/>
We chose to keep the keys in the resources/security directory. You do not need to create these keys in advance. Liberty automatically creates the keys for you if the keys do not exist.
If you do not change the keysFileName attribute, the keys are stored in your server’s output directory/resources/security/ltpa.keys.
When you successfully connect and authenticate to a Liberty application, the server automatically generates and returns an LTPA token as a cookie to the requester. When the requester sends another HTTP request to the same server, it can return the LTPA token as a cookie. The server validates and decrypts the token and extracts the attached user ID by using it for the request.
The cookie that is stored is named LtpaToken2. The following methods can be used to review this cookie:
•You can use your browser to connect to the application. After you successfully authenticate and call the backing service, you can use your browser to view the cookies that are stored locally on your workstation.
The option to view cookies often can be found in your browser’s settings menus. In Firefox, click Settings → Privacy → remove individual cookies. Then, enter LtpaToken2 into the Search field, as shown in Figure 7-20 on page 215.

Figure 7-20 LTPA token as seen in the Firefox browser
•As described in 7.7, “JSON client code with cookie printer” on page 216, we provided a simple Java HTTP client that can be used with Java 8. No libraries are required to run this code, only base Java.
When you run this code, it prints any cookies that are returned by the server. The cookie output from our application when we ran it in our system is shown in Example 7-54. The cookie is encoded to prevent it from being human readable. Decrypting it requires the encryption keys from the LTPA keys file.
Example 7-54 LTPA token returned to our client by Liberty
LtpaToken2=kPnM6XfPMXLSRCLhRHaXK0K8h2MgrPPhCOO+hrYyIvLWntHoPIl++jdyREuSEbhHXyj+PeHLF6iSVEEVBY583eDrOB3tFa2OrB4iZA+iMjILlUe7/KLjlioQ1JCcDAg3nOaB8wCRrBj7pKyDQ8hqFiIAvJKrnzcM2cQKox+lq1yn+lXB9gS6qPfd8a+3JXcHh5aBpjONbNxIhJwbDBOtrKI9nwJhhdMT+k1frzUjywNdI9inIjtf7aaVFYKd/2dlFIcpHRrOYPuKXdXqAOpWNnRMF1uKCMEarH56ESMoRx3aEllFpqGvmZPQb2yqv0nu
7.6.2 Disabling SSO in Liberty
In some scenarios, you might not want to use LTPA or SSO in your system. If you are using security in your Liberty JVM server, LTPA is active by default. To turn off SSO, and thus in turn LTPA, you can add the webAppSecurity element to your Liberty JVM server's configuration file (server.xml). Add the element into your configuration with the element singleSignOnEnabled set to false.
The webAppSecurity configuration element that we used in our JVM server is shown in Example 7-55.
Example 7-55 webAppSecurity configuration with SSO disabled in server.xml
<webAppSecurity singleSignOnEnabled="false"/>
7.6.3 Requiring TLS when using SSO
You might want to add an extra layer of protection to your SSO configuration by requiring any connection with the server that uses LTPA (or other session token) to be made by using HTTPS rather than HTTP.
This protection can be enabled by adding the webAppSecurity configuration to your server’s configuration file (server.xml). Add the ssorequiresssl attribute to the configuration and specify its value as true.
The webAppSecurity configuration element that we used to enforce TLS usage with SSO in our Liberty JVM server is shown in Example 7-56.
Example 7-56 webAppSecurity configuration with TLS for SSO in server.xml
<webAppSecurity ssorequiresssl="true"/>
7.7 JSON client code with cookie printer
The code that is shown in Example 7-57 is a simple Java 8 HTTP client that sends JSON data with HTTP basic authentication credentials to a URL by using HTTP POST. No other libraries are required to run this code, only base Java 8.
Example 7-57 JSON client code with cookie printer
import java.io.IOException;
import java.io.OutputStream;
import java.net.HttpURLConnection;
import java.net.URL;
import java.util.Base64;
import java.util.Base64.Encoder;
/**
* A very basic client for calling REST services in CICS
* Liberty.
*
* This client is designed to run locally on a workstation.
* Requires Java 8.
*
* Note: ENCODING METHOD USED NOT SUITABLE FOR PRODUCTION
* ENVIRONMENTS OR HIGHLY SENSITIVE INFORMATION
*
* @author Michael Jones/IBM-CICS ([email protected])
*
*/
public class JSONClient {
// Full path to our JAX-RS service
String target =
http://wtsc80:57080/stock/api/items;
public static void main(String[] args) throws IOException {
// Change the URL to point at your host and port
URL url = new URL(target);
// Create a very basic connection object which is configured
// for HTTP POST
HttpURLConnection conn =
(HttpURLConnection)url.openConnection();
conn.setRequestMethod("POST");
// Encode the user's ID and password to send to the server
// NOTE: Base64 is not a secure encoding. Not suitable for
// production, only for personal testing
Encoder encoder = Base64.getEncoder();
String encodedCreds =
encoder.encodeToString("WEBUSER:WEBUSER_PASSWORD".getBytes());
conn.addRequestProperty("Authorization", "Basic " +
encodedCreds);
// Set up some basic properties on the connection to prepare
// it to send JSON
conn.addRequestProperty("Content-Type", "application/json");
conn.setDoOutput(true);
conn.setDoInput(true);
// The actual JSON data we want to send to the server. Modify
// this as required.
String sendJson = "{"name" : "Golf Club", "stock" : 1}";
// Send the HTTP POST request to the server with the JSON data
OutputStream os = conn.getOutputStream();
os.write(sendJson.getBytes());
// Go through and get cookies
printCookies(conn);
// Return the response to the command line
System.out.println("Response code was: " +
conn.getResponseCode());
}
public static void printCookies(HttpURLConnection conn) {
String cookieHeader = conn.getHeaderField("Set-Cookie");
if(cookieHeader == null) {
System.out.println("No cookies");
return;
}
System.out.println(cookieHeader);
}
}
You can change the target URL by changing the target field in the code. As shown in Example 7-57 on page 216, it is listing our machine’s host name and ports and triggering the EJB shop sample’s stock update service
You can also change the JSON data that is sent to the endpoint by updating the sendJson String object in the main method.
When the code runs, it sends the JSON request to endpoint that is listed. Then, it prints any cookies that are received in response from the server and the return code for the application.
The quickest way to run this code is by using Eclipse. Create a Java class in a new or existing project and paste in the code. Then, select run from the toolbar at the top of the GUI. No other set-up is required if Java 8 is installed.
..................Content has been hidden....................
You can't read the all page of ebook, please click here login for view all page.