

Configuring Transport Layer Security support
In this chapter, we describe how to configure Secure Sockets Layer (SSL), which is now known as Transport Layer Security (TLS), with a CICS Liberty JVM server. We also describe how to configure TLS client and server authentication scenarios and provide information on how to analyze the use of the IBM z14 cryptographic hardware when TLS is used.
This chapter includes the following topics:
6.1 JSSE and JCE
TLS support in Java uses the underlying Java Secure Socket Extension (JSSE) and Java Cryptography Extension (JCE) frameworks that are provided as part of Java Standard Edition (Java SE), as shown in Figure 6-1. This support can be integrated with the RACF security registry to control access to digital certificates that are stored in RACF.

Figure 6-1 TLS support in Java that uses JCE and JSSE
Java Secure Socket Extension
The JSSE API provides a framework and Java implementation of the SSL and TLS protocols as used by Liberty HTTPS support. The JSSE API is provided in the javax.net and javax.net.ssl packages in Java SE.
|
Note: IBMJSSE is IBM’s Java implementation of TLS and so does not use the facilities of System SSL as used by CICS web support or AT-TLS as provided by IBM Communications Server. Therefore, Liberty in CICS does not use the CICS sockets domain or CICS TCPIPSERVICE resources to configure TLS. All configuration is performed by using the JVM profile and the Liberty server configuration file (server.xml).
|
Java Cryptography Extension
JCE is a standard extension to the Java Platform that provides the underlying implementation for cryptographic services, including encryption, key generation, and Message Authentication Codes (MAC). The IBM Java SDK for z/OS includes the following JCE providers:
•IBMJCE
•IBMJCECCA
The use of the JCE provider is controlled by editing the list of security providers. The default provider is IBMJCE and was used in our initial usage scenarios. For more information about how to configure the IBMJCECCA provider to use ICSF to drive the IBM Crypto Express cards, see 6.6, “Using cryptographic hardware with JSSE” on page 164.
6.1.1 Updating the JCE policy files
Because of import regulations in some countries, the strength of certain ciphers is restricted in the default IBMJCE configuration. Therefore, the first step in preparing our system to use TLS is to remove the default restriction on usage of strong ciphers in the JCE policy files.
|
Note: It is the user’s responsibility to verify that this action is permissible under local regulations.
|
By default, the JCE policy files are in the $JAVA_HOME/lib/security directory. The unrestricted versions can be found in $JAVA_HOME/demo/jce/policy-files/unrestricted/. The latest unrestricted files are available for download from the Unrestricted SDK JCE policy files website (login required).
For more information about support for cipher suites with the IBM SDK for Java on z/OS, see IBM Knowledge Center.
|
Note: If the unrestricted policy files are not installed on your system, stronger ciphers, such as AES_256, fail to operate. In our system, we saw the following exception when the unrestricted policy files were not available:
FFDC1015I: An FFDC Incident has been created: "java.lang.IllegalArgumentException: Cannot support SSL_ECDHE_RSA_WITH_AES_256_CBC_SHA with currently installed providers com.ibm.ws.channel.ssl.internal.SSLConnectionLink 238" at …
|
Installing the policy files
We added the following line to our CICS JVM server profile to activate the IBM supplied unrestricted policy files. Then, we restarted our JVM server:
-Dcom.ibm.security.jurisdictionPolicyDir=/usr/lpp/java/
J8.0_64/demo/jce/policy-files/unrestricted
J8.0_64/demo/jce/policy-files/unrestricted
6.2 TLS server authentication by using a Java keystore
The default JVM server autoconfigures behavior for TLS in CICS Liberty is to use a Java keystore (JKS) with only server authentication. JKSs are stored in the zFS file system by using files with a .jks extension. Because Java keystores are easy to configure, they are useful for initial TLS connectivity testing.
To configure TLS with Liberty, you must first add the ssl-1.0 feature to the server.xml and then, use the ssl and keyStore elements to define the required settings. These settings are dynamically created if you set the CICS com.ibm.cics.jvmserver.wlp.server.https.port system property in the JVM profile when JVM server autoconfigure is used.
In our CICS region, we started by adding the com.ibm.cics.jvmserver.wlp.server.https.port property to our JVM profile, as shown in Example 6-1. Then, we restarted the JVM server.
Example 6-1 com.ibm.cics.jvmserver.wlp.server.https.port system property
-Dcom.ibm.cics.jvmserver.wlp.autoconfigure=true
-Dcom.ibm.cics.jvmserver.wlp.server.host=wtsc80
-Dcom.ibm.cics.jvmserver.wlp.server.http.port=57080
-Dcom.ibm.cics.jvmserver.wlp.server.https.port=57443
On restart, the JVM server autoconfigure function created the necessary TLS-related elements in the server.xml, which caused Liberty to create its own JKS-based keystore and self-signed certificate for use by the HTTPS endpoint.
Our server.xml configuration file now contained the following new entries, as shown in Example 6-2:
•ssl-1.0: This entry is the SSL feature, and must be added to the feature manager list.
•httpEndpoint: This entry is the HTTP endpoint that is used to define the attributes of the HTTP and HTTPS listening ports.
•ssl: This entry is the element that defines the SSL/TLS protocol that is used and the associated keystore.
•keyStore: This entry is the key store that holds the certificates. The type defaults to a JKS. Although the location defaults to ${server.output.dir}/resources/security/key.jks in zFS, it can be configured to use a RACF key ring. For more information, see 6.3, “TLS server authentication by using a RACF key ring” on page 149. If a trustStoreRef attribute is not defined on the ssl element, the signing certificates also are assumed to be in this keystore.
Example 6-2 SSL support
<featureManager>
<feature>cicsts:core-1.0</feature>
<feature>jsp-2.3</feature>
<feature>ssl-1.0</feature>
<httpEndpoint id="defaultHttpEndpoint"
host="wtsc80"
httpPort="57080"
httpsPort="57443" />
<ssl id="defaultSSLConfig"
keyStoreRef="defaultKeyStore"
sslProtocol="TLS" />
<keyStore id="defaultKeyStore"
password="defaultPassword" />
For more information about the TLS configuration attributes for Liberty, see the Enabling SSL communication in Liberty page of IBM Knowledge Center.
On startup, the Liberty messages.log now reports that the defaultHttpEndpoint-ssl endpoint started with message CWWKO0219I, as shown in Example 6-3.
Example 6-3 HTTP endpoint started
CWWKO0219I: TCP Channel defaultHttpEndpoint-ssl has been started and is now listening for requests on host WTSC80.CPOLAB.IBM.COM (IPv4: 9.76.61.131) port 57443.
We then connected our web browser to the Liberty default landing page by using the following URL. We also specified the HTTPS protocol and the port 57443:
https://wtsc80:57443/
|
Note: If your browser cannot connect to the HTTPS endpoint in Liberty at this stage, you might need to modify the supported TLS protocols because the supplied default sslProtocol="TLS" restricts support to only TLS v1.0. Setting sslProtocol="SSL" allows any TLS version to be negotiated. For more information, see 6.5.5, “Controlling the TLS version” on page 160.
|
On loading this page, our Mozilla web browser shows the warning Your connection is not secure, as shown in Figure 6-2.

Figure 6-2 Your connection is not secure message
The error code SEC_ERROR_UNKNOWN_ISSUER clarifies the reason because the server certificate that was presented to the browser by Liberty was auto-generated by Liberty. Therefore, it is self-signed and defaults to specifying the host name as localhost in the Common Name (CN).
If you select Add Exception, the Add Security Exception window opens. A message indicates that the Wrong site and Unknown Identity are being used, as shown in Figure 6-3.

Figure 6-3 Add Security Exception message
If you click View, you see that the distinguished name for the Issued To and Issued By are the same, as shown in Figure 6-4. This similarity indicates that this site uses a self-signed certificate.

Figure 6-4 Could not verify this certificate
Also, the CN includes localhost as the host name. Because this name does not match the host name that is specified in the UR (in our case, wtsc80.cpolab.ibm.com), the Unknown Identity warning is displayed.
If you click Confirm Security Exception to store this exception, the HTTPS session is complete and you see the Liberty welcome page (see Figure 6-5). You now have a basic TLS setup configured. However, that setup includes a few limitations, which we describe in the following sections.

Figure 6-5 Liberty landing page that uses TLS
|
Note: The application that is used for testing TLS support is not important in this scenario. We used the Liberty landing page because it is available by default; however, you can use your own application, if wanted.
|
6.3 TLS server authentication by using a RACF key ring
The next step in our configuration process is to use RACF to store our TLS certificates, which provides the ability to integrate certificate access control with z/OS security policies and procedures. Although we used RACF in our tests, other SAF-compliant z/OS security providers can also be used.
The examples in this section use RACF to generate a self-signed certificate authority (CA) certificate. Other third-party CAs can be used and if they are used, the sequence of commands is slightly different.
|
Note: The user ID that is used to issue the example RACF commands in this section require the correct authority to the relevant IRR.DIGTCERT.* profiles. For more information, see the z/OS Security Server RACF Command Language Reference.
|
Complete the following steps to configure RACF to store the TLS certificates:
1. Create a CA certificate for use as a signing certificate by using the following RACDCERT GENCERT command:
RACDCERT GENCERT CERTAUTH
SUBJECTSDN(CN('ITSO CA') O('IBM') OU('CICS'))
SIZE(2048) WITHLABEL('ITSO CA')
NOTAFTER(DATE(2020-12-31))
2. List the CA certificate by using the following RACF command to verify the CA:
RACDCERT CERTAUTH LIST(LABEL('ITSO CA'))
The result of the use of the command is shown in Example 6-4.
Example 6-4 Liberty CA certificate
Digital certificate information for CERTAUTH:
Label: ITSO CA
Certificate ID: 2QiJmZmDhZmjgcnj4tZAw8FA
Status: TRUST
Start Date: 2017/10/09 00:00:00
End Date: 2020/12/31 23:59:59
Serial Number:
>00<
Issuer's Name:
>CN=ITSO CA.OU=CICS.O=IBM<
Subject's Name:
>CN=ITSO CA.OU=CICS.O=IBM<
Signing Algorithm: sha256RSA
Key Usage: CERTSIGN
Key Type: RSA
Key Size: 2048
Private Key: YES
Ring Associations:
*** No rings associated ***
|
Note: The certificate features a Key Usage of CERTSIGN, which signifies that this certificate is a signing certificate.
|
3. Create a server certificate that is signed by the certificate authority from Step 1. This certificate is used to identify our Liberty server and binds the server’s public key to a subject, as identified by the distinguished name (DN).
The common name in the DN should be set to the server’s TCP/IP host name because this name is validated by the browser. In our case, the host name is wtsc80.cpolab.ibm.com. The label is used to identify this certificate in the RACF key store. For our certificate label, we used the concatenation of the region name and JVM server name SC8CICS7-ITSOWLP1, as shown in the following example:
RACDCERT ID(CICSREGN) GENCERT
SUBJECTSDN(CN('wtsc80.cpolab.ibm.com') O('IBM') OU('CICS'))
SIGNWITH (CERTAUTH LABEL('ITSO CA'))
WITHLABEL('SC8CICS7-ITSOWLP1')
NOTAFTER(DATE(2020-12-31))
SIZE(2048)
4. List the contents of the new server certificate by using the following RACF command to verify the certificate:
RACDCERT ID(CICSREGN) LIST(LABEL('SC8CICS7-ITSOWLP1'))
The result of the use of the command is shown in Example 6-5.
Example 6-5 Liberty server certificate
Digital certificate information for user CICSREGN:
Label: SC8CICS7-ITSOWLP1
Certificate ID: 2QjDycPi2cXH1eLD+MPJw+L3YMnj4tbm09fx
Status: TRUST
Start Date: 2017/10/09 00:00:00
End Date: 2020/12/31 23:59:59
Serial Number:
>03<
Issuer's Name:
>CN=ITSO CA.OU=CICS.O=IBM<
Subject's Name:
>CN=wtsc80.cpolab.ibm.com.OU=CICS.O=IBM<
Signing Algorithm: sha256RSA
Key Type: RSA
Key Size: 2048
Private Key: YES
Ring Associations:
Ring Associations:
*** No rings associated ***
5. Create a RACF key ring, which acts as a holder for the certificates in the RACF database. We named our key ring LIBERTY.SC8CICS7 because it is associated with our CICS region SC8CICS7 and with our CICS region user ID CICSREGN, a shown in the following example:
RACDCERT ID(CICSREGN) ADDRING(LIBERTY.SC8CICS7)
6. Connect the signing certificate and the server certificate to the RACF key ring by using the following RACDCERT commands:
RACDCERT ID(CICSREGN) CONNECT(RING(LIBERTY.SC8CICS7)
LABEL('ITSO CA') CERTAUTH)
RACDCERT ID(CICSREGN) CONNECT(RING(LIBERTY.SC8CICS7)
LABEL('SC8CICS7-ITSOWLP1'))
7. Grant the CICS region user ID the ability to read the contents of a key ring that is associated with its own user ID, as shown in the following example:
PERMIT IRR.DIGTCERT.LIST CLASS(FACILITY)
ID(CICSREGN) ACCESS(READ)
8. Export the signing certificate to an MVS dataset to allow it to be transferred to the workstation, as shown in the following example:
RACDCERT CERTAUTH EXPORT(LABEL('ITSO CA'))
DSN('CICSUSER.CERTS.ITSOCA') FORMAT(CERTDER)
|
Note: We did not specify a password on this export command because this command only exports the public key of the certificate authority, which does not warrant password protection.
|
9. Issue the following RACF command to refresh the RACF FACILITY and DIGTCERT classes:
SETROPTS RACLIST(FACILITY DIGTCERT) REFRESH
10. Transfer the signing certificate that was exported from the MVS dataset to your workstation. You should transfer this certificate in binary mode and save it with a .cert file extension.
11. Import this .cert file into Firefox by clicking in Firefox Tools → Options → Advanced → Certificates → View Certificates → Import.
12. In Firefox, click Trust this CA to identify websites and the new certificate authority is displayed in the Firefox Certificate Manager under Authorities as IBM → ITSO CA.
13. To use this new RACF key ring with Liberty, update your server.xml be completing the following steps:
a. Update the location attribute in the keystore element to specify safkeyring:///LIBERTY.S8CICS7, which causes Liberty to use the CICS region user ID (CICSREGN) to access the RACF key ring LIBERTY.SC8CICS7.
b. Update the type attribute to specify JCERACFKS, which indicates that the IBMJCE provider is used with a RACF keystore, as shown in the following example:
<keyStore id="defaultKeyStore"
fileBased="false"
location="safkeyring:///LIBERTY.S8CICS7"
password="password"
readOnly="true"
type="JCERACFKS" />
|
Note: Although the password that is defined for a safkeyring keystore is not validated by RACF because access is controlled by the DIGTCERT class, it must always be specified as the string "password".
|
14. Restart the Liberty server and review the Liberty messages.log for the message CWWKO0219I, which indicates that the HTTPS endpoint listened on port 57443.
15. Connect to the HTTPS listener that is specifying the default landing page again. You should see that the Liberty landing page (see Figure 6-5 on page 148) is secured with the TLS padlock symbol.
6.4 TLS client authentication
In this section, we describe how to configure a Liberty server to support TLS client authentication for an HTTPS connection. We used RACF to create a personal certificate that is signed by the same trust authority we used for server authentication. We then exported the client certificate and associated private key from z/OS to our workstation and imported this certificate into our web browser.
For more information about how to use <auth-method>CLIENT-CERT</auth-method> to map the identity from a TLS client certificate to the identity used in the Liberty server, see Chapter 7, “Securing web applications ” on page 175.
Complete the following steps to configure TLS client authentication:
1. Create a personal certificate that is owned by the user ID, which is to be authenticated. Because we use the RACF user ID WEBUSER, we created this certificate by using the following RACDCERT command (see Example 6-6) that used our ITSO CA signing certificate that we created as described in 1.3, “Setting up a Liberty JVM Server” on page 11.
Example 6-6 RACDCERT GENCERT personal certificate
RACDCERT ID(WEBUSER) GENCERT SUBJECTSDN(CN('WINDOWSX230')
O('IBM') OU('CICS')) SIZE(2048)
SIGNWITH(CERTAUTH LABEL('ITSO CA')) WITHLABEL('WEBUSER-CERT')
In the CN field of the SUBJECTDSN, we specified the local host name of our test machine (WINDOWSX230).
|
Note: An alternative to the use of RACF to create the client certificate is to create the certificate on a third-party platform. Then, the certificate is imported into the RACF registry by using a PKCS12 file. This process can be done by using the following RACDCERT ADD command:
RACDCERT ADD('dataset') TRUST ID(userid) PASSWORD (password)
|
2. Validate the information in this new certificate by using the following command:
RACDCERT ID(WEBUSER) LIST( LABEL('WEBUSER-CERT'))
The output of the command is shown in Example 6-7.
Example 6-7 RACDCERT LIST personal certificate
Digital certificate information for user WEBUSER:
Label: WEBUSER-CERT
Certificate ID: 2QTXyMnT18jJ02DDxdnj
Status: TRUST
Start Date: 2017/10/09 00:00:00
End Date: 2018/10/09 23:59:59
Serial Number:
>05<
Issuer's Name:
>CN=ITSO CA.OU=CICS.O=IBM<
Subject's Name:
>CN= WINDOWSX230.OU=CICS.O=IBM<
Signing Algorithm: sha256RSA
Key Type: RSA
Key Size: 2048
Private Key: YES
Ring Associations:
*** No rings associated ***
3. Export the certificate in PKCS12 mode to an MVS dataset to enable it to be transferred to the workstation. Ensure that the PKCS12 package is password protected because it now contains the private key, as shown in the following example:
RACDCERT ID(WEBUSER) EXPORT(LABEL('WEBUSER-CERT'))
DSN('CICSUSER.CERTS.WEBUSER')
FORMAT(PKCS12DER) PASSWORD('ITSO')
|
Note: We used the PKCS12 file format because this format exports the certificate and the private key, which are required if this format is to be used as a client certificate.
|
4. Transfer to the workstation in binary mode by using FTP and save as a file with a .p12 extension.
5. Import the .p12 file into your web browser by clicking (in Firefox) Tools → Options → Advanced → Certificates → View Certificate → Your Certificates.
6. Click Import and then, browse to the location of your .p12 file. You are presented with a Password Required window in which you enter the password that is used to encrypt the certificate. Enter the password value that was used in Step 3.
If this process is successful, you see that the certificate is installed, as shown in Figure 6-6.

Figure 6-6 Certificate Manager window
7. To enforce client authentication during the TLS handshake, we now must change the Liberty configuration in the server.xml. This process requires that the clientAuthentication attribute in the ssl element is changed to true. The changes to the ssl element in our server.xml is shown in Example 6-8.
Example 6-8 Server.xml: clientAuthentication attribute
<ssl id="defaultSSLConfig"
clientAuthentication="true"
keyStoreRef="defaultKeyStore"
serverKeyAlias="SC8CICS7-ITSOWLP1" />
8. Start the JVM server and connect to the HTTPS listener that specifies the Liberty landing page again. You are prompted to choose a client certificate to present as identification, as shown in Figure 6-7.
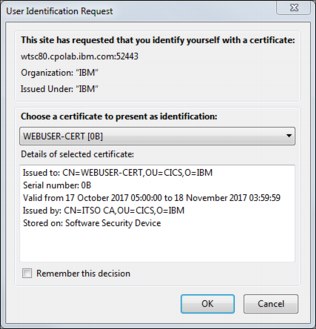
Figure 6-7 User Identification Request window
9. Select the certificate that you imported and click OK. The TLS handshake should complete and the Liberty welcome page is displayed with the lock symbol, as shown in Figure 6-5 on page 148.
Making client authentication optional
If clientAuthentication="true" but the client does not include a certificate or the certificate is not trusted by the server, the TLS handshake and HTTP connection fail. If you do not want to cause a failure in this scenario, you can specify the attribute clientAuthenticationSupported="true" instead of clientAuthentication="true". This change causes the server to request a certificate from the client, but allow the connection to proceed without one.
|
Note: If client certificate authentication is specified in the application’s web.xml by using <auth-method>CLIENT-CERT</auth-method> and no TLS client certificate is available, Liberty provides the following server.xml attribute:
<webAppSecurity allowFailOverToBasicAuth="true" />
If specified, this attribute causes Liberty to fail over to basic authentication for any application in which client certificate authentication fails.
|
Adding a truststore
When client authentication is configured, Liberty asks the client to provide its certificate for each new HTTPS connection. Then, it validates the chain of trust for that certificate by using its truststore. That is, it validates that the client certificate issuer is in the RACF key ring.
The server does not need access to the client certificate, only the signing certificate. In our configuration, the truststore defaults to the keystore. However, if a separate signing certificate is used to sign the client certificate, it can be added to a specific RACF key ring by using the following commands (assuming that the certificate label for the client’s signing certificate is CLIENT CA):
RACDCERT ID(CICSREGN) ADDRING(LIBERTY.TRUST.SC8CICS7)
RACDCERT ID(CICSREGN) CONNECT(RING(LIBERTY.TRUST.SC8CICS7)
LABEL('CLIENT CA') CERTAUTH)
This key ring should then be specified in a trustStoreRef element in server.xml that refers to another keystore that references the separate key ring, as shown in Example 6-9.
Example 6-9 Server.xml: trustStoreRef for client CA
<ssl id="defaultSSLConfig"
clientAuthentication="true"
keyStoreRef="defaultKeyStore"
trustStoreRef="trustStore"
serverKeyAlias="SC8CICS7-ITSOWLP1" />
<keyStore id="defaultKeyStore"
fileBased="false"
location="safkeyring:///LIBERTY.S8CICS7"
password="password"
readOnly="true"
type="JCERACFKS" />
<keyStore id="trustStore"
fileBased="false"
location="safkeyring:///LIBERTY.TRUST.S8CICS7"
password="password"
readOnly="true"
type="JCERACFKS" />
6.5 Hints and tips when using TLS
In this section, we describe how to analyze and optimize the TLS support that is used in Liberty.
6.5.1 Tracing TLS
Several methods are available for tracing the usage of TLS in Liberty. In this section, we describe some of the techniques that we used.
JSSE tracing
JSSE-specific debug tracing support is controlled by using the system property javax.net.debug. This support traces different components of the JSSE SSL implementation. For more information, see IBM Knowledge Center.
To enable JSSE tracing, we set the following system property in our CICS JVM profile:
-Djavax.net.debug=ssl
This property causes JSSE tracing to be written to the JVM server stdout, which can also be viewed in the Liberty messages.log output.
With tracing enabled at startup of the JVM, you see the output that is shown in Example 6-10 when the IBM JSSE provider initializes, which lists the installed JCE providers.
Example 6-10 JSSE trace initialization
IBMJSSEProvider2 Build-Level: -20170728
Installed Providers =
IBMJCECCA
IBMJCE
IBMJGSSProvider
IBMJSSE2
IBMCertPath
IBMSASL
IBMXMLCRYPTO
IBMXMLEnc
IBMSPNEGO
SUN
……
Liberty SSL tracing
The Liberty logging component can be controlled by using the server.xml configuration. We used the logging element as shown in Example 6-11 to trace the SSLChannel and SSL components in our Liberty server. The output was written to the specified ssl_trace.log in the default ${server.output.dir}/logs directory. The trace is useful to validate if errors in the Liberty SSL configuration existed.
Example 6-11 server.xml: traceSpecification
<logging traceSpecification="SSLChannel=all:SSL=all"
traceFileName="ssl_trace.log"
maxFileSize="20"
maxFiles="10"
traceFormat="BASIC" />
6.5.2 Enforcing TLS for web applications
The following options are available to enforce that TLS is used for HTTP connections into Liberty:
•Disable the HTTP endpoint
•Use a security constraint in the web.xml
These options are described next.
Disabling the HTTP endpoint
The simplest option to enforce that TLS is used is to disable the use of the Liberty HTTP endpoint. This endpoint can be disabled by updating the httpPort attribute to specify httpPort="-1", as shown in Example 6-12.
Example 6-12 server.xml: Enforcing TLS
<httpEndpoint id="defaultHttpEndpoint"
host="wtsc80"
httpOptionsRef="httpoptions"
httpPort="-1"
httpsPort="57443" />
|
Warning: If the httpPort attribute is removed from the httpEndpoint, the default value of 9080 is assumed and the server starts to listen on this port.
|
Security constraint
Another mechanism to enforce TLS usage is create a rule in each application by adding the following transport-guarantee element to the security constraint in the application’s web.xml:
<transport-guarantee>CONFIDENTIAL</transport-guarantee>
If you specify CONFIDENTIAL as the value, all requests that match the constraint pattern are automatically redirected to the HTTPS endpoint.
We added a web.xml to our restapp sample (see Example 6-13 on page 158) and redeployed this version of our application into our Liberty server.
Example 6-13 Web.xml: Enforcing TLS
<security-constraint>
<web-resource-collection>
<web-resource-name>restapp</web-resource-name>
<url-pattern>/com.ibm.cicsdev.restapp/*</url-pattern>
</web-resource-collection>
<user-data-constraint>
<transport-guarantee>CONFIDENTIAL</transport-guarantee>
</user-data-constraint>
</security-constraint>
We then connected our browser to the insecure cicsinfo service at the following URL:
http://wtsc80:57080/com.ibm.cicsdev.restapp/rest/cicsinfo
Our browser was then redirected to the secure HTTPS listener on port 57443.
6.5.3 HTTP persistent connections
The most intensive encryption process when TLS is the RSA or Elliptic Curve Cryptography (ECC) that is used during the handshake phase to encrypt and sign messages. It also produces the symmetric session keys that are used for payload encryption.
The simplest mechanism to reduce this cost is to enable persistent HTTP connections because a TLS handshake occurs only during the creation of the HTTP connection. By using this mechanism, the cost of the handshake is spread over multiple requests.
In Liberty, the default number of persistent requests that can reuse an HTTP connection is 100. After 100 requests, the HTTP connection and the underlying socket are closed. If HTTPS is used, a full TLS handshake occurs every 100 requests. To improve performance, you can increase this value by using the maxKeepAliveRequests attribute on an httpOptions element that is referenced from the httpEndpoint, as shown in Example 6-14.
Example 6-14 httpOptions element
<httpEndpoint id="defaultHttpEndpoint"
host="wtsc80"
httpOptionsRef="httpoptions"
httpPort="57080"
httpsPort="57443" />
<httpOptions id="httpoptions"
maxKeepAliveRequests="10000" />
The setting for maxKeepAliveRequests is important because not only can this setting affect performance, it affects workload distribution in a high availability (HA) cluster. For more information about how we configured HA with Liberty, see Chapter 9, “Port sharing and cloning regions” on page 251.
|
Note: To further improve the performance of TLS handshaking, the IBMJCECCA provider can also be used. This provider uses the ICSF callable service to drive the IBM Crypto Express cards. For more information, see 6.6, “Using cryptographic hardware with JSSE” on page 164.
|
TCP/IP netstat
Liberty does not monitor HTTP persistent session usage. However, the TCP/IP NETSTAT command can be used to query the number of socket connection requests when a TCP/IP listening port is used.
In our configuration, we ran a workload of 100 requests by using a curl script. Then, we issued the following MVS command, which returned the information that is shown in Example 6-15:
/D TCPIP,,NETSTAT,ALL,PORT=57443
Example 6-15 NETSTAT display
EZZ2500I NETSTAT CS V2R3 TCPIP 584
CLIENT NAME: SC8CICS7 CLIENT ID: 00044C1A
LCLSOCK: 9.76.61.131..57443 FGNSOCK: 0.0.0.0..0
BYTESIN: 0000000000 BYTESOUT: 0000000000
SEGMENTSIN: 0000000000 SEGMENTSOUT: 0000000000
STARTDATE: 10/18/2017 STARTTIME: 13:00:15
LAST TOUCHED: 13:01:02 STATE: LISTEN
RCVNXT: 0000000000 SNDNXT: 0000000000
CLIENTRCVNXT: 0000000000 CLIENTSNDNXT: 0000000000
INITRCVSEQNUM: 0000000000 INITSNDSEQNUM: 0000000000
CONGESTIONWINDOW: 0000000000 SLOWSTARTTHRESHOLD: 0000000000
INCOMINGWINDOWNUM: 0000000000 OUTGOINGWINDOWNUM: 0000000000
SNDWL1: 0000000000 SNDWL2: 0000000000
SNDWND: 0000000000 MAXSNDWND: 0000000000
SNDUNA: 0000000000 RTT_SEQ: 0000000000
MAXIMUMSEGMENTSIZE: 0000000536 DSFIELD: 00
ROUND-TRIP INFORMATION:
SMOOTH TRIP TIME: 0.000 SMOOTHTRIPVARIANCE: 1500.000
REXMT: 0000000000 REXMTCOUNT: 0000000000
DUPACKS: 0000000000 RCVWND: 0000032768
SOCKOPT: 80 TCPTIMER: 00
TCPSIG: 00 TCPSEL: 00
TCPDET: C0 TCPPOL: 08
TCPPRF: 00 TCPPRF2: 00
TCPPRF3: 00
QOSPOLICY: NO
TTLSPOLICY: NO
ROUTINGPOLICY: NO
RECEIVEBUFFERSIZE: 0000016384 SENDBUFFERSIZE: 0000016384
CONNECTIONSIN: 0000000100 CONNECTIONSDROPPED: 0000000000
MAXIMUMBACKLOG: 0000000010 CONNECTIONFLOOD: NO
CURRENTBACKLOG: 0000000000
SERVERBACKLOG: 0000000000 FRCABACKLOG: 0000000000
CURRENTCONNECTIONS: 0000000000 SEF: 100
QUIESCED: NO
The value of the CONNECTIONSIN is 100, which indicates that our workload did not use persistent connections because 100 socket connections were created for the 100 requests.
|
Note: If the NETSTAT command returns multiple records, you should use the record that specifies STATE:LISTEN because this record is for the listening socket, rather than the ephemeral sockets that were established for the browser sessions.
|
6.5.4 TLS session timeout
When HTTP connections timeout, the effect of full handshakes can be avoided by reusing the SSL session ID. Reusing the session ID is known as a null handshake, and it is considerably cheaper to perform. The time interval in the server during which the server allows session IDs to be resumed is configured by setting the sslSessionTimeout attribute on the sslOptions element. The default setting is 8640 ms and can be extended to 10 minutes, as shown in the following example:
<sslOptions id="mySSLOptions"
sslRef="DefaultSSLSettings"
sslSessionTimeout=“10m” />
Increasing the session timeout can be a performance benefit if HTTP connections are not long-lived, and TLS clients must reconnect frequently. For optimum performance, the sslSessionTimeout attribute must be set to longer than the time between client HTTP requests. Setting this attribute allows the server to reuse session IDs.
6.5.5 Controlling the TLS version
To control the TLS version that is supported by the server, the sslProtocol attribute on the ssl element is updated in server.xml to ensure that only a specific version is used. We found protocol versions can be specified in the sslProtocol attribute, which results in the SSL/TLS versions being supported on the SSL/TLS handshake, as listed in Table 6-1.
Table 6-1 SSL/TLS protocol versions in JSSE
|
sslProtocol attribute
|
Supported protocol versions
|
|||
|
SSL V3.0
|
TLS V1.0
|
TLS V1.1
|
TLS V1.2
|
|
|
SSL
|
No *
|
Yes
|
Yes
|
Yes
|
|
SSLv3
|
No *
|
No
|
No
|
No
|
|
TLS
|
No
|
Yes
|
No
|
No
|
|
TLSv1
|
No
|
Yes
|
No
|
No
|
|
TLSv1.1
|
No
|
No
|
Yes
|
No
|
|
TLSv1.2
|
No
|
No
|
No
|
Yes
|
|
SSL_TLS
|
No *
|
Yes
|
No
|
No
|
|
SSL_TLSv2
|
No *
|
Yes
|
Yes
|
Yes
|
|
Note: * SSL v3 and v2 is disabled by default in IBMJSSE and in many browsers because of security vulnerabilities. Its use is no longer recommended.
|
The latest version of TLS is TLS v1.2 and provides for the most secure set of ciphers. We made the change that is shown in Example 6-16 on page 161 to our server.xml to enforce use of TLSv1.2 in our server. For more information about SSL protocols that are supported in JSSE, see the Protocols section of the IBM SDK, Java Technology Edition 8.0.0 page of IBM Knowledge Center.
Example 6-16 Liberty server.xml - enforcing TLS v1.2
<ssl id="defaultSSLConfig"
keyStoreRef="defaultKeyStore"
sslProtocol="TLSv1.2" />
If the client and server do not have a mutually acceptable cipher suite, you might see the message SSL_ERROR_NO_CYPHER_OVERLAP returned by your web browser, as shown in Figure 6-8. This message can be caused by a too restrictive set of cipher suites being specified, or that the client might not support the same TLS version as the server.

Figure 6-8 Secure Connection Failed message
In this situation, you might need to modify the sslProtcol attribute in server.xml to specify a less restrictive range of TLS versions. You also can allow a less restrictive range of cipher suites to be used (for more information, see 6.5.6, “Controlling the cipher suite” on page 161).
6.5.6 Controlling the cipher suite
The process in which the cipher that is used for a TLS connection is negotiated during the TLS handshake includes the following steps:
1. The TLS client sends a “client hello” message that lists cryptographic information, including the SSL or TLS version and, in the client’s order of preference, the cipher suites that are supported by the client.
2. TLS server responds with a “server hello” message that contains a mutually agreeable cipher suite that is chosen by the server from the list that is provided by the client.
Different TLS ciphers feature different encryption strengths and performance characteristics. Therefore, it is often useful to understand which cipher suite was negotiated between the client and the server.
Most browsers can display the negotiated cipher suite. You can determine which cipher suite was negotiated on the server by using JSSE tracing, as described in 6.5.1, “Tracing TLS ” on page 156.
By using the JSSE trace log, you can search for the string %% Negotiating. In our example, we saw that the following cipher suite was chosen during the negotiation between the browser and the Liberty server:
%% Negotiating: [Session-100, SSL_ECDHE_RSA_WITH_AES_128_GCM_SHA256]
This cipher suite defines the use of the following encryption algorithms:
•Key exchange: Ephemeral Elliptic Curve Diffie-Hellman with RSA (ECDHE_RSA)
•Block cipher: AES_GCM encryption algorithm with a 128-bit key (AES_128_GCM)
•Data integrity: SHA hash algorithm with a 256-bit key (SHA256)
To modify the list of ciphers that are supported by the server, they can be added as a white space-separated list in the enabledCiphers attribute on the ssl element. We modified our server.xml as shown in Example 6-17 to support the following ciphers:
•SSL_ECDHE_RSA_WITH_AES_128_GCM_SHA256
•SSL_ECDHE_RSA_WITH_AES_128_CBC_SHA256
Example 6-17 Liberty server.xml: Enabled ciphers
<ssl id="defaultSSLConfig"
enabledCiphers="SSL_ECDHE_RSA_WITH_AES_128_CBC_SHA256
SSL_ECDHE_RSA_WITH_AES_128_GCM_SHA256"
keyStoreRef="defaultKeyStore"
sslProtocol="TLSv1.2" />
For more information about the supported ciphers in the IBM Java z/OS SDK, see the Cipher Suites topic of the IBM SDK, Java Technology Edition 8.0.0 page of IBM Knowledge Center.
6.5.7 Restricting weak algorithms
One useful customization feature of JSSE is the ability to restrict ciphers and algorithms to a specific minimum strength. This restriction can be achieved by using the jdk.tls.disabledAlgorithms property, which can be specified in the Java security policy.
By default, the IBM Java SDK disables specific algorithms, such as RSA key sizes less than 1024 bits. We restricted this behavior further to RSA key sizes less than 2048 bits as shown in the following process:
1. We copied the java.security file from $JAVA_HOME/lib/security to /var/cics/ibmjce/java.security.2048 and set the location by using the following java.security.properties system property in our JVM server profile:
-Djava.security.properties=/var/cicsts/ibmjce/java.security.2048
2. We modified the jdk.tls.disabledAlgorithms property in this file to restrict RSA key sizes to 2048 bits or greater as shown in the following example:
jdk.tls.disabledAlgorithms= RSA keySize < 2048, SSLv3, RC4, MD5withRSA, DH keySize < 768, 3DES_EDE_CBC, DESede, EC keySize < 224
3. We followed the processing (as described in 6.4, “TLS client authentication” on page 152) to generate a personal certificate in RACF. However, this time with a key size of 1024 (see Example 6-18 on page 163).
Example 6-18 RACDCERT GENCERT: Weak personal certificate
RACDCERT ID(WEBUSER) GENCERT
SUBJECTSDN(CN('WINDOWSX230') O('IBM') OU('CICS'))
SIZE(1024) SIGNWITH(CERTAUTH LABEL('ITSO CA'))
WITHLABEL('WEAK-CERT')
4. We exported this personal certificate as a PKSC12 file and transferred this file to our workstation. Then, we imported this file into our Mozilla web browser by using the same procedure as described in 6.4, “TLS client authentication” on page 152.
5. We opened a new private tab in our Mozilla browser and connected to the Liberty HTTPS port. Then, we specified the default Liberty landing page as https://wtsc80:57443.
We were asked to choose a client certificate to present as identification, as shown in Figure 6-9.

Figure 6-9 User Identification Request window
6. We selected the certificate that was labeled WEAK-CERT and clicked OK.
7. The browser reported the error Secure Connection Failed.
By using javax.net.debug tracing as described in 6.5.1, “Tracing TLS ” on page 156, we also found the following exception in the JSSE trace that explains that the TLS connection failed because the certificate that was presented did not match our rule of RSA keySize < 2048:
java.security.cert.CertificateException: Certificates does not conform to algorithm constraints
6.6 Using cryptographic hardware with JSSE
In this section, we describe how to use the IBM Z cryptographic hardware with JSSE.
6.6.1 Cryptographic hardware
Two cryptographic hardware devices are available on IBM Z: CP Assist for Cryptographic Function (CPACF) and IBM Crypto Express cards, which are supported in different ways by the two IBMJCE providers we are using, as shown in Figure 6-10.

Figure 6-10 JSSE and IBM Z cryptographic hardware
CP Assist for Cryptographic Function
CPACF is a set of cryptographic instructions that are available on all CPs, including zIIPs, IFLs, and General Purpose CPUs. The CPACF is accessible through native assembler instructions (such as the KM cipher message), or by using the callable services that are available with ICSF. It provides symmetric key cryptography for clear key and protected key scenarios, along with support for hashing functions.
Various symmetric algorithms are supported by the CPACF, including DES, 3DES, and AES-CBC and AES-GCM. CPACF also supports random number generation and SHA-based digest algorithms.
Use of the CPACF provides the potential for significantly improved performance for symmetric encryption with clear keys, which is the encryption mechanism that is used for block and stream ciphers in the TLS protocol.
To ascertain whether the CPACF is enabled on your system, check the ICSF startup log for the production of the following message:
CSFM126I CRYPTOGRAPHY - FULL CPU-BASED SERVICES ARE AVAILABLE
IBM Crypto Express cards
The IBM Crypto Express cards are optional I/O attached cards that implement more cryptographic functions. On an IBM z14, this feature is available as a Crypto Express 6S (CEX6S) adapter, or Crypto Express 5S (CEX5S).
The CEX6S adapter can be configured in one of the following modes:
•CEX6C: Common Cryptographic Architecture (CCA) coprocessor
By default, this card is a coprocessor and can support a wider range of callable services, including secure key and clear key support for PKA decrypt, digital signature verify, and digital signature generate (including RSA and ECC variants).
•CEX6A: Common Cryptographic Architecture accelerator
This card can be configured as an accelerator. In this mode, the card supports only three clear key cryptographic APIs that are associated with RSA public key encryption, decryption, and verification.
When the cryptographic coprocessor is configured as an accelerator, it provides better throughput at the expense of supporting fewer services.
•CEX6P: IBM Enterprise Public-Key Cryptography Standards (PKCS) #11 (EP11) coprocessor
Support is available for EP11 or PKCS #11 Enterprise mode. In this mode, the card supports only APIs associated with PKCS #11.
|
Note: At least one Crypto Express card that is configured as a coprocessor is required for IBMJCECCA to initialize. To remove the coprocessor as a single point of failure, it is common for two Crypto Express cards to be configured in coprocessor mode when supporting TLS usage with JSSE.
|
For more information, see the IBM Techdoc A Synopsis of z Systems Crypto Hardware, WP100810.
6.6.2 Cryptographic software
In this section, we describe the different software components that are necessary to use the cryptographic hardware with Java on z/OS.
Integrated Cryptographic Service Facility
The Integrated Cryptographic Service Facility (ICSF) works with the hardware cryptographic features and RACF to provide secure, high-speed cryptographic services in the z/OS environment. As new cryptographic functions are implemented in the hardware, new versions of ICSF are made available to start those functions. ICSF is available as a component of and packaged with z/OS; however, the most current versions are available at the IBM z/Os downloads page of the IBM IT infrastructure website.
For more information about hardware support for the various versions of ICSF, see the Techdoc z/OS: ICSF Version and FMID Cross Reference, TD103782.
|
Note: The CSFSERV class controls access to ICSF callable services. This class was not active in our testing. If it is active, access must be granted when generating keys or calling ICSF by using the IBMJCECCA provider.
|
IBMJCE
The IBM JVM default security provider is IBMJCE, which is the default implementation of the Java Cryptographic Extension (JCE) on z/OS. When Java 8 is used, the IBMJCE provider does not use the services of ICSF; instead, it uses native assembler instructions to detect and use the CPACF. This support for CPACF provides improved performance for symmetric key encryption (for example, AES and 3DES) and hashing algorithms (for example, SHA1 and SHA2) that are used in bulk encryption with TLS because the ability to avoid JNI calls to ICSF and thus improves potential zIIP offload.
For more information about performance with Java 8 on IBM Z and IBMJCE, see the IBM Z Development Blog and Mainframe Insights blog post.
IBMJCECCA
The IBM Java SDK on z/OS provides another security provider that is named IBMJCECCA, which is integrated with ICSF and can use the Crypto Express cards to assist with asymmetric key encryption. Similar to the IBMJCE provider, the IBMJCECCA provider also uses native assembler instructions to directly call the CPACF to assist with specific symmetric key encryption algorithms.
The following key facilities are provided by IBMJCECCA:
•Digital signing and verify functions, which are used during public key exchange for TLS.
•Secure and protected key support (that is, keys that are never available in the clear).
To benefit from the Crypto Express card, the IBMJCECCA provider must be added to the JCE providers list at a higher position than the IBMJCE provider. ICSF must also be started.
Use of IBMJCECCA can provide a performance advantage over IBMJCE when performing asymmetric encryption during the secret key exchange that is involved in the TLS handshaking phase.
|
Note: For IBMJCECCA to initialize, ICSF must be started and at least one coprocessor must be available. We found in our testing that if IBMJCECCA cannot be loaded at initialization, the IBMJCE provider is loaded instead because this provider was the next provider in our java security provider list.
|
IBMJCEHYBRID
The IBM JCE hybrid provider is designed to enable an application to use the underlying JCE providers without being concerned whether the hardware cryptographic features are available. If the IBMJCEHYBRID provider is used, the HTTPS support can continue to function, even if the underlying hardware or ICSF is not available.
Configuring the JCE providers
The different JCE providers that are available and how to configure their usage in the server.xml configuration file are listed in Table 6-2.
Table 6-2 JCE provider and server.xml configuration settings
|
JCE provider
|
server.xml
|
|
|
ssl keystore location attribute
|
ssl keystore type attribute
|
|
|
IBMJCE
|
location="safkeyring:///"
|
type="JCERACFKS"
|
|
IBMJCECCA
|
location="safkeyringhw:///"
|
type="JCECCARACFKS"
|
|
IBMJCEHYBRID
|
location="safkeyringhybrid:///"
|
type="JCEHYBRIDRACFKS"
|
For more information about configuring the JCE providers on z/OS, see the z/OS Java Security Frequently Asked Questions.
6.6.3 Configuring TLS to use the cryptographic coprocessors
In this section, we describe how to configure IBMJCECCA to use the cryptographic coprocessors on an IBM z14.
To use the IBMJCECCA provider on our system, we performed the following configuration steps:
1. We downloaded and installed the latest version of ICSF to obtain the updates for z/OS 2.3 support.
2. We copied the security provider file java.security from $JAVA_HOME/lib/security to the location /var/cicsts/ibmjce/java.security.jcecca and added IBMJCECCA to the security provider list, as shown in Example 6-19.
Example 6-19 IBMJCECCA in the security provider list.
# Java security providers
security.provider.1=com.ibm.crypto.hdwrCCA.provider.IBMJCECCA
security.provider.2=com.ibm.crypto.provider.IBMJCE
security.provider.3=com.ibm.jsse2.IBMJSSEProvider2
security.provider.4=com.ibm.security.jgss.IBMJGSSProvider
security.provider.5=com.ibm.security.cert.IBMCertPath
security.provider.6=com.ibm.security.sasl.IBMSASL
security.provider.7=com.ibm.xml.crypto.IBMXMLCryptoProvider
security.provider.8=com.ibm.xml.enc.IBMXMLEncProvider
security.provider.9=com.ibm.security.jgss.mech.spnego.IBMSPNEGO
security.provider.10=sun.security.provider.Sun
3. We updated our JVM to use this new provider list by adding the following system property to our JVM server profile:
-Djava.security.properties=/var/cicsts/ibmjce/java.security.jcecca
4. We updated our server.xml to use the safkeyringhw prefix in the location attribute, and set the JCECCARACFKS type on the keyStore element, as shown in Example 6-20.
Example 6-20 Liberty server.xml - JCECCARACFKS settings
<keyStore id="racfKeyStore"
fileBased="false"
location="safkeyringhw:///LIBERTY.SC8CICS7"
password="password"
readOnly="true"
type="JCECCARACFKS" />
5. We restarted our CICS JVM server, established an HTTPS connection to our Liberty default application, and verified that the web page successfully loaded.
IBMJCEHYBRID
The IBMJCEHYBRID provider is designed to use cryptographic hardware and processors when they are available, but continues without those cryptographic features when they are not available.
To use IBMJCECCA provider, we performed the following steps after configuring IBMJCECCA:
1. We added the IBMJCEHYBRID provider to the top of our Java security provider list in /var/cicsts/ibmjce/java.security.jcecca, as shown in Example 6-21.
Example 6-21 IBMJCEHYBRID in the security provider
security.provider.1=com.ibm.crypto.ibmjcehybrid.provider.IBMJCEHYBRID
security.provider.2=com.ibm.crypto.hdwrCCA.provider.IBMJCECCA
security.provider.3=com.ibm.crypto.provider.IBMJCE
security.provider.4=com.ibm.jsse2.IBMJSSEProvider2
security.provider.5=com.ibm.security.jgss.IBMJGSSProvider
security.provider.6=com.ibm.security.cert.IBMCertPath
security.provider.7=com.ibm.security.sasl.IBMSASL
security.provider.8=com.ibm.xml.crypto.IBMXMLCryptoProvider
security.provider.9=com.ibm.xml.enc.IBMXMLEncProvider
security.provider.10=com.ibm.security.jgss.mech.spnego.IBMSPNEGO
security.provider.11=sun.security.provider.Sun
2. We updated our server.xml to use the safkeyringhybrid keyword and the JCEHYBRIDRACFKS type, as shown in Example 6-22.
Example 6-22 Liberty server.xml
<keyStore id="racfKeyStore"
fileBased="false"
location="safkeyringhybrid:///LIBERTY.SC8CICS7"
password="password"
readOnly="true"
type="JCEHYBRIDRACFKS" />
3. We restarted our CICS JVM server, established an HTTPS connection, and verified the web page successfully loaded.
|
Note: In our testing, we found that if no cryptographic coprocessors were available when the JVM server started or ICSF was not started, the IBMJCEHYBRID provider silently failed over to use IBMJCE. However, if the cryptographic coprocessor went offline while the JVM was running, the JVM server needed to be restarted to allow TLS requests to continue to be successfully processed because calls to the service CSNDPKI (PKA key import) failed, which resulted in runtime Exceptions.
|
6.6.4 Monitoring cryptographic hardware
The IBMJCE and the IBMJCECCA provider can use cryptographic hardware. However, one of the advantages of using IBMJCECCA is that various tools are available to monitor the use of the cryptographic hardware by using the underlying ICSF support.
Use one of the following mechanisms to monitor the use of the cryptographic hardware when the IBMJCECCA provider is used:
•IBM RMF™ - Monitor I CRYPTO report
•ICSF - DISPLAY ICSF,CARDS
•ICSF SMF 82 records - subtype 31
•Hardware event data collection
In this section, we describe how we used the DISPLAY ICSF,CARDS command and SMF 82 records to analyze ICSF usage of the cryptographic coprocessors. We did not use RMF because the Monitor I crypto report only analyzes processor usage, which was relatively low in our tests.
Hardware event data collection can also be used to monitor the use of the CPACF facility. It is useful if you want monitor the use of the CPACF by IBMJCE because it does not use the facilities of ICSF.
Running the test
To monitor our cryptographic hardware when TLS was used, we started a Liberty JVM server and ran a workload of 1000 HTTPS requests to our restapp by using the following cipher suite:
SSL_ECDHE_RSA_WITH_AES_128_GCM_SHA256
The Liberty server was configured to disable persistent connections by using the following httpOptions element to ensure that each request drove a full TLS handshake:
< httpOptions id="httpoptions" keepAliveEnabled="false" />
DISPLAY ICSF,CARDS
|
Note: Use of the ICSF display cards command and SMF82 recording requires updates to the level of ICSF. We used ICSF FMID=HCR77C1.
|
Before the test, we ran the /DISPLAY,ICSF,CARDS MVS command to display the configured cryptographic coprocessors on our system, as shown in Example 6-23.
Example 6-23 DISPLAY ICSF,CARDS: Before test
RESPONSE=SC80
CSFM668I 10.30.59 ICSF CARDS 642
ACTIVE DOMAIN = 001
CRYPTO EXPRESS6 COPROCESSOR 6C00
STATUS=Active SERIAL#=DV785304 LEVEL=6.0.6z
REQUESTS=0000006013 ACTIVE=0000
CRYPTO EXPRESS6 ACCELERATOR 6A01
STATUS=Active
REQUESTS=0000002562 ACTIVE=0000
This result confirmed that we have a coprocessor (CEX6C) and an accelerator (CEX6A) configured on the system, and both are active.
After the test, we saw the results of this command that are shown in Example 6-24.
Example 6-24 DISPLAY ICSF,CARDS: After test
RESPONSE=SC80
CSFM668I 10.36.25 ICSF CARDS 702
ACTIVE DOMAIN = 001
CRYPTO EXPRESS6 COPROCESSOR 6C00
STATUS=Active SERIAL#=DV785304 LEVEL=6.0.6z
REQUESTS=0000009040 ACTIVE=0000
CRYPTO EXPRESS6 ACCELERATOR 6A01
STATUS=Active
REQUESTS=0000002639 ACTIVE=0000
The difference between these two commands shows that approximately 3000 requests to the CEX6C and 77 requests to the CEX6A during the test period. This result confirms that the cryptographic coprocessors were being used during the test, but we did not fully understand what services were being requested or if the CPACF facility is being driven in our tests.
ICSF SMF 82 records
To gather SMF82 subtype 31 records, we completed the following steps:
1. Before running the test, we started statistics collection in ICSF for engines, services, and algorithms by using the following ICSF command:
/SETICSF OPT,STATS=(ENG,SRV,ALG)
We then ran the test to drive 1000 request into our restapp.
2. After running the test, we disabled statistics collection to force an SMF record to be collected by using the following command:
/SETICSF OPT,STATS=NONE
3. We collected SMF82 subtype 31 records from SMF by using the job that is shown in Example 6-25. This job used the IFASMFDL procedure to dump the SMF records from the log stream for the specific day of the year (2017285), sorted them by date, and then formatted out the SMF 82 records by using the new ICSF supplied REXX exec, CSFSMFR.
Example 6-25 ICSF SMF82 subtype: 31 records
//CSFSMFJ JOB (999,POK),'FORMAT CRYPTO SMF',CLASS=A,MSGCLASS=T,
// NOTIFY=&SYSUID,TIME=NOLIMIT,REGION=0M
/*JOBPARM L=999,SYSAFF=*
//DUMP EXEC PGM=IFASMFDL
//SYSPRINT DD SYSOUT=*
//DUMPOUT DD DISP=(NEW,PASS),DSN=&&VBS,UNIT=3390,
// SPACE=(CYL,(1,1)),DCB=(LRECL=32760,RECFM=VBS,BLKSIZE=4096)
//SYSIN DD *
LSNAME(IFASMF.DEFAULT,OPTIONS(DUMP))
OUTDD(DUMPOUT,TYPE(82))
DATE(2017285,2017285)
SID(SC80)
SOFTINFLATE
USER1(SMFDPUX1)
USER2(SMFDPUX2)
USER3(SMFDPUX3)
/*
//*-------------------------------------------------------------*
//* COPY VBS TO SHORTER VB AND SORT ON DATE/TIME *
//*-------------------------------------------------------------*
//COPYSORT EXEC PGM=SORT,REGION=200M
//SYSOUT DD SYSOUT=*
//SORTWK01 DD UNIT=VIO,SPACE=(CYL,10)
//SORTIN DD DISP=(OLD,DELETE),DSN=&&VBS
//SORTOUT DD DISP=(NEW,PASS),DSN=&&VB,UNIT=3390,
// SPACE=(CYL,(1,1)),DCB=(LRECL=32752,RECFM=VB)
//SYSIN DD *
SORT FIELDS=(11,4,A,7,4,A),FORMAT=BI,SIZE=E4000
//*
//*-------------------------------------------------------------*
//* FORMAT TYPE 82 RECORDS *
//*-------------------------------------------------------------*
//FMT EXEC PGM=IKJEFT01,REGION=200M,DYNAMNBR=100
//SYSPROC DD DISP=SHR,DSN=SYS1.SAMPLIB
//SYSTSPRT DD SYSOUT=*
//INDD DD DISP=(OLD,DELETE),DSN=&&VB
//OUTDD DD SYSOUT=*
//SYSTSIN DD *
%CSFSMFR
SMF test data of AES with GCM mode
CSFSMFR produced the report for our test run that is shown in Example 6-26.
Example 6-26 ICSF SMF82 subtype - 31 records.
**************************************************
Subtype=001F Crypto Usage Statistics
Written periodically to record crypto usage counts
12 Oct 2017 10:35:01.99
TME... 003A2397 DTE... 0117285F SID... SC80 SSI... 00000000 STY... 001F
INTVAL_START.. 10/12/2017 14:30:30.003602
INTVAL_END.... 10/12/2017 14:35:01.996442
USERID_AS..... CICSREGN
USERID_TK.....
JOBID......... STC08894
JOBNAME....... SC8CICS7
JOBNAME2......
PLEXNAME...... WTSCPLX8
DOMAIN........ 1
ENG...CARD...6C00/DV785304... 3003
ENG...CARD...6A01/N/A ... 77
ENG...CPACF... 8001
ALG...AES128..... 8000
ALG...AES256..... 1
ALG...RSA2048.... 1059
ALG...RSA4096.... 19
ALG...ECCP256.... 3000
ALG...MD5........ 280
ALG...PRNG....... 10262
SRV...CSFDSG..... 1000
SRV...CSFDSV..... 102
SRV...CSFOWH..... 280
SRV...CSFPKI..... 1001
SRV...CSFSYD..... 4000
SRV...CSFSYE..... 4001
SRV...CSFIQF..... 3
SRV...CSFRNGL.... 10262
SRV...CSFEDH..... 1000
SRV...CSFPKB..... 3124
**************************************************
Subtype=001F Crypto Usage Statistics
Written periodically to record crypto usage counts
12 Oct 2017 10:35:01.99
TME... 003A2397 DTE... 0117285F SID... SC80 SSI... 00000000 STY... 001F
INTVAL_START.. 10/12/2017 14:30:30.003602
INTVAL_END.... 10/12/2017 14:35:01.996442
USERID_AS..... CICSREGN
USERID_TK.....
JOBID......... STC08894
JOBNAME....... SC8CICS7
JOBNAME2...... OMVS
PLEXNAME...... WTSCPLX8
DOMAIN........ 1
ALG...PRNG....... 8
SRV...CSFRNG..... 8
************************************************** 
|
Note: The SMF output from this test contained two records. Most of the ICSF activity is performed in the CICS address space and contained in the first record; however, the calls to the CSFRNG random number generation service require a space switch from the CICS address space to the ICSF address space and so are contained in another record.
|
The data in Example 6-26 shows that initialization of the IBMJCECCA security provider and the 1000 TLS handshakes used the following ICSF callable services:
•CSFDSG - Digital Signature Generate
•CSFDSV - Digital Signature Verity
•CSFOWH - One way hash generate
•CSFPKI - PKA Key Import
•CSFSYD - Symmetric Key Decipher
•CSFSYE - Symmetric Key Encipher
•CSFIQF - ICSF Query Facility
•CSFRNGL - Random Number Generate
•CSFEDH - ECC Diffie-Hellman
•CSFPKB - PKA Token Build
For more information about the ICSF callable services, see the Resource names for CCA and ICSF entry points topic in IBM Knowledge Center.
The engine statistics (ENG) show 8001 calls to the CPACF to assist with the bulk cipher encrypt/decrypt of the TLS payload. It also showed 3001 calls to the crypto-coprocessor (6C00) and 77 calls to the crypto-accelerator (6A01).
The 8001 calls to the CPACF were driven by 4001 calls to the CSFSYE (symmetric key encipher) and 4000 calls to CSFSYD (symmetric key decipher) services, which resulted in 8000 calls that used the AES128 algorithm. This cipher is the bulk cipher that was specified in our negotiated cipher suite SSL_ECDHE_RSA_WITH_AES_128_GCM_SHA256, which uses Elliptic Curve Diffe Hellman with RSA for the key exchange and AES in Galois/Counter Mode (GCM) for the bulk cipher.
|
Note: In IBM SDK, Java Technology Edition, Version 8, SR5 new functionality was added to the IBMJCE provider to support AES-GCM hardware acceleration on IBM z13® and z14. this support is provided by using the CPACF; therefore, ICSF is not required to obtain the hardware assistance.
For more information, see the IBM SDK, Java Technology Edition, Version 8, Service Refresh 5 page of the IBM developerWorks website.
|
SMF test data of AES with CBC mode
Finally, we ran another test workload and modified the cipher suite to use SSL_ECDHE_RSA_WITH_AES_128_CBC_SHA256. This cipher suite uses the AES cipher-block chaining (CBC) mode of symmetric encryption, which is an older mode of AES that is implemented directly by the IBMJCECCA and IBMJCE providers. It does not require the support of ICSF. The ICSF SMF82 data from this test is shown in Example 6-27.
Example 6-27 ICSF SMF82 subtype: 31 records
**************************************************
Subtype=001F Crypto Usage Statistics
Written periodically to record crypto usage counts
12 Oct 2017 11:44:00.69
TME... 00407445 DTE... 0117285F SID... SC80 SSI... 00000000 STY... 001F
INTVAL_START.. 10/12/2017 15:42:18.555146
INTVAL_END.... 10/12/2017 15:44:00.690368
USERID_AS..... CICSREGN
USERID_TK.....
JOBID......... STC08894
JOBNAME....... SC8CICS7
JOBNAME2......
PLEXNAME...... WTSCPLX8
DOMAIN........ 1
ENG...CARD...6C00/DV785304... 3000
ALG...RSA2048.... 1000
ALG...ECCP256.... 3000
ALG...PRNG....... 14000
SRV...CSFDSG..... 1000
SRV...CSFPKI..... 1000
SRV...CSFRNGL.... 14000
SRV...CSFEDH..... 1000
SRV...CSFPKB..... 3000
**************************************************
In this case, we can see that we now have no use of the CPACF by ICSF because the only engine that is started is the coprocessor (CARD...6C00). The reason for this result is that the AES-CBC mode cipher does not require ICSF support because it is directly implemented by the JCECCA provider that uses native assembler calls to drive CPACF directly.
Instead, we now the see that the RSA, ECC, and random number generation algorithms are used in ICSF because they are started during the asymmetric key exchange during the 1000 TLS handshakes in our test case.
This test showed us how the new ICSF SMF statistics provide a powerful tool to analyze the use of the cryptographic hardware by the IBMJCECCA provider when JSSE is used. For more information about the new crypto statistics resource usage, see the Crypto Statistics Monitor Watches Resource Usage blog post of the IBM Systems Magazine website.
..................Content has been hidden....................
You can't read the all page of ebook, please click here login for view all page.