

Operating system maintenance
This chapter describes how to apply software maintenance to the operating system (OS) of deployed pattern instances, which includes virtual system instances and virtual application instances, also referred to as workloads.
The ability to apply software maintenance to a running, production-level OS in a consistent and repeatable manner is a common and sensible requirement. Simply redeploying a newer version of a Virtual System Pattern (VSP) or a virtual application pattern is often not wanted or possible.
As an example, recall the various open source secure sockets layer (OpenSSL) vulnerabilities that recently were discovered, as described at the following website:
Most of these vulnerabilities required urgent patching, which reinforces the need to have a solution for OS maintenance in place. Updating and redeploying patterns to patch systems is both time-consuming and prone to error.
This chapter covers the following topics:
7.1 Introduction
When planning for OS maintenance on IBM PureApplication System or in an IBM PureApplication Software environment, you need a mechanism with the following characteristics:
•Repeatable
•Consistent
•Scalable
You need the ability to apply OS maintenance to some or all virtual system and virtual application instances, or, to be more precise, to the OS that is installed on each of the corresponding virtual machines (VMs). Having said that, these might not be the only VMs that run an OS on PureApplication System. Some shared service instances also run on one or more VMs, so OS maintenance must be applied to them.
The solution for OS maintenance depends on the OS that is used on the PureApplication platform. Table 7-1 lists the various platforms and OSs and the corresponding solutions.
|
Note: Most clients use a single OS across their PureApplication platform. In the case of a hybrid model, however, multiple solutions for OS maintenance might need to be implemented. A detailed description about hybrid models is outside of the scope of this book.
|
Table 7-1 Solutions for OS maintenance depend on the PureApplication platform and OS
|
Platform
|
OS
|
Solution for OS maintenance
|
|
PureApplication Software
|
Red Hat Enterprise Linux (RHEL) 6 or RHEL 7
|
Red Hat Satellite Server
|
|
PureApplication Software
|
Windows Server 2008 R2 or Windows Server 2012
|
IBM Endpoint Manager
|
|
PureApplication System models W1500/W2500 (Intel)
|
RHEL 6 or RHEL 7
|
Red Hat Satellite Server
|
|
PureApplication System models W1500/W2500 (Intel)
|
Windows Server 2008 or Windows Server 2012
|
IBM Endpoint Manager
|
|
PureApplication System models W1700/W2700 (POWER)
|
IBM AIX
|
IBM Endpoint Manager
|
|
Note: IBM also supports the use of Red Hat Update Infrastructure for OS maintenance on PureApplication System. However, both IBM and Red Hat deprecated Red Hat Update Infrastructure. Use Red Hat Satellite Server for OS maintenance of RHEL 6 and RHEL 7 on PureApplication System.
For a full comparison of Red Hat Update Infrastructure and Red Hat Satellite Server on PureApplication System, see the IBM Knowledge Center at the following website:
|
As Table 7-1 on page 156 shows, here are the two solutions for OS maintenance on PureApplication System:
7.2 OS maintenance by using Red Hat Satellite Server
This section describes the use of Red Hat Satellite Server for OS maintenance on PureApplication System.
7.2.1 Overview
PureApplication System can automatically register the RHEL OS on deployed VMs with an existing Red Hat Satellite Server, which is done by deploying the Red Hat Satellite Service (External) shared service, which automatically configures the RHEL OS of VMs on PureApplication System to use the Red Hat Satellite Server. When you deploy this shared service, you must specify the URL of the Red Hat Satellite Server and the Activation Key to be used for registration. This key is used to register when the RHEL OS on the VMs registers with the Red Hat Satellite Server.
The following sections describe how to implement RHEL OS maintenance on PureApplication System. Here is a brief outline of the steps and the corresponding sections in this chapter:
|
Note: Some clients already have a Red Hat Satellite Server environment in place. For example, you might use it to apply OS maintenance to RHEL OS instances outside of PureApplication System. PureApplication System can directly integrate with that environment.
If this situation applies to your organization, go to 7.2.5, “Understanding the scope of the Red Hat Satellite Service shared service” on page 175.
|
With the Red Hat Satellite Server shared service in place, go to 7.2.7, “Using Red Hat Satellite Server integration on PureApplication System” on page 179 for a demonstration of performing OS maintenance and the general installation of Red Hat packages.
7.2.2 Preparing to deploy Red Hat Satellite Server on PureApplication System
If you do not have an existing Red Hat Satellite Server available, you can easily set up one on PureApplication System. IBM ships a VSP that is named Red Hat Satellite Server 5.6, which automatically installs and configures Red Hat Satellite Server 5.6. This pattern is shown in Figure 7-1. This chapter provides the deployment process for use during OS maintenance.
|
Note: There are multiple versions of the Red Hat Satellite Server 5.6 pattern. At the time of writing, Version 1.0.0.3 is the most recent, and it was shipped with PureApplication System V2.1.0.1 firmware.
|

Figure 7-1 Red Hat Satellite Server 5.6 Virtual System Patterns in PureApplication System
This section describes the deployment of a VSP. Figure 7-2 shows what deployment of this pattern on PureApplication System entails.

Figure 7-2 Overview of Red Hat Satellite Server 5.6 Virtual System Pattern on PureApplication System
|
Note: As a prerequisite, you need an active Red Hat account. To create one, go to the following website:
|
Here are the high-level steps for deploying a VSP:
1. Request and receive the Red Hat registration codes for PureApplication System from IBM Support and access your Red Hat account by providing the registration codes.
2. Obtain the following items from Red Hat to deploy the Red Hat Satellite Server 5.6 VSP on PureApplication System:
– Satellite entitlement certificate
– Satellite activation key
– Satellite ISO download certificate
|
Note: The Satellite ISO download certificate is a PEM file that IBM Support provides to you. You do not need to obtain this certificate from Red Hat yourself.
|
3. Deploy the Red Hat Satellite Server 5.6 VSP.
4. During deployment, the VSP downloads an ISO file from https://cdn.redhat.com that contains the Red Hat Satellite Server 5.6 installation binary file1s.
5. After the VSP installs Red Hat Satellite Server 5.6, the Satellite Server is registered with Red Hat. With the registration in place, all packages for the following Red Hat Software Channels are downloaded to the local Red Hat Satellite Server:
– RHEL Server (v.6 for 64-bit x86_64)
– RHEL Server (v.7 for 64-bit x86_64)
|
Note: This section focuses on the two most important aspects to deploy the Red Hat Satellite Server 5.6 VSP:
•Obtaining the Red Hat Satellite Server certificates and activation key
•Ensuring network connectivity to the internet
To see all the pre-requirements for the deployment of the Red Hat Satellite Server 5.6 VSP, go to the IBM Knowledge Center at the following website:
|
Obtaining the Red Hat Satellite Server certificates and activation key
As shown in Figure 7-2 on page 158, the deployment of the Red Hat Satellite Server 5.6 VSP requires two certificates and an activation key from Red Hat. Before you can generate these certificates and key on the Red Hat portal, you first must obtain the registration code for your PureApplication Platform from IBM by completing the following steps:
1. Open an IBM Problem Management Report (PMR) by using one of the IBM Support channels by going to the following website:
2. Await an email from IBM Support, which contains the registration codes and detailed documentation.
To obtain the two certificates and the activation key for deployment of the Red Hat Satellite Server 5.6 VSP, complete the following steps:
1. Obtain the Red Hat Satellite activation key. The activation key is used to register the Red Hat Satellite Server 5.6 with Red Hat. To obtain the key, go to the following website:
2. Obtain the Red Hat Satellite ISO download certificate. The Red Hat Satellite Server pattern downloads an ISO file containing the Red Hat Satellite Server installation binary files. This certificate is required to be able to download the file from Red Hat. To obtain the certificate, go to the following website:
3. Obtain the Red Hat Satellite entitlement certificate. This certificate from Red Hat contains the precise set of entitlements that are attributed to your PureApplication environment. To obtain the certificate, go to the following website:
Ensuring connectivity to Red Hat
As we saw in Figure 7-2 on page 158, the deployment of the Red Hat Satellite Server 5.6 VSP requires internet connectivity to Red Hat. Figure 7-3 shows the connectivity requirements in more detail.

Figure 7-3 Internet access from Red Hat Satellite Server 5.6 on PureApplication System
Red Hat websites
The VM that is hosting the Red Hat Satellite Server on PureApplication System needs access, by using HTTPS, to the following Red Hat websites:
|
Note: When possible, configure access to https://*.redhat.com. If the network connectivity requirements dictated by Red Hat change over time, no additional network changes are required.
|
(Optional) Security First
As an option, you can install Security First. This pattern provides data-at-rest encryption. You can access it at the following website:
|
Note: Access to Security First is only applicable when you purchase and install the IBM Encryption Pattern for Security First SPxBitFiler-IPA from Security First. For more information, go to the following website:
|
Verifying connectivity
Verify the connectivity of a VM that is in the IP group to which you plan to deploy the Red Hat Satellite Server 5.6 VSP. This task ensures that the VM can access the URLs that are listed in “Red Hat websites” on page 161. Use a tool such as wget or curl.
Many clients do not allow a direct connection to the internet from their data center. Instead, a forward proxy must be used to connect to the internet. The deployment of the Red Hat Satellite Server 5.6 VSP supports the use of a forward proxy; however, it must be configured without SSL termination for all outbound connections to the sites listed in “Red Hat websites” on page 161.
|
Note: The IBM Knowledge Center mentions that a reverse proxy is not supported. However, a forward proxy is supported if no SSL termination is performed on the outbound connections. For more information, go to the following website:
|
Sometimes, it is valuable to prove that SSL termination is turned off in your proxy server. Example 7-1 shows how you can use curl to accomplish this task.
|
Note: When performing this task, pay attention to the issuer of the SSL certificate. If it looks like that the issuer originated from your own proxy server, that means that the SSL connection was terminated.
The issuer in Example 7-1 is the correct one. Akamai, not Red Hat, is the issuer, confirming that Red Hat uses Akamai’s Content Distribution Network for https://access.redhat.com. Here is the line of interest:
issuer: C=NL; L=Amsterdam; O=Verizon Enterprise Solutions; OU=Cybertrust; CN=Verizon Akamai SureServer CA G14-SHA1
|
Example 7-1 Using curl to access https://access.redhat.com through a proxy server
[virtuser@pure-9-3-172-231 ~]$ curl -v -k -I -x proxy.emea.ibm.com:80 https://access.redhat.com/
* About to connect() to proxy proxy.emea.ibm.com port 80 (#0)
* Trying 9.139.247.81... connected
* Connected to proxy.emea.ibm.com (9.139.247.81) port 80 (#0)
* Establish HTTP proxy tunnel to access.redhat.com:443
> CONNECT access.redhat.com:443 HTTP/1.1
> Host: access.redhat.com:443
> User-Agent: curl/7.21.3 (x86_64-unknown-linux-gnu) libcurl/7.21.3 OpenSSL/1.0.1e zlib/1.2.3
> Proxy-Connection: Keep-Alive
>
< HTTP/1.1 200 Connection established
HTTP/1.1 200 Connection established
<
* Proxy replied OK to CONNECT request
* successfully set certificate verify locations:
* CAfile: /etc/pki/tls/certs/ca-bundle.crt
CApath: none
* SSLv3, TLS handshake, Client hello (1):
* SSLv3, TLS handshake, Server hello (2):
* SSLv3, TLS handshake, CERT (11):
* SSLv3, TLS handshake, Server finished (14):
* SSLv3, TLS handshake, Client key exchange (16):
* SSLv3, TLS change cipher, Client hello (1):
* SSLv3, TLS handshake, Finished (20):
* SSLv3, TLS change cipher, Client hello (1):
* SSLv3, TLS handshake, Finished (20):
* SSL connection using AES256-SHA
* Server certificate:
* subject: C=US; ST=NC; L=Raleigh; O=Red Hat, Inc.; OU=Web Operations; CN=access.redhat.com
* start date: 2014-10-17 20:30:01 GMT
* expire date: 2015-10-17 20:29:57 GMT
* subjectAltName: access.redhat.com matched
* issuer: C=NL; L=Amsterdam; O=Verizon Enterprise Solutions; OU=Cybertrust; CN=Verizon Akamai SureServer CA G14-SHA1
* SSL certificate verify ok.
> HEAD / HTTP/1.1
> User-Agent: curl/7.21.3 (x86_64-unknown-linux-gnu) libcurl/7.21.3 OpenSSL/1.0.1e zlib/1.2.3
> Host: access.redhat.com
> Accept: */*
>
< HTTP/1.1 200 OK
HTTP/1.1 200 OK
< Server: Apache
Server: Apache
< X-Powered-By: PHP/5.3.3
X-Powered-By: PHP/5.3.3
< Content-Language: en
Content-Language: en
< X-Cnection: close
X-Cnection: close
< Content-Type: text/html; charset=UTF-8
Content-Type: text/html; charset=UTF-8
< Cache-Control: no-cache, must-revalidate, post-check=0, pre-check=0
Cache-Control: no-cache, must-revalidate, post-check=0, pre-check=0
< Expires: Tue, 21 Jul 2015 14:22:26 GMT
Expires: Tue, 21 Jul 2015 14:22:26 GMT
< Date: Tue, 21 Jul 2015 14:22:26 GMT
Date: Tue, 21 Jul 2015 14:22:26 GMT
< Connection: keep-alive
Connection: keep-alive
* no chunk, no close, no size. Assume close to signal end
<
* Closing connection #0
* SSLv3, TLS alert, Client hello (1):
7.2.3 Deploying Red Hat Satellite Server on PureApplication System
With all the pre-requirements in place, deploying the VSP is relatively straightforward. To do so, complete the following steps:
1. Log in to the PureApplication System web console and click Patterns → virtual system patterns.
2. Find Red Hat Satellite Server 5.6 Pattern version 1.0.0.3 and click the deployment icon. The Deploy Pattern window opens, as shown in Figure 7-4.

Figure 7-4 The Deploy Pattern window for deploying the Red Hat Satellite Server 5.6 pattern
3. Complete the Name and Priority fields in the Configure window.
4. Make a selection for the Environment Profile field. You must assign an IP group to the first data Network Interface Card (NIC). Addresses from this IP group must have connectivity to the internet, as described in “Ensuring connectivity to Red Hat” on page 160.
|
Note: The first data NIC corresponds to eth1 for VMs that are deployed on PureApplication System, but to eth0 for VMs on PureApplication Software.
Note: Take extra care if your environment profile contains more than just that one data IP group:
•When using an internally managed environment profile, you can immediately specify the IP group that is used in the Configure window.
•When using an externally managed environment profile, you must proceed to the Prepare to Deploy window and assign the correct IP group from your environment profile.
|
5. Enter the following information into the Deploy Pattern window for the Red Hat Satellite Server 6_6 software component of the Red Hat Satellite Server node:
– Satellite entitlement certificate
The Red Hat Satellite Server entitlement certificate that you obtained from Red Hat, ad described in “Obtaining the Red Hat Satellite Server certificates and activation key” on page 159. It is an XML file. For more information, see the following website:
– Certificate to download Satellite ISO image
This is the Red Hat Satellite Server ISO download certificate that you obtained from Red Hat, as described in “Obtaining the Red Hat Satellite Server certificates and activation key” on page 159. It is an XML file.
– Satellite activation key
This is the Red Hat Satellite Server activation key that you obtained from Red Hat, as described in “Obtaining the Red Hat Satellite Server certificates and activation key” on page 159. It is an XML file.
– Satellite Server admin user name
Enter your Satellite Server admin user name.
– Satellite Server admin password
Enter your Satellite Server admin password.
– Satellite Server admin email ID
Enter your Satellite Server admin email ID.
6. In the right pane, specify a password for the root and virtuser users.
7. Click Prepare to Deploy and ensure that the correct data IP group is assigned, as shown in Figure 7-5.

Figure 7-5 Select the correct data IP group to be used at deployment time
8. If you are using an internally managed environment profile, you can directly proceed with deployment by clicking Quick Deploy. If you are using an externally managed environment profile, select one of the IP groups that are defined in your profile.
Deployment of the VSP depends on the speed of your internet connection. Figure 7-6 shows the History of a successfully deployed Virtual System Instance. As you can see, deployment took over 20 hours to complete.

Figure 7-6 Sample of a successfully deployed Virtual System instance
With the process complete, the deployed Virtual System instance looks like the window that is shown in Figure 7-7 on page 167.

Figure 7-7 Deployed and running Red Hat Satellite Server Virtual System instance
7.2.4 Configuring Red Hat Satellite Server on PureApplication System
The Red Hat Satellite Service shared service automatically registers the RHEL OS of all VMs that are within the scope of the shared service with a Red Hat Satellite Server, as described in 7.2.6, “Deploying the Red Hat Satellite service shared service” on page 177. During the registration, a specific activation key that is defined in the shared service is used. So, you must configure at least one such activation key in the Red Hat Satellite Server you deployed.
Creating the activation key and a system group
The first task is to create an activation key. This key is associated with the Systems Group, which is also created in this section. Complete the following steps:
1. Log in to the Red Hat Satellite Server GUI, shown in Figure 7-8, by using the credentials that you specified during the deployment of the VSP (described in 7.2.3, “Deploying Red Hat Satellite Server on PureApplication System” on page 164).

Figure 7-8 Log in to the Red Hat Satellite Server GUI
2. Click System → Activation Keys, as shown in Figure 7-9, and click create new key in the upper right corner.

Figure 7-9 Create an activation key in the Red Hat Satellite Server GUI
3. Enter a Key and Description, as shown Figure 7-10. Ensure that the Red Hat Satellite Default channel is selected.

Figure 7-10 Provide information for the new activation key
4. Click Create Activation Key to create the key.
5. Associate the activation key with the software channels. Click Child Channels, and at a minimum, ensure that the following two child channels are selected:
– RHN Tools for RHEL (v.6 for 64-bit x86_64)
– RHN Tools for RHEL (v.7 for 64-bit x86_64)
As shown in Figure 7-11, for this example, we also selected the child channel Security First kernel RPMS for RHEL (v.6 for 64-bit x86_64).

Figure 7-11 Configure an additional child channel for the newly created activation key
6. Click Update Key to apply these changes.
|
Note: Without the child channels for RHN Tools for RHEL, PureApplication System cannot automatically install and configure osad. This daemon is required to push out package updates. For more information, see “Applying updates to deployed VMs from the Red Hat Satellite GUI” on page 184.
|
With the new activation key created, you can now configure a new Systems Group and associate it with the new activation key.
|
Note: This task is not strictly necessary, but it can greatly simplify managing a large number of VMs that are all registered with the Red Hat Satellite Server by using the same Activation Key.
With all the VMs conveniently grouped, rolling out updates, for example, to packages, can be applied to all VMs at one time. For more information about this topic, see “Applying updates to deployed VMs from the Red Hat Satellite GUI” on page 184.
|

Figure 7-12 Create a System Group
8. Provide a Name and Description for the new System Group, as shown in Figure 7-13 on page 173, and click Create Group.

Figure 7-13 Provide a Name and Description for the new System Group
9. With the new System Group created, click Systems → Activation Keys and select the Activation Key Redbooks that was created in step 4 on page 170.

Figure 7-14 System Groups for the activation key Redbooks
11. Now, select the System Group Redbooks and click Join Selected Groups, as shown in Figure 7-15 on page 175.

Figure 7-15 Activation key Redbooks joining the System Group Redbooks
This completes the association of the activation key Redbooks with System Group Redbooks. Any RHEL OS on a VM that automatically registers by using this key automatically joins the System Group Redbooks.
|
Note: Although a single activation key is required, there are many scenarios where multiple activation keys can help. Each activation key can, in turn, be associated with its own System Group. For more information, see Figure 7-16 on page 176.
|
7.2.5 Understanding the scope of the Red Hat Satellite Service shared service
When deploying a shared service on PureApplication System, consider the scope, that is, consider the set of VMs with which the shared service instance interacts.
Historically, the scope of a shared service is the cloud group where the shared service is deployed. All VMs that run inside that cloud group are considered in scope. However, since the release of PureApplication System 2.0, the scope is no longer always the cloud group. Instead, when using an externally managed environment profile to deploy a shared service, the scope of that shared service is the environment profile. Only VMs deployed by using that same environment profile are now in scope of the shared service.
Table 7-2 shows how the scope of a shared service varies depending on the type of environment profile that is used.
Table 7-2 The scope of shared services is determined by the type of environment profile
|
Environment profile
|
Cloud management of cloud group
|
Scope
|
|
Internally managed
|
By way of internal network
|
Cloud group
|
|
Externally managed
|
By way of external network
|
Environment profile
|
When applied to the Red Hat Satellite Service (external) shared service, the scope is important. By deploying multiple shared service instances where each uses a unique key, the VMs on PureApplication System can easily be grouped in the Red Hat Satellite Server. For example, you might want to have separate groups for production and non-production VMs, as shown in Figure 7-16.

Figure 7-16 Using two shared service instances each with a unique activation key
7.2.6 Deploying the Red Hat Satellite service shared service
Before you deploy the Red Hat Satellite Server (external) shared service, ensure that you have the following items in place:
•The URL for the Red Hat Satellite Server
•At least one activation key that is defined in your existing Red Hat Satellite Server
•(Optional) HTTP proxy server details for accessing your Red Hat Satellite Server
You are now ready to deploy the Red Hat Satellite Service (external) shared service. Complete the following steps:
1. From the console, click Patterns → Pattern instances → Shared service and click Create New, as shown in Figure 7-17.

Figure 7-17 Create a shared service (external) instance
2. Locate the shared service Red Hat Satellite Service (External) in the list and click OK, as shown in Figure 7-18.

Figure 7-18 Select the Red Hat Satellite Service (external) shared service for deployment
3. In the deployment pane, complete the following steps:
a. Provide a Name for the shared service instance.
b. Choose the environment profile that is used for deployment. In this example, we opted to deploy to an externally managed environment profile that is named Redbooks - external.
|
Note: Because this is an external shared service, no VMs are deployed. Hence, there is no need to provide an SSH (public) key.
|
c. Enter the URL for your Red Hat Satellite Server into the URL to connect to Satellite Server host field.
|
Note: You must provide either the IP address or the Fully Qualified Domain Name (FQDN) of the host.
|
d. Enter the Activation Key into the Satellite Server activation key field. In our example, we set the activation key to match what we defined in the Red Hat Satellite Server (1-Redbooks).
e. (Optional) Enter the details for your HTTP proxy server.
f. Click Quick Deploy to prepare the deployment, as shown in Figure 7-19. The Prepare to Deploy button is not valid here because this is an external shared service, and no actual VMs are deployed.

Figure 7-19 Deploying the Red Hat Satellite Service (external) shared service
4. When the deployment is complete, the shared service instance can be viewed by clicking Patterns → Pattern instances → Shared services, as shown in Figure 7-20.
|
Note: The shared service that we deployed in our example is the first one in the list. No cloud group is mentioned for this shared service instance because we deployed it by using an externally managed environment profile.
|

Figure 7-20 Deployed Red Hat Satellite Service (external) shared service instance
|
Note: If you want to delete and re-deploy the Red Hat Satellite Server shared service, then the OS of all VMs in scope automatically re-register themselves with the Red Hat Satellite Server that is specified in the newly deployed shared service instance.
|
7.2.7 Using Red Hat Satellite Server integration on PureApplication System
With the Red Hat Satellite Server shared service instance in place, each RHEL OS that is deployed in the scope of that shared service automatically registers with the Red Hat Satellite Server. Here are a few key scenarios that are enabled by the registration with the Red Hat Satellite Server:
Before you can get started, you first must deploy a simple VSP, as described in “Deploying a simple Virtual System Pattern on PureApplication System” on page 179.
Deploying a simple Virtual System Pattern on PureApplication System
In this example, you create and deploy a simple VSP that consists of two VMs running Red Hat Enterprise Linux 6.6. Here is a summary of the steps:
1. Create a VSP that is called Multisystem core OS, as shown in Figure 7-21. The pattern consists of two VMs, each running the IBM Virtual Image for Red Hat Linux version 2.1.2.0 (which corresponds to RHEL 6.6).

Figure 7-21 Simple Virtual System Pattern consisting of two VMs running RHEL 6.6
2. Deploy this pattern by using the environment profile Redbooks - external, as shown in Figure 7-22. Click Prepare to Deploy.

Figure 7-22 Deploy the Virtual System Pattern by using environment profile Redbooks - external
3. Assign each VM to a different PureApplication System within the deployment subdomain, as shown in Figure 7-23.

Figure 7-23 Assign VMs to different PureApplication Systems within the deployment subdomain
4. When the deployment is complete, obtain the host name, IP address, and PureApplication System of each VM, as shown in Figure 7-24 on page 181. They are listed in Table 7-3 on page 181 because you need them in the next section.

Figure 7-24 Obtain the host name, IP address, and PureApplication System for each VM
Table 7-3 VMs and corresponding host names as deployed on PureApplication Systems
|
VM
|
Host name
|
IP address
|
PureApplication System
|
|
OS_Node_1
|
ausipas034.austin.ibm.com
|
9.3.169.34
|
Austin Intel rack 1
|
|
OS_Node_2
|
ipas-lpar-9-3-171-72.austin.ibm.com
|
9.3.171.72
|
Austin Intel rack 4
|
With the deployment complete, both RHEL OSs on both VMs are automatically registered with the Red Hat Satellite Server. They use the activation key 1-Redbooks, as configured when you deployed the Red Hat Satellite Service shared service instance to the environment profile Redbooks - external.
|
Note: The exact inner workings of the registration of the deployed VMs with the Red Hat Satellite Server defined in the shared service are beyond the scope of this book. However, it is worth highlighting that the system plug-in rhusclient is associated with each VM that is deployed. This system plug-in performs the registration with the Satellite Server and logs to the following file on each VM (the name OS_Node and the IDs will vary):
/opt/IBM/maestro/agent/usr/servers/OS_Node.11437482855011/logs/OS_Node.11437482855011.RHUSClient/trace.log
|
Using yum to install packages from a deployed VM
When the VMs are registered with Red Hat Satellite Server, administrators can use yum to install new packages by using a command-line interface (CLI).
|
Note: By default, this package is not installed on the Virtual Image “IBM OS image for Red Hat Linux Systems” version 2.1.2.0 (which is the RHEL 6.6 Virtual Image that ships with PureApplication System 2.1.0.1).
|
Here are the steps to log in to one of the first VMs that are listed in Table 7-3 on page 181 and install the package for Telnet:
1. Use an SSH client to log in to the VM as virtuser, as shown in Example 7-2. Here, we opt to authenticate with the corresponding SSH private key.
|
Note: Authenticating with a private SSH key requires that the corresponding public SSH key be set. In this example, we configured the public SSH key at deployment time of the Virtual System, as described at the following website:
|
Example 7-2 Log in to the VM as root by using SSH
login as: virtuser
Authenticating with public key "Redbooks" from agent
[virtuser@ausipas034 ~]$ sudo su -
-bash-4.1#
3. Run yum list installed telnet, as shown in Example 7-3. This command confirms that Telnet is not installed.
Example 7-3 Confirm that a package for Telnet is not installed
bash-4.1# yum list installed telnet
Loaded plugins: rhnplugin, security
This system is receiving updates from RHN Classic or RHN Satellite.
Error: No matching Packages to list
4. Run yum info telnet, as shown in Example 7-4. This command confirms that Telnet is available from the rhel-x86_64-server-6 repository.
Example 7-4 Confirm the availability of the Telnet package from the repository in Red Hat Satellite Server
bash-4.1# yum info telnet
Loaded plugins: rhnplugin, security
This system is receiving updates from RHN Classic or RHN Satellite.
Available Packages
Name : telnet
Arch : x86_64
Epoch : 1
Version : 0.17
Release : 48.el6
Size : 109 k
Repo : rhel-x86_64-server-6
From repo : rhel-x86_64-server-6
Summary : The client program for the Telnet remote login protocol
License : BSD
Description : Telnet is a popular protocol for logging into remote systems over
: the Internet. The package provides a command line Telnet client
5. To install the package for Telnet, run yum -y install telnet. The -y flag automatically answers yes to any questions, making this a convenient command for automating the installation of a package. Example 7-5 shows the output.
Example 7-5 Install the package for Telnet
bash-4.1# yum -y install telnet
Loaded plugins: rhnplugin, security
This system is receiving updates from RHN Classic or RHN Satellite.
Setting up Install Process
Resolving Dependencies
--> Running transaction check
---> Package telnet.x86_64 1:0.17-48.el6 will be installed
--> Finished Dependency Resolution
Dependencies Resolved
================================================================================
Package Arch Version Repository Size
================================================================================
Installing:
telnet x86_64 1:0.17-48.el6 rhel-x86_64-server-6 58 k
Transaction Summary
================================================================================
Install 1 Package(s)
Total download size: 58 k
Installed size: 110 k
Downloading Packages:
telnet-0.17-48.el6.x86_64.rpm | 58 kB 00:00
Running rpm_check_debug
Running Transaction Test
Transaction Test Succeeded
Running Transaction
Installing : 1:telnet-0.17-48.el6.x86_64 1/1
Verifying : 1:telnet-0.17-48.el6.x86_64 1/1
Installed:
telnet.x86_64 1:0.17-48.el6
Complete!
6. With the installation successfully complete, run yum list installed telnet again. The output that is shown in Example 7-6 confirms that the package for Telnet is installed.
Example 7-6 Confirm that Telnet is now installed
bash-4.1# yum list installed telnet
Loaded plugins: rhnplugin, security
This system is receiving updates from RHN Classic or RHN Satellite.
Installed Packages
telnet.x86_64 1:0.17-48.el6 @rhel-x86_64-server-6
7. Now you can use Telnet, as shown in Example 7-7.
Example 7-7 Use Telnet on the VM
-bash-4.1# telnet
telnet> quit
Applying updates to deployed VMs from the Red Hat Satellite GUI
There is a more powerful mechanism for applying updates to packages on a deployed VM. Administrators can use the Red Hat Satellite Server GUI to schedule the installation of updates on a VM. Therefore, there is no longer a need to log in to a VM and apply updates by running yum update.
From the Red Hat Satellite Server GUI, administrators can also work with groups of systems to schedule the installation of updates. As described in 7.2.4, “Configuring Red Hat Satellite Server on PureApplication System” on page 167, we configured our activation key Redbooks so that, upon registration, all systems automatically join the system group Redbooks. The systems group in turn enables an administrator to apply updates to all systems in this group.
|
Note: Although this section describes how to apply updates to packages through the Red Hat Satellite Server GUI, the same mechanism can be used to install (or remove) packages.
|
Start by using CLI to discover which packages are in need of updates. With that information, you can apply the updates by completing the following steps:
Example 7-8 Available updates
-bash-4.1# yum list updates
Loaded plugins: rhnplugin, security
This system is receiving updates from RHN Classic or RHN Satellite.
Updated Packages
abrt.x86_64 2.0.8-26.el6_6.1 rhel-x86_64-server-6
abrt-addon-ccpp.x86_64 2.0.8-26.el6_6.1 rhel-x86_64-server-6
2.0.8-26.el6_6.1 rhel-x86_64-server-6
0.12.4-4.el6_6.1 rhel-x86_64-server-6
3.7.19-260.el6_6.5 rhel-x86_64-server-6
selinux-policy-targeted.noarch 3.7.19-260.el6_6.5 rhel-x86_64-server-6
tzdata.noarch 2015e-1.el6 rhel-x86_64-server-6
-bash-4.1#
2. Log in to the Red Hat Satellite Server GUI, as described in 7.2.4, “Configuring Red Hat Satellite Server on PureApplication System” on page 167.
3. Go to System Groups. You see the System Group Redbooks, as shown in Figure 7-25. This group contains two systems. These are the two VMs that we deployed in 7.2.7, “Using Red Hat Satellite Server integration on PureApplication System” on page 179.

Figure 7-25 Examine all System Groups through the Red Hat Satellite Server GUI

Figure 7-26 The System Group Redbooks
5. You want to work with all systems that are in the System Group, so click work with group (upper right corner), which adds all systems to the System Set Manager, as shown in Figure 7-27 on page 187.

Figure 7-27 Both systems are now set up to be used by the System Set Manager
6. There are 19 applicable errata that can be applied to the systems. Click the Errata tab to review them.
7. Apply all errata to both systems. Click Select All and then Apply Errata, as shown in Figure 7-28.

Figure 7-28 Apply all errata that are applicable to both systems in the System Set Manager
8. Schedule the actions to apply all errata as soon as possible and click Schedule Updates, as shown in Figure 7-29 on page 189. There can be scenarios where scheduling the actions to be carried out later is preferable.

Figure 7-29 Schedule the actions to apply all errata as soon as possible
9. Click Schedule to examine the status of the scheduled actions. Because you scheduled the errata to be applied as soon as possible, click Completed Actions.
10. Within a few minutes, you see all of the entries (in this case, 19) listed in the Completed Actions section. All errata are applied on two systems, as shown in Figure 7-30.

Figure 7-30 A total of 19 completed actions on both systems confirms that all errata were applied
Examine the System Group Redbooks again.
11. Click Systems → System Groups. The status of the System Group reports a status of OK, as shown in Figure 7-31 on page 191. This confirms that there are no more errata that are applicable to either of the two systems in the System Group Redbooks at this time.

Figure 7-31 The reporting status for System Group Redbooks is OK
12. Log in to one of the VMs again and run yum list updates. As shown in Example 7-9, no updates for any packages are available.
Example 7-9 List all applicable updates for the installed packages
-bash-4.1# yum list updates
Loaded plugins: rhnplugin, security
This system is receiving updates from RHN Classic or RHN Satellite.
-bash-4.1#
Installing and updating packages at Virtual System Pattern deployment time
In addition to installing and updating packages on deployed VMs, you can also perform these actions at the deployment time of a VSP. The software component Red Hat Package Manager can install a set of packages on a VM within a VSP. In addition, this software component can be configured to update all packages to the latest version.
As an example, you can build and deploy a simple VSP by completing the following steps:
1. Create a VSP that is named Core OS with Firefox and Telnet, consisting of a single VM with Red Hat Enterprise Linux 6.6. Use the IBM OS image for Red Hat Linux Systems 2.1.2.0.
2. Add the software component Red Hat Package Installer to the VM. Configure the software component with the following information:
– Yum Package list: firefox,telnet
– Fail deployment if above packages are not installed: Enabled
– Update VM with latest OS patches: Enabled
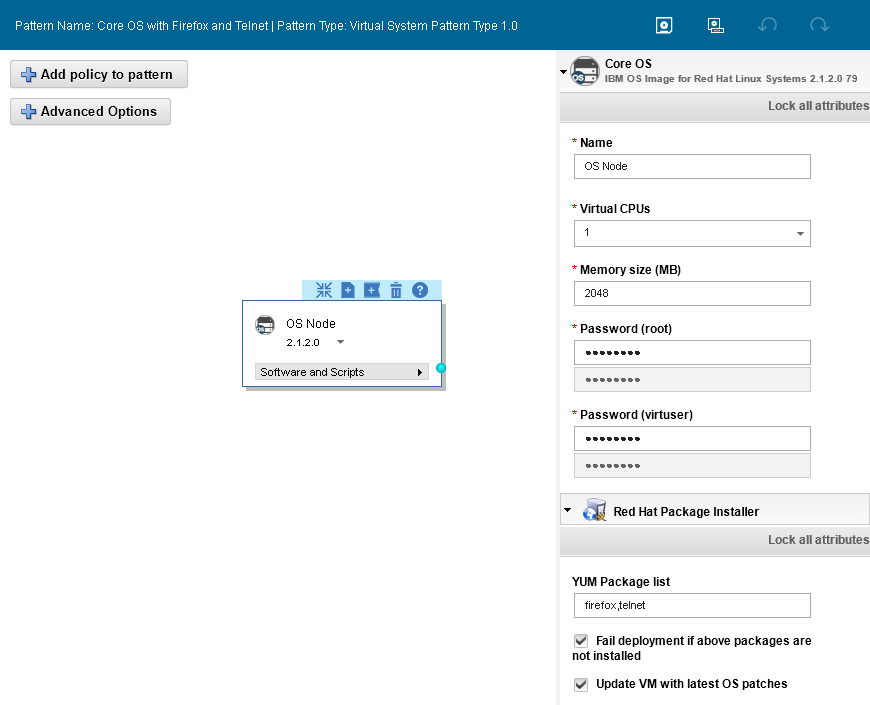
Figure 7-32 Virtual System Pattern by using the software component Red Hat Package Installer
4. Deploy the VSP by using the environment profile Redbooks - external, as shown in Figure 7-33 on page 193. This profile ensures that the VM automatically registers with the Red Hat Satellite Server that was configured during the deployment of the Red Hat Satellite Service (external) shared service (see 7.2.6, “Deploying the Red Hat Satellite service shared service” on page 177).
|
Note: The inner workings of the software component Red Hat Package Installer are beyond the scope of this book. However, it is worth highlighting that this software component logs to the following file on each VM (the name OS_Node and the IDs vary):
/opt/IBM/maestro/agent/usr/servers/OS_Node.11437482855011/logs/OS_Node.11437482855011.Red_Hat_Package_Installer-Part/trace.log
|

Figure 7-33 Deploy the Virtual System Pattern that is named Core OS with Firefox and Telnet
5. When the deployment is complete, obtain the host name and IP address from the Virtual System Instance, as shown in Figure 7-34. You need this information later. In this case, the VM is assigned host name ipas-lpar-9-3-171-70.austin.ibm.com and IP address 9.3.171.70.

Figure 7-34 Obtain the host name and IP address of the deployed VM
6. Log in to the VM as virtuser and switch to the root user by running sudo su -.
7. Run yum list installed firefox telnet to confirm that both packages are installed, as shown in Example 7-10.
Example 7-10 Confirm that Firefox and Telnet are installed
-bash-4.1# yum list installed firefox telnet
Loaded plugins: rhnplugin, security
This system is receiving updates from RHN Classic or RHN Satellite.
Installed Packages
firefox.x86_64 38.1.0-1.el6_6 @rhel-x86_64-server-6
telnet.x86_64 1:0.17-48.el6 @rhel-x86_64-server-6
8. Run yum list updates to review updates that are applicable to any of the installed packages. In this example, we configured the software component Red Hat Package Installer to Update VM with the latest OS patches. As expected, no updates are listed, as shown in Example 7-11.
Example 7-11 Confirm that there are no pending updates for any packages
-bash-4.1# yum list updates
Loaded plugins: rhnplugin, security
This system is receiving updates from RHN Classic or RHN Satellite.
You can log in to the Red Hat Satellite Server GUI and examine the newly registered VM that is deployed. Because the latest updates are applied at deployment time, no errata are applicable, as shown in Figure 7-35. The system ipas-lpar-9-3-171-70 corresponds to the VM that was deployed.

Figure 7-35 No errata or packages are applicable to the newly deployed VM
7.3 IBM AIX OS maintenance by using IBM Endpoint Manager
IBM Endpoint Manager is a solution for addressing highly diverse, distributed, and complex IT environments. It provides real-time visibility and control through a single infrastructure, single agent, and single console for policy-based management capabilities, including asset discovery and inventory, patch management, OS deployment, remote desktop control, endpoint protection, security configuration, and vulnerability management.
PureApplication System and PureApplication Software do not perform any patch management. PureApplication System provides an Endpoint Manager shared service that you can use to access Endpoint Manager running remotely on another system. For the purposes of this publication, the Endpoint Manager shared service is deployed on a POWER-based PureApplication System. The Endpoint Manager server runs on an Intel based system. Installation of the Endpoint Manager server is beyond the scope of this publication.
After the PureApplication System or PureApplication Software is deployed, clients (deployed workloads) are registered to the Endpoint Manager server. Patch management is performed on the Endpoint Manager server from its console.
From PureApplication System or PureApplication Software, the system administrator or workload administrator deploys the Endpoint Manager shared service, which is configured to point to the Endpoint Manager server. Any workloads that are deployed on the same cloud group as the Endpoint Manager shared service are automatically connected to the Endpoint Manager server through the Endpoint Manager shared service.
|
Note: PureApplication System and PureApplication Software clients are entitled to install and use an Endpoint Manager server for the purpose of AIX and Windows OS patch management.
|
Deploying the Endpoint Manager shared service
The Endpoint Manager shared service is shipped with PureApplication System and PureApplication Software. and is included in the Foundation Pattern type. Endpoint Manager acts as a relay between an external Endpoint Manager server and Endpoint Manager clients. By default, Endpoint Manager clients are integrated into virtual application and virtual system deployments.
After you deploy the Endpoint Manager service in a cloud group, the Endpoint Manager clients automatically connect to the shared service to receive OS updates and to install patches on VMs. For more information about the Endpoint Manager console and patch management, see “Accessing the Endpoint Manager server” on page 201.
The Endpoint Manager service acts as a relay to receive updates and install patches on clients. You must use the Endpoint Manager console to deliver fixes and perform other administrative tasks on the Endpoint Manager server.
When you deploy the Endpoint Manager service in a cloud group, you configure the shared service by pointing to a masthead file. The masthead file contains connection information about the Endpoint Manager server, including the host name, security certificates, server configuration details, and more. The Endpoint Manager clients, in the cloud group where the shared service is deployed, automatically discover the shared service and import the masthead file with no manual configuration.
To deploy the Endpoint Manager service, complete the following steps:
1. Click Patterns → Patterns → Shared Services. A list of available shared services displays (Figure 7-36).

Figure 7-36 List of shared services
2. Expand Endpoint Manager Service. The latest version of the shared service is listed. Select the shared service. Details of the service are shown in the right pane, as shown in Figure 7-37.

Figure 7-37 Endpoint Manager service details
3. The service is not deployed. To deploy it, click the Deploy icon in the upper right corner of the window.
4. Requirements for the deployment are minimal. The masthead file (or location of the masthead file) is needed for the deployment. You can obtain this location from the group that manages the Endpoint Manager server. In the deployment window, the masthead file is required. The relay files are optional.
|
Note: In the database, use the Endpoint Manager Administration Tool to export the masthead from the database by completing the following steps:
•Click Start Menu → All Programs → IBM Endpoint Manager → IBM Endpoint Manager Administration Tool.
•Point to the deployment’s license.pvk site signing key. Click OK and enter the password.
•On the Masthead Management tab, click Export Masthead to save masthead.afxm to your desktop.
The ActionSite.afxm is on the Endpoint Manager server and is found in one of the following site version folders at C:Program FilesBigFix EnterpriseBES ServersitearchiveactionsitearchiveDiractionsite_<nnn>, where nnn = actionsite version #:
•C:Program FilesBigFix EnterpriseBES Server
•For 64-bit OSs: C:Program Files(x86)BigFix EnterpriseBES Server
ActionSite.afxm on the BES clients is in C:Program FilesBigFix EnterpriseBES Client.
|
5. Enter the location of the masthead file. In this example, the masthead file is on the Endpoint Manager server, as shown in Figure 7-38. It can also be on the local file system. Click OK.

Figure 7-38 Masthead file selection
6. Click Prepare to Deploy. The system prepares the deployment pattern.

Figure 7-39 Deploy Endpoint Manager
8. With the service deployed, you see an instance of the shared service. Click Patterns → Pattern Instances → Shared Services. The instance is displayed in the list, as shown in Figure 7-40.

Figure 7-40 Instance of the Endpoint Manager service

Figure 7-41 VM created by the Endpoint Manager service deployment
Instances and the Endpoint Manager service
The Endpoint Manager client is part of any virtual image that is supplied by PureApplication System. The client adds a background controller service that is set to run automatically. After the shared service is deployed, any virtual system instances that you deploy reference the shared service, as shown in Figure 7-42 on page 201. The shared service and Endpoint Manager client work together to discover and apply patches from the Endpoint Manager server.

Figure 7-42 Virtual system with reference to the Endpoint Manager service
Accessing the Endpoint Manager server
The Endpoint Manager server console is used by the operator to monitor and repair networked computers running the Endpoint Manager client. You can run the Endpoint Manager console on a 64-bit Windows OS that has network access to the Endpoint Manager server. There are two kinds of authorized console users:
•Operators: Operators manage the day-to-day operation of the program, including fixlet management and action deployment, subject to the management rights that are assigned by a site administrator or master operator.
•Master operators: Master operators have the added authority to assign management rights to other console operators.
Endpoint Manager for patch management is a console view that provides an automated patching process. This view gives you near real-time visibility and enforcement to deploy and manage patches to all distributed endpoints. Some of the features are that Endpoint Manager can accomplish the following tasks:
•Automatically manage patches to hundreds of thousands of endpoints for multiple OSs and applications, regardless of location, connection type, or status
•Apply only the correct patches to the correct endpoint
•Visibility into patch compliance with near real-time monitoring and reporting
•Near real-time visibility and control from a single management console
The Endpoint Manager console has several views that are useful to the system administrator of a PureApplication System or PureApplication Software installation. This publication specifically describes patches and fixlets for IBM AIX 7.1. Screen captures and descriptions in this section might vary from the installation and configuration of your console.
Patch Management
Patches can be found in this view, as shown in Figure 7-43. Patches are categorized by vendor and version number. Patches are added to the Endpoint Manager server by an administrator and managed from the console. PureApplication System does not perform any patch management.

Figure 7-43 Patch management for IBM AIX 7.1
For AIX, patches can include service advisories, service packs, APARs, and bulletins. For a sample of patches, see Figure 7-44 on page 203.

Figure 7-44 Patches for IBM AIX 7.1
The details and description of each patch are available as shown in Figure 7-45. You can also see which computers (VMs) must have the patch applied.

Figure 7-45 Patch details
All Content
As the view name implies, you can see all the content from this view. This view is useful for finding specific VMs that have their OS patches managed by Endpoint Manager. In the example that is shown in Figure 7-46, you see a list of all the managed VMs.

Figure 7-46 All Content view - list of all managed VMs
As you select an individual computer, the details of that VM are shown. You can view the fixlets and tasks that are relevant to that VM, as shown in Figure 7-47.

Figure 7-47 VM details
..................Content has been hidden....................
You can't read the all page of ebook, please click here login for view all page.