
Roughly defined, social networking is the process of developing relationships across and within a group of people. What defines the links amongst the group of people is the social network, which is a structure made up of nodes tied together through various interdependencies; it is essentially a map that defines how people in a network are connected. You might sometimes hear people also refer to social networking as social computing, though these are two distinctly different things.
While the social might connote nonbusiness networking, many people use social networking as an extension of the workplace to build their interpersonal and business networks. The Internet has in some sense revolutionized the ways in which we build these networks, providing virtual environments for our networks to grow and flourish. For example, recent examples of social networking environments on the Internet are Flickr, MySpace, LinkedIn, and Facebook. If we take a look at how social networking has evolved, you can see that there are many common technologies (for example, e-mail) we’ve probably all been using that fit within this general heading of social networking. Figure 5-1 provides an overview of some key social networking technology advancements over the past couple of decades.
Many companies are taking a keen interest in these social networking environments (as evidenced by the stake Microsoft recently bought in Facebook) because they provide an organic way to extend and build not only your social but also your business network, to communicate, and, what some might argue is most important, to share knowledge. (In some cases, they also represent platforms on which you can build interesting applications or mash-ups, as we’ll see later in this chapter.) And at the end of the day, developing and sustaining key relationships is paramount to doing good business in today’s competitive environment. And social networking is integral to this relationship management.

By now you should have a pretty good understanding of what an Office Business Application is, and you’re probably beginning to understand how you go about building one. Your next question, then, is probably how does social networking apply to OBAs? The answer is an important one. OBAs are primarily about bringing business data within key line-of-business (LOB) systems closer to the information worker (IW), and while that’s all good, we can’t treat the IW as an isolated individual within the modern organization, or else we’re really right back where we started, with the results gap existing across people as opposed to the business data and the people. Thus, part of the critical ingredient to our OBAs is the ability to bring other IWs into our knowledge paradigm, creating social networks around specific areas within the organization. This means that we need to have the ability to invite, manage, and evolve networks around, for example, our SharePoint sites and portals (which would be developed as part of our OBA) so other IWs can be armed with similar information that can help them make strong and qualified business decisions. Figure 5-2 illustrates this by extending the simple OBA pie chart (representing the three high-level pieces of an OBA) with a more detailed representation of some of the core social networking features within SharePoint. In this representation, we’re leveraging features such as My Site (or indeed wider team sites through SharePoint sites), My Profile, blogs, wikis, RSS, and so on, to extend the reach of our OBA into the enterprise—or conversely to enable access to our personal project information or profiles through SharePoint search or our blogs through RSS feeds. Either way, the goal is to extend the reach of your OBA through the mechanism of social networking, and each one of the SharePoint technologies in Figure 5-2 can help achieve this. (Note: In Figure 5-2, "SharePoint Server++" indicates that while SharePoint is a key part of OBAs, you can also use other servers in the Office platform, like Exchange Server, to build your OBA.)

As you saw earlier in Figure 5-1, there are many different types of technologies that we can classify as being a part of the social networking paradigm. However, the social networking technologies this chapter discusses are predominantly Microsoft Office SharePoint Server (MOSS) 2007-centric, and thus will cover the following:
My Site and My Profile
Blogs
Wikis
RSS
Third-party social networking environments
And while we’ll discuss the development of social networking customizations within your OBA, we’ll predominantly be talking about higher-level development within SharePoint (for example, creation and configuration of Web parts) as opposed to lower-level coding (for example, adding C# code to a VSTO client-side customization). That said, let’s now turn to a deeper discussion on each of these.
My Site and My Profile are two key elements in building social networking capabilities into your OBA. They do this by providing first an individual page that you can build to contain information specific to you and your projects, and second, by providing a place where you can add profile information that people can search against or be attached to. Let’s first discuss My Site and then turn to discussing My Profile.
The SharePoint site is the point of entry for not only you to view, edit, and manage information on your projects, but also a point of entry for others in your team and wider organization to be connected to you (for example, through the Colleague Tracker Web part), the project information you want to expose to them, and information you may be an expert in that you also want to expose to them. It is this collaborative annex that provides a key social networking piece to the OBAs that you build. More specific than the SharePoint Team Site is this idea of My Site, or a personalized site that you can build and deploy on your team site that provides personal information about you and the projects you may be working on. Figure 5-3 illustrates a sample My Site and shows that there are different things that you can do with it. For example, you can connect your Outlook calendar to your site so you can view your appointments, you can have a Colleague Tracker, which provides links to colleagues who may serve as experts in other related areas in which you may be interested, as well as other Web parts that are more general, like house links to documents. You can also create links to membership DLs, connect to Outlook and expose your contacts and mail, as well as a host of other interesting Web parts.

The nice thing about My Site is that you can assess permissions to expose the information to specific people, so if there is confidential information on your site (for example, budget information), then you can expose that information only to specific people in your organization.
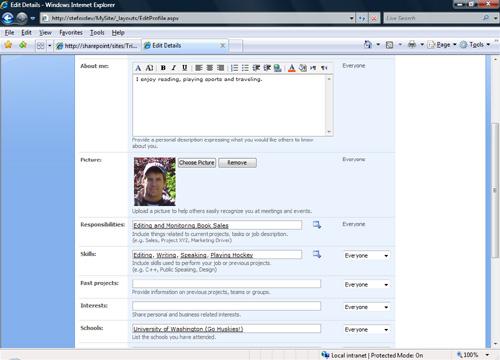
Setting up your own My Site is straightforward. To do so, you click the My Site link in the upper right-hand portion of your SharePoint site. If you have not done this before, SharePoint will prompt you to answer some configuration questions and then create the default My Site for you, which you can then go ahead and customize. For example, if you click the Describe Yourself link, this opens a page where you can provide personal information about yourself, as seen in Figure 5-4. Note that on this page, you have the option to display the properties that you enter into the page to specific people in your organization, for example, Only Me, Everyone, My Manager, My Colleagues, and so on.
One of the key social networking elements, as mentioned above, is the Colleague Tracker. This is where you can add colleagues to your site, thus creating an organic social/business network through attaching others to your My Site. Colleagues are a list of friends (within your organization), team members, and co-workers who are related to a specific person in an organization through one’s user profile and are presented to users through My Site. The colleagues list (or Colleague Tracker Web part), presented through a Web part on the personal profile page of My Site, lists these related individuals and provides contact, presence, and organizational information to other users. This aspect of social networking enables broader communication and information exchange across the organization and is thus a key pillar for supporting social networking.
You can add colleagues to your My Site by clicking the Colleague Tracker link. After you click the link, SharePoint opens the Add Colleagues page. Use the Identify Colleagues section to find and add colleagues to your list. You can then select who to expose within this list of colleagues in the Show These Colleagues list box. You can then add the colleagues to an existing workgroup or create a new workgroup. In the next example (Figure 5-5), we’ve created a new workgroup called OBA Working Group and added the aforementioned colleagues to that workgroup.

As mentioned earlier, you can also manage a subset of your Outlook calendar functionality through the My Calendar Web part, which loads a view of your calendar into the Web part. For example, if you click the New drop-down button, you’ll be presented with a number of options, such as Appointment, Meeting, Message, etc. (see Figure 5-6). Clicking on any one of these loads Outlook Web Access (OWA), which is essentially a thin client layer that enables Outlook access through your browser.
We’ve shown you just a couple of things that you can do with your My Site. Note that you can take other actions, such as adding links to your favorite sites by clicking My Links (in the upper right-hand corner of the page), adding personal documents to your site, and adding additional Web parts to your site (for example, a Business Data Catalog Web part that loads project information into My Site). You can also add other sites to your My Site by clicking Site Actions and Create Page. This will invoke the New SharePoint Site page, where you can select a specific site type under the Template Selection area of the page. And lastly, similar to other pages on SharePoint, you can adjust the settings for your individual page. To access the settings, click Site Actions and Site Settings. Here you can do things like alter the look and feel of your page and edit the permissions for the site.

While My Sites are often not thought about in the context of extending OBAs, we encourage you to think about how you can leverage them when designing and deploying your OBA to your own organization. That is, an important element in the context of building OBAs is the collaborative and social aspect, so leveraging the core SharePoint features is something organizations should definitely take advantage of.
In MOSS 2007, one of the key strengths is the collaboration features that are built into the product. Within the area of collaboration, MOSS provides a framework for the creation and management of user profiles as well as the ability to understand the relationship between those profiles. And while user profiles may not be sexy, it is important when we want to connect IWs with and to one another; it is the user profile that provides that object, if you will, that helps us represent ourselves at our most metadata level within SharePoint. The user profile essentially collects and stores data on users and also contains a set of fields that can be extended and/or customized. You can also import or manually enter data into a user profile. For example, if you wanted to map the fields to an organizational data source, you could connect the fields to that source or you could tie the user profile data to Active Directory (AD) or Lightweight Directory Access Protocol (LDAP) compliant directory services, or through the Business Data Catalog (BDC). One of the major value-adds for the user profile is the fact that IWs can use existing social relationships in order to quickly find resources or subject-matter experts (SMEs) for a particular area or project. The ability to search for specific experts (that is, search against the user profiles) is primarily facilitated through the use of colleagues.
The goal for many organizations is to optimize their social networking experience by combining heterogeneous personnel information into an Office SharePoint Server user profile. By combining this information and modifying user profile properties, organizations can enrich the presentation of team and colleague information to organization members. In order to accomplish this goal, organizations require a carefully planned strategy when combining multiple sources of personnel information to provide a rich user profile for social networking using SharePoint Products and Technologies.
You can create and manage user profiles either programmatically or through your SharePoint site. In this chapter, we’ll focus on creating and managing user profiles via your SharePoint site. While the discussion on programmatically creating a user profile is interesting, this chapter can’t possibly cover all of the discussion. Besides, there are books out there that already cover the programmatic side in fairly good detail. (See the Further Reading section in this chapter for recommendations.)
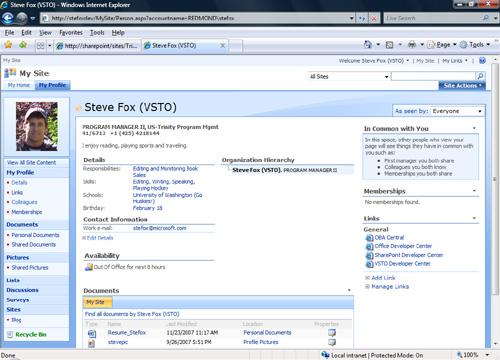
To edit your profile from your SharePoint site, click My Site and then click the My Profile link at the top left-hand side of the page. This invokes your profile page. Figure 5-7 illustrates a sample profile page that I built using a demo SharePoint site. You can see in the profile I’ve set up that I’ve added a picture with some personal details, some of the common links I use, as well as a couple of sample files in my Documents Web part. Note that there are also pieces of the profile page that are linked to our internal Microsoft system—for example, my title, organization, office information, and organizational hierarchy. This type of "inherited" data is noneditable on your Profile Details page.
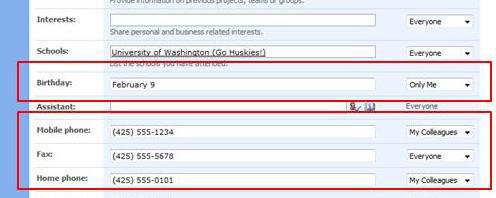
You can edit each of the parts of your personal profile by clicking the links underneath My Profile in the left-hand launch bar. This invokes the Edit Details page (see Figure 5-4), in which you can edit and set permissions against your personal information. Figure 5-8 illustrates the fact that I have set some personal information on My Profile to be viewable by different people who are looking at my site. For example, my birthday is set to be viewed by Only Me, and my mobile and home phone numbers to be viewable by My Colleagues, and my fax by Everyone.
After you’ve created your profile page, others in the enterprise will be able to search against you (for example, "Steve Fox") as the search criteria, and your profile page will be indexed and exposed as part of the search results. Those searching on you can subsequently add you to their Colleague Tracker, and then attach you to their social network, thus building a network around a specific knowledge space.
Beyond the details of your profile, you can also edit other information from your profile page, such as links, colleagues, memberships, and documents. For example, to edit the links you want to expose on your site, click the Links link and SharePoint opens the My Links page (see Figure 5-9). Click Add Link and provide a title, URL address, permissions for the link, and grouping.

Note you can also access the links directly from your My Profile page by clicking the My Links link in the upper right-hand corner of the page (see Figure 5-10). You can also access the My Links page from here as well to add and manage the links you have associated with your profile.

We discussed adding colleagues earlier; adding documents is similar to adding documents in a document library.
Memberships are similar to the Colleague Tracker in that they provide relationships between and among people in the enterprise and the content that is generated by those people. Memberships can either relate to Active Directory (for example, distribution lists) or they can be generated within SharePoint, thus becoming a custom object within and consumed by SharePoint—specifically Windows SharePoint Services 3.0. To edit memberships, click the Memberships link underneath My Profile. This launches the Edit Memberships page, in which you can click Edit Memberships to edit information about your memberships. (Note that if you’re editing memberships for the first time, you’ll need to make sure you have a membership group to which you attach your members.)
Now that we’ve discussed My Sites and My Profile, let’s now turn to talking about other SharePoint features to further integrate social networking into your OBA.
Of growing use and importance for communication are blogs. A straightforward technology, essentially a Web-based diary in reverse chronological order, blogs provide users with a) an additional way to publish information outside of normal publication channels (such as documents, formal Web sites, etc.), b) a way to get information out to a specific audience (either by virtue of topic or through RSS subscription to the blogs), and c) a way to publish information in a more personable and unstructured fashion. In the IT world, blogs often provide ways for SMEs to post information about specific facets of the area in which they’re experts. Indeed, many experts—Microsoft technology guru and long-time developer (not to mention Microsoft General Manager) Scott Guthrie, for one—have strong followings through their informative blogs, which contain a wealth of technical information.
In the context of OBAs, blogs aid in the collaboration of teams around specific project or technical areas. This collaboration provides a voice for experts or important information that is delivered to (or subscribed to) teams and groups within your organization from your SharePoint site. Thus, SharePoint blogs allow for an informational exchange from and by SMEs. And similar to Internet-facing blogs, internal (to the organization) consumers of SharePoint blogs can subscribe to these blogs as well. The supplemental importance to OBAs, then, is to provide an additional communication avenue that helps inform individuals, teams, and the wider organization on particular areas of a technology or project.
Let’s take a look at how you can create your own blog for your SharePoint site.
The first thing you need to do is navigate to your site. After you’ve done this, click Site Actions and Create Site. This will invoke the New SharePoint Site page, where you can provide properties (for example, Title, Description, and URL) for your new site. Provide these properties, but then make sure that in the Template Selection area you select the Collaboration tab and then select the Blog template and click Create. Figure 5-11 illustrates this page.
After you’ve done this, SharePoint will create your blog site for you and open the default page. It is here where you can, for example, add/configure categories for your blog, add links to other related blogs or sites, and manage the blog as the administrator for the blog. For example, if you want to provide specific categories for your blog, click the Categories link on your default blog site. This will open the Categories page, on which you can edit or add the categories. By default, you have three categories that can be edited (that is, Category 1, Category 2, and Category 3); however, more than likely you’ll want to provide more intuitive ways of classifying your blog postings. In Figure 5-12, I have created five different categories for my new blog that I’ll then use to categorize postings to my blog. When I go ahead and create my blogs, this will help me classify the blogs into different categories.

That said, let’s go ahead and create a new blog post. If you return to your default view, not only should you now see your new categories, but you should also see a link to the right that reads Create a Post. Click this link, and SharePoint will open the New Item page, as shown in Figure 5-13. On the New Item page, you can enter a title for your blog, type some text for the content of the blog, and then provide a category (from the ones you just created). You can then provide a Published time, which will be set to the current date as the default (you can select an alternate date if desired). You can then select Save as Draft, if you’re not completely finished with the blog post, or click Publish if you’re ready to publish the blog to your SharePoint site.
After you click Publish, SharePoint will publish your post to the site and then take you to the default blog view, as shown in Figure 5-14.
Note that there are also other functions that as the administrator you have access to on your blog site. For example, you might want to edit or delete certain postings, change the look and feel of your blog site, or provide special permissions for others to either access or post to your blog site. If you look on the right-hand side of the default blog site page, there are a number of Admin links that provide different types of functionality for you, which are listed as follows:


Create a post—creates a new blog post
Manage posts—supports management functions around posts such as view, edit, and delete specific blog posts (see Figure 5-15)
Manage comments—supports management functions around comments such as view, edit, and delete
All content—lists all of the site content
Set blog permissions—enables you to edit site permissions and parent site permissions
Launch blog program to post—enables you to publish blog postings from client-side applications such as Microsoft Word 2007 (see Figure 5-16)
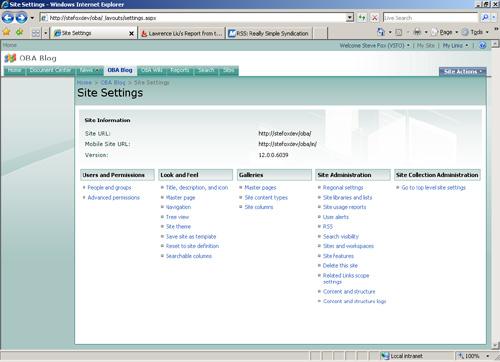
Beyond these links, you can also configure different settings within your blog site. To do this, click Site Actions and then select Site Settings. This invokes the Site Settings page (see Figure 5-17), where you can edit or configure different parts of your blog site. For example, you can edit the Title, Description, and icon from this page, change the look and feel of your blog site through the Site theme link, and add users to your site by clicking the Advanced permissions link.


Overall, blogs are a great way to publish additional information about a specific topic, be it technical or otherwise. They provide a collaborative way for teams and organizations to not only push information to SharePoint sites, but they also provide a way for people to subscribe to them. Beyond the blog, another type of SharePoint communication feature that provides cross-team, collaborative discussion is the wiki, which we’ll discuss next.
As we’ve seen in the preceding sections (and in the preceding chapters), collaboration is important. I would argue that in the context of OBAs, collaboration not only means proximity and interaction with other people, but also proximity to the business data and information that other people in the organization generate and store. This chapter thus far has discussed SharePoint profiles, sites, and blogs, but another interesting type of interactive and collaborative communication is the often underused wiki.
A wiki is essentially a type of Web site that allows multiple authors to interact with the same document, so those who have permissions for a specific wiki can edit and update the content for that wiki. What results is a constantly changing and interactive platform for content exchange. Using a wiki, multiple people can edit the content on the page, add new content to the page, add new pages to the wiki, and add links to other sites within the organization. Interestingly, in a corporate environment where our conversations often happen in e-mail, around the "water cooler," on whiteboards, in the halls, and so on, the wiki provides an alternative way to record these conversations in a way that not only makes them part of the organic knowledge of the organization, but also makes them centrally accessible. And if you remember back to earlier in the book, it is this idea of centrally accessible data (and in our case here, centrally accessible information exchange) that lies at the heart of a successful OBA.
Creating a wiki is straightforward. First, you navigate to your SharePoint site, click Site Actions, and then click Site Settings and Modify All Site Settings. In the Site Administration section, click the Sites and Workspaces link, and then click Create. This will open a page where you can provide properties for your new Wiki page (see Figure 5-18). Now fill in the Title and Description fields and complete the URL address for your wiki. Next, select the Wiki template from within the Collaboration tab within the Template Selection section. Set the permissions for your wiki (inheriting the parent site permissions or providing unique permissions for your specific wiki site), select where you want the wiki to be displayed (for example, Quick Launch bar), and then click OK.

After you’ve created your wiki, SharePoint opens the default wiki site. This is essentially the collaborative space within which you can edit team-contributed content. To do so, click Edit and edit the page. After you’ve finished your editing, click OK to publish. You can also view the history of the wiki, which provides a strikethrough history of what has been added or removed to the wiki, and view any incoming links to the page. Figure 5-19 provides a screenshot of a newly published wiki page.

Similar to other SharePoint sites, you can edit the settings for your Wiki pages. To do this, click Site Actions and Settings, and SharePoint opens the Site Settings page. For example, to change the theme of the wiki site, click Site Theme under Look and Feel and select one of the templates from the list.
We’ve discussed how you can create blogs to record and publish information and data that is specific to your area in the organization; however, is it reasonable to assume that someone in the organization is going to be checking back to review your blog on a regular basis? Probably not. The way in which many people automate the process of having information delivered to them is through RSS. RSS, or Really Simple Syndication, is essentially a news feed that provides a way for data from one source to be exposed to other tools. At its core, RSS is an XML document specification that provides the mechanism to deliver content like blogs and search, and it’s a great way to have information pushed directly to your desktop. In the Further Reading section of this chapter are some links to XML examples of RSS feeds and additional resources on more general RSS reading.
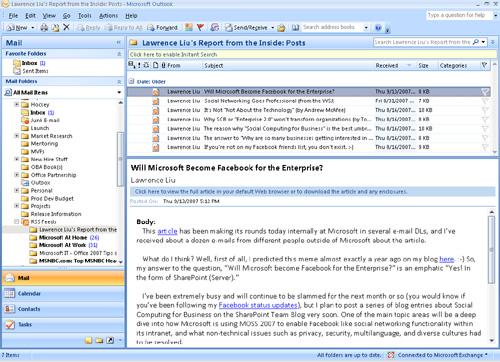
When you develop your OBAs, RSS feeds may integrate in a couple of different areas. For instance, Outlook ships with the ability to connect RSS feeds to specific folders within your RSS Feeds folder. For example, Figure 5-20 illustrates the fact that in my mailbox, one of the blogs I subscribe to is Lawrence Liu’s social networking blog (which I highly recommend if you’re interested in being part of a wider social networking discussion).
Interestingly, while Figure 5-20 shows the feed being displayed in the reading pane, you can also display feed displays for those RSS feeds where the feed only provides a headline and a link out to an external source—many Microsoft sites do this to optimize the display of information in your feed. To do this, you first create a new Outlook form region in a VSTO Outlook add-in project and then add a Web browser control to the default design surface (see Further Reading for additional references on the Outlook Form Region). You then add the code in the FormRegionShowing event (which invokes whenever the form region displays) and the ParseURL method to the code behind the Outlook form region (in this case I added it to the RSSFeed class), and your form region will now display the Web page from the RSS feed (see Example 5-1).
Example 5-1. RSS feed that displays Web page from feed
using System;
using System.Collections.Generic;
using System.Linq;
using System.Text;
using Office = Microsoft.Office.Core;
using Outlook = Microsoft.Office.Interop.Outlook;

namespace CustomOFR
{
   partial class RSSFeed
{
   ...
   private void RSSFeed_FormRegionShowing(object sender, System.EventArgs e)
   {
      Outlook.PostItem rssItem = (Outlook.PostItem)this.OutlookItem;
      this.RSSWebBrowser.Navigate(ParseUrl(rssItem));
   }
   private void RSSFeed_FormRegionClosed(object sender, System.EventArgs e)
   {
   }
      private void RSSWebBrowser_DocumentCompleted(object sender, System.Windows.Forms
      .WebBrowserDocumentCompletedEventArgs e)
   {

   }
// Return the url of the 'View article' link that appears in the headline of the RSS item.
      public static string ParseUrl(Outlook.PostItem item)
      {
         string lookUpText = "HYPERLINK";
         string articleStr = "View article";
         string body = item.Body;

         int index = body.IndexOf(lookUpText, 0, body.Length);
         int end = 0;
         // Look through body for 'HYPERLINKS' and narrow down to 'View article...' link.
         while (true)
         {
            end = body.IndexOf(articleStr, index, body.Length - index);
            int nextIndex = body.IndexOf(lookUpText, index + 1, body.Length - (index + 1));

            if (nextIndex > index && nextIndex < end)
            {
               index = nextIndex;
            }
            else
               break;
            }
            // Get the Link to the article.
            string url = body.Substring(index + lookUpText.Length + 1, end - index -
            (lookUpText.Length + 1));
            url = url.Trim('"'),
            return url;
         }
      }
   }
What the implementation of this code results in is a custom Outlook form region with the article displayed in the Web browser control you added to the form region designer, as shown in Figure 5-21. The thing to note here is that the RSSFeed form region now displays the page behind the "View Article" link. For more information on the previous customer Outlook RSS form region sample, you can download the sample solution and the code from MSDN here: http://msdn2.microsoft.com/en-us/library/bb157881(VS.90).aspx.
The second way of integrating RSS feeds into your OBA is SharePoint-based and specifically addresses enabling the RSS feed on your SharePoint blog or creating a Web part where you can display content from either internal (that is, SharePoint blogs that are internal to your organization) or external (i.e., publicly facing blogs that you can integrate into your internal SharePoint sites).

We discussed the creation of a blog to integrate social networking into your OBA earlier in the chapter. However, we again run into this problem of the connectivity of the content that you publish making its way to the people who care about that content. The subscription-based model of RSS is a great and simple answer to this problem. That is, have users subscribe to your blog so that the content is pushed to them when you update it. So, let’s talk about how you do this.
After you’ve created your blog, you can enable RSS feeds from your blog so other people can subscribe to it. To do this, click Site Actions, Site Settings, and under the Site Administration section, click RSS. This invokes the RSS page (see Figure 5-22), on which you check the Allow RSS feeds in this site and add information in the Advanced Settings section (for example, copyright, editor, etc.).
When you enable the RSS feeds for your blog, you enable other people to subscribe to your blog. You will know RSS is enabled on your blog because you will have the RSS Feed standard image when you load your blog site, as shown in Figure 5-23.
Now that we’ve enabled the RSS feed on the blog that we created earlier in the chapter, let’s now create a Web part on another SharePoint page that then points to this blog. Again, the goal of doing this is to more tightly couple SMEs and the content they create to information workers across the organization. To create a Web part, navigate to the page where you want to add the Web part and click Site Actions and Edit Page. Click Add a Web Part (in the area of the page you want to edit) and then check the RSS Viewer Web part and click Add. When the Web part has been added to the page, click the Open the Tool Pane link to edit the properties of the Web part. You add the RSS Feed URL to the RSS Feed URL field. If you don’t want to edit any of the other properties, click OK. SharePoint will then load the blog postings into your new RSS Viewer Web part, as shown in Figure 5-24.


You may be asking yourself where you actually get the RSS Feed URL that I added when I had the tool pane open, and the answer is it depends on where your feed comes from. If it’s an internal blog (meaning intranet blog on SharePoint), you navigate to that blog, click the RSS Feed link (beside the image, as shown in Figure 5-23) and then click the View feed properties link. This invokes the Feed Properties dialog box (see Figure 5-25), where you can copy the RSS URL out of the Address field and into the RSS Feed URL field in the RSS Viewer Web part tool pane.


To add an RSS feed to an external blog is similar to the process just described; the only major difference would be that you’d get the RSS URL from the public blog. For example, in the case of Lawrence Liu’s social networking blog, I clicked on the Feed link for the posts on his blog site and then retrieved the feed from the View Feed XML link. I then added that URL in the same way I added my internally facing blog—to the RSS Feed URL field in the RSS Viewer Web part tool pane.
With regard to RSS, I’ll lastly mention that you need to be wary of the information that you’re exposing through your RSS feeds. If there’s any chance of exposing sensitive data or information, then your organizational security policy will likely restrict you from revealing that blog content. If this is the case, you can disallow RSS feeds for specific objects (for example, lists, libraries, etc.). To do this, navigate to the list where you do not want RSS feeds to be allowed and click Settings and then List Settings (or Document Library Settings in the case of a document library). Under Communications, click the RSS Settings, and this will invoke the Modify List RSS Settings page (see Figure 5-26). Here you can change whether the list allows or disallows RSS by clicking Allow RSS for this list.

Thus far, we’ve discussed My Sites, user profiles, blogs, wikis, and RSS feeds—all important aspects of integrating social networking with your OBA. Lastly, we’ll discuss the use of SharePoint to integrate with third-party social networking applications. Specifically, we’ll explore how you can integrate a Facebook mash-up into your OBA.
Facebook, among many other types of social networking environments, is being used more frequently not only in a social context, but also in a business context. The result of this is that our organic social networks not only include our friends from high school, girlfriends/boyfriends, and college roommates, but also our colleagues and, in some cases, our managers. The blurring distinction between work and home notwithstanding (that you do need to manage), this can be a very powerful network to harness and integrate within your OBA. For example, think of a scenario in which you want to integrate a list of contacts from different regions in the world that specialize in, say, biophysics into your SharePoint site. By doing this, you’ve now extended your professional contacts for a specific area quite a distance—all through social networking. You can do this in a number of ways, but let’s look at the inclusion of a Popfly Facebook mash-up in your SharePoint site as one way of integrating Facebook into your OBA.
Popfly is a recent technology that allows both developers and nondevelopers to build mash-ups, gadgets, blocks, or Web pages that can be shared with other Web sites and applications (for example, gadgets for Vista). At the time of this writing, Popfly is in beta and requires a Windows Live ID to use it. However, once you get your Windows Live ID (which you would have if you have a Windows Live e-mail account) and you have a Facebook account, you can begin. What we’re going to do here is create a mash-up that connects to my Facebook account and displays information about my Facebook friends list. I’m then going to take the mash-up code and add that to a Web part in my SharePoint site, which will then connect to my Facebook account and render photos and information about my friends in the Web part. Essentially, this is a fairly simple example that illustrates an integration with Facebook.
To begin, navigate to the Popfly site and then log in. After you log in, you have a number of different options. Select Create Stuff, and then choose Mashup. This will launch the Mashup designer, where you can drag and drop existing "blocks" onto the designer surface. Figure 5-27 illustrates the Popfly designer with the Facebook block on the designer. [Note that in order to implement the block, you’ll need to obtain a Facebook developer key—that is, a key that is specific to your account that allows you to develop against your Facebook account. To get this key, go to www.facebook.com, sign up for an account (if you don’t have one already), and go to the Developers area of the site and click the Get Started link, which will walk you through the process of getting a key.]

After you’ve added the Facebook block, there are a number of preconfigured functions that you can implement. To view these options, click the small wrench. This will enlarge the block and display a drop-down list with a number of options on it (for example, getFriends, getMyInfo, and so on). Each of these predefined options enables you to implement event calls against your Facebook account. Click the drop-down list and select getFriends. This is a method call that will retrieve the list of friends you currently have associated with your Facebook account.
After you’ve selected getFriends, click Display in the left-hand navigation and select the PhotoFlip block. This is a block that will show images passed to it in a flip-chart format. Figure 5-28 illustrates how the photo flip renders the photos. Note that in Popfly you can preview your mash-ups; however, it typically will not render the specific data from Facebook, but it will render mock data just to show you what the mash-ups will look like. With your simple mash-up created, click Save, provide a name and description for your mash-up, and click Accept and Save.

At this point, you’ve created a mash-up, but you will now want to embed the mash-up within a SharePoint site. To do this, you need to click My Stuff and then select Projects. This will list any active (in other words, saved) projects in your Popfly account. In your project options, click Share. This will add another option to your project options called MashOut. Click MashOut and then select Embed It. This will open a small window with some embeddable code that was generated by your mash-up (see Example 5-2).
Example 5-2. Mash-up embedded code reference
<iframe style='width:100%; height:100%;' src='http://www.popfly.ms/users/Redmondhockey/
MyFacebookPhotoFlip.small'

frameborder='no'>

</iframe>
This code snippet can then be copied and pasted into a Web page, and the mash-up you created will be rendered—assuming no connectivity issues with Facebook exist. Copy the code out of the Embed It text box and then open up your SharePoint site. Navigate to where you want to add the mash-up and click Site Actions and Edit Page. In Edit mode, click Add a Web Part and select the Content Editor Web Part and click Add. Once added, you’ll need to click the Open the Tool Pane link. In the tool pane, click Source Editor, which will open up a window in which you can paste the mash-up Embed It code. Click OK after you’ve done this, and SharePoint will load and display the embedded mash-up in the published page (see Figure 5-29).

The interesting thing about mash-ups, specifically the social networking Popfly blocks, is that there are many different types of mash-ups you can create and add to your SharePoint site. For example, you can take your Facebook friend information and create Virtual Earth mappings of where they’re located, or display their contact information. Each action, of course, is going to have varying degrees of usefulness in your OBA, and this is something you’ll surely work through as you explore this technology. Note that you can also create your own custom blocks in Popfly as well; it’s a little more involved than what we’ve explored thus far, but it certainly can be done.